Get tips on hosting a Zombie party that your guests will be dying to attend! Make this zombie-themed Halloween party the best ever with creepy decorations and gory food.
Welcome to our 2012 Zombie-themed Halloween party.
We had so much fun planning and hosting our Zombie Party this year and I want to share some tips for decorating for your own Zombie-themed event. It's such a great theme for Halloween.
Today, I'm going to share ideas for planning a zombie party. I'll show you how we decorated our house, yard, and garage for our party and give you some tips for making your zombie-themed event fun for the whole family.
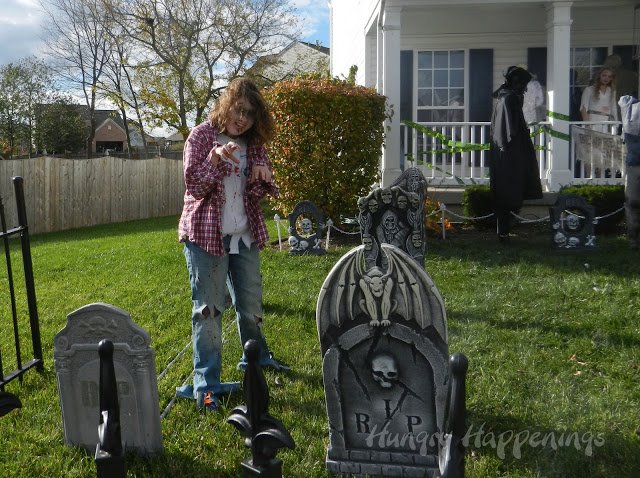
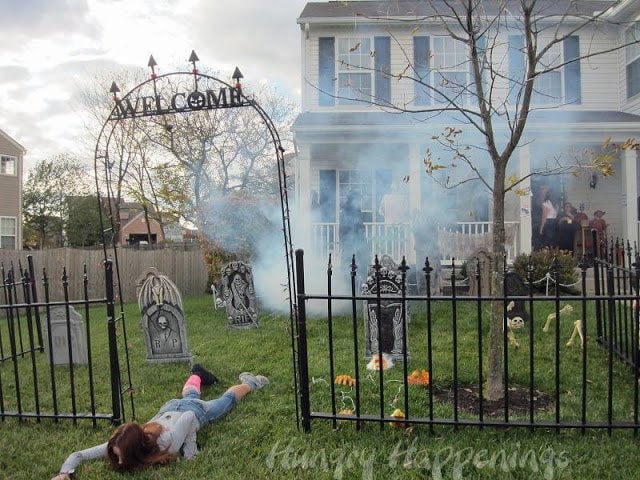
Real Zombie Greeters
We set up a graveyard in our front yard and had a group of teenagers dress up as zombies to greet our guests.
As people entered through our cemetery, the Zombies would creep up to them and groan.
It was the perfect way to let our guests know that they had entered the zombie zone.
If you don't know a group of teens, you can call your local high school and see if you can recruit kids from the theater department. They are always eager to try out their acting skills.
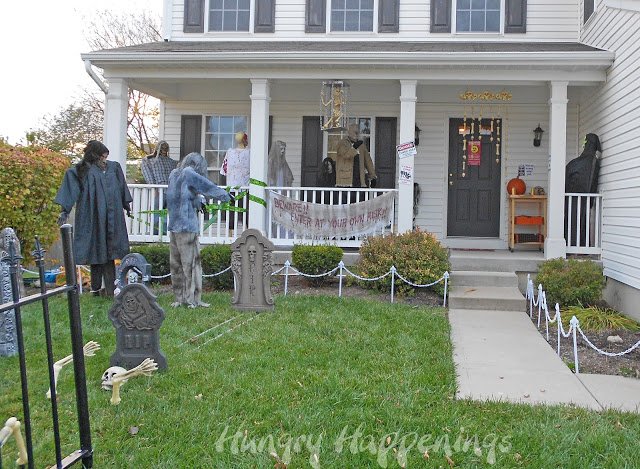
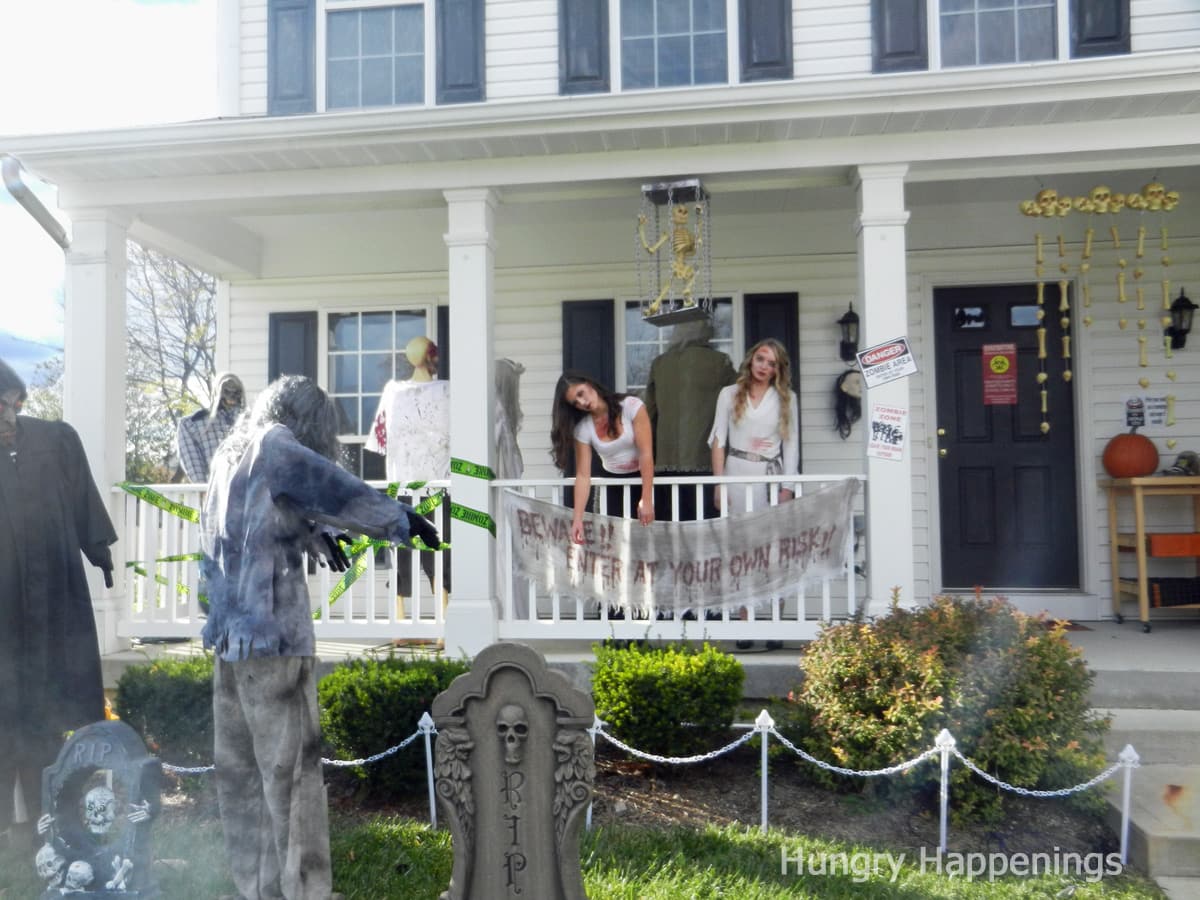
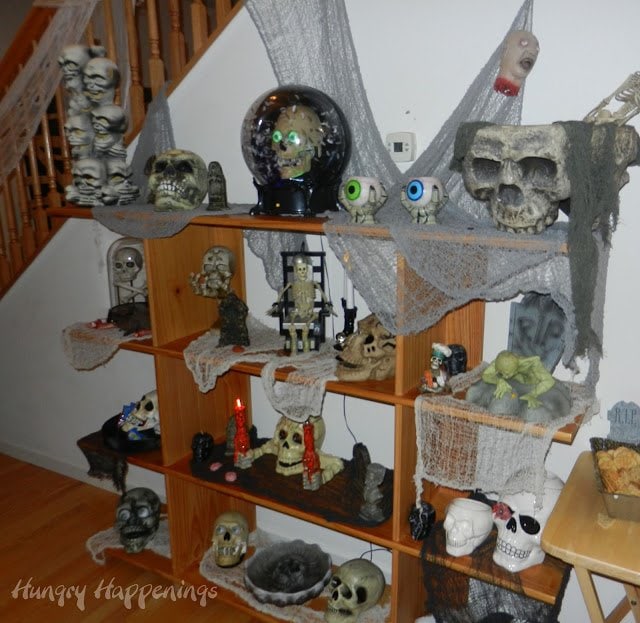
Our graveyard and front porch were decorated with several life-size props, tombstones, and bones.
Guests were summoned to enter the haunted house at their own risk.
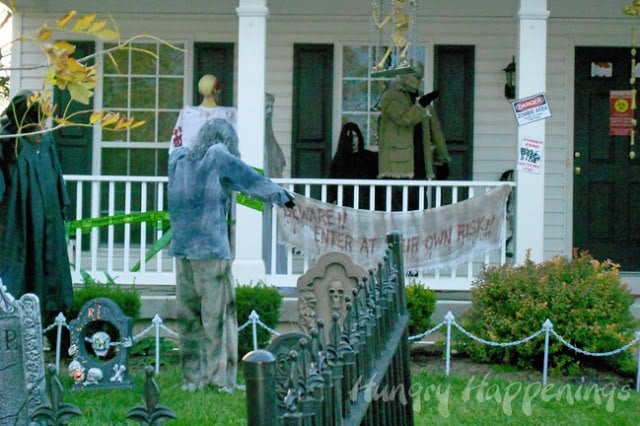
Brain-eating zombies were trying to enter our home from every door and window.
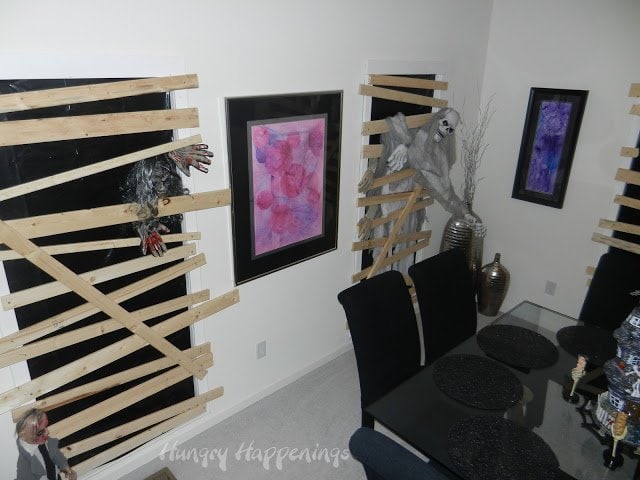
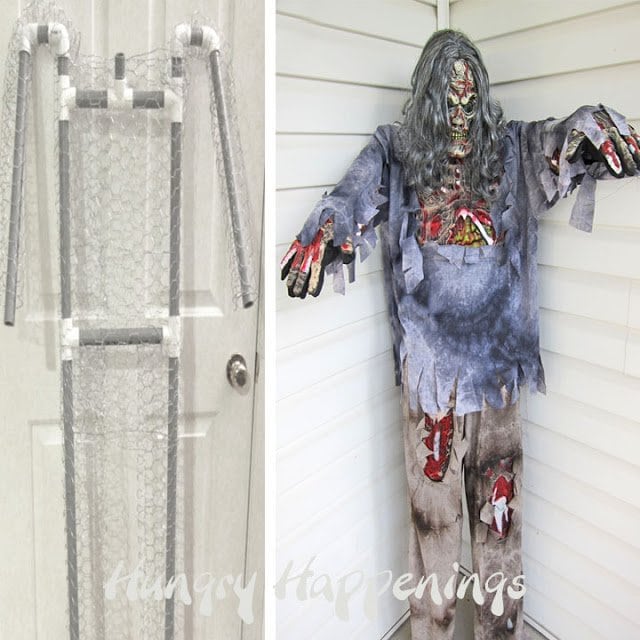
Boarded Window Props
Some zombies were successful at breaking through the windows that we had boarded up.
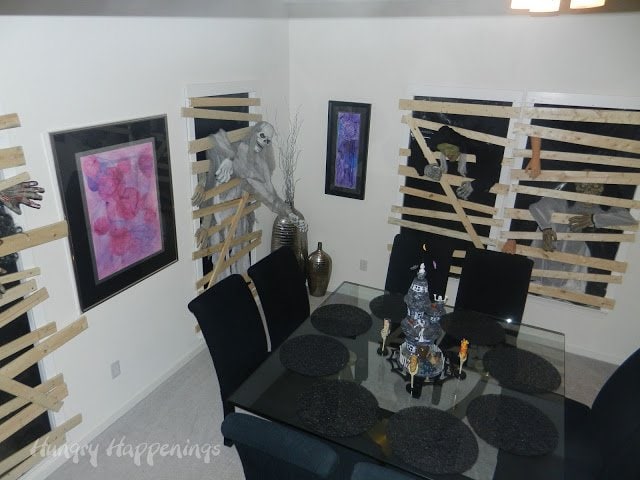
Their arms were reaching in to grab unsuspecting guests.
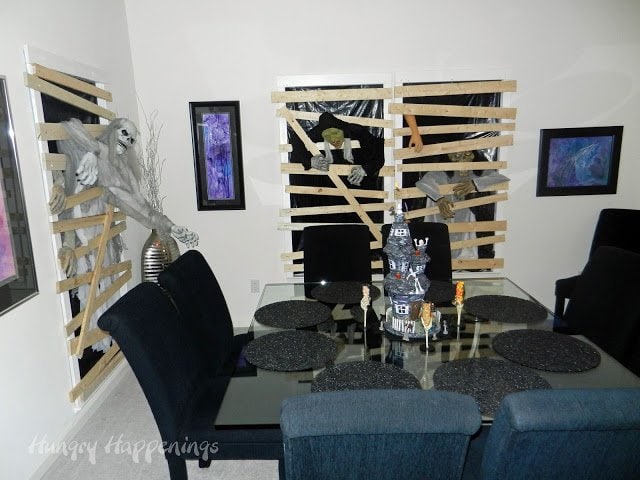
No window frames were harmed in the making of this display!
These clever props, designed by my husband, just pop into our window opening and can be pulled out after the party.
He built a wooden frame that fit directly into our window opening. We painted that frame white to match the walls so it would go unnoticed. Then we nailed boards going across the frame.
We slid the large boarded-up frame into the window opening and it looked like we actually boarded up our windows.
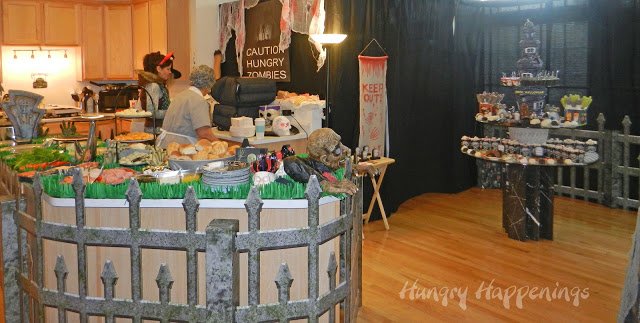
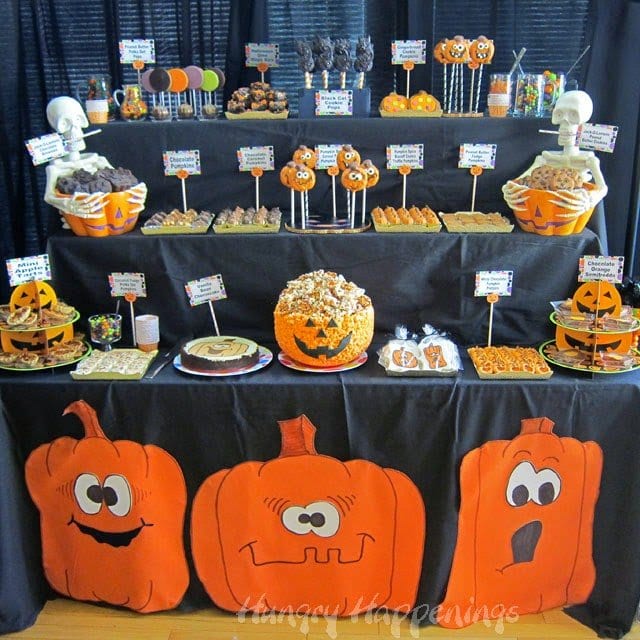
Zombie Party Food
We had 103 party attendees and we knew they were going to come hungry. We needed a lot of space to hold all of our Pizza Skulls, Stuffed Pizza Brains, Open Face Sandwiches, and Eyeball Appetizers.
Fortunately, we have a very large kitchen and morning room with an 8-foot-long island. We always decorate the island and this year it looked amazing!
Last year, I was able to buy a cardboard graveyard fence from a Halloween store at the end of the season. It was used as a display.
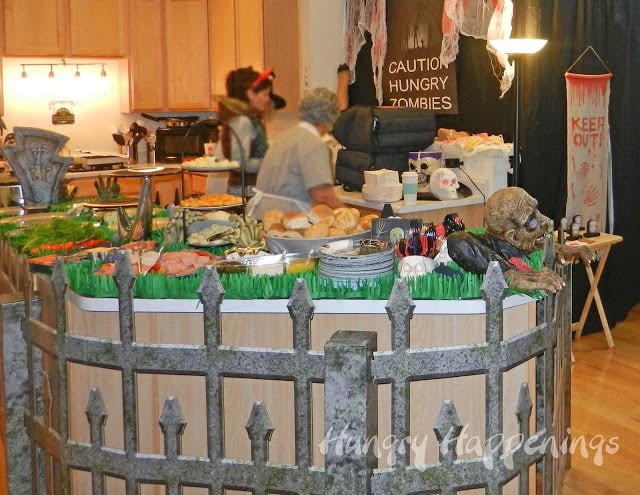
Cemetery Fence
It never hurts to ask if you see signs or big displays at a store if you can purchase them at the end of a season. Most of these displays get thrown into the dumpster.
The fence fit perfectly around our island and it really gave the kitchen the graveyard look I was hoping for.
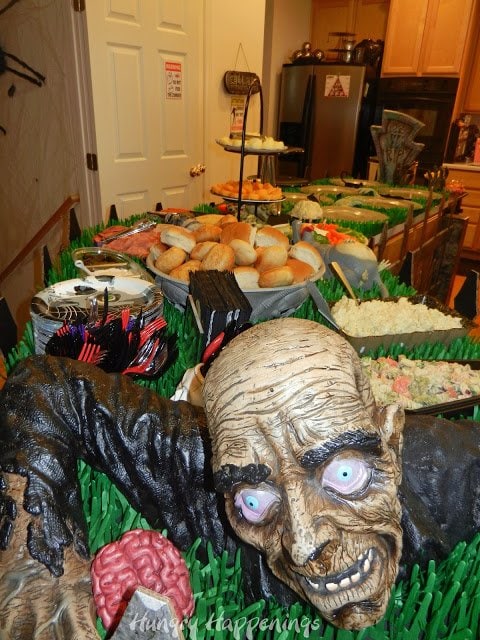
Brain-Eating Zombie
I placed a brain-eating zombie at the end of our island to greet our guests as they entered the kitchen. He looked like he was climbing out of a grave.
The island was covered with tissue paper grass. Did you know that was a thing? It's used for decorating store windows and it worked perfectly to create the cemetery.
I could easily set bowls and platters of food on top of the paper grass.

Creepy Appetizers
Creepy zombie hands reached up out of the ground grasping at food like the skull-shaped cheese.
I was able to put the plastic hands down through the blades of the paper grass and place the fingers through the metal rack so they stayed in place during the party.
From a distance, they looked like they really were reaching out of the ground.
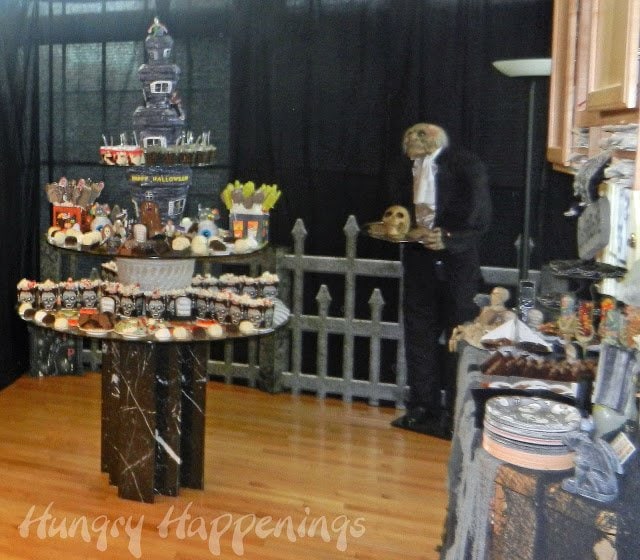
Creepy Kitchen Decor
I used more of the cardboard fence to line the walls of our morning room. I hung black sheets on PVC frames so that our kitchen would be black.
We placed a zombie waiter prop in the kitchen along with our desserts and drinks.
Our Halloween dessert table was a focal point of the party food. We were sure to leave plenty of room around the tables so our guests could easily serve themselves.
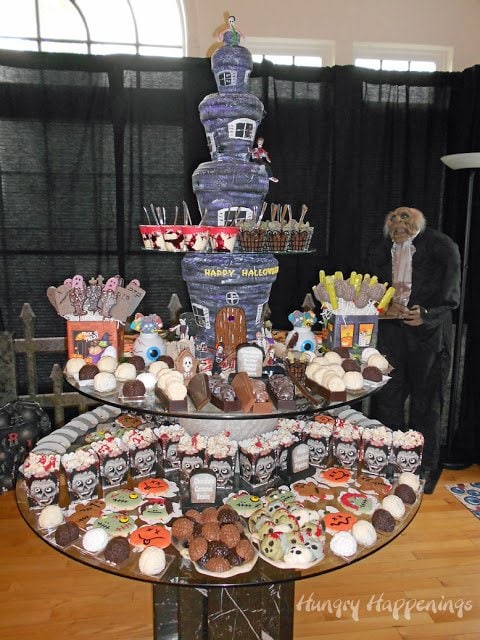
Desserts Display
I have a 4-foot round glass table that is on a black and white marble pedestal. It makes a fantastic display for desserts.
I add a big planter in the center of the table, and a smaller glass round on top of it.
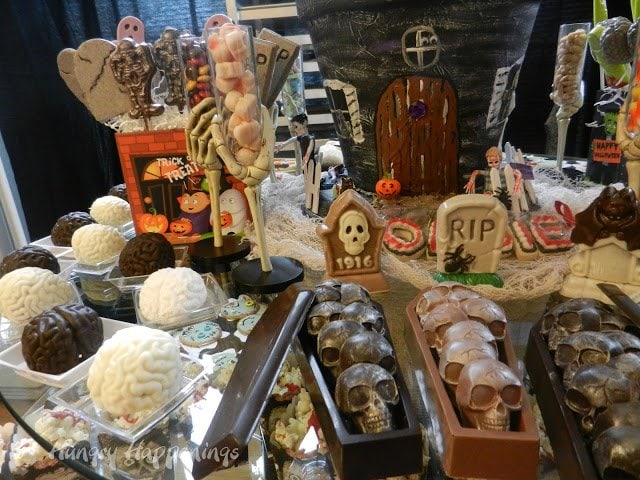
My friend handcrafted the coolest haunted house out of clay pots. I set the largest one on top of the second glass round then added a third glass round over it.
Then, I placed the top pieces of the haunted house on top. It made a spectacular display or all of my zombie-themed desserts.
Creepy Desserts
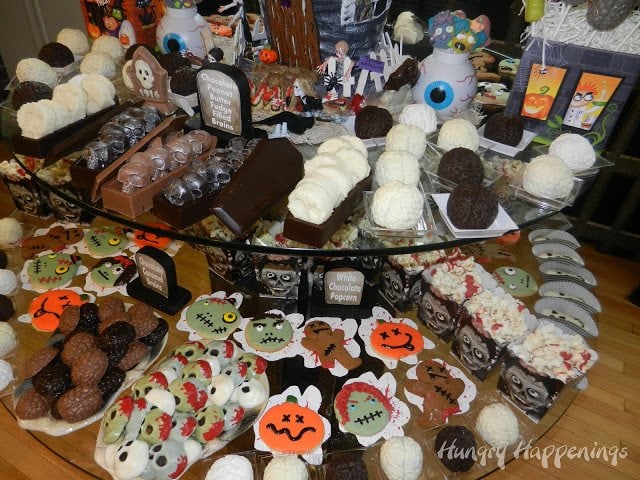
I served so many creepy-looking desserts including my popular Cake Ball Brains, Gummy Brains and Skulls, and Bleeding PB&J Brains.
I also served Dark Chocolate Marshmallow Filled Brains and Caramel-Filled Chocolate Brains that I made using a silicone brain mold. You can see my Chocolate Marshmallow Eggs recipe and my Chocolate Caramel Eggs recipe for instructions. Just swap out a brain mold for an egg mold.
I also made my Homemade Marshmallows recipe into brains using the molds too. I added drips of red candy melts (blood) to my White Chocolate Popcorn and used a Skull silicone mold to create Coconut Cream candies.
To round it out, I had Gingerbread Zombies, Zombie Sugar Cookies, White Chocolate Zombies, and Chocolate Coffins on the dessert table.
Halloween Chocolates
We made plenty of hand-painted chocolate lollipops and painted candies to set around the table too.
I loved that I could fit my small skull-shaped candies into chocolate coffins. During the party, one young boy came up to me holding a chocolate coffin lid that had a big bite taken out of it and said, "This is chocolate, the whole thing is chocolate, this is so awesome." It was so cute!
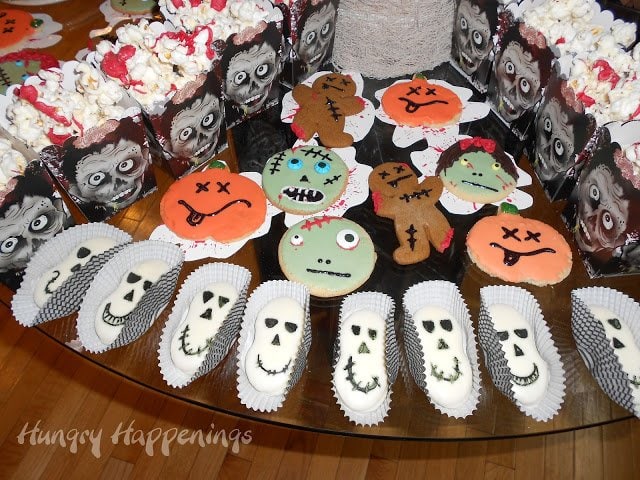
Zombie Cookies
We really had fun decorating lots of zombie-themed cookies for our display including Nutter Butter Skulls.
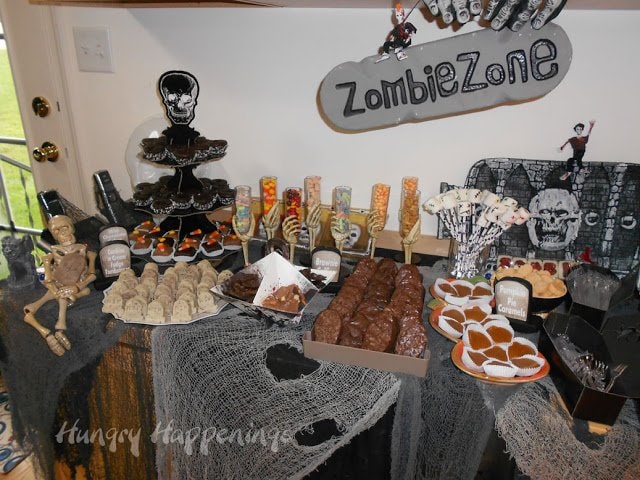
More Dead-Serts
All of the desserts I made for our party guests did not fit on that one display so I used the desk in our kitchen too.
Our guests also enjoyed Cookies 'n Cream Fudge Tombstones, Brownie Coffins, Pumpkin Caramels, Zombie Marshmallow Pops, and lots of handmade Halloween Chocolates.
Sorry, I don't have recipes to share for all of these desserts. Blogging at the same time we are preparing to host a party is daunting!
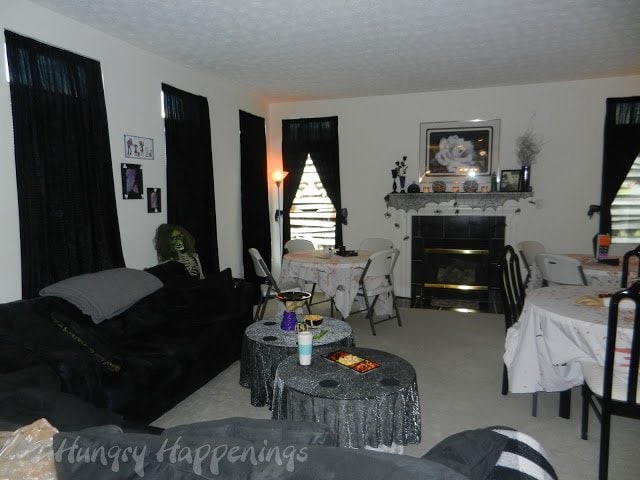
Creepy Living Room Decor
Let me show you the rest of the house.
To keep the room dark, I hung black curtains on the windows and added some zombie window decorations to a few.
I had a zombie party guest sitting in a chair and lots of creepy Halloween decorations throughout the room.

Blood Splattered Tablecloths
We added tables covered in blood-splattered tablecloths to our living room so our guests could sit and enjoy all their tasty morsels. To make the tablecloths, we used cheap white sheets, tore holes in them, and splattered them with fake blood.
Vases were filled with dead black roses, our mantle was decked out with blood-dripped candles, and our tables each had a Halloween game for our guests to play.
One of my favorite decorations at this year's party was our zombie family portrait wall.
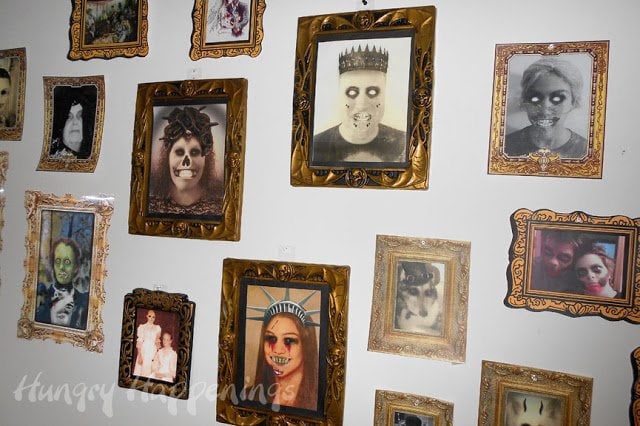
Zombie Family Gallery
Family and friends were zombified using a clever zombie app. Even the dogs were zombified!
I printed them out on photo paper and hung them on the wall using removable tape.
I added pictures of many of our party guests. Everyone loved it!
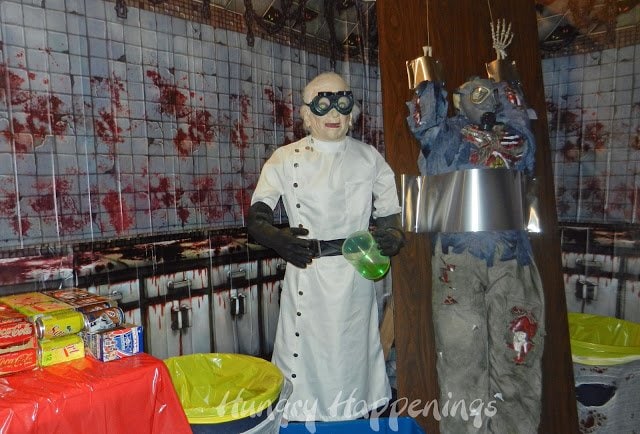
Mad Scientist Laboratory
Our garage was transformed into a laboratory complete with a mad scientist doing experimental work.
We create PVC frames and hang scene setters around the walls of the garage. This allows us to hide all of our garage stuff and add a cool look to an otherwise drab room.
We served drinks and had more tables and chairs set up for our guests in the garage.
If you plan to use your garage be prepared for the weather. We open the garage door if it is nice outside and add heaters if it's cold.
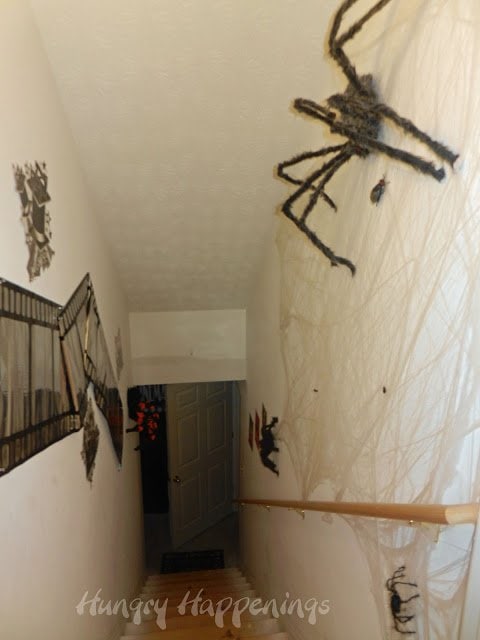
Spider-Infested Basement
Our basement, once again, became a movie theater. The entry into the movie theater was infested with spiders and guests got their hands stuck in spider webs as they made their descent down into the catacombs.
Every year we change up our movie theater so our guests aren't bored seeing the same thing year after year.
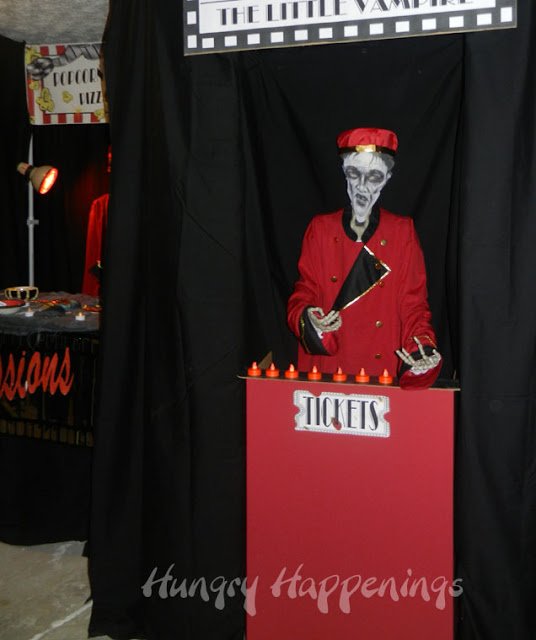
Zombie Ticket Taker
Guests entered the cinema and met our zombie ticket taker. You can see how you can make this prop in my Halloween Movie Theater post.
This prop usually looks like a skeleton but this year I put a fabric zombie make over the skeleton's head to keep with our zombie theme.
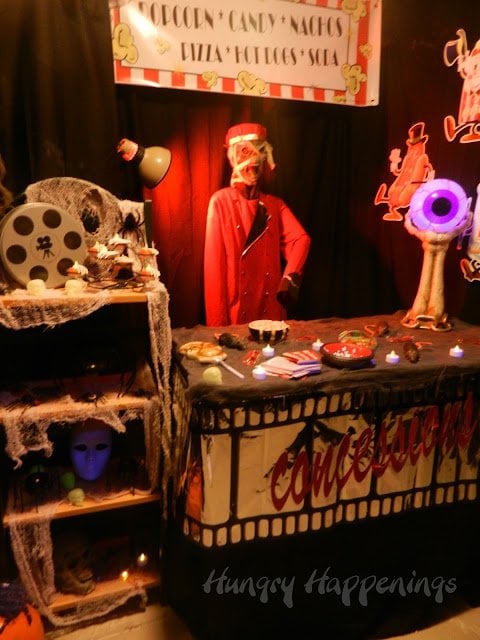
Concession Stand
Our zombie usher was ready for a new job this year so I put him behind the concession stand.
Our party guests could grab popcorn and candy before they sat down to watch a movie.
The picture above shows the set up but we added the snacks after that picture was snapped. I had movie theater candy boxes and big bowls of popcorn.
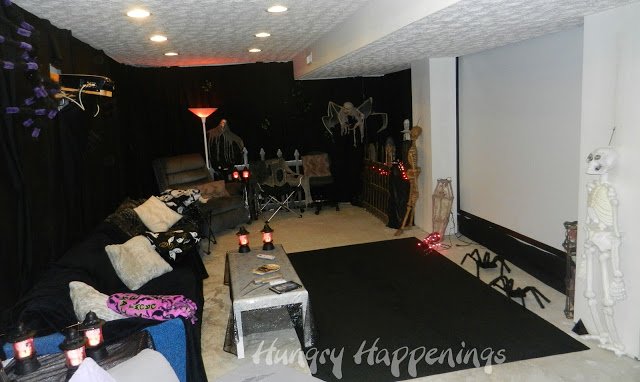
Movie Theater
Movies played throughout the party and many guests enjoyed time viewing the show. We typically show short 30-minute clips instead of a full-length movie. That is so our guests don't spend the entire evening in the theater when there are other fun things to do.
Aside from the movies, we always have a scavenger hunt for the kids. With 30 kids in attendance, it gets pretty crazy. So we send them out in teams, each with a teenage leader, to solve clues and find items throughout the neighborhood.
This is the highlight for most of the kids.
The parents get over an hour of kid-free time to enjoy spending time with other adults. It's a win-win.
Speaking of winning, we always have games and prizes for the kids and adults. We host a costume contest and give a big $50 prize to the grand prize winner. We have smaller prizes for each category: scariest costume, cutest costume, best couple costume, most original costume, and best themed- costume (to match our party theme.)
Dead End
It's always sad to say goodbye at the end of the night. Our guests walked past this ghoulish display as they exited the house.
We have so much fun decorating and making food for our Halloween parties.
More Halloween Party Themes
Be sure to check out my posts for these other fun Halloween party themes.
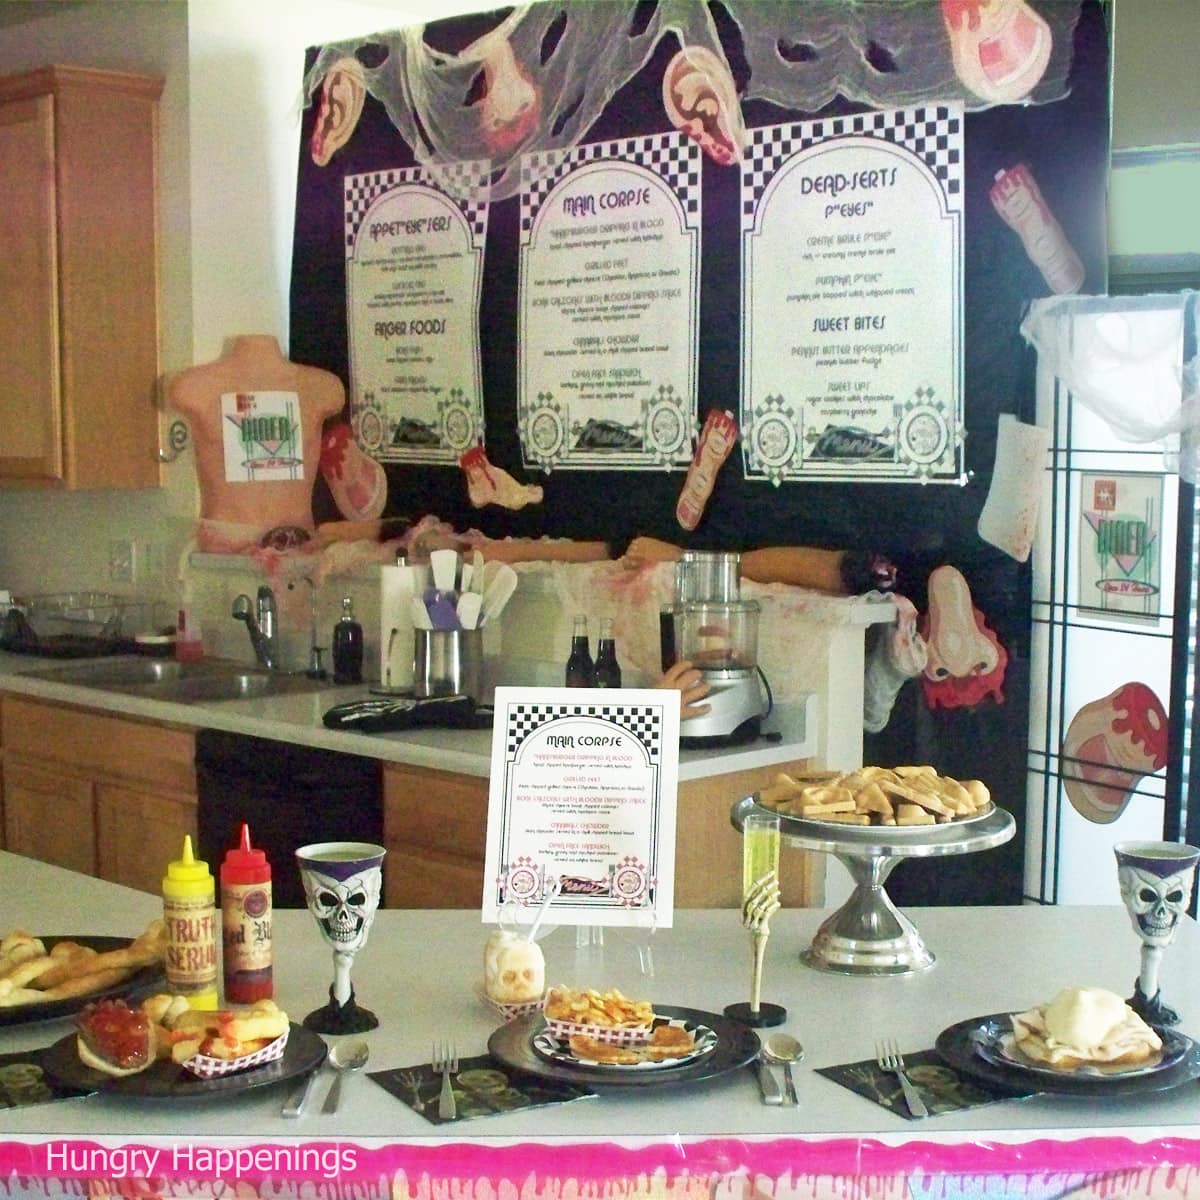
Dead Man's Diner
We transformed our kitchen into the Dead Man's Diner and served creepy diner food.
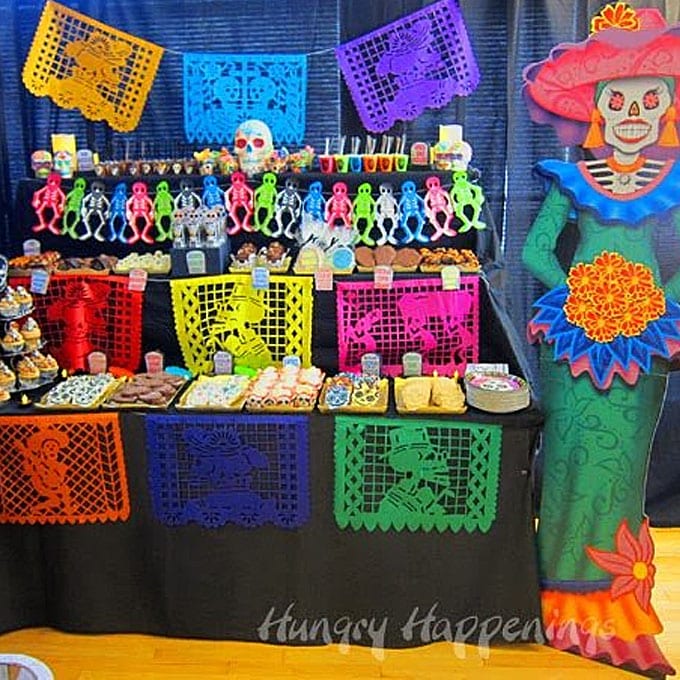
Dia de Los Muertos
Then, we created a Day of the Dead Party complete with sugar skull decorations, food, and desserts.
Spooky Carnival
One year, we turned each room in our house into a different themed room. Check out our fun Halloween party ideas. We turned our garage into a classic Halloween carnival and served a variety of Halloween party food.
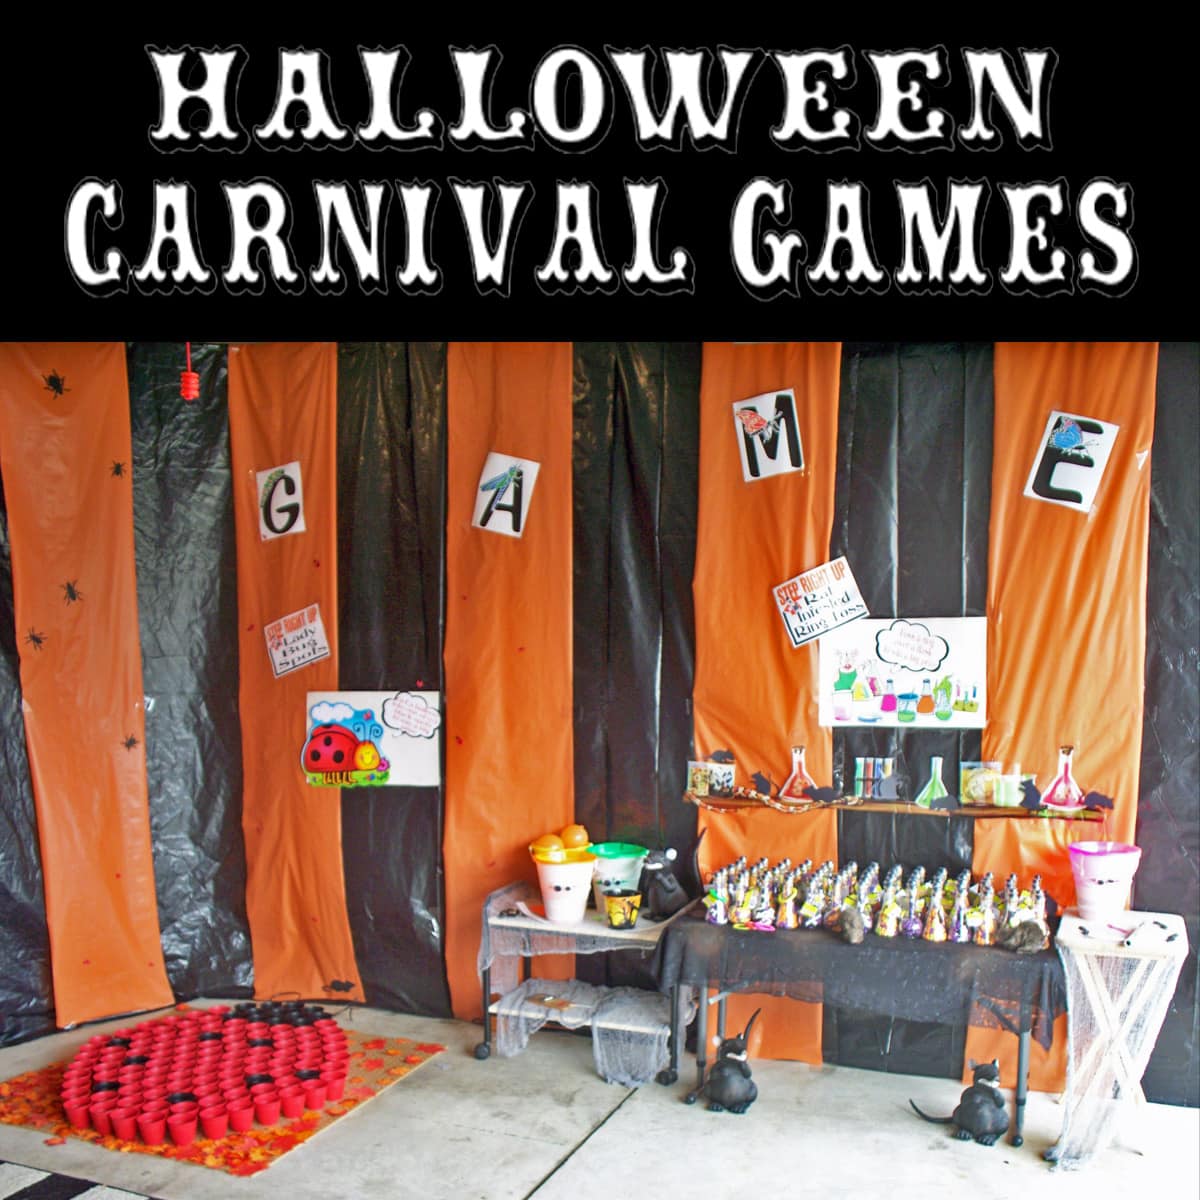
Creepy Crawler Carnival
Speaking of carnivals. For another party, we hosted a creepy crawler carnival party and served Bug-Themed Food. The kids had a blast playing these clever DIY Halloween carnival games.
Pumpkin Carving Party
We don't always have gross or gory party themes. One year we hosted a Pumpkin Carving Party, served cute pumpkin-themed desserts, and decorated the house with adorably cute Jack-O-Lanterns.
I hope you are inspired to create festive food and fun decorations for your next Halloween party.

- Banana Split Bars – A Fun and Easy Summer Dessert - March 4, 2026
- Pineapple Fudge (No Candy Thermometer Needed!) - March 4, 2026
- No-Bake Peanut Butter Pie Recipe - March 3, 2026
Miss.L says
This is awesome!! I run a youth centre and I think your window idea is incredible but Im curious how did your husband build that? Is it hard, or would it be a project we can do with our teens?
beth says
The windows popped into our window frames and that was the hardest aspect of building these windows. My friend used them for her party this year and they just hung them so they would have been easier to build to begin with. We created the frame using two by fours. The frame had one by two's attached on the back, and that's what held them into our window frames. If you are just going to hang these, then just make a big rectangle using the two by fours. Paint the frame white. Then cut more boards in various widths and lengths and nail them across the window frame. I hope that simple explanation helps.
Miss.L says
This looks awesome!! I run a youth center and would love to decorate as such. How did your husband build the boarded window panels? Is it a hard task? I would love to get our teens involved in creating a similar look
Miss.L says
This is awesome!! I run a youth centre and I think your window idea is incredible but Im curious how did your husband build that? Is it hard, or would it be a project we can do with our teens?