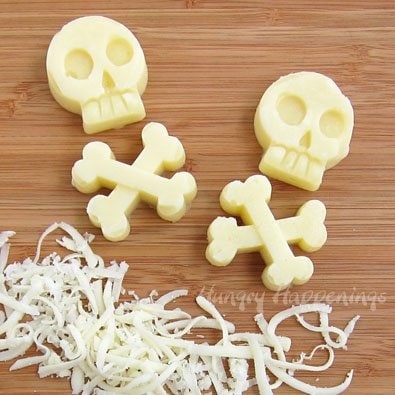
Turn mozzarella cheese into Skull and Crossbones Cheese using a silicone mold. This simple snack would be a great addition to a Halloween appetizer platter.
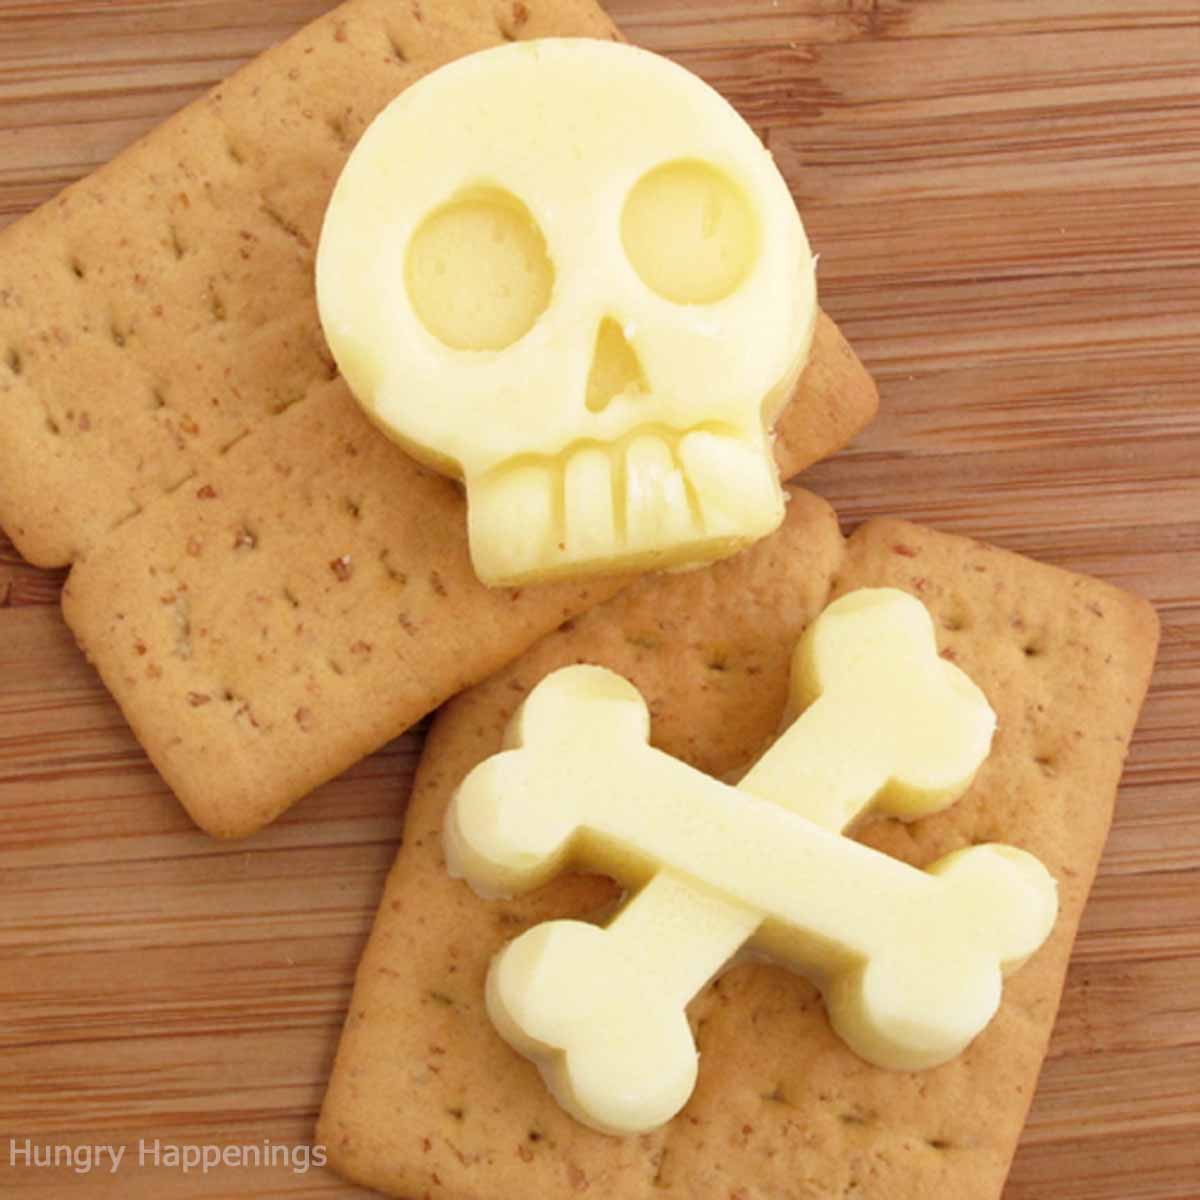
Can you believe this skull and crossbones are made of cheese?
How did I do that, you ask? It's easy and I'll show you the simple process below.
I can't wait to make these for our Catacomb Cinema Halloween party. They'll look great on my food table along with Pizza Skulls, Black Caramel Spiders, and Nutter Butter Skulls.
Skull and Crossbones Mozzarella Cheese (fills one mold)*
Ingredients
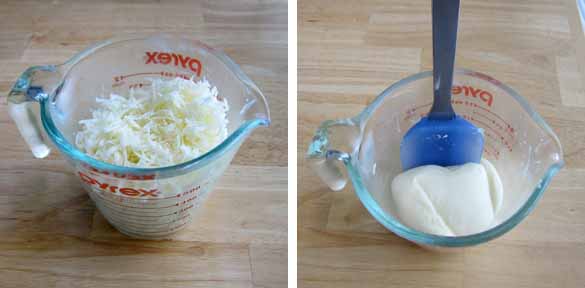
8-ounce block of Mozzarella Cheese - You must use a block of cheese. Do not use pre-shredded cheese as that contains ingredients to keep it from sticking. That type of cheese won't melt as smoothly.
Supplies
cheese grater/shredder
microwave-safe bowl
Skull and Crossbones Silicone Ice Cube Mold (or any other shape)
Halloween silicone molds are available on Amazon.com. I earn a small commission when you make a purchase using the links below at no extra cost to you.
 Fairly Odd Novelties Bone C...Shop on Amazon
 Chicago Metallic Silicone P...Shop on Amazon
 Wilton Halloween Skulls Ice...Shop on Amazon
 Wilton 24 Cavity Silicone M...Shop on Amazon
Instructions
Melt the cheese.
Shred the cheese. Do not use the already shredded cheese, as there are things in those packages to keep the cheese from sticking and it is too dry for this project.
Pour cheese into a microwave-safe bowl. Heat on high for 20 seconds. Stir. Heat for 15 seconds. Stir.
Heat for 10-second increments, stirring after each until completely melted.
It will be one thick ball once melted.
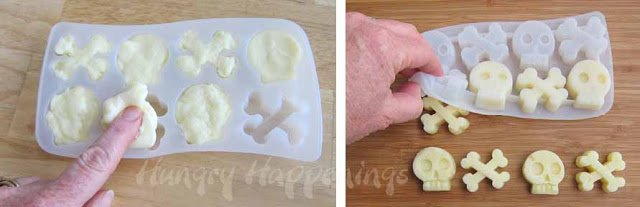
Fill the silicone molds with melted cheese.
Pinch off pieces of the mozzarella cheese and press it into the cavities of the skull and crossbones silicone mold.
Fill the cavities completely, adding pieces of cheese as needed.
Heat the filled mold in the microwave for 12-15 seconds just to re-melt the cheese so that it stays together.
Refrigerate for 30 minutes.
Remove the mold from the fridge, turn it upside down, and press on the skull or crossbones and the cheese will pop right out.
Serve with crackers.
Recipe Notes
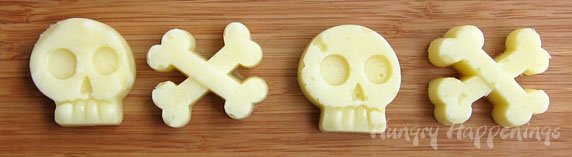
One 8-ounce block of cheese filled the 8 cavities in this skull and crossbones silicone mold.
The cheese is easier to unmold from softer silicone molds than from those molds sold as ice cube trays.
Storage
Store in an airtight container in the refrigerator until your party.
Variations
There are so many cool silicone molds available these days that you can make them for practically any holiday. You can use any freshly shredded melting cheese to make fun cheese for a party.
Related Recipes
If you are looking for more skull-themed recipes, be sure to check out these other recipes.
Be sure to check out all the Halloween recipes here on Hungry Happenings.

- Banana Split Bars – A Fun and Easy Summer Dessert - March 4, 2026
- Pineapple Fudge (No Candy Thermometer Needed!) - March 4, 2026
- No-Bake Peanut Butter Pie Recipe - March 3, 2026


Anonymous says
excellent, thanks!!!
Anonymous says
approximately how many pieces of cheese do you get from (1) 8 oz. block?
Beth Jackson Klosterboer says
I filled the mold once and had a little left over, so I'd say 10 or so pieces.
Lolly Jane says
Heehee sooo cute!!
Regina says
cheesy LEGO minifigs and bricks are definitely in my future this weekend!
Sarah says
Fantastic! Definitely a new way to use those molds for me, and I am so doing skulls for the 19th!!
Mommyof2girlz/StephD says
So awesome! I have the same molds and have no idea what to do with them. Now I do 😉
Keitha says
Thanks so much for sharing this!!! I can't wait to use molds of cheese in my son's lunch.
Astrid says
Wonder if it would work with cheddar... might have to try!
Beth Jackson Klosterboer says
I assume it will work, but I'm going to try to find time to check it out too.
Beth Jackson Klosterboer says
I just tried this out with cheddar cheese and it works too. The cheese is a bit more greasy than the mozzarella, but it still molds well.
Anonymous says
Oh my goodness, this is brilliant!! And to think... I JUST passed up some wicked marvel heroes silicon molds today! for shame...
Jaime L says
Such a great idea! Love it!
Michelle | Creative Food says
This is awesome! We use silicone molds but never tried with cheese. Love the idea!
Dixie Delights says
love it! I pinned it!
algonacchick says
This is cool, and the skull and crossbones would also work for International Talk Like A Pirate Day, which is September 19th. 🙂
algonacchick says
Oh, that is awesome! Just in time for International Talk Like A Pirate Day, as well as Halloween! :)Yummy cheesy skull and crossbones? Yes, please!
Wendy says
Brilliant!
Jill @ KitchenFunWithMy3Sons.com says
This is such a great idea!
Glory says
So cool - Maybe I can do this and kiddo will finally eat Mozzarella Cheese?!
Anonymous says
Very very cool!
~ Kerry DeKelver|~
Janine (sugarkissed.net) says
Oohhh... u just opened up a whole new world of silicone molds for me! Did not know that shredded cheese was any different. Thanks for the heads up on that!
Anonymous says
Thanks for sharing this! I have lots of candy molds that I haven't been using. With this great idea, I'll be breaking them out again. 🙂