Your Halloween party guests will be dying to try these delicious Candy Tombstones inscribed with funny epitaphs. The cookies and cream fudge gravestones are easy to make using just 3 ingredients.
My Cookies and Cream Fudge Rocks have been so popular that I've used the easy fudge recipe to make Edible Garden Stones for Mother's Day, Candy Rocks for Valentine's Day, and Sweet Serenity Stones for any day.
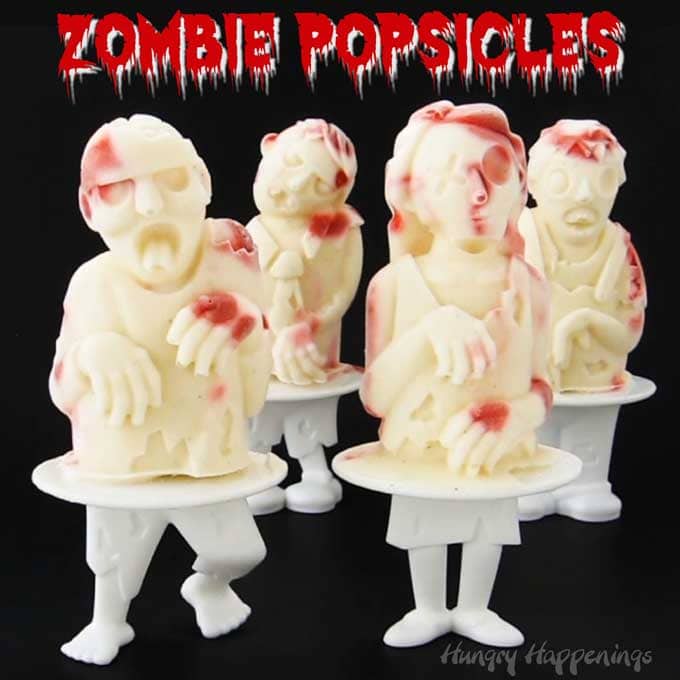
I couldn't resist making these candy gravestones for our zombie-themed Halloween party.
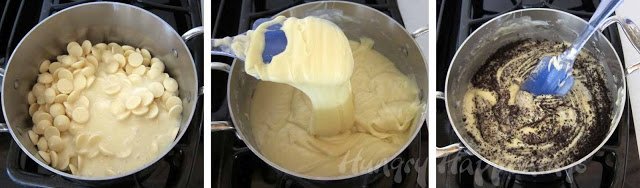
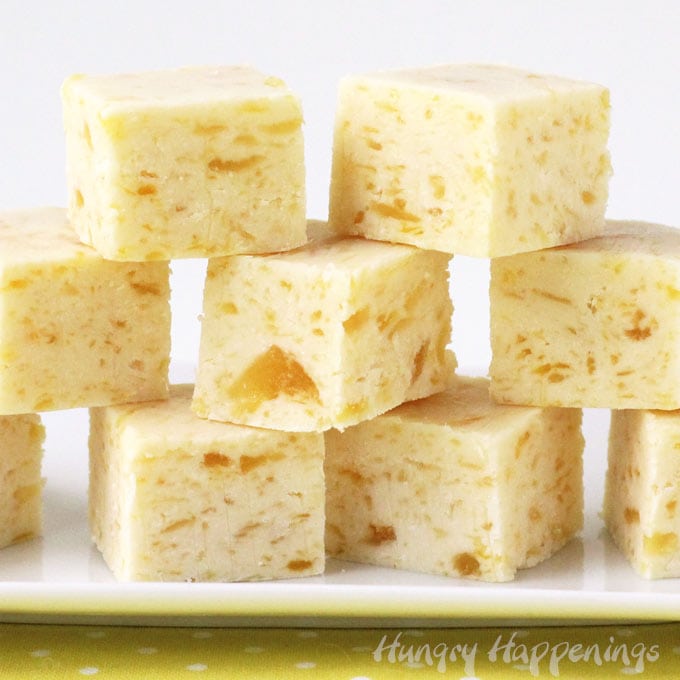
The fudge itself is super easy to make by melting white chocolate and sweetened condensed milk and blending in OREO Cookie crumbs. You pour it into a pan, let it firm up, and then cut it into tombstones using cookie cutters or a knife.
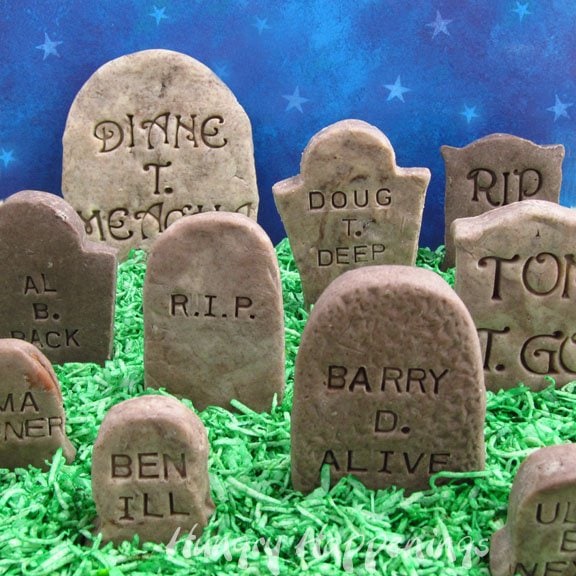
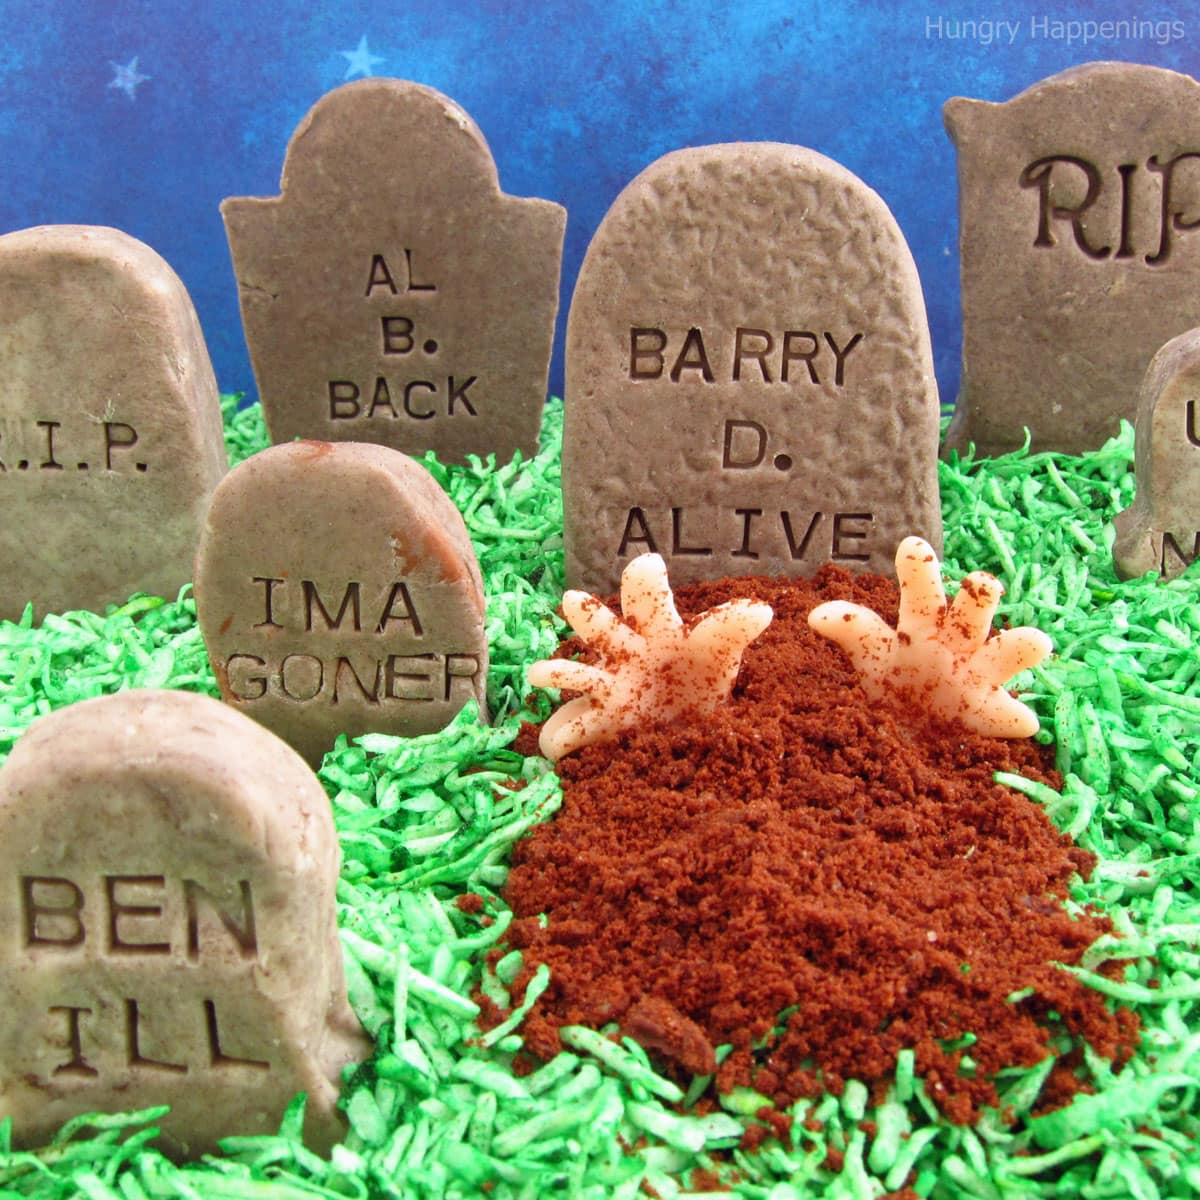
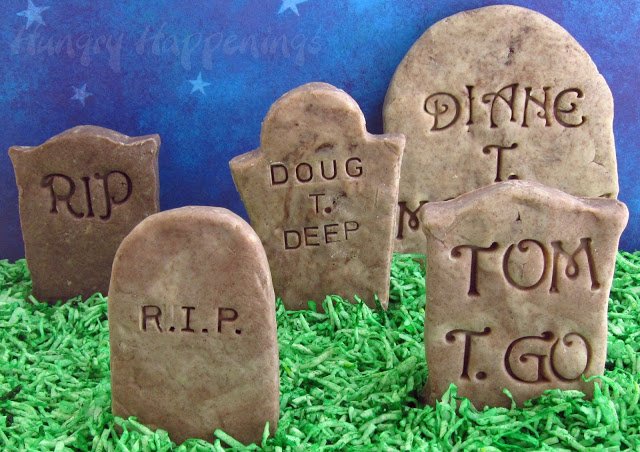
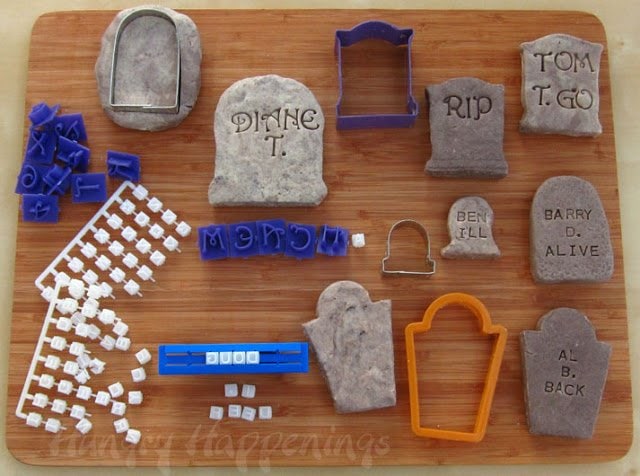
Then, the fun begins. You'll use alphabet stamps to inscribe the tombstones with funny names like, Barry D. Alive, Ima Ghost, Diane T. Meacha.
How fun would these be to use as place cards for a Halloween or Over the Hill dinner party?
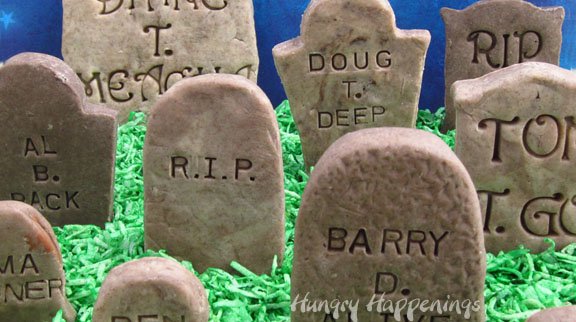
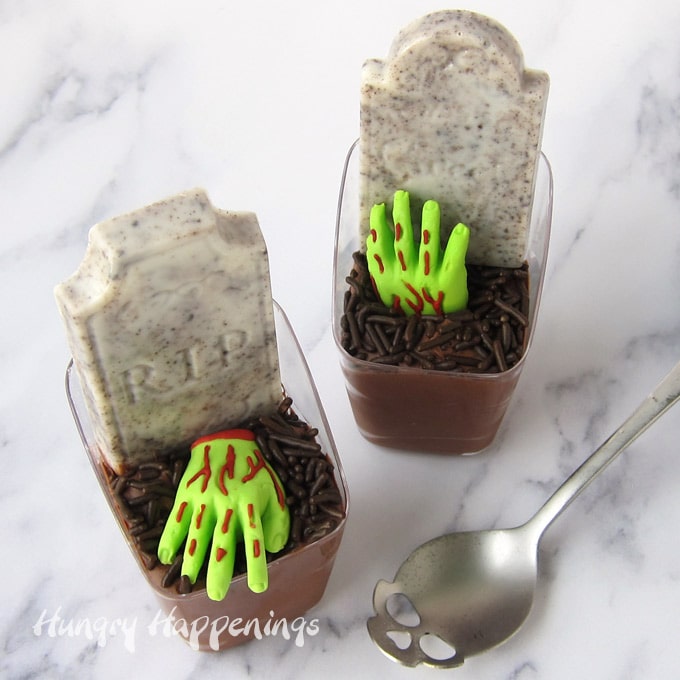
I plan to serve the fudge headstones as pictured above in a graveyard nestled among green coconut grass and cookie-crumb dirt. I can't wait to see how my party guests react to these hilarious treats.
RELATED: Find dozens of easy fudge recipes at HowToMakeEasyFudge.com.
Cookies 'n Cream Fudge Tombstones
Ingredients
cookies and cream fudge
white chocolate chips or white candy melts
sweetened condensed milk
OREO Cookies
optional edible decorations for a graveyard
green colored coconut - To make the edible green grass for your graveyard, place coconut in a zip-top bag, add green food coloring, close the bag, and shake until the coconut turns green.
chocolate cookies - Crush the cookies into small crumbles to make edible dirt.
flesh-colored modeling chocolate or fondant to make hands
Supplies
tombstone cookie cutters in various sizes
small plastic alphabet stamps
8-inch or 9-inch square baking pan lined with non-stick aluminum foil or parchment paper
cutting board
Products used to make this project are available on Amazon.com. I earn a small commission when you use the Amazon links to make a purchase at no extra cost to you.
 R&M Tombstone 3" Cookie Cut...Shop on Amazon
  WJSYSHOP Tombstone Cookie C...Shop on Amazon
  Tombstone Cookie Cutter 3.5...Shop on Amazon
  Tool Gadget Cookie Stamps, ...Shop on Amazon
  3pcs Alphabet Letter Stamps...Shop on Amazon >
Instructions
Make the cookies and cream fudge.
- Combine the white chocolate and sweetened condensed milk in a medium saucepan.
- Set the pan on the stovetop over LOW heat.
- Heat until about 50% of the white chocolate has melted then remove from the heat (or turn off the gas).
- Let the pan rest for 5 minutes, then stir the fudge until smooth and creamy.
- Stir in chocolate cookie crumbs until the fudge looks grey and speckled with cookie crumbs.
- Pour into lined an 8-inch or 9-inch square pan.
- Cover and set aside for about 4 hours until the fudge firms up. To speed up the process, refrigerate the fudge for about 2 hours.
- Remove the fudge from the pan, peel off the tin foil or parchment paper, and set it on a cutting board.
This will create tombstones that are about ½" to ¾" thick. If you want tombstones for cupcake toppers, pour the fudge into a larger pan so you can make them thinner.
Imprint the fudge tombstones with funny names.
- Use tombstone cookie cutters to cut out shapes from the fudge.
- Take scraps of fudge and smash them into a ball. Flatten the fudge to about the same thickness you just cut through.
- Cut out more shapes. Repeat until you've used all of your fudge.
- Use garden stone stamps, a clay embossing set featuring alphabet stamps, or any rubber alphabet stamps that fit to create funny epitaphs for each candy tombstone.
- Simply press a stamp into the fudge and then lift it out of the fudge. You may need to experiment with the pressure. If you press too hard, you'll leave a square impression in the fudge around the letter.
Tips: Cover the fudge tombstones that you haven't inscribed with plastic wrap to keep them from drying out. If they dry too much, they will crack as you imprint them.
Funny Epitaphs
Here are 25 funny names to add to your candy tombstones.
Diane T. Meacha (dying to meet 'ya)
Barry D. Alive (buried alive)
Al B. Back (I'll be back)
Doug T. Deep (dug too deep)
Tom T. Go (time to go)
Ima Goner (I'm a goner)
Ben Ill (been ill)
Ule B. Next (you'll be next)
Imma Ghost (I'm a ghost)
Wee G. Bord (Ouija board)
Rustin Peace (rest in peace)
Hugo First (you go first)
Eileen Dover (I leaned over)
Yul B. Next (you'll be next)
Dee Compose (decompose)
Anita Moore-Tishan (I need a mortician)
Otto B. Alive (aught to be alive)
Perry Noid (paranoid)
Will B. Back (will be back)
Stella Live (still alive)
Rick Amortis (rigamortis)
Anita Newhart (I need a new heart)
Yule B. Sorry (you'll be sorry)
Cy Yonara (sayonara)
Storage
Store your fudge tombstones in an airtight container for up to several weeks.
Related Recipes
Be sure to check out all the Halloween recipes here on Hungry Happenings

Tombstone-shaped cookies and cream fudge imprinted with funny epitaphs.
- 24 ounces white chocolate chips or white candy melts
- 14 ounces (1 can) sweetened condensed milk
- 6 OREO Cookies
-
Line an 8-inch or 9-inch square pan with non-stick tin foil or parchment paper.
-
Combine the white chocolate and sweetened condensed milk in a medium saucepan.
-
Set the pan on the stovetop over LOW heat.
-
Heat until about 50% of the white chocolate has melted then remove from the heat (or turn off the gas).
-
Let the pan rest for 5 minutes, then stir the fudge until smooth and creamy.
-
Crush the cookies into crumbs and stir them into the fudge.
-
Pour the cookies and cream fudge into lined an 8-inch or 9-inch square pan.
-
Cover and set aside for about 4 hours until the fudge firms up. To speed up the process, refrigerate the fudge for about 2 hours.
-
Remove the fudge from the pan, peel off the tin foil or parchment paper, and set it on a cutting board.
-
Cut the fudge using a variety of tombstone cookie cutters.
-
Knead the scraps of fudge together. Then flatten the fudge out and cut more tombstones.
-
Use small plastic alphabet stamps to imprint the fudge tombstones with funny names or epitaphs.
Cover the fudge tombstones that you haven't inscribed with plastic wrap to keep them from drying out. If they dry too much, they will crack as you press the alphabet stamps into them.
Store your fudge in an airtight container at room temperature for up to a week. You can also freeze the fudge tombstones in a well-sealed zip-top bag for up to 3 months. Thaw in the bag for several hours before removing the fudge. This will keep condensation from forming on the candy.

- Banana Split Bars – A Fun and Easy Summer Dessert - March 4, 2026
- Pineapple Fudge (No Candy Thermometer Needed!) - March 4, 2026
- No-Bake Peanut Butter Pie Recipe - March 3, 2026

Chris says
My daughter and her best friend (both 9) will be making these, and shaping modeling chocolate, to decorate a graveyard cake. They're out of their minds with excitement, and will spend the week trying to think of good epitaphs!
Thanks: this stone-appearance fudge is perfect.
Beth says
I love to hear that young kids are excited to be in the kitchen making fun treats. I'm so happy to have inspired them. I hope they have fun!
plasterers bristol says
Oh my, this looks so good, thank you for posting this up, going to be giving this a go.
Simon
Carrie says
Thanks so much for sharing the recipe! Happy Halloween!!
Carrie says
Hello! I have used your recipe to make my own tombstones for cupcakes! Pics etc are here: http://whatanawesomecake.blogspot.co.uk/2013/10/halloween-cupcakes-zombie-cupcakes-and.html
Thank you so much for the idea / recipe! Your blog is great!
Mike 'Cookie Man' D. says
Very Creative...these are going to be GREAT fun to make next Halloween. Thanks for sharing!
Mary says
Wow! It is a brilliant idea for halloween! I am charmed with it! and, in addition ...... tiene que estar de muerte!!!! jajaja
Trish says
These are so awesome! How fun for a Halloween party! Thanks so much for sharing at Mom On Timeout!
Ally says
So cute! I think Halloween might be my favourite holiday (:
Monica says
Hi Beth! What a great idea and thanks for the easy-to-follow recipe. I cut the recipe down to a third but still followed the directions and used an 8x8 inch square pan. However, after 5 hours of being in the fridge the fudge is delicious but super sticky and not peeling off of the parchment paper. More for me to eat, I guess 🙂 Is there any way to salvage it? Would you recommend freezing it as a way to get it peel easier? I thought if I could freeze it, peel it, and then use the cookie cutter to get the shape and stick it on my graveyard cake a couple hours before serving that might work. But I'm a beginner and don't know what to do. Help! Where did I go wrong?
Beth Klosterboer says
HI Monica, I am sorry to hear you had trouble with the fudge. It may have to do with the amount of sweetened condensed milk. Even though a can says there is 14 ounces in it, I've never actually gotten a full 14 ounces to come out of the can. It's closer to 13 ounces. If you used 4.66 ounces (1/3rd), it might have been just a bit too much. You can definitely put the fudge in the freezer to allow it to firm up enough so you can peel off the paper. Then, let it sit out at room temperature for a few hours. It might firm up enough for you to be able to cut it into the tombstones. You might even allow it to sit out uncovered for a while. The top edge will start to dry out. Flip it over to allow the underside to dry for a little while too. Another option would be to knead more cookie crumbs into the fudge and then flatten it out again on some parchment paper. This will deepen the gray color but it will also dry out the fudge a bit. I hope these tips help.
Beth (www.livinglifeintentionally.blogspot.com) says
This is amazing! This would go great for a Disney Haunted Mansion family fun night =-) Seriously you amaze me with your creativity & execution! Thanks for linking up to TGIF! I always LOVE seeing what you've created!!
Beth =-)
P.S. Shared with my readers on Facebook too.
Beth Jackson Klosterboer says
Thanks! Great idea to use these for a Haunted Mansion night. So fun.
Veronica says
Oh I just love how cute this is!! I'll definitely be getting myself those tombstone cutters!! Visiting from Mom on Timeout 🙂
Tiffany@Fizzy Party! says
These cookies will be perfect for your zombie party. Love the theme.
CuteEverything.com says
These are great, I love all of your rock ideas, the cookies and cream fudge works soo well!
Nicky @ Pink Recipe Box says
What a fantastic idea for Halloween!
Pinning 🙂
Janine (sugarkissed.net) says
Gotta get me some of those letter stamps! Love the set of hands sicking up put of the ground!
Carrie's Experimental Kitchen says
These are adorable Beth, thanks for sharing!
Stacey Merrill says
too fun! Thanks for sharing
Trish - Sweetology101 says
oooh I LOVE the stone stamps - great links to amazon too - smart! I am ordering some now. I am excited to make this - I am going to try to make some your rock fudge for back to school and put "this year will rock" on the tag for teachers and staff!
Beth Jackson Klosterboer says
Oh, great idea!!!! I love it. Be sure to send me some pictures so I can share with everyone.
The Partiologist says
Who knew what fun you could have with a tombstone! Love these!
Jo and Sue says
Sooooo, yeah.....these are awesome. Seriously. I'm pretty sure we will be stealing this idea for this year's Halloween party! 🙂
Beth Jackson Klosterboer says
I'm glad you will =)