Learn how to store and work with modeling chocolate in this tutorial. Keep your modeling chocolate fresh so that you can use it to decorate festive treats.
HOW TO STORE MODELING CHOCOLATE TO KEEP IT FRESH:
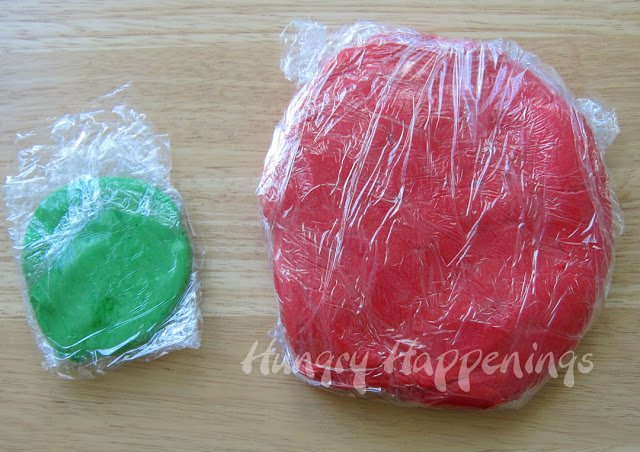
Wrap tightly in plastic wrap and store in a zip top bag or airtight container. It keeps for months if stored properly.
If it becomes hard, break off small pieces and knead until soft. If you can't do that, place the hard chocolate clay in the microwave and heat on defrost for 3-5 seconds. Remove and carefully knead.
HOW TO MAKE MODELING CHOCOLATE DECORATIONS:
Simply pinch off pieces of modeling chocolate, knead until workable, then use to sculpt into shapes, press into silicone molds, or roll out and cover cakes.

Modeling chocolate can be rolled thin using a rolling pin or a pasta machine using one of these methods:
-
Dust your work surface or the rollers on the pasta machine very lightly with powdered sugar or corn starch if using white chocolate, milk, and colored chocolates or dust it with cocoa powder for dark chocolate to keep the modeling chocolate from sticking. Then roll out using a rolling pin that has also been dusted.
-
To keep it clean you can roll it out in a zip top bag, instead. Cut slits along three sides of the bag then pull back the top piece, set the modeling chocolate in the center of the bag, lay the top piece over the chocolate, and roll out using a rolling pin. When the modeling chocolate is at the thickness you want, peel off the top piece of the bag and use the chocolate as needed.
-
The best method is to use a non-stick fondant rolling pin and a silicone mat. I prefer using Wilton's Flexi Mats because they are completely smooth unlike other silicone mats. You simply roll the chocolate clay out on the mat. It shouldn't stick. If it does you can very, very lightly dust the mat and rolling pin with powdered sugar or corn starch, but it's usually not necessary.
Recommended tools you can use to roll out your candy clay.
 Wilton Fondant Dusting CupShop on Amazon
  Wilton Dusting PouchesShop on Amazon
  Wilton Fondant Roller, 20-I...Shop on Amazon
  Wilton Fondant 9 Inch Rolli...Shop on Amazon
  Wilton Easy Flex Silicone 1...Shop on Amazon
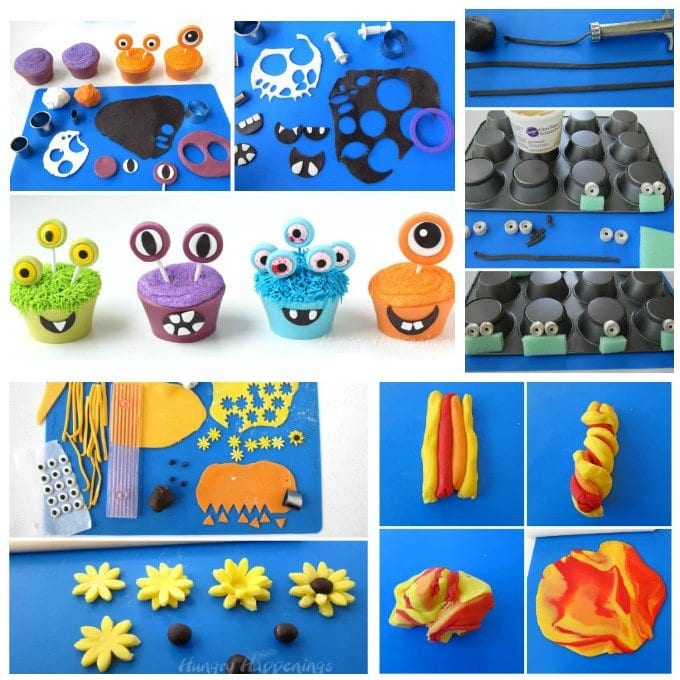
Once you've rolled out the modeling chocolate, you can cut it using a pizza cutter, knife, cookie cutters, fondant cutters, or plunger cutters.
You can create modeling chocolate decorations using one solid color or you can marble some colors together.
Tools used to cut candy clay...
 R&M International Miniature...Shop on Amazon
  Makin's USA 37004 Clay Cutt...Shop on Amazon
  RoyalStyle 33 Piece Fondant...Shop on Amazon
  Winco Winware 6 Wheel Adjus...Shop on Amazon
  JEM Strip Cutter No. 3Shop on Amazon
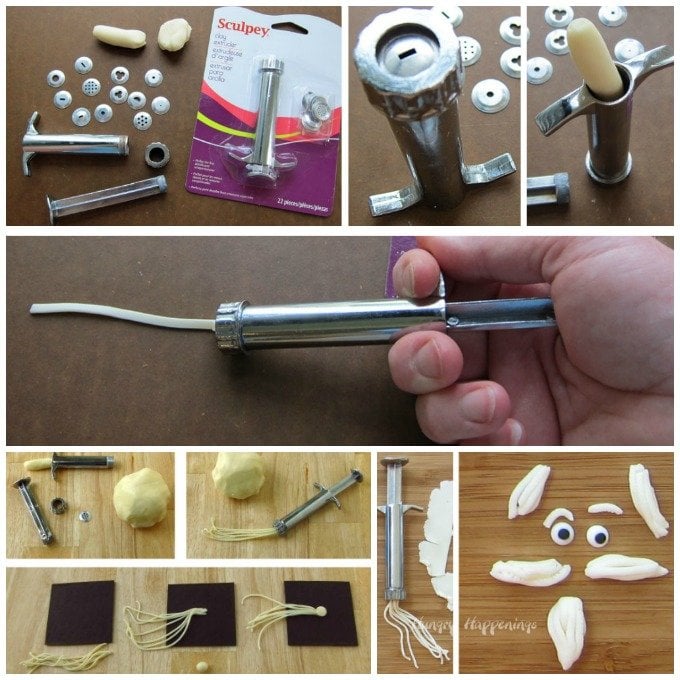
Being modeling chocolate has almost the exact same texture as modeling clay, you can use clay tools to help you create decorations. Just be sure the tools you use are only used for food.
Using a Sculpey Clay Extruder makes creating thin strands of hair or long tubes or flat ribbons out of chocolate clay so easy.
Simply insert the disc you want to use in the tip of the extruder, insert some modeling chocolate, then insert the plunger and push. The candy clay will come out quickly and easily.
Clean up is easy too. Just push any remaining candy clay out of the extruder and wash the metal parts. You can clean the tube using a pastry tip cleaner or a bottle brush. Just be sure it's completely dry before using it again.
Be sure to check out all of the modeling chocolate tutorials on Hungry Happenings and don't forget to check out the tutorials for melting chocolate and candy melts, as well as, coloring and painting with white chocolate and candy melts.

If you'd like to have the ultimate guide to working with Candy Clay be sure to get your printed or e-book copy of Candy Clay Creations. This 102 page book is filled with tips and tricks for making and working with candy clay along with 17 step-by-step tutorials for decorating cupcakes, cookies, and more using candy clay. It's a fantastic resource for anyone who wants to make festively decorated treats.

Take my modeling chocolate course to learn how to make modeling chocolate using pure chocolate and candy melts. Also learn how to fix dry, crumbly, and greasy modeling chocolate and how to make modeling chocolate decorations including that cute bunny.
When you purchase the course, you will also have access to over 20 commercial-free modeling chocolate video tutorials.
How to Fix Dry Modeling Chocolate
How to Fix Hard, Sticky, or Soft Modeling Chocolate
How to Use Colored Candy Melts to Make Candy Clay

- Banana Split Bars – A Fun and Easy Summer Dessert - March 4, 2026
- Pineapple Fudge (No Candy Thermometer Needed!) - March 4, 2026
- No-Bake Peanut Butter Pie Recipe - March 3, 2026