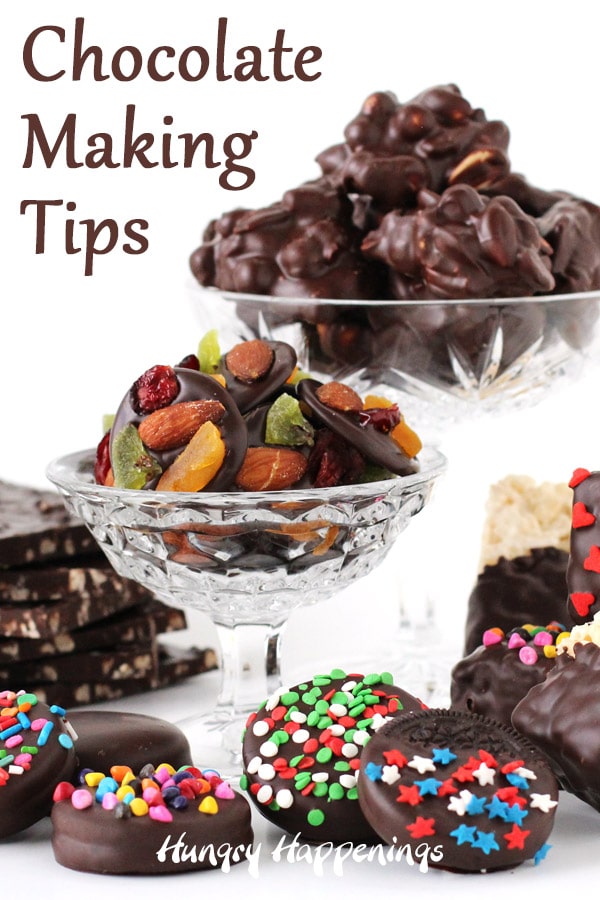
Learn how to make chocolate at home using these chocolate-making tips.
Once you learn the basics, you'll be able to make delicious homemade chocolates that look amazing, too.
Thanks for stopping by to learn how to make homemade chocolates. I have been a chocolatier for over 30 years and am so excited to share these chocolate-making tips with you. I have been blogging since 2010 and have shared hundreds of chocolate recipes here on this blog.
Once you learn the basics, you can create amazing chocolate candies and desserts to share with family and friends.
If you prefer to learn visually, check out my Chocolate Making Course video series from The Sugar Academy.
In this tutorial, you will learn:
- the difference between pure chocolate and compound chocolate
- how to melt and temper pure chocolate
- how to melt compound chocolate (also known as confectionery coating, candy melts,
almond bark, or melting wafers)
- how to melt compound chocolate (also known as confectionery coating, candy melts,
See these other tutorials for more information:
- how to color white chocolate and white confectionery coating
- how to paint candy molds using colored chocolate
- how to make and use modeling chocolate (candy clay)
Let's start with the basics.
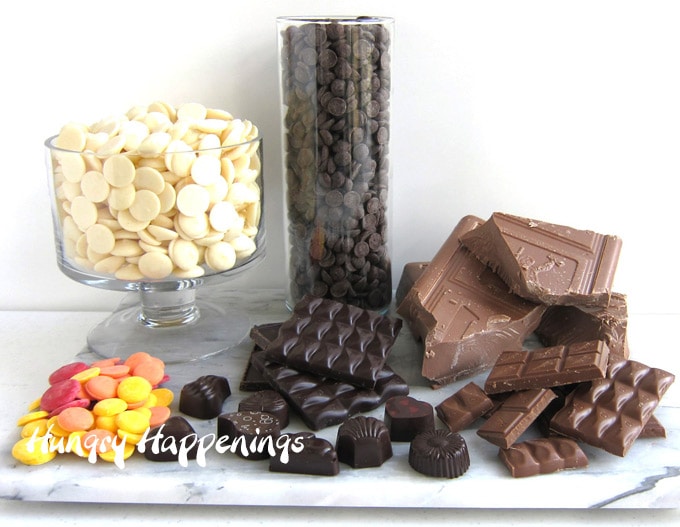
TYPES OF CHOCOLATE
There are several different types of chocolate that are available to the home cook for use in candy making:
Pure chocolate (real chocolate)
- contain cocoa butter
- has a luxuriously creamy texture and rich flavor
- must be properly tempered in order to set up correctly
- can be purchased in bars, blocks, wafers, pistoles (bean-shaped wafers), callets (slightly smaller wafers), and chips
- is available as:
- unsweetened (no sugar added)
- bittersweet (small amount of sugar added)
- semi-sweet (more sugar added)
- milk chocolate (milk powder and sugar added)
- white chocolate, which can also contain cocoa butter, but it doesn't contain any cocoa liquor, so technically it is not considered chocolate (But that is what it is called, so that's what we'll call it too!)
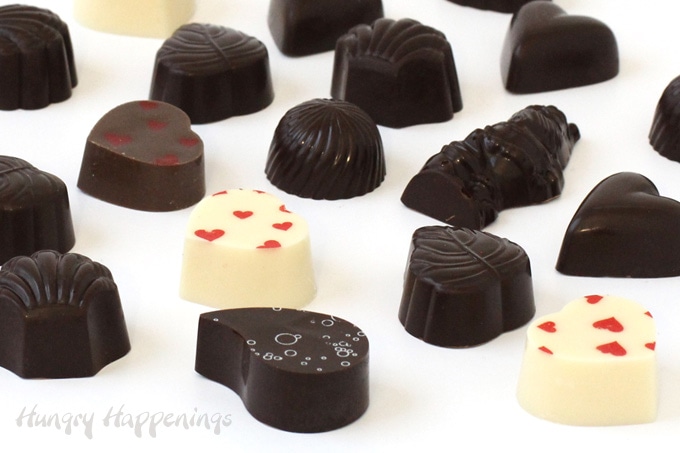
You can use pure chocolate to make:
- Hot Chocolate Bombs
- Artisan Chocolates decorated with Chocolate Transfer Sheets
- Chocolate Truffles
- Chocolate Cups filled with Chocolate Mousse
Compound Chocolate (also known as confectionery coating, Candy Melts, almond bark, or melting wafers)
- contains vegetable oil, typically palm kernel oil
- will melt and set up easily with little effort
- is not as creamy or as rich as pure chocolate, but it’s easy to use and has a very pleasant flavor
- is available in dark, light, white, and flavors like peanut butter, mint, and butterscotch
- can be colored using candy coloring, but is also available in colored wafers
- is typically less expensive than pure chocolate
NOTE about compound chocolate and wax
- The melting point of compound chocolate is higher than that of pure chocolate, which means that it will take longer to melt on your tongue, which can give it a waxy feel in your mouth.
- However, there is no wax in compound chocolate, candy melts, or almond bark, as some people believe. What you are feeling on your tongue is palm kernel oil, not wax.
- Cocoa butter melts at a lower temperature and melts quickly as soon as it hits your tongue; you will not feel this waxy sensation when eating pure chocolate.
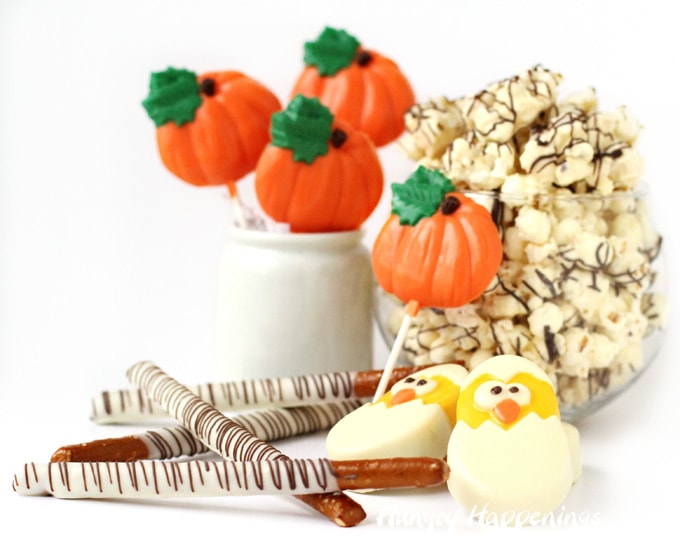
You can use compound chocolate to make:
- White Chocolate Popcorn and a White Chocolate Popcorn Bowl
- Hand-painted Easter chocolates and lollipops
- Pretzel Pops
- Sprinkle Coated Chocolate Cups filled with ice cream or candy
Buying chocolate for candy making.
I personally use Peter's Burgundy (semi-sweet), Peter's Ultra (milk chocolate), and Callebaut dark, milk, and white chocolate callets for my chocolate making, but there are many other delicious brands of chocolate.
Choose the chocolate you like to eat. Everyone enjoys different flavors, so you need to find your favorite.
my favorite pure chocolate brands
Some brands of chocolate I recommend using are available on Amazon.com.
I earn a small commission when you use the links below at NO extra cost to you.
 Peter's Gourmet Burgundy Di...Shop on Amazon
  Callebaut No 811 Finest Bel...Shop on Amazon
  - 33.6% - 1 bag, 5.5 lbs") Belgian Milk Chocolate Baki...Shop on Amazon
Belgian Milk Chocolate Baki...Shop on Amazon popular brands of compound chocolate
I have created hundreds of recipes here on Hungry Happenings using compound chocolates (candy melts). I personally prefer the taste of Peter's Eastchester (dark), Westchester (milk), and Whitecaps, but they are not readily available unless you live near a cake & candy decorating store, so I often use Wilton Candy Melts for my projects.
You can find Wilton Candy Melts at most craft stores, at discount stores like Walmart, and at some grocery stores. You can also find Ghirardelli Melting Wafers and CandiQuik (or other brands of almond bark) at many grocery stores.
 Wilton Red Candy Melts® Ca...Shop on Amazon
  Merkens Super White 1 lb Ba...Shop on Amazon
  Light Blue Vanilla Flavored...Shop on Amazon
 ") Log House CandiQuik Candy C...Shop on Amazon
Log House CandiQuik Candy C...Shop on Amazon Store chocolates in a cool, dry place away from direct sunlight. Pure chocolates have a shelf life of at least 18 months from the date of manufacturing, and confectionery coating can last up to 12 months if stored properly.
Once you open the package, seal it well or place the chocolate in an airtight container.
I don't suggest refrigerating or freezing chocolate.
If chocolate or confectionery coating is kept in the refrigerator or freezer for too long, it will become wet and sticky and might develop white spots.
If you do freeze or refrigerate your chocolates, you need to wrap them well and keep them wrapped as they thaw to avoid excessive condensation.
Learn how to melt chocolate.
First, you need to get your chocolate into small uniform-size pieces.
How to chop chocolate?
- If you are using a large block of chocolate or a candy bar, chop your chocolate into small, uniform pieces. The best way to do this is to use a serrated knife to shave off small bits of chocolate.
- Place the knife blade on the edge of the chocolate block, and press down on the top of the knife while shaving off a small amount of chocolate. Then just chop any larger bits before using.
- You can also use a food processor to chop your chocolate. Add small chunks of chocolate to the bowl of the food processor and pulse until you have fine crumbs
- You can also grate the chocolate using a grating wheel in your food processor.
Melting chocolate in a double boiler.
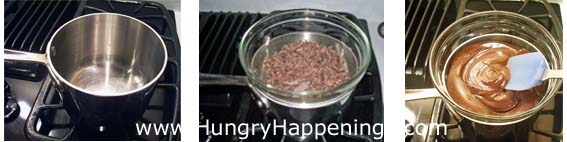
- Heat 1” of water over low heat in a saucepan.
- Place a bowl over the saucepan, being sure the bottom doesn't touch the water.
- Put chopped chocolate, wafers, or chips in the bowl and stir occasionally until melted.
- This process is slow. Do not raise the temperature to speed things up. If you do, you can burn your chocolate.
It is very important that you do not allow any water to come in contact with the chocolate. Chocolate mixed with a drop or a few drops of water will seize (stiffen or harden).
If this happens, your only option is to add more liquid in order to get the chocolate smooth again. However, you can not use this thinned batch of chocolate for tempering or dipping as it will never harden properly.
All is not lost, as you can turn it into a delicious chocolate ganache or use it for baking.
Melting chocolate in the microwave.
Every microwave is different, so this is just a guideline, but it is safest to go slow and stir often. I always use high power for short bursts of time.
The amount of time needed to melt your chocolate will depend on how much chocolate you need to melt. The instructions below are based on 16 ounces of chocolate or confectionery coating wafers.
- Pour finely chopped chocolate, Candy Melt wafers, chocolate callets, or chocolate chips into a microwave-safe bowl.
- Heat on high power for 30 seconds, remove from the microwave, and stir. Your chocolate won't look melted much at all at this point, but if you don't stir it, you may burn the chocolate in the center of the bowl.
- Return to the microwave and heat for 30 seconds. At this point, the chocolate will look only slightly melted around the edges.
- Continue to stir, and the chunks will indeed start to become liquid.
- Continue to heat for 30 seconds. Now your chocolate will look more liquid, but you will have chunks remaining.
- Allow the chocolate to sit for 1-2 minutes, preferably in the microwave, then stir vigorously, and the heat from the melted chocolate will melt the chunks.
- If, after stirring for a while, you still have chunks of chocolate remaining, heat for 10-15 second intervals, stirring in between each until melted.
- Do not rush this process. Chocolate burns easily. If you do burn the chocolate, throw it away and start over in a clean bowl. To melt more than 16 ounces, you can increase your times by 10-15 seconds per interval. For 2 lbs. (45 seconds, 35, 25, 10). For 3 lbs. (60 seconds, 45, 30, 20). If your microwave is less powerful, increase the time, but go slowly.
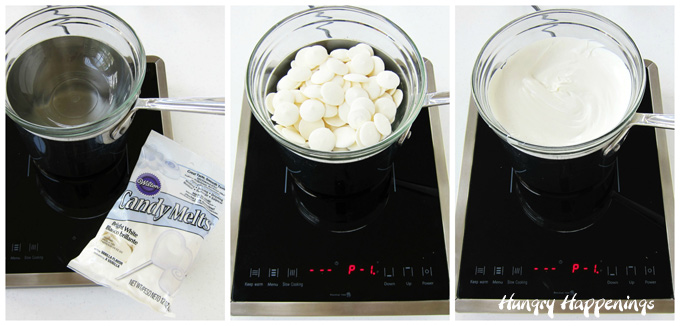
Melting candy melts in a melting pot.
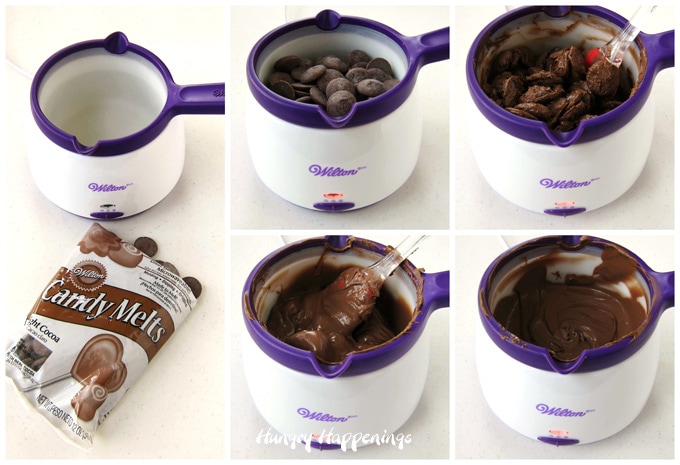
- Fill the silicone bowl in a Wilton Melting Pot with candy melts.
- Turn on low heat.
- Stir often, until the chocolate melts.
- If you use the high heat setting to melt the chocolate, be sure to stir it more frequently, then turn it down to low once the chocolate is melted.
- You can keep compound chocolate (candy melts) melted for hours using a melter.
Melting candy melts using an electric skillet.
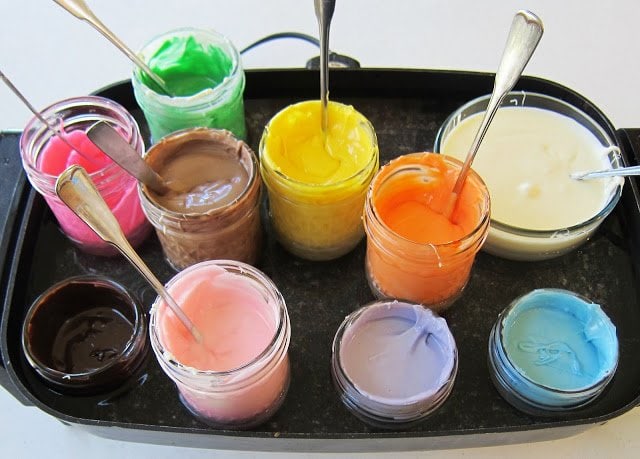
- Fill glass jars or coffee mugs with candy melts wafers.
- Set the jars into an electric skillet.
- Fill the skillet with an inch or two of hot water.
- Turn the skillet to the lowest setting. My skillet has a warm setting, which works great.
- Allow the water to warm up and the candy melts to melt, stirring often.
- You can also melt the candy melts using the microwave, then place the jars in the water bath in the skillet to keep them melted all day. Be sure to replenish the water as it evaporates.
How to Temper Pure Chocolate?
Pure chocolate contains cocoa butter, and when melted, the crystals in the cocoa butter lose their structure. In order to get that crystal structure back in alignment, you have to heat and cool the chocolate properly so that the chocolate sets up properly.
Any chocolate that you purchase from the store that contains cocoa butter is already in temper, but once you melt it, it can go out of temper if it gets too hot.
What does tempering mean?
Tempering refers to a process of heating and cooling pure chocolate to ensure that the cocoa butter in the chocolate hardens in a uniform crystal structure. When you buy pure chocolate, it is in temper. When you melt the chocolate to reuse it, you take it out of temper and need to bring it back.
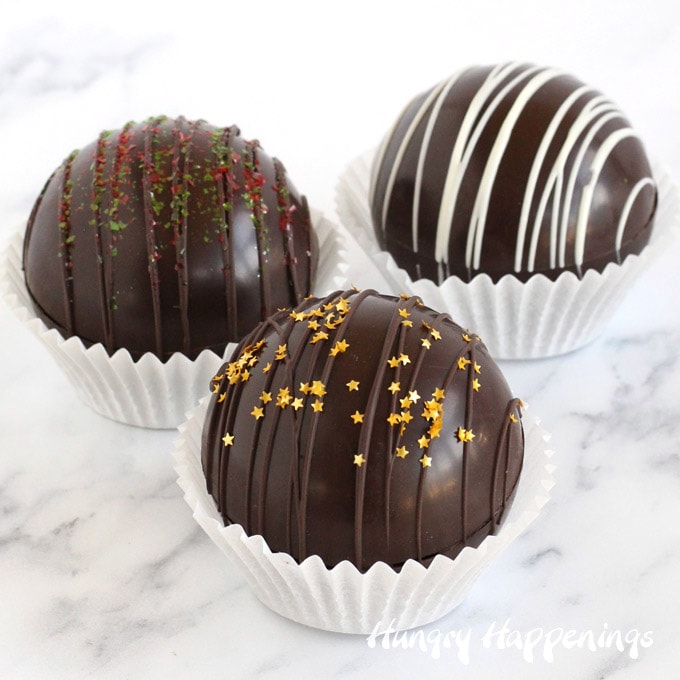
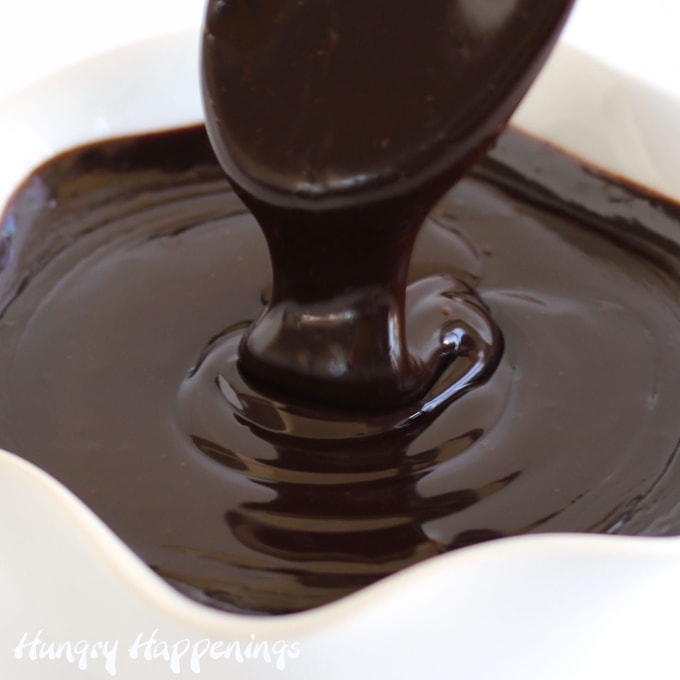
Chocolate that is tempered has:
- a smooth texture
- a glossy shine (like the hot chocolate bombs pictured above)
- snaps when broken
Chocolate that is not tempered correctly might be:
- cloudy
- gray
- sticky
- soft
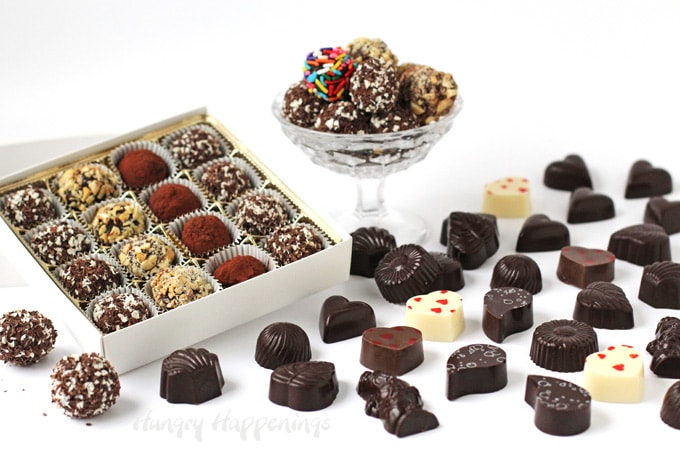
Learn to make these gorgeous truffles in my Chocolate Making Course
Easy Microwave Chocolate Tempering
If you are very careful, you can melt pure chocolate without taking it out of temper.
- Finely chop or grate your chocolate and place it in a microwave-safe bowl.
- Heat on high for 15 seconds, then remove the bowl and stir. Note: if using more than 12 ounces, you can start by heating it for 30 seconds.
- Then heat on high for 10 to 15-second increments, stirring after each, until melted. As you get close to melting, cut the heat to 50% power or the time to 5 seconds.
- When using this tempering method, you want to be very careful not to get your chocolate too hot. You want the melted chocolate to be between:
- 88° F - 91° F (31° C - 32° C) for Dark Chocolate
- 86° F - 88° (30° C - 31° C) for Milk Chocolate
- 84° F - 86° (29° C - 30° C) for White Chocolate
- If the temperature of your chocolate goes above these numbers and you still have pieces of chocolate remaining in the bowl, continue to stir and allow that chocolate to melt. Check the temperature once all of the chocolate melts. If it is within the ranges listed above, your chocolate should be in temper.
- If the temperature of the melted chocolate is above the range, then you must use another method to temper the chocolate. I recommend the seeding method listed below.
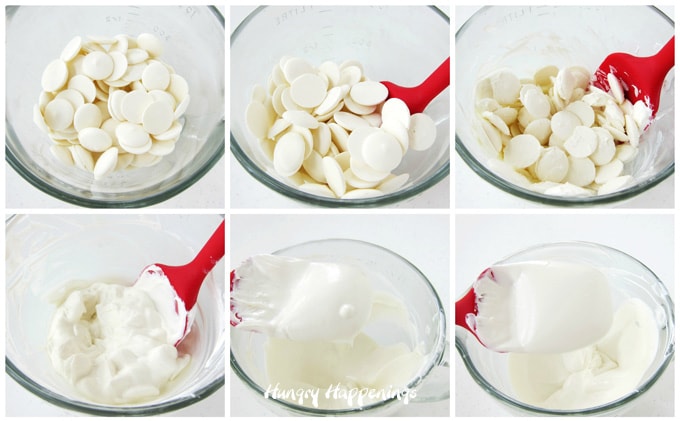
Seeding Method of Tempering Chocolate
- Chop your chocolate into really fine pieces.
- Divide the chocolate and reserve 25% (¼) of it to seed the melted chocolate.
- Heat 74% (¾) of the chopped chocolate in the microwave on high power for 15 to 30-second increments, stirring after each.
- The heat in the bowl of melted chocolate will continue to help melt the solid pieces, so as you get close to having all your chocolate melted, allow the chocolate to rest in the bowl for a minute before stirring.
- Heat until the chocolate melts and reaches:
- 115°-120° F (46°-49° C) for dark chocolate
- 110°-115° degrees F (43°-46° C) for milk chocolate
- 110° F (43° C) for white chocolate
- Add about half of the reserved chocolate to the melted chocolate and stir until melted.
- Check the temperature of the chocolate. The goal is to get the chocolate to:
- 88° F - 90° F (31° C - 32° C) for Dark Chocolate
- 86° F - 88° (30° C - 31° C) for Milk Chocolate
- 84° F - 86° (29° C - 30° C) for White Chocolate
- Note that these temperatures can vary depending on the brand of chocolate.
- Continue to add a small amount of the remaining chocolate into the melted chocolate and stir until either all of the chocolate melts or your chocolate reaches the desired temperature.
- It’s best to stop at the upper end of the temperature range because the chocolate will continue to cool slightly as you are checking the temper.
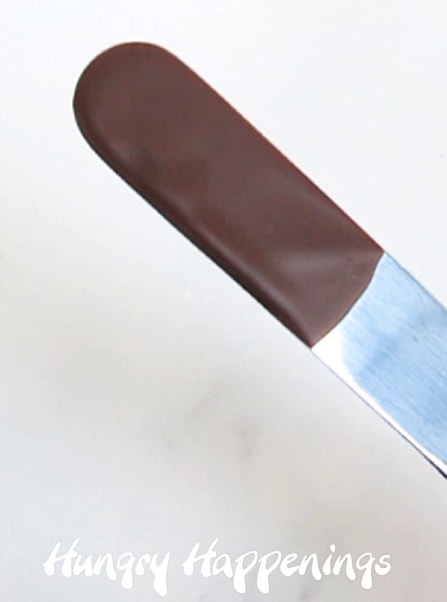
- To check the temper, dip the end of a metal spatula or knife into the chocolate and allow all the excess chocolate to drip off. You want a really thin coating of chocolate on the spatula. If the chocolate dries hard and looks shiny within 3-5 minutes, then the chocolate is in temper.
VIDEO
Watch the video to see how to temper chocolate using the seeding method.
How to know if chocolate is in temper?
- Test the temper of the chocolate by dipping a metal spatula, spoon, or knife into the chocolate.
- Shake it, to remove the excess chocolate, then set it aside at room temperature.
- In 3-5 minutes, the chocolate should harden and look shiny.
- Alternatively, you can spread a small amount of chocolate on a piece of parchment paper and allow it to air dry for 3-5 minutes. It should peel off the paper and snap when broken.
- While you are waiting, be sure to stir your bowl of chocolate to make sure it doesn't cool too much around the edge.
- If your test chocolate has hardened and looks shiny, be sure to check the temperature of your bowl of chocolate before proceeding to make your chocolate balls.
- The chocolate will have cooled slightly and will need to be warmed slightly!
- Heat it in the microwave for about 5 seconds, then remove, stir, and check the temperature. Do not let it go above the temper temperature (88° milk or 84° white). If it does, you have to start this whole process over again.
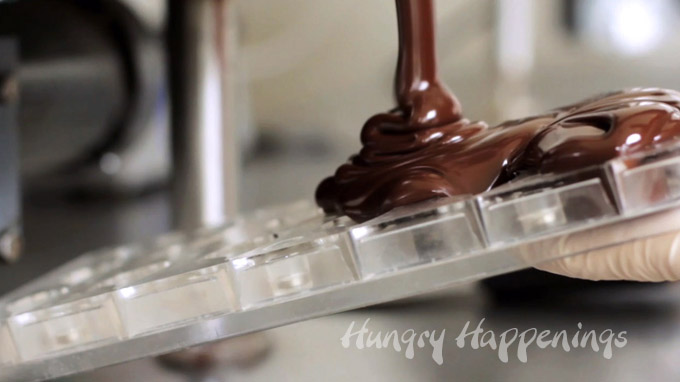
- You are now ready to fill your molds with chocolate.
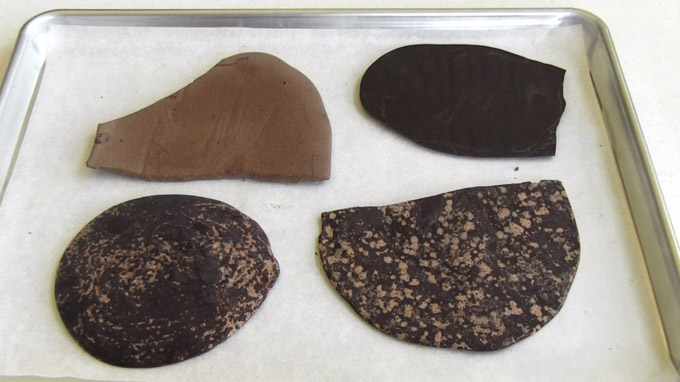
Can I skip tempering pure chocolate?
- NO. Do not skip tempering pure chocolate!
- Chocolate that is not tempered properly will be soft, streaky, spotty, or even chalky. The chocolate that is pictured above is all out of temper.
- Chocolate that is not properly tempered will not harden and retract from a mold.
How to keep chocolate in temper?
- To keep the chocolate in temper, you can heat the chocolate in the microwave for 3-5 seconds, which is just long enough to warm it slightly.
- Or you can use a hot blow dryer to heat up the bowl of chocolate by blowing the hot air on the outside of the bowl.
- Keep an eye on the temperature of the chocolate. You don't want it to go above the temperatures listed above. If it does, then you'll need to start the tempering process again by raising the temperature to 115° F (46° C), seeing it with more tempered chocolate, and lowering the temperature to those listed above.
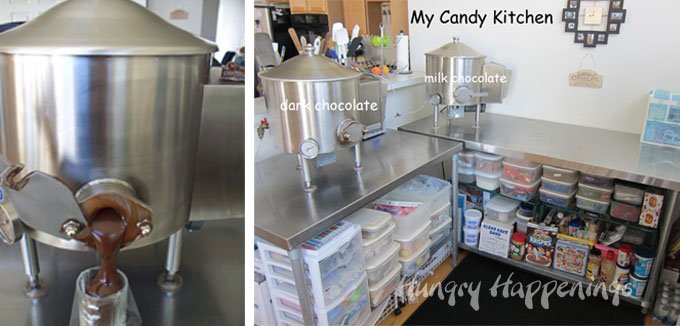
Chocolate Tempering Machines
If you are serious about making a lot of chocolate, you might want to consider buying some chocolate tempering machines.
I own two Savage Brothers melters and love them. I don't have to hand temper my chocolates. The machines do the work for me. It's great. I leave melted chocolate in my machines 365 days a year. I temper it as needed.
Each of my machines holds 50 pounds of chocolate, which is the smallest Savage Bros. makes, but other companies make smaller tabletop tempering machines. You can even get a machine that will temper just one or two pounds of chocolate at a time.
 ChocoVision Revolation Delt...Shop on Amazon
 ") ChocoVision Revolation 2 Ch...Shop on Amazon
ChocoVision Revolation 2 Ch...Shop on Amazon  HILLIARD'S Chocolate Temper...Shop on Amazon
  ChocoVision Mini Rev Chocol...Shop on Amazon
I prefer to use pure (real) chocolate to make my confections because the flavor is far superior to any other chocolate product.
I have made some really fun holiday treats using pure chocolate and shared the recipes and tutorials here on Hungry Happenings.
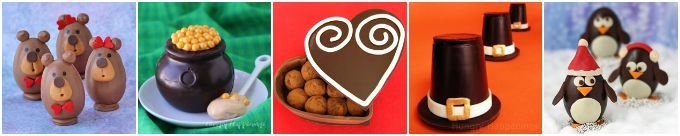
Using pure chocolate, you can make:
Buckeye Bears • Chocolate Cauldrons • Chocolate Heart Boxes • Chocolate Pilgrim Hats • Chocolate Penguin Truffles
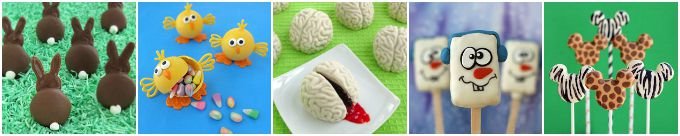
Using Confectionery Coating, you can make lollipops, cake pops, filled candies, dipped cookies, Rice Krispie treats, and more, including:
Chocolate Bunny Silhouettes, Candy Filled Chicks, Cake Ball Brains, Snowman Rice Krispies Treats, Animal Print Mickey Pops

If you prefer learning via video, then be sure to check out my
Chocolate Making Courses at The Sugar Academy
Save 20% off using coupon code HUNGRYBLOG20
The videos feature 3 ½ hours of instructions and are broken down into 3 separate courses or one full-length bundle.
Can I use chocolate chips to make homemade chocolate?
Yes, but you need to know how to use them properly.
- Chocolate Chips can be pure chocolate or compound chocolate. You need to look at the ingredients to determine the type of chocolate.
- Pure chocolate chips will have cocoa butter listed in the ingredients and will need to be tempered.
- Most dark and milk chocolate chips are pure chocolate, but many white chocolate chips, like Nestle Premier White Morsels, are not; they are compound chocolates.
Chocolate Chips are:
- made to keep their shape in high heat
- melt very slowly
- have to be tempered if they contain cocoa butter
- come in semi-sweet, bittersweet, milk, white, peanut butter, butterscotch, and more flavors
- can be used as decoration on edible crafts
Should I add wax to chocolate chips when making homemade chocolate?
NO!
It is common practice in old candy-making recipes to add paraffin (wax) to melted chocolate chips so that the chocolate will set up properly. I don't advise this, as it adds a terrible mouthfeel and taste to the finished chocolates. Plus, who wants to eat wax? Not me.
If you use chocolate chips to make candies, you have to temper the chocolate in order for it to set properly. If you don't want to go through that much effort, then you are better off using confectionery coatings to make your candies.

You can use variations of chocolate chips and peanut butter chips to make sweet treats, including:
Peanut Butter Starfish, Mini Pumpkin Cheesecake, Polar Bear Ice Cream Cones, Chocolate Chip Cookie Serving Bowl, Happy Chocolate Chip Cookies
Troubleshooting Tips
When making homemade chocolate, things can go wrong. Let's talk about how to fix the problems.
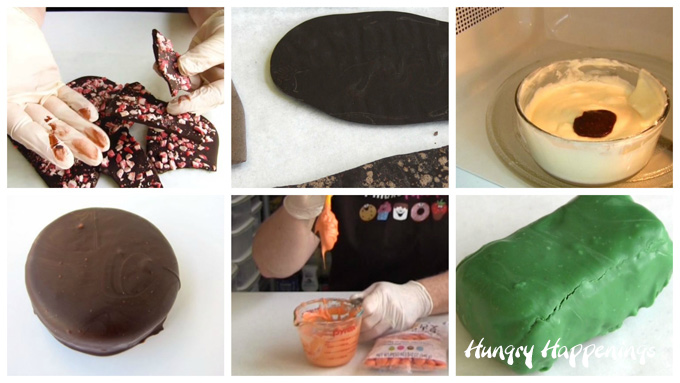
my chocolate is too soft, and it melts too easily
- If your chocolate is too soft, like the peppermint bark shown above, it is not in temper. You must temper pure chocolate so that it hardens properly and has a good snap when broken.
- See the tempering instructions above.
my chocolate pieces have white spots or streaks
- Chocolate that has not been tempered properly or that has not been stored properly will develop white streaks and spots (fat bloom or sugar bloom). These spots are actually cocoa butter crystals that have separated from the cocoa solids.
- White spots and streaks in untempered chocolate may appear hours or days after your chocolate sets.
- See the tempering instructions above.
my chocolate is burnt
- If you overheat your chocolate in the microwave or on the stove, it will burn.
- You cannot salvage burnt chocolate. It is ruined.
- Even if only a small portion of the chocolate looks like it, like in the image above, the entire bowl of chocolate will taste burnt. Throw it all away, and start over.
- That's why I suggest using short bursts of power, stirring after each, when melting chocolate or candy melts in the microwave.
my chocolate is sticky and wet
- Chocolates that have been stored in the freezer or refrigerator will develop condensation (beads of water).
- To ensure your chocolate candies do not become sticky, store them at room temperature.
- If you do refrigerate or freeze your chocolate candies, wrap them well in plastic wrap, wax paper, or tin foil, then place them in a zip-top bag or airtight container. Thaw at room temperature in the packaging for several hours before unwrapping.
- If you are making homemade chocolates and they are left in the freezer or refrigerator for too long, they can become sticky, too. So, be sure to remove your chocolate as soon as it hardens.
my melted candy melts are too thick
Compound chocolates (candy melts) can become thick for several reasons:
- they are heated to too high a temperature
- they have been stored improperly (in moist, damp areas, in direct sunlight, near a heat vent, in the refrigerator or freezer)
- they are old (the older they get, the thicker they get)
- they have gone through drastic temperature changes (from hot to cold or cold to hot)
- they are exposed to moisture (even one drop of water or condensation can thicken your candy melts or chocolate)
To thin out thick candy melts:
- If once melted, your confectionery coating is really thick, add Paramount Crystals or Wilton Easy Thin, which are flakes of palm kernel oil, to thin out the coating.
- Simply add a small pinch of the flakes and stir. If the candy melts are not thin enough, then add another small amount of the crystals and stir.
- You can use Crisco or vegetable oil instead, but your candy coating may be a bit soft once hardened.
You can thin pure chocolate or chocolate chips by adding some cocoa butter.
 Wilton EZ Thin Dipping Aid ...Shop on Amazon
  CK Products Paramount Cryst...Shop on Amazon
  SAAQIN Raw Cocoa Butter - 1...Shop on Amazon
 my chocolate is cracked
- Chocolate will crack when it's too cold.
- If you dip something into the chocolate and it's cold, the chocolate coating can crack. So be sure anything you dip in chocolate, like cake balls or chocolate truffles, is at room temperature.
- If you are chilling compound chocolates (candy melts) in the freezer, be sure to remove the candy as soon as it has hardened. If candies are frozen for too long, they will crack.
BE SURE TO CHECK OUT THESE OTHER CHOCOLATE-MAKING TIPS TUTORIALS.
- How to Color White Chocolate or Confectionery Coating
- How to Use Colored White Chocolate to Paint Candy Molds to make Lollipops and more
- How to make Modeling Chocolate (chocolate clay) - Modeling Chocolate Recipe
- How to fix greasy, oily, dry, crumbly, or soft modeling chocolate (candy clay)
- How to roll out modeling chocolate
- How to Cut Modeling Chocolate
- How to make Hot Chocolate Bombs
- How to make Chocolate Truffles
Learn more at The Sugar Academy
Save 20% off the chocolate-making courses at The Sugar Academy using the coupon code HUNGRYBLOG20
Now that you know the chocolate-making basics, you are ready to learn more.

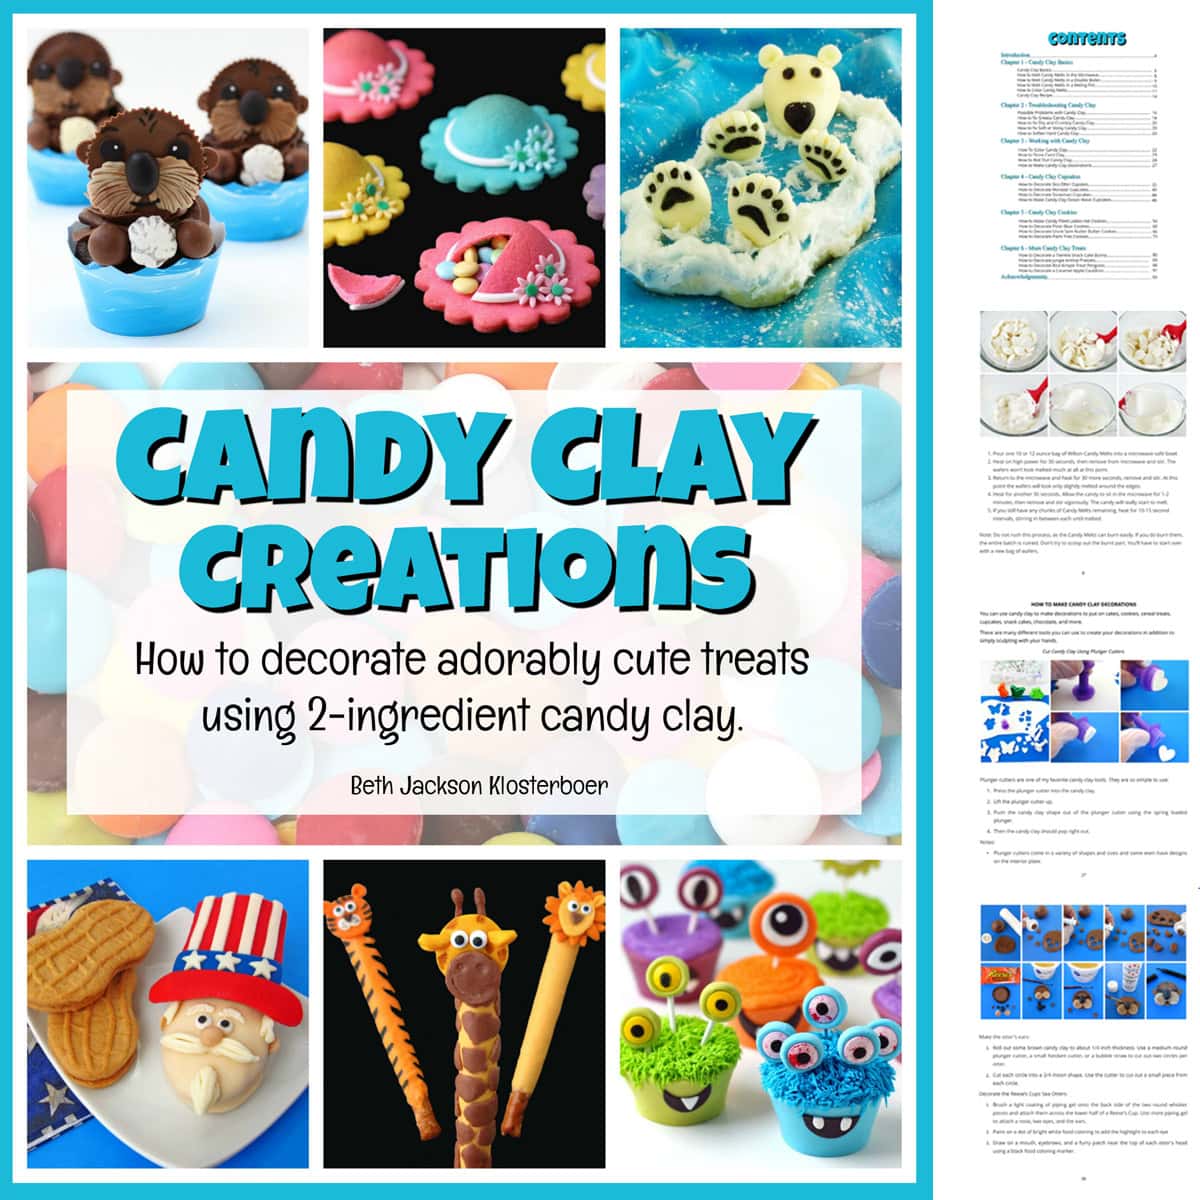
Candy Clay Creations
If you want to learn all about making modeling chocolate (candy clay) be sure to also check out my book, Candy Clay Creations.

- Banana Split Bars – A Fun and Easy Summer Dessert - March 4, 2026
- Pineapple Fudge (No Candy Thermometer Needed!) - March 4, 2026
- No-Bake Peanut Butter Pie Recipe - March 3, 2026
Curious says
Thank you for your timely responses! I find that to be as impressive as your fantastic chocolate creations. I plan on trying it tomorrow. If all goes well I will send them in a care package to our church's college kids.
Beth Jackson Klosterboer says
I was thinking back to a bark I used to make - I spread dark chocolate in a thin layer, sprinkled on some coffee, then drizzled on some milk chocolate. It looked pretty and the coffee lovers really enjoyed it. Just be sure to package it separately as it will be very aromatic.
Curious says
I am playing with candy melts and chocolate chips. I really want to infuse coffee into my chocolate. I don't want to use coffee grounds or add a ganache to the center. I was thinking of adding instant coffee grounds to melted shortening, then adding the shortening to the melted chocolate. Is this a feasible idea or would this leave the chocolate to soft to harden properly?
Beth Jackson Klosterboer says
You wont be able to add shortening to the chocolate, but you can just stir in the coffee grounds. Make sure you use really good quality coffee. I have done that before with a lot of success.
Curious says
I was looking at the pictures of your favorite creations. I love your packaging! Is the egg also chocolate? If so how did you get the two hollow halves to fit so perfectly?
Beth Jackson Klosterboer says
Hi, Yes the egg is chocolate decorated with luster dust. I use plastic molds that were made to create sugar eggs and the two halves line up perfectly. I bought the plastic eggs years ago.
Anonymous says
Thanks so much for your help Beth! How do you attach the design to the cookie after it dries on the paper? Thanks again!
Nina
Beth Jackson Klosterboer says
Just pipe a bit of melted chocolate onto the cookie and press the design down onto the cookie.
Anonymous says
Hello 🙂 I was wondering if I could decorate sugar cookies using melted chocolate instead of icing? I love you tutorials and use them often.
Nina
Beth Jackson Klosterboer says
Hi Nina,
Yes, you can decorate with melted chocolate. You can pipe on designs, just be aware that it is a bit more challenging to pipe than icing as it will run a bit more. One suggestion would be to pipe your design onto a piece of parchment paper then add the design to your cookies once it has set. I might just do a tutorial on that technique!
Good luck and have fun.
Anonymous says
Sorry it took me a fat min. to get back to you! The baby shower went really well. I made 55 cake pops, and 55 cheesecake pops. The crock pot worked like a charm! Thank you so much for all the tips! I'm not sure I would have had such a good outcome otherwise! If I knew how to post a pic. I'd show off a little...:) Thanks again! Stefanie
Beth Jackson Klosterboer says
So glad to hear it worked and that everything went well 🙂
Anonymous says
hi beth! great article! very helpful!! thanks....
ib been trying to make chocolate bouquets,,, i bought merkens chocolate buttons.... melted them and put them in molds... freezed for a short while just till set and took them out... waited till room temp and then tried to wrap them,,,but they were still slightly melting in my hands...
what can i do abt that? i want to wrap them in colored foils and make a bouquet so i cannot refridgerate them, becuse i need to gift them out. pls help...it would be greatly appreciated. it is happening becus i live in a warm place like panama? if so what can i do? and how to store them till i gift them out?
Beth Jackson Klosterboer says
Hi,
Did you use merkens pure chocolate with cocoa butter in the ingredients or their confectionery coating with hydrogenated oil in the ingredients? If you used the first, it needs to be tempered in order to set up properly. If it isn't tempered then it will always be soft, it will never harden properly. If you used the confectionery coating and it pops out of the mold but later feels soft, it has gotten too warm. The only thing you can do is to cool your room where you are working. It's best if your room is between 65-70 degrees Fahrenheit, but that is a bit chilly for most, so 70-74 degrees would be alright. Anything above that, and you will have trouble with your candied melting. I never suggest refrigerating candies, as they will develop condensation, but if you just can't get your room cool enough, you may need to store them in a refrigerator, just be aware that they will become a bit wet upon removal.
Hermes Strong says
I made rum balls but the chocolate coating kinda melts (sticky) the moment i took them out from fridge. What shall i do?
Beth Jackson Klosterboer says
Hi Hermes,
The reason your chocolate is sticky, is that it probably wasn't tempered correctly. When working with chocolate that has cocoa butter in it, you must work using exact temperatures. You need to melt it and heat it to 100-115 degrees fahrenheit then it needs to be cooled down to 88-91 degrees, depending on the type of chocolate (dark is usually 90-91 and milk and white are 88-90.) There are several different tempering methods and you can do an on-line search to find all sorts of resources regarding tempering chocolate. There are lots of videos too. I have two machines that temper my chocolate for me, that is why I didn't add tempering directions here on this page. I don't feel I'm an expert at it, being my machines do all the work for me. Good luck.
Cheryl says
This is an excellent article on molding chocolate!!! I love it, thank you!
Unknown says
Your post on the modeling chocolate is so sooooo helpful. I made it using dark chocolate and was very excited to use it but somehow ended up not using it and it's been in the fridge for quite a while now. I definitely don't want to use it for any cakes now since its been so long but I thought I could some how use it to just practice roses. It has bloomed a lot sitting in the fridge. It was pretty hard and so I cut it into pieces literally hammering the knife. I tried to soften a couple pieces but they are crumbling big time and oil starts to show through a bit while I try to knead it. Is there a way to recover it at all? Or should just discard it and try making new one again....just didn't want to waste it 🙁
Beth Jackson Klosterboer says
I don't ever refrigerate my modeling chocolate. I just wrap in in plastic wrap or a zip top bag and store it in a Rubbermaid or Tupperware container. Modeling chocolate by nature will harden as it sits and will definitely harden if it's cold. You can certainly use it to practice with, you'll just need to get it to soften up. You can microwave it on DEFROST for a few seconds, then try to knead it. Then into the microwave again for a few seconds on Defrost then try to knead it. You do not want to get it so hot that it really begins to melt, or you'll end up with a greasy mess. You can also put it in a zip top bag and set it in a bowl of room temperature water, not hot or warm water. Try to knead it after a while. You should be able to salvage it, at least to practice with. Taste it, and if it tastes good, and you get get it softened and workable, then by all means use it for a project. Good luck.
Anonymous says
Hi.. i made some chocolate lollipops... It is good. my problem is when i am trying to pack them and put some ribbon... it became greasy.. So what i do... I will put them back on the fridge... so it will set again... What should i do? I need your help... Thank you.
Beth Jackson Klosterboer says
Hi, the problem you are having is that condensation has built up on your lollipops. They were in the freezer for too long, and they get sticky or wet when that happens. There is nothing you can do about this, other than let them sit at room temperature until they completely dry. They will have a bit of a texture once dry, because the beads of condensation will dry but wont really go away. You should only leave your lollipops in the freezer for about 5-10 minutes, until set.
BakerGirl2020 says
I was told if you leave your chocolate wrapped until they come to room temperature, they will sweat less
beth says
Yes, if you buy boxes of chocolate and store them in the refrigerator, it's best to leave them in the box until the chocolates come to room temperature, but if you are making lollipops and they have sweat on them before you package them, this process isn't going to help. I never recommend storing chocolates in the refrigerator or freezer, but do know that people often do.
Anonymous says
Thanks so much with a quick response! I'm doing as much homework as I can before hand! I'm planning a trial run this coming week, I'll let you know how it goes! You really do clean, beautiful work! Again, Thank you! -Stefanie
Beth Jackson Klosterboer says
Thank you! I hope it all works out for you and that you have fun with your project.
Anonymous says
Could I use my crock pot in place of the skillet? I'm going to be dunking about 100-150 cake pops and cheesecake pops, but I don't have an electric skillet. Thanks- Stefanie
Beth Jackson Klosterboer says
Hi Stefanie, as long as you fill the crock pot with water then set jars or bowls of candy coating in the water, it should work. Crock pots are usually quite a bit taller than a skillet, so it will be more challenging to work with, but I do think it will work. Let me know how it turns out. God luck with your cake pops.
Anonymous says
Love all the tips AND the pictures - will be coming back here to read more when I have some free time! Tara Lidell
Beth Jackson Klosterboer says
Hi Tara,
I have successfully used honey, dulce de leche, and rootbeer flavored ice cream toppers. Here are the links the recipe posts:
https://hungryhappenings.com/2011/05/how-to-create-school-books-using-corn.html
https://hungryhappenings.com/2011/06/celebrate-end-of-school-year-by-making.html
Marina Favalaro says
Thank you for sharing all your awesome knowledge. I will most definitely be tring the skillet idea once I steal the electric skillet frommy mom..lol
Anonymous says
Thank You so much. I have tryed the candy molds last year and said never again because of the work involved in keeping it warm enough to work with. Water in the skillet is a great idea. I will be trying that idea out. thanks again
Beth Jackson Klosterboer says
I've made tens of thousands of painted chocolate pieces in my lifetime and have been using the skillet the whole time. I can't imagine making them without it. It's worth the $20 investment.
Anonymous says
Thank you very much for all this information, pictures and helpful tips. Love this!!
Just brilliant!
Disa from Iceland.
Anonymous says
This is so helpful. Thank you for sharing your knowledge and also for providing an alternative recipe for people in England who don't have corn syrup. Your troubleshooting section is excellent. Thanks again
Beth Jackson Klosterboer says
I'm so happy it helped!
Rachel says
I cannot find the alternative to corn syrup. Could you point it out or post here to tell me? Thanks!
Chantelle says
In the UK we use Liquid Glucose, if that helps.
Beth Jackson Klosterboer says
Thanks for the information, Chantelle.
Anonymous says
You can get Karo corn syrup in the UK from Waitrose and Ocado.
Nikki says
I usually get by when working chocolate into my projects. I've never really thought about what the differences were in products, I just follow the recipes I find. Thank you for explaining all of the chocolates! I now understand why I've had difficultly sometimes. This is a great resource that Im going to share with friends 🙂