Dress up a PVC and chicken wire frame for Halloween. It's easy to create a human body frame using PVC and chicken wire to create a creepy Zombie prop for your front porch.
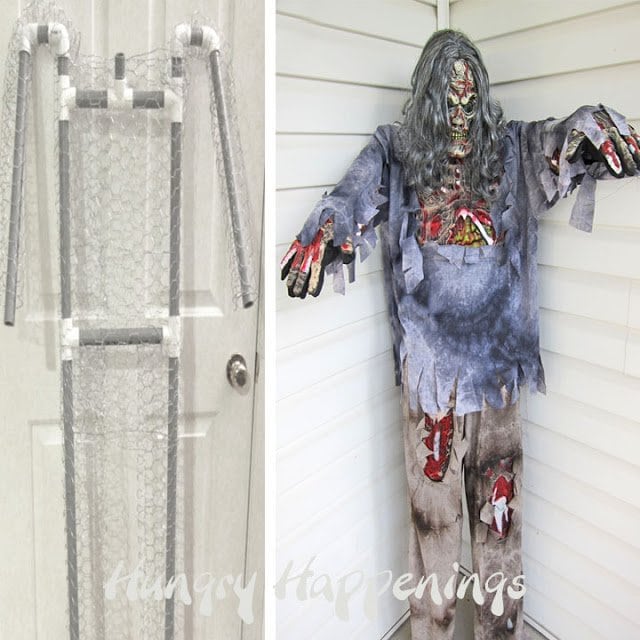
Today I'm going to stray from my usual tutorial on creating fun holiday food and instead share with you how we built this zombie using PVC pipe, chicken wire, a costume, a mask, and a styrofoam head.
Purchasing full-size Halloween props can get very expensive, so we try to reduce those costs by doing some DIY projects each year.
Once you have finished reading this tutorial, you can check out all of our other cool zombie-themed decorations on my Zombie Party Post. We created boarded-up windows with zombies crashing through them for our dining room, created a creepy graveyard in our front yard, and more.
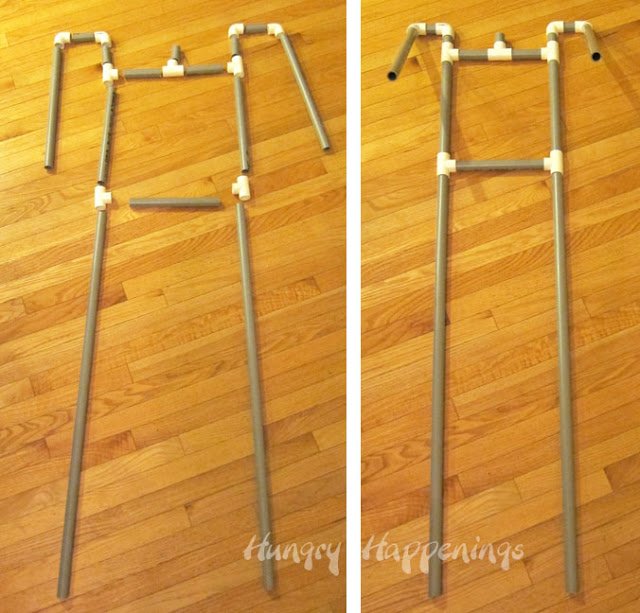
Create a PVC frame.
Before you cut your PVC pieces, be sure the costume you are using works for this size figure.
We held up the pant legs and then cut our pipes to fit the pants. Then we determined how tall the torso should be and cut those pieces.
Our costume had short arms, so we cut accordingly. Use the measurements below as a guide.
PVC pieces needed:
We used all ¾ inch wide PVC pipe, and these are the sizes we cut:
- 2 - 41" (that means 41 inches) PVC pipe
- 1 - 10 ¼" PVC pipe
- 2 - 12 ¾" PVC pipe
- 2 - 4 ½" PVC pipe
- 4 - 2 ¼" PVC pipe
- 1 - 2" PVC pipe
- 2 - 17" PVC pipe
- 4 - PVC elbows (curved pieces)
- 5 - PVC T's (T-shaped pieces)
Other Supplies needed:
- chicken wire*
- costume
- styrofoam head
- mask
- optional, eyes of some kind to fill in the eye holes in the mask
- optional, steel rebar**
*Chicken wire helps to build out the shape of your human frame, but you can also just wrap the frame with bubble wrap.
You can make the arms and legs using pool noodles or just leave it a PVC frame if you want a really skinny zombie.
**If you want to use this Halloween prop outside, put rebar in the ground then set the pipe over the top of the rebar to hold it firmly in place.
You can find costumes, PVC, and chicken wire from Amazon. I earn a small commission (at no extra cost to you) when you use the links below.
 Fun World Complete 3D Zombi...Shop on Amazon
  California Costumes Men's R...Shop on Amazon
  FunWorld Young Men's Teen S...Shop on Amazon
  BSTWM Chicken Wire Net for ...Shop on Amazon
 ") PVC Cutter, Cuts up to 2-1/...Shop on Amazon
PVC Cutter, Cuts up to 2-1/...Shop on Amazon ") CHARLOTTE PIPE ¾ SCH 40 T...Shop on Amazon
CHARLOTTE PIPE ¾ SCH 40 T...Shop on Amazon  Spears 406 Series PVC Pipe ...Shop on Amazon
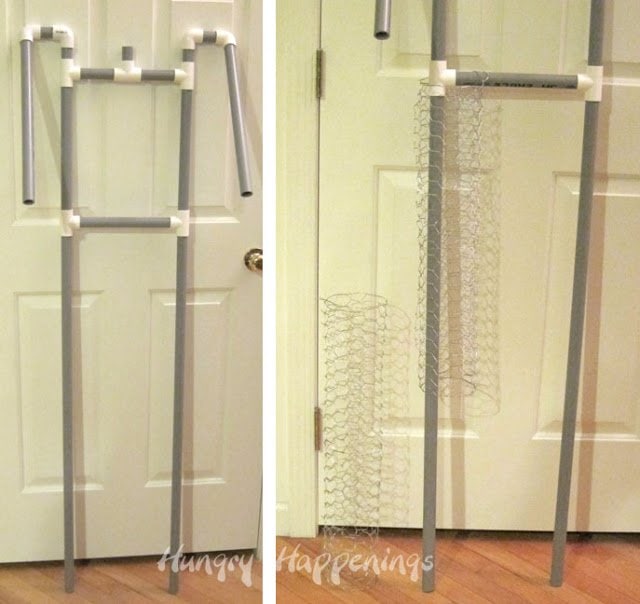
Assembling the human frame
- Cut and attach all of the PVC pieces together as shown in the picture above.
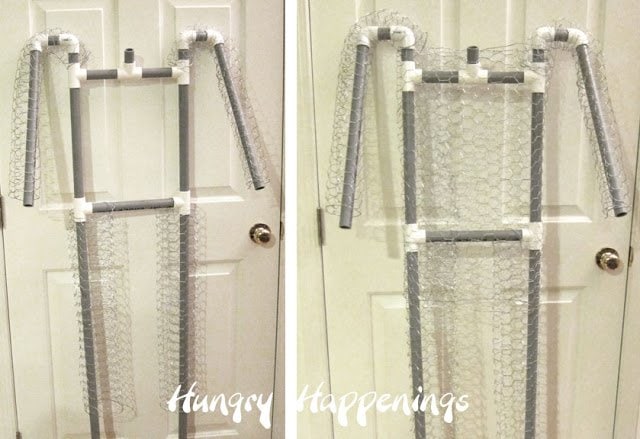
- Use the chicken wire to create a structure for your PVC-framed body.
- Create two legs using "tubes" of chicken wire, then attach the wire to the PVC frame by snipping the wire and wrapping those cut pieces around the frame.
- Make smaller tubes of chicken wire to create the arms and shoulders.
- Just feed the PVC arm into the tube and bring the tube up and around the shoulder pieces of PVC.
- My chicken wire tubes stayed in place after I wrapped it around the shoulder area.
- If yours does not, just cut some wire and attach it to the shoulder.
- Make a large tube and wrap it around the torso area.
- I just fed the neckpiece of PVC around one hole of the chicken wire and it held this in place.
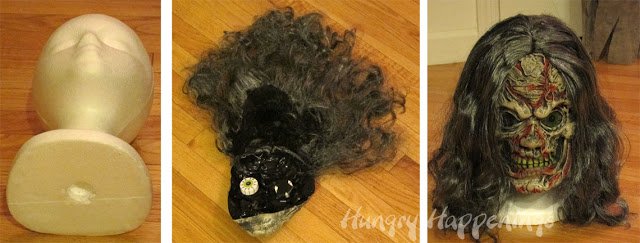
Adding the zombie's head
- Cut a hole in the bottom of a styrofoam head, just big enough for a piece of PVC to go into it.
- Cover the styrofoam head with a mask.
My mask didn't have eyes, so I used some black electrical tape to attach two eyes (actually, the eyes are erasers with eyes printed on them) to the inside of my mask. Then fit the mask onto the styrofoam head.
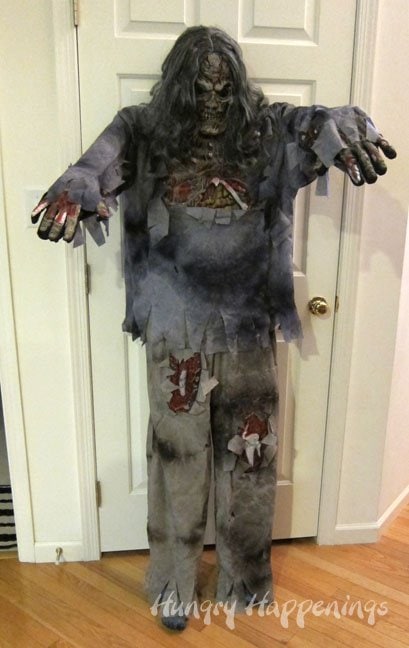
Dressing the PVC frame
- Carefully dress your zombie, add the head, and some feet or shoes.
- You will probably have a difficult time finding both left and right feet for your zombie at a Halloween store. I do not understand why they do not make both! It's a mystery to me. Anyway, I just hid one foot under the costume and let the other foot stick out.
- I did have to pin the costume a bit at the top so that it looked more natural.
- I also pinned the chest piece to the chicken wire underneath it, because at first, it looked too boxy.
- Now I think it looks great, don't you?
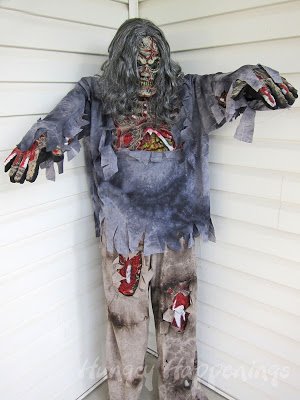
- When we finally decide where he will go, we'll figure out what to do with the feet.
- He'll probably end up in our graveyard outside.
- We'll hammer two pieces of steel rebar into the ground, cut holes in a pair of old shoes, and feed them over the rebar, then feed the PVC leg pieces down over the rebar so that it looks like he's wearing the shoes. I
- love him and am excited to display him at our Halloween party.
NOTE: This human-sized prop does not stand up on its own. You will either need to prop it up next to a wall or use rebar to attach it to the ground.
This post was originally published on September 21, 2012.
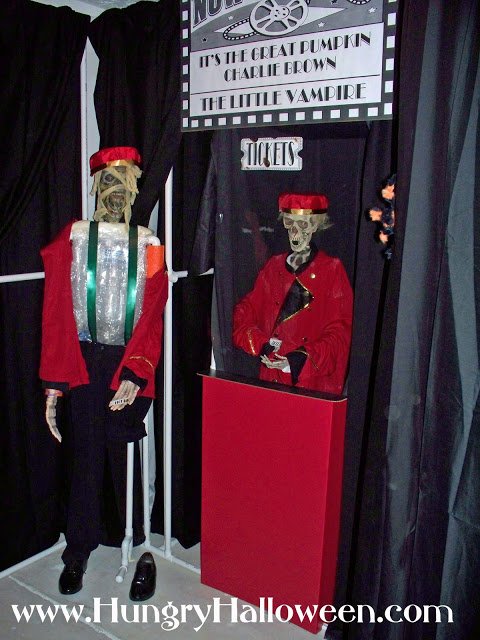
PVC Zombie Ticket Taker and Usher
To make the props stand up on their own, you need to add more PVC fittings to the bottom of the legs, as we did with these zombies.
We used a similar technique to create our zombie movie theater props.
The zombie usher was made with PVC and bubble wrap. The ticket taker was actually a skeleton prop that we purchased. We just dressed him up in a vintage movie theater costume.
See more about these zombie movie props.
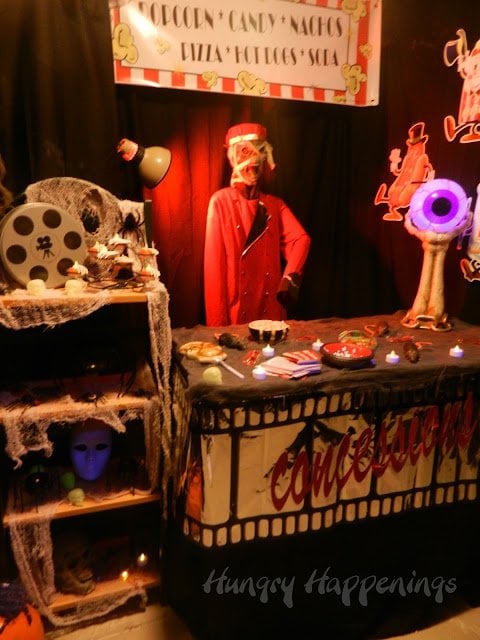
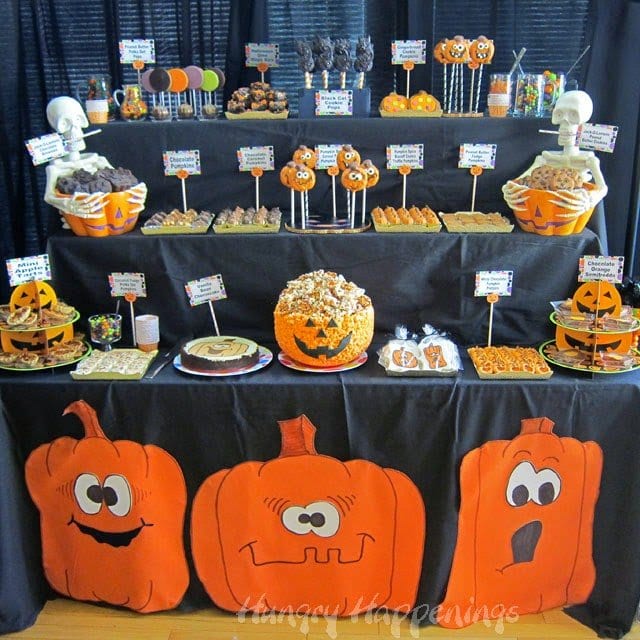
This zombie prop has been used for many of our parties. He's usually an usher, leading our guests into our Catacomb Cinema, but one year we placed him behind the concession stand.
During the party, that table was loaded up with candy, popcorn, and a few creepy snacks.
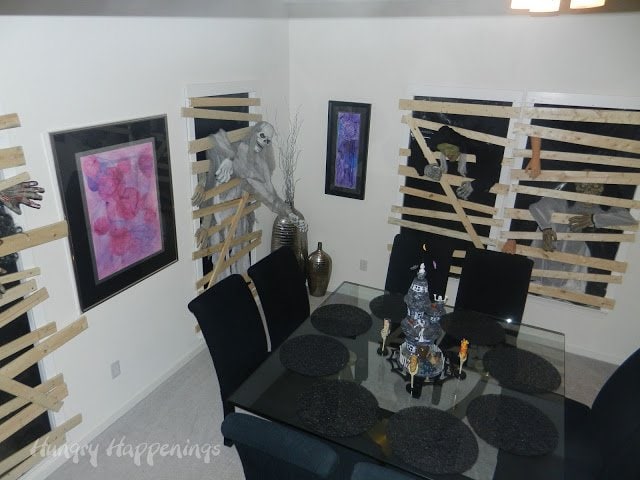
These boarded-up window decorations were our favorite DIY Halloween project ever.
We created frames that fit into our window cavities so the windows were not damaged. The frames fit snuggly, so they stayed in place but were able to be removed after Halloween.
You can see more about our zombie-themed party here.
Zombie-Themed Recipes

If you are hosting a zombie party, don't forget to make some creepy, yet delicious) zombie-themed desserts.
Gumdrop Brains Zombie Popsicles
Peanut Butter and Jelly Brains
Cake Ball Brains Zombie Candy Cups
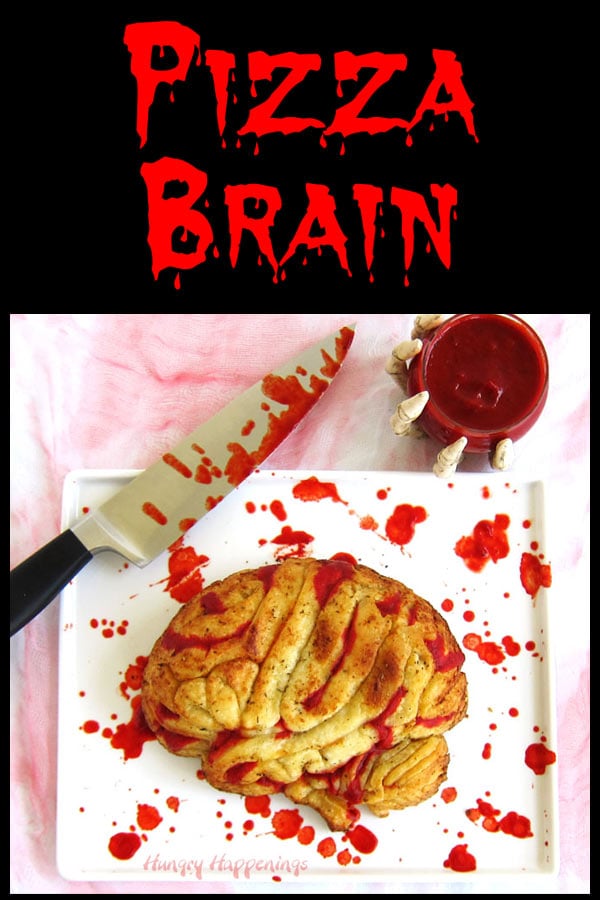
I wish I had thought to make this Stuffed Pizza Brain for our zombie party. Next time! You can make one, though.
Have you made your own Halloween props? If so, let me know what you made in the comments below.

- Banana Split Bars – A Fun and Easy Summer Dessert - March 4, 2026
- Pineapple Fudge (No Candy Thermometer Needed!) - March 4, 2026
- No-Bake Peanut Butter Pie Recipe - March 3, 2026


Fiddlesticks says
That's Awesome....
We have a full size Mummy that we sit out on the front porch every year and he lights up and as soon as someone gets close enough to him he makes a loud scary noise and it never fails to make everyone scream LOL!!!!
Got to Love Halloween :))
dwmarks33@comcast.net
Emily says
Fun! Thanks again for the snack cake party 🙂 Kids LOVED it!!
Khandra Henderson says
I would live to win this giveaway
khandra.henderson@gmail.com
golfdad says
Your zombie turned out great. The chicken wire is a great addition. Thanks for the tips.
golfdad303 [at] g.mail.com
louise says
I get your e-mails
louisepaints {at} hotmail.com
louise says
I used to make all my own costumes by hand and always loved the ones I made for my children including a witch, pumpkin and clown.
louisepaints {at} hotmail.com
Hoa says
Following Hungry Happenings on Pinterest : Hoa Le
alittlepieceofheaven777(at)yahoo(dot)com
Hoa says
Thanks for the giveaway! I was a hamster with my daughter last year.
alittlepieceofheaven777(at)yahoo(dot)com
Anna Geidl says
My favorite costume when I was a kid was Strawberry Shortcake. Even then I was obsessed with desserts. 🙂
juju mama says
So smart! Im doing a grim reaper with an ironing board I can use pvc for the arms. Thanks!
Beth Jackson Klosterboer says
Wow are you using the ironing board to create the body? That is a very clever idea.
Danielle says
Hmm this would be a hard decision but I's love a chance to win!
Danielle summers says
I like HH on FB 🙂
Ella says
I'm following all of your boards on Pinterest.
Ella,
Ella says
I followed Hungry Happenings on Twitter.
Ella,
Ella says
I liked Hungry Happenings on Facebook.
Ella,
Ella says
Hi, I just found your blog yesterday. I love it! You have so many wonderful ideas.
Enter me please! =]
Ella,
Jessica says
I Follow Hungry Happenings on Pinterest
jessicarwarfield at gmail dot com
Jessica says
I Follow Hungry Happenings on Twitter
jessicarwarfield at gmail dot com
Jessica says
I Like Hungry Happenings on Facebook
jessicarwarfield at gmail dot com
Jessica says
I LOVE the baby Ketchup packet costume!
jessicarwarfield at gmail dot com