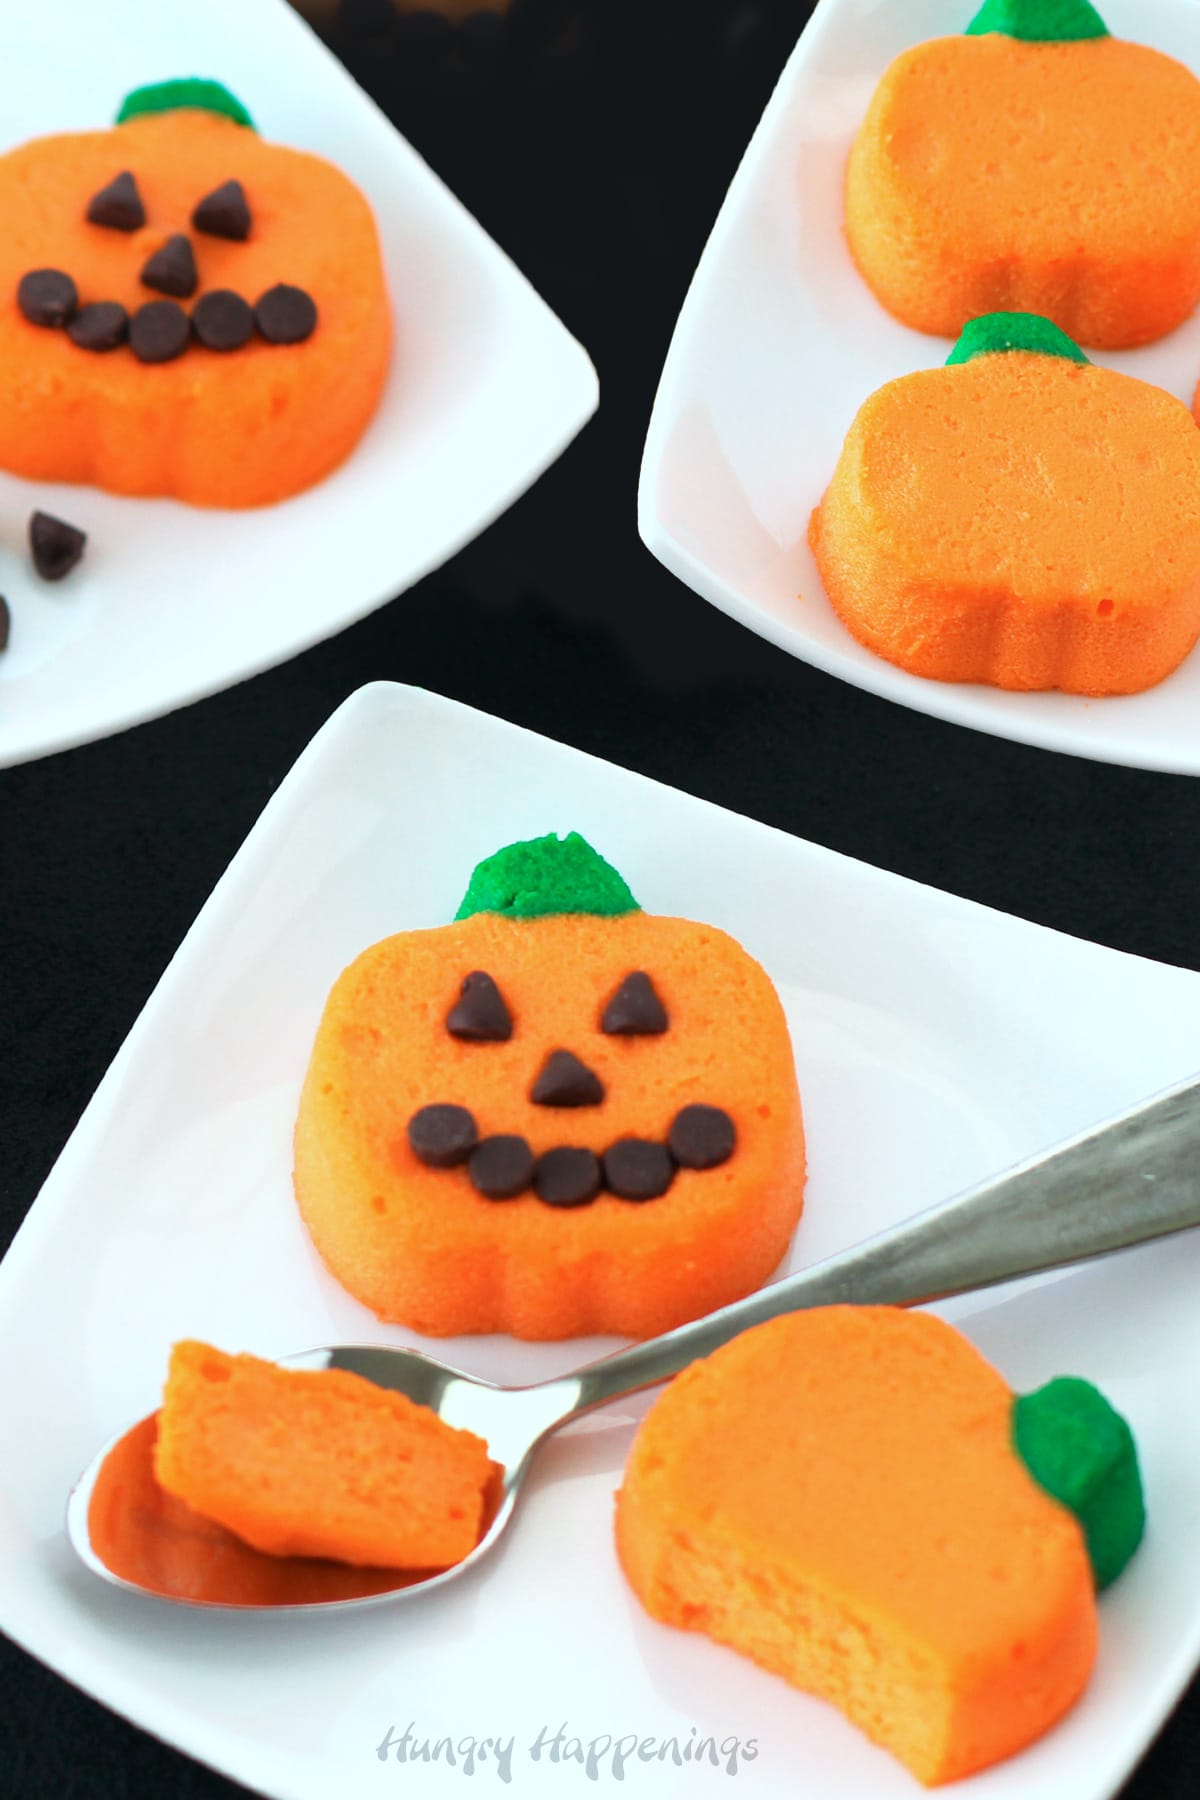
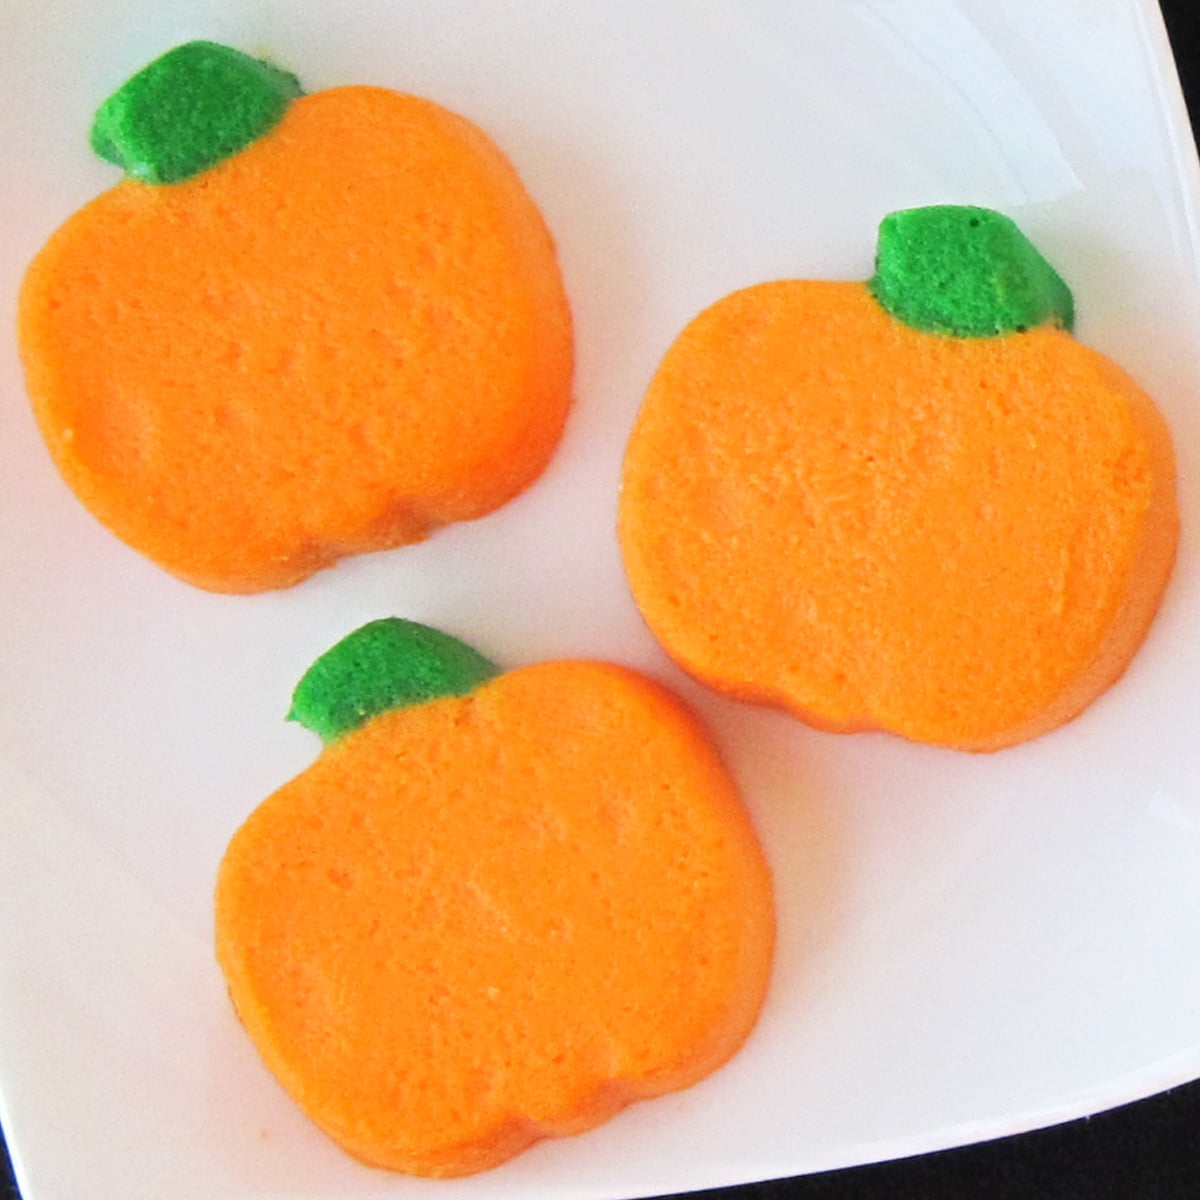
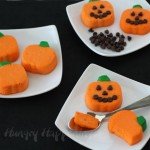
These creamy Mini Cheesecake Pumpkins are a Halloween treat that will have your party guests lighting up with excitement! Each orange-colored bite-sized cheesecake can be served plain or decorated like a Jack-O-Lantern using mini chocolate chips.
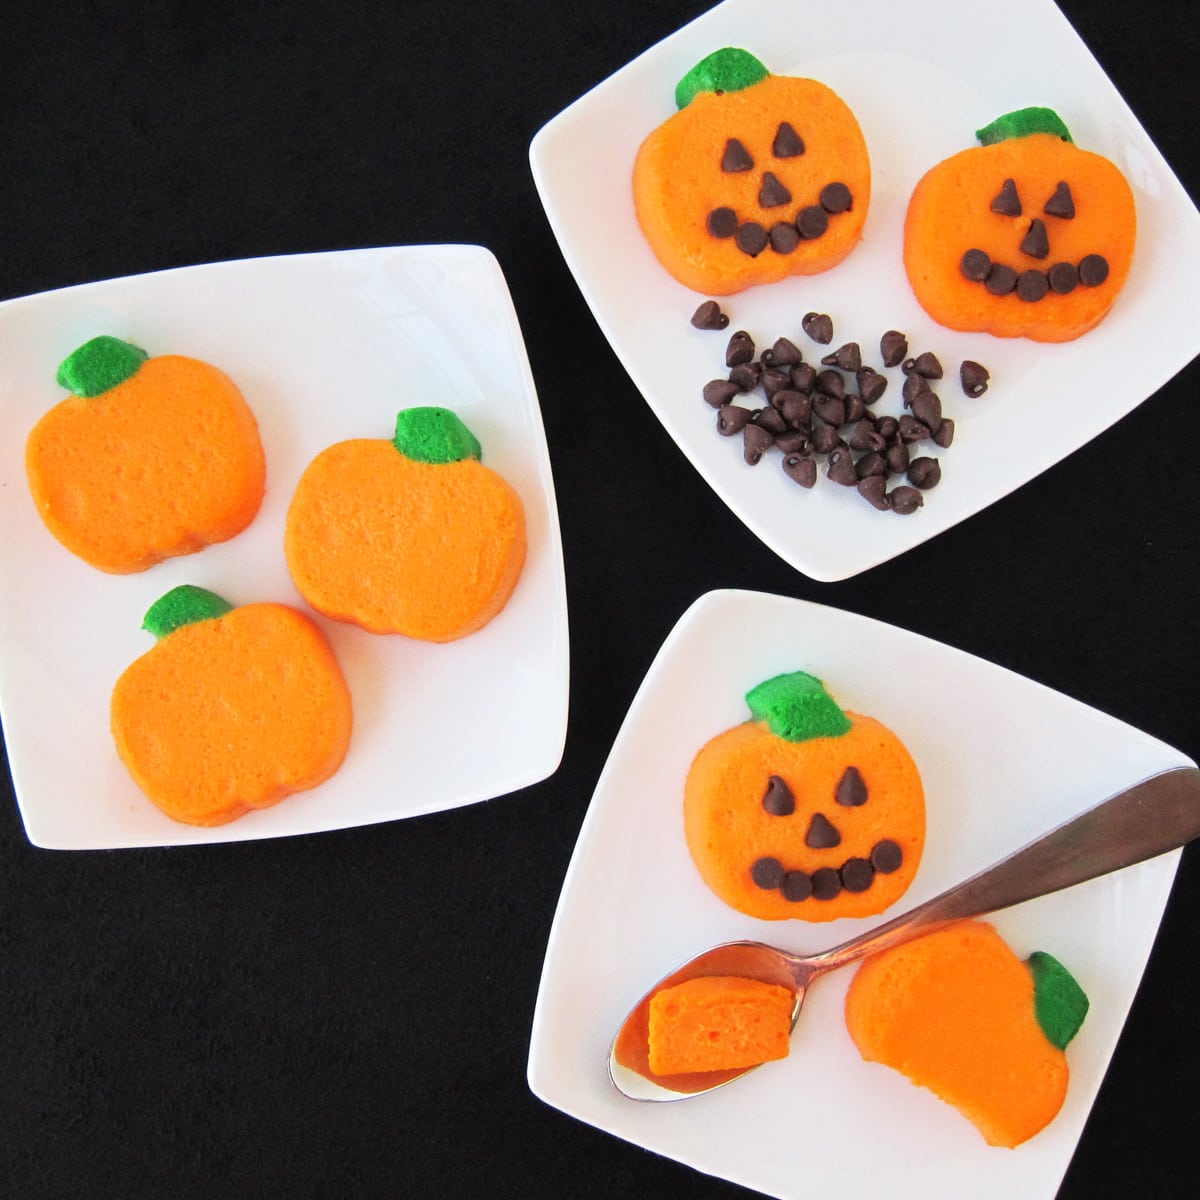
Cheesecake just makes me happy and these little jack-o-lanterns with their chocolate chip smiles look happy to be cheesecakes too.
Each little pumpkin has a delicious vanilla custard flavor and a smooth and creamy texture. Plus, they are super cute.
They are decorated to look like pumpkins and Jack-O-Lanterns using colorful cheesecake filling and mini chocolate chips. They are easy to make using a silicone mold and they'll make a fun Halloween dessert.
Ingredients
butter - to coat the inside of your pumpkin mold
cream cheese - Use full-fat cream cheese for the best flavor. I don't recommend using low-fat or no-fat cream cheese for this recipe. Be sure to set it out to soften at least 3 hours before you plan to make the cheesecake filling.
sugar
heavy whipping cream - This will add a rich and creamy flavor and texture but it will also thin out the cheesecake filling so that it is easier to paint into the molds.
eggs
vanilla extract
orange and green food coloring - You can use natural food coloring if you prefer.
Supplies
mixing bowl and hand-held mixer
2 Mini Pumpkin Molds with 24 cavities in each
2 baking sheets
food use only paintbrush
NOTE the silicone molds that I used to create my cheesecake pumpkins have been discontinued. I have included links below to some of the silicone pumpkin molds that will work for this recipe. I've also shared links to some fun cupcake wrappers.
 Chocolate Candy Molds, Hall...Shop on Amazon
Instructions
Preheat oven to 325 degrees.
Butter the inside of the pumpkin cavities in your silicone molds.
Cheesecake Filling Recipe
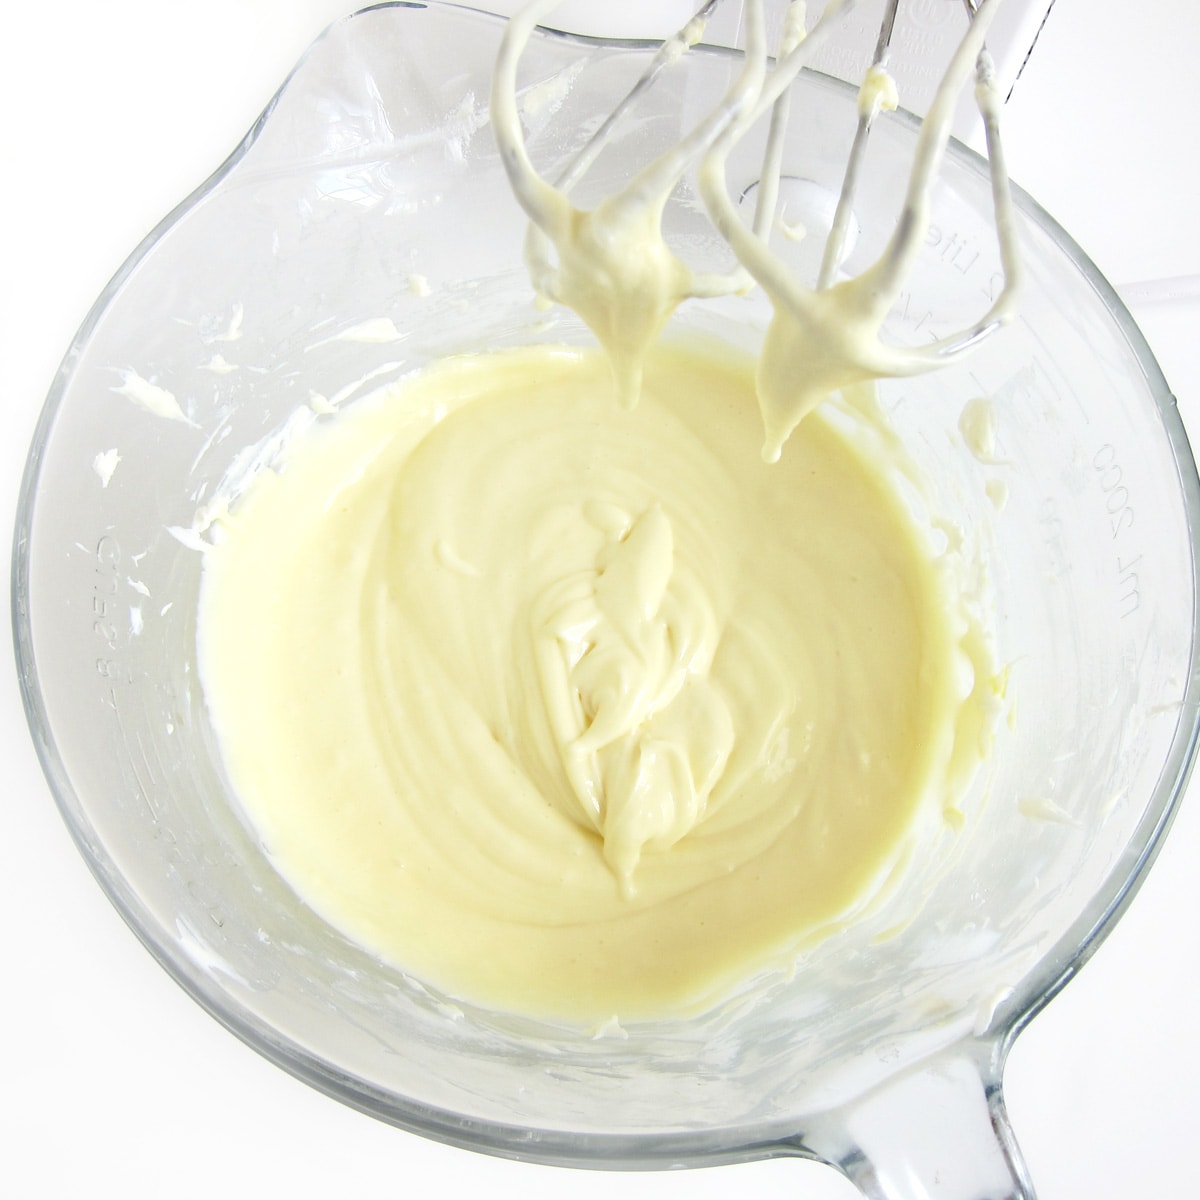
- Beat the cream cheese on low speed until creamy. Scrape down the bowl as you are mixing to make sure you have no lumps remaining in the bowl.
- Add the sugar and beat on low speed until smooth and creamy.
- Add the heavy whipping cream, eggs, and vanilla and beat just until combined.
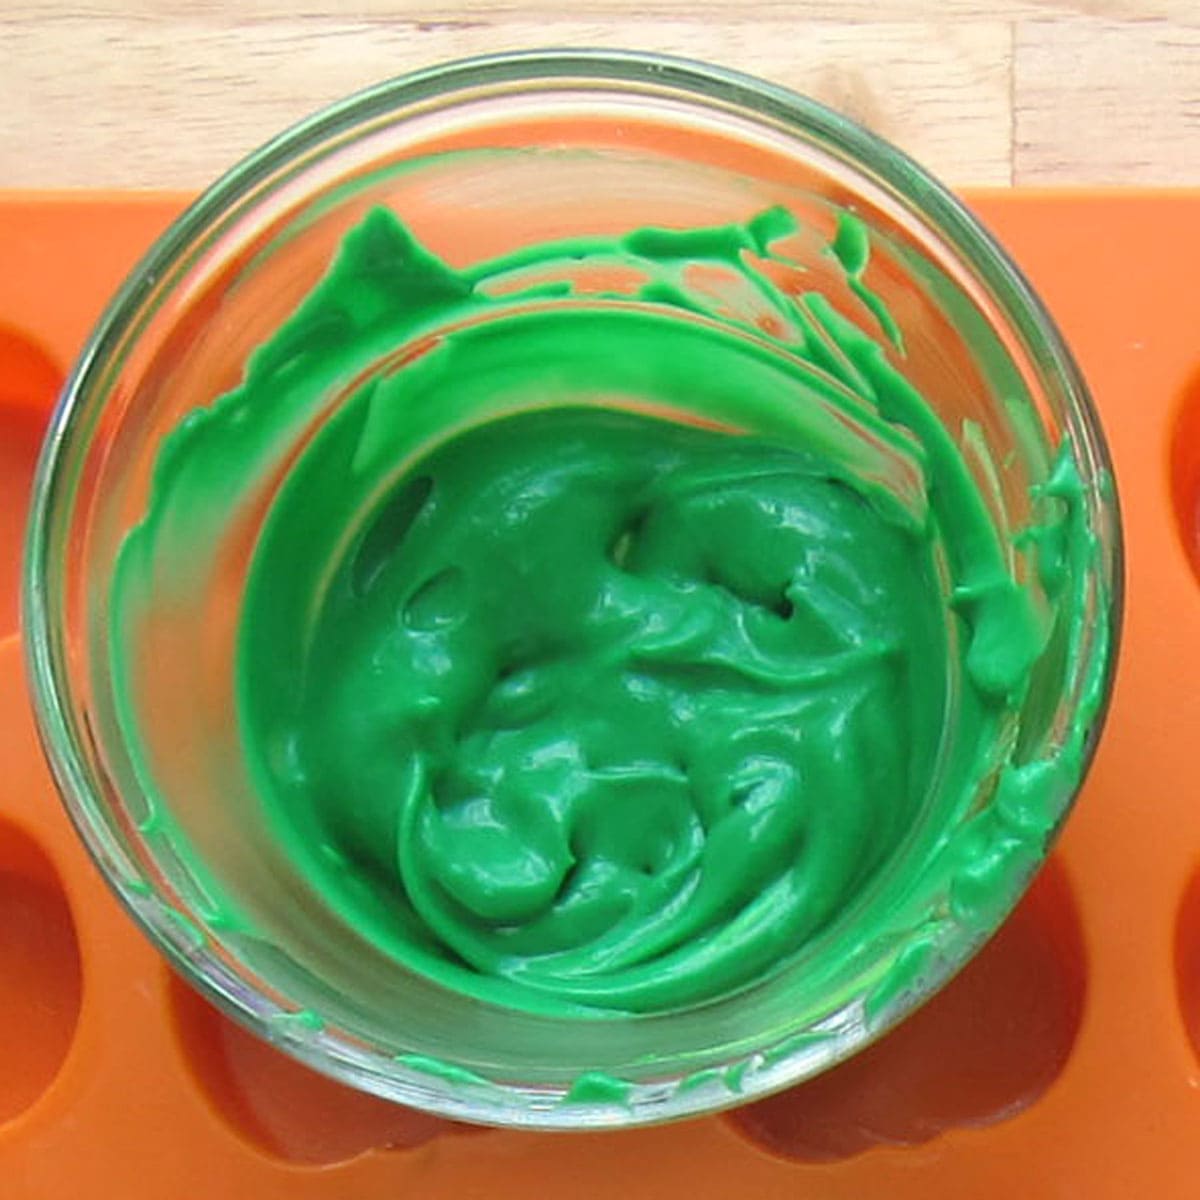
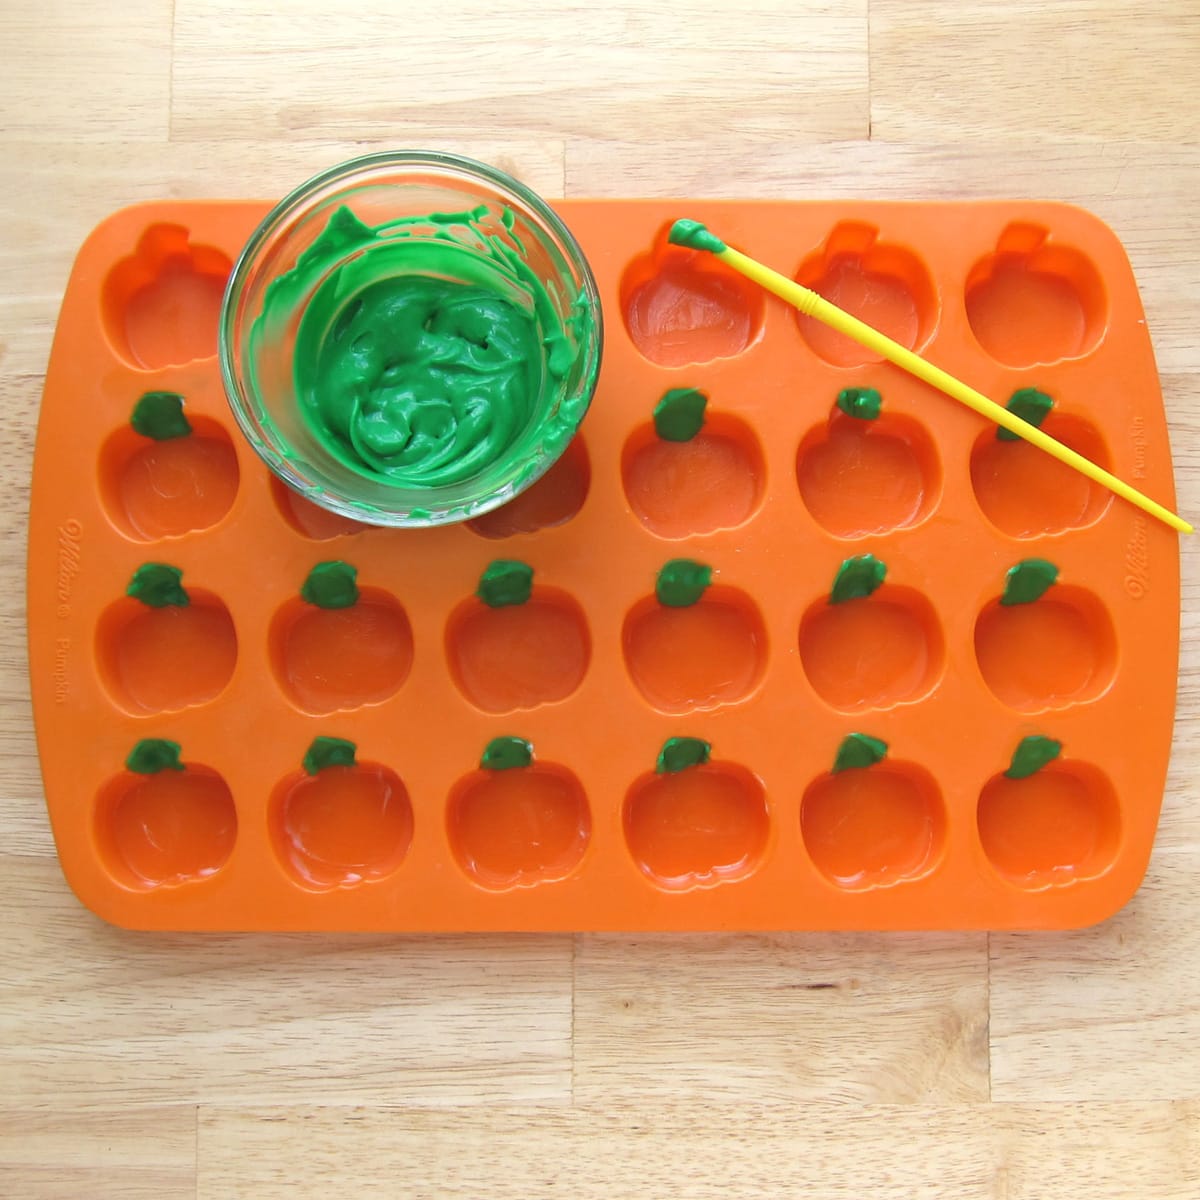
Color cheesecake filling green.
- Remove about 2 tablespoons of filling and color it green.
- Color the remaining filling using orange food coloring.
Create Pumpkins using a silicone mold.
- Paint the green filling into the stems of 40 cavities.
- The filling is thick enough to stay in place nicely, but just to be safe, pop these filled molds into the freezer for 5 minutes before filling the mold with the orange cheesecake.
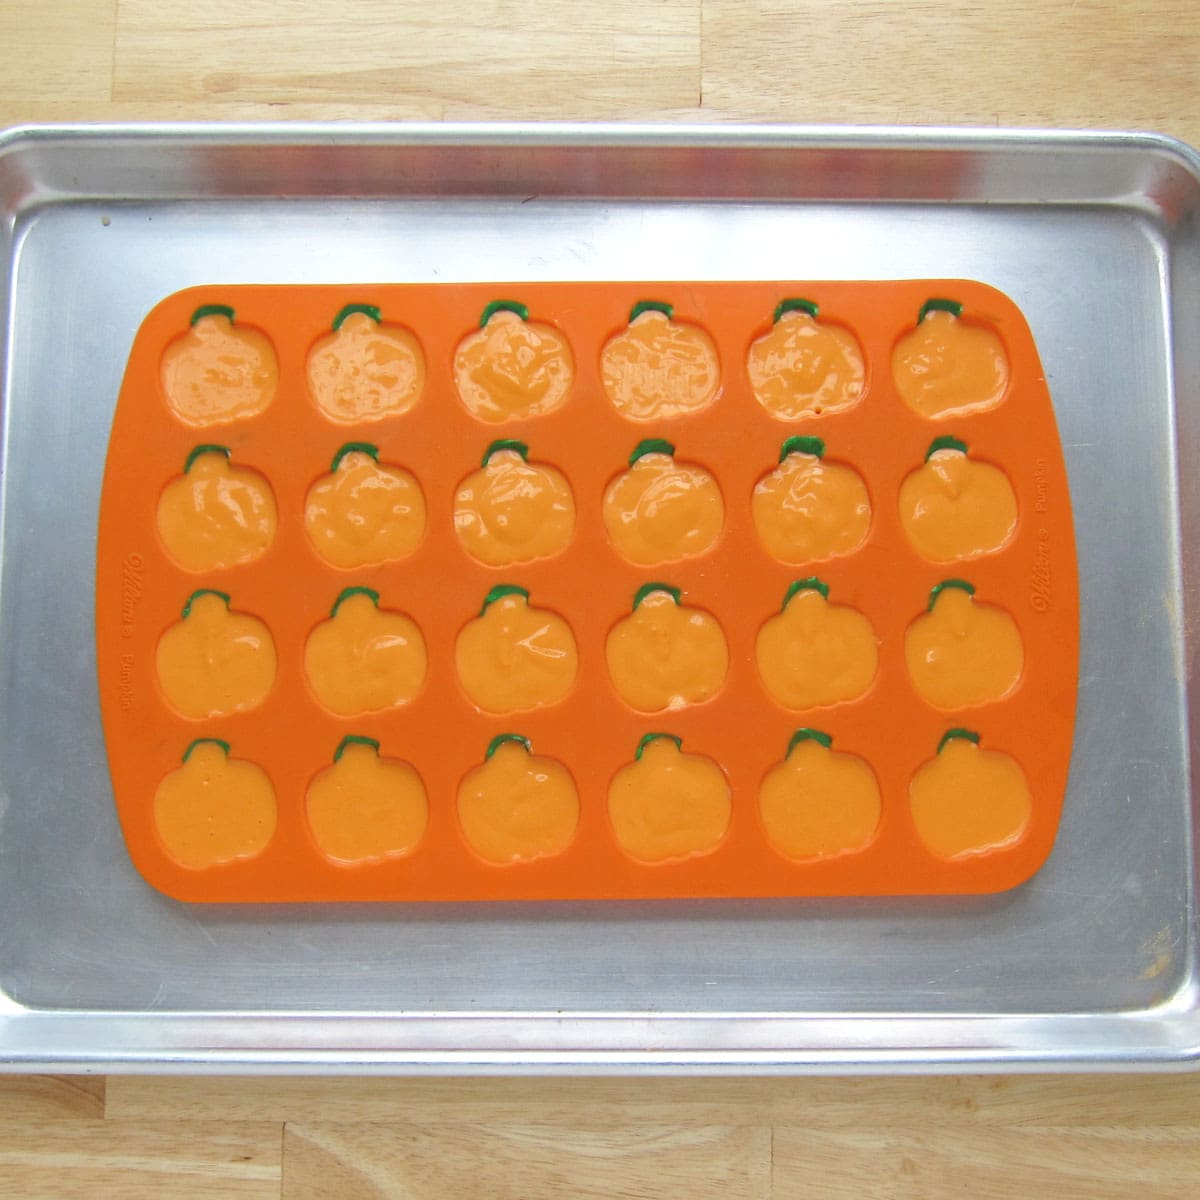
Fill the mold with orange cheesecake filling.
- Set silicone pumpkin mold on a baking sheet.
- Fill the pumpkins with orange cheesecake filling. I filled a disposable pastry bag with the cheesecake filling and piped the orange filling into the molds.
- Leave a small amount of room in each mold for the filling to expand while baking (about a 16th of an inch.)
Bake.
- Bake 12-14 mins until the tops look set but the cheesecake pumpkins are still jiggly.
- Allow to cool for 30 minutes at room temperature, then place in the freezer for at least 1 hour. You can, at this point, wrap the mold well and store them in the freezer for up to several weeks.
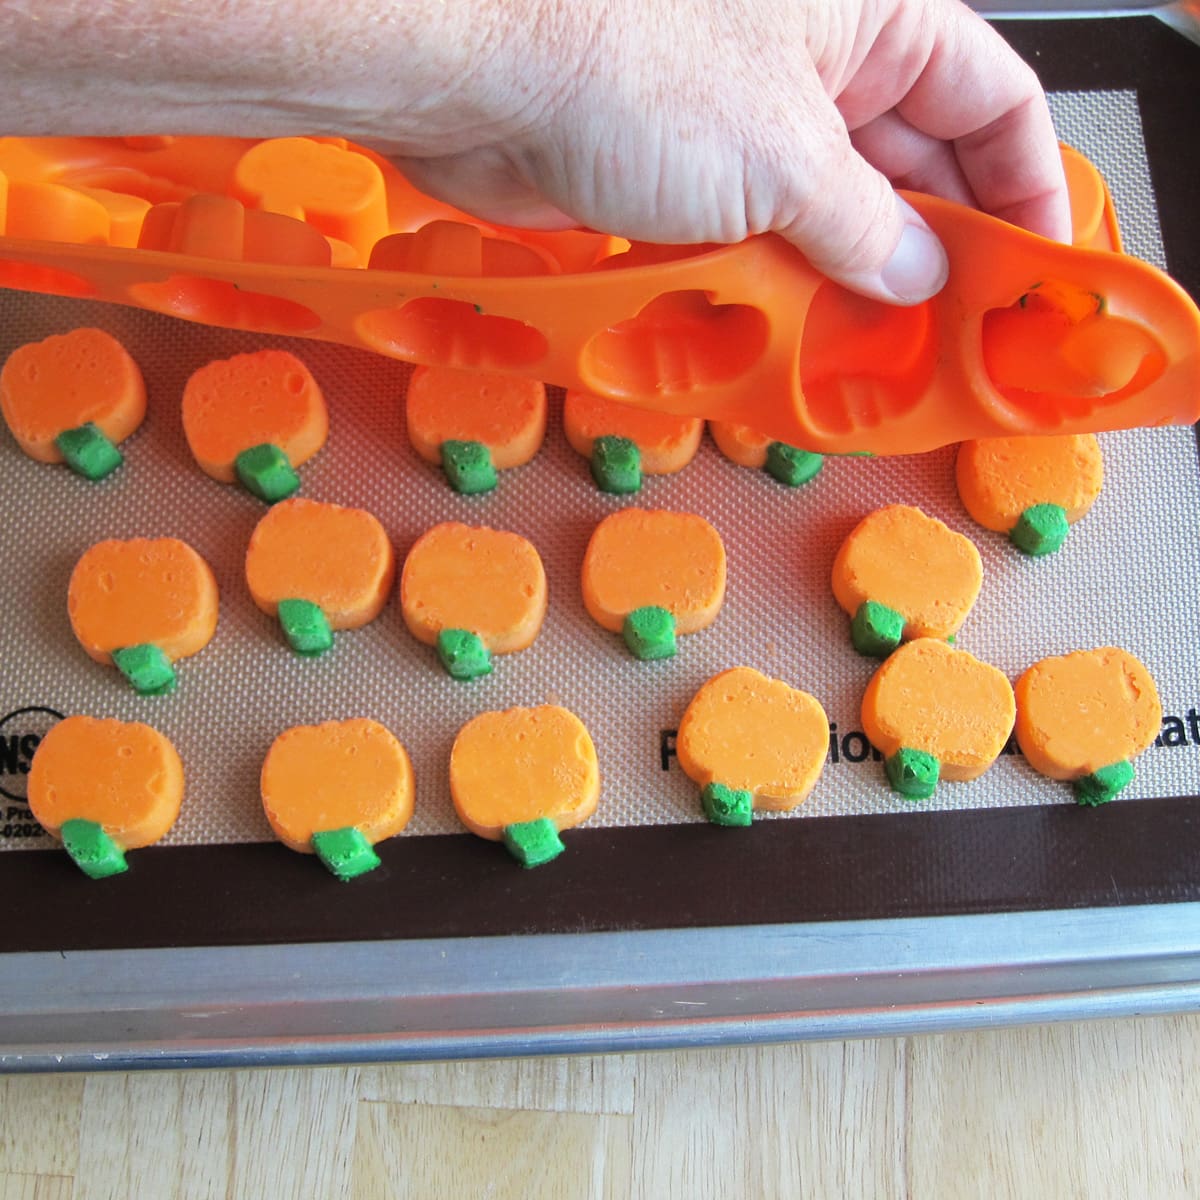
Unmold.
- Remove the molds from the freezer, turn the mold upside down, and press the pumpkin cheesecakes out.
- I set mine on a non-stick baking mat just to be sure they wouldn't stick later once they thawed. It will be easiest to move these now to a serving platter or dessert plates.
Storage
- Store the mini cheesecake pumpkins in the refrigerator for up to 5 days or keep frozen for a few weeks.
- Thaw frozen cheesecakes in the refrigerator for several hours.
Before serving, decorate with mini chocolate chips, if desired. Simply press the chocolate chips into the cheesecakes creating jack-o-lantern faces.
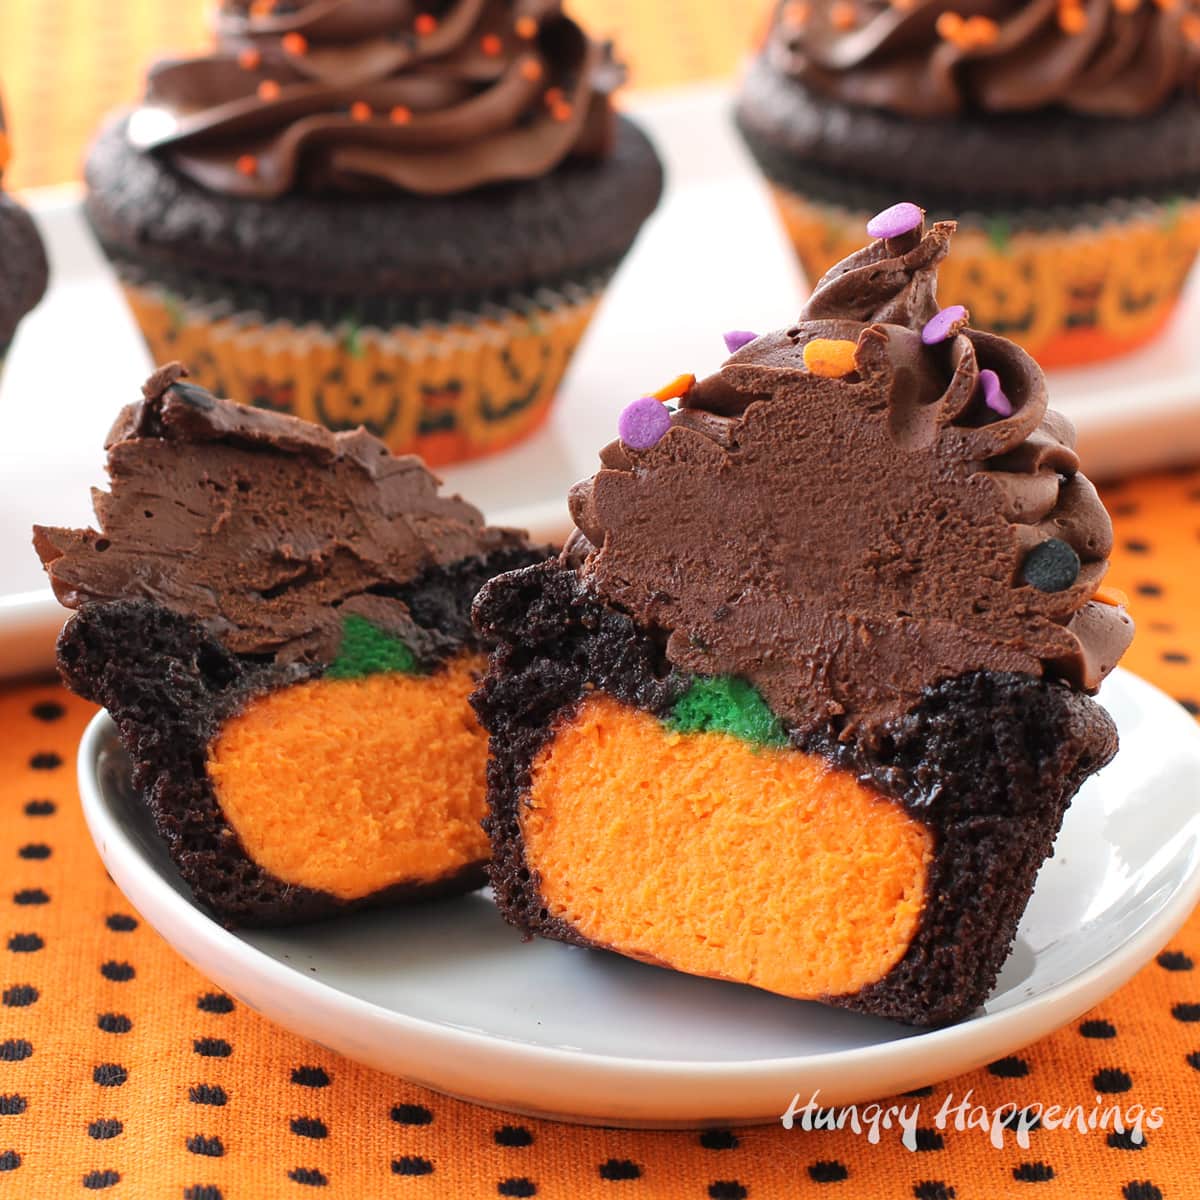
You can even bake these pumpkin-shaped cheesecakes into these delicious Chocolate Cheesecake Stuffed Halloween Cupcakes
Related Recipes
You might also like these other decorated cheesecakes.
Be sure to also check out my 100+ Halloween Recipes too.
Recipe
Originally Published on September 18, 2013.
Cute little creamy pumpkin-shaped cheesecakes that are decorated using colored cheesecake filling.
- butter to coat the inside of your pumpkin molds
- 16 ounces cream cheese softened (do not use low fat or no-fat cream cheese)
- ⅔ cup sugar
- ⅓ cup heavy whipping cream
- 2 large eggs
- 1 teaspoon pure vanilla extract
- orange and green food coloring - you can use natural food coloring if you prefer
-
Preheat oven to 325 degrees. Butter the cavities in your pumpkin molds.
-
Beat the cream cheese on low speed until creamy. Scrape down the bowl as you are mixing to make sure you have no lumps remaining in the bowl. Add the sugar and beat on low speed until smooth and creamy. Add the heavy whipping cream, eggs, and vanilla and beat just until combined.
-
Add the sugar and beat on low speed until smooth and creamy. Add the heavy whipping cream, eggs, and vanilla and beat just until combined.
-
Remove about 2 tablespoons of filling and color it green.
-
Color the remaining filling using orange food coloring.
-
Paint the green filling into the stems of 40 cavities.
-
The filling is pretty thick and should stay in place nicely, but just to be safe, pop these filled molds into the freezer for 5 minutes before filling with the orange cheesecake.
-
Set silicone pumpkin mold on a baking sheet.
-
Fill the pumpkins with orange cheesecake filling.
-
Leave a small amount of room in each mold for the filling to expand while baking (about a 16th of an inch.)
-
Bake 12-14 mins until the tops look set but the cheesecake pumpkins are still jiggly.
-
Allow to cool for 30 minutes at room temperature, then place in the freezer for at least 1 hour.
-
Remove the molds from the freezer, turn the mold upside down and press the pumpkin cheesecakes out.
-
Store the mini cheesecake pumpkins in the refrigerator for up to 5 days or keep frozen for a few weeks.
-
Before serving, decorate with mini chocolate chips, if desired. Simply press the chocolate chips into the cheesecakes creating jack-o-lantern faces.

- Banana Split Bars – A Fun and Easy Summer Dessert - March 4, 2026
- Pineapple Fudge (No Candy Thermometer Needed!) - March 4, 2026
- No-Bake Peanut Butter Pie Recipe - March 3, 2026


Sharon Schroeter says
Hi Beth,
I love these cute pumpkin cheesecakes Where did you get the molds? I can't find them on Amazon or anywhere else/
Keep up the good work--so fun!!
Sharon
Beth says
Thanks! I used a Wilton mold which has sadly been discontinued, but they do have a new mold (although it is smaller and has fewer pumpkin cavities per mold). You can find them on amazon here https://amzn.to/2CggoHx
Yasmin says
Is there a way to add some actual (canned) pumpkin without messing up the texture? Should I add less of something else?
Beth says
I created a pumpkin cheesecake for Tablespoon.com. It would work great for this. You can find the recipe here - https://www.tablespoon.com/recipes/painted-chocolate-pumpkin-cheesecake/309b5785-165f-4aec-a80f-e7df9d2adfde
Danielle S. says
I just made these after dying to try them ever since I first saw this page 🙂 They taste amazing and look so sweet! I'm taking a whole tray to a Halloween party this evening.. 🙂
beth says
I'm so happy to hear you made these pumpkins and hope they are a huge hit at the party.
Nicolee Stewart says
AWESOME! I've really wanted to make your cupcakes with these, but haven't found a way. I'm going to add peanut butter extract to t he cheesecake and make a peanut butter frosting! Thank you for your help!
beth says
I'd love it if you let me know how this works for you. Good luck. Sounds yummy! I love peanut butter:)
Nicolee Stewart says
Is there a way to make these without a silicone mold. I cannot for the life of me find a mold in any of the stores here..
beth says
I haven't done this, but you could line a 9x13 baking pan with non-stick tin foil. Pour in the batter then bake in a water bath. Set the pan inside a larger pan, add some boiling water, being sure it doesn't get into the cake pan. I really can't give you an exact time, but would estimate it will take about 30 minutes. Cool completely, then freeze for an hour or so. Cut using a small pumpkin cookie cutter. I think that will work. Let me know if you give it a try.
beth says
Hi Nicolee,
I just finished making a Christmas version of these. I made green cheesecake Christmas trees to stuff inside cupcakes. I didn't have a mold, so I poured the cheesecake into a non-stick tin foil lined 9x13 pan. I baked it in a water bath and it only took 18 minutes to cook. I cooled the cheesecake for 30 minutes then froze it for a few hours. I lifted the cheesecake out of the pan then used a tiny cutter to cut out the Christmas trees. It worked quite well.
The recipe is now available at Tablespoon.com and the tutorial with step-by-step pictures will be available there on December 10th. You can see one picture of the finished Cheesecake Stuffed Christmas Tree Cupcakes, here - > http://www.tablespoon.com/recipes/cheesecake-stuffed-christmas-tree-cupcakes/3e2d43d7-ec9b-46b9-b30c-a407bf2a5cfd?src=SH
Elettra says
Hi Beth,
thank you for your answer 🙂
Yes, I was able to bake them (it was quite adventurous 😉 ) but I had my problems to press the pumpkins out of the mold because some of them fell to pieces.
And I guess you are right because I used a mixture of light and full fat cream cheese.
Nevertheless, the cupcakes were soooo delicious 🙂
And next time I will use the full fat cream cheese 😉
beth says
Hi Elettra,
I just added a comment in the ingredients list to avoid the low fat or no fat cream cheese. Sorry I hadn't done that before you made them. I'm just happy some of them turned out nicely and you loved the flavor!
Elettra says
Hi Beth,
last week I made your chocolate cupcakes with the cheesecake pumpkins. First of all - best chocolate cupcake recipe ever! 🙂
But I had my difficulties with the pumpkins...I didn't get them thick at all! The mixture was too liquid and even after adding more creamcheese...no improvement 🙁
Do you have an idea what I did wrong?
Regards from Germany,
Elettra
beth says
Hi Elettra,
I'm so happy you made these, and I agree the chocolate cupcakes are amazing. As far as the cheese cake, my only guess is that the cream cheese you used has more water or whey in it than what I used. I have discovered recently that if you don't use full fat cream cheese the cheesecake mixture will be much thinner. So, if you used a light or no-fat version the mixture will be thin. I'm not familiar with cream cheese in Germany, unfortunate. I will be visiting there this summer, and may have an opportunity to try some, though! The liquid nature of the cheesecake mixture shouldn't have been a problem once it was baked, but I'm sure it made it difficult to paint on the stems. Where you able to bake them?
Renata McDonald says
Just made them last nite and they're great 🙂
beth says
Hi Renata,
I'm so happy to hear you made these and like them. If you snapped any pictures, I'd love to share them in my Reader's Gallery. You can send them to beth@hungryhappenings.com. Have a great Halloween:)
Crystal says
Thanks for sharing these cute treats at my weekly linky party at Crystal & Comp. I just pinned it as well and shared with my facebook page. 🙂
beth says
Thank you, Crystal. I appreciate you sharing this recipe with your readers. Have a wonderful weekend:)
Jenn Kurkiewicz says
WOW! These are so cute, I will have to make these for our upcoming Halloween Party! I am so glad I found you at the Made By You party!
~ Jenn
Amberly Steele says
These look so yummy and they are super cute too!
Sarah Vanderkooy says
These are adorable! Love the links to your other holiday inspired cheesecakes too. Thanks for sharing.
Anonymous says
Plan to make these for my kindergarten class as we do the senses. I will let them make their faces. Thanks for sharing!
beth says
Sounds like fun, I hope the kids enjoy them.
The Bearfoot Baker says
These have to be the cutest pumpkin cheesecakes ever!!
beth says
Thank you:)
The Partiologist says
Always love seeing your cheesecake projects! I have that pumpkin mold so maybe
just maybe I'll have time to make some! 🙂
beth says
I love using the silicone molds for cheesecakes. They are really so easy to make!
Engagement Rings says
ummm.. Amazingly simple and cute cheesecakes. I am craving for them right now, but I know I won't get anything like that in my local bakery stores.
beth says
I'd share some with you! They are really tasty:)
Hani/Hanielas says
These are so cute! You are the master of molded cheesecakes!
beth says
Thanks, Hani. I do love making and eating cheesecake:)
Meme @ Living Well Kitchen says
These are so adorable!! I need one of those pumpkin molds
Can't wait to see what your surprise is tomorrow 🙂
beth says
Thanks. I love using silicone molds. I highly recommend adding some to your kitchen collection.
Brenda @ SweetSimpleStuff says
I like the face options ... faces for Halloween ... plain pumpkins for Thanksgiving! Smart idea 😉
beth says
Thanks, Brenda:)