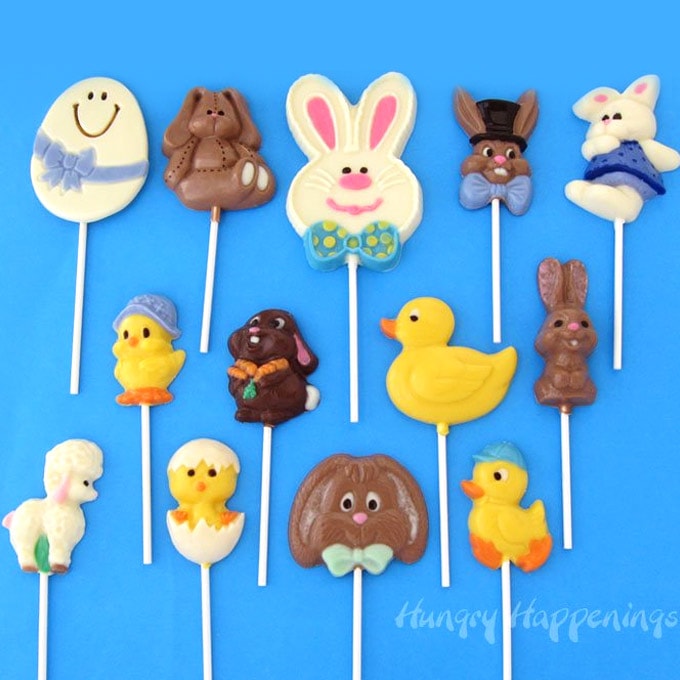
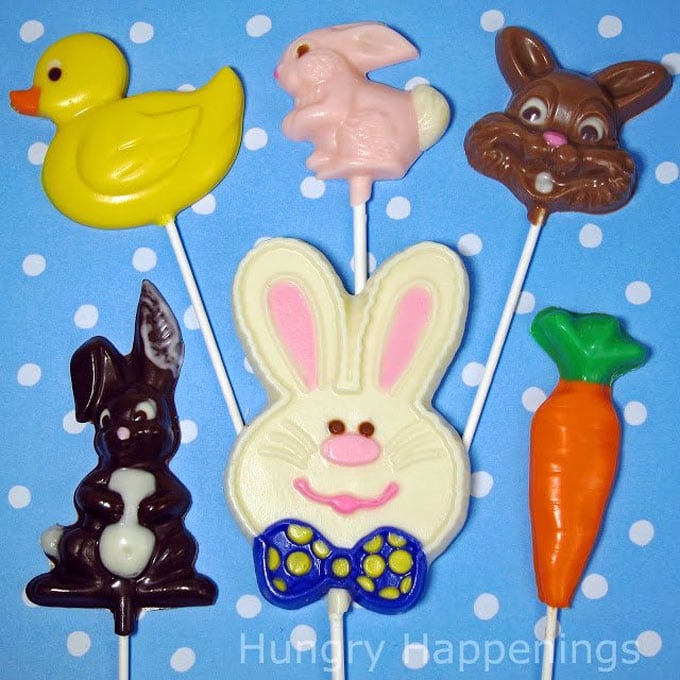
Learn how to hand-paint chocolate lollipops for Easter using colored compound chocolates (Candy Melts). It's such a fun Easter activity for kids and these lollipops are the perfect addition to an Easter basket.
Painting chocolate lollipops requires a bit of patience, a little bit of practice, and a willingness to have some fun.
Happily, I can tell you that I have had a lot of fun over the years making Easter lollipops.
I am sure I have created well over 20,000 of these cute candies in my lifetime. I have been making them for (gulp!) over 40 years now.
I'm excited to teach you how to make these Easter lollipops at home. I am going to share step-by-step instructions for painting Easter chocolates, but I did create a video where I paint birthday party lollipops including a unicorn.
You might want to watch it before reading the instructions below.
Video
[adthrive-in-post-video-player video-id="Q51F8NS9" upload-date="2019-05-16T18:53:10.000Z" name="How To Paint Candy Lollipops" description="Hand painted chocolate lollipops are great treats to make for birthday parties, holidays, and any special occasion. " player-type="default" override-embed="default"]
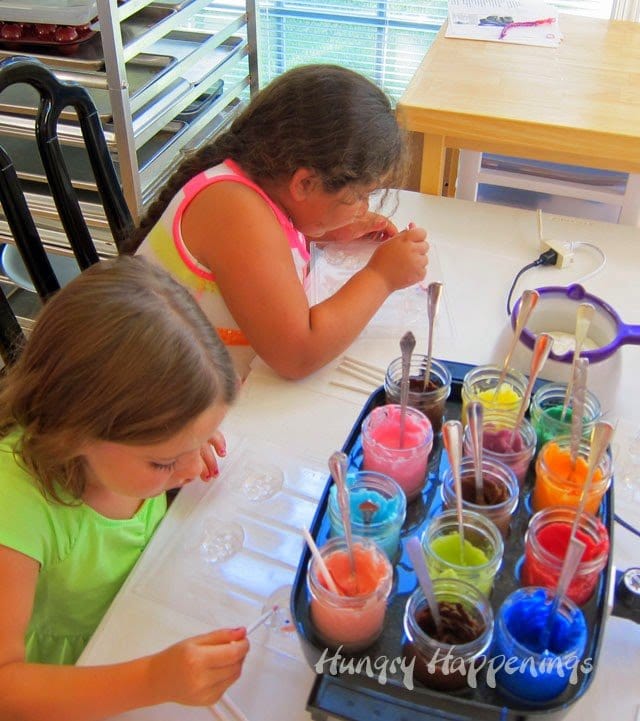
This is a great project to do with kids.
I learned how to paint these lollipops when I was a young girl and it became a lifelong passion for me. It's still one of my favorite projects to do in the kitchen.
I do recommend that you read my chocolate-making tips page before you begin.
For this project, you will want to use compound chocolate.
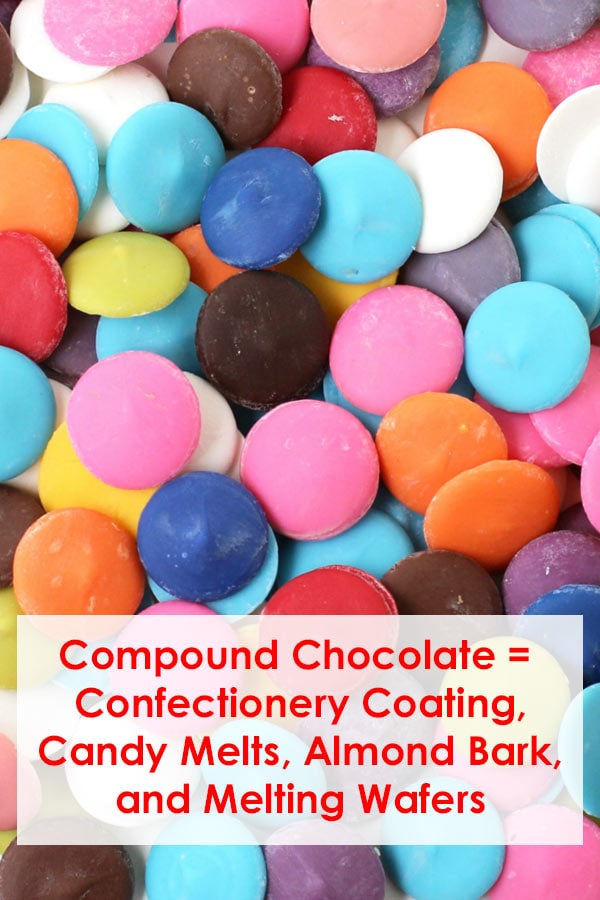
What is compound chocolate?
- Compound chocolate is chocolate that is made with palm kernel oil (or other vegetable oil) instead of cocoa butter.
- It is also known as confectionery coating, candy melts, melting wafers, or almond bark.
- In this post, I may refer to this type of chocolate as candy coating, chocolate, confectionery coating, or candy melts.
- You can find compound chocolates at craft stores like JoAnn Fabric's and Michaels, grocery/discount stores like Walmart, cake & candy decorating stores, and online.
- They are available in white, milk, and dark wafers (or blocks) as well as colored and flavored wafers.
Colored Candy Melts
To make lollipops for Easter, you will want candy coatings in a rainbow of colors.
You can either purchase the colored wafers or you can color white wafers using candy colorings. I do a bit of both.
The colors you need will depend on the candy molds you choose to use, so purchase your colored wafers or your candy colorings based on the lollipops you plan to make.
Notes:
- Most white candy melts have a cream or slightly yellowish tint.
- When you are trying to achieve a cool color like purple or blue you'll need to use bright white candy melts or your colors will not be pure. Example: blue will look teal.
- You can use Wilton Bright White Candy Melts, Guittard Vanilla Apeels, or Merken Super White.
- For some reason, white candy melts that are colored with pink candy coloring tend to fade over time, so I always buy the pink-colored wafers.
- If the wafers you buy are really hot pink, just add a bit of white coating to it to tone them down. Wilton has a nice light-colored pink candy melt.
Best brands to use:
I use Peter's confectionery coatings (Peter's White Caps, Peters Westchester-Milk, Peters Eastchester-Dark) and Wilton Candy Melts to make my lollipops, but you can use Ghirardelli, Guittard, Merkens, or Make 'n Mold. You can even use almond bark
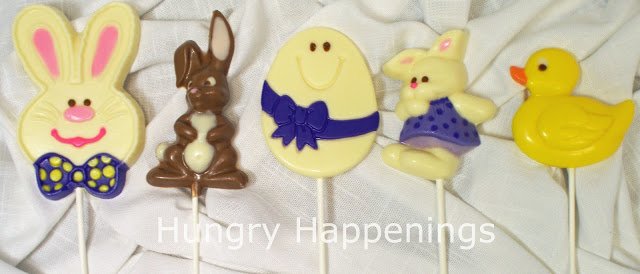
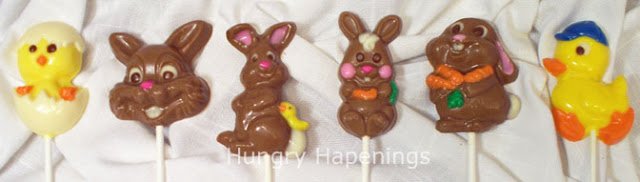
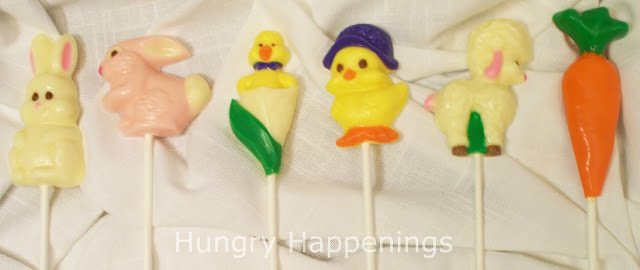
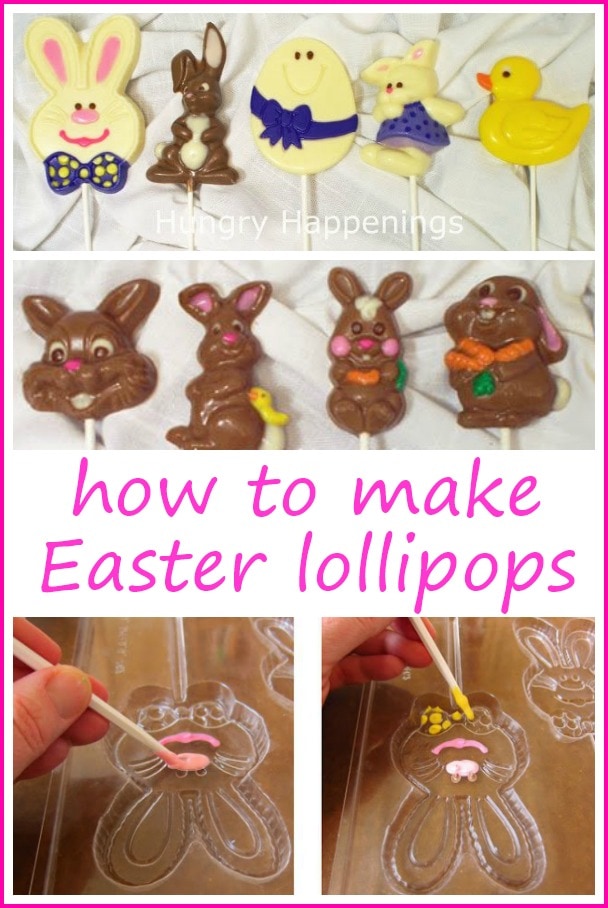
Hand-painted Chocolate Easter Pops
Ingredients:
- compound chocolate/candy melts in white, milk, dark, and colored varieties
- candy coloring*
- lollipop sticks
*Candy Coloring
- You MUST use oil-based chocolate coloring to color your compound chocolate (candy melts).
- Do not use liquid coloring from the grocery store or icing coloring. If you add water-based coloring to chocolate it will seize up (harden).
Each small lollipop will take approximately 1 ounce of candy and larger pops will take about 2 ounces, so purchase your coatings according to the number of lollipops you would like to make
Special equipment needed:
- electric skillet (this will make this process so easy)
- glass jars, coffee mugs, or glasses
- paintbrushes (use new or food only brushes, I recommend plastic handle brushes)
- candy molds- Lamb, Eggs, Easter Assortment, bunny, Carrot, bunnies, hatching chick (here are a few links to purchase some of the molds, but you can also find them at craft stores and candy decorating stores)
Some of the products used in this project can be found on Amazon. I earn a small commission when you make a purchase using the links in this post.
 Wilton Melting Chocolate Br...Shop on Amazon
  Wilton Bright Pink Candy Me...Shop on Amazon
  Wilton 12 oz. Yellow Candy ...Shop on Amazon
  Wilton 12 oz. Light Cocoa C...Shop on Amazon
  U.S. Cake Supply Large 2-ou...Shop on Amazon
  Presto 06852 16-Inch Electr...Shop on Amazon
  Wilton EZ Thin Dipping Aid ...Shop on Amazon
  Wilton White Treat Sticks -...Shop on Amazon
  7 Colors (Rose-red, Blue, Yellow, Purple, Green, Watermelon Red, White)") 210 count Colored Lollipop ...Shop on Amazon
210 count Colored Lollipop ...Shop on Amazon  200 Pack Clear Cellophane B...Shop on Amazon
  Testor 8707 Economy Pointed...Shop on Amazon
  HATCHING CHICK LOLLYShop on Amazon
  Carrot Chocolate Candy Mold...Shop on Amazon
  Candy Molds N More Easter B...Shop on Amazon
  Easter Egg Face Pop Lollipo...Shop on Amazon
 Instructions:
You will need to melt and color your confectionery coatings. There are several different methods to do this, listed below.
When I am making a lot of lollipops I use an electric skillet filled with warm water to keep small jars of colored compound chocolate melted.
That way I don't have to continually re-melt my candy. I usually make a lot of lollipops at one time, so I melt a big bowl of white coating in the microwave, then pour the melted coating into small jars and color them.
If I'm only using a small amount of colored candy melts, I will just melt them in a jar in the skillet.
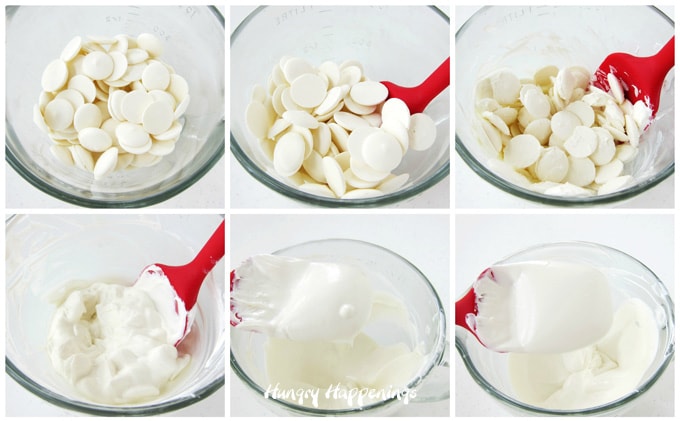
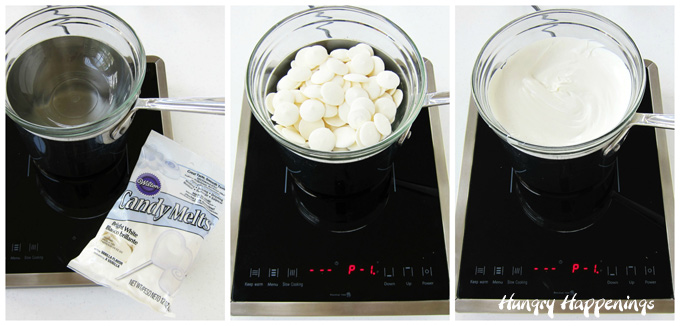
Melt candy melts wafers in the microwave.
Every microwave is different so this is just a guideline, but it is safest to go slow and stir often. I always use high power for short bursts of time.
- Pour 16 ounces compound chocolate wafers into a microwave-safe bowl.
- Heat on high power for 30 seconds, remove from microwave, and stir. Your wafers won't look melted much at all at this point but if you stir vigorously the chunks will indeed start to become liquid.
- Continue to heat for 20 seconds. Now your candy will look more liquid, but you will have chunks remaining.
- Stir vigorously and the heat from the melted chocolate will indeed melt the chunks.
- If, after stirring for a while you still have chunks of chocolate remaining, heat for 10-15 second intervals, stirring in between each until melted.
- Do not rush this process. Candy coatings burn easily. If you do burn the coating, throw it away and start over in a clean bowl.
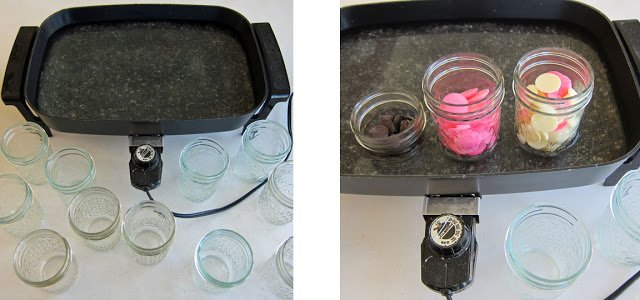
Melting Confectionery Coating in a Skillet:
- Fill your skillet with some warm water and set the temperature to "WARM".
- Fill glass jars, coffee mugs, or ramekins with some candy melts.
- Place the jars in the water-filled skillet.
- Make sure the water comes up about halfway on your shortest jar.
NOTE:
- You can keep your compound chocolate (candy melts) melted all day using this method, just stir the chocolate throughout the day to keep the chocolate near the top of the jar from hardening.
- And be sure to replenish the water as it evaporates.
- Most importantly, be careful that you don't spill water in the chocolate, or it will seize up and become too thick to use.
- So, if you pick up a jar to move it closer to you, put a towel under the jar as you move it, so drops of water don't end up in other jars of the chocolate.
- You cannot use this method with pure chocolate, as pure chocolate (made with cocoa butter) needs to be tempered (heated and cooled at specific temperatures).
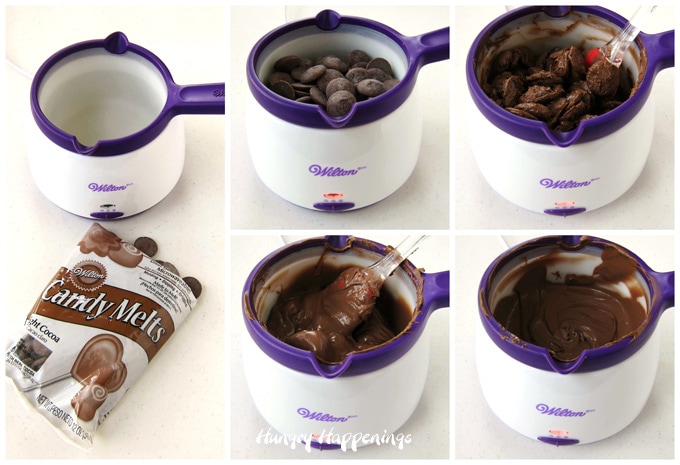
Melting candy melts in a double boiler.
- Fill a pot with about an inch of water.
- Set the pot on the stove over LOW heat.
- Fit a bowl snuggly over the pot so that the bottom of the bowl does not touch the water.
- Fill the bowl with candy melts.
- Allow the chocolate to melt slowly, stirring often.
Melting Pots
- You can melt an entire bag of candy melts using a Wilton Melting Pot.
- Fill the silicone bowl with the candy melts and turn the heater on low heat.
- Stir often, until melted.
- You can melt the wafers using the high setting, but I'd stir the candy melts every few minutes. Then once almost melted, turn the heat down to low.
Coloring Confectionery Coating:
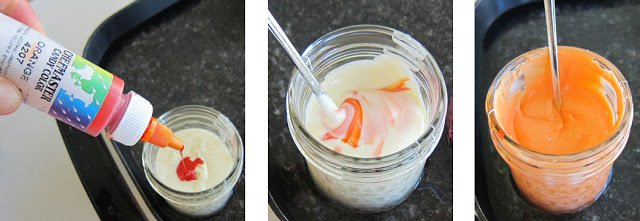
- Pour some melted white compound chocolate into a jar.
- Squeeze in some candy coloring (Start with a drop or two if you aren't familiar with the strength of the coloring.) Stir.
- If you are using candy coloring (icing coloring) from a jar, stick a toothpick into the jar, pull out some coloring and stir it into the chocolate.
- DO NOT put the toothpick back in the jar of coloring or you will contaminate the coloring. Use a new toothpick every time you want to get more coloring.
Note about thick candy melts.
- If you add coloring and your chocolate becomes thick add some Paramount Crystals or Wilton EZ Thin, stirring after each addition until thin and smooth.
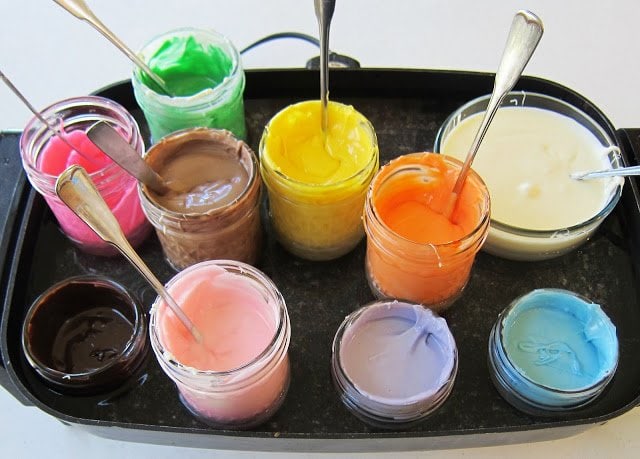
- Create all of the colors you want to use in your lollipops.
- For Easter, I like to use pastel colors for some of the pops and more vibrant colors for others.
- You can adjust colors while you are working by adding more coloring (for brighter colors) or by stirring in some white candy melts (for more pastel colors).
- Get your candy molds and paintbrushes together and clean your freezer, so you have some space to place the molds.
- Before you begin painting, decide what colors you want to use for the features and what color you want for the background.
- If you choose to make a white bunny, do not paint any of the features white, as they will just blend into the background color.
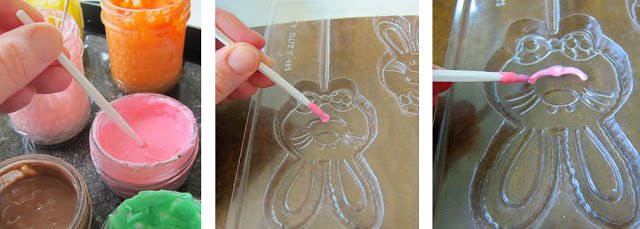
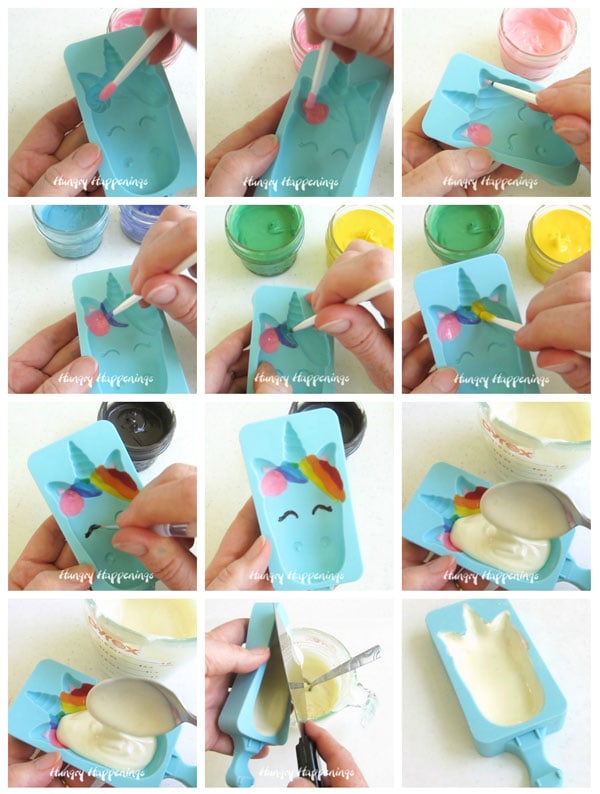
Painting chocolate into a candy mold.
- You can paint all or just some of the features on your mold.
- Here I started by painting the mouth with bright pink chocolate.
- Dip a paintbrush into the chocolate and dab it into the indentation on the candy mold.
- Add more chocolate to your brush as needed to fill in the entire indented area.
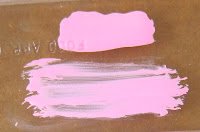
By dabbing the chocolate (as seen at the top of the picture) you will end up with a nice opaque area. If you brush the chocolate on (bottom of the picture), it will harden, streak, and leave you with a see-through area.
Also, always dip your brush down into melted chocolate and not along the sides of the jar, to pick up nicely melted chocolate.
If you end up with hardened chocolate on your brush, just dip it in the melted chocolate and allow it to sit for a minute to melt away the hardened chocolate from the brush.
- Using a different paintbrush for each color, paint more details on the candy mold.
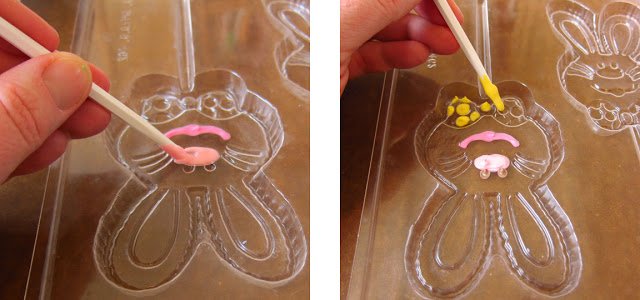
- I used a lighter pink for the bunny's nose and milk chocolate for the eyes. I wanted to create a layered effect for the bow tie.
- In order to layer the colors, I first painted on the yellow polka dots, then put the mold into the freezer for 2-3 minutes to harden the yellow dots.
- When you remove the mold from the freezer, it will be very cold and look very cloudy.
- Allow it to warm to room temperature before proceeding.
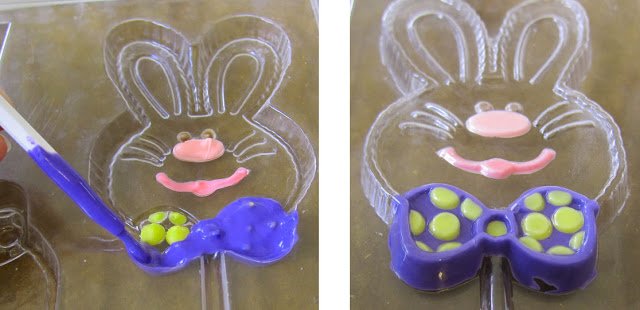
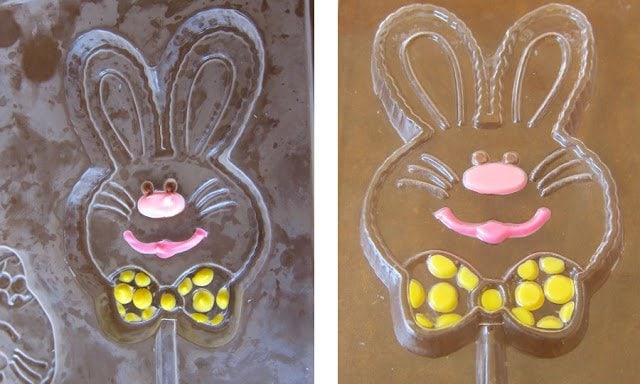
- For the areas that require two colors, paint the next layer of color directly over the first layer. I painted purple on top of my yellow polka dots.
- Carefully turn the mold over and look to see if you have covered the entire area.
- Check to see if there are any holes or air bubbles (see the lower right side of the bow) and fill in those areas.
- After fixing the bow tie, I painted the ears (not shown) then put the candy mold back in the freezer for a few minutes.
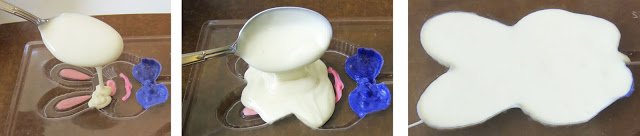
- Before filling the mold, allow the mold to warm up to room temperature.
- Then spoon whatever colored chocolate you've decided to use for the background into the mold.
- I usually spoon some in, then tap the mold gently on the table, allowing the chocolate to spread and fill in areas like the ears.
- It's best not to overfill the mold, so tap as you go. Once the mold is filled, you need to tap it on the table a few times to remove any air bubbles that may have formed.
Notes:
- Don't fill in the indentation that is for the lollipop stick.
- If you do overfill your mold, you can use your finger to wipe off the excess candy or wait until the candy is hardened and you will be able to shave it off with a knife.
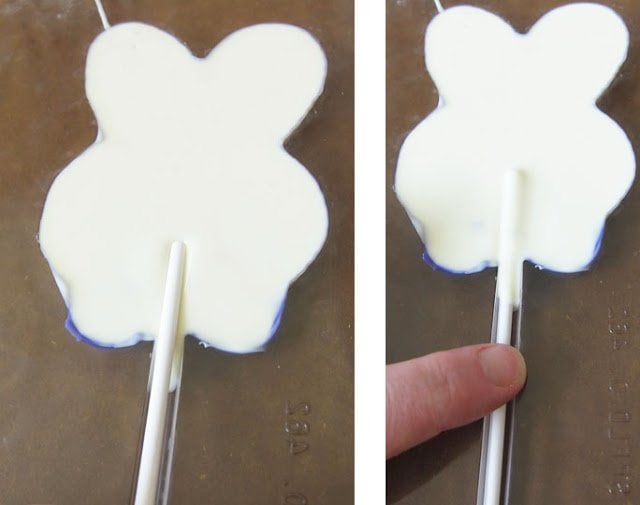
- Add a lollipop stick by setting the stick in the indentation and gently pressing it into the candy.
- Use your finger to roll the stick around so it gets completely coated in the candy.
- Place the lollipop in the freezer for 5-8 minutes. It may take a bit longer if you are opening and closing your freezer a lot during the process.
- As the chocolate cools and hardens it will shrink slightly and retract from the mold. You can tell if the lollipop is hardened by carefully holding the mold up over your head and checking to see the candy is one even color.
- If you see dark spots, that means the candy is still wet in those areas. Freeze the candy a few minutes longer. You can also check to see if the lollipops are ready by very gently tugging on the lollipop stick. If the chocolate moves, it should come out of the mold easily.
- If it sticks, it is not ready. Don't tug too hard, or you may pull a lollipop out before it is completely hardened.
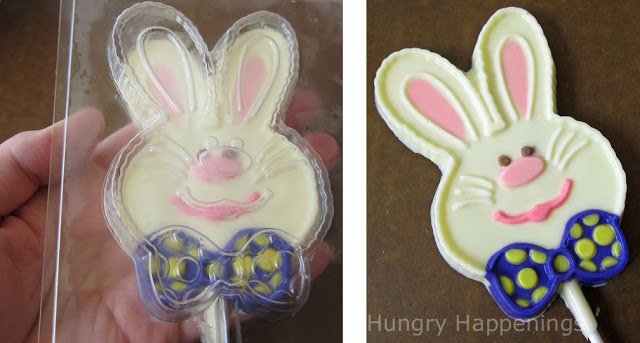
To un-mold your candy, you have a few options
- Gently tug on the stick and pull the candy out of the mold
- Place your hand over the candy, turn the mold upside down and allow the candy to fall out of the mold into your hand.
- Place a baking sheet over the candy, turn the mold and the baking sheet upside down allowing the candy to fall out onto the baking sheet.
- If you have overfilled the candy mold and the lollipop has excess chocolate around the edges, allow the candy to warm up to room temperature.
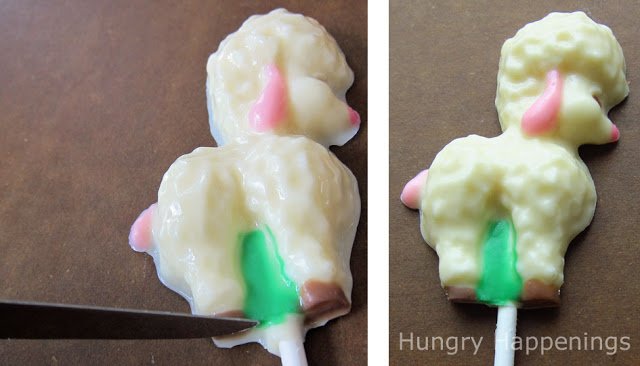
- Then use a small knife to carefully cut off the excess candy.
- If you have a lot of excess chocolate and it is very thick, you may want to heat up your knife by running it under really hot water (then drying it) or by holding the knife blade over a flame.
- Then as you cut off the excess the knife will melt the chocolate, as you go, making it easier to remove. Brush off any crumbs using a pastry brush.
How to store chocolate lollipops?
- Store your hand-painted chocolate Easter pops in a cool place preferably in an airtight container.
- You can package them in clear cellophane bags and tie them with a colorful bow.
- Add these adorable pops to your Easter baskets or give them as gifts.
- This same technique can be used to make Easter bunnies.
Printable Recipe
Below is a very brief explanation of this recipe. The step-by-step tutorial above is much more detailed. I'd recommend you read it first.
Use compound chocolate (candy melts) to make hand-painted Easter lollipops like bunnies, chicks, lambs, carrots, ducks, and more.
- 16 ounces melted compound chocolate (in a variety of colors)
-
Dip a food-use-only paintbrush into colored candy melts.
-
Dab the candy melts into the indentations in the plastic candy mold, coloring the desired area. Example: paint an Easter bunny's nose with pink candy melts.
-
Use another paintbrush to pick up another color and dab it into the mold. Example: paint dark chocolate eyes.
-
Repeat this process until you have decorated the indentations in the mold with colored candy melts.
-
Freeze the mold for a minute or so just until the chocolate hardens.
-
Remove the mold from the freezer and let it come to room temperature.
-
Fill the mold with compound chocolate (in the desired color). Example: fill a bunny mold with milk or white candy melts.
-
Tap the mold to remove air bubbles.
-
Insert a lollipop stick.
-
Freeze for 5-10 minutes until hardened.
-
Remove the chocolate lollipop from the mold.
-
Let sit at room temperature for at least 30 minutes before packaging in a cellophane bag.
Store in an airtight container for up to 2 months.
This post was originally published on April 20, 2011.
I oftentimes will paint my candy molds with this colored chocolate, then fill the molds with pure tempered chocolate. Sometimes the painted features pop off, but for the most part, it works.
So, go have some fun painting lollipops for Easter or any special occasion.
If you'd like to learn more about working with compound chocolate or pure chocolate,
be sure to check out my online video chocolate-making lessons at The Sugar Academy.
Hosting a chocolate-making party for kids is so much fun.
Be sure to check out my How to Host a Candy Making Party post for great tips.
Now that you have learned how to paint chocolate lollipops,
you can use those skills to make Unicorn Cakesicles.
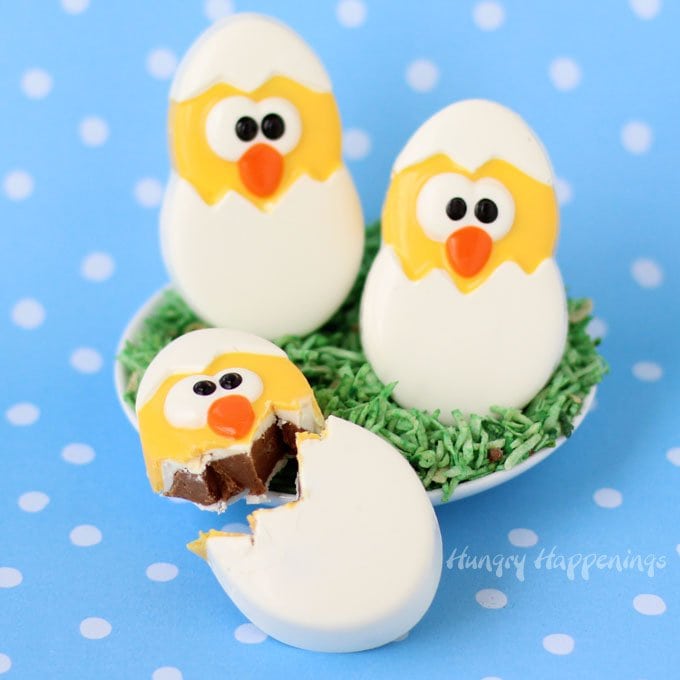
Or these cute Caramel Chocolate Fudge-Filled Hatching Chicks.

- Banana Split Bars – A Fun and Easy Summer Dessert - March 4, 2026
- Pineapple Fudge (No Candy Thermometer Needed!) - March 4, 2026
- No-Bake Peanut Butter Pie Recipe - March 3, 2026
Patty Wohlrab says
Hi, I love the bunny with the bow lollipop mold. Can you please tell me where you purchased it?
Thank you!
Beth says
Hi Patty,
As I mentioned in the post, some of the candy molds that I used to make these cute Easter chocolates are no longer available. The mold company went out of business and sadly many of their molds are not being sold by anyone anymore. Some of their designs have been picked up by other mold companies but after doing a search online for the bunny with bow mold, I was unable to find any. Sorry! They were one of my favorite Easter molds and my customers loved the chocolate bunny pops.
I'd recommend checking out Country Kitchen and Life of the Party for fun Easter candy molds.
Anonymous says
When I add the next layer of chocolate the spots are melting and running into the purple coloured chocolate.
beth says
If that is happenings, it is because your chocolate is too hot. You need to cool it down a bit. Optimally you want the chocolate between 90 and 100 degrees Fahrenheit. That will feel just barely warm to the touch, not hot.
SuzieB0020 says
Hello! I'm really hoping you can help me with a issue I am having. When I paint the molds, I let the colors set in the fridge, then fill with my main chocolate (milk or white usually), but then bubbles form in the colored layers! I don't know what to do, I've tried letting the colors set for varying times/temps and also different temps of filling chocolate. I understand bubbles in the filling chocolate and can fix that, but I'm going nuts with the other bubbles ruining my lollipops!
Beth Jackson Klosterboer says
It sounds like your chocolate that you are painting with is hardening before you finish painting the entire area thus forming pockets which trap in the air. Be sure the candy coating you are painting with is hot and fluid. I love using the skillet to keep my chocolate hot.
As you are working lift the mold up over your head, keeping it flat, to look at what you have painted. You should be able to see the air bubbles and you can fix them before you fill the molds.
I hope this helps.
Beth says
These look fantastic! What kind of brushes do you use because I have yet to find one that I like.
Beth Jackson Klosterboer says
Hi Beth, I purchased my brushes from a wholesale chocolate supplier years ago. I can't find them on amazon.com and sadly don't know the brand name as they've been out of the package for so many years. If I can find the information, I'll let you know. I think the candy making supply shop in my area carries them. I can call and find out later today when they open.
Beth says
Guess I'll just keep looking for ones I like. Precision gets tricky with these guys but maybe one day I'll get them as perfect as yours. Thanks for the help. I appreciate it!
Beth Jackson Klosterboer says
Hi Beth, well I called around to a few places and no one seems to carry them. I'll keep my eye out. I love them because they have plastic handles and a nice size tip.
Anonymous says
Wow! How fun! I've wondered how that great detail is achieved on these type of suckers. Thanks so much for taking the time to share this with other people! My family will enjoy doing this together so much! God bless you! Thanks again! Happy Easter!
Beth Jackson Klosterboer says
Happy Easter to you too. Have fun making your lollipops.
Gissel8701 says
Hi Beth,
I was wondering once you make the pops, how long can you preserve them for before they spoil? I'm planning on making 80 pops for my daughter's 1st Birthday and since I'm a beginner, I wanted to plan a head to make room for error.
I would appreciate any further tips you can give.
Gissel
Beth Jackson Klosterboer says
I usually try to make them within a week or two, but they will be perfectly fine to eat even a few months after making them. Confectionery coating has a shelf life of 6-9 months from the time it is made. It is hard to know how fresh it is when you buy it, so it is safe to assume it is already a few months old. Keep them sealed in an airtight container to preserve the best flavor.
Gissel8701 says
Hi Beth,
I was wondering once you make the pops, how long can you preserve them for before they spoil? I'm planning on making 80 pops for my daughter's 1st Birthday and since I'm a beginner, I wanted to plan a head to make room for error.
I would appreciate any further tips you can give.
Gissel
Trish says
I love making candy melts! You have such clear instructions, I would like to share them on my blog if it's okay.
Beth Jackson Klosterboer says
Hi Trish,
Thanks, I'm glad you find my instructions helpful. You may use one picture on your blog along with a description of this post and a link to the post. I appreciate it if you don't copy and paste the entire post, though.
Thanks,
Beth
Trish says
Hi Beth,
Thanks. I put a post up today. Here it is if you want to see it. http://tparties.blogspot.com/2012/08/how-to-make-candy-melts.html. I looked through some of your other posts also. You have a lot of creative ideas!
Jenilee Steigerwald says
Thank you so much for this! I can't wait til Halloween now!!! My friend introduced me to chocolate dipping..and then we found a mold at the store and decided to try that. Now I'm on Etsy looking for different crazy molds, I just didn't know how to paint them! Thanks again 😀 great blog!
Beth Jackson Klosterboer says
I'm so happy to have helped, Jenilee. There are thousands of great candy molds available and I'm sure you'll have fun painting your own homemade candies.
Art By ASM says
What a great idea with the skillet and jars to keep the chocolate tempered! I am so going to do this next time! Thank you for sharing your trick!
Happy Easter,
Annamaria
Beth Jackson Klosterboer says
Hi Annamaria, Thank you! This technique is a great way to keep confectionery coating melted, but wont actually keep pure chocolate tempered correctly without some work. If you can regulate the water temperature and keep an eye on the chocolate temperature, you could get it to work, though.
I hope you had a wonderful Easter!
Anonymous says
These are beautiful! Thanks for the tips and ideas!
Meg@MegaCrafty says
I love how these turned out! You reminded me how much I enjoyed making multi color pops. I only tried in once (made carousel horses to decorate a cake) but it was so fun I remember thinking I had to do it again. Thanks for sharing your project.
Beth Jackson Klosterboer says
Thanks! Oh, I painted carousel horses before too. They were really detailed lollipops and took so long to paint, but turned out great. I'm sure your cake looked amazing.
Beth Jackson Klosterboer says
Hi Mandy,
I am still amazed when someone from half way across the world finds my blog and is inspired to make something using my instructions. I just love it and am so glad you found my information helpful. I started painting chocolate lollipops when I was 13 years old and gave them as Christmas gifts for the past 30+ years. Everyone enjoys receiving them especially kids. Good luck with your project. Let me know if you have any questions.
I have never used gumpaste, but know that anything I create out of modeling chocolate could easily be done with gumpaste or fondant as well. I have had so much fun creating all of my holiday designs. I'm working on a new blog post that will be finished this afternoon with an image of a toy soldier made out of modeling chocolate.
Merry Christmas,
Beth
Anonymous says
Good morning to you Beth,
I have just found you after googling for info on how to go about painting molded chocolates and am already instantly grateful to you for such easy and clear instructions - thank you kindly. I have absolutely no experience with this fascinating craft, but am a quick learner and am off to the local stockist to get some candy melts to do some lovely Christmas gift chocolates. Thank you kindly - as a 53
year old novice in the world of all things baked and sweet, I am anxious to learn and practice all that I learn as quickly as possible
- thank you again, from Empangeni, South Africa.
PS I have saved your blog under my favorites and will revisit it again and again, especially all your lovely chocolate ideas that easily translate to gumpaste as well. Wishing you and yours a blessed Christmas,
Mandy Nel
Aka Schweeet Mamma Click Me!
Beverly says
Thanks so much for this!! Just what I needed. I plan on doing the princess molds for my daughters birthday and I'm nervous about doing the small details. I just hope I have enough patience!
Trish - Sweetology101 says
you make me think I could make these...have always wanted too...kinda like "bucket list" stuff.