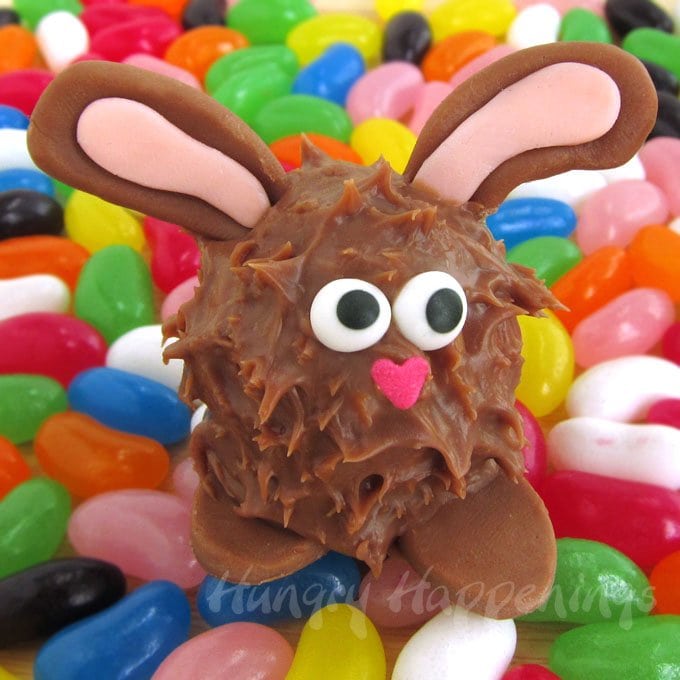
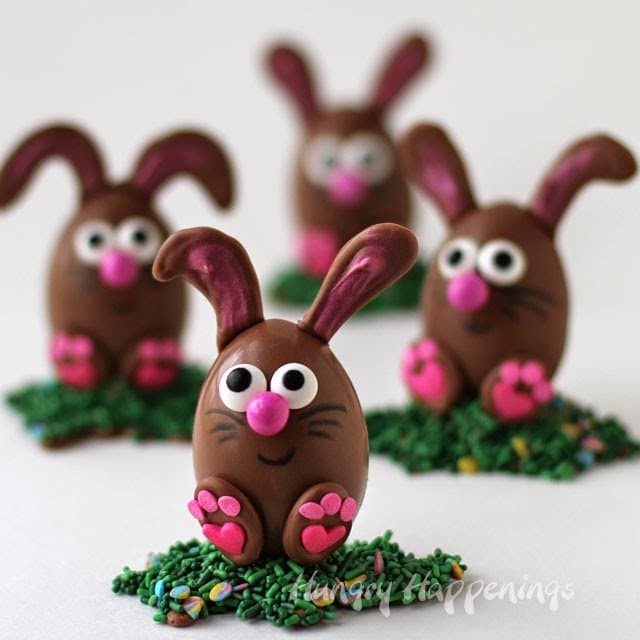
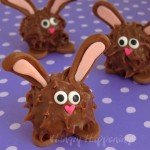
Fill your baskets with these adorably cute Peanut Butter Fudge Filled Chocolate Easter Bunnies. Each one is made with a peanut butter fudge ball coated in milk chocolate ganache and is decorated with chocolate ears and feet.

Waking up on Easter morning to find a basket filled with sweet treats was one of the highlights of my year when I was young. Oh, who am I kidding, I still love it.
Of course, the chocolate bunnies that used to satisfy me at age 7, don't hold a candle to the ones found in my basket now.
Each year my husband goes out and buys some Peeps, jelly bunnies, and jelly beans to put in my basket, but for the most part he just raids my chocolate kitchen and is always sure to grab a solid chocolate bunny and some peanut butter fudge filled chocolate eggs.

I love, love, love peanut butter and chocolate and so do my customers. Each year I make more peanut butter fudge filled eggs than any of the other 18 flavors in my selection. So when it came time to put together Easter recipes, I knew I needed to do something with peanut butter fudge.
My peanut butter fudge recipe which uses melted white candy coating and peanut butter chips mixed with creamy peanut butter and a pinch of salt is very versatile. It can be poured into molds, hardened, and served as is, like my Peanut Butter Fudge Hearts or Peanut Butter Fudge Starfish. Or it can be poured into a chocolate shell to create the eggs pictured above or my Chocolate Easter Egg Bunnies.
It can also be scooped and rolled into balls like I did to make these Peanut Butter Fudge filled Chocolate Easter Bunnies.
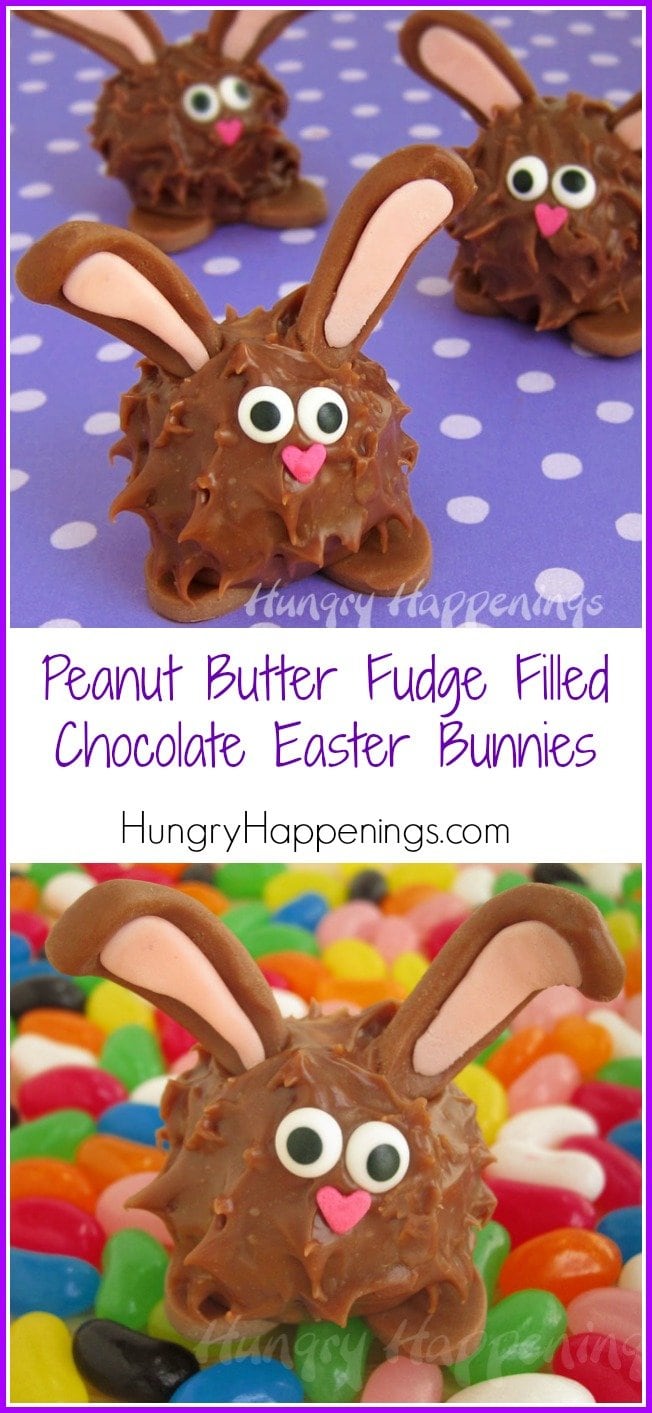
To make these bunnies, you'll make the creamy peanut butter fudge, allow it to cool and firm up so you can scoop it into balls which will be dipped into milk chocolate ganache and decorated with modeling chocolate ears and feet and candy eyes, and a cute heart-shaped nose.
This recipe will make the most decadently creamy chocolate bunny you've ever tasted.
I actually made these sweet little Easter bunnies back in 2012. That was during my second year of blogging when I didn't have a very large number of followers. They are still one of my favorite Easter treats, so I thought I'd share them with you again with enhanced images and a printable recipe.

Here are a few notes about this recipe...
I absolutely love the creamy peanut butter fudge made using peanut butter chips and white chips, but realize some of you will not have the time to wait several hours or overnight for it to set up. If you are in a hurry, you can use the peanut butter fudge recipe I used to make my Pink Fuzzy Slipper Cookies, It uses peanut butter, powdered sugar, butter, and whipping cream and is quick and easy to make.
If you aren't a fan of peanut butter but still want to make these adorably cute chocolate Easter bunnies, simply use the techniques I'm going to show you, but use cake balls, chocolate truffles, doughnut holes, or Oreo truffles instead.
I used modeling chocolate to create the ears and feet, but you could pipe them out of chocolate or use Tootsie Rolls and pink taffy or store bought fondant. There are so many possibilities.

Before you begin If you don't have much experience working with chocolate and confectionery coatings, you might want to read my Chocolate Making Tips. You'll also find the recipe and tutorial for making homemade modeling chocolate there too along with troubleshooting information.
Ingredients:
Peanut Butter Fudge -
8 ounces white confectionery coating*
4 ounces Reese's Peanut Butter Chips
1 cup creamy peanut butter (I suggest Jif Peanut Butter)
a pinch of salt
Milk Chocolate Ganache -
16 ounces good quality milk chocolate, finely chopped or chips
½ cup heavy whipping cream
1 tablespoon light corn syrup
Decorations -
milk modeling chocolate (¼ of the recipe will be enough for this project)
white modeling chocolate (¼ of the recipe will be more than enough for this project)
pink candy coloring
powdered sugar to dust work surface, optional
water
36-40 candy eyes
18-20 pink heart sprinkles
*I personally use Peter's White Caps which you can usually find at cake/candy decorating stores, but Merken's white coating also has a good flavor for this recipe. A grocery store option is to use Nestle Premier White Morsels (white chips) which when melted may need a teaspoon of vegetable oil stirred in, if too thick, they have the right flavor.
Supplies needed:
Microwave-safe mixing bowl
rolling pin
small oval metal cutter
parchment paper or Silpat
baking sheet
double boiler (or use a pan with a bowl set on top)
drinking glass
chocolate dipping fork or a plain fork
spatula or knife
optional, tweezers (food only)
Items used to make this recipe available on Amazon.com (affiliate links)
 Reese's Peanut Butter Bakin...Shop on Amazon
  Pink Heart Sprinkles 2.6 Ou...Shop on Amazon
 Wilton 417-438 Wilton Oval ...Shop on Amazon
  White And Black ½-Inch Ca...Shop on Amazon
Instructions:

Place white confectionery coating wafers and peanut butter chips in a microwave-safe mixing bowl. Heat on high power for 30 seconds. Remove and stir the chips around or they will burn. Heat for 25 more seconds, then stir. Heat for 20 seconds, then let it sit in the microwave for 2-3 minutes, then stir vigorously.
If all of the chips are not melted, heat at ten-second intervals, stirring in between each, until completely melted. If you don't have a microwave, you can melt this in a double boiler. Once melted, stir in peanut butter and salt.
Make sure to mix really well, scraping the bottom of the bowl. If you don't stir the peanut butter into the candy, you'll end up with clumps of hardened candy coating your peanut butter fudge.
Don't you just want to put your mouth under the flowing fudge? I can't resist sampling it in its liquid state. Quality control is so important, don't you agree?
At this point, you need the peanut butter fudge filling to go from a melted state to a solid state. I like to just cover my bowl and let it sit overnight. If you don't have that kind of time, pour it into a shallow bowl, like a pie dish, and let sit for several hours until set.
While your peanut butter fudge is setting you can get busy making your bunny ears and feet. Use the instructions here to color your white modeling chocolate pink. Just be aware that the pink coloring can be very vibrant and bright, so use a very small amount.
Make bunny ears.
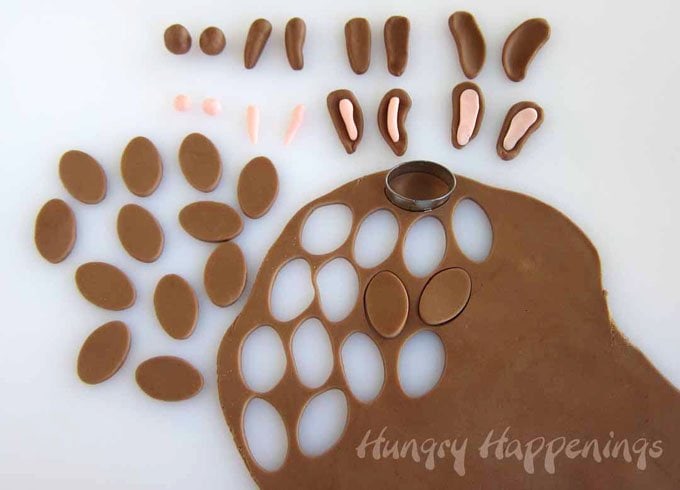
To make the bunny ears, pinch off 40 small pieces of your milk-flavored modeling chocolate. Roll into balls then into a teardrop shape then flatten and curve up the edges and bend 20 to the right and 20 to the left.
Pinch off smaller pieces of pink modeling chocolate and do the same making the pink fur for inside the ears. Brush the back of the pink piece lightly with water and press it onto the brown ears.
Lightly dust your work surface with powdered sugar. Roll the milk-flavored modeling chocolate to about ⅛" thickness. Use a small oval metal cutter to cut out 40 feet. If you don't have a small oval cutter, you can just pinch off balls of milk modeling chocolate and flatten them into ovals.
Make peanut butter fudge balls.
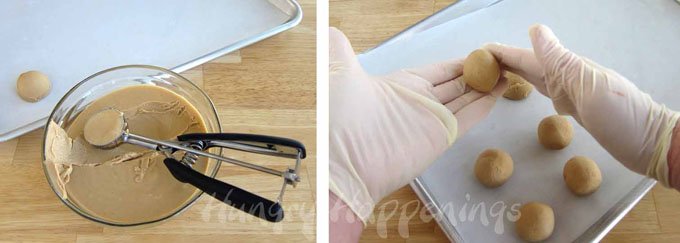
Once your peanut butter fudge has been set up, scoop out 18-20 heaping tablespoonfuls and roll into balls.
If your hands are warm, the balls will melt a bit as you roll them. Either wash your hands as needed or wear food-handling gloves, as I did. If the balls are a bit bumpy, it won't matter.
Make chocolate ganache.
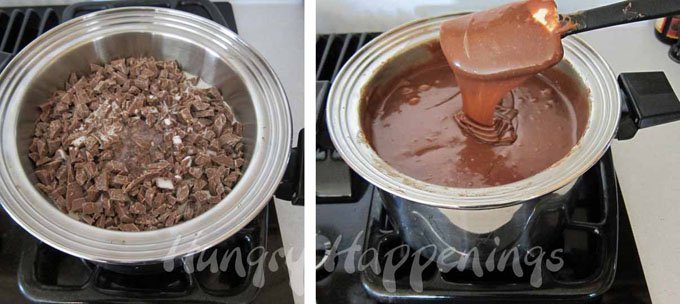
Use a double boiler or a pan with a bowl that fits on top of the pan to make your milk chocolate ganache. Fill the bottom pan with 1 inch of water. Set it over low heat. Fill the top bowl with your chopped milk chocolate, heavy whipping cream, and corn syrup. Set the bowl on top of the pan of water making sure the water doesn't touch the bowl.
Allow the chocolate to melt, stirring often. Do NOT increase the heat or you might burn the chocolate. Allow it to melt slowly.
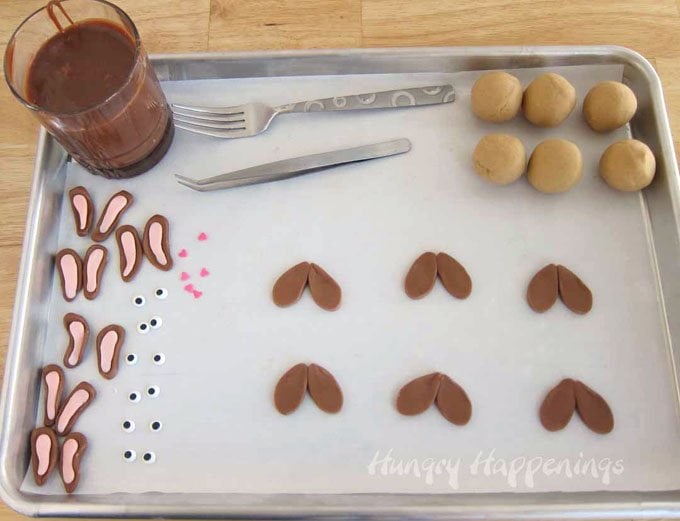
Pour some of your milk chocolate ganache into a drinking glass for ease of dipping. Place two bunny feet next to each other on a parchment paper or Silpat lined baking sheet.
Have your chocolate ears, candy eyes, and heart sprinkles ready. I find it easiest to add small decorations if I use tweezers so have those ready too.
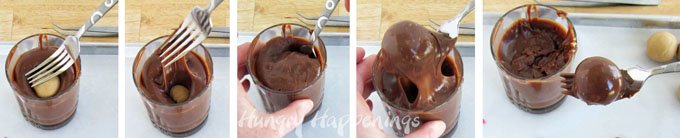
Dip peanut butter balls.
Set one peanut butter ball in your chocolate ganache. Use a fork to press the ball down into the ganache, covering it completely. Put the fork under the ball and pull it out of the ganache. Tap the fork on the side of the glass a few times to remove the excess ganache.

Make the chocolate look furry.
Set the peanut butter fudge ball on top of two of the modeling chocolate bunny feet. Use a spatula or knife to create the furry look of your chubby bunnies. Press the spatula onto the chocolate ganache, and pull up and away creating spikes. Do this all around the peanut butter fudge ball.
If you have any spots where the peanut butter fudge is showing, fill in with some ganache. Immediately decorate your bunny.
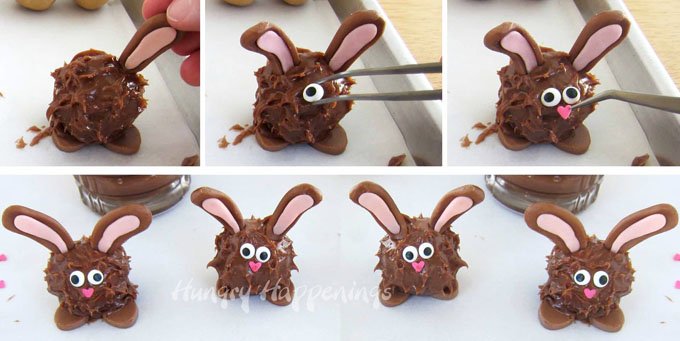
Decorate your bunnies.
Press the ears onto the top of the ball.
Press on two eyes and a heart-shaped nose.
Repeat creating more bunnies. Allow your chocolate bunnies to sit at room temperature to dry.
Storage
Store in an airtight container for up to 10 days. If you keep them refrigerated, just be aware that the modeling chocolate pieces will get condensation on them and will appear sticky, so I recommend just keeping them at room temperature.
If you’d like to have the ultimate guide to working with Candy Clay (modeling chocolate) be sure to get your printed or e-book copy of Candy Clay Creations. This 102 page book is filled with tips and tricks for making and working with candy clay along with 17 step-by-step tutorials for decorating cupcakes, cookies, and more using candy clay. It’s a fantastic resource for anyone who wants to make festively decorated treats.
RELATED: Find dozens of easy fudge recipes at HowToMakeEasyFudge.com.
Related Recipes
Be sure to check out all of my Easter Recipes.
Recipe
Fill your Easter Baskets with Peanut Butter Fudge Filled Chubby Bunnies! They're so delicious and are the perfect Easter candy.
- 8 ounces white confectionery coating candy coating
- 4 ounces Reese's Peanut Butter Chips
- 1 cup Jif creamy peanut butter
- a pinch of salt
- 6 ounces milk modeling chocolate
- 2 ounces white modeling chocolate
- pink candy coloring
- powdered sugar to dust work surface optional
- water
- 36-40 candy eyes
- 18-20 pink heart sprinkles
- 16 ounces good quality milk chocolate finely chopped or chips
- ½ cup heavy whipping cream
- 1 tablespoon light corn syrup
-
Combine white confectionery coating and peanut butter chips in a microwave safe mixing bowl.
-
Heat for 15-30 second increments, stirring after each, until melted.
-
Stir in the peanut butter and salt.
-
Pour it into a shallow bowl and let sit for several hours until firm.
-
Scoop out 18-20 heaping tablespoonfuls and roll into balls.
-
To make the bunny ears, pinch off 40 small pieces of your milk modeling chocolate.
-
Roll into balls then into a teardrop shape then flatten and curve up the edges and bend 20 to the right and 20 to the left.
-
Pinch off smaller pieces of pink modeling chocolate and do the same making the pink fur for inside the ears.
-
Brush the back of the pink piece lightly with water and press it onto the brown ears.
-
Lightly dust your work surface with powdered sugar.
-
Roll the milk modeling chocolate to about ⅛" thickness.
-
Use a small oval metal cutter to cut out 40 feet.
-
Set a double boiler filled with 1 inch of water over low heat.
-
Fill the top bowl with your chopped milk chocolate, heavy whipping cream and corn syrup.
-
Allow the chocolate to melt, stirring often.
-
Pour some of your milk chocolate ganache into a drinking glass for ease of dipping.
-
Place two bunny feet next to each other on a parchment paper or Silpat lined baking sheet.
-
Dip one peanut butter ball into chocolate ganache.
-
Remove and allow excess ganache to drip off.
-
Set the peanut butter fudge ball on top of two of the modeling chocolate bunny feet.
-
Create spikes all over the ganache (see tutorial for instructions.)
-
Press the ears onto the top of the ball.
-
Press on two eyes and a heart shaped nose.
-
Repeat creating more bunnies.
-
Allow your chocolate bunnies to sit at room temperature to dry.

- Banana Split Bars – A Fun and Easy Summer Dessert - March 4, 2026
- Pineapple Fudge (No Candy Thermometer Needed!) - March 4, 2026
- No-Bake Peanut Butter Pie Recipe - March 3, 2026

Beth Jackson Klosterboer says
Thanks for the feature, Michelle!
Kristin@gratefulbelly.com says
These are so cute and I'm sure they're yummy! I'm a new follower, and I'd love to have you stop by my brand new blog and follow too! My first link party (and give-away)is running now thru Saturday night. I'd love to have you link up!
Hazel - Chicken in a Cherry Sauce says
What a genius idea - these are absolutely adorable! 🙂
Sue @ Cakeballs, cookies and more says
I love peanut butter and chocolate, and these are cute to boot.
Jo and Sue says
So cute!! Love these guys 🙂 We have a few Easter bake sales coming up and I'm guessing these would sell BIG TIME. Thanks for another great idea! You are a genius 🙂
Nicola says
Cuteness overload! I love these little guys. They're just perfect for Easter.
Lisa @ Flour Me With Love says
All of your creations amaze me! Thank you so much for sharing your talents at Mix it up Monday 🙂
Ambika says
OMG!!! These are so cute and pretty!!! Love them 🙂
Maria @ JustCallMeMaria says
Found you on a linky, these are so cute! I made sure to pin them on my Easter ideas board!
Jill @ KitchenFunWithMy3Sons.com says
These are just adorable!
Scarlett says
I LOVE THIS IDEA!!!! Easter bunny makin a list. Homemade treats this year in the basket...must be sneaky!!! 🙂
Erin says
So darn cute! You are amazing!
The Better Baker says
You're so clever and creative!!! These are just as cute as they can be. Thanks for all the tutorials too.
Robin @ Bird On A Cake says
Everything you post impresses me. These bunnies are seriously cute and sound delicious too! :0)
Winnie says
I'm speechless (and believe me it doesn't happen much often)
These bunnies are sooooooooooooo cute and adorable
and you are extremely creative!
Mama Jodi says
These bunnies are adorable. I was so glad to find your modeling chocolate recipes by clicking through. I ordered some online once and didn't have a great experience. I will try this. Thanks so much.
Kim Lau says
thank you so much for sharing all this with us. I also posted on flour me with love, that is how I found you. I made the happy birthday cake. I am going to be following you now.
Larissa says
Popping over from Sew Can Do to tell you these are adorable!
Dorothy @ Crazy for Crust says
He is so flippin' cute! Peanut butter and chocolate...yum! Those are my favorites in the Easter basket.
Mindie Hilton says
Oh such cute bunnies.