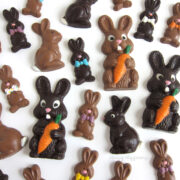
Learn how to make and decorate the cutest homemade chocolate Easter bunnies. Each hand-painted chocolate bunny is fun to make and will look great in your Easter baskets.
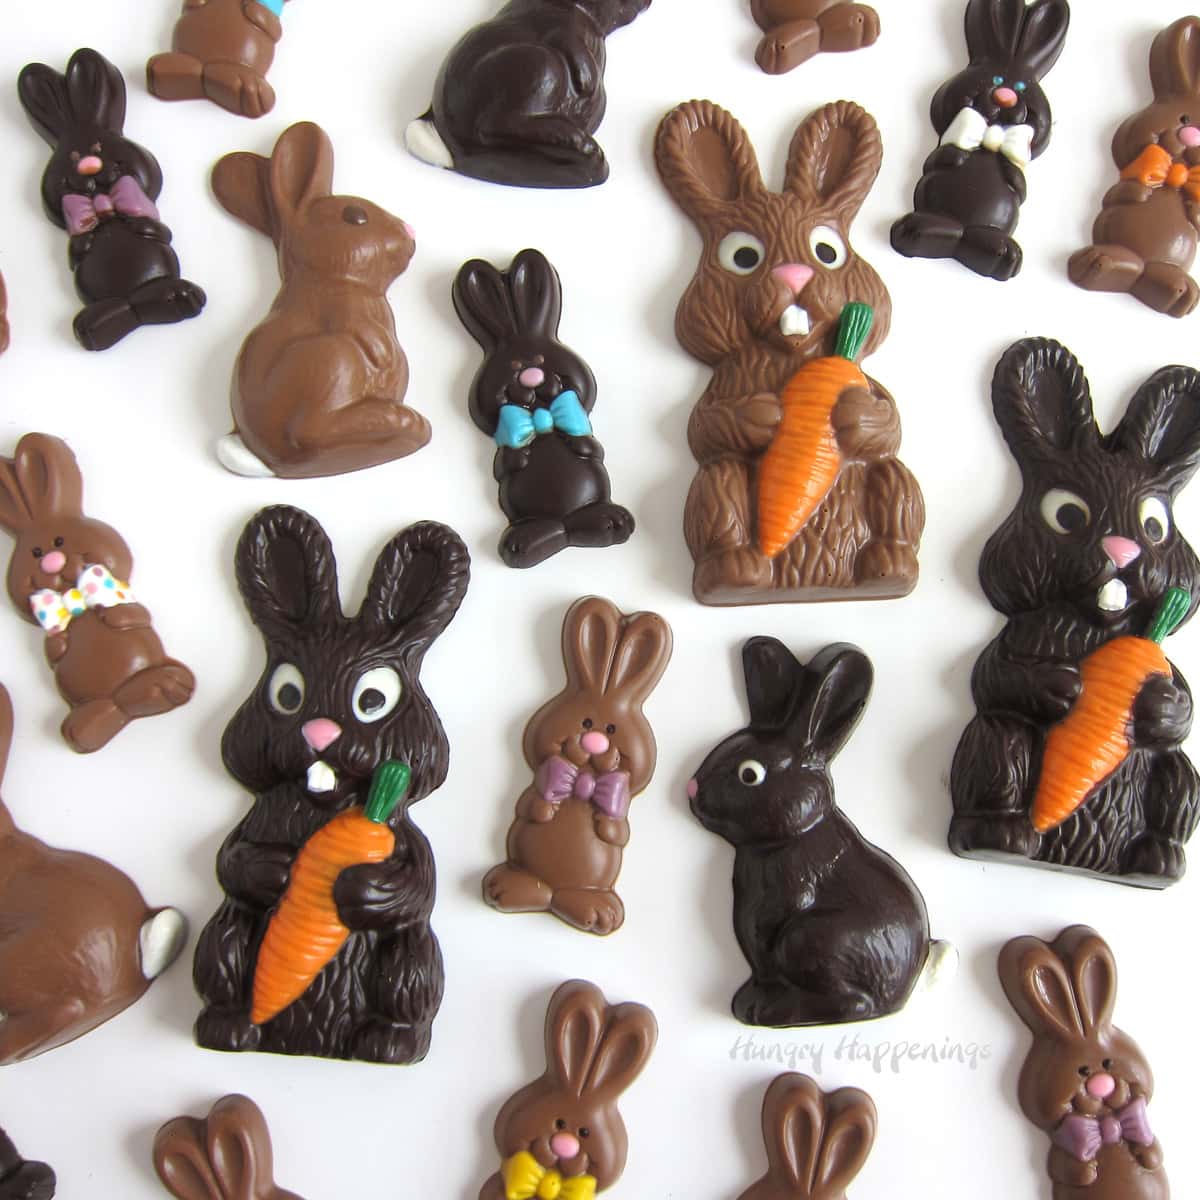
I look forward to Easter every year because I love making cute hand-painted chocolate bunnies and chocolate Easter lollipops. My husband used to laugh at me because I would hop out of bed so excited to go into my candy shop to make these sweet Easter treats.
Easter was the one time of year, I just couldn't contain my enthusiasm for chocolate-making and it was apparent to all of my customers too. They loved shopping for my hand-painted Easter candies.
Today, I am going to share my technique for creating the most adorable chocolate bunnies with you. This is a very in-depth tutorial and I hope you find it very helpful. I definitely recommend you read through the entire thing but you can skip around reading just the parts you need.
Jump To
Ingredients
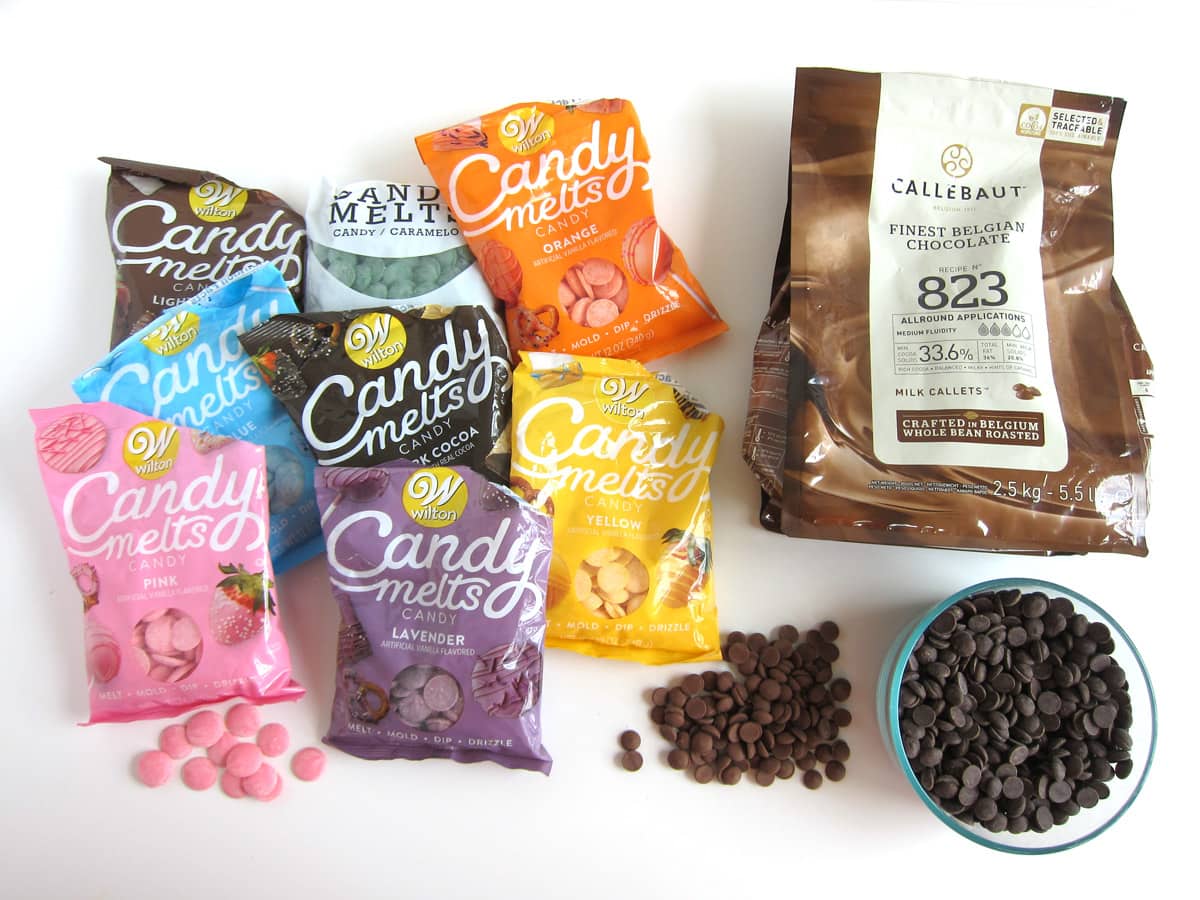
- chocolate (pure and/or compound chocolate)
Chocolate Easter bunnies can be made using pure chocolate or compound chocolate. I actually use both to make my hand-painted bunnies.
What is the difference?
Pure Milk or Dark Chocolate
- Pure chocolates contain cocoa butter which melts at body temperature giving the chocolate a luxuriously smooth texture when it melts on your tongue.
- Pure chocolate is available to buy in bars, blocks, callets (small chips), Pistoles (ovals), and chips.
- The flavor of pure chocolate is decadent and rich.
- Pure chocolate that has been melted properly will have a nice snap and shine.
- You cannot simply melt pure chocolate to use in a candy mold. It must be tempered (more on that below).
I fill my candy molds with pure chocolate to give my bunnies the best flavor.
Compound Chocolate
- Compound chocolate, also known as Candy Melts, Almond Bark, Confectionery Coating, or Melting Wafers do not contain cocoa butter. Instead, they are made using vegetable oils, typically palm kernel oil.
- Some people refer to compound chocolate as fake chocolate.
- Compound chocolates are easy to melt and will make shiny chocolate bunnies that have a good snap without a lot of fuss.
- You simply melt the wafers in the microwave or a double boiler on the stove and they are ready to use.
- The flavor isn't as rich as pure chocolate but compound chocolate does have a nice chocolate flavor.
- Some popular brands of compound chocolate are Ghirardelli Melting Wafers, Merckens Confectionery Coating, Wilton Candy Melts, and Great Value Almond Bark.
I use compound chocolates (colored Candy Melts) to create the painted parts (nose, eyes, bowties, etc.) You could use colored pure white chocolate or colored cocoa butter but I prefer using Candy Melts because it's the easiest method and the colors are vibrant.
You can also make the entire chocolate bunny using compound chocolate. It is easier just not quite as tasty!
Wax in chocolate.
Because compound chocolate melts at a higher temperature than pure chocolate it won't melt as quickly on your tongue. Due to this, compound chocolate may taste a bit waxy but there is NO wax in it. Some people do add paraffin wax when making homemade chocolates to help the chocolate firm up. This is not necessary if you use compound chocolate and if you temper pure chocolate (I'll teach you how in the instructions below).
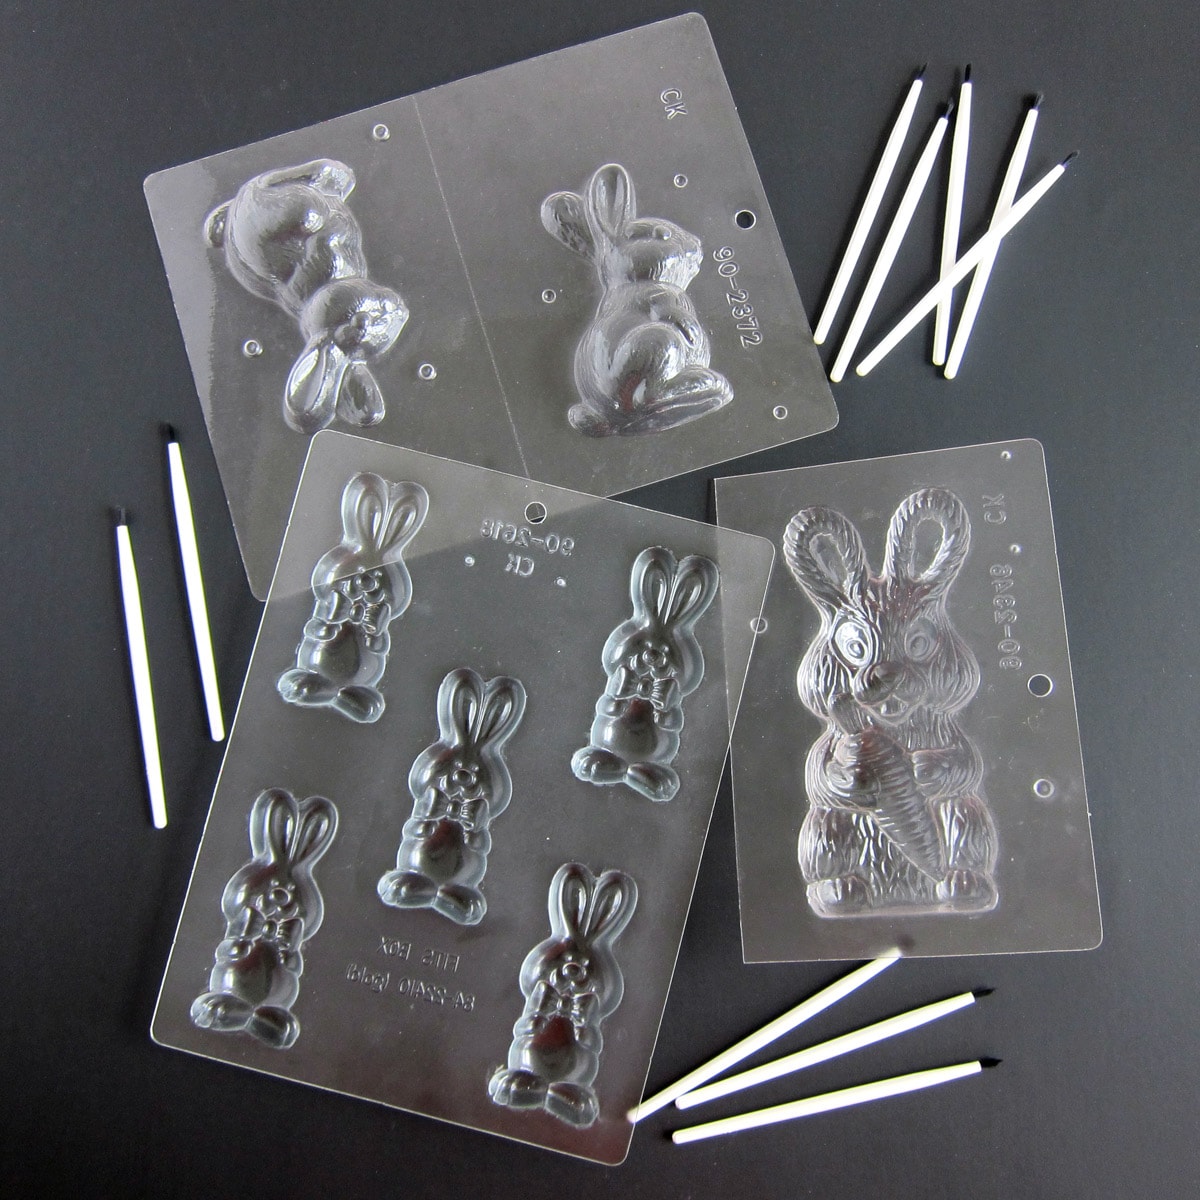
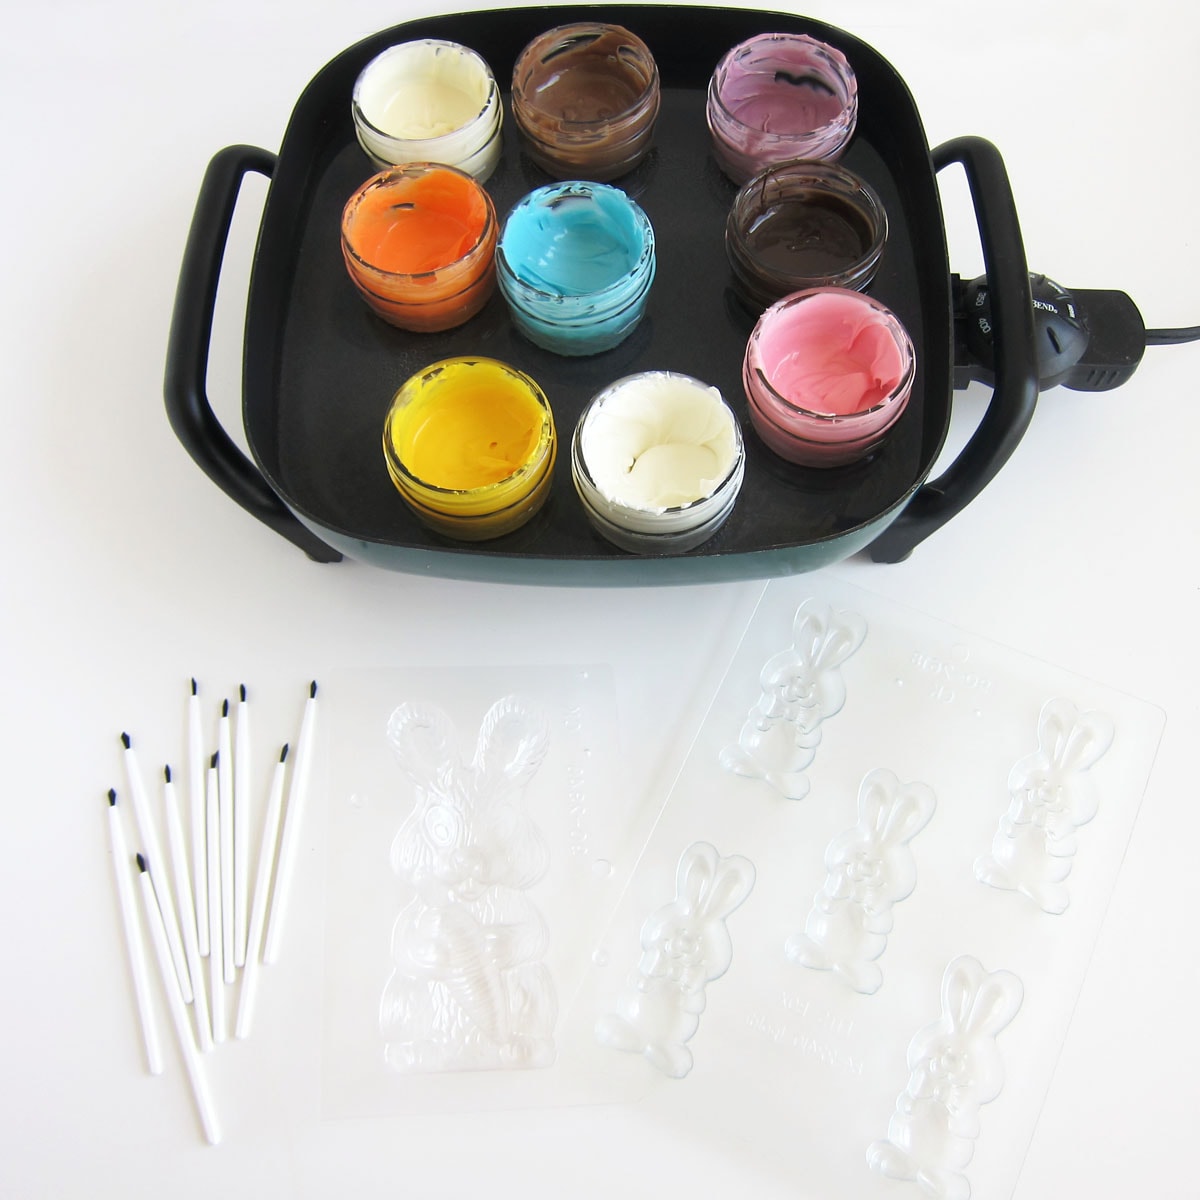
Supplies
- Easter bunny candy molds (plastic hobby-grade bunny molds or polycarbonate chocolate bunny molds)
- food-use-only paint brushes (I like Testors Paint Brushes because they have plastic handles and bristles that do not easily pull out.)
- optional, electric skillet
- jars or coffee mugs (I use the short 4-ounce mason jars)
Instructions
I like to paint the details (nose, eyes, bowties, carrots, etc.) on my bunnies using compound chocolates (Wilton Candy Melts) then I fill the chocolate molds with pure milk or dark chocolate.
Alternatively, you can use colored white chocolate or colored cocoa butter. I prefer using Candy Melts because it's easier and I get nice vibrantly colored details.
Let's start by painting the candy molds. First, you need to melt the compound chocolate.

How to melt compound chocolate (candy melts)?
- Pour your candy melts into a microwave-safe bowl and heat on high power for 30 seconds then remove and stir.
- Repeat this process until most of the chocolate is melted.
- Then heat at high power for 15-second increments, stirring after each, until completely melted.
- Alternatively, you can melt your chocolate in a double boiler set over low heat.
- Fill a pot with 1-inch of water and set a tight-fitting bowl over the opening of the pan.
- Fill the bowl with chocolate and heat on low stirring often until melted.
- Or you can melt the compound chocolate (candy melts, almond bark, etc.) in the oven if you are careful!
- Heat your oven to the lowest temperature it can go for 5 minutes.
- Then turn off the heat.
- Set a bowl of compound chocolate into the oven and let it slowly melt.
- Remember, the wafers will hold their shape as they melt. Remove the bowl and stir after about 30 minutes.
- If needed, reheat the oven.
- DO NOT leave a bowl of chocolate in a very hot oven or when the oven is heating up. It may burn.
Melt compound chocolates using an electric skillet.
You can also melt compound chocolates (candy melts) using a water bath in an electric skillet. This is my favorite method to use when I'm hand-painting chocolate bunnies for Easter because my chocolate will stay melted all day allowing me to make dozens or even hundreds of bunnies.
Simply fill jars or coffee mugs with compound chocolate (I use a variety of colored Candy Melts), and set the jars into an electric skillet. Fill the skillet with enough hot tap water to come halfway up the sides of the jars. Turn the skillet on the lowest setting (warm for most skillets) and allow the candy to melt, stirring often. D
o not turn up the heat in order to melt the chocolate more quickly as you can burn your chocolate. If you are in a hurry, melt the jars of chocolate in the microwave, then place them in the warm water in the skillet.
Let's paint some chocolate bunnies!
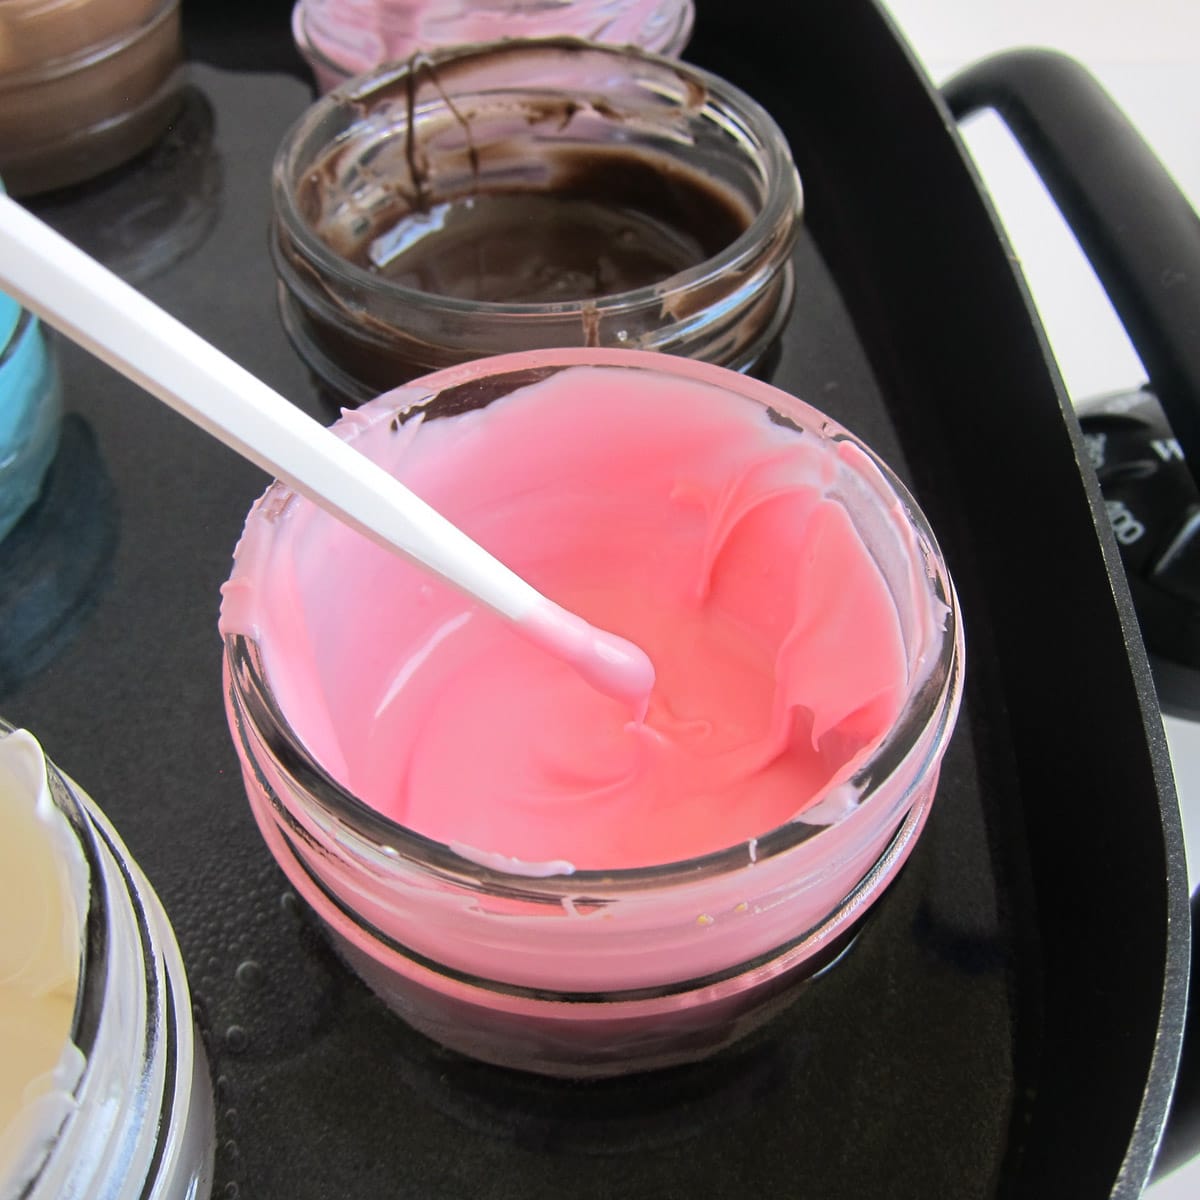
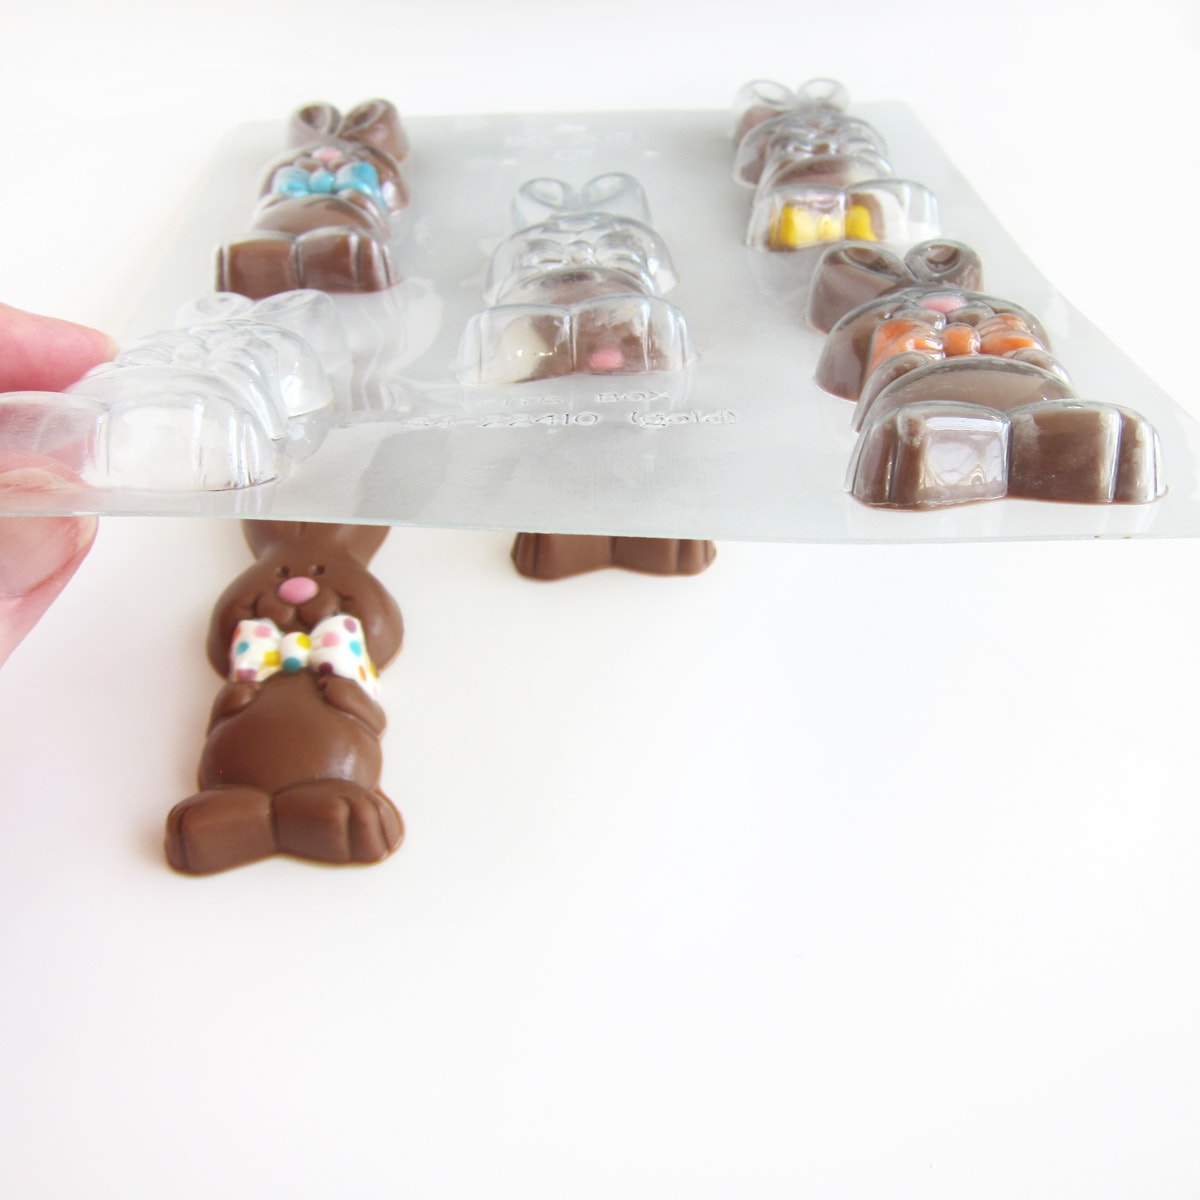
Start by dipping a paintbrush into melted candy melts. To make the bunny noses, use pink candy melts.
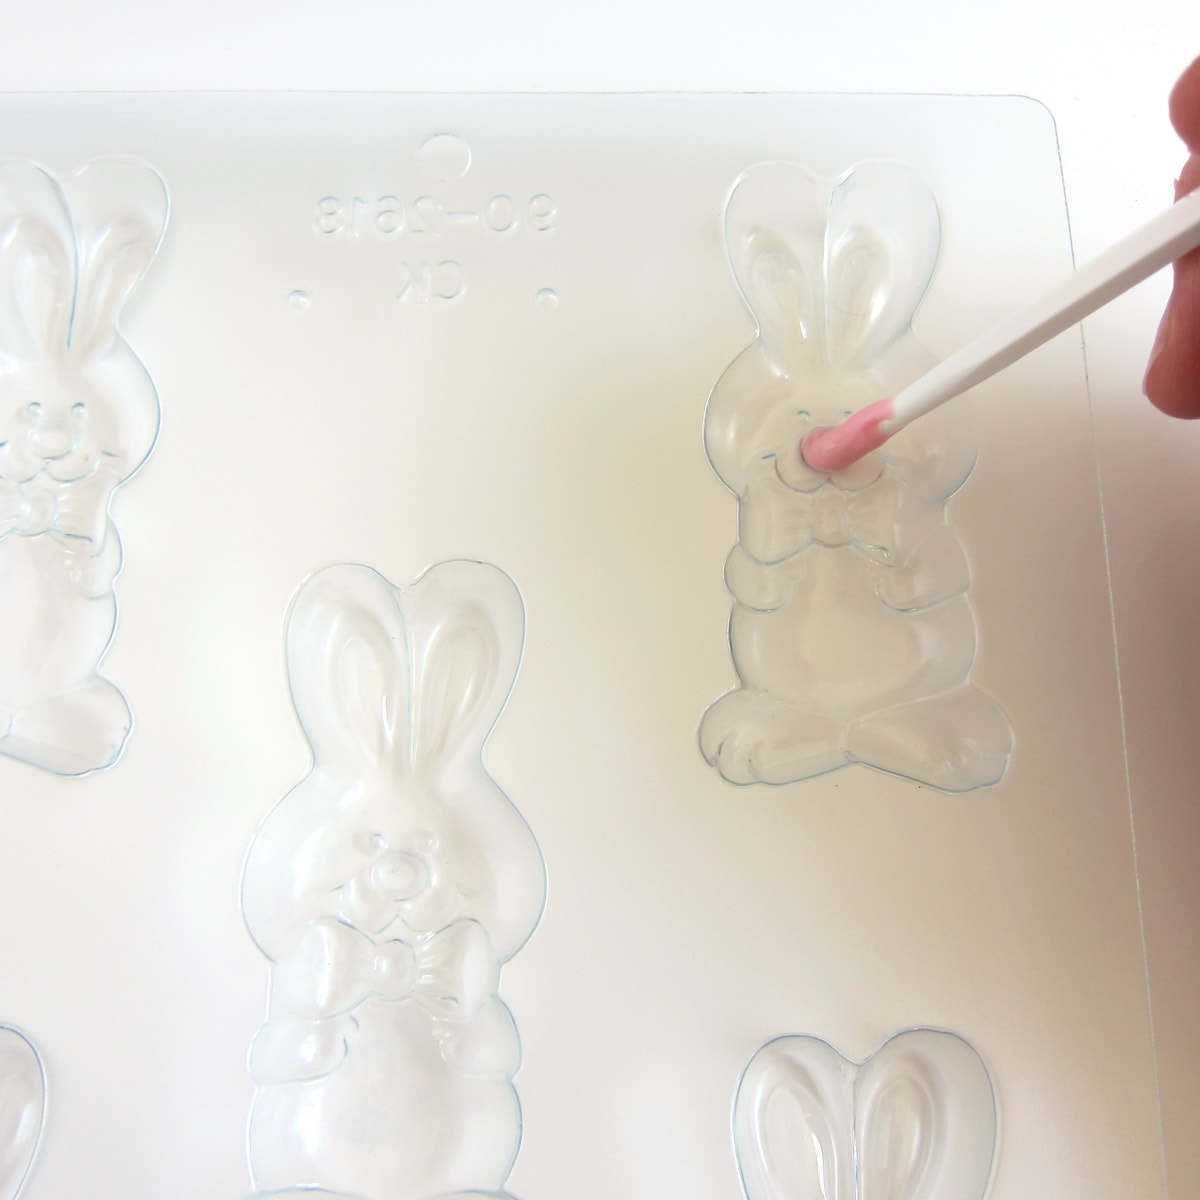
Dab the pink candy melts into the nose cavity in the plastic bunny mold.
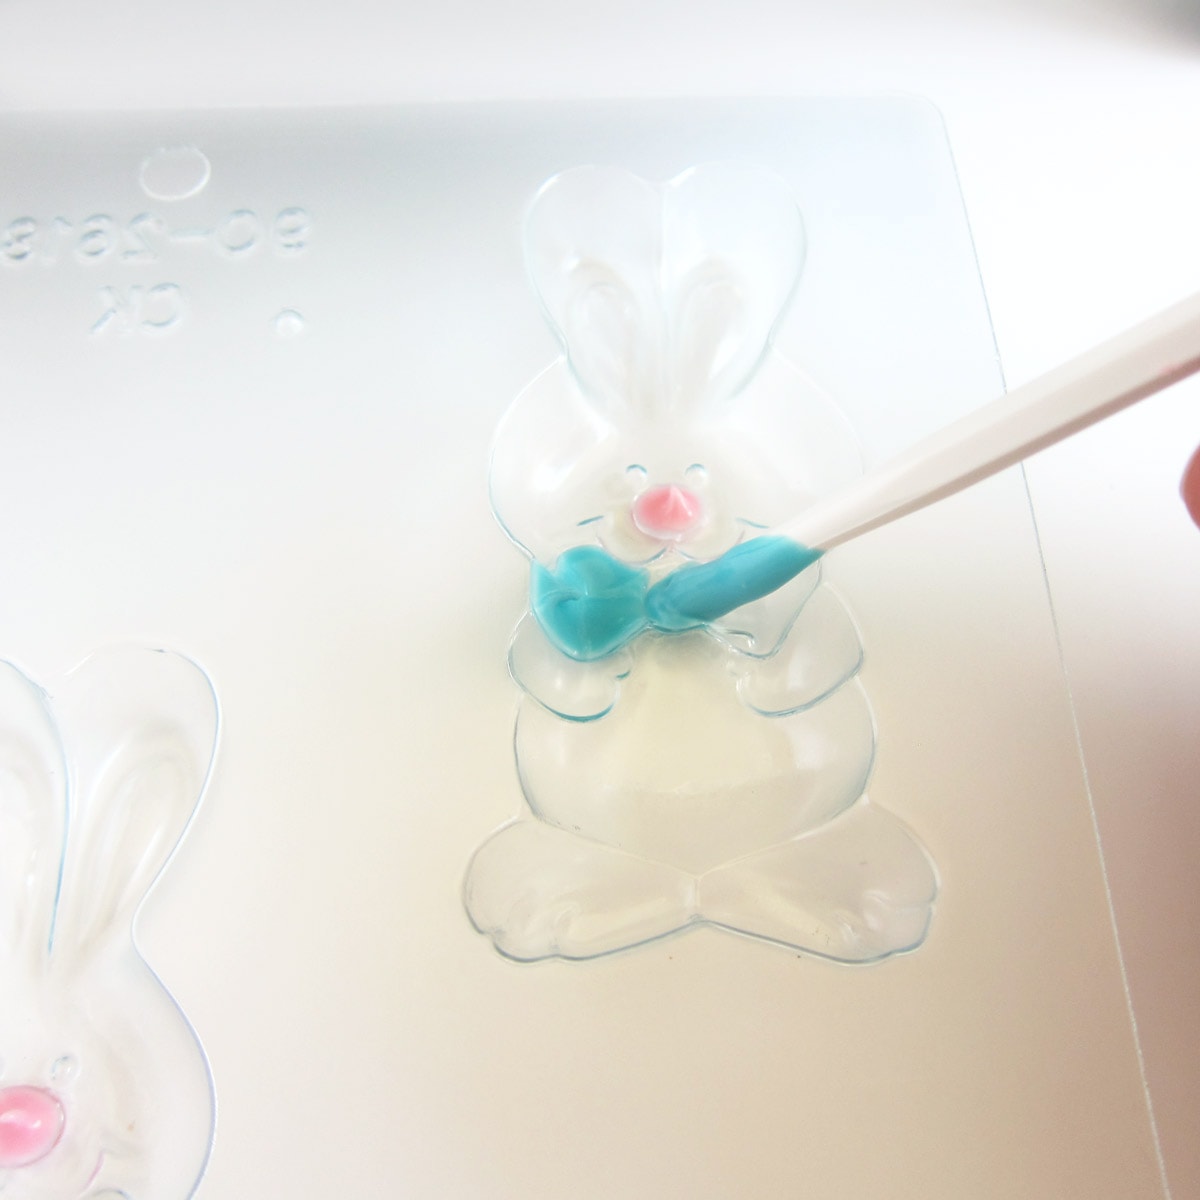
Dip a clean paintbrush into blue candy melts (use a different brush for each color) and dab it into the bow tie area in the mold. You'll need to dip the paintbrush and dab the candy melts into the mold a few times.

If you want to make a polka dot bow tie, dab a variety of colored candy melts into the bow tie cavity. Freeze the candy melts until hardened, let the mold warm to room temperature and then fill the cavity with white candy melts.
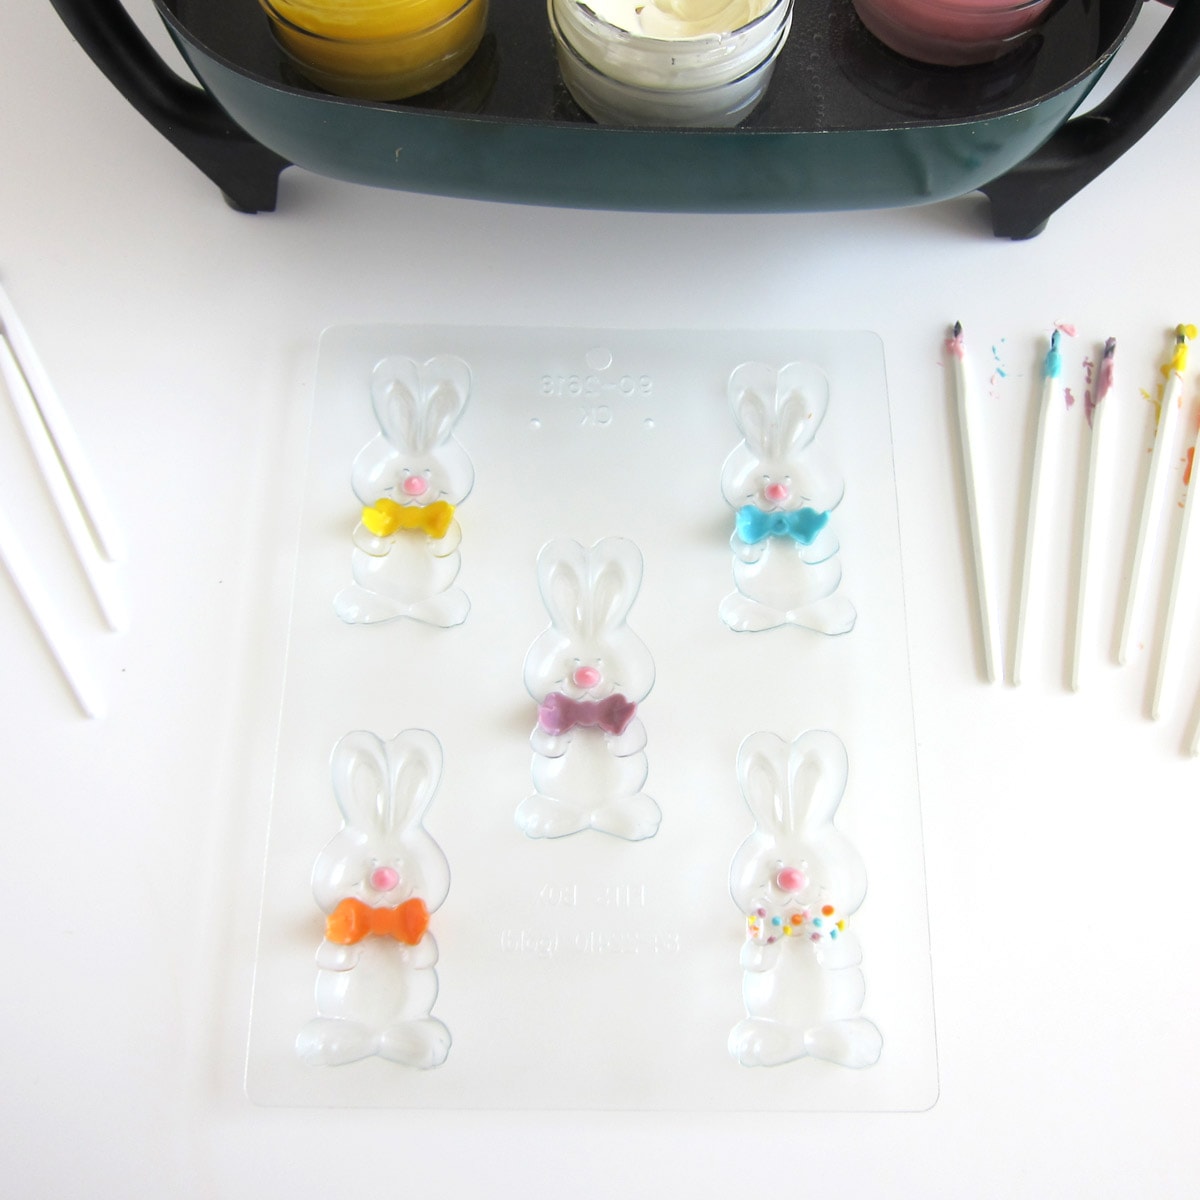
I painted solid colors into 4 of the bow tie cavities and painted polka dots into another. Once the bow ties are painted, place the mold in the freezer for 3-5 minutes until the chocolate hardens.
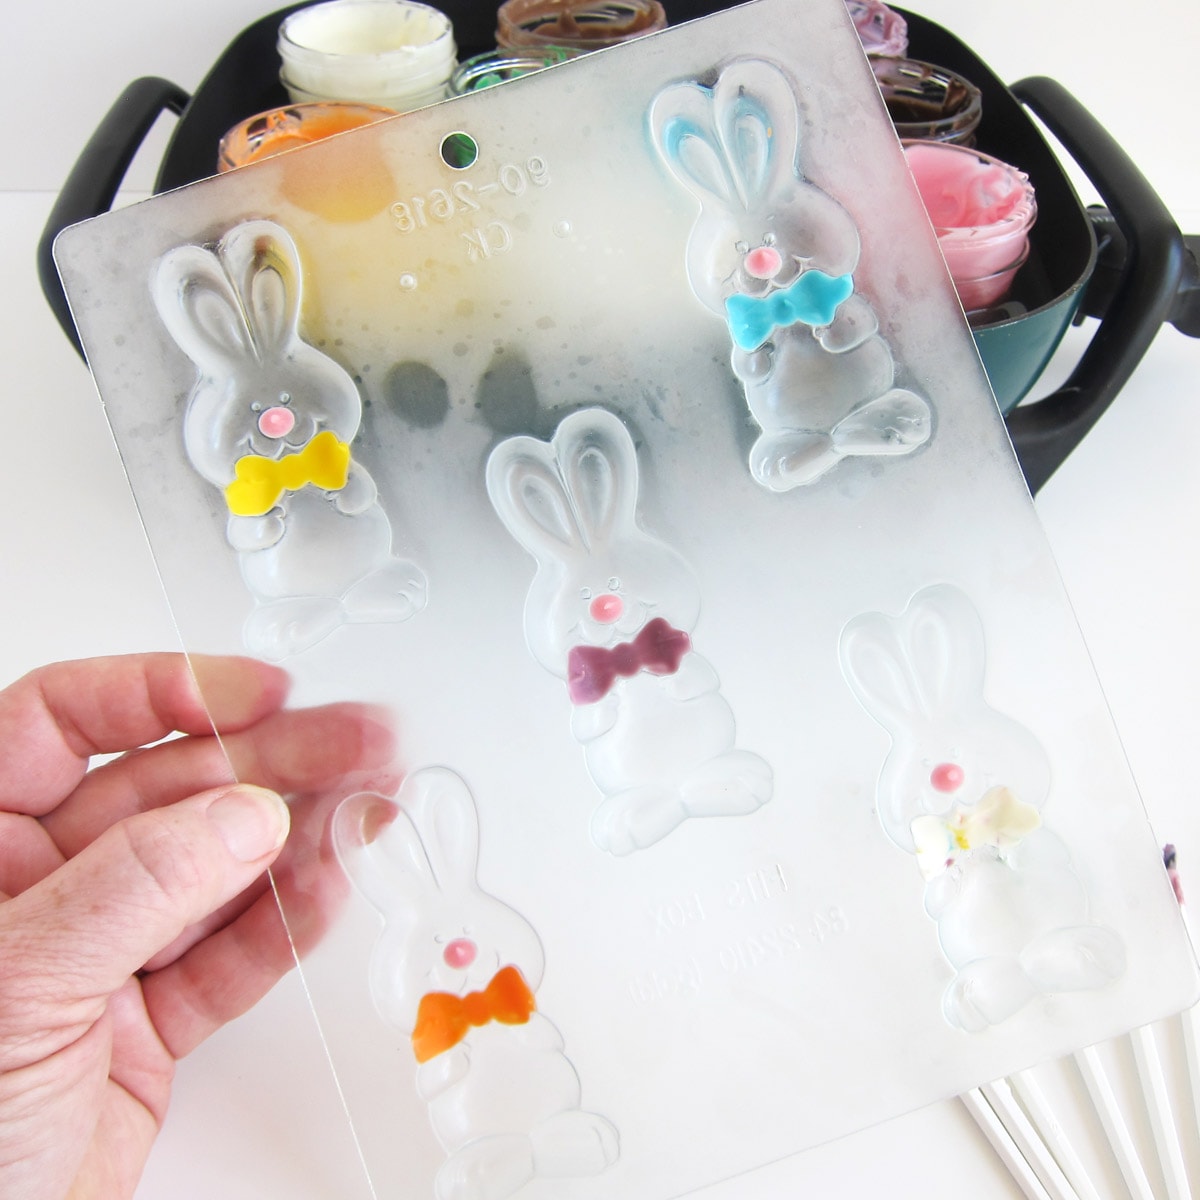
When you remove the mold from the freezer, you will notice frost on the mold. You need to wait until that frost thaws (a few minutes) before painting more chocolate into the mold.
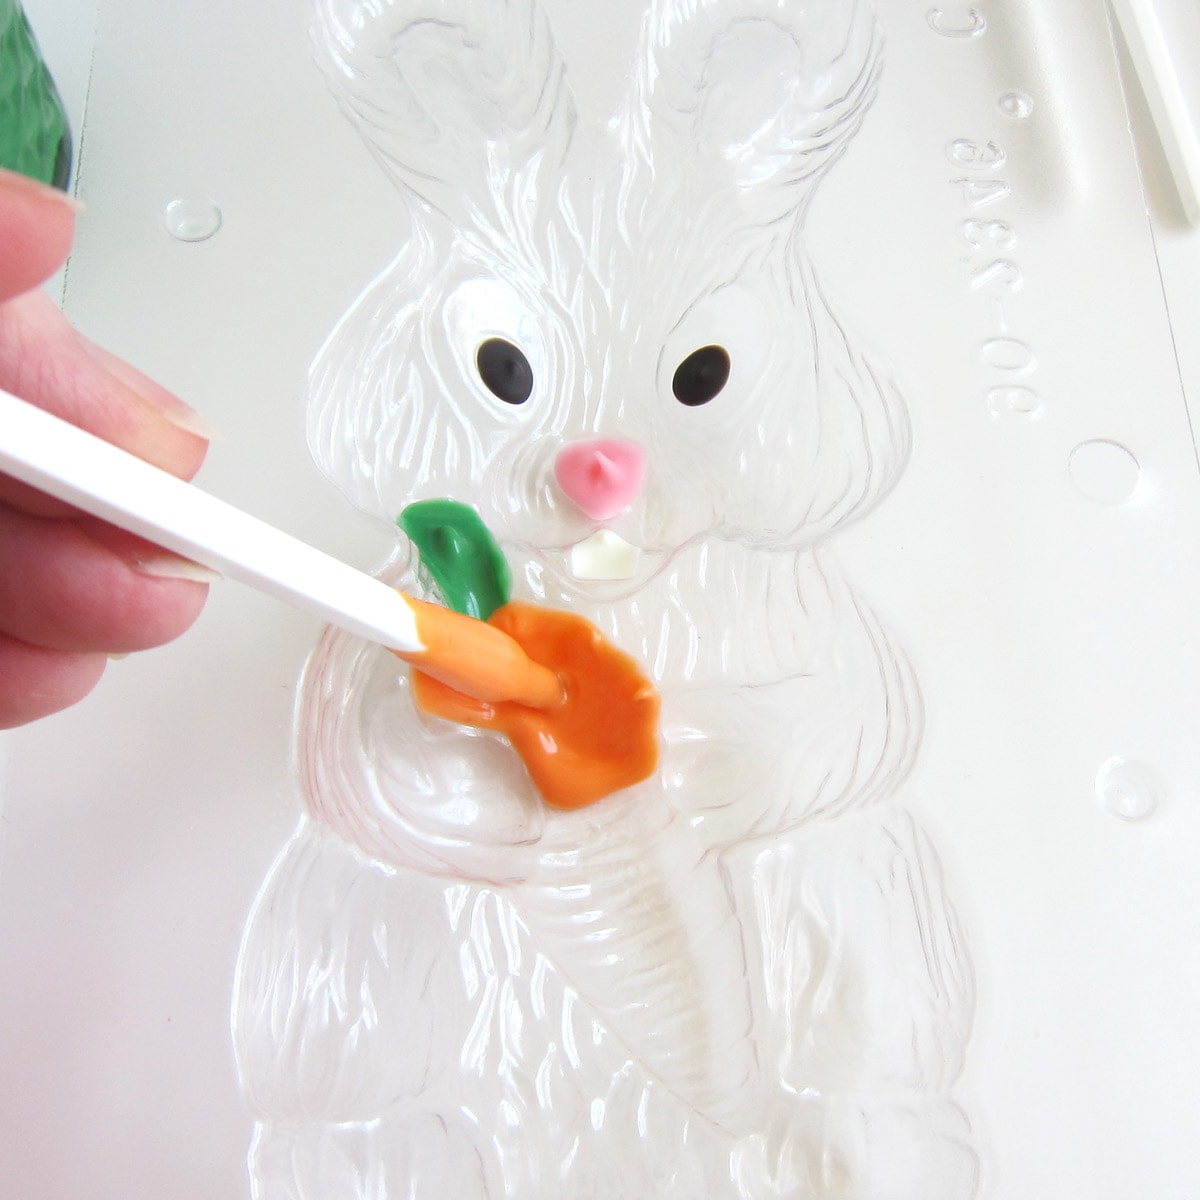
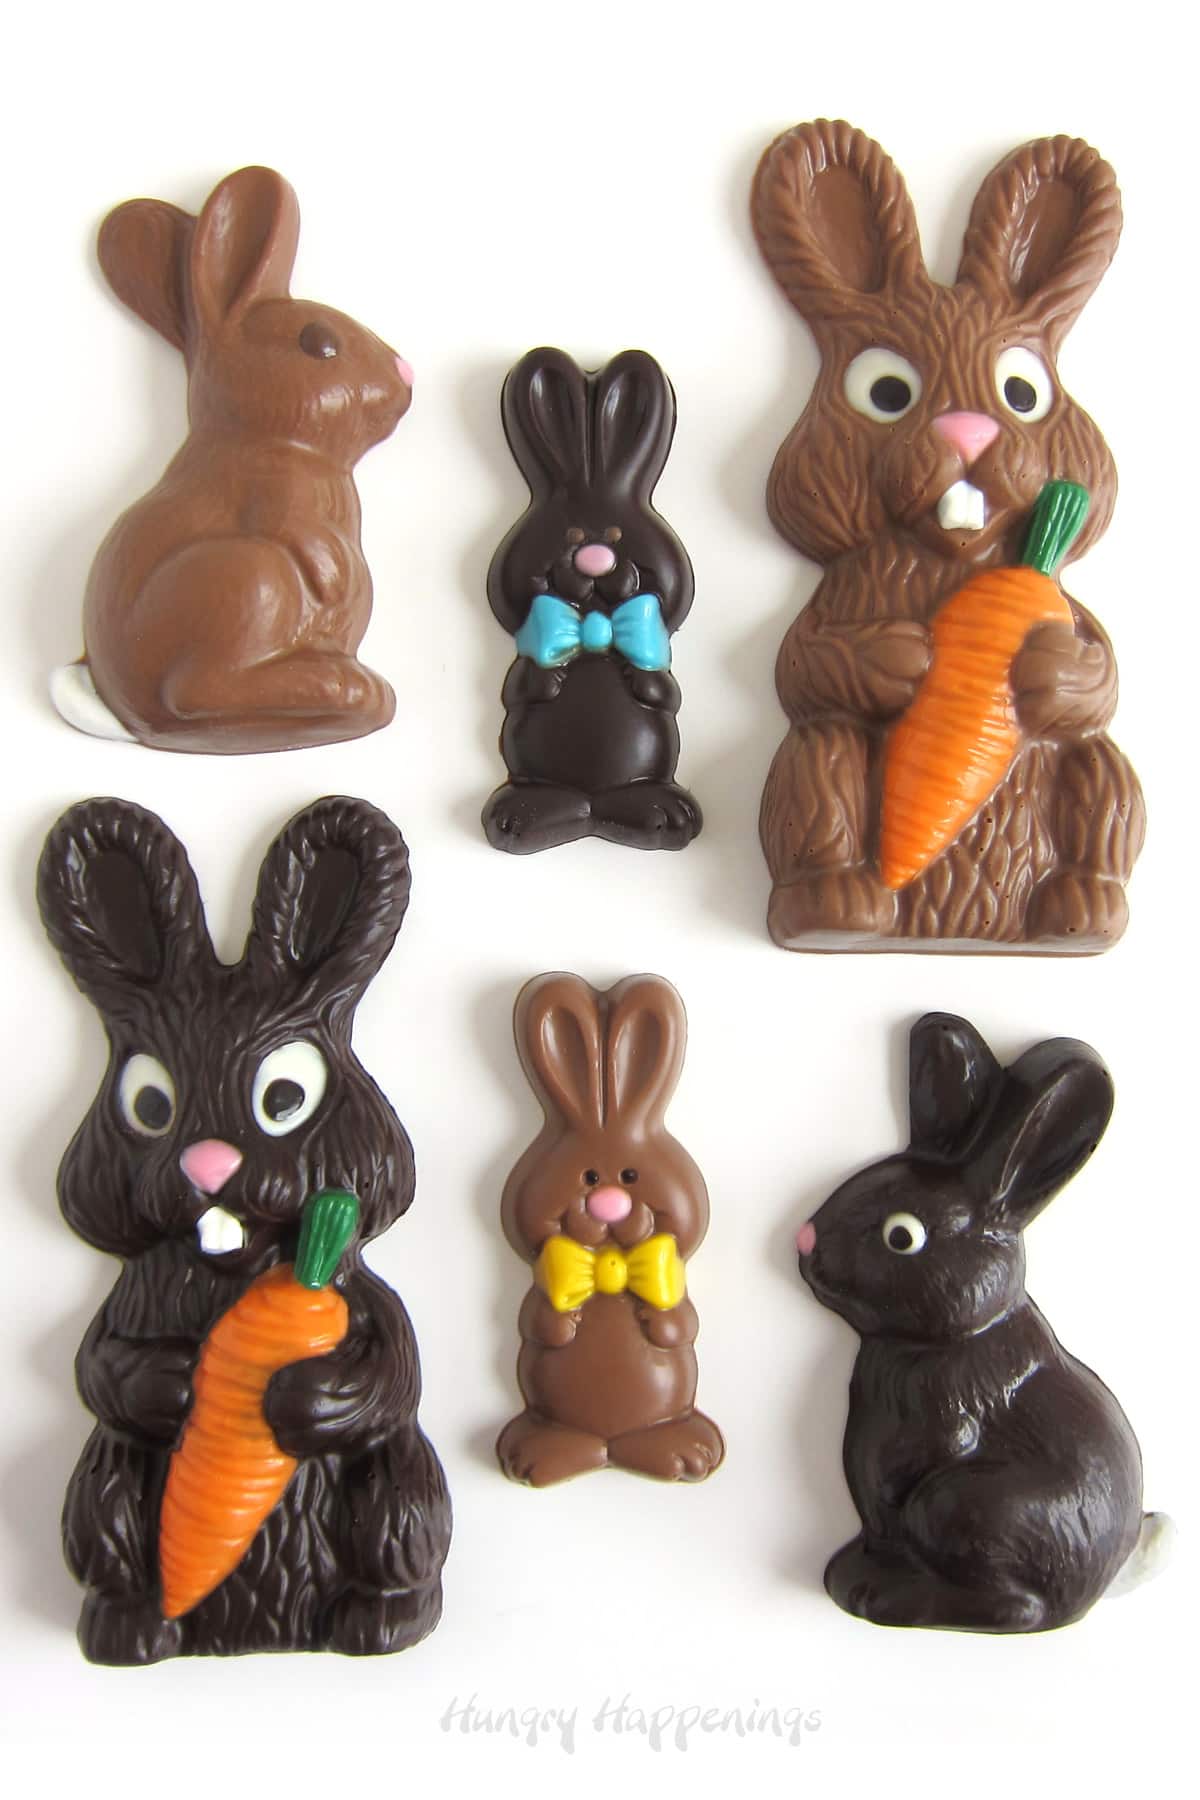
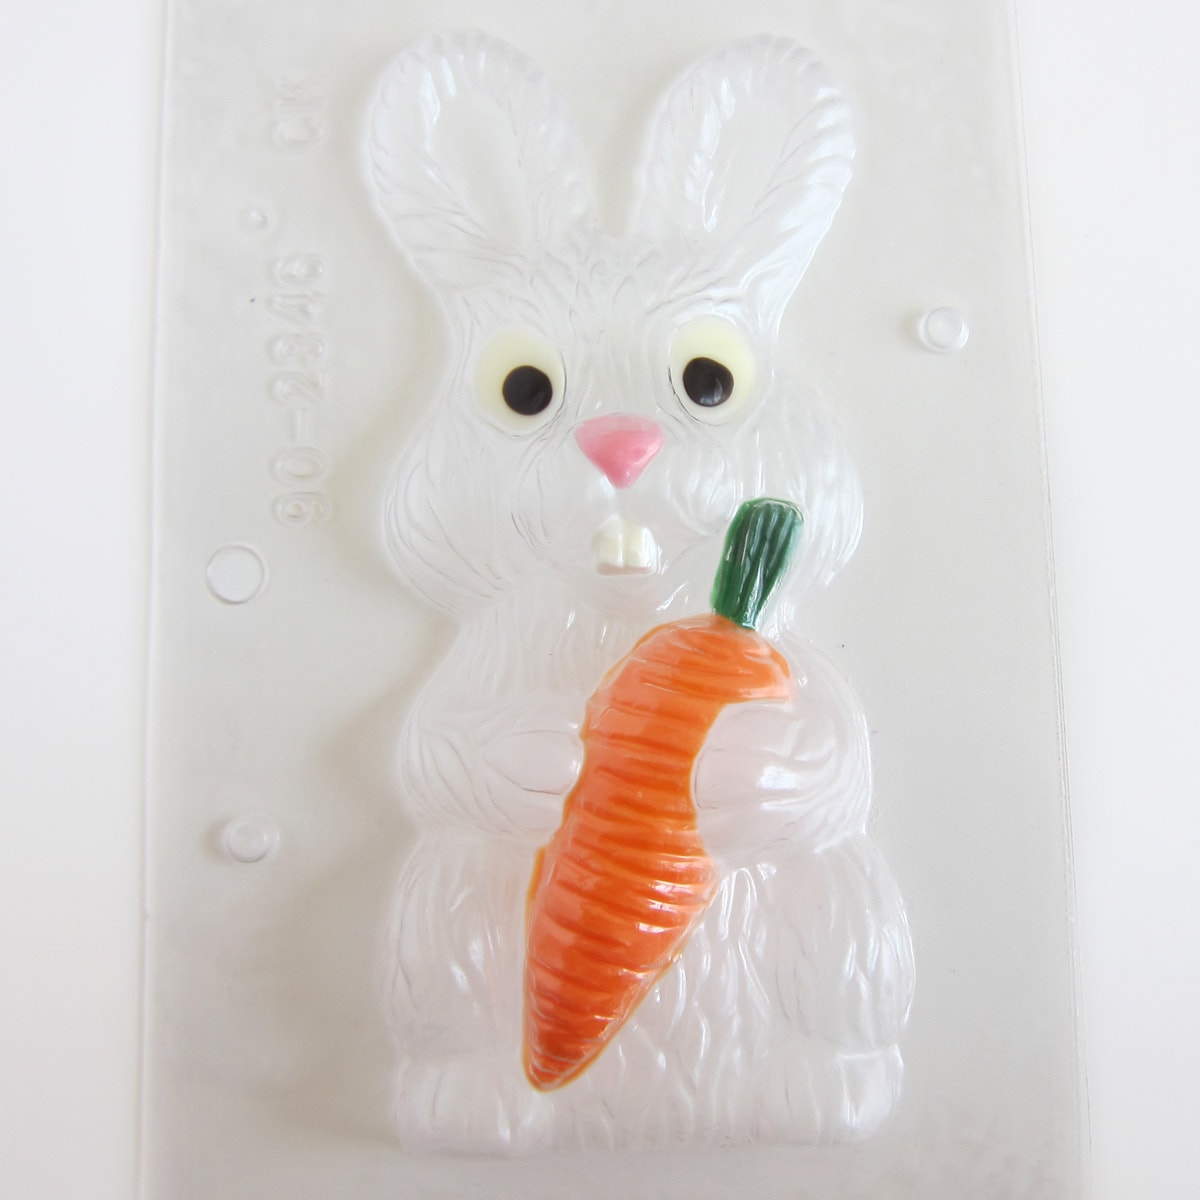
To paint a bunny with carrot mold, paint the black or dark chocolate pupils in the eyes, a pink nose, white teeth, and a green and orange carrot. Then, pop the mold in the freezer to allow the chocolate to harden.
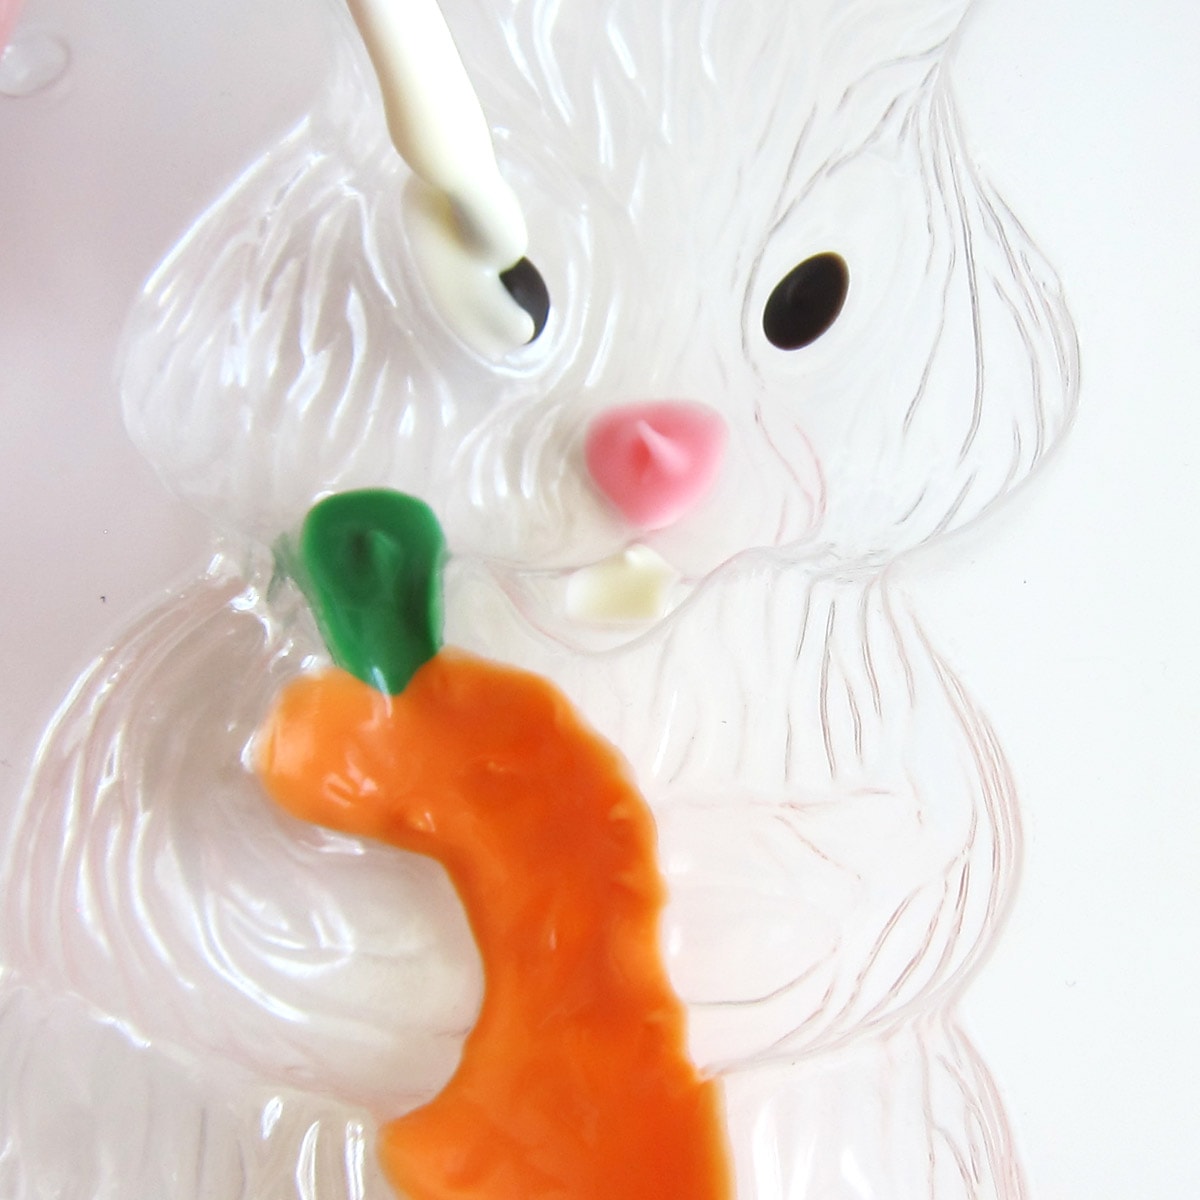
Then, layer white over the dark pupil in each eye. Dab the white chocolate around the dark pupil. Do not brush it or you might melt and smear the dark chocolate.
Tip
If you dab the colored chocolate into the mold, you will get a nice opaque color. If you brush the chocolate across the mold instead of dabbing, you'll end up with a thin, streaky-looking colored area.
When you turn the mold over, you should not be able to see through the painted areas. See how solid the orange carrot looks? If it looks thin, the milk or dark chocolate will show through.
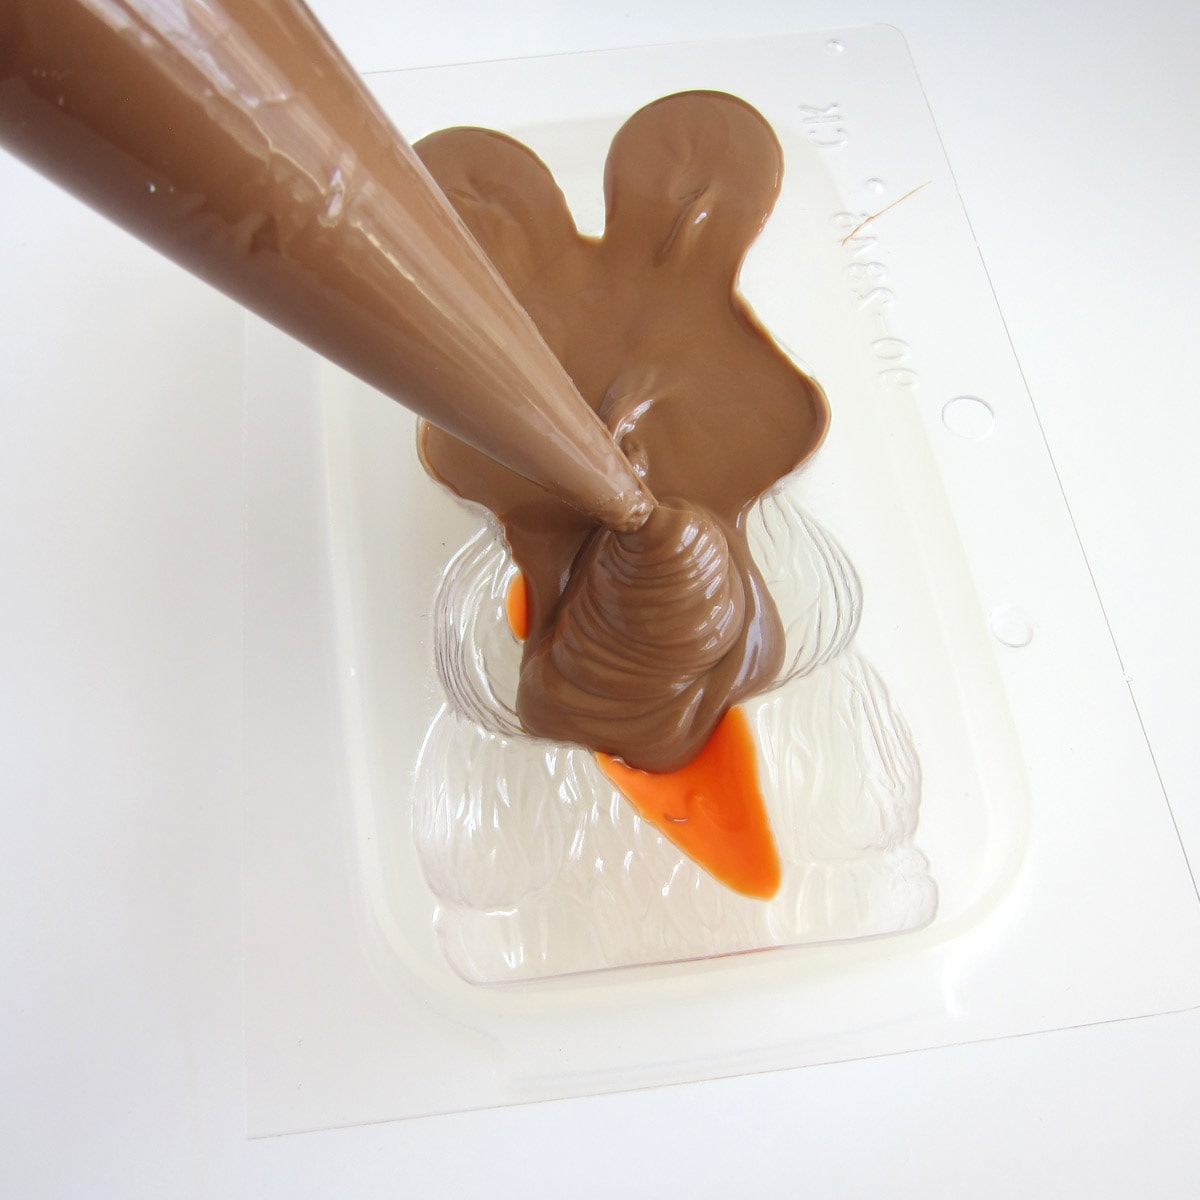
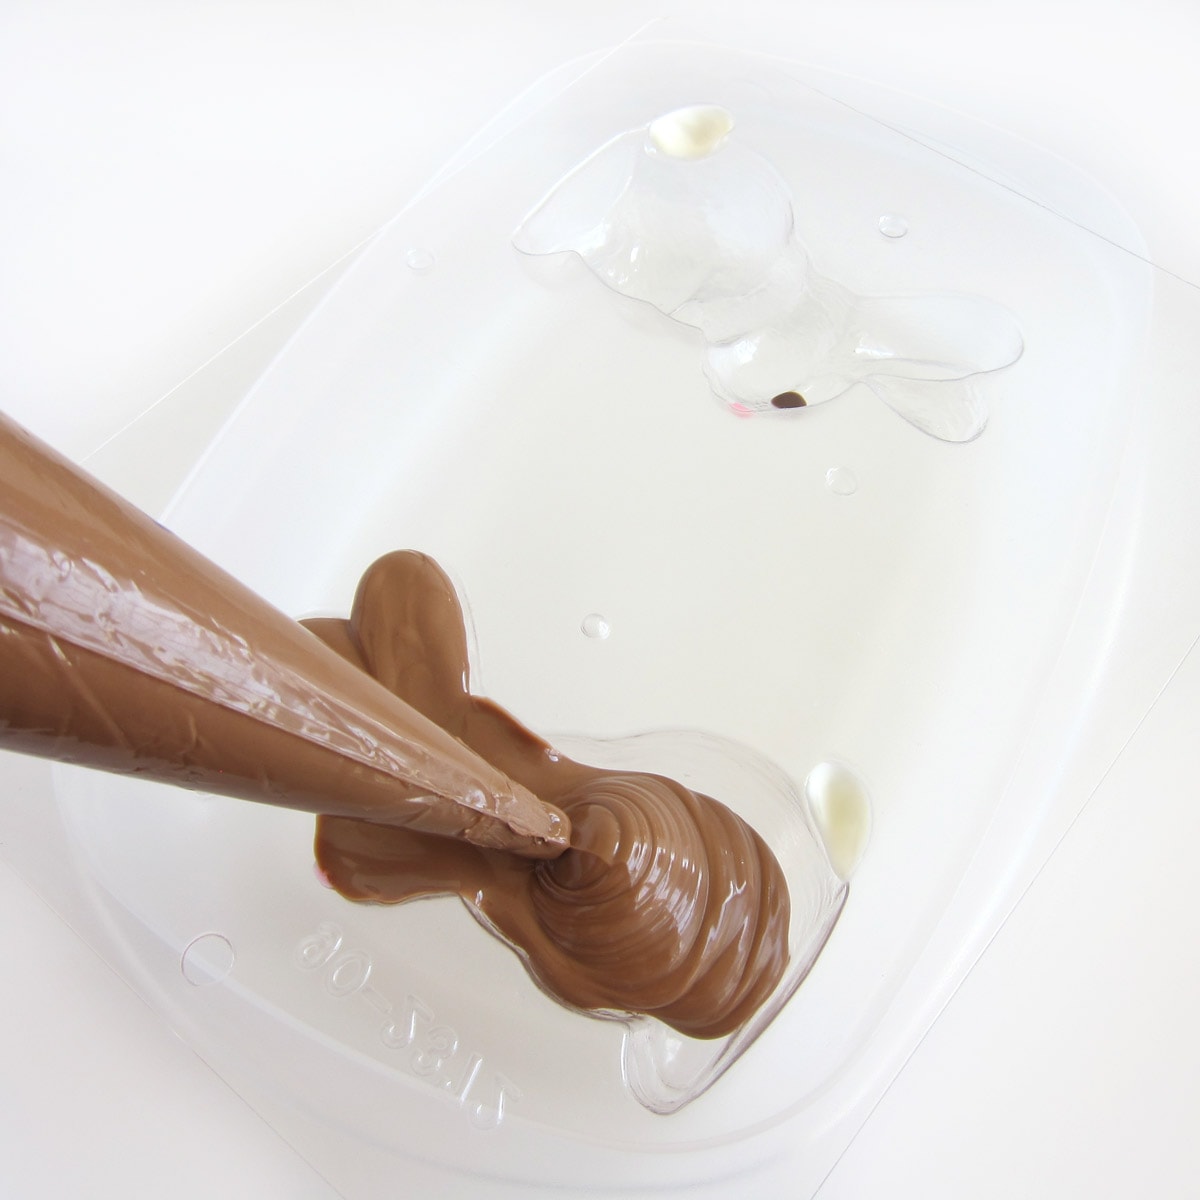
Fill the candy molds with chocolate.
If you are using compound chocolate (Candy Melts, Ghirardelli Melting Wafers, almond bark, or Merckens melts), you can simply pour or pipe the melted chocolate into the bunny molds, tap the mold on the counter a few times to remove air bubbles, and freeze it until the chocolate hardens.
But, if you are using pure chocolate, you must temper it first.
What is tempering?
- Pure chocolates must be melted (using the microwave or double-boiler on the stove) and cooled to specific temperatures to set up properly and have a good snap and shine. Compound chocolates can simply be melted.
Do I have to temper pure chocolate?
YES!
- Pure chocolate contains cocoa butter which contains crystals that are stabilized at certain temperatures. If you simply melt pure chocolate and fill a mold with it, the chocolate may not set properly. It might be soft, sticky, or even spotty.
- Chocolate bars, blocks, callets, Pistoles, or chips, that you purchase from the store are already in temper but once you melt them the crystal structure changes and they need to be tempered again.
- When you temper pure chocolate, you need to either heat the chocolate slowly so that it never goes out of temper or you need to heat it to a temperature where all the crystals break apart before cooling to get the crystals to form the proper type of crystal structure.
- When tempered chocolate is poured into a mold it shrinks slightly as it cools and hardens so it’s easy to remove from a candy mold.
- If you do not temper your pure chocolate it will NOT harden properly and it will not retract from the mold, meaning it will stick to the mold and you won’t be able to remove it.
Easy tempering method
- Finely chop or grate 16 ounces of chocolate and place in a microwave-safe bowl. You want tiny uniform pieces of chocolate for this tempering method.
- Heat on high at 10-15 second increments, stirring after each, until melted. As you get close to melting, cut the heat to 50% power.
- You need the chocolate to melt and stay within the tempering range of:
- 88-91 degrees Fahrenheit (31.111°C to 32.778°C) - for dark chocolate
- 86-88 degrees Fahrenheit (30°C to 31.111°C) for milk chocolate
- 82-84 degrees Fahrenheit (27.778°C to 30°C) for white chocolate
- If the temperature of your chocolate goes above these numbers, you will have to heat it to 110°-120°F (43.333°-48.889°C) and use the seeding method below.
You can use this method with any chocolate bar that you purchase from the grocery store, but I recommend using either Callebaut semi-sweet chocolate bars or Peter's Burgundy Chocolate Bars. Both come in large 10 or 11-pound blocks.
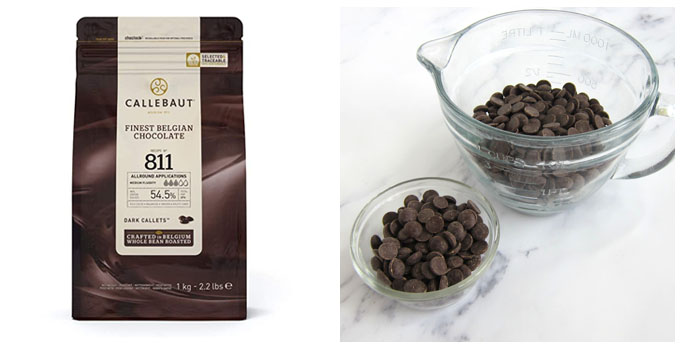
Couverture Chocolate Callets
I find tempering Callebaut Couverture Chocolate Callets easier than any other form of pure chocolate.
If you have never tempered chocolate, I highly recommend purchasing these chocolate callets. These callets may look like chocolate chips but they are not. These little chocolate "chips" are made of couverture chocolate and will melt quickly and easily.
Chocolate chips that you purchase at the grocery store contain stabilizers so the chips hold their shape when baked in cookies at high temperatures. You can melt and temper chocolate chips, but it takes longer.
I teach my students how to temper chocolate using Callebaut callets and every single student has had success tempering their chocolate the very first time. Not so with blocks or bars.
Plus, they are made with the most delicious Belgium chocolate.
Seeding Method of Tempering Chocolate
This is the tempering method I use most often.
- Melt 12 ounces of dark chocolate to 115°-120° Fahrenheit (46°-49°C), milk chocolate to 110°-115° F (43°-46°C), or white chocolate to 105-110° F (40°-43°C) using the microwave or a double boiler on the stove using the same method as melting compound chocolate.
- Then, begin to cool the chocolate by stirring in about 2 ounces of chocolate. Continue to stir, scraping down the sides of the bowl until all of those chocolate pieces have melted.
- Check the temperature of the chocolate.
- Continue to sprinkle in small amounts of the chocolate callets stirring constantly and continue to scrape the sides of the bowl until the chocolate cools to the correct temperature.
- Your goal is to get the chocolate to 88-91°F (31-32°C) for dark chocolate; 86-88°F (30-31°C) for milk and 82-84°F (28-29°C) for white.
- Once the chocolate reaches that temperate, remove any unmelted chocolate pieces. If there aren't many pieces you can also just dissolve them using an immersion blender. If there are too many, however, you don't want to do that as you will run the risk of cooling the chocolate too much.
How to know if chocolate is in temper?
- First, you need to get your chocolate to the proper temperature.
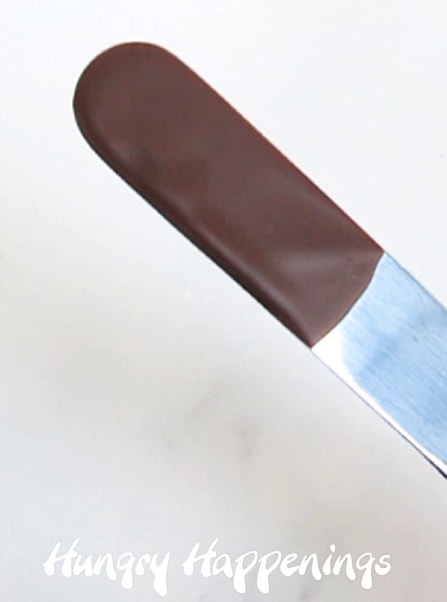
- Then, to make sure it's in temper before pouring it into your bunny mold, you can test the temper of the chocolate by dipping a metal spatula, spoon, or knife into the chocolate.
- Shake it, to remove the excess chocolate then set it aside at room temperature.
- In 3-5 minutes, the chocolate should harden and look shiny.
- Alternatively, you can spread a small amount of chocolate on a piece of parchment paper and allow it to air dry for 3-5 minutes. It should peel off the paper and snap when broken.
- While you are waiting, be sure to stir your bowl of chocolate, to make sure it doesn't cool too much around the edge.
- If your test chocolate has hardened and looks shiny be sure to check the temperature of your bowl of chocolate before proceeding to make your chocolate balls.
- The chocolate will have cooled slightly and will need to be warmed slightly!
- Heat it in the microwave for about 5 seconds or set the bowl over your double boiler for 5-10 seconds then remove and stir and check the temperature. Repeat as needed but do not let it go above temper temperature (91° dark, 88° milk, or 84° white). If it does, you have to start this whole process over again.
- You can also reheat your chocolate as needed as you are working with it to keep it at the proper temperature.
- You are now ready to fill your molds with chocolate.
Can I skip tempering pure chocolate?
NO!
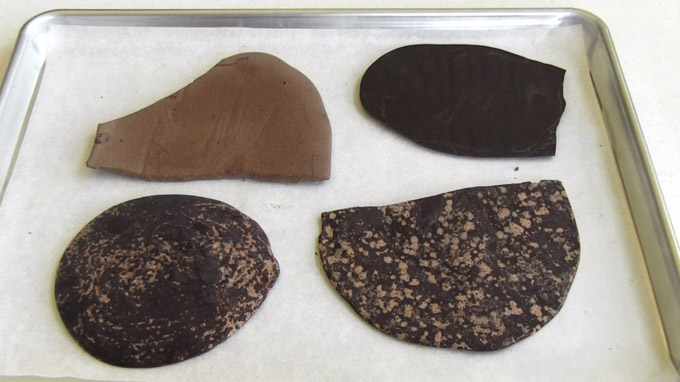
- If you do not temper pure chocolate, it will be soft, streaky, and spotty. It might even have a dry, chalky texture after a few days.
- The chocolate pieces that are pictured above are all out of temper.
- They have streaks and spots of cocoa butter on the surface which is called bloom.
- If your chocolate feels soft or sticky after it has dried, it might not have bloomed right away but it will develop over time.
- Also, as I mentioned above, chocolate that is not in temper will not harden properly and it will stick inside your molds. If this happens to you, you can try to freeze the chocolate so that it will harden enough to remove from the molds otherwise you might have to dig out the chocolate the wash it out using very hot water.
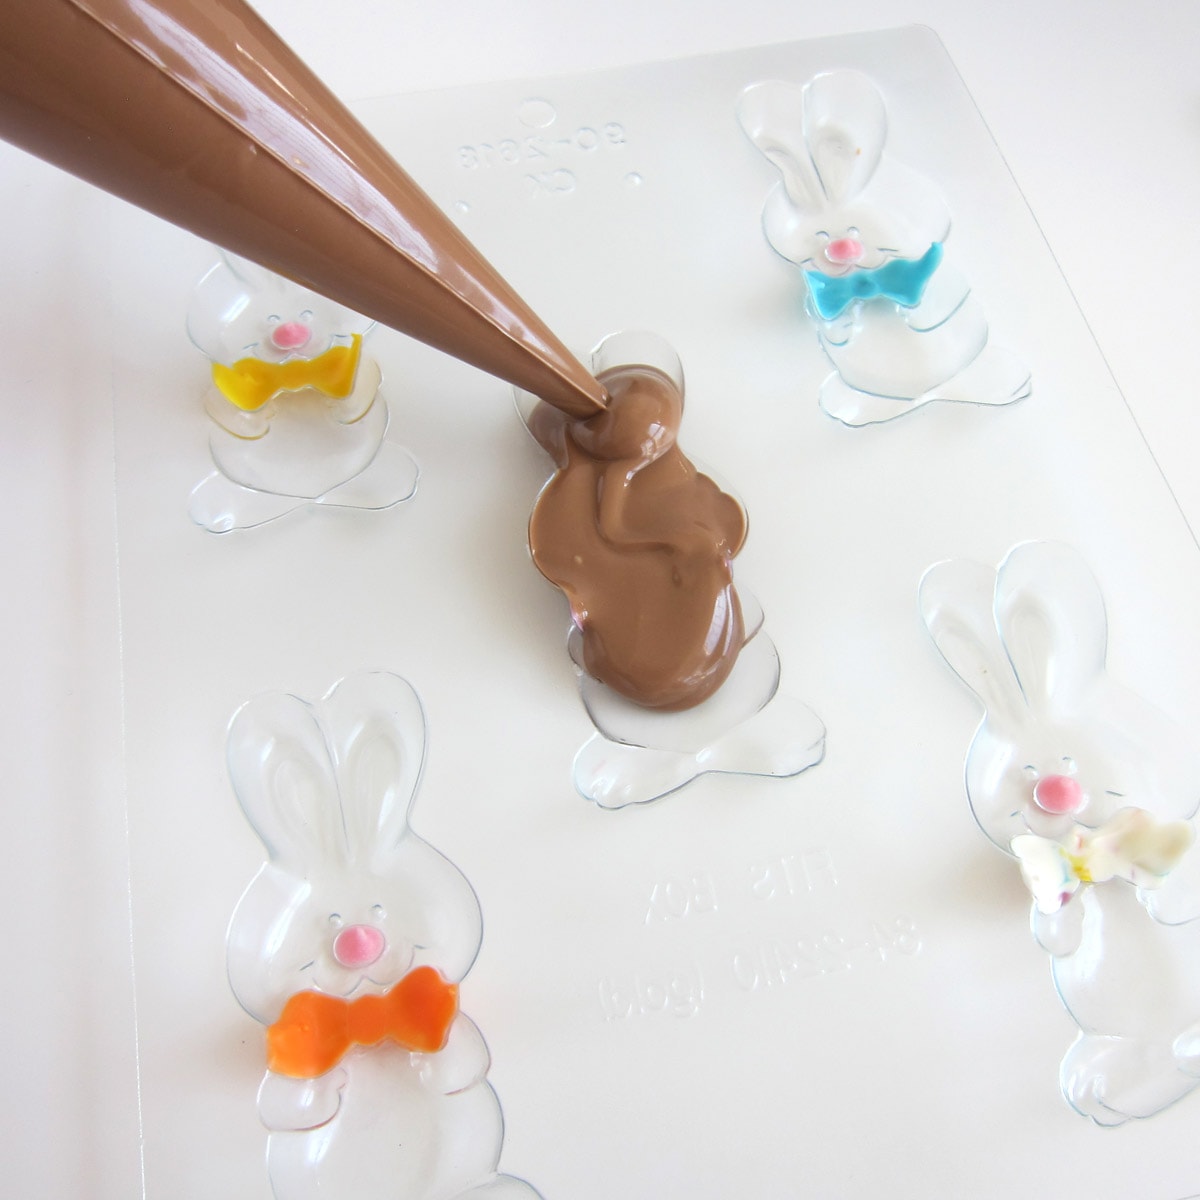
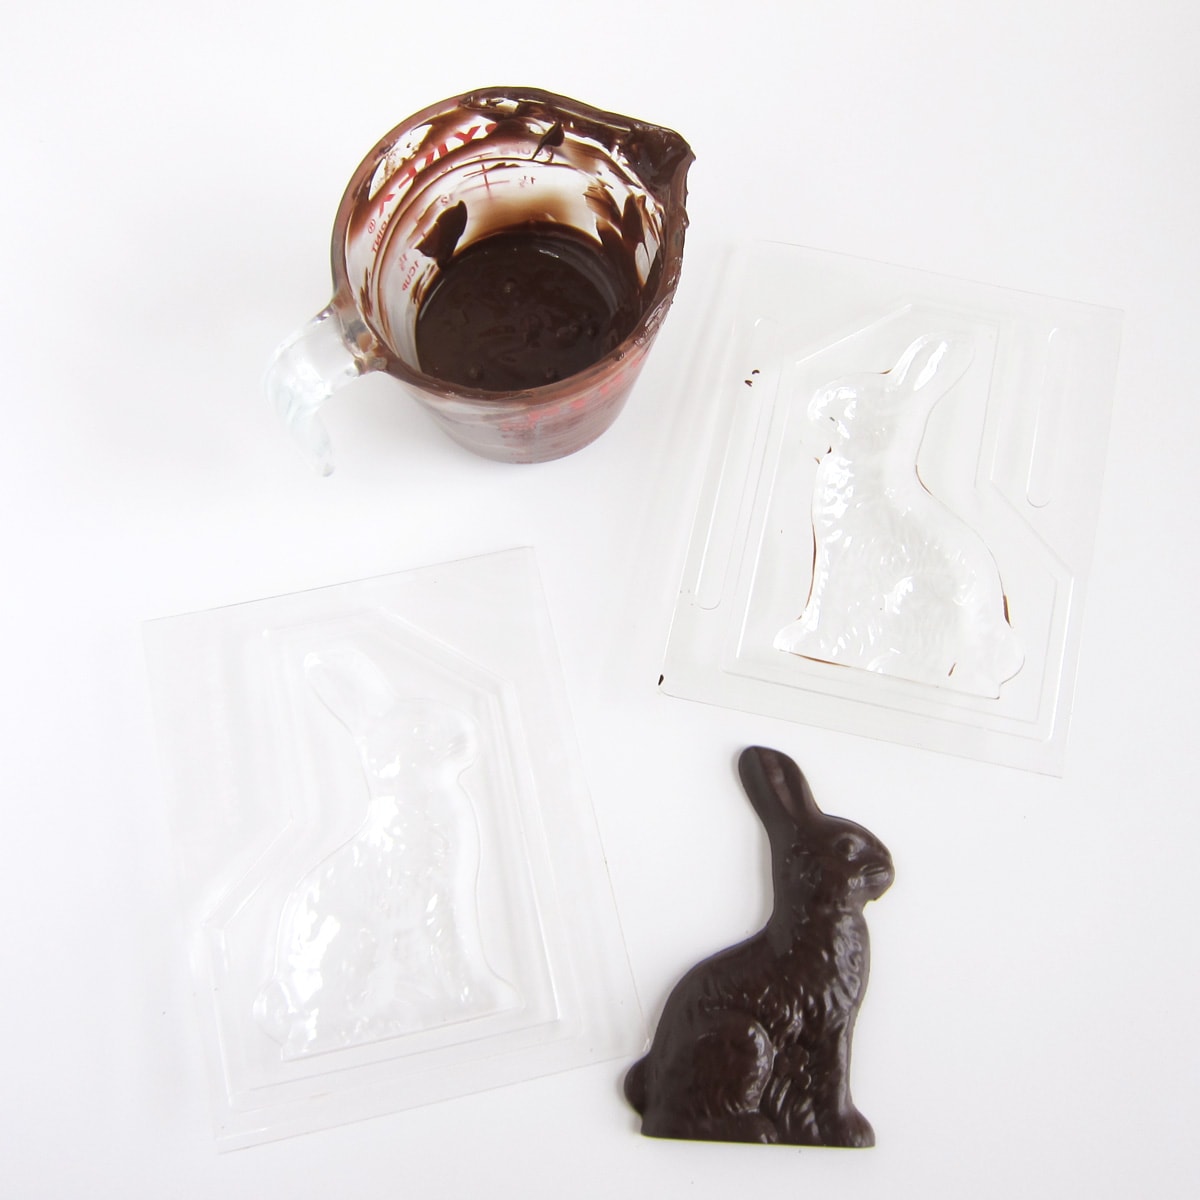
To make the chocolate Easter bunnies with bow ties, pipe melted and tempered pure milk or dark chocolate into the molds using a pastry bag. You can use a squeeze bottle or a spoon to fill the molds if you prefer.
Once filled, tap the mold several times on the counter to remove any air bubbles and refrigerated the mold for about 20 minutes until the chocolate hardens. Freeze if using compound chocolate to fill the molds.
Tips
I carefully hold the mold up over my head keeping the mold level at all times to see if there are any big air bubbles in my chocolate bunnies before I place it in the fridge. You will see dark spots on your bunnies where there are air bubbles. If there are, then I use a toothpick or paintbrush to pop them.
You can also lift the mold over your head to check to see if the chocolate has completely hardened. If you see dark spots, it needs longer in the fridge.
Small bunnies like the bunnies with bow ties should take about 20 minutes to chill whereas the thicker bunnies with carrots can take up to an hour to chill. If you fill your molds with compound chocolate you should chill them in the freezer. The chocolate will harden much more quickly. Do not freeze pure chocolates as it needs a slower cooling process.
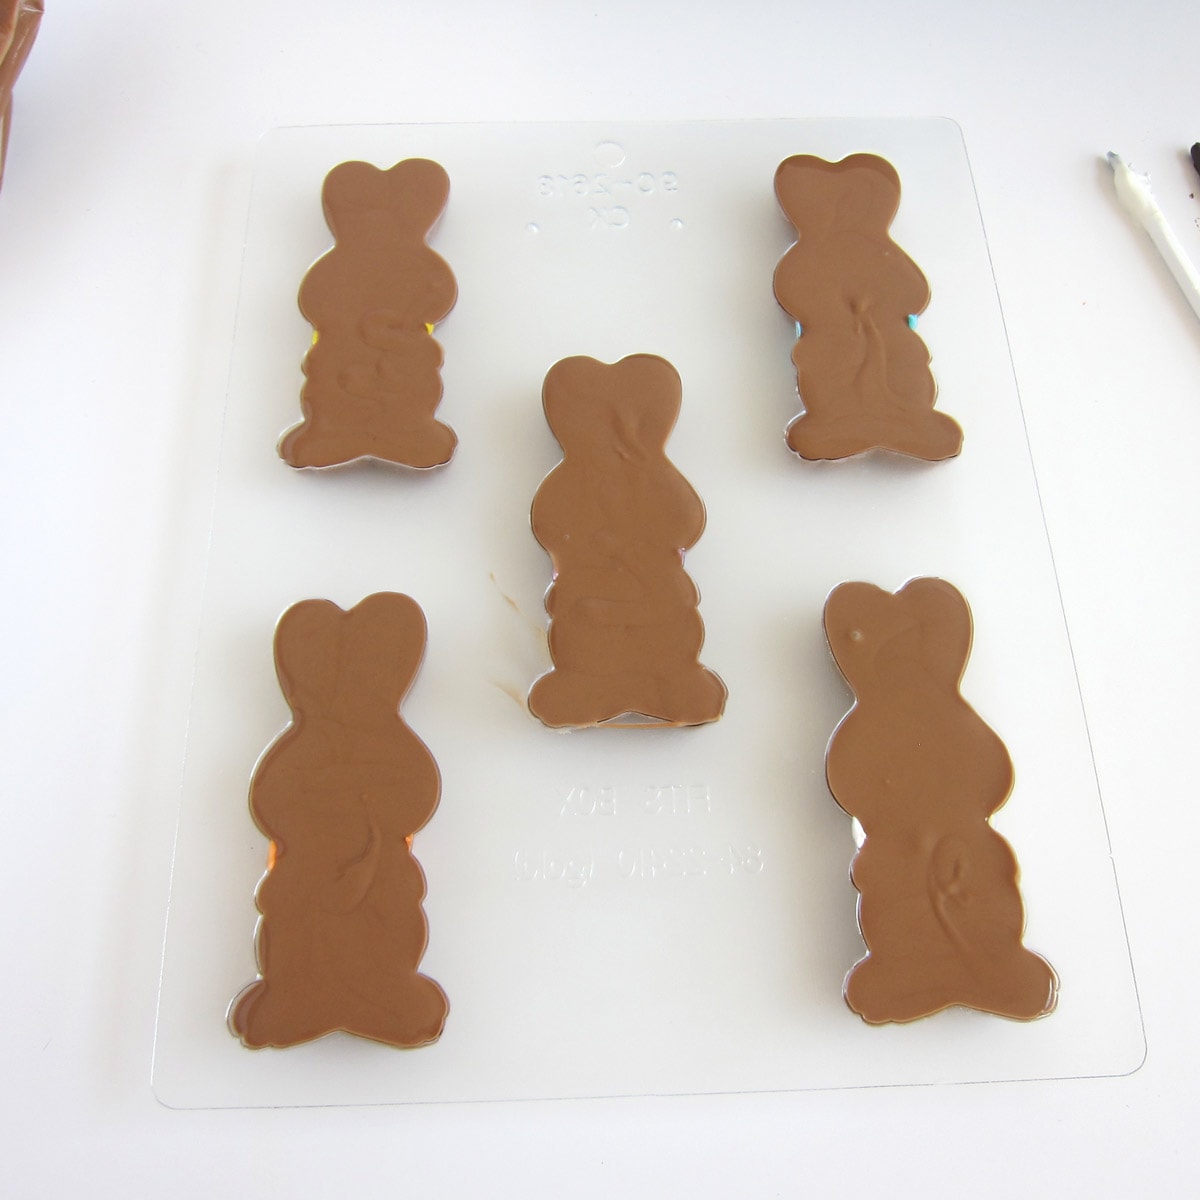
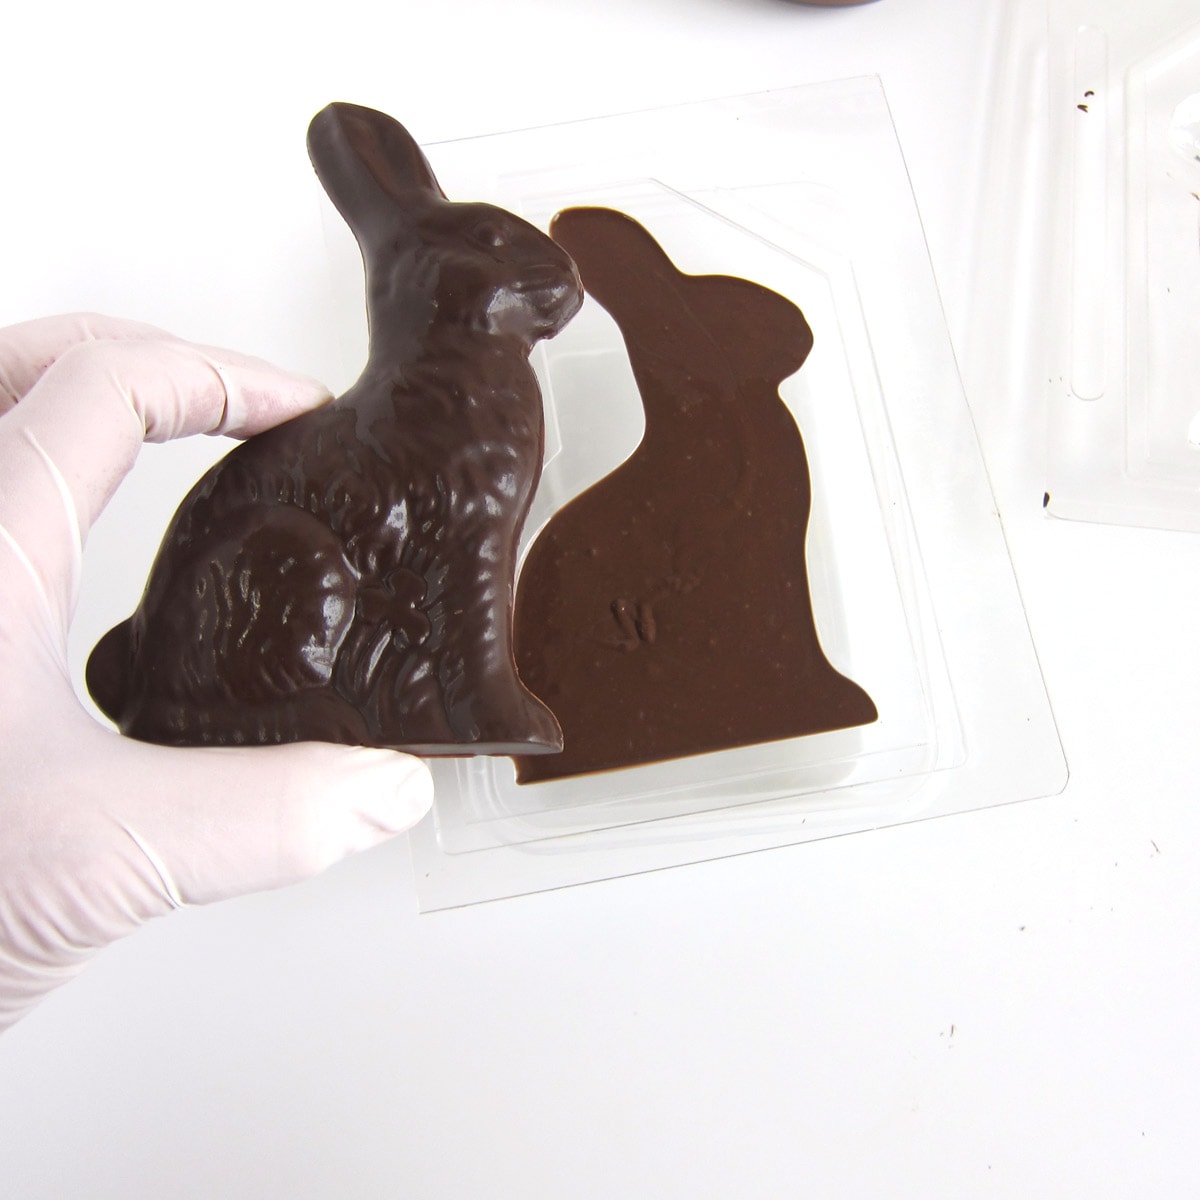
Remove the mold from the fridge and carefully turn it upside down. Hold your hand over the chocolates as you turn the mold upside down so the bunnies don't fall out and break. Allow the chocolate to gently fall out onto the counter. If needed, you can twist the mold back and forth a few times to remove the chocolates.
For these bunnies, I dabbed a bit of dark chocolate into the eyes. For some reason, the eye cavities in this mold are indented. I find it easier to fill the eyes with chocolate after the chocolate bunnies come out of the molds. The ears are the same. I just leave them empty. They look fine. You can fill them with pink or white.
NOTES ABOUT THE CHOCOLATE BUNNIES HOLDING CARROTS:
If you use the bunny with carrot mold, it is thinner around the ears than around the belly so the mold wobbles. Place the mold in a box or plastic container to hold it level before filling it with chocolate.
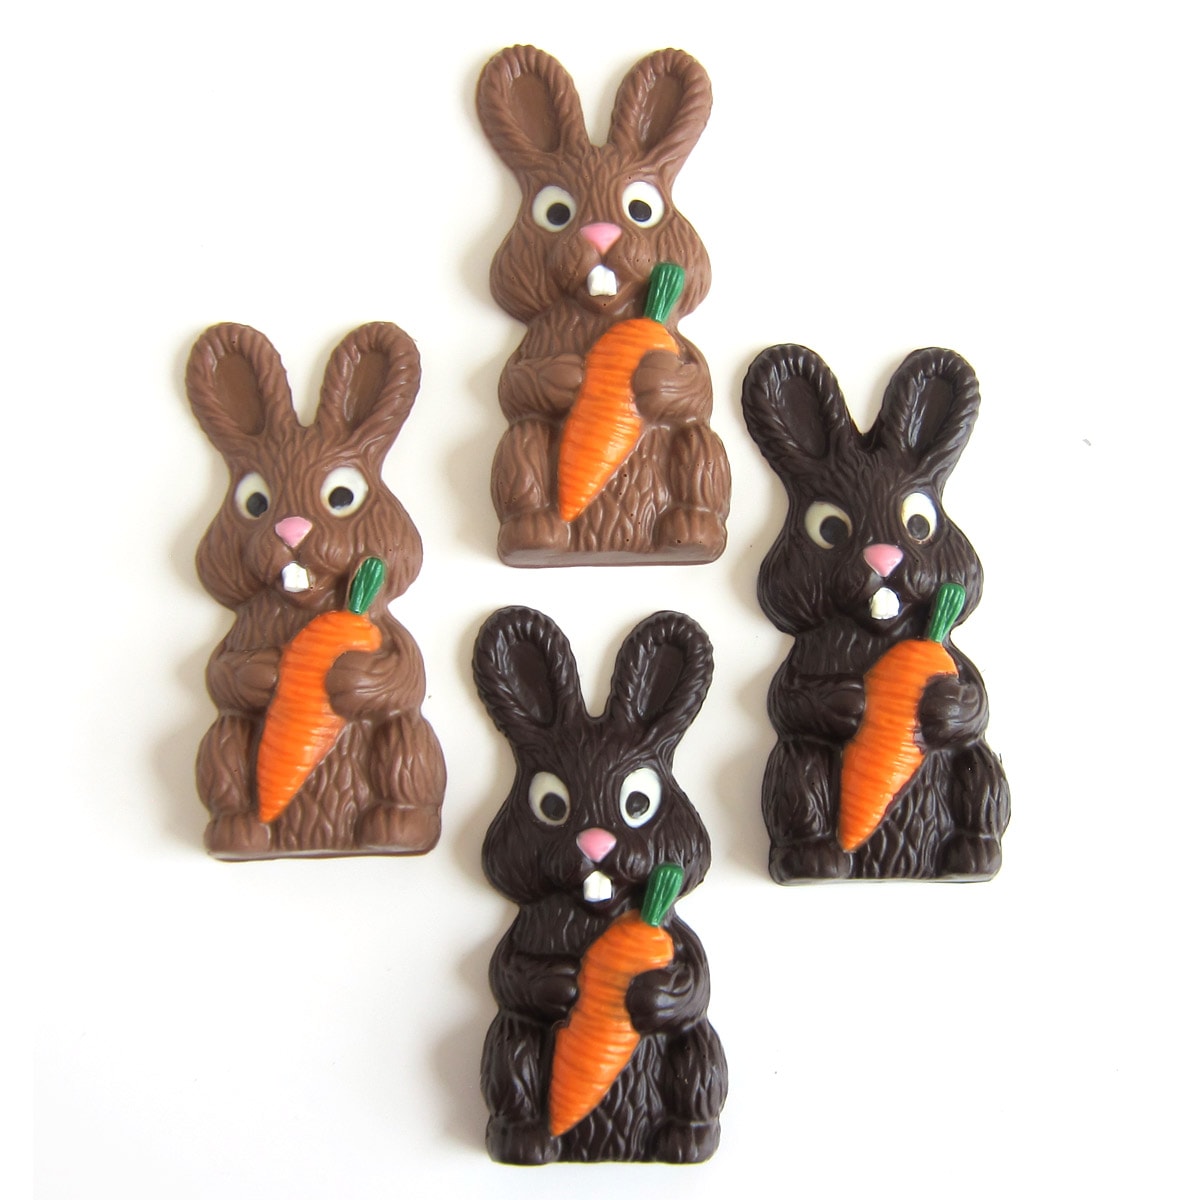
On occasion, the pink nose, white teeth, and/or the carrot green will stick inside the mold as you unmold the chocolate. I carefully pop them out and "glue" them back on the bunny using melted chocolate.
Many bunny molds like the one pictured above won't lay flat due to the ears being thinner than the bunny's belly. You may need to search for the perfect container to hold them level. I used Rubbermaid containers which work great.
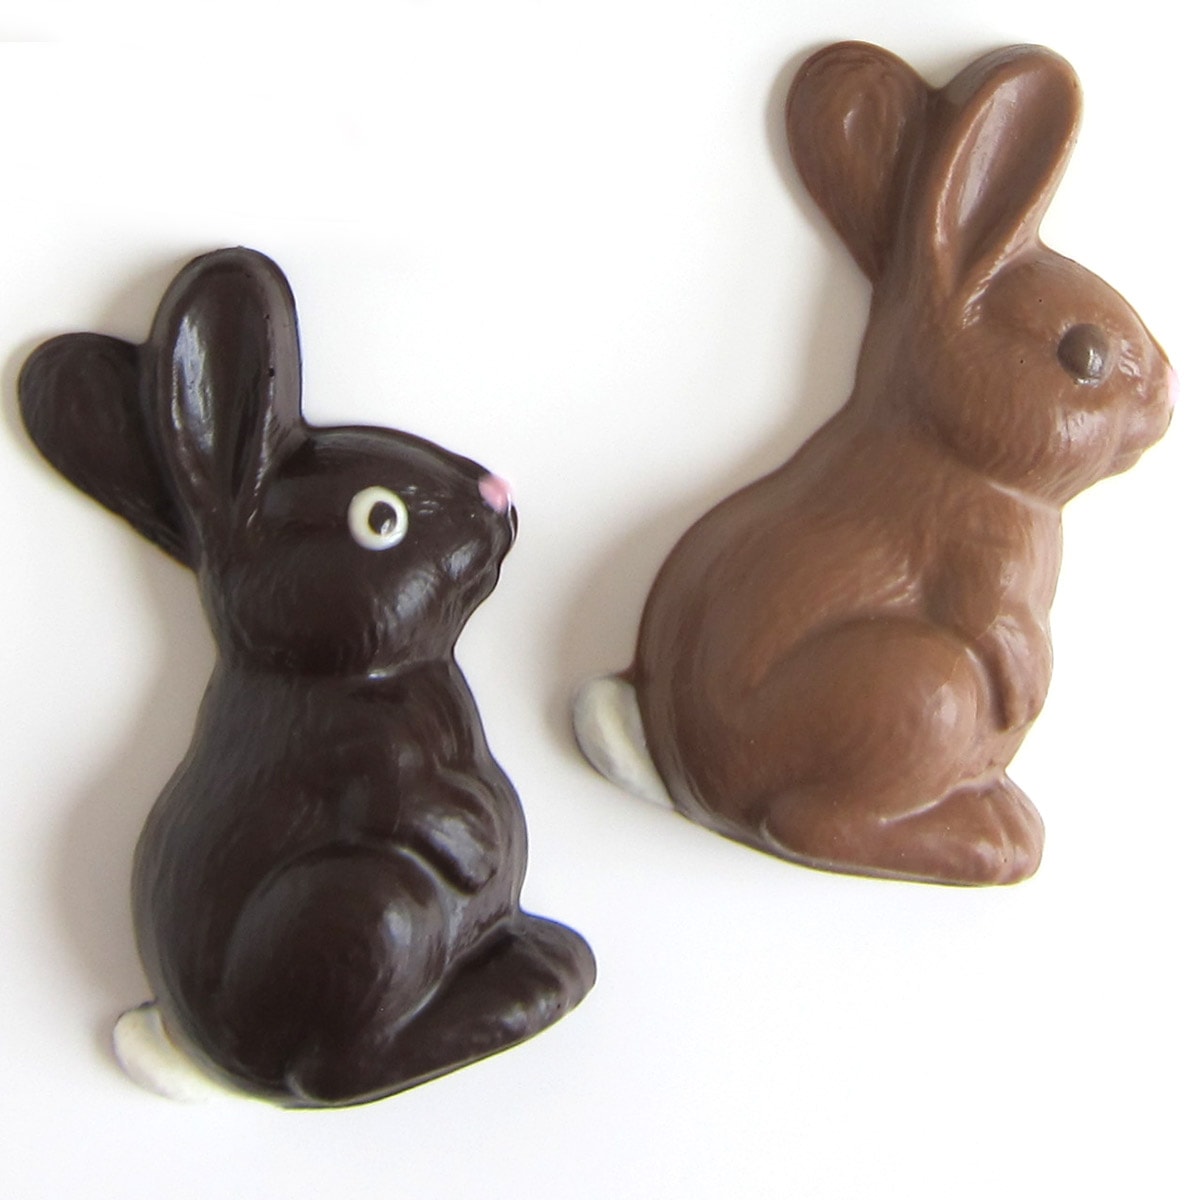
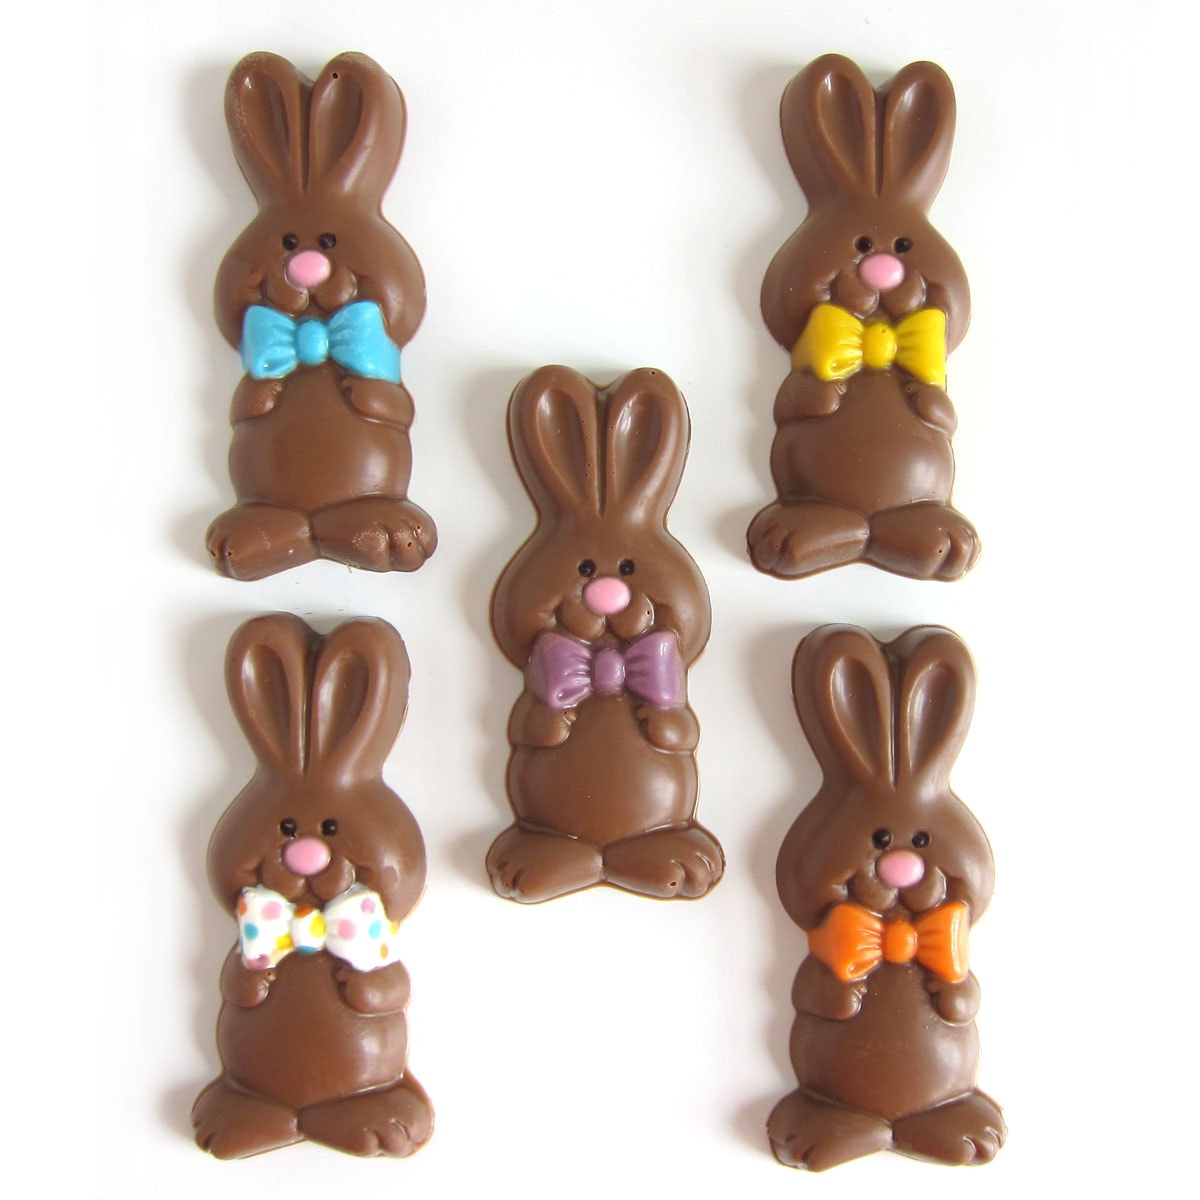
These cute chocolate bunnies are so easy to make. You simply paint a pink nose, a white tail, and an eye. You can paint a solid chocolate eye or create a dark pupil with white around it. Either looks cute.
Solid Chocolate Bunny
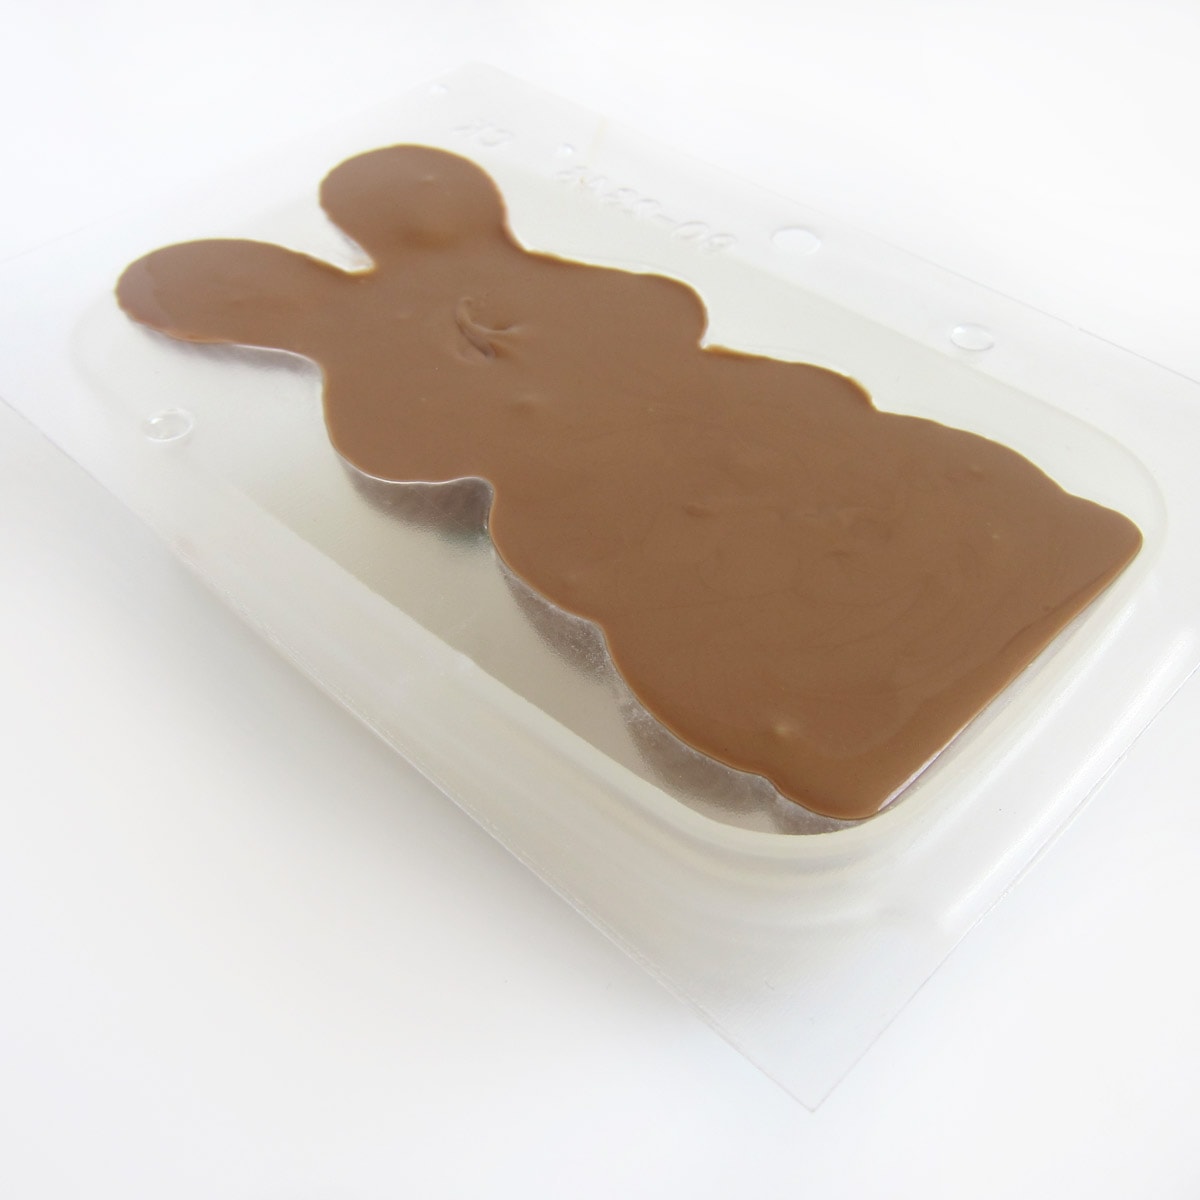
If you'd like even more chocolate, you can make solid chocolate Easter bunnies using a two-piece bunny mold. You can paint the mold or just make a plain chocolate bunny.
To make a solid chocolate bunny, you will want to fill one half of the mold with chocolate and chill and allow that to harden then remove it from the mold.
Then, fill the other half of the mold with chocolate and carefully place the chocolate bunny on top. Make sure the two sides are securely fixed together. Chill until hardened.
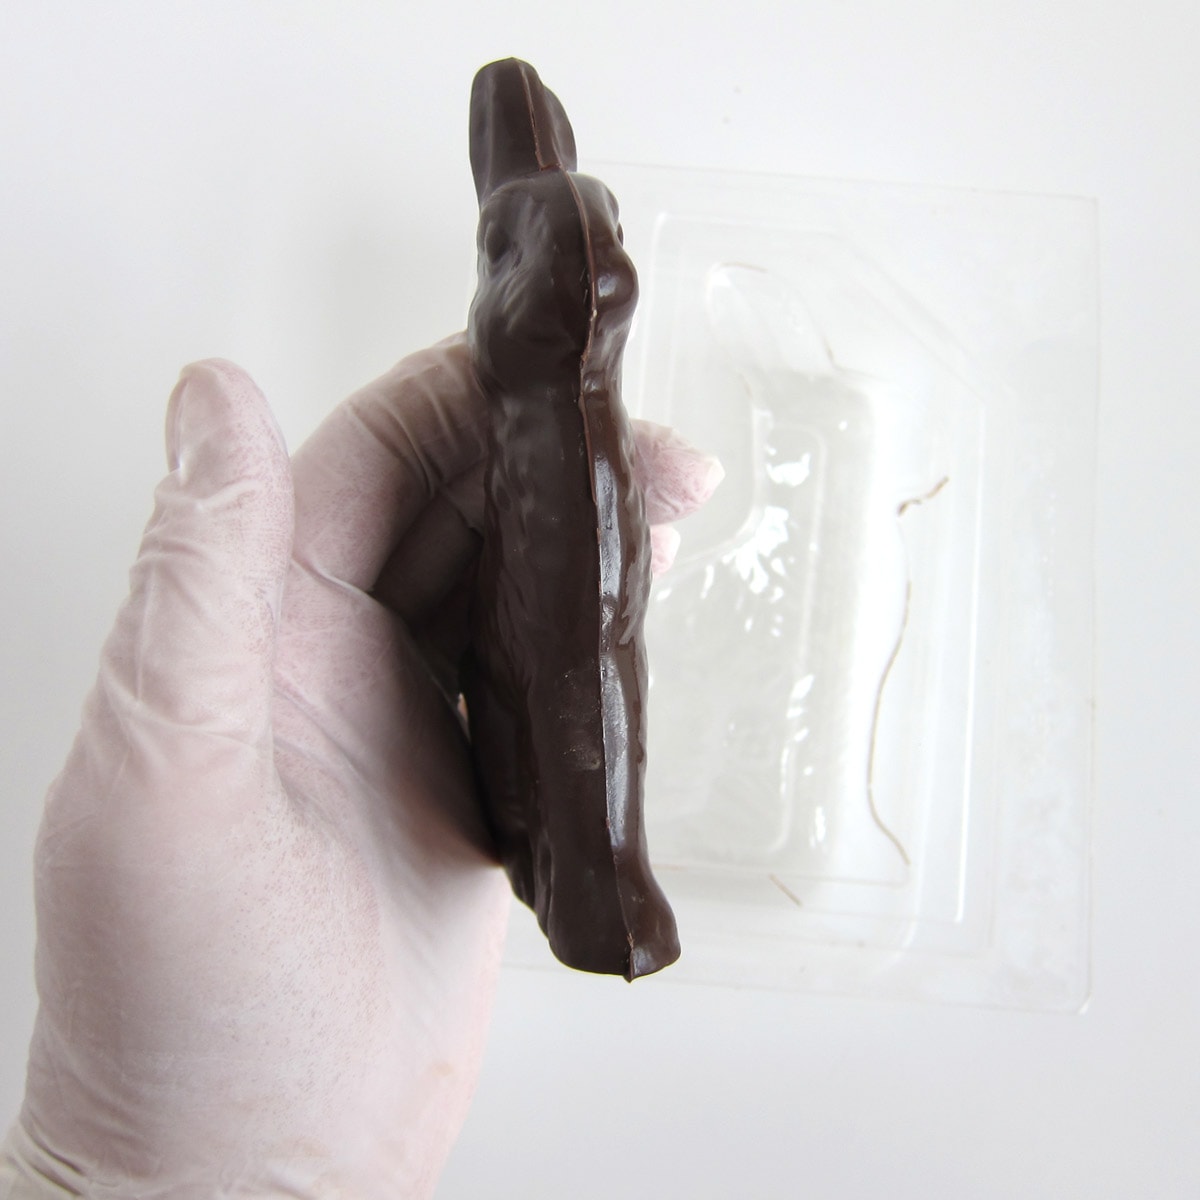
Flip the mold over and allow the chocolate bunny to fall out.
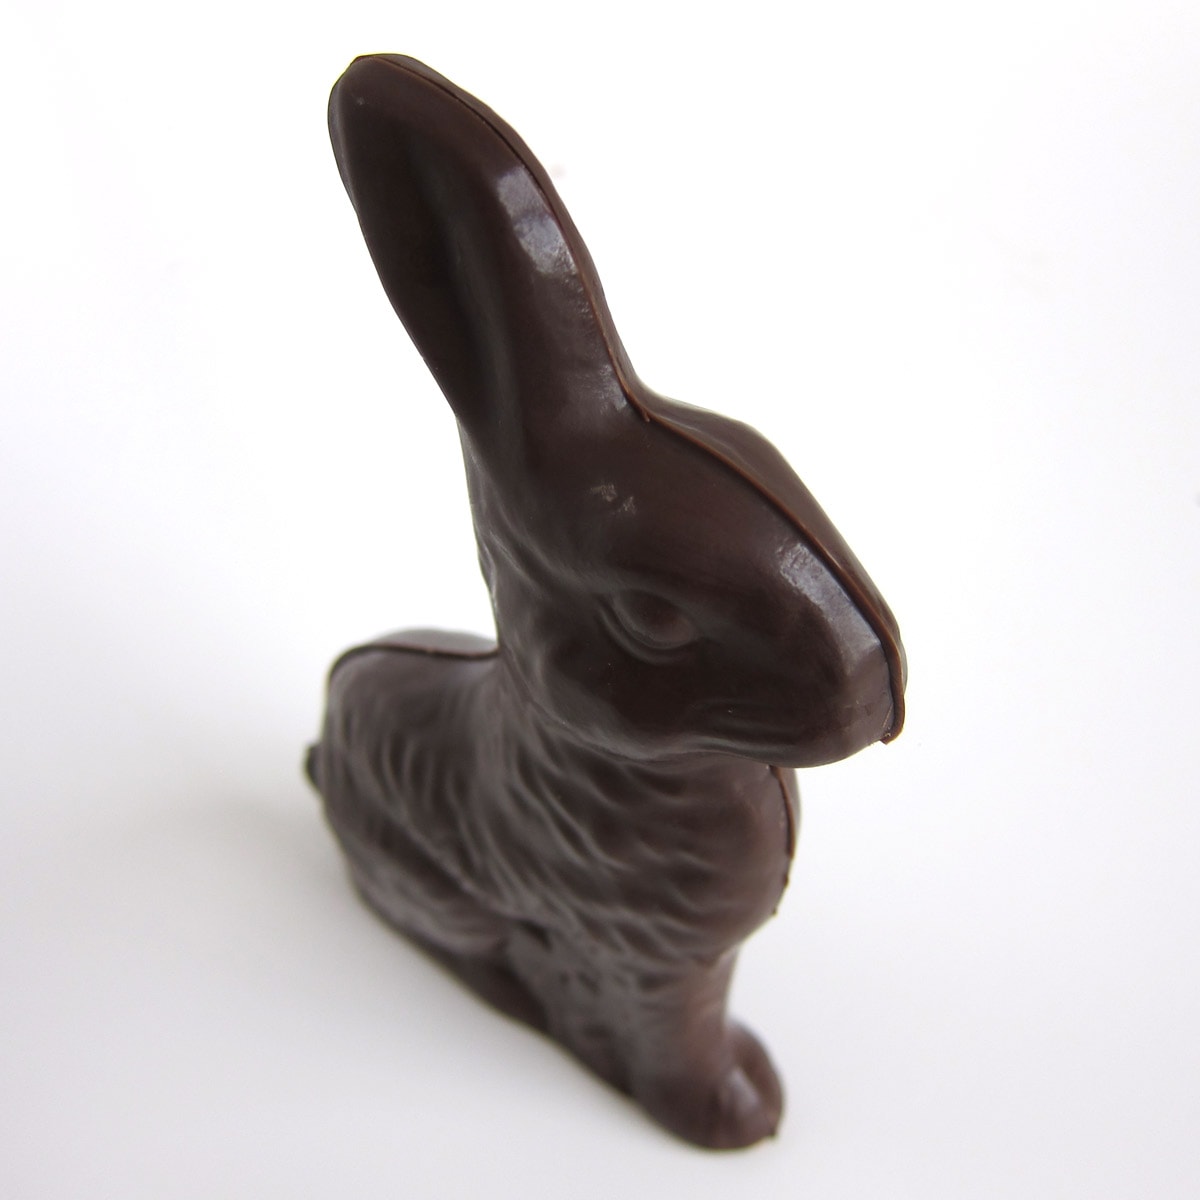
If needed, use a knife to shave any excess chocolate off around the edge of the bunny.
Some 2-piece bunny molds will have a hole at the base (the bottom of the bunny) where you can pour the chocolate into the mold. You'll need to set the mold into a container that will hold it upright and that will fit into your refrigerator before adding the chocolate.
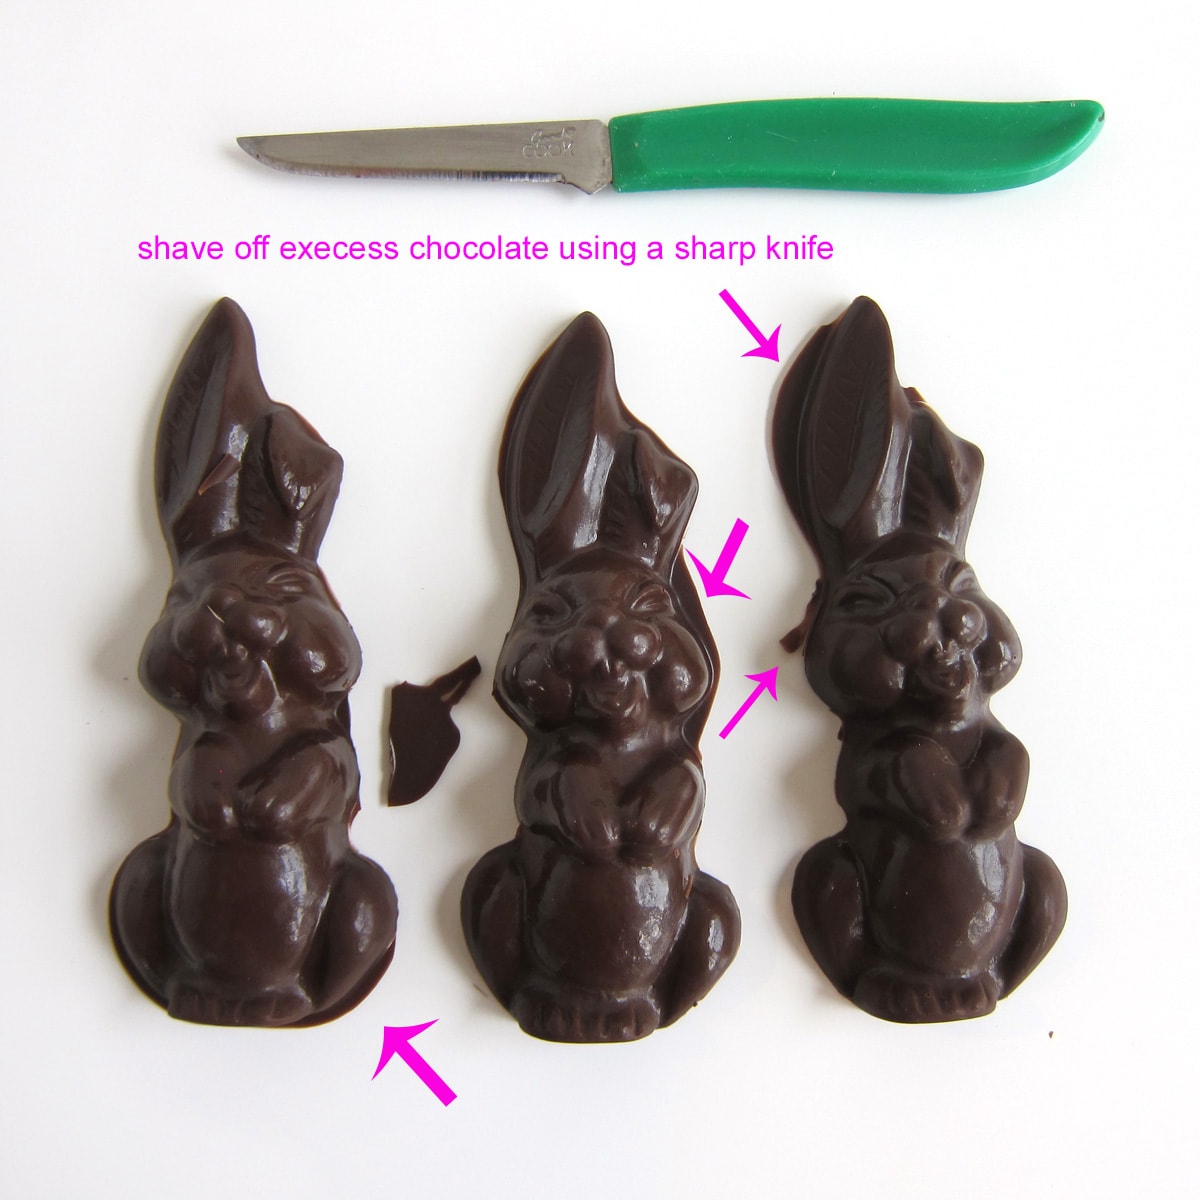
If you have excess chocolate around the edges of your bunnies (see the areas near the arrows), allow the chocolate to come to room temperature, then use a sharp knife to shave off the excess.
Variations
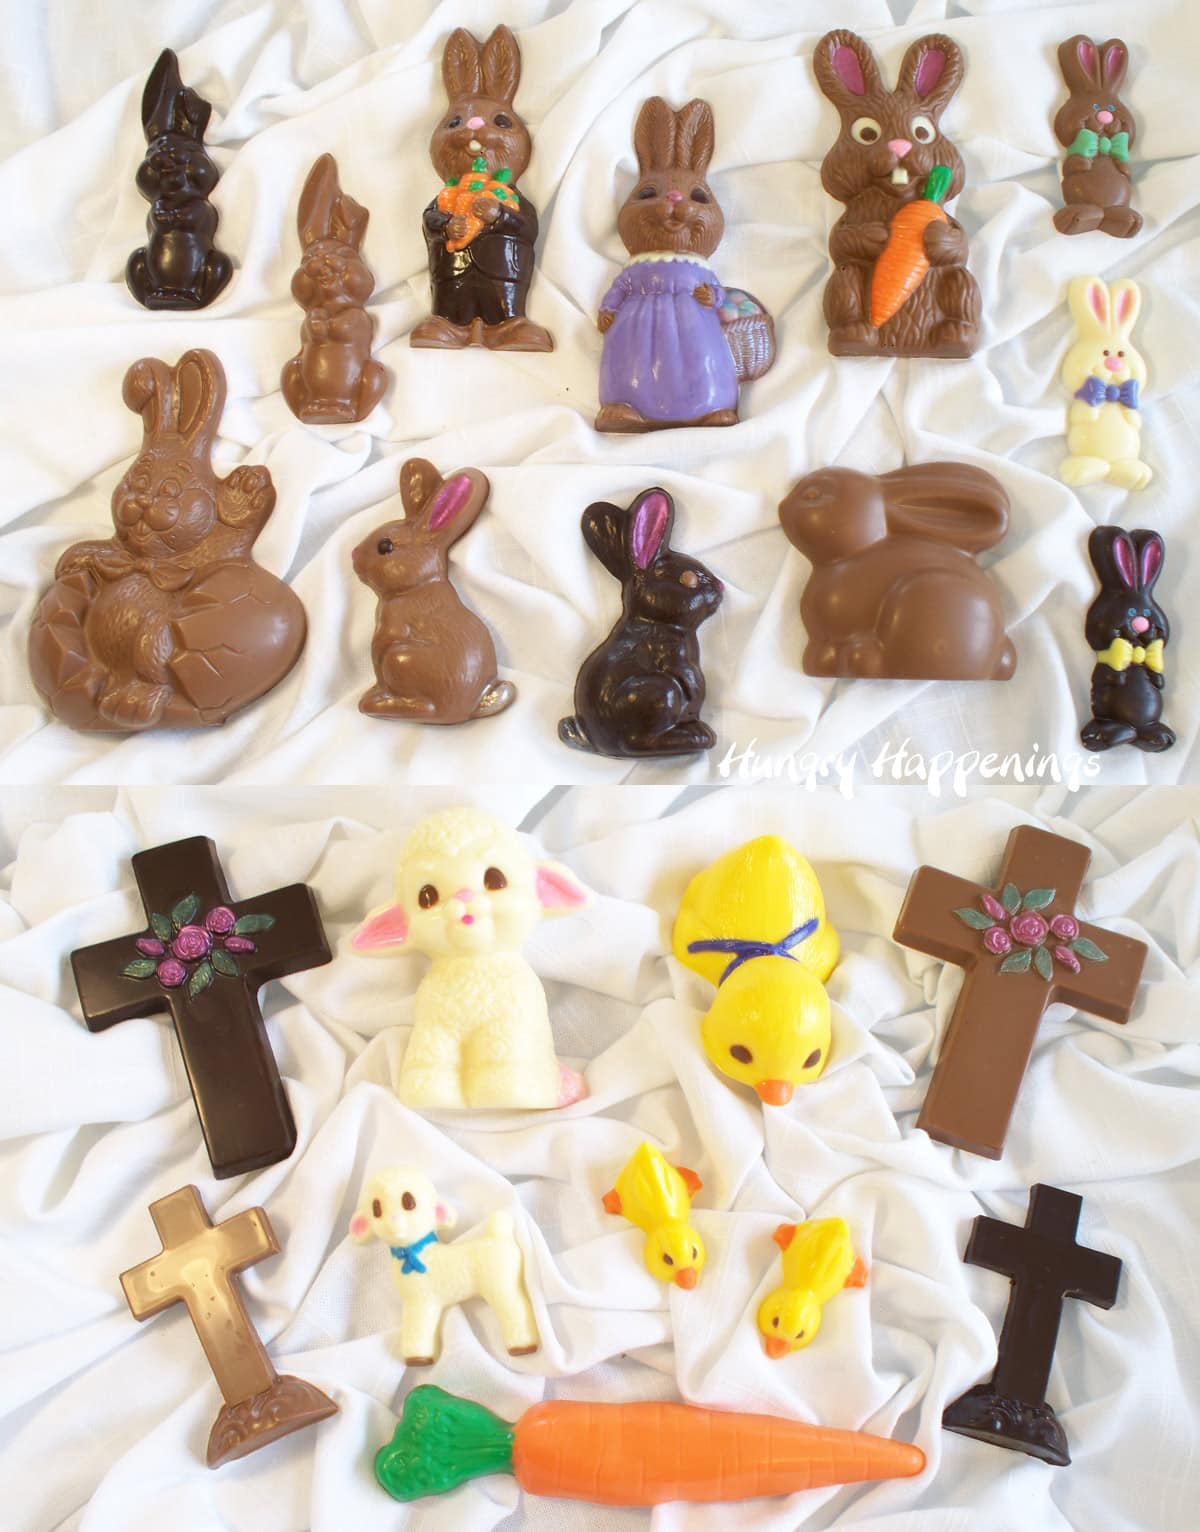
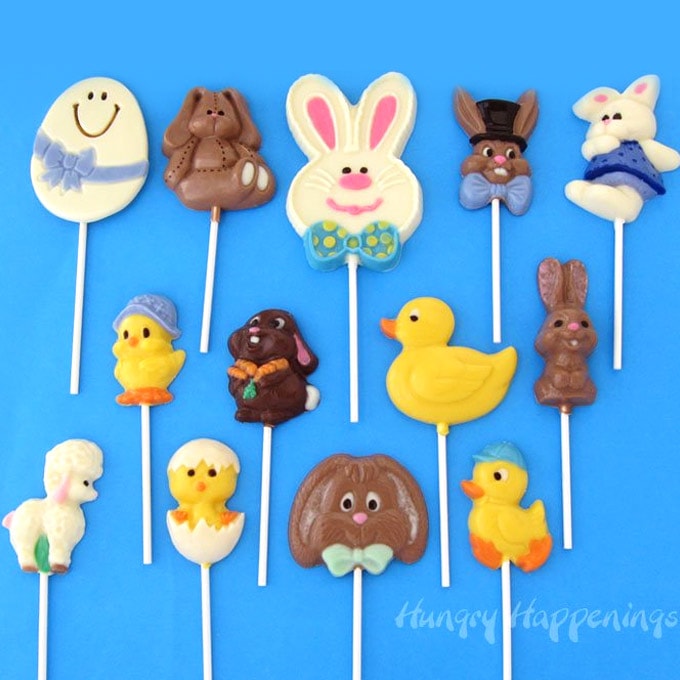
You can use the same painting technique to make chocolate crosses, ducks, lambs, and carrots for your Easter baskets. Click on the links to see a variety of Easter candy molds.
To decorate the chocolates, you can even brush edible luster dust over the finished chocolates as I did with the flowers on the crosses and some of the bunny ears.
Storage
Store your chocolate bunnies at room temperature in a cool dry place away from heat, sunshine, or odors. The bunnies will stay fresh for at least 6 months if not longer depending on the freshness of your chocolate.
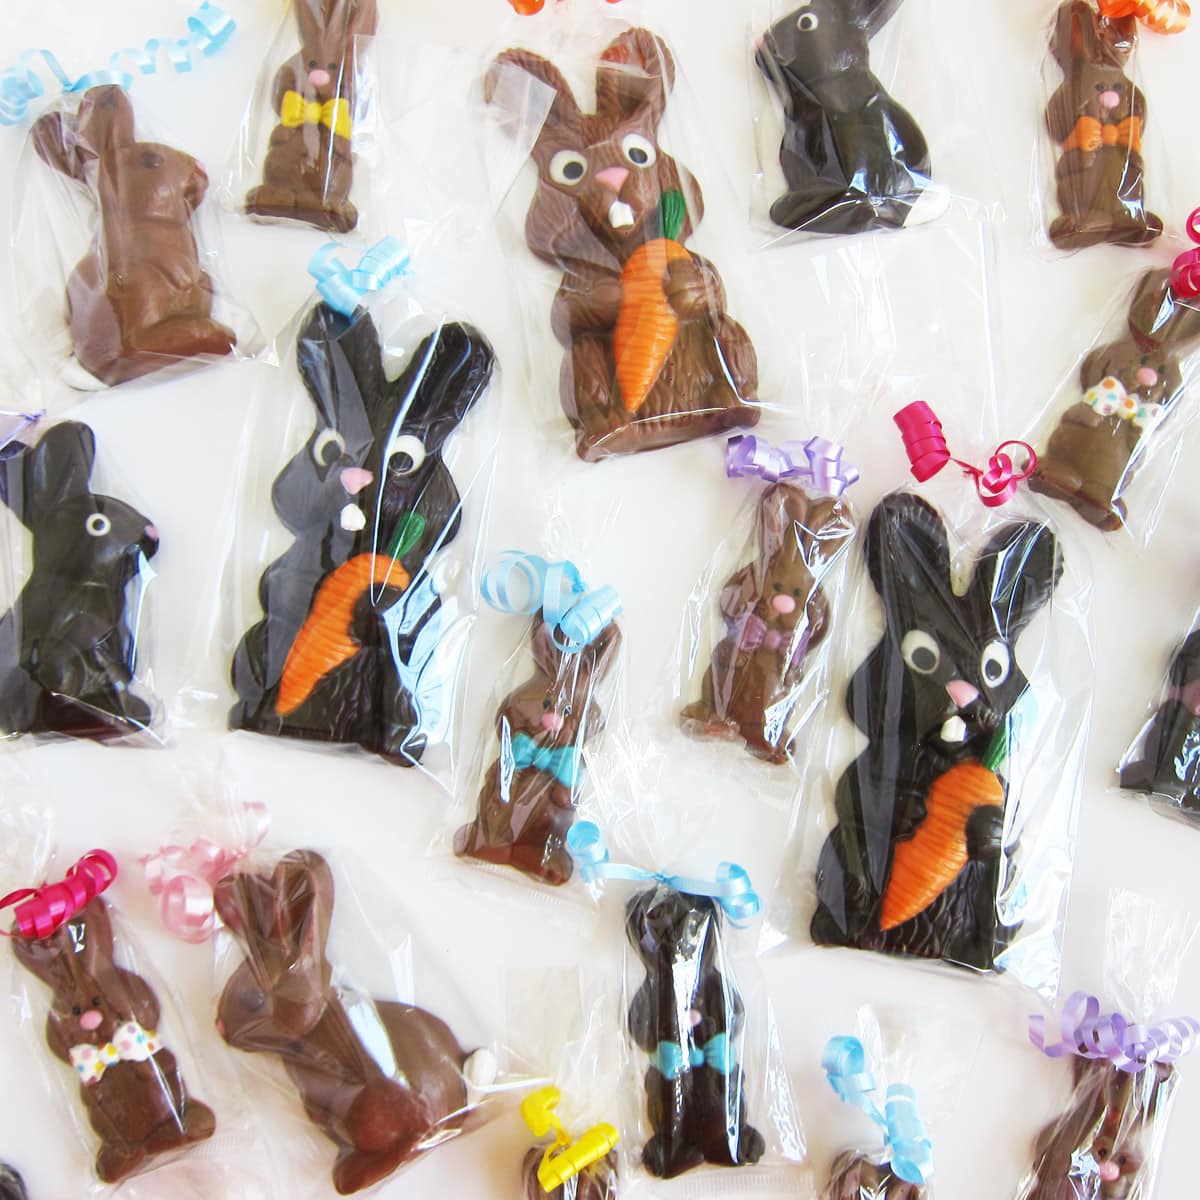
I like to package my bunnies in clear cellophane bags tied with curling ribbons to put in my Easter baskets.
There is no need to refrigerate your chocolate bunnies unless you live in an exceptionally hot climate. Refrigeration can cause bloom (streaks and spots) and condensation (beads of water) to form on your chocolate.
Related Recipes

Recipe
Make hand-painted chocolate Easter bunnies to fill your baskets. Everyone will fall in love with these cute Easter candies.
- 4 ounces melted colored Candy Melts (use any colors you like to paint your chocolate molds)
- 16 ounces melted and tempered pure chocolate or melted compound chocolate (candy melts, almond bark, melting wafers, etc.)
-
Follow these specific instructions to make the chocolate Bunny with Bow Tie.
-
Dip a paintbrush in melted pink Candy Melts.
-
Dab the pink Candy Melts into the nose cavity in the Bunny with Bow Tie candy mold.
-
Repeat, painting all the noses pink.
-
Dip another paint brush into blue, purple, yellow, or orange Candy Melts.
-
Dab the colored candy melts into the bow tie cavities in the molds. You'll need to dip it into the candy melts then into a mold a few times in order to fill the entire bow tie.
-
Repeat, filling all the bow tie cavities.
-
Pop the mold into the freezer for about 5 minutes until the chocolate hardens.
-
Remove the mold from the freezer and allow it to warm up for a few minutes before filling it with chocolate.
-
Pipe or spoon melted and tempered pure milk or dark chocolate OR melted milk or dark compound chocolate (Candy Melts, almond bark, melting wafers) into the mold. Completely fill the bunny mold.
-
Tap the mold on the counter a few times to remove any air bubbles.
-
Place the mold in the refrigerator if you filled the bunnies with pure chocolate or in the freezer if you filled the molds with compound chocolate for about 20 minutes until the chocolate hardens.
-
Remove the molds from the fridge and carefully turn the mold upside down while holding the chocolate bunnies in place using your hand or a cutting board. Allow the chocolate bunnies to gently fall out of the mold.
-
If you use a different candy mold, paint all the features, layering chocolate if needed. For example, if you want pupils in the bunny's eyes, paint chocolate pupils, pop the mold in the freezer, and allow the chocolate to harden. Then, paint white around and over the pupil.
The calories listed are for one 1.1-ounce bunny with a bow tie. 16 ounces of chocolate will make 15 of these bunnies. If you use a different mold, it will use more or less chocolate per bunny.
See the step-by-step tutorial for melting and tempering instructions. https://hungryhappenings.com/homemade-chocolate-easter-bunnies/
Store your chocolate Easter bunnies at room temperature in a cool dry place for up to 6 months. Package in clear cellophane bags or boxes.

- Banana Split Bars – A Fun and Easy Summer Dessert - March 4, 2026
- Pineapple Fudge (No Candy Thermometer Needed!) - March 4, 2026
- No-Bake Peanut Butter Pie Recipe - March 3, 2026
Please leave a comment.