Cakesicles are a fun twist on a traditional cake pop. Crafted in popsicle molds, cakesicles are an easy-to-make version of the ever-popular treat with a chocolate shell surrounding a blend of cake and frosting.

If you have ever struggled to dip a cake pop or had them crack or fall off the stick, you are going to be so happy to discover the cakesicle.
Unlike a cake pop, which is made by rolling a cake and frosting combo into a ball (or another shape) and then dipping it in chocolate or candy melts, a cakesicle is created by painting the chocolate into a popsicle mold, then filling the hardened candy shell with the cake/frosting mixture.
The candy shell is thick enough that it won't crack but thin enough to bite into. It's also smooth and shiny and perfectly shaped.
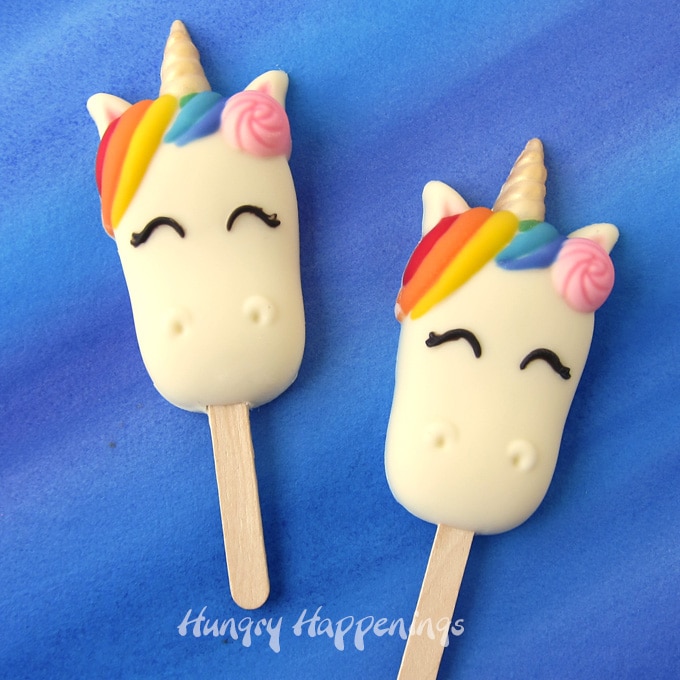
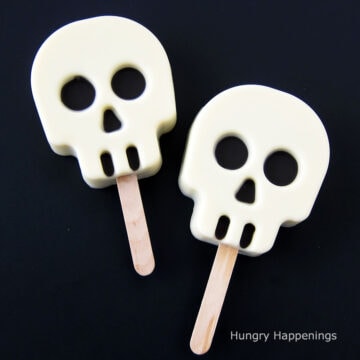
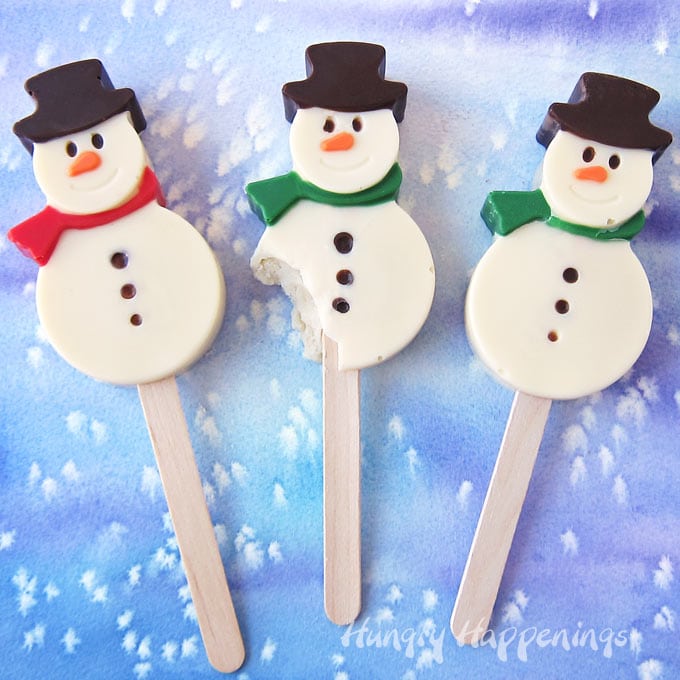
You can make simple popsicle shapes, or you can make shaped pops like Unicorn Cakesicles, Skull Cakesicles, or Snowman Cakesicles.
You can even make cakesicles shaped like Hot Chocolate Bombs.

In this tutorial, I will show you how to make cakesicles using white chocolate or white candy melts. You can use the technique to create dark or milk chocolate cakesicles too.
If you plan to make cakesicles for a holiday or special occasion, you can even use colored candy melts.
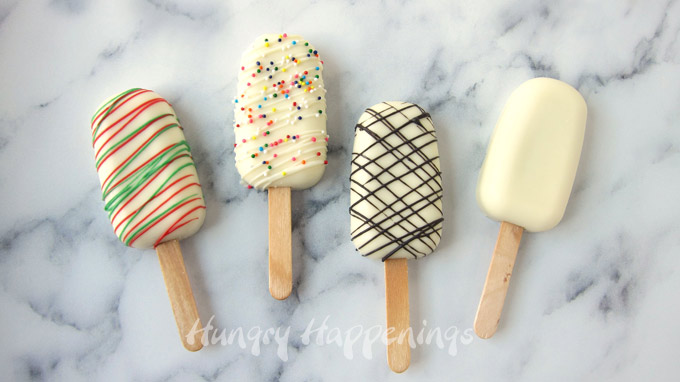
Cakesicles look great plain, in one solid color or shade of chocolate, but they look even better when decorated.
You can simply add a drizzle of chocolate or colored candy melts to add a festive touch. Christmas cakesicles drizzled with red and green candy melts or birthday cakesicles topped with rainbow sprinkles make fun desserts, party favors, or gifts.
Ingredients
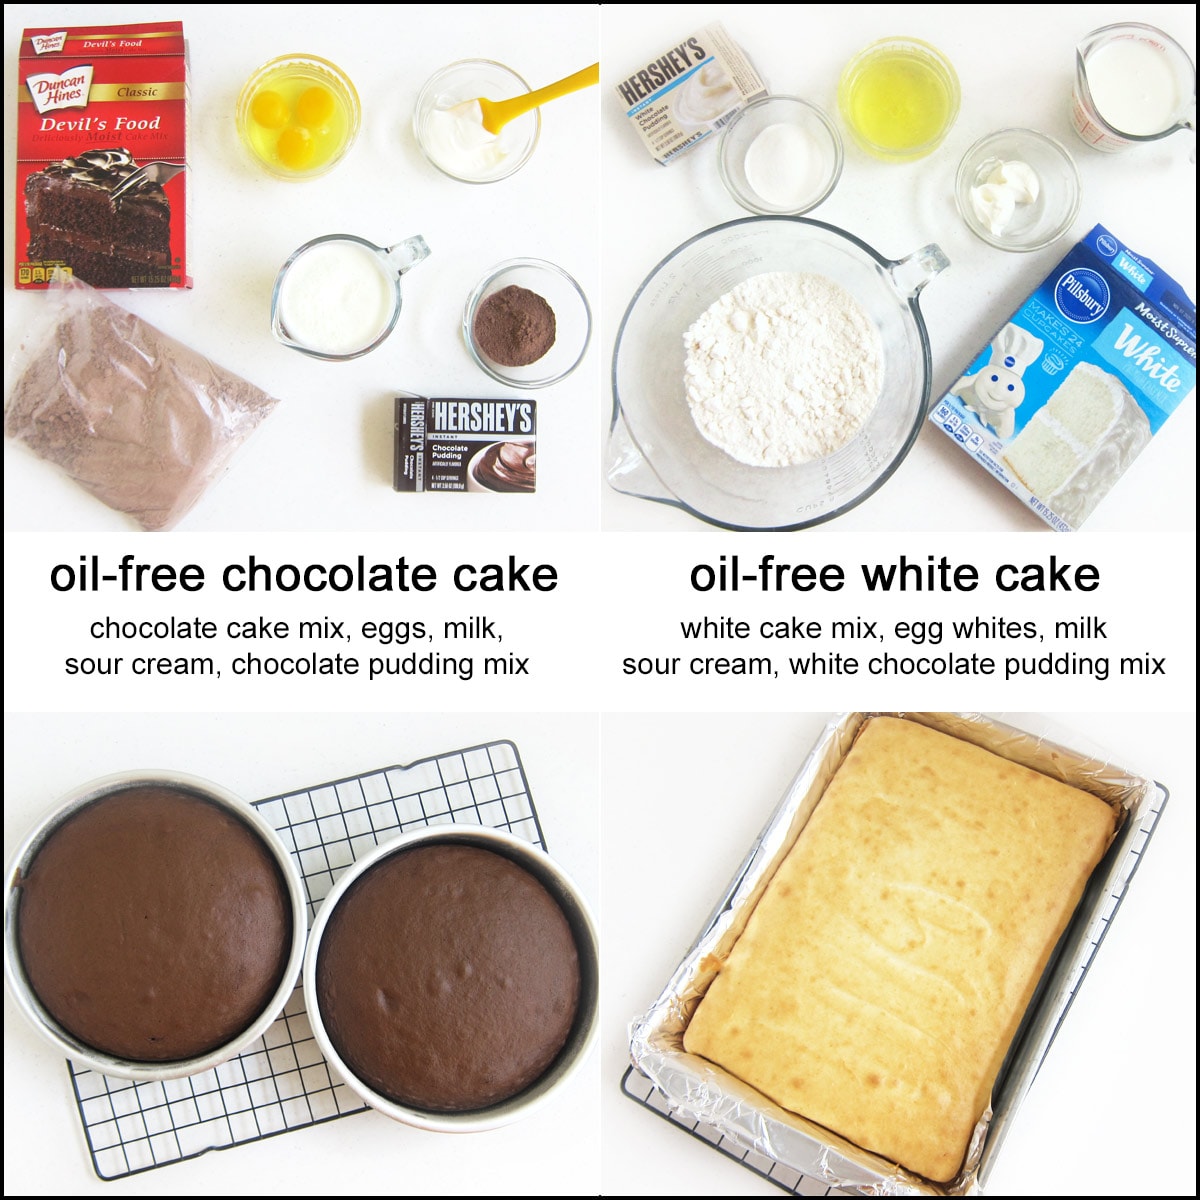
Oil-Free Cake
- cake mix - Use any flavor you like.
- eggs or egg whites - Use what is called for on the box.
- milk or water - Use milk for a richer flavor.
- sour cream - Add moisture to the cake.
- pudding mix (to match the flavor of your cake mix) - Adds flavor and enhances the texture of the cake.
You'll notice in the recipe and video that I didn't add oil to the cake mix. I wanted to experiment with this, as so many people complain about having oily cake pops.
The cake baked without oil baked up beautifully and was only slightly drier than a cake baked with oil. Once the frosting was mixed in, you couldn't even tell the difference in flavor, but the filling was not greasy at all.
Instructions
Make a cake.
- To make an oil-free cake using a cake mix, just skip the oil, use the number of eggs and water (or use milk) listed on the box, then add 3 tablespoons of instant pudding mix and 3 tablespoons of sour cream. This makes a really delicious cake!
- Bake a cake either in a 9x13 pan or two 8-inch round pans according to the package instructions.

Mix the cake with the frosting.
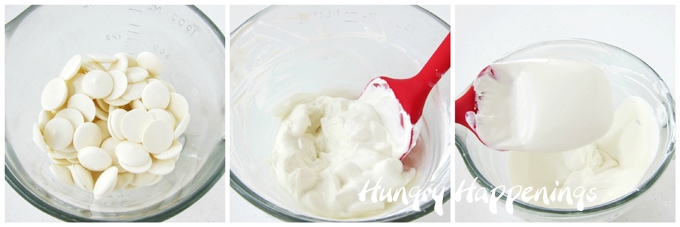
- Crumble the cake into a bowl or preferably into the bowl of a stand mixer (my favorite method for getting super smooth cake ball filling)
- Add some frosting and mix using a stand mixer or your hands. The amount of frosting may vary depending on your cake. Start by adding ⅓ cup of frosting, then add more if desired. If you like your filling to be really gooey, you can add up to 16 ounces of frosting.
You don't have to dip these, so it won't matter if the cake ball filling is soft. That's one of the benefits of this method of making cake balls.
- If using a stand mixer to combine the frosting and cake, beat on medium speed until well blended and smooth. Your cake ball filling will be really smooth and creamy!
- If mixing by hand, use your hands to blend the cake and frosting together. This will help you achieve a better texture.
You'll notice in the video below that I only crumbled one cake and added a few tablespoons of frosting. This recipe will make about 48 cakesicles with ½ ounce of filling in each. I didn't need that many, so I used one of my 8-inch round cakes for another purpose. The picture above shows the full amount of frosting and a whole cake.

Create a chocolate shell.
You can use melted and tempered pure chocolate or melted compound chocolate (confectionery coating). I've shared detailed information regarding the differences between the two on my Chocolate Making Tips page, but here's a short recap.
I'm going to use white chocolate to make my cakesicles, but you can use dark or milk chocolate if you prefer.
What type of chocolate to use?
Pure White Chocolate
- Pure white chocolate made with cocoa butter has a wonderful flavor and creamy texture, and tastes amazing as a coating for cakesicles or cake balls.
- You can buy bars, blocks, chips, or wafers (also called callets).
- Pure white chocolate will need to be melted and then tempered in order for the white chocolate to set hard and be free of any fat or sugar bloom (white streaks or spots).
- Callebaut and Lindt make really nice white chocolate.
White Compound Chocolate (also known as Confectionery Coating, White Candy Melts, White Melting Candy, or White Almond Bark)
- Compound chocolates are similar to white chocolate but are made using a form of vegetable oil, typically palm kernel oil, instead of cocoa butter.
- If you like the flavor of the candy straight out of the package, then you will also enjoy it as a coating on your cakesicles.
- I actually prefer the flavor of some white confectionery coating to pure white chocolate, and it's so much easier to work with, as it doesn't require tempering.
- I usually use Peter's IceCaps for my candy making and use it to make these cakesicles, but you can use Merckens, Girardelli, or Wilton's Candy Melts. You can even purchase Nestle Premier White Morsels or white almond bark from the grocery store and use those. They are also compound chocolates (confectionery coating) and can simply be melted to make the candy shell around your cakesicles.
NOTES:
- If you want to learn more about working with compound chocolates, be sure to check out my Chocolate Making Basics video lesson at TheSugarAcademy.com.
You can find white chocolate and white confectionery coating on Amazon (commission earned for sales at no extra cost to you)
") Lindt CLASSIC RECIPE White ...Shop on Amazon
Lindt CLASSIC RECIPE White ...Shop on Amazon") ZUNKOM Peter's White Caps C...Shop on Amazon
ZUNKOM Peter's White Caps C...Shop on Amazon Merckens Coating Melting Wa...Shop on Amazon
 Ghirardelli Chocolate White...Shop on Amazon
  Popsicle Molds Set of 3, 12...Shop on Amazon
  Ouddy Life Popsicle Molds S...Shop on Amazon
 How to melt confectionery coating?
You need to heat your confectionery coating so that it registers between 100° and 120° Fahrenheit. If you get it too hot, it will thicken and may burn.
- Pour your compound chocolates (confectionery coating/candy melts) wafers into a microwave-safe bowl.
- Heat on high power for 30-second increments, stirring after each, until about 75% melted.
- Then let the candy rest for 3 minutes before stirring until melted.
- It's best to allow the residual heat of the melted candy to melt the remaining wafers so that the candy does not get too hot.
How to temper pure chocolate?
- Chop ¾ of your white chocolate into really fine pieces if using bars or blocks.
- Heat the chopped white chocolate in the microwave at 50% power for 15-second increments, stirring after each, and allowing the chocolate to rest for a minute, then stirring again.
- Heat until about 75% of the white chocolate is melted.
- Remove and continue to stir until all the chocolate is melted.
- Check the temperature of the chocolate.
- If it hasn't gone above 88-89 degrees Fahrenheit, then your chocolate will still be in temper, and it's ready to use, and you can skip the rest of these steps.
- If it has gone over 88-89 degrees, then you'll need to continue to heat the chocolate until the temperature reaches 110 degrees Fahrenheit.
- Then stir in the remaining chunk of white chocolate and stir continuously until the chocolate cools to 88 degrees F.
- Remove the chocolate chunk and test the temper of the chocolate by dipping the tip of a knife into the melted chocolate and setting it on your counter. If the chocolate hardens within a few minutes and is shiny, the chocolate is tempered and ready to work with.
- If needed, you can return the chocolate to the microwave and heat at 50% power for 5 seconds to keep it warm.
NOTE:
- If you simply melt pure white chocolate and use it to create the outer shell of your cakesicles, the white chocolate will not set up hard, may be difficult to remove from the mold, and may bloom a day or so afterward, leaving streaks and spots on the exterior of the cakesicle.
- If you are really interested in learning more about tempering chocolate, be sure to check out my Chocolate Making Basics video lesson.

Paint White Chocolate Into Popsicle Molds
You will need some silicone popsicle molds to make your cakesicles. You can find molds that have popsicle cavities that are 1 ½ - 2 inches wide, 2 ½ - 3 ½ inches long, and ½ - 1 inch deep.
- I used a 4-cavity silicone popsicle mold to create my cakesicles.
- I love the size of this mold. The pops are 1 ½ x 2 ½ x ½ inch, which is a great size. It's about twice as big as a typical cake pop. I've always thought cake pops were a bit too small. These treats are perfect!
The quantities listed below are for this particular popsicle mold. If you use a different-sized mold, then your quantities will change.
- Spoon 1 tablespoonful of white chocolate or white confectionery coating into one cavity in the popsicle mold.
- Brush the chocolate up the sides of the mold.
- Immediately, while the chocolate is still wet, insert a popsicle stick, then remove it. This will keep the hole for the popsicle stick free of white chocolate. You might want to do this twice just to ensure none of the wet chocolate covers the hole.
- Repeat, creating all the candy shells in the 4-cavity mold.*
- Pop the mold into the refrigerator if using pure white chocolate or into the freezer if using confectionery coating.
- Let the candy shell chill for 3-5 minutes, just until hardened.
- Remove and allow the mold to sit at room temperature for 10 minutes.
- Then, paint a second layer of white chocolate just around the edges of each popsicle cavity.
- Chill for about 2 minutes, just until the chocolate hardens.
*If using confectionery coating and painting into a larger, 10-cavity silicone popsicle mold, just paint 5 of the cavities, then chill, then repeat with the remaining cavities. If your candy dries at room temperature, it may streak.

Fill the chocolate shell.
- Pinch off a tablespoonful (½ ounce) of cake ball filling and press it into the candy shell, leaving about 1/16 of an inch space on top to add more white chocolate.
- Insert the popsicle stick.
- Make sure the cake ball filling is still touching the candy shell in all places. You don't want any big gaps to fill up with chocolate.
- Spoon about 1 teaspoon of white chocolate over the filling, then spread it into a thin layer.
- For a nice flat surface, scrape off any excess chocolate using an offset metal spatula.
- Pop the cakesicles into the refrigerator (pure white chocolate) or into the freezer (for white confectionery coating) for 3-5 minutes until the chocolate hardens.
NOTE: You may see some of the darker chocolate cake through the white chocolate on top, but as long as the candy is at least 1/16 of an inch thick over the top of the filling, the cake filling won't come through. If you scrape, and you actually see cake ball filling sticking through, then cover it again, and just leave it a bit thicker on top.
Un-mold Cakesicles
- Press the pops out of the silicone mold.
- Use a sharp, thin knife to remove any excess chocolate around the outer edges of the cakesicles after they have come to room temperature. If you try to shave off bits of cold chocolate, the pieces will stick to the outer shell of the cakesicles.
Tips
The shelf life of a cakesicle is 7-10 days if using fresh cake. Count the days based on when your cake was baked. If you use fresh frosting made with butter, you might want to consume your cakesicles within 3-5 days.
NOTE: Mold will develop on the filling if you keep them longer than that, and the problem is that you won't notice the mold until you bite into your cakesicle.
I know this from experience. Thankfully, I cut into, instead of biting into, a 14-day-old cakesicle just to see what it looked like. When I saw the fuzzy white mold, I was so happy that I used a knife instead of my teeth. Yuk!
Yes, but be aware that the white chocolate or white confectionery shell will attract moisture from the refrigerator and may become sticky or wet.
To store them in the chill box, wrap each pop well in plastic wrap, then place them in zip-top bags. Then place them in a cardboard shipping box before placing them in the refrigerator. The box will wick up most of the moisture.
To thaw the cakesicles, remove the box and the zip-top bag. Allow the bag of cakesicles to sit, unopened, for at least one hour to allow the cake pops to come to room temperature. This will keep them from cracking due to the temperature change.
Then remove and unwrap each cakesicle.
Yes, you may keep the cakesicles in the refrigerator for up to 2 weeks.
You may store your cakesicles in the freezer for up to 3 months.
There are so many ways to create festive-looking cakesicles, and you can watch the video below to see how you can drizzle chocolate or colored candy melts over top. You can even add sprinkles.
I am so excited to show you how to make more elaborate cakesicles. Stop back soon to see more fun cakesicle designs.
If you love cake balls or cake pops, be sure to check out these other recipes.
- Chocolate Cherry Bombs - chocolate cake balls with a maraschino cherry center
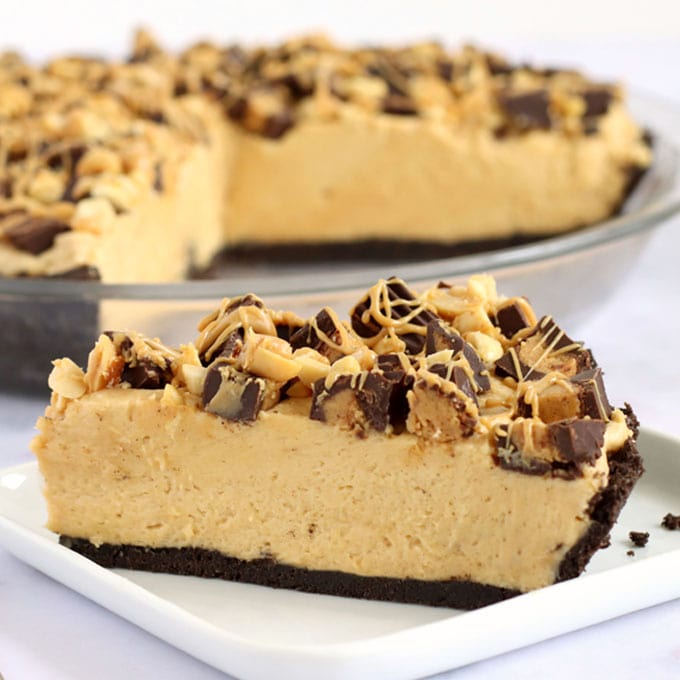
- Cake Ball Buckeyes - peanut butter cake balls dipped partially in dark chocolate to look like peanut butter fudge buckeyes
- Funfetti Cake Pops - white cake pops decorated with rainbow sprinkles
Printable Recipe
Popsicle-shaped cake pops that are fun to make for any occasion, and won't crack, leak, or fall off the stick.
- 1 baked 9-inch by 13-inch sheet cake (or two 8-inch round or square cakes)
- ⅓ cup frosting, plus more if desired
- 32 ounces melted and tempered white chocolate or melted white confectionery coating
-
Crumble the cake and blend it together with the frosting.
-
Add more frosting if desired until the cake ball filling has a nice chocolate truffle-style texture.
-
Spoon 1 tablespoonful of white chocolate into one popsicle cavity.
-
Paint it into a thin layer on the bottom and up the sides of the mold.
-
Immediately insert then remove a popsicle stick into the mold, to remove any white chocolate from that area.
-
Repeat creating 4 white chocolate shells in your popsicle mold.
-
Pop the mold into the refrigerator, if using pure white chocolate, and into the freezer if using confectionery coating (Candy Melts).
-
Chill for 3-5 minutes until the candy hardens.
-
Scoop out 1 tablespoonful of the cake ball filling and press it into the candy shell, leaving at least 1/16 of an inch of space at the top for the additional layer of chocolate.
-
Repeat filling all the popsicles.
-
Spoon about a teaspoon of white chocolate over top and spread it out thin.
-
Use an offset spatula to scrape off any excess white chocolate.
-
Repeat covering all the cakesicles.
-
Chill for about 2 minutes until the candy layer hardens.
-
Unmold the cakesicles and they are ready to serve.
Recipe Video
- If you are using a cake mix, just skip adding the oil and use the number of eggs and water (or use milk) listed on the box then add 3 tablespoons of instant pudding mix and 3 tablespoons of sour cream. This makes a really delicious cake!
- I used Duncan Hines cake mixes so I added 3 whole eggs, 1 cup of milk, 3 tablespoons of the dry pudding mix, and 3 tablespoons sour cream.
- You can add the oil if you prefer. When making cakesicles the addition of the oil isn't too bad. For cake pops it can make the filling a bit greasy making balls difficult to dip.
This recipe was originally published on September 30, 2019.

- Banana Split Bars – A Fun and Easy Summer Dessert - March 4, 2026
- Pineapple Fudge (No Candy Thermometer Needed!) - March 4, 2026
- No-Bake Peanut Butter Pie Recipe - March 3, 2026
Judy Molumby says
this cakesicle process works, other don't allow chilling so the candy cracks
Beth Klosterboer says
I'm happy you found my instructions helpful and that your cakesicles turned out well.
Cindy says
Hi there I’m making these for grandson’s first birthday and wondering what tip you use to drizzle chocolate onto it? Thanks for such clear instructions! Cindy
Beth Klosterboer says
I like to use a disposable pastry bag to drizzle chocolate over my cakesicles. Fill the bag with your melted chocolate, snip the tip off leaving a small opening, squeeze the bag as you move the bag back and forth across the top of the cakesicle. You'll get a very pretty drizzle using this method. You can also use a zip top bag but it's harder to get a nice small opening. The chocolate drizzle may be a bit thicker, which looks good too.
Have fun making your cakesicles for your grandson's party!
Roberta Wall says
Thank you so much for all the amazing tips. My daughter and I made our first batch of cakesicles for her birthday party and they turned out great. We had one crack but the rest were perfect. She is excited to serve them to her friends this weekend.
Beth says
That is wonderful to hear! Wish your daughter a "Happy Birthday". I hope her friends love the cakesicles.
D Esco says
I am so glad I stumbled upon your recipe! The detail of doing each step was very helpful. My first attempt at making cackle sicles was a huge success. Kids and adults alike were suitably impressed! Thanks
Beth says
That is wonderful! I'm so glad you found the step-by-step instructions so helpful. I'm glad they were a hit.
kookie says
I have to make 48 and do you wash or wipe the molds after each time using ?
Beth says
You can simply wipe them clean to remove any hardened chocolate or spots inside the mold. Have fun!
Joanie says
Have you ever used milk or dark chocolate shell and white cake filling? If so, any hints?
Beth says
Yes, I have. You can use pure milk or pure dark chocolate or you can use candy melts (compound chocolate/confectionery coating) to make the shell of your cakesicles. You can read all about the differences between these two types of chocolate (pure vs. compound) and how to melt them each. If you use pure chocolate, you must temper the chocolate so that it will harden properly. Check out my Chocolate Making Tips page (https://hungryhappenings.com/chocolate-making-tips/) to read all my tips for working with chocolates.
Use the same filling recipe to make white cake filling. If you want to use chocolate cake or any other flavor, just use frosting that pairs well with the cake you are using.
Have fun!
Kaya says
Thank you so much for so many great ideas about choclates and cakesicles. It was very usefull. I have one question, can I reheat pure choclate callebaut again and again? Beause i do reheat when i use candymelts and it works ok. I havent tempred choclates before, first time trying this, so nervous
Beth says
Hi Kaya,
Yes, you can melt, harden, and remelt pure chocolate like Callebaut Callets. You just need to temper it each time you melt it. But nothing goes to waste!
I always suggest practice tempering first before you make any candy or cakesicles. Once you get the feel for it, tempering becomes pretty easy.
Have fun!
Rodella says
You make everything so easy! Love this will try and make some🤞🏻
Beth says
I'm glad you find my instructions helpful!
Ashanti says
What type of frosting did you use?
Beth says
I use Wilton Decorator frosting because I like the flavor and I always have it on hand. You can use any store-bought frosting or homemade frosting to make your cakesicles. I’ve used Betty Crocker and Duncan Hines frosting and they worked great. Have fun!
Tracy says
I made these this morning they turned out so well, the instructions were so easy to follow.
Beth says
I'm so happy to hear that! Enjoy your cakesicles. 🙂
Michelle Gerbig says
Love this very detailed recipes and instructions. We got our mold today so this will be a project over the weekend for me and my girls. Thank you! Just one question though: what kind of frosting do you use for the cake? Do you use a store bought one or do you make it yourself? thanks!
Beth says
Hi Michelle, I hope you and your girls have fun making your cakesicles. I use Wilton Decorator frosting because I like the flavor and I always have it on hand. You can use any store-bought frosting or homemade frosting to make your cakesicles. I've used Betty Crocker and Duncan Hines frosting and they worked great. Have fun!
Nil says
Hi... I'm very new to this. Can I use chocolate blocks from the supermarket for the chocolate shell? I want to make them for my son's birthday Thanks Nil
Beth says
Yes, you can. Just be sure to look at the ingredients. If there is cocoa butter in the ingredients, then you will need to melt and temper the chocolate. If there is Palm Kernel Oil (or some other vegetable oil) you can simply melt the chocolate and use it. It might be helpful to read my chocolate-making tips page to get a better understanding of the types of chocolate and how to melt them. Check it out here - https://hungryhappenings.com/chocolate-making-tips/
Rose says
Is the 7-10 days at room temperature? Im making some for a vday and wondering how far in advance I can make them
Beth says
I like to share them within a few days but the cakesicles should keep at room temperature, if stored in an airtight container for 7-10 days.
Erica says
Hi Beth,
Excited to try these. Is it possible to use food coloring to dye the white candy melts?
Beth says
Hi Erica,
Yes, you can color the white candy melts but you must use oil-based candy/chocolate coloring not water-based icing coloring or liquid food coloring. You might want to read my post where I explain how to color candy melts here -- https://hungryhappenings.com/chocolate-making-tips/how-to-color-white-chocolate-paint-candy-molds/
lindsay says
hi. i was wondering what frosting recipe you used for these.
Beth says
You can find my homemade frosting recipe on my Easter Bunny Cake recipe post - https://hungryhappenings.com/easter-bunny-cake/
I usually just use store-bought frosting because it's a lot of work to make such a small amount of frosting for these cakesicles. I keep tubs of Wilton Decorator Icing in my refrigerator for projects like this. You can find tubs here - https://amzn.to/2Xzs2qf
Sheetal says
Hi there!
I was wondering what recipe you use for the frosting or if you just use a store ready frosting ?
Thank you !
Beth says
I usually just use store-bought frosting because it's a lot of work to make such a small amount of frosting. I keep tubs of Wilton Decorator Icing in my refrigerator for projects like this. You can find tubs here - https://amzn.to/2Xzs2qf
You can also find my homemade frosting recipe on my Easter Bunny Cake recipe post - https://hungryhappenings.com/easter-bunny-cake/
CG says
Hi!
What are your dimensions for your cake popsicle molds?
Thanks in advance!
Beth says
I used molds that make 1 1/2 x 2 1/2 x 1/2 inch cakesicles. There are smaller molds available too.
Pam says
I have made cakesicles several times and they look amazing, but when I take a bite the chocolate separates from the cake every time. I use Merkins chocolate. Any idea what causes this?
Beth says
If you are using compound chocolate made with palm kernel oil as opposed to pure chocolate made using cocoa butter, it melts at a higher temperature than pure chocolate. So, when you bite into it, it doesn't immediately melt in your mouth. This also means that there is a more solid separation between the cake ball mixture and the surface of the compound chocolate. Be sure to really fill the chocolate shell with your cake mixture. Compact it using your fingers to ensure it is pressed up against the chocolate shell. You also might want to eliminate any oil in your cake recipe. If the cake mixture is greasy at all it will have a slick surface that won't adhere to the chocolate. I hope this helps.
Lyn says
By far, THE BEST tutorial and blog post I’ve seen on Cakesicles!! I can’t wait to order the molds and get started!!!
Beth says
Thanks, Lyn! I'm so glad you found my instructions helpful. Enjoy making your cakesicles.
Karen Black says
Hi- the video is not showing up for me- it has the heading but no video. Could you possibly send a link or please check it on your end? Thank you so much!!
Beth says
Hi Karen,
I'm sorry the video wasn't working. It does pop up to the top of the page on your computer and then it goes into the sidebar. You can also watch it on Youtube here- https://youtu.be/V95Nnn4zjtw