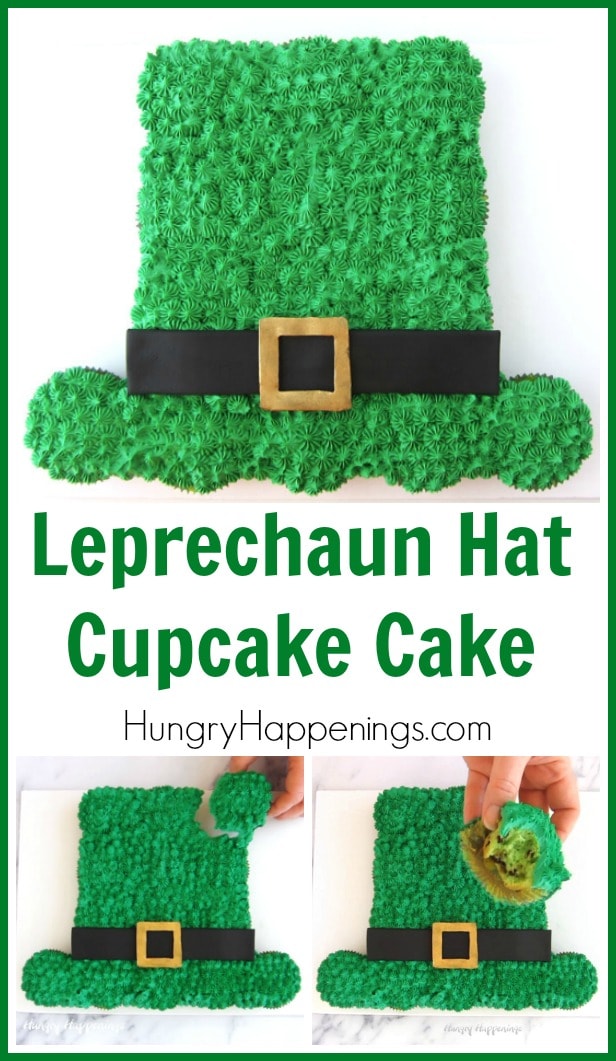
Create a simple pull-apart Leprechaun Hat Cupcake Cake to celebrate St. Patrick's Day using Mint Chocolate Chip Cupcakes topped with minty green frosting and decorated with a wee bit of modeling chocolate.
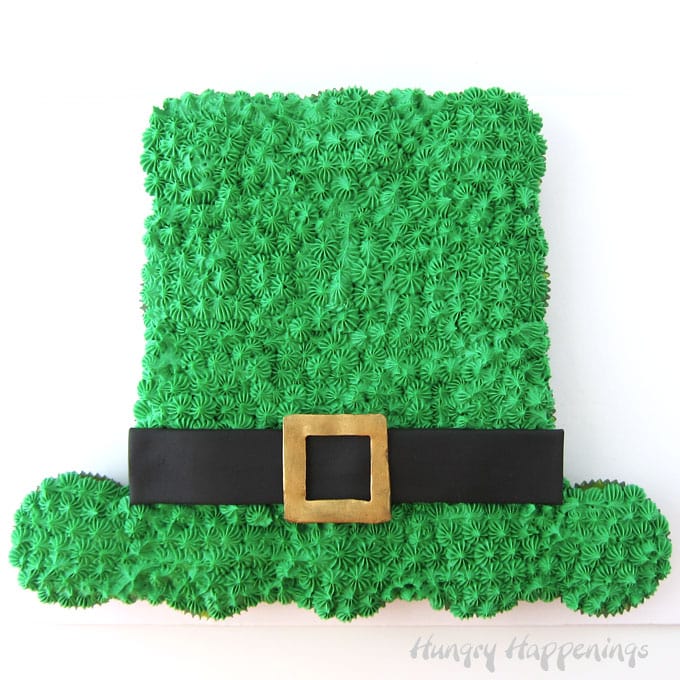
Have you ever made a cupcake cake? This Leprechaun Hat Cupcake Cake was my first. It's hard to believe I've never tried this before.
The benefit of making a cupcake cake for a party is that your guests can simply pull apart the cupcakes and enjoy their dessert. There's no knife needed to cut the cake. You don't even have to be involved in the serving of the cake.
The trick, however, is to make a cupcake cake that can be decorated such that when it is pulled apart it isn't too messy.
Jump To
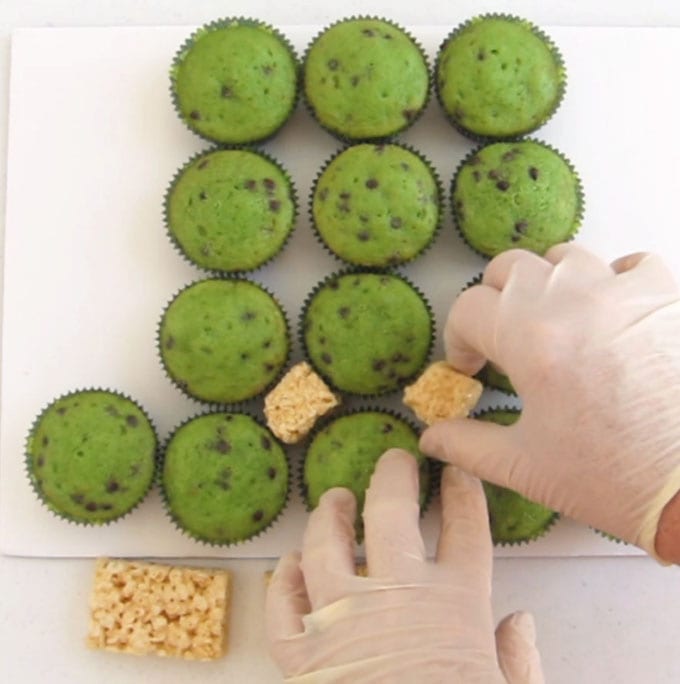
When you arrange cupcakes together to form the shape of your cake there will be gaps in between the round little cakes. Those holes need to be filled in order to have a flat surface to cover with frosting.
I've seen where people have piped frosting in between the cupcakes to fill in the holes but that means your cupcakes will stick together and when your party guests pull them apart and frosting will be stuck to the wrappers.
Not good!
Pro Tip
Others use marshmallows, which I think is a good idea, but I have an even better idea...
Fill the gaps in your cupcake cake with Rice Krispie Treats!
- Rice Krispie Treats can be molded into just the right shape to fill in the gaps in between the cupcakes.
- The treats taste great covered in a bit of frosting! Some of your party guests may even prefer the cereal treat to the mint chocolate chip cupcakes.
- Rice Krispie Treats are easy to make:
- Melt 2 tablespoons of butter with 4 ounces of marshmallows then mix in 2 cups of Rice Krispies cereal.
- Let it cool just enough so that you can pick it up and mold it into shapes.
- Press the cereal treats into a shape that will fit in between 4 cupcakes.
- Or you can use store-bought cereal treats.
- Just cut them in half and press them into the shape needed to fill the gaps between the cupcakes.
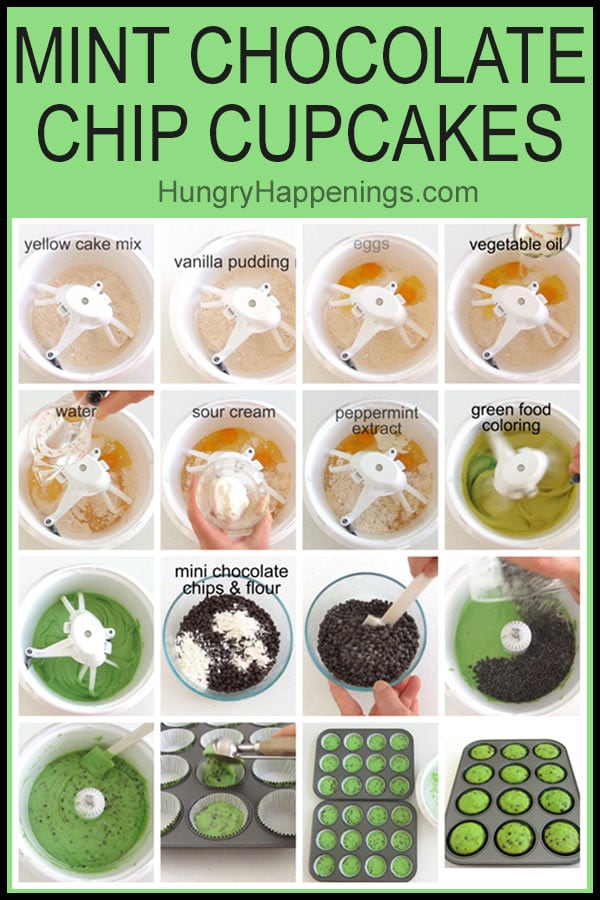
Start by making tasty cupcakes. I chose to use mint chocolate chip cupcakes. Yum!
Mint Chocolate Chip Cupcake Recipe
Doctor a cake mix to make these bright green mint-flavored cupcakes speckled with mini chocolate chips. To make moist and delicious cupcakes add some instant vanilla pudding mix and sour cream to the cake mix. You'll be amazed and how much difference it makes!
- Beat together 1 yellow cake mix with ¼ cup of instant vanilla pudding mix, 3 whole eggs, ½ cup vegetable oil, 1 cup water, ¼ cup sour cream, and 1 teaspoon peppermint extract on low speed for 30 seconds.
- Add some drops of green food coloring then increase the mixer speed to medium and beat for a minute.
- Toss 1 tablespoon of flour with 1 cup of mini chocolate chips then stir them into the cake batter.
- Spoon into 24 cupcake liners and bake for 16-20 minutes.
- The cupcakes are done when you press a finger in the center of a cake and the cake springs back.
- Allow the cupcakes to cool for 10 minutes in the pan then move them to a cooling rack to cool completely.
This recipe will make 24 standard-size cupcakes. You will only need 14 of them to make this cupcake cake. You can serve the others separately.
You can find the NutriMill Mixer and attachments (including the amazing bowl scraper and batter beaters) from Amazon (commission earned for sales at no additional cost to you).
 NutriMill Artiste Kitchen E...Shop on Amazon
 NutriMill Baker’s Package...Shop on Amazon
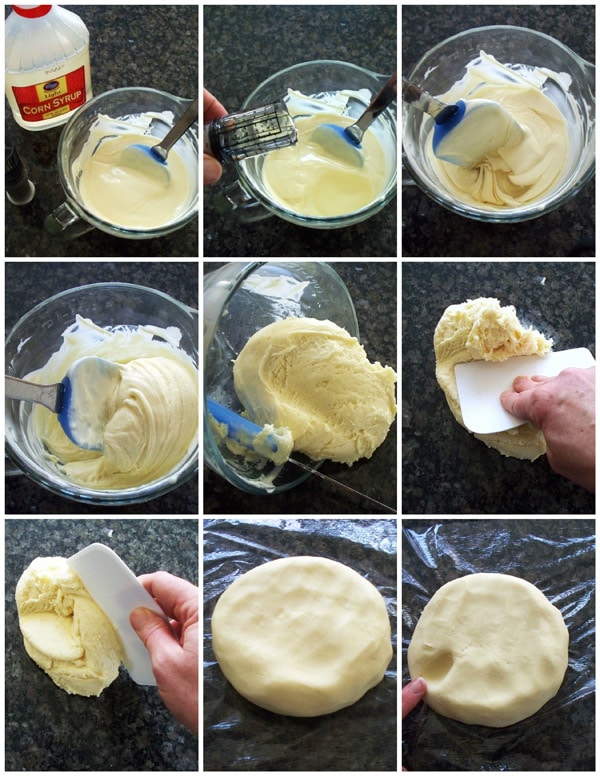
Make modeling chocolate.
You can find my detailed recipe for making homemade modeling chocolate (or candy clay - which is made using Candy Melts) on my Chocolate Making Tips page but below are the quick directions. Be sure to check out the tips page so that you can easily make perfect modeling chocolate (that isn't greasy or hard) the first time.
But here's a quick recap of the recipe.
- Stir together 12 ounces of melted chocolate (that has cooled to about 91 degrees) with ¼ - ⅓ cup of corn syrup until thickened. The amount will depend on the type of chocolate you use.
- Knead until smooth.
- Cover in a zip-top bag and allow it to cool for at least 30 minutes before using it.
NOTES about Candy Clay
- If modeling chocolate is made using confectionery coating (Candy Melts) then it is known as candy clay.
- I love working with candy clay. It tastes great and is easy to shape, cut, and sculpt.
- I even wrote an entire book about candy clay filled with recipes, troubleshooting tips, and 17 really fun projects. It's called Candy Clay Creations and it's available on Amazon in print format or Kindle format.
Making black modeling chocolate.
- You can make black modeling chocolate by kneading black food coloring into modeling chocolate that has been made using semi-sweet chocolate.
- Whenever you add food coloring to modeling chocolate I recommend you wear food-handling gloves otherwise your hands will get stained with the coloring. The coloring will wash out of your hands after a day or so, but it's just best to avoid it!
- Or you can make candy clay using black Candy Melts just be sure to add more black coloring to get a true black color.
- Learn more about how to color modeling chocolate, here.
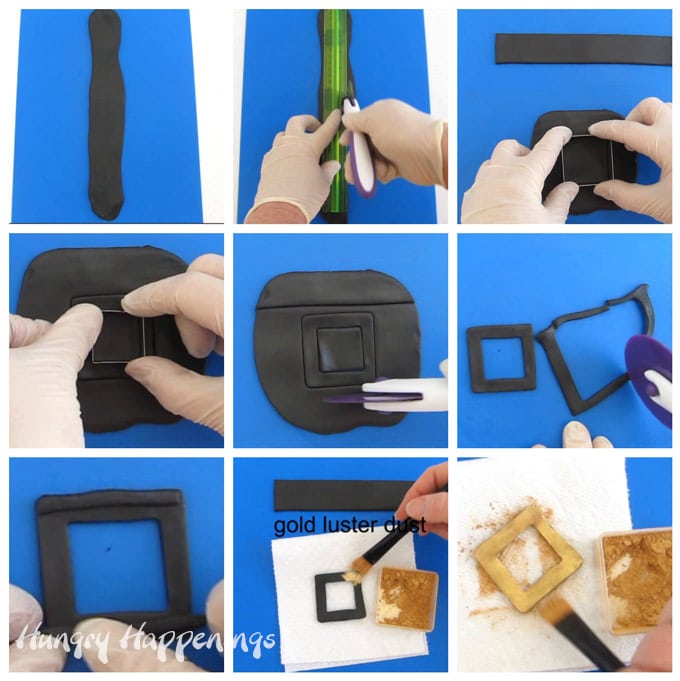
Make Modeling Chocolate Hat Band and Buckle
While your cupcakes are baking and cooling you can make your hatband and buckle using black modeling chocolate.
Modeling chocolate (also known as candy clay, when made using candy melts) is a simple 2-ingredient cake decorating medium that looks like fondant but tastes like chocolate. See the quick recipe below these instructions.
- Roll out black modeling chocolate to about ⅛th inch thickness and cut it into an 8-inch by 1 ½-inch strip for the hatband.
- Also, cut out a 2-inch square then cut out a 1 ¼-inch square inside the larger square.
- Then cut two thin strips (about ⅛th inch wide by 1 ¾ inch long) to attach to the backside of the outer square along the top and bottom edge.
- The strips will help to keep the buckle flat once it's set over the hatband on the cupcake cake.
- If the modeling chocolate is soft and fresh the strips should stick easily. If not, use a bit of water or clear piping gel to attach them.
- Flip the buckle over so that the flat side is facing up and brush with edible (FDA approved) gold luster dust.
- You could also use yellow candy clay to make the buckle if you prefer.
NOTES:
- If you roll modeling chocolate out on a silicone mat using a silicone rolling pin you do not need to dust your surface.
- It's always best to roll once or twice then lift the modeling chocolate and rotate it, then roll again, and rotate, etc. This will keep the modeling chocolate from sticking if it gets too warm.
- If you roll it out on a countertop or cutting board be sure to lightly dust the surface with cornstarch so the modeling chocolate does not stick.
You can find the supplies to make the hatband and buckle on amazon (commission earned for sales at no extra cost to you).
 Fox Run, 1 x 2.75 x 2.75 in...Shop on Amazon
 LONGFITE Large Silicone Cou...Shop on Amazon
 Wilton Fondant 9 Inch Rolli...Shop on Amazon
 Celebakes by CK Products Sh...Shop on Amazon
 Wilton Fondant Cutter Set, ...Shop on Amazon
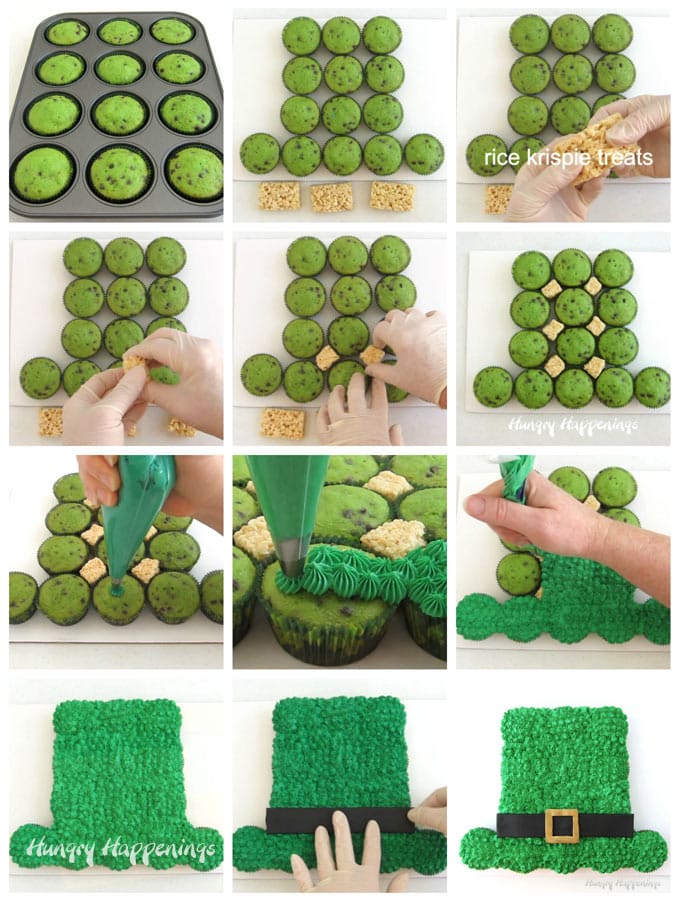
Decorate the cake.
- Arrange a row of 5 cupcakes along the bottom edge of a rectangle cake board.
- Arrange three rows of 3 cupcakes up above the first row creating the top of the hat.
- Use homemade rice Krispie treat mixture or cut 3 rice Krispie treats in half and press the treat into a shape that will fit in between the cupcakes.
- Pipe green frosting all over the cupcakes and over top of the Rice Krispie treats, filling in all the gaps. See the frosting recipe in the recipe card below.
- You can use any star pastry tip you like.
- There are open star tips and closed star tips with a variety of openings which all create a different look.
- For this cake, I chose to use an open star tip with lots of openings.
- You can see how the tip with fewer openings creates a different look. Check out my Panda Bear Cake or my Toothless and Light Fury Cakes.
- Pipe some frosting around the edge of the cupcake to give the hat a more smooth shape along the edges.
- It's alright if the bottom of the hat brim is not completely smooth.
- Set the black modeling chocolate hatband across the cupcake cake just above the hat brim.
- Set the gold buckle in the center of the hatband.
- Your cake is ready to serve.
NOTES:
- Your cupcake cake will stay fresh if covered and stored at room temperature for up to 3 days.
- Allow the frosting to crust over before covering it with plastic wrap or tin foil.
- You can set a large box over top to keep the cake free of dust or place it in a large cake carrier.
- I don't recommend refrigerating cupcakes as it tends to dry them out, but if you do place this cupcake cake in the fridge, just be aware that the modeling chocolate hatband and buckle should not be refrigerated as they will wick up the moisture in the chill box and will become sticky. Allow your cupcake cake to come to room temperature before setting the modeling chocolate decorations over top.
FROSTING TIPS:
- You can spread the frosting across the cupcake if you want a smooth look to your Leprechaun Hat.
- If you do this, be sure to add a crumb coat (a thin layer of frosting over each cupcake) before frosting the entire cake. It might also be a good idea to try to create a flat top on each cupcake using the crumb coat.
- Use a pastry bag to pipe frosting in big ribbons over the entire cake then smooth it out using an offset spatula.
You can find supplies needed to decorate your Leprechaun Hat Cupcake Cake from amazon (commission earned for sales at no additional cost to you).
 McCormick Green Food Color,...Shop on Amazon
 Wilton Icing Colors, 1-Ounc...Shop on Amazon
 Wilton 19-by-13-Inch Cake B...Shop on Amazon
 Kootek Piping Bags, Disposa...Shop on Amazon
 Ateco 870 - 10 Piece French...Shop on Amazon
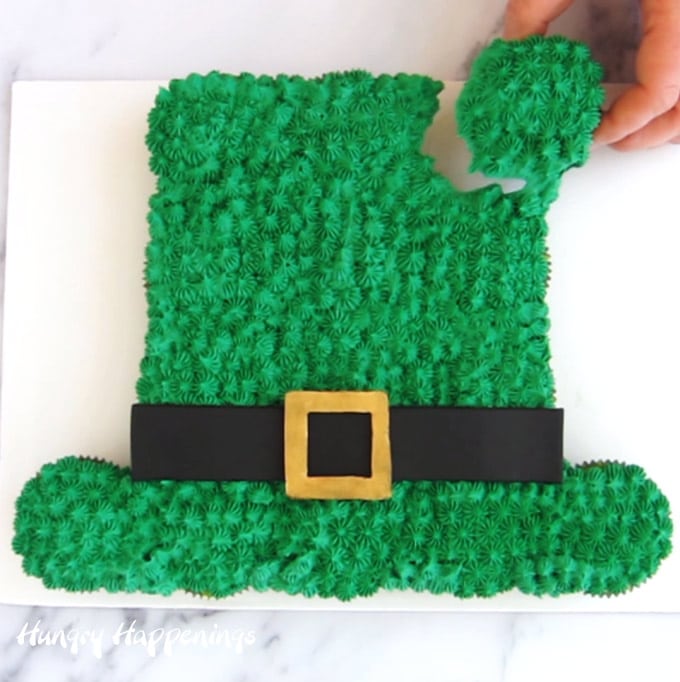
When you serve this cupcake cake allow your party guests to pull apart the cupcakes from the cake. Because you have piped on the frosting the cupcakes should pull apart cleanly with just enough frosting clinging to each little cake.
Related Recipes
If you love celebrating St. Patrick's Day be sure to check out these other recipes:
See all my St. Patrick's Day Recipe Ideas, here!
Video
Watch this video to see how you can make one of these Leprechaun Hat Cupcake Cakes for your St. Patrick's Day celebrations.
Recipe
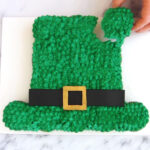
A pull-apart cake shaped like a Leprechaun's Hat made using mint chocolate chip cupcakes topped with minty green frosting and a modeling chocolate hat band and buckle makes a festive St. Patrick's Day dessert.
- 1 box (15.25 ounce) yellow or white cake mix
- 1 cup water
- ⅓ cup vegetable oil
- 3 large eggs
- ¼ cup sour cream
- ¼ cup instant vanilla pudding mix
- 1 teaspoon peppermint extract
- green food coloring
- 1 tablespoon flour
- 1 cup mini chocolate chips
- 1 cup vegetable shortening, preferably hi-ratio shortening
- ½ cup butter, softened
- 6 cups powdered sugar
- 3 tablespoons milk, plus up to 3 tablespoons more, if needed
- 1 teaspoon peppermint extract
- green food coloring
- 4 ounces black modeling chocolate (candy clay, or fondant)
- edible gold luster dust
- 3 Rice Krispie Treats
-
Allow the cake ingredients to sit at room temperature for about an hour.
-
Preheat oven to 350 degrees Fahrenheit.
-
Line 24 cupcake cavities with cupcake liners.
-
Combine the cake mix, water, oil, eggs, sour cream, pudding mix, and peppermint extract together in a large mixing bowl.
-
Use an electric mixer to beat on low for 30 seconds.
-
Add drops of green food coloring until you get the desired shade of green coloring.
-
Increase the mixer speed to medium and beat for 1 minute.
-
Toss 1 tablespoon of flour with 1 cup of mini chocolate chips then stir them into the cake batter.
-
Fill 24 cupcake cavities about ⅔'s full with batter.
-
Bake the cupcakes for 16-20 minutes. A toothpick inserted into the cupcakes should come out with just a few moist crumbs or the cakes should spring back when you press a finger on top.
-
Allow the cupcakes to cool for 10 minutes in their pans then remove them and set them on a cooling rack.
-
Beat the shortening and butter together until well combined using an electric mixer.
-
Add the powdered sugar and beat until light and fluffy.
-
Add the peppermint extract, 3 tablespoons of the milk, and drops of green food coloring and beat until fully incorporated and the frosting is smooth.
-
Add more milk, as needed to make the frosting soft enough to pipe through a star tip, yet firm enough to hold it's shape, and add more green food coloring until you get a vibrant Kelly green (the color will intensify as the frosting sits).
-
Roll out the black modeling chocolate to about ⅛th inch thickness.
-
Cut one 8 inch by 1 ½ inch strip for the hat band.
-
Cut one 2 inch square then cut out a 1 ¼ inch square from the center.
-
Cut two 1 ¾ inch long by ⅛th inch wide strips to attach to the backside of the square along the top and bottom edge.
-
Brush gold luster dust over the flat side of the square.
-
Arrange one row of 5 cupcakes along the bottom edge of a rectangle cake board or platter to form the hat's brim.
-
Stack three rows of three cupcakes above the hat's brim.
-
Cut rice krispie treats in half then shape them to fit in between the cupcakes, filling in the gaps.
-
Fill a pastry bag fitted with an open star tip with green frosting.
-
Pipe frosting stars over the cupcakes.
-
Frost the entire surface of the Leprechaun Hat Cupcake Cake with green frosting.
-
Set the black modeling chocolate band over the first row of 3 cupcakes just above the hat's brim.
-
Place the buckle in the center of the hat brim.
-
Serve!
You will have an additional 10 cupcakes you can frost and serve separately.
Store your cupcake cake at room temperature for up to 3 days.
Did you make this Leprechaun Hat Cupcake Cake for St. Patrick's Day? Let me know in the comments below.
- How to make peanut butter? - February 15, 2024
- OREO Penguins - December 20, 2023
- OREO Snowmen - December 20, 2023


Gina
Love this! I just finished making it and it is adorable
Beth
I'm so happy to hear that you made this cupcake cake! I hope you have a fun St. Patrick's Day. 🙂
Karen @ Sugartown Sweets
Your leprechaun hat is awesome! I've never made a cupcake cake so I didn't know you needed to "fill the holes". Your idea of using crispy treats is perfect! You always make your creative treats look so easy!
Beth
Thanks Karen! It was my first time to make a cupcake cake and I realized quickly that you definitely need to fill the holes. The treats do work perfectly.
Scarlet
This came out so cute! I never would have thought of filling in the gaps with rice crispy treats. I like how that keeps the cupcakes uniform and you don't need a hat mold. Very clever!
Beth
Thanks Scarlet. The rice krispie treats worked out great and everyone enjoyed finding them hiding inside the cupcake cake.
The Partiologist
At a glance I had NO idea it was a cupcake cake, it's fantastic! Plus it makes serving super easy!
Beth
I'm so glad you thought it looked more like a cake. Adding the rice krispie treats really helped!