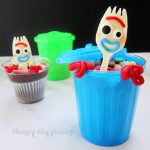
Serve these Forky Cupcakes in brightly colored plastic trash cans, and the kids at your Toy Story 4 party will think you are as cool as any animated toy. Each of these chocolate cupcakes is topped with a white chocolate spork decorated with candy clay to look like Forky. The garbage cans are even filled with edible "trash" to make Forky feel at home.

Have you seen the Toy Story 4 movie yet? I just did, and fell in love with the new character, Forky, who thinks he is trash and deserves to be thrown away. He can't understand why Bonnie loves him so much, since he isn't a toy. She literally made him out of trash.
He feels comfortable in a trash can, and throughout the movie, he continually jumps in them. So when I designed these cupcakes, each made with a white chocolate Forky, I just knew Forky had to be in a trash can.
Finding just the right size trash can for these Forky Cupcakes was a challenge, though, so I had to get creative.

Trash Cans
- I found several options online, but finally decided on a set of brightly colored plastic trash cans that are about the size of a 16-ounce drinking cup.
- Each plastic trash can is 4 inches tall and has a 3 ½ inch diameter opening at the top.
How to fit the Forky Cupcake in the garbage can?
- The plastic trash cans are too big to put a cupcake directly into them, so I inserted a smaller, shorter, 9-ounce disposable cup to help hold the cupcakes up near the top of the opening of the can.
- See that plastic cup in the background of the picture above? The one with the Forky Cupcake inside? That is what is inside the blue trash can.
- The lip around the top edge of the smaller cup will hold it in place in the trash.
- Then you can fill the lower portion of the trash can with candy or you can leave it empty.
- You can find these short 9-ounce plastic cups at most grocery stores.
What size cupcakes fit in the trash cans?
- A standard-size cupcake fits down into the cup but they are 1 ¼ inches tall and the cup is more than twice that tall.
- You can use standard cupcakes, but you'll need to add a big layer of frosting, or you can fill the bottom of the cup with candy.
- A larger cupcake baked in a jumbo cupcake liner that measures 2 inches at the base and is 1 ¾ inches tall works much better.
- This size liner fits into a standard-size muffin tin but will hold more cake batter and will bake up at least ½ inch taller than a standard cupcake.
- NOTE: Not all jumbo cupcake liners have a 2-inch base; some are as large as 3 inches.
- You can find 2-inch by 1 ¾ inch tall cupcake liners using this link.
- I found mine at a local grocery store. I believe it was Walmart.
How to bake jumbo cupcakes
- Fill the cupcake liner ¾ full of cake batter.
- Add about 2 minutes of extra baking time to your cupcake recipe.
- I used my favorite doctored cake mix recipe, where I add ⅓ cup of powdered pudding mix (in this case, chocolate) and ⅓ cup of sour cream to the cake mix ingredients, and was able to get 18 cupcakes from one Duncan Hines Chocolate Cake Mix.

Frosting and "Trash"
- Place the jumbo cupcake down into the 9-ounce drinking cup, then spread a big scoop of frosting over the top.
- For the "trash," I chose to go the easy route and just tossed on some colorful dehydrated marshmallows, the kind you find in Lucky Charms Cereal.
- I just wanted to add some things that could mimic trash, not actually look like specific pieces of garbage. They worked great.
- I figured making and decorating the white chocolate sporks, baking and frosting the cupcakes, and assembling the Forky Cupcakes in Trash Cans was enough work for you to do for your Toy Story 4 party, but if you want to go all out, you can certainly craft crumpled up paper, tin cans, and even banana peels or boxes out of modeling chocolate (candy clay) to go in your trash cans.

How to make white chocolate Forky (sporks):
You will need to have a few disposable plastic sporks to use as molds. You can order large quantities of sporks from Amazon, here, or you can just pick up a few at a restaurant that does carry-out.
- Melt and temper pure white chocolate or melt white confectionery coating (candy melts).
- You can find melting instructions on my Chocolate Making Tips page.
- Use a food-use-only paint brush to brush the white chocolate over the top of a plastic spork, covering about half of the handle.
- Wipe off any chocolate that has dripped down the sides of the spork.
- It's very important that you wipe off any white chocolate that has dripped over the edge of the spork, especially around the tines. Once it cools, the white chocolate will retract, allowing it to easily pull away from the plastic spork.
- Refrigerate (if using pure white chocolate) or freeze (if using candy melts) for just a few minutes until the candy hardens.
- Let the spork sit at room temperature for about 5 minutes before adding a second coat of white chocolate.
- Chill again for about 5 minutes.
- You want to chill the chocolate long enough that it will retract from the plastic spork, but not too long that it will crack.
- Gently run a thin knife under the edge of the chocolate on the spork handle.
- The chocolate should release from the plastic and pop off easily.
- If it does not release, then chill it a little longer and try again.
- Do not tug too hard, or you will break the handle.
Why don't you cover the entire handle of the spork?
- You will insert the white chocolate Forky into the cupcake, so you don't need the entire handle.
- The handle would be too long to fit into the cupcake.
What is the difference between white chocolate and white confectionery coating?
- White chocolate contains cocoa butter and must be melted, cooled, and agitated in order to re-align the beta crystals in the cocoa butter so that the chocolate hardens properly. This process is called tempering.
- White confectionery coating (also known as candy coating, Candy Melts, melting wafers, summer coating, and almond bark) contains palm kernel oil (or some other vegetable oil) and does not require tempering.
- Confectionery coating can simply be melted between 110 and 120 degrees Fahrenheit and will harden beautifully.
See my Chocolate Making Tips page for really detailed information about the various types of chocolate and learn how to properly melt them.
- Confectionery coating can simply be melted between 110 and 120 degrees Fahrenheit and will harden beautifully.
Which white chocolate should I use?
- Use a white chocolate or candy coating that you enjoy eating and that you are comfortable working with.
- Lindt, Callebaut, and Ghirardelli make nice pure white chocolate that can be used to coat these cereal treats.
- I personally love using Peter’s White Caps (Ice Caps) for most of my candy making, but this brand is typically only available at cake and candy decorating stores or online.
- I love the flavor of this confectionery coating and actually prefer its flavor over pure white chocolate.
- Plus, it melts easily and always has the perfect fluidity, allowing for a beautiful coating on treats.
- You can also use Girardelli White Melting Wafers, Mercken’s, Make ‘n Mold Vanilla Wafers, Wilton Candy Melts, CandiQuik, and even store-brand almond bark if you want to use confectionery coating.

To decorate my Forky Cupcakes, I chose to use modeling chocolate, but you can certainly use store-bought fondant or homemade fondant, if you prefer. You could also color some white chocolate (or candy melts) and pipe on Forky's mouth and eyebrows.
Modeling Chocolate (also known as Candy Clay)
If you have never made modeling chocolate, it is really simple. The basic recipe requires you to blend together white chocolate or white confectionery coating and corn syrup to form an edible clay that is pliable enough to cut, roll, sculpt, and form.
How to make modeling chocolate:
You can find detailed instructions on my Modeling Chocolate Recipe page. Below is a brief overview.
- Melt 12 ounces of white chocolate or white confectionery coating in the microwave using 30-second bursts of high power until about 75% of the white chocolate melts.
- Remove from the microwave and continue to stir until all the chocolate melts.
- Continue to stir it, scraping the bowl, until the white chocolate cools to between 91 and 92 degrees Fahrenheit.
- Pour in ¼ cup light corn syrup and stir, slowly, just until well combined.
- If you over-stir or if you pour it into hot white chocolate, your modeling chocolate may become greasy.
- See the modeling chocolate troubleshooting guide to fix your greasy modeling chocolate.
- Place it in a zip-top bag and allow it to cool for 30-60 minutes.
- If you are in a hurry, you can cool it on a marble or granite slab, as pictured above.
- Flatten it on the marble slab, then scrape it up and flatten it again. Do this over and over again, until it is soft and pliable.
- Then let it rest in a zip-top bag or in a plastic bowl for at least 10 minutes before working with it.
- If the modeling chocolate feels dry, knead in more corn syrup, about a tablespoon at a time.
- Every brand of chocolate contains different amounts of fat, thereby requiring varying amounts of corn syrup.
I love working with modeling chocolate (known as Candy Clay when made using confectionery coating), so I shared my expertise in my book, Candy Clay Creations. This is the ultimate guide to making perfect candy clay every time.
 every time!")
Color the modeling chocolate
- Once you have the modeling chocolate made, you will need to color about 6 ounces of it red and 2 ounces of it blue.
- You can use just about any food coloring to color your modeling chocolate. I used AmeriColor Gold Gel Coloring to color the gold candy clay (pictured above).
Pro Tips:
- Be sure to wear food handling gloves (powder-free are preferable) when coloring your modeling chocolate, or you will stain your hands.
- Knead in a drop of coloring to see how vibrant the color will be, then add more as needed to achieve your desired color.
 to add to a Forky Cupcake. Tutorial at HungryHappenings.com. #forky #toystory #chocolate #modelingchocolate")
Decorate the white chocolate spork to look like Forky
Forky's Eyes and Rosy Cheeks
- Attach one ½ inch candy (royal icing) eye and one ¼ inch eye to the white chocolate spork using melted white chocolate or candy melts.
- Use a food-use-only paint brush to dust on two small circles of edible red luster dust to create the rosy cheeks.
Forky's Mouth and Eyebrow
- Pinch off small pea-sized pieces of blue modeling chocolate and roll them into thin ropes.
- Cut the logs into 2-inch pieces and curve them into Forky's mouth, cutting off any excess and pinching the seams together.
- Pinch off small pieces of red modeling chocolate and roll them into thin ropes.
- Cut them into ⅞th inch pieces.
- Brush a very thin layer of water on the backside of the mouth and attach it below the eyes and next to the rosy cheeks.
- Use water to attach the red eyebrow above the eyes.

How to make Fory's arms using red modeling chocolate:
- Roll out a small ball of red modeling chocolate into a 12-inch-long rope.
- Fold one end into a small loop, then bend and create two more loops next to the first.
- Fold the loops so that the first loop and the third loop are directly across from each other. (Watch the video below to see this in action. It was hard to describe.)
- Pinch together the seams to make Forky's first hand.
- Repeat this process on the other end of the red modeling chocolate rope.
I found it easiest to use a lollipop stick to help me shape the loops, but I have large hands, which makes creating small details difficult. You may find you can create Forky's hands without the use of the stick.

Assemble the Forky Cupcakes in your trash cans
- Fill the bottom of the plastic trash can with some candy.
- Place your jumbo cupcake in a short 9-ounce plastic cup.
- Set that into the trash can.
- Add a scoop of frosting on top of the cupcake and smooth it out.
- Break about ⅓ of a cookie stick (I used chocolate Pocky Sticks) and insert the longer piece into the cupcake about an inch from the front edge of the trash can.
- Sprinkle some edible "trash" (dehydrated marshmallows) over the frosting, leaving the front edge empty.
- Set the garbage can lid on the cookie stick so that it allows enough room in front for Forky.
- Insert a white chocolate Forky into the cupcake near the front edge of the trash can.
- Wrap his red modeling chocolate arms around his spork handle body, then pinch the hands over the edge of the trash can to hold them in place.
All of these directions will make so much more sense after you watch the video.
You can find the supplies needed to make your Forky Cupcakes in Trash Cans from Amazon (commission earned for sales at no extra cost to you).
, Multicolored") U.S. Toy Assorted Color Gar...Shop on Amazon
U.S. Toy Assorted Color Gar...Shop on Amazon BPA-Free White Disposable S...Shop on Amazon
 White And Black ½-Inch Ca...Shop on Amazon
 White Edible Icing Royal Ey...Shop on Amazon
") White Cupcake Liners/White ...Shop on Amazon
White Cupcake Liners/White ...Shop on Amazon  Medley Hills Farm Dehydrate...Shop on Amazon
 Testor 8707 Economy Pointed...Shop on Amazon
 Edible Luster Dust Red Rose...Shop on Amazon
Forky Cupcakes Recipe
Forky Cupcakes decorated with white chocolate sporks are served in colorful trash cans.
- 16 ounces white chocolate or confectionery coating, melted (and tempered if using pure white chocolate)
- 18 ½-inch candy eyes
- 18 ¼-inch candy eyes
- edible red luster dust
- 6 ounces red modeling chocolate
- 2 ounces blue modeling chocolate
- 18 cupcakes baked in tall cupcake liners (see blog post for notes)
- 4 ½ cups chocolate frosting
- 18 Pocky Sticks
- 1 cup colorful dehydrated marshmallows
-
Use a food-use-only paint brush to brush white chocolate in a thin layer over the top of a plastic spork.
-
Wipe away any chocolate that drips down the the backside of the spork.
-
Chill in the refrigerator if using tempered pure white chocolate or in the freezer if using confectionery coating (candy melts) for about 3 minutes until hardened.
-
Allow the spork to come to room temperature then brush on a second layer of white chocolate.
-
Chill until the white chocolate hardens.
-
The chocolate should retract from the spork so you can pop it off.
-
Attach one ½ inch candy eye and one ¼ inch candy eye to each white chocolate spork.
-
Brush rosy red cheeks onto each Forky using edible red luster dust.
-
Roll red and blue modeling chocolate into thin ropes and create a mouth, eyebrow and arms for each Forky. See the blog post for detailed instructions.
-
Attach the mouth and eyebrow to the white chocolate spork using water.
-
If desired, fill the bottom of each garbage can with candy.
-
Place one jumbo cupcake into each 9-ounce disposable cup.
-
Set the cupcakes down into the garbage cans.
-
Add a scoop of frosting onto each cupcake and spread over top.
-
Break off about ⅓rd of each Pocky Stick and insert the longer piece into each cupcake about an inch from one edge.
-
Sprinkle dehydrated marshmallows over the frosting.
-
Set the trash can lid over the Pocky Stick allowing a small opening near the front of the trash can.
-
Insert one white chocolate Forky into the cupcake at the very front edge of the garbage can.
-
Wrap a red modeling chocolate arms/hands around the spork and press the hands onto the top edge of the garbage can.
Recipe Video
How to store your Forky Cupcakes
- It will be best to decorate and assemble these cupcakes the day you serve them.
- You can store the white chocolate Forkys at room temperature, just covered with some plastic wrap. You don't want to store them in an airtight container because the modeling chocolate may become too moist.
- They will stay fresh for up to a few weeks.
- You can bake, cool, and even frost the cupcakes ahead of time and just store them in an airtight container for up to 3 days.

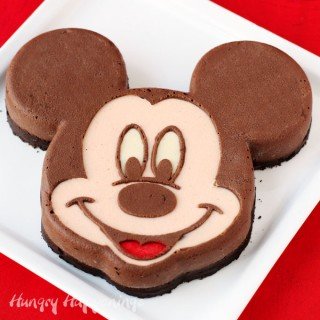
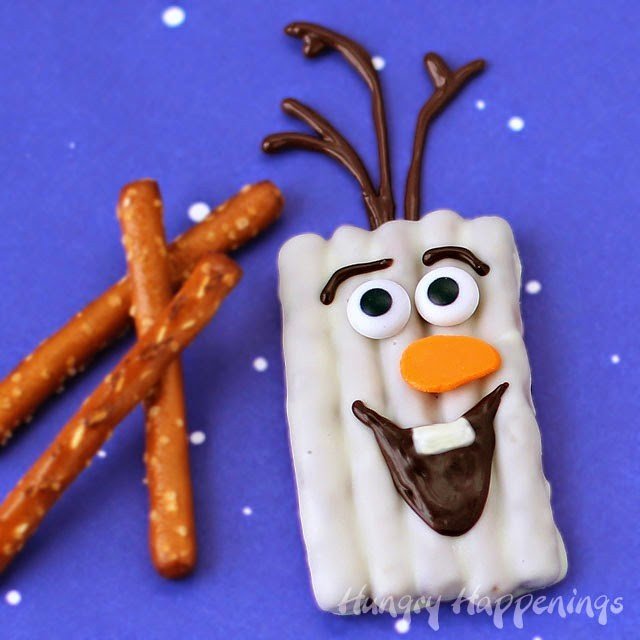
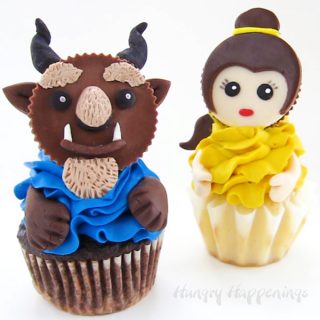
If you like these fun Forky Cupcakes, you might also like these cute movie character desserts:

- Banana Split Bars – A Fun and Easy Summer Dessert - March 4, 2026
- Pineapple Fudge (No Candy Thermometer Needed!) - March 4, 2026
- No-Bake Peanut Butter Pie Recipe - March 3, 2026
The Partiologist says
Oh my goodness, Beth these little Forky treats are SPOT ON! I have to say the cutest replica ever!
Beth says
Thanks! I had a lot of fun creating them.
Sharon says
OMG!!!!!! These are the cutest EVER!!! I can't wait to make them!
Beth says
Thanks, Sharon! Have fun making your Forky Cupcakes.