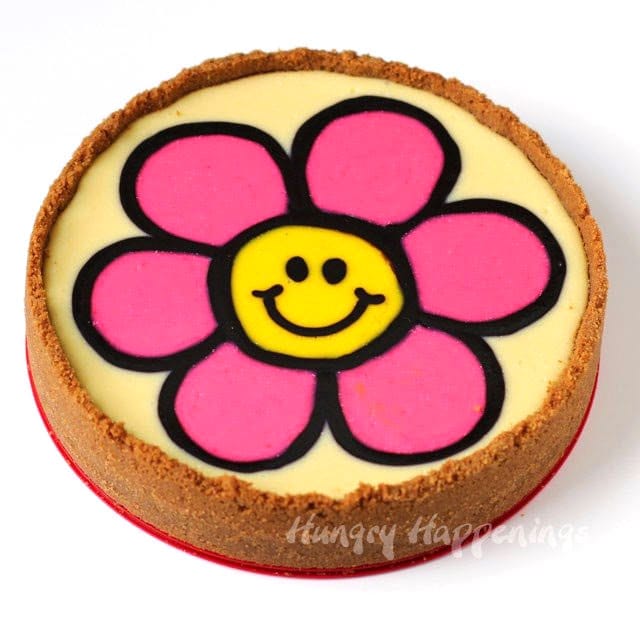
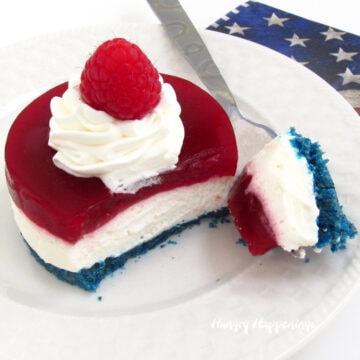
Add a pretty decoration to the top of a delicious cheesecake for any special occasion. It's easy to make this Daisy Cheesecake using colored cheesecake filling.
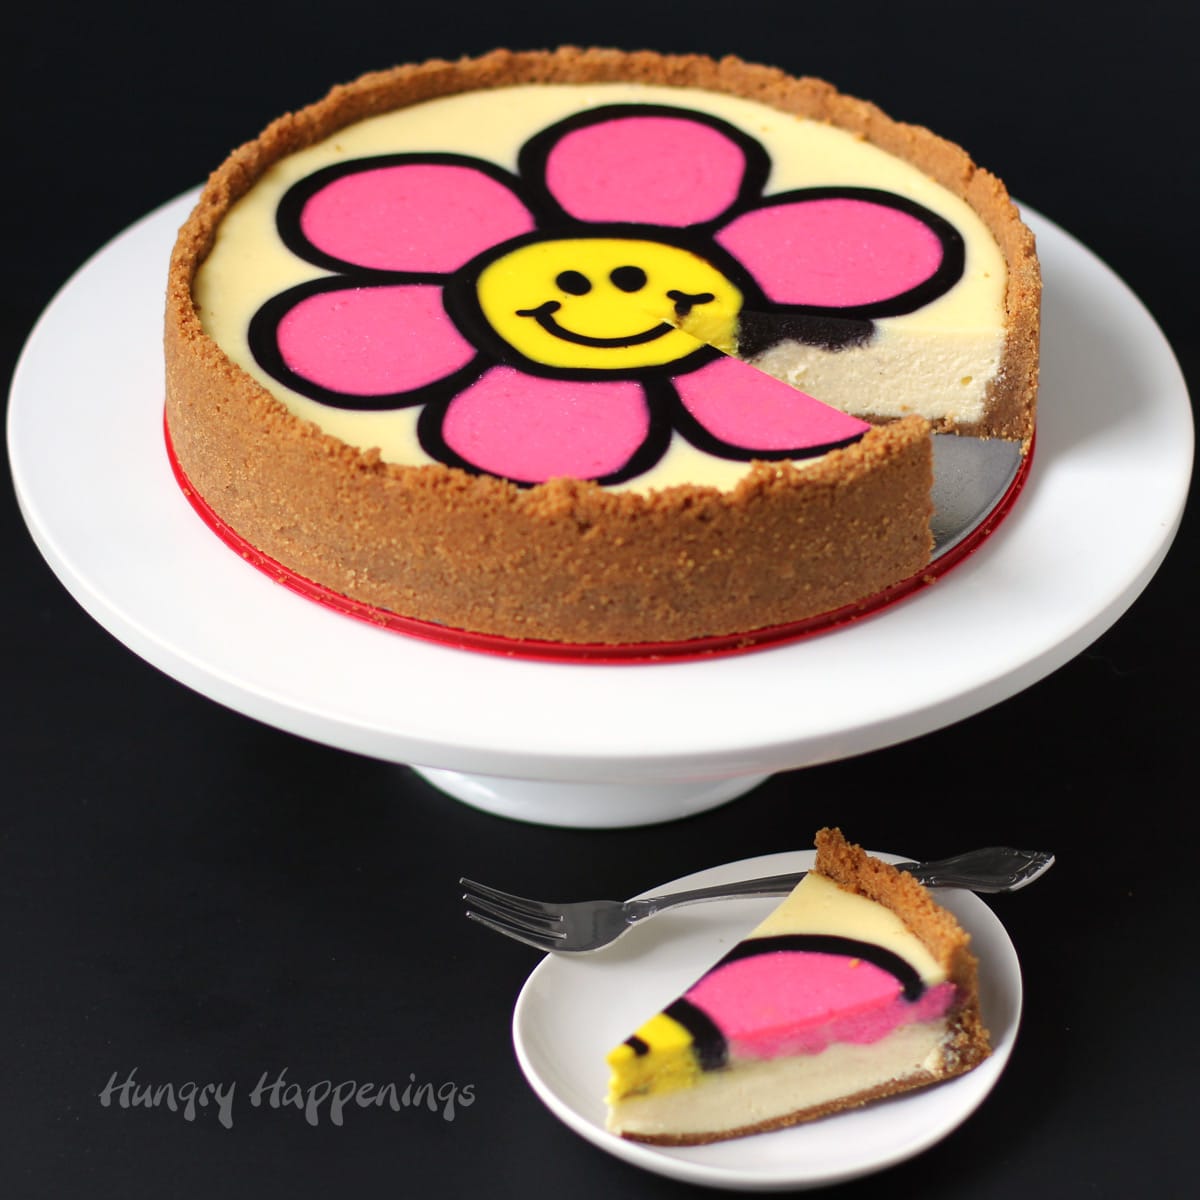
I am in love with this Decorated Daisy Cheesecake. It's a perfect Mother's Day Recipe or Birthday Party idea. It would also be fun to serve at a wedding shower or even a springtime luncheon.
Not only is it made with a version of my absolute favorite cheesecake recipe from Tyler Florence, but it also is made using a clever decorating technique.
I colored some of the cheesecake filling and used it to decorate the top of the cheesecake. Everyone who saw this cheesecake in person was amazed and asked how I got the design on top.
I've used cheesecake filling that's colored using food coloring to make Cheesecake Easter Eggs, Conversation Heart Cheesecakes, and Cheesecake Leaves and Pumpkins.
I've also created Naturally Colored Conversation Heart Cheesecakes using vegetables and fruits instead of food coloring. For this daisy cheesecake, I've used food coloring. If you prefer to use natural colorings be sure to check out that recipe.

Let's make a decorated cheesecake with a daisy design.
Ingredients
Crust:
graham cracker crumbs - Crush 15 squares or 7 ½ full rectangle graham crackers to get the crumbs for this recipe.
cinnamon - This is optional, but I think it adds a nice warm spice flavor to the crust.
sugar - Add sugar to the graham cracker crust so it browns better.
butter - You can use salted or unsalted butter for the crust. Either works fine.
Cheesecake Filling:
cream cheese - Use full-fat cream cheese for the best texture and flavor. Be sure to set it out at room temperature for at least 3 hours before mixing your cheesecake.
sugar - Use granulated sugar to add sweetness to the cheesecake filling.
eggs - They will add richness and structure to your cheesecake.
sour cream - This adds a nice tang to your cheesecake and makes the cheesecake silky smooth.
vanilla extract or vanilla paste - Use pure vanilla for the best flavor.
food coloring - To make the daisy design on top of the cheesecake, you'll need pink, yellow, and black food coloring.
cocoa powder - Getting a true black color is challenging, so adding cocoa powder to the cream cheese helps to darken the off-white filling's color without having to add too much food coloring.
Room Temperature Ingredients
Set your cream cheese, eggs, and sour cream out on the counter for at least 1 hour before you plan to make your cheesecake filling. You want all of your ingredients to be at room temperature.
Supplies
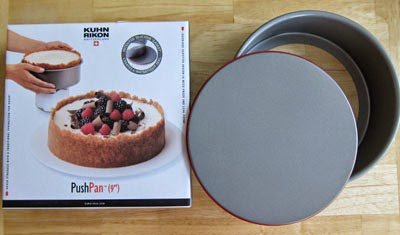
9-inch springform pan or PushPan*
roasting pan or round pan that is large enough to hold the springform pan
*For years I've baked my cheesecakes in springform pans in a water bath. I always line my springform pan with a few layers of tin foil, but the water always seems to leak into the cheesecake.
I just discovered the PushPan by Kuhn Rikon. The outer ring does not clip open and closed, instead, the bottom plate pushes in and out of the ring. It has a silicone gasket around the bottom which not only holds it in place but miraculously keeps the water out. Another great feature it the plate is flat, and having no lip means it's easier to remove the cheesecake.
UPDATE: Sadly this pan is no longer being manufactured. You might be able to find some on Ebay or other sites.
But, I have found something even better!!!
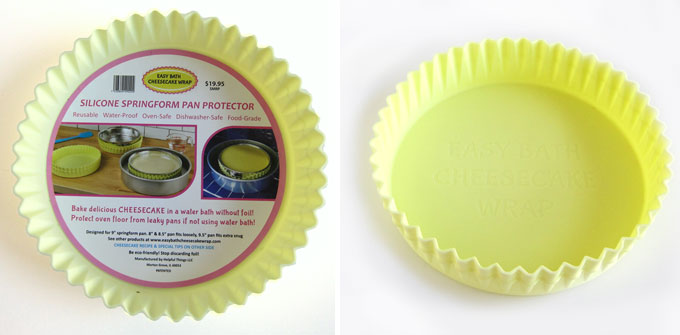
You can use a traditional springform pan to bake your cheesecake. Just set the pan inside this Easy Bath Cheesecake Wrap Silicone Springform Pan Protector before placing it in your water bath and no water gets in.
Check out my Plain Cheesecake Recipe for detailed information.
Items used to create this project are available on Amazon.com (commission earned for sales).
 EASY BATH CHEESECAKE WRAP- ...Shop on Amazon
  Calphalon Simply Calphalon ...Shop on Amazon
  Large Clear Squeeze Bottle, Condiment Squeeze Bottle, Open-Tip, Screw-On Spout, Polyethylene Durable Plastic, Diner Style") SET OF 2 -- 24 Oz. (Ounce) ...Shop on Amazon
SET OF 2 -- 24 Oz. (Ounce) ...Shop on Amazon  AmeriColor, Electric Pink, ...Shop on Amazon
  Americolor Soft Gel Paste F...Shop on Amazon
  AmeriColor, Super Black, .7...Shop on Amazon

Instructions

Make a graham cracker crust.
- Preheat oven to 325 degrees.
- Combine graham cracker crumbs, cinnamon, sugar, and melted butter, stirring until it looks like sand.
- Press the mixture into the bottom and up the sides of the springform pan.
- Bake for 10-12 minutes until fragrant and the edges begin to brown. Allow the crust to cool completely.
You will need a water bath to bake your cheesecake.
You can either bring a large pot of water to a boil and pour it in the pan after you add the cheesecake, or you can fill your pan now with enough hot water so that it will come ½ way up the sides of your springform pan. Place that in the hot oven until ready to bake the cheesecake.
I like using a roasting pan with a flat rack inside. When the cheesecake has been baked, I can lift the entire rack out of the pan.

Make the cheesecake filling.
- Beat 3 blocks of cream cheese on medium speed until smooth, scraping down the sides of the bowl and the beater as needed. You really need to make sure there are no lumps in the cheesecake and now is the time to get rid of them.
- Add sugar and beat until light and fluffy.
- Add eggs one at a time and beat until creamy.
- Add sour cream and vanilla and beat until combined.

Color the filling.
- Pour ¼ cup of the cheesecake batter into a small bowl and color it pink.
- Color 2 tablespoons of batter yellow.
- Pour 3 tablespoons batter into a bowl, stir in the cocoa powder, and some black food coloring until you get a deep dark color.
Or use natural colorings instead.
- If you prefer to use natural colors, you can add about a tablespoon of raspberry puree for the pink, a ½ to 1 egg yolk for the yellow, and just use cocoa powder to make the dark brown. The colors won't be as vibrant, but they will be pretty.
- See my Naturally Colored Cheesecake Hearts recipe for more details about using fruit and veggies to color your cheesecake.

- Pour the plain cheesecake batter into the PushPan or a springform pan.
- Pour the colored cheesecake batter into squeeze bottles or zip-top bags.

Pipe on your design.
- Pipe the outline of the daisy using the dark batter.
- I colored way too much batter (I've adjusted the amounts for you.) I didn't want to waste it, so I kept piping over the design. That is why my cut cheesecake slices show the design so far down into the cake.
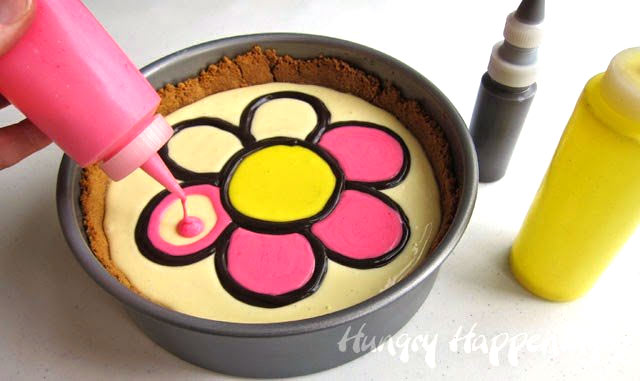
- Pipe the yellow batter into the center circle and add the pink to the petals.
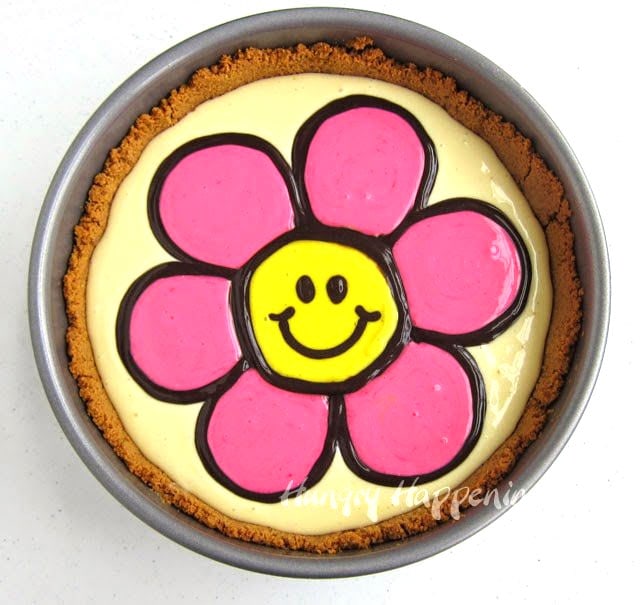
- Pipe on a smiley face.
- Carefully carry your cheesecake to the oven and set it in your roasting pan. If needed, fill the roasting pan with boiling water being careful to not spill any water into your cheesecake.

Bake the cheesecake in a water bath.
- Bake your cheesecake in a water bath for 45-50 minutes. The top will still jiggle, but look shiny and set.
- Remove from the water bath, set on a cooling rack, and cool at room temperature for an hour.
- Refrigerate for at least 4 hours. Remove from pan and serve.
Storage
Store your cheesecake in the refrigerator. I suggest you place the cheesecake in a large airtight container so that it doesn't pick up any odors from the other food in the fridge.
It's also a good idea to lay paper towels on the underside of the container's lid and seal the container so the paper towels hang outside the container. This will keep the paper towels from touching the cheesecake but will allow them to wick up any moisture that forms inside the container.
More Decorated Cheesecake Ideas


Printable Recipe
This cheesecake recipe was originally posted on May 5, 2014.
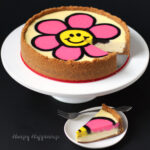
Make a creamy cheesecake and decorate the top of it with a pretty pink daisy using colored cheesecake filling. This Daisy Cheesecake makes a wonderful dessert for Mother's Day, Earth Day, a birthday, or any day.
- 1 cup graham cracker crumbs (from15 squares)
- ⅛ teaspoon cinnamon
- 1 tablespoon sugar
- 4 tablespoons (½ stick) butter, melted
- 24 ounces (3 blocks) cream cheese, softened
- 1 cup sugar
- 3 large eggs
- 1 cup sour cream
- 1 teaspoon vanilla extract or vanilla bean paste
- food coloring pink, yellow, and black
- 2 tablespoons cocoa powder
-
Set your cream cheese, eggs, and sour cream out on the counter for at least 1 hour so they come to room temperature.
-
Preheat your oven to 325 degrees.
-
Combine the graham cracker crumbs, cinnamon, sugar, and melted butter.
-
Press the mixture into the bottom and up the sides of the springform pan.
-
Bake for 10-12 minutes until fragrant and the edges begin to brown.
-
Allow the crust to cool completely.
-
Fill the roasting pan with about 1 inch of water.
-
Set it on the middle rack in the oven to get hot.
-
Beat 3 blocks of cream cheese on low speed until smooth, scraping down the sides of the bowl and the beater as needed.
-
Add 1 cup of sugar and beat until well combined.
-
Add three eggs, one at a time, beating until incorporated after each addition.
-
Add the sour cream and vanilla and beat until combined.
-
Pour ¼ cup of the cheesecake batter into a small bowl and color it pink.
-
Color 2 tablespoons of the cheesecake filling yellow.
-
Pour 3 tablespoons of the filling into a small bowl and stir in the cocoa powder.
-
Add some black food coloring until you get a deep dark color.
-
Pour the plain cheesecake batter into your springform pan.
-
Pour the colored cheesecake batter into squeeze bottles or zip-top bags.
-
Pipe the outline of the daisy using the chocolate cheesecake filling.
-
Pipe the yellow cheesecake filling into the center circle and add the pink to the petals.
-
Pipe on a chocolate smiley face.
-
Carefully carry your cheesecake to the oven and set it in the water in your roasting pan.
-
Bake your cheesecake in a water bath for 45-50 minutes. The top will still jiggle, but look shiny and set.
-
Remove from the water bath, set on a cooling rack, and cool at room temperature for an hour.
-
Refrigerate for at least 4 hours. Remove from pan and serve.
Store in the refrigerator for up to 5 days.

- Banana Split Bars – A Fun and Easy Summer Dessert - March 4, 2026
- Pineapple Fudge (No Candy Thermometer Needed!) - March 4, 2026
- No-Bake Peanut Butter Pie Recipe - March 3, 2026
Joanne Low says
Hi Beth,
I have just stumbled upon your blog recently and reading this post makes me sad to know that people are stealing your hard work and creativity. Please do no stop blogging and sharing your incredible work as my husband and I, we both enjoyed looking at your work creations and drooling over it. 😉
beth says
Thanks Joanne, I'm so happy you and your husband are enjoying my blog. I appreciate your support!
mettateoh says
Actually you are a very generous person to share your creations. Those who copy your creations without giving your credits are nothing but thieves stealing your ideas. There are many such people around: they claim credit for things not done by them. Don't be disheartened by the antics of these type of people. Dont give up blogging because of them.
beth says
Thank you so much for you kind words of encouragement. I do appreciate it!
BeautyMe says
Hi,
How much is 1 cup sour cream in grams please?
beth says
There are 230 grams in one cup of sour cream.
Hani Bacova says
Don't you care what others are saying. You are amazing. Right now I can't decide what to make for my little 3 year old niece that is coming for a visit from Europe. It's either this or the super cool rainbow cake with 5 in the middle, or one of your other million awesome creations you made. It's sohard ot decide, I want it to be surprise.I like this cheese cake a lot, maybe I can make a little bear or a cat she like those. Keep your chin up and do your magic. You have so many ideas Beth and inspired so many. Have good day.
beth says
Hani, one of the very best things that has come from blogging is making friends like you. Getting to know others who love creating fun food as much as I do has been wonderful. I can only imagine how beautiful your cheesecake would be considering you have such an amazing artistic flair. I'm sure your niece will love anything you make for her.
Anonymous says
Hi Beth, You are a VERY CREATIVE and GENEROUS person for showing us how to make all your unique and awesome creations. You truly inspire me. I LOVE the look of this cheesecake and I am going to try and make it for a luncheon at my husband's office. I was wondering if there was a way to get the cheesecake off the spring form pan round and onto a cake plate without disastrous results? Someone told me to turn the round bottom upside down prior to putting the crust on it, so the lip will not interfere with removing the cheesecake, but that leaves a small well along the sides... Any suggestions? Or, should I just leave it on the spring form bottom? Thanks again for the inspiration! ;o)
beth says
Thanks. I'm so happy to hear you plan to make a decorated cheesecake. When I want to move the cheesecake off the bottom of the pan, I cover a round piece of cardboard in tin foil and put it in the pan before add the crust. As long as your pan doesn't leak a lot, the cardboard will hold up and you can move the cheesecake easily once you remove it from the pan .
Have fun and be sure to send me a picture so I can share it in the reader's gallery.
Sue says
For selfish reasons, I hope you never stop blogging, Beth! I love your creativity and you inspire me:) I have always blogged just "for fun" and the interaction with other bloggers, though I have thought of using Adsense (I think my window of opportunity has passed), I haven't gotten around to it. I have noticed that Pinterest and facebook have seemed to trump blog visits (at least for me) and I sorely miss the interaction at my "home" spot. Keep up the good work; you are appreciated by so many of us! 🙂
LOVE the cheesecake; so cute!
beth says
Sue, I don't think it's ever too late to put ads on your blog. In the beginning you may not make much, but over time it adds up. Any little bit can help to even just pay for the food and props you use for your blog. I have also seen a decline in blog traffic over the past few months. I'm sure you are right that people are seeing more things via pinterest and facebook that they don't need to really visit the blog directly. It's too bad.
Chichi Dodoo says
This is my first visit to your blog and i much say i love it. Love your tutorial. I'm glad you decided to keep blogging.
beth says
Welcome, Chichi. I'm so glad you stopped by and hope you do come back to see what's new and exciting here at Hungry Happenings.
Brenda @ SweetSimpleStuff says
Beth, you said everything so well and I'm happy that you are still here! I don't think that some people "get it", Bloggers should respect each other ... remember the golden rule ... karma!!!
The cheesecake ... outstanding 🙂
beth says
Yes, karma is a powerful thing!