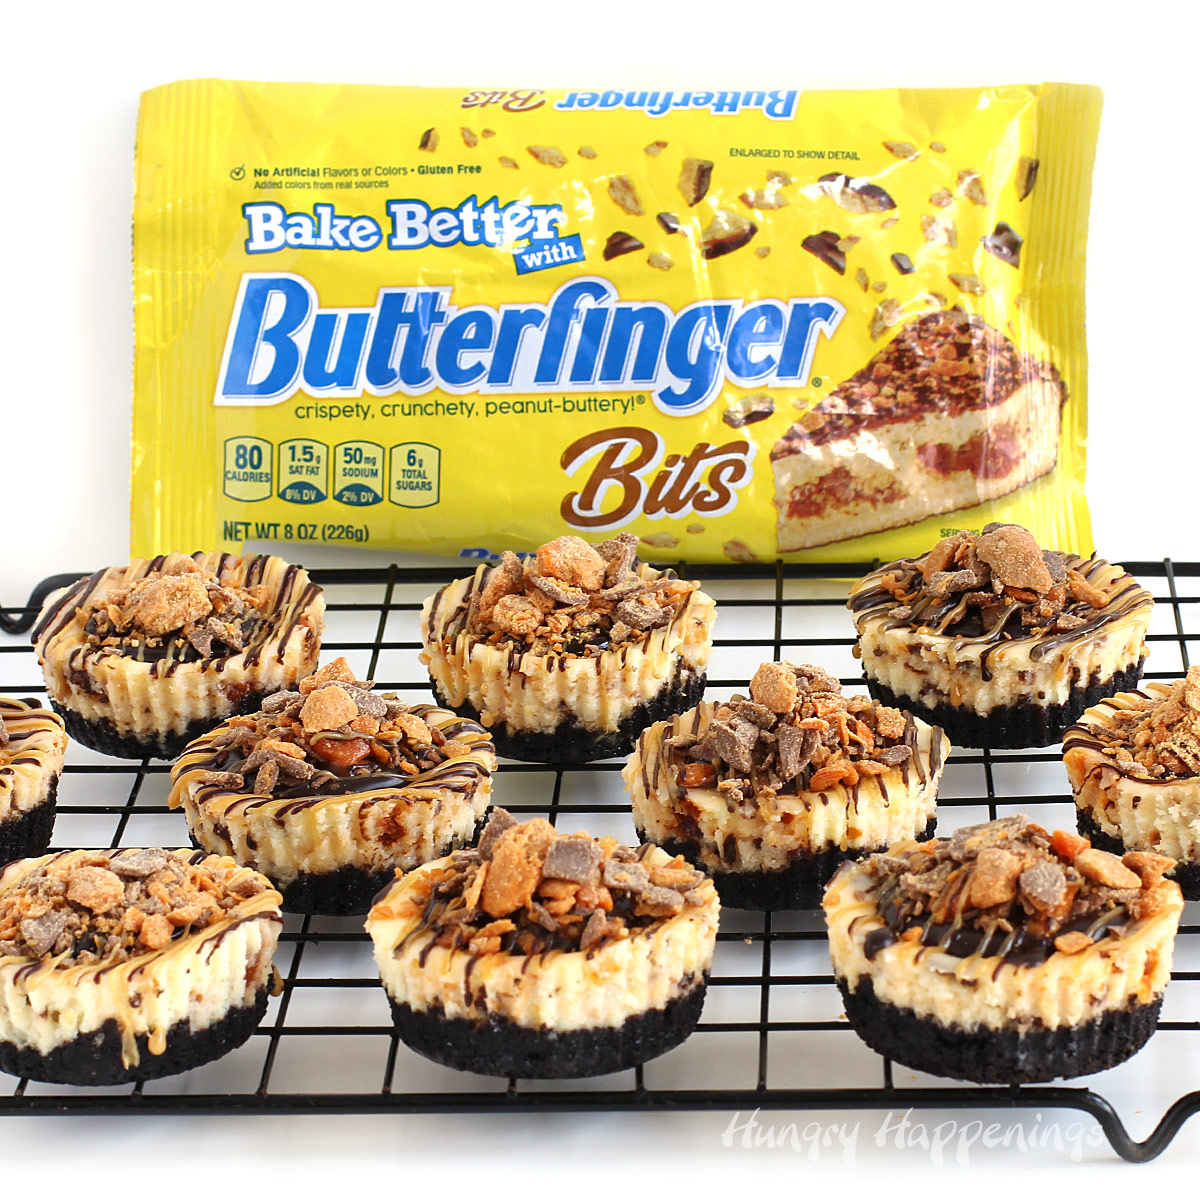
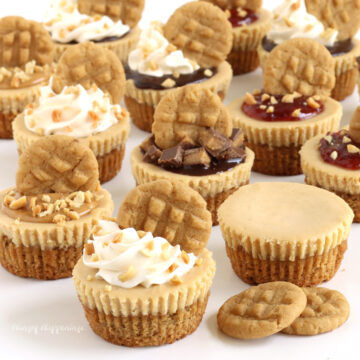
Mini cheesecakes loaded with Butterfinger Baking Bits are topped with chocolate ganache, creamy peanut butter, and even more of the candy bar pieces. These Mini Butterfinger Cheesecakes are easy to make in a cupcake pan, and they are perfectly sized desserts.
This post was sponsored by Ferrero and all opinions expressed in my post are my own.

How much do you want to reach into your screen right now and grab one of those Mini Butterfinger Cheesecakes?
I am enjoying one right now. It is so good!
Seriously, what is not to love about a Mini Cheesecake filled with Butterfinger Baking Bits? With each creamy bite, I'm enjoying crunchy bits of peanut butter and chocolate Butterfinger bars, a chocolate cookie crust, chocolate ganache, and creamy peanut butter.
If you want to enjoy this explosion of flavor, you will want to check out the recipe below.

Are you ready to make some cheesecakes?
Ingredients
- chocolate sandwich cookies with vanilla filling - Use the cookie and the filling to make the cookie crust.
- butter - You can use salted or unsalted butter. The salted butter will balance out the sweetness, but unsalted butter works fine too.
- cream cheese - Use regular cream cheese (not low-fat) for the best texture and flavor. Be sure to set the cream cheese out at room temperature for at least 2 hours (preferably 4 hours) to soften it.
- sugar - Granulated sugar will add sweetness to your cheesecake batter.
- sour cream - This will add a nice subtle tang to your cheesecakes. You also want the sour cream to be at room temperature when making your cheesecake filling. See the notes below about using room-temperature ingredients.
- eggs - Whisk two large, room-temperature eggs before adding them to the cheesecake filling. Whisking the eggs will keep you from beating too much air into your cheesecake filling.
- vanilla extract - Use pure vanilla extract or vanilla bean paste for the best flavor.
- Butterfinger Baking Bits - You can find 8-ounce bags of these crushed candy bars at Walmart.
- chocolate ganache or hot fudge sauce - I chose to make a homemade 2-ingredient chocolate ganache, but a jar of chocolate or hot fudge sauce will work well too.
- creamy peanut butter - You'll heat some creamy peanut butter until it melts enough that you can drizzle it over your cheesecakes.
Room Temperature Ingredients
- It is vitally important that your cream cheese, sour cream, and eggs be at room temperature before mixing your cheesecake filling, so set the cheesecake ingredients out on your counter at least 2 hours before you plan to make the cheesecake batter. I like to set my cream cheese out about 4 hours in advance to ensure it is really soft.
- Why? If your cheesecake ingredients are too cold, they will require longer mixing and longer mixing adds too much air into the filling which can cause air bubbles on the surface of your cheesecake or can cause your cheesecakes to sink in the middle.
- If you forget and do not have time to wait:
- Cut the cream cheese into slices and spread them out on the wrapper. The smaller pieces will soften more quickly. The pieces should soften in about an hour.
- To really speed up the process, you can also gently soften the cream cheese by heating it in the microwave on low power for 10 seconds, then flipping it over and heating it for another 10 seconds. Then set it on your counter for 15 minutes to soften.
- Do not heat the cream cheese more than that. If it gets hot and you make your filling, it can curdle.
- You can quickly bring your eggs to room temperature by placing them, still in their shell, in a bowl of hot water for 5-10 minutes.
- If you spread the sour cream into a thin layer in a large shallow bowl, it will come to room temperature in about 30 minutes.
Instructions
step 1 - Prep your oven
- Place a glass baking pan on the bottom rack in your oven and fill it with about one inch of water.
- You won't actually bake the cheesecakes in a water bath like you do when baking a whole plain cheesecake, but the water will add steam to the oven for more even, gentle baking.
- Preheat your oven to 325 degrees Fahrenheit.
step 2 - Make the chocolate cookie crust.
- Cookie Crust
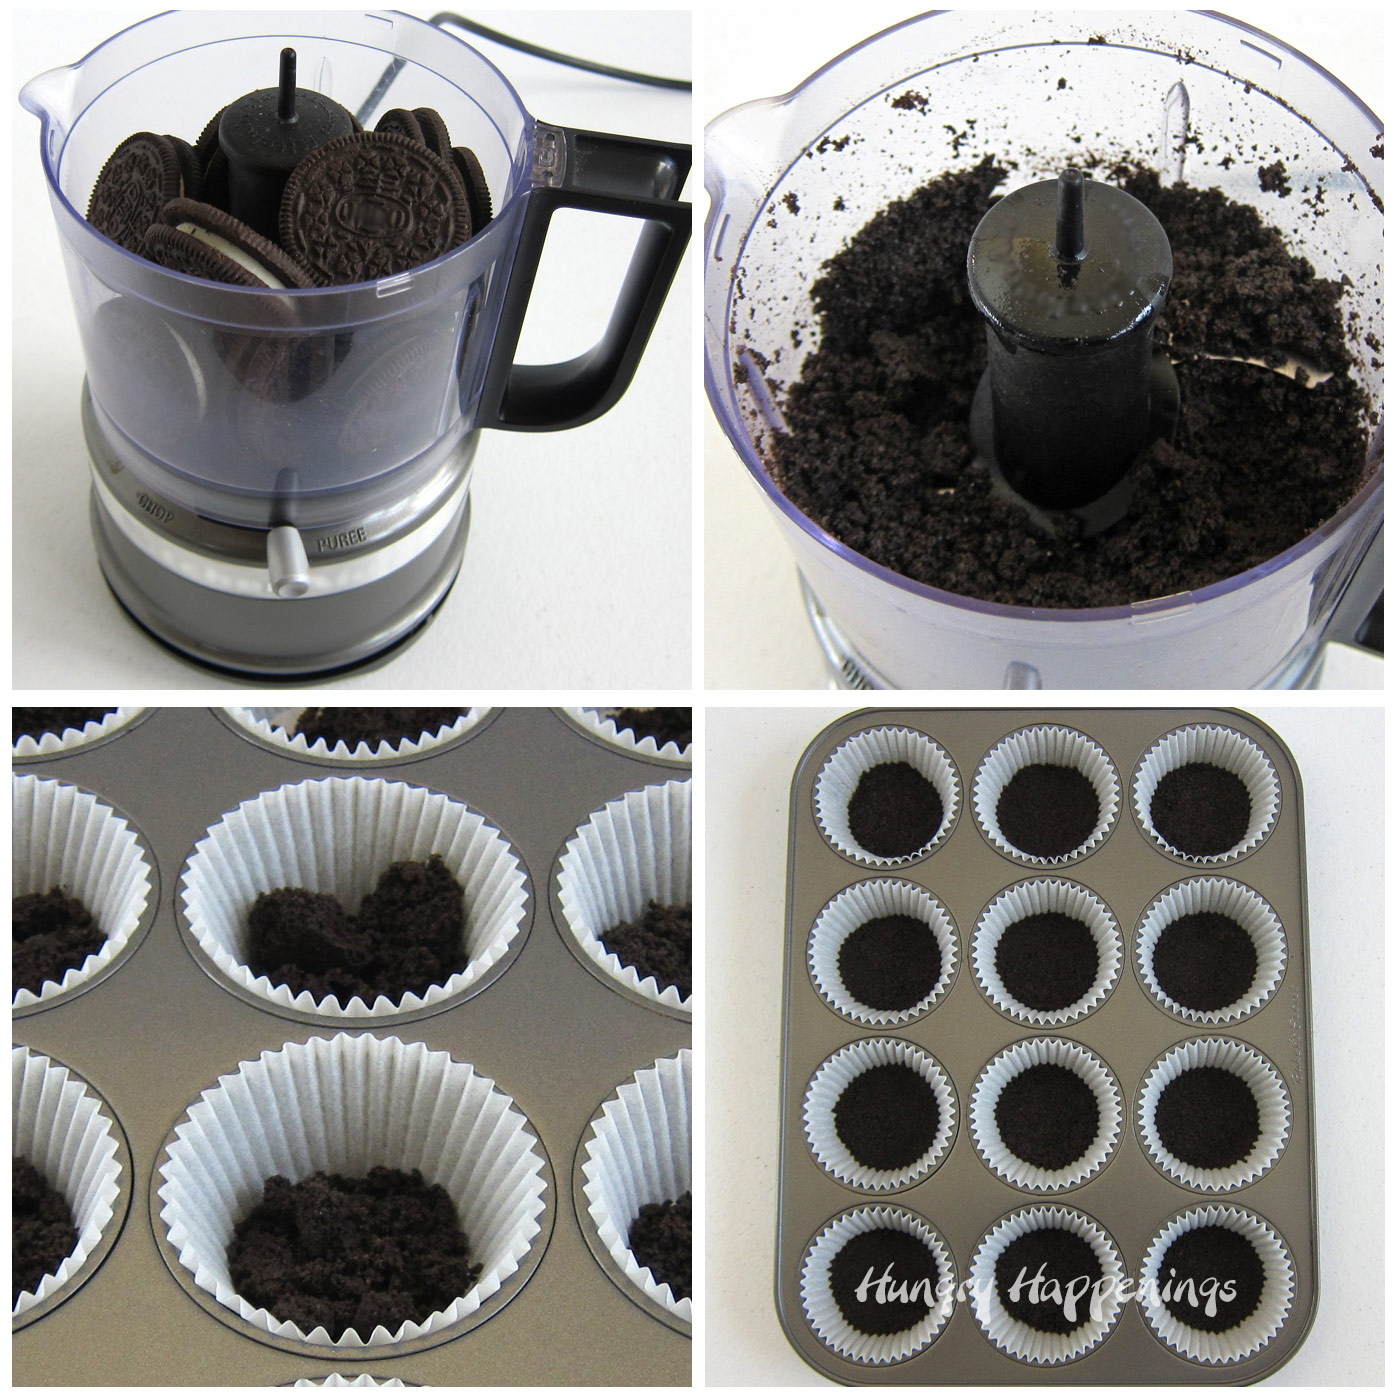
- Crush 24 chocolate sandwich cookies into fine crumbs using a food processor.
- If you do not have a food processor, you can place your cookies in a large zip-top bag and smash them using a rolling pin, the back of a skillet, or a meat mallet.
- You want the cookies to be in very fine crumbs, so be sure to break up any larger pieces.
- Crush 24 chocolate sandwich cookies into fine crumbs using a food processor.
- Melted Butter
- Melt ¼ cup (½ stick) of butter either in the microwave on high power for about 30 seconds or in a small saucepan set on your stove over medium heat.
- Pour the melted butter over the cookie crumbs and mix to combine.
- If you’re using a food processor you can just pulse a few times until well blended.
- Cupcake Wrappers
- Line 21 cavities in two cupcake pans (muffin tins) with paper liners.
- Fill Muffin Tin
- Scoop out about one packed tablespoon of the cookie crumbs and drop it into the cupcake papers.
- Press the crumbs down into an even layer in the bottom of the cupcake wrapper.
- I used a wooden tart tamper but you can simply use your fingers to do this job.
step 3 - Make the Butterfinger cheesecake filling.
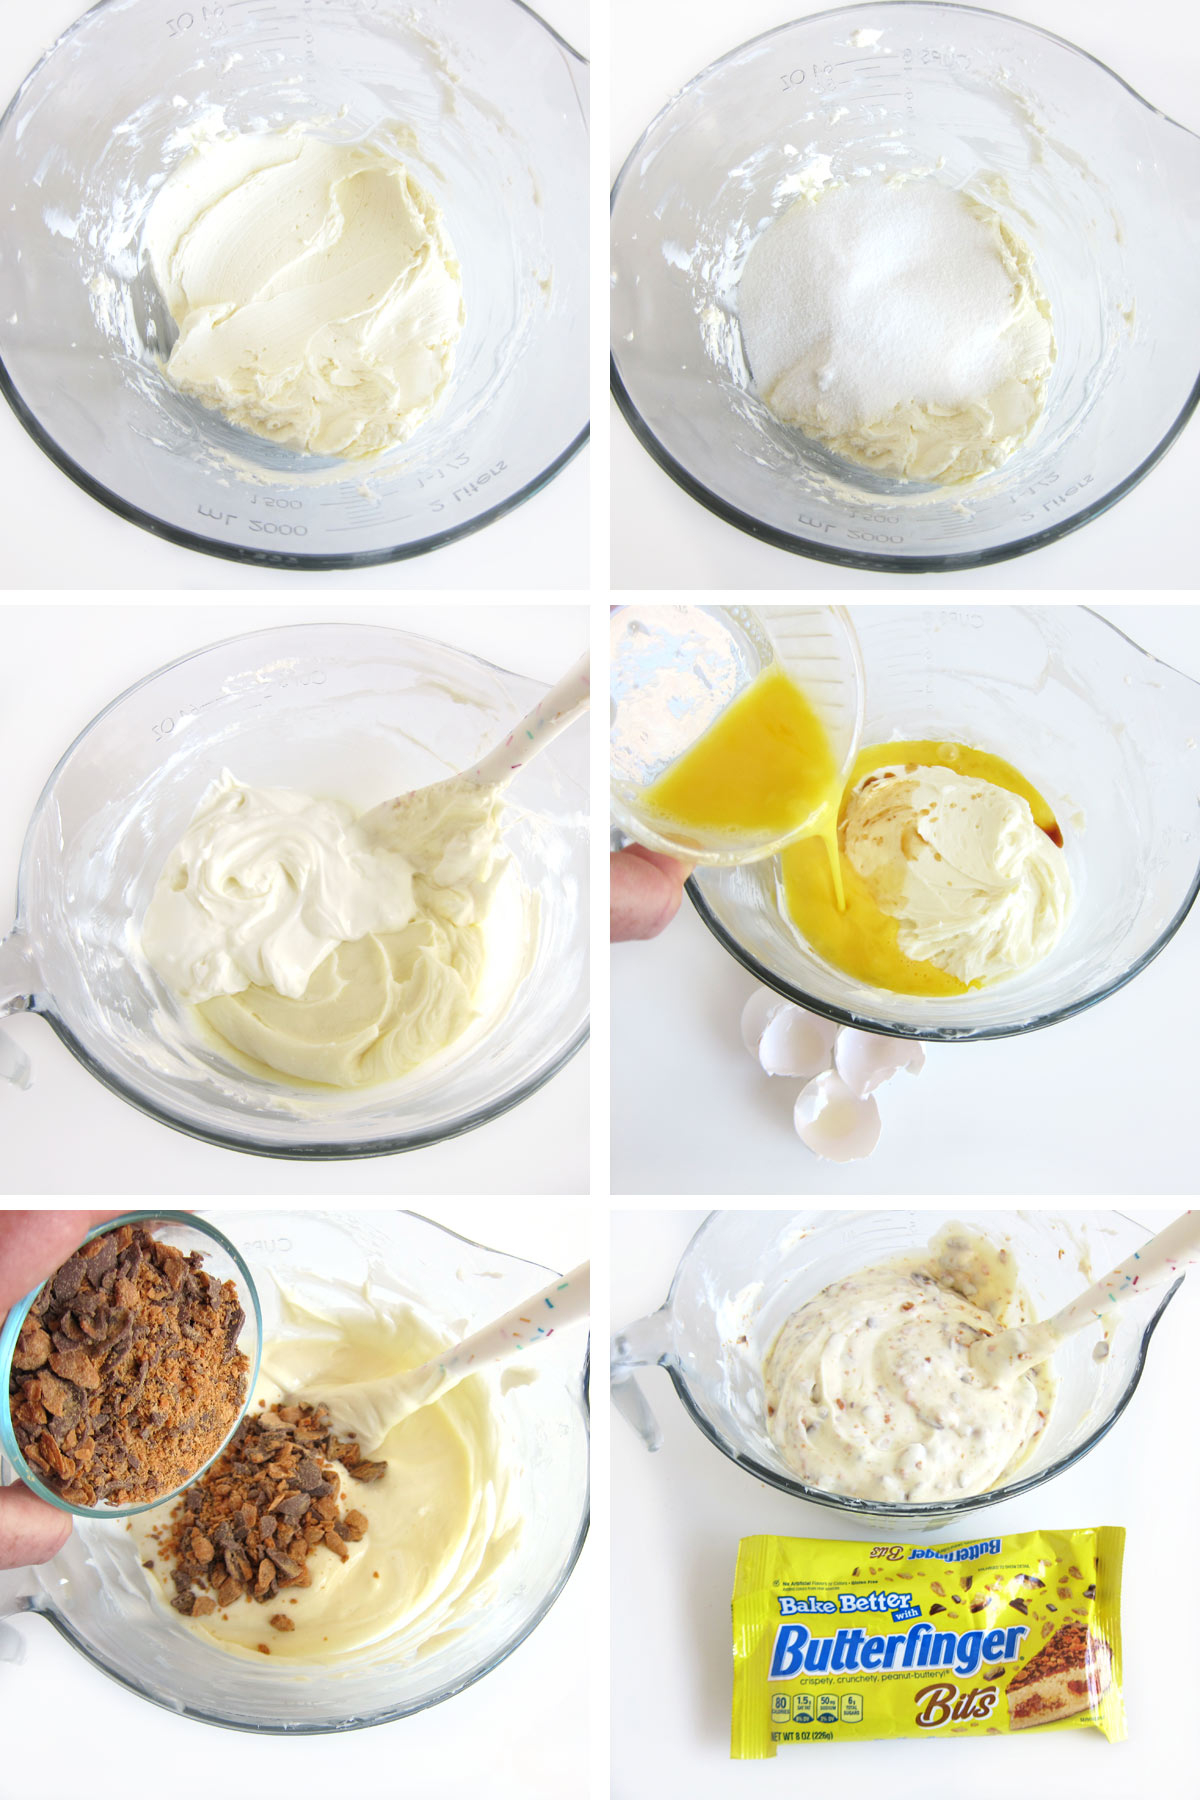
- Beat 16 ounces of cream cheese on low speed using an electric mixer or mix by hand until smooth and creamy.
- Be sure the cream cheese is very smooth at this point. Smash any lumps that remain before adding any other ingredients.
- Add ⅔ cup of granulated sugar and beat on low speed until creamy.
- Stir in ⅔ cup of sour cream.
- Then mix in 2 lightly beaten eggs and 1 teaspoon vanilla extract or vanilla bean paste just until combined.
- If you overmix the cheesecake filling at this point, the cheesecakes will rise a lot while baking, then they will deflate and sink in the middle.
- Your cheesecakes will deflate a bit as they cool, but they won't sink in the middle if you do not overmix the batter.
- Fold in 1 cup of Butterfinger Baking Bits.
step 4 - Spoon filling over the cookie crust.
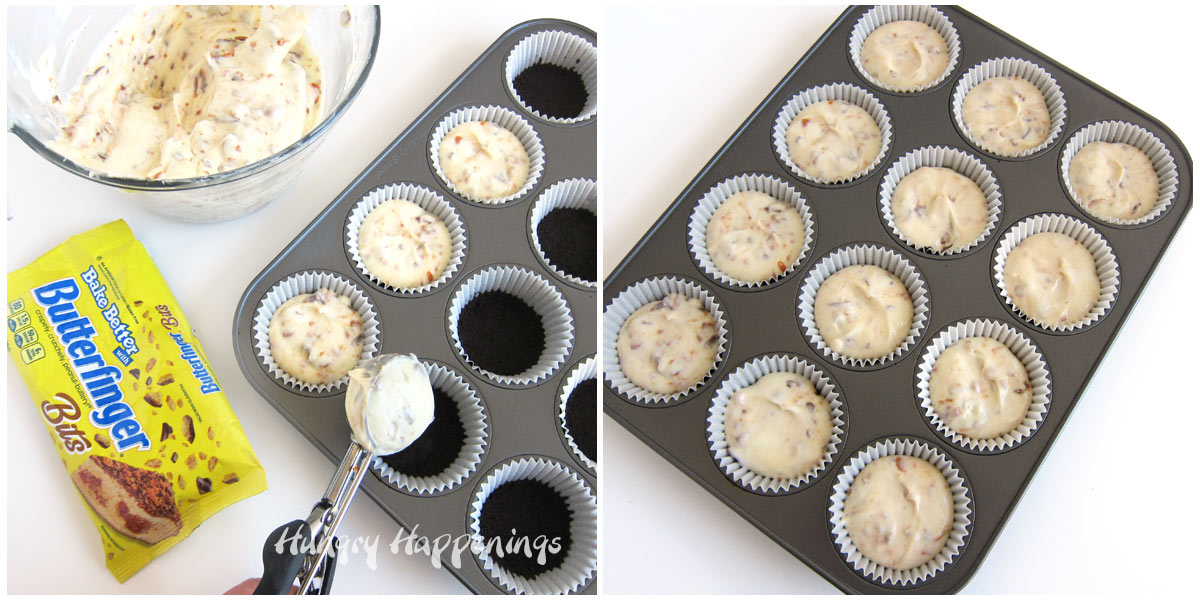
- Scoop out 3 tablespoons of cheesecake batter and spoon it over each of the cookie crusts.
- I used a large ice cream scoop to get an even amount of batter in each cupcake liner.
- Fill all 21 cupcake liners with the cheesecake filling.
step 5 - Bake.
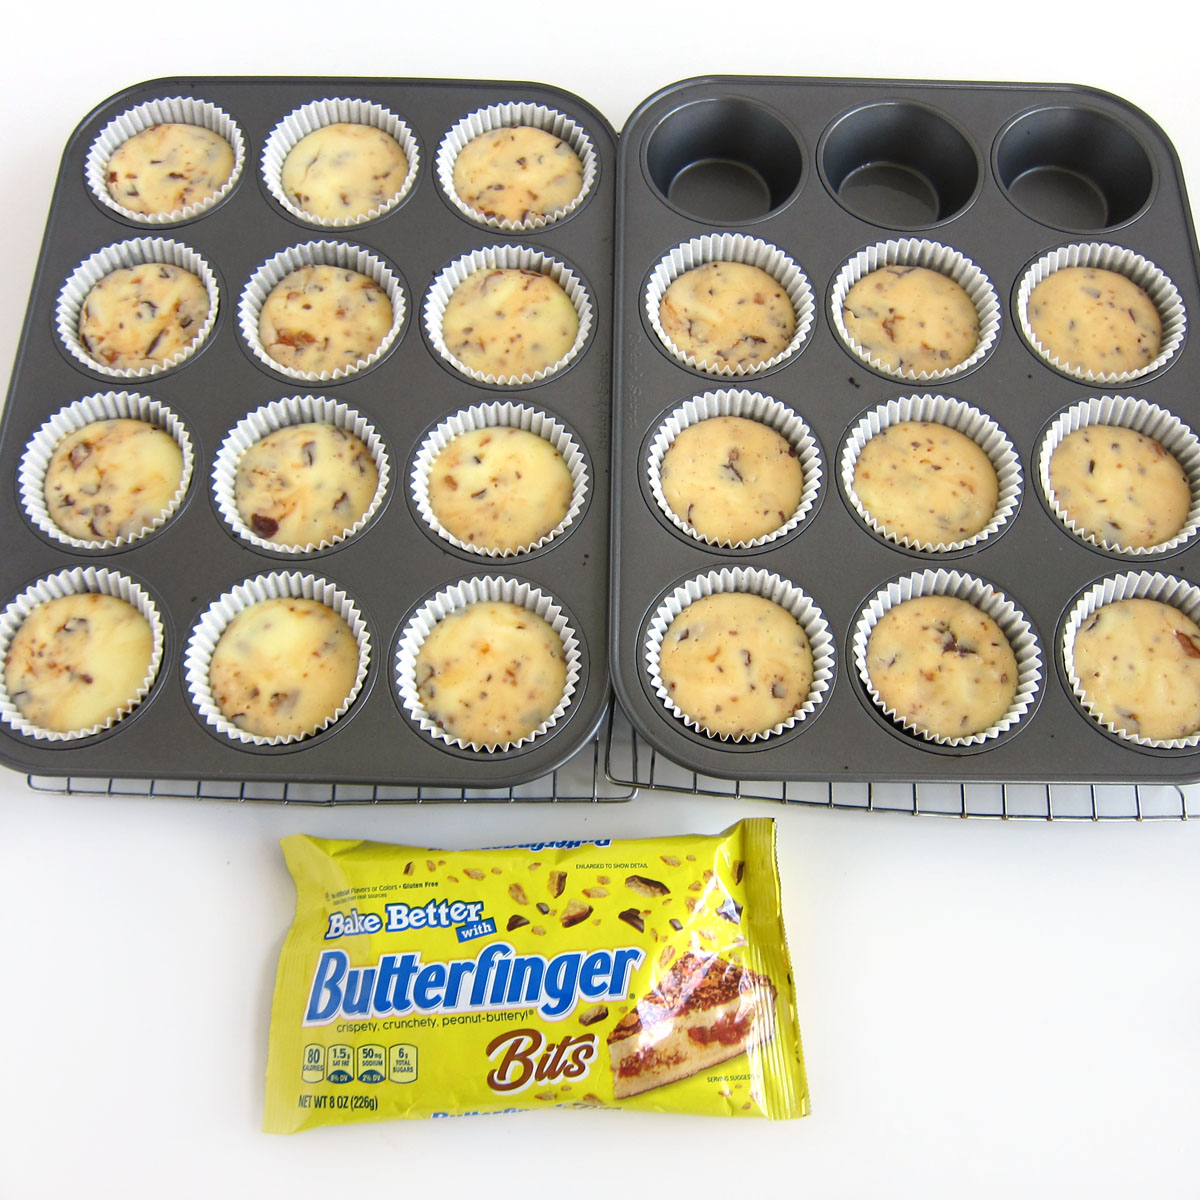
- Set the cupcake pans in the oven on the middle rack (above the pan of water that's on the lower rack).
- Bake for 14 minutes, then turn off the oven, crack the door open an inch or two, and let the cheesecakes rest in the oven for about 10 minutes. This will allow the cheesecakes time to begin cooling slowly.
- If the tops of your cheesecakes still look wet (they should jiggle but not look wet), leave them in the open oven a little longer.
- If the cheesecakes begin to crack, remove them immediately.
- As the cheesecakes cool, any cracks that appear will close up.
- Then remove from the oven and set the cupcake pans on a cooling rack.
- Allow the cheesecakes to cool at room temperature for 45-60 minutes.
- Chill them in the refrigerator for at least 2 hours and up to 3 days before decorating and serving.
- You can freeze the mini cheesecakes for up to 3 months. I put the cheesecakes in an airtight container, then drape a layer of paper towels over the inside of the lid and seal it shut. The paper towel will soak up any condensation that forms, keeping the cheesecakes from getting wet and sticky.
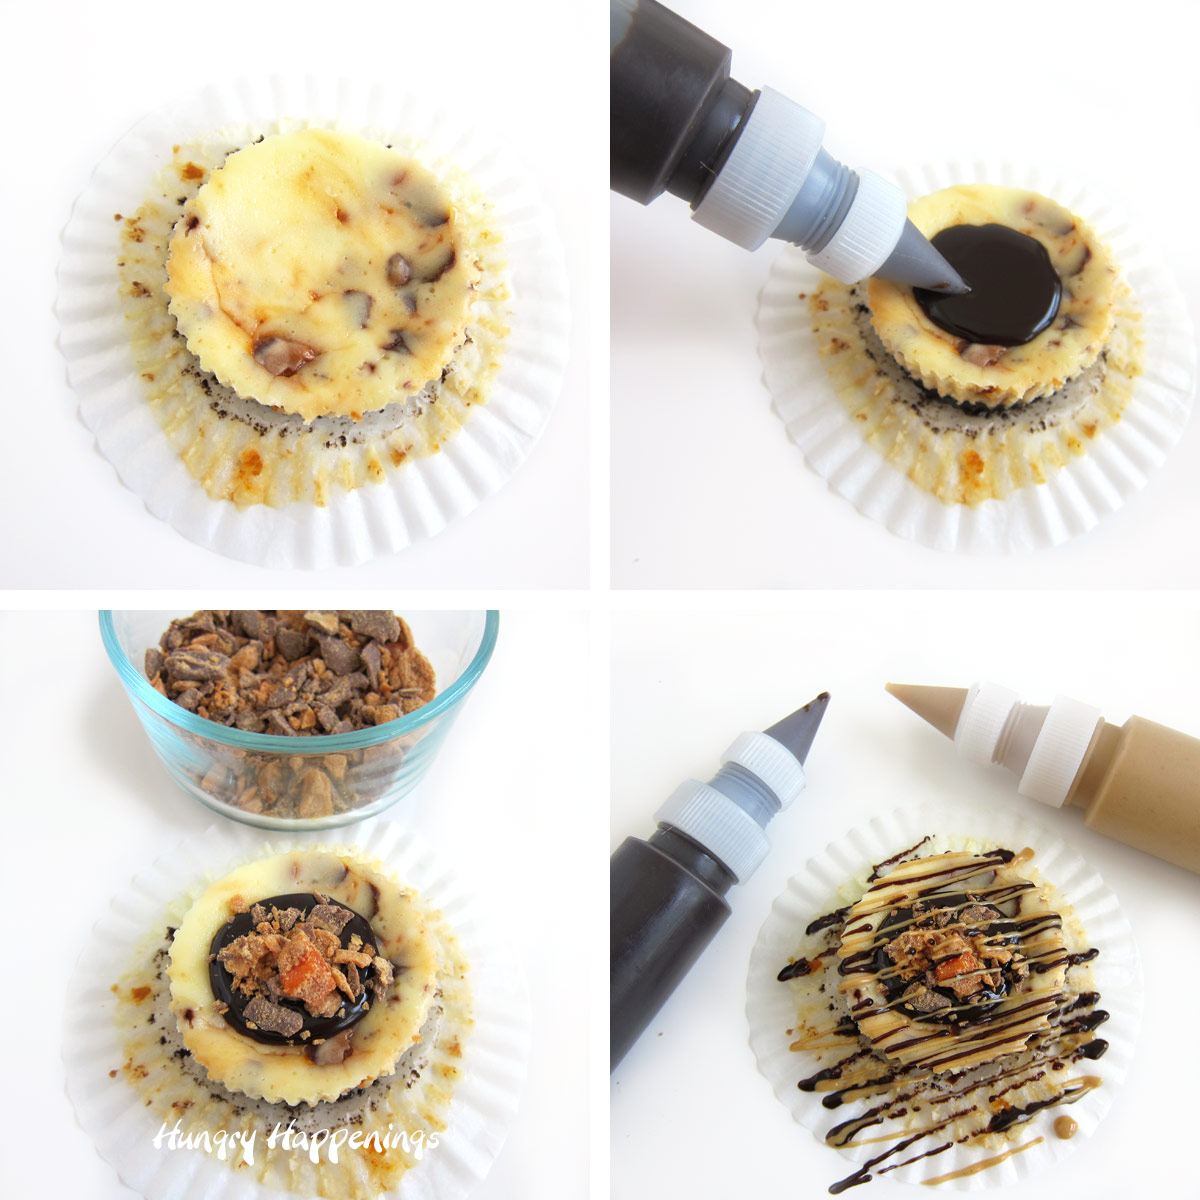
step 6 - Decorate and serve.
Add the toppings to your cheesecake just before serving.
- Peel the cupcake wrapper off of a cold cheesecake.
- Spoon or pipe a circle of chocolate ganache or hot fudge sauce in the center of each mini Butterfinger cheesecake.
- Sprinkle on some Butterfinger Baking Bits.
- Heat some creamy peanut butter in the microwave until it becomes liquid (30-40 seconds).
- Drizzle the peanut butter over the top of the cheesecake.
- Then, drizzle some chocolate ganache over the top too.
step 7 - Add more Butterfinger Baking Bits.
- Sprinkle on a bit more Butterfinger Baking Bits.
- Serve and enjoy!
More Mini Cheesecake Recipes
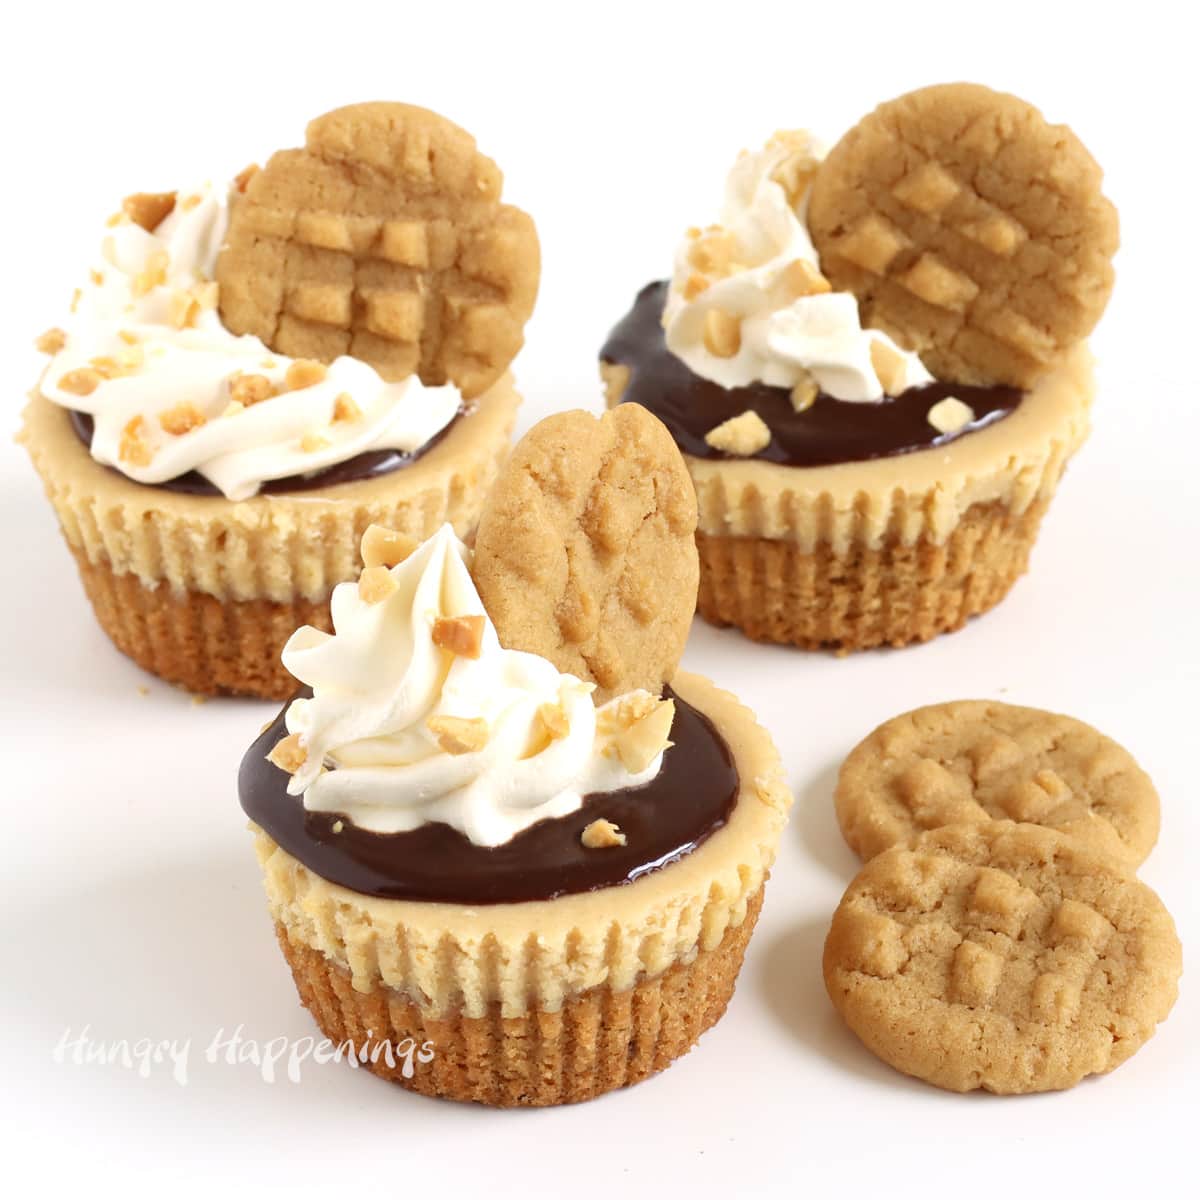
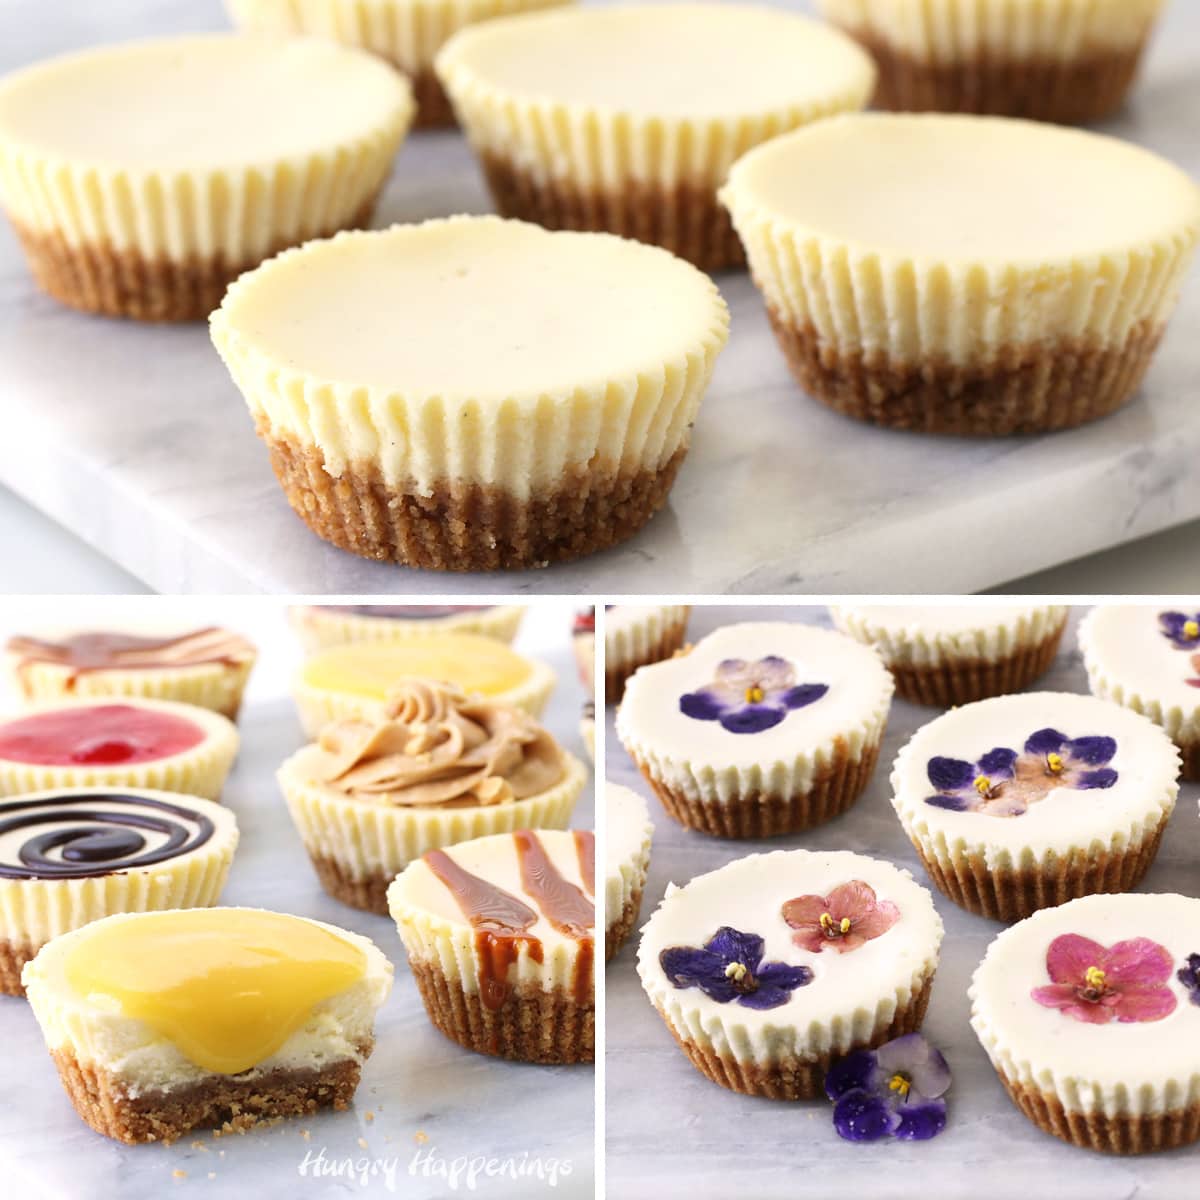
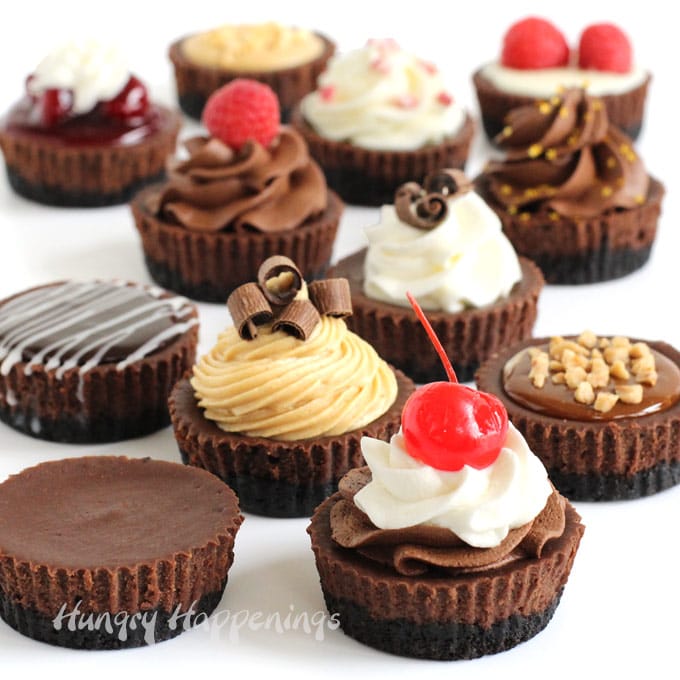
If you love these Butterfinger Cheesecakes be sure and check out all of my Cheesecake Recipes.
Recipe

Creamy mini cheesecakes filled with Butterfinger Baking Bits baked on a chocolate cookie crust and topped with chocolate ganache, peanut butter, and more Butterfinger Baking Bits.
- 24 chocolate sandwich cookies with vanilla cream
- ¼ cup butter, melted
- 16 ounces (2 blocks) cream cheese
- ⅔ cup sugar
- 2 large eggs
- ⅔ cup sour cream
- 1 teaspoon vanilla extract or vanilla bean paste
- 8 ounces Butterfinger Baking Bits, divided (use 1 cup in the batter)
- ½ cup chocolate ganache or hot fudge sauce
- ¼ cup creamy peanut butter
- remaining Butterfinger Baking Bits
-
Set your ingredients (cream cheese, eggs, sour cream) out on the counter to come to room temperature at least 2 hours before you plan to bake your mini cheesecakes.
-
Once your ingredients are ready, fill a glass baking dish with 1 to 1 ½ inches of water and set it on the lowest rack in your oven.
-
Arrange another rack in the middle of the oven.
-
Preheat your oven to 325 Fahrenheit.
-
Line 21 cupcake cavities in a cupcake pan with paper liners (cupcake wrappers).
-
Crush the cookies (and vanilla filling) into fine crumbs using a food processor.
-
Alternatively, you can crush the cookies in a zip-top bag using a rolling pin, meat mallet, or heavy pan.
-
Stir together the cookie crumbs and melted butter.
-
Press 1 packed tablespoon of the crumbs into each of the cupcake wrappers to form a cookie crust.
-
Beat the cream cheese on low speed, scraping down the bowl, as needed, until smooth.
-
Add sugar and beat on low until smooth.
-
Stir in the sour cream.
-
Lightly whisk the two eggs just until they come together and look yellow.
-
Add the lightly beaten eggs and vanilla to the cream cheese mixture and stir just until combined. Do not overmix at this point.
-
Fold in 1 cup of the Butterfinger Baking Bits.
-
Equally divide the cheesecake filling among the 21 cupcake wrappers, spooning about 3 tablespoons of filling into each.
-
Bake on the middle rack in the oven for 14 minutes until the cheesecakes no longer look wet, but the center still jiggles.
-
Turn off the oven and crack open the door about 1-2 inches.
-
Let the cheesecakes rest in the warm oven for about 10 minutes so they can slowly begin to cool down.
-
Remove and set on a cooling rack.
-
Allow them to cool for about 45 minutes then refrigerate for at least 2 hours.
-
Just before serving, remove and immediately peel away the paper liners.
-
If your chocolate ganache has cooled and is thick, warm it in the microwave or on the stove just until it becomes liquid.
-
Spoon or pipe about 1 teaspoon of chocolate ganache in the center of each cheesecake.
-
Sprinkle on about a teaspoon of Butterfinger Baking Bits.
-
Warm the peanut butter in the microwave or on the stove just until it becomes a liquid.
-
Drizzle peanut butter over all the cheesecakes.
-
Then, drizzle chocolate ganache over the top.
-
Sprinkle any remaining Butterfinger Baking Bits over the tops of the cheesecakes.
-
Serve and enjoy!
- Store your cheesecakes in an airtight container in the refrigerator for up to 1 week or in the freezer for up to 3 months. Top them with chocolate, peanut butter, and Butterfinger Baking Bits just before serving.
- Room Temperature Ingredients
It is vitally important that your cream cheese, sour cream, and eggs be at room temperature before mixing your cheesecake filling.- If you forget to set them out at least 2 hours in advance follow these instructions to warm them quickly (but not too much!)
- Cut the cream cheese into slices and spread them out on the wrapper. The smaller pieces will soften more quickly.
- In a pinch, can also gently soften the cream cheese by heating it in the microwave on 50% power for 15-30 seconds. Do not get the cream cheese hot as hot cream cheese can cause your cheesecake filling to curdle.
- You can quickly bring an egg to room temperature by placing it, still in its shell, in a bowl of hot water for 5-10 minutes.
- Spread the sour cream into a thin layer in a large shallow bowl to allow it to warm up more quickly.

- Banana Split Bars – A Fun and Easy Summer Dessert - March 4, 2026
- Pineapple Fudge (No Candy Thermometer Needed!) - March 4, 2026
- No-Bake Peanut Butter Pie Recipe - March 3, 2026
Erika says
Followed the recipe to a T, came out perfect!!! Thank you!
Beth says
I am so happy to hear that!!!