• Skip to primary navigation
  • Skip to main content
  • Skip to primary sidebar
  • Skip to footer
Hungry Happenings
  • RECIPES
    • All Recipes
    • Dessert Recipes
    • Decorated Cookies
    • Decorated Cakes
    • Cheesecake Recipes
    • Everyday Desserts
    • Homemade Candy
    • Everyday Meals
    • Readers’ Gallery
    • Hungry Happenings Blog Posts
  • HOW TO
    • Chocolate Making Tips
    • Chocolate Making Course (video lessons)
    • Make Modeling Chocolate
      • Modeling Chocolate Recipe and Tutorial
      • How to Color Modeling Chocolate
      • How to Store and Work with Modeling Chocolate
      • How to Fix Greasy Modeling Chocolate
      • How to Fix Dry Modeling Chocolate
      • Use Colored Candy Melts to Make Candy Clay
    • Candy Clay Creations
    • How To Color White Chocolate and Candy Melts and Paint Candy Molds
    • How to Use Food Coloring Markers
  • HOLIDAYS
    • ALL HOLIDAY RECIPES
    • Valentine’s Day
    • St. Patrick’s Day
    • Easter
    • 4th of July
    • Halloween
      • Hungry Halloween
    • Thanksgiving
    • Christmas
    • New Year’s Eve
    • MORE HOLIDAYS
      • Mother’s Day
      • Father’s Day
      • April Fools
      • Chinese New Year
      • Cinco de Mayo
      • Day of the Dead
      • Earth Day
      • Hanukkah
      • Mardi Gras
  • PARTY FOOD
    • Super Bowl
    • Graduation
    • Birthday Party
    • March Madness
    • Summer Fun
    • Baby Shower
    • Wedding Shower
    • School/Teacher
    • Movie and T.V. Characters
    • Kid’s Treats
    • Fun Party Recipes
  • BUY MY COOKBOOKS
  • ABOUT/CONTACT

Conversation Heart Cheesecakes – A sweet Valentine’s Day dessert

February 4, 2012 This post may contain affiliate links.

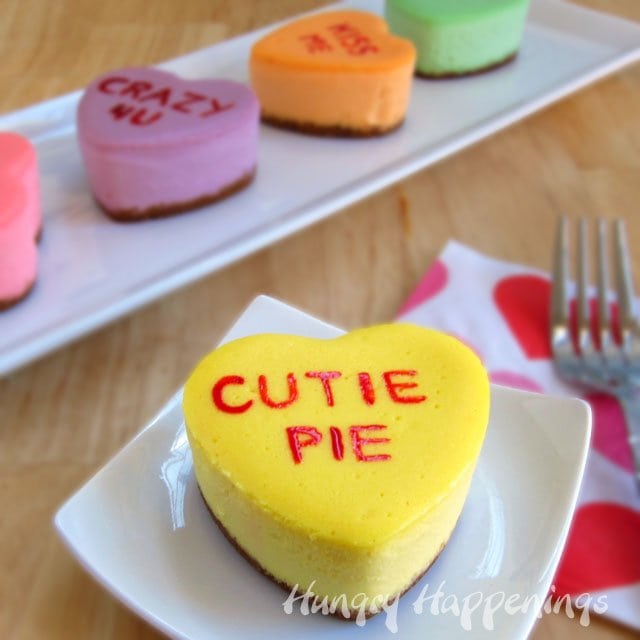
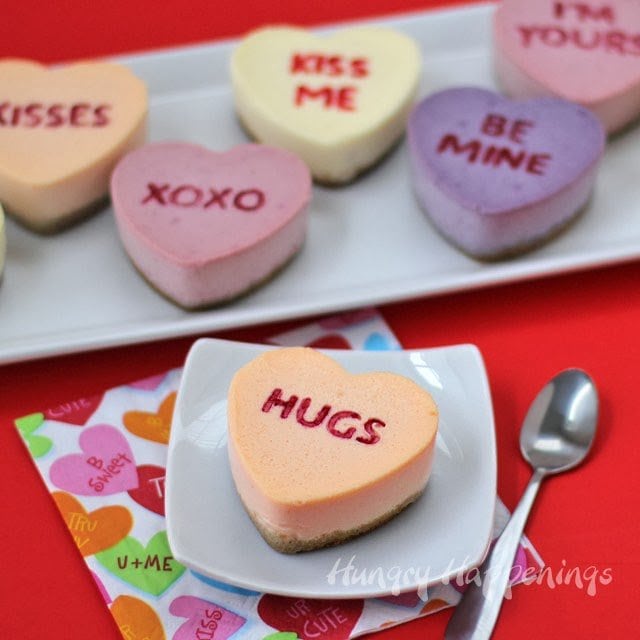
This Valentine’s Day tell your sweethearts how you feel by adding personalized messages to brightly colored, rich and creamy, Conversation Heart Cheesecakes. This fun twist on a holiday classic is sure to win the hearts of your loved ones. See the new Video Tutorial at the end of this post.
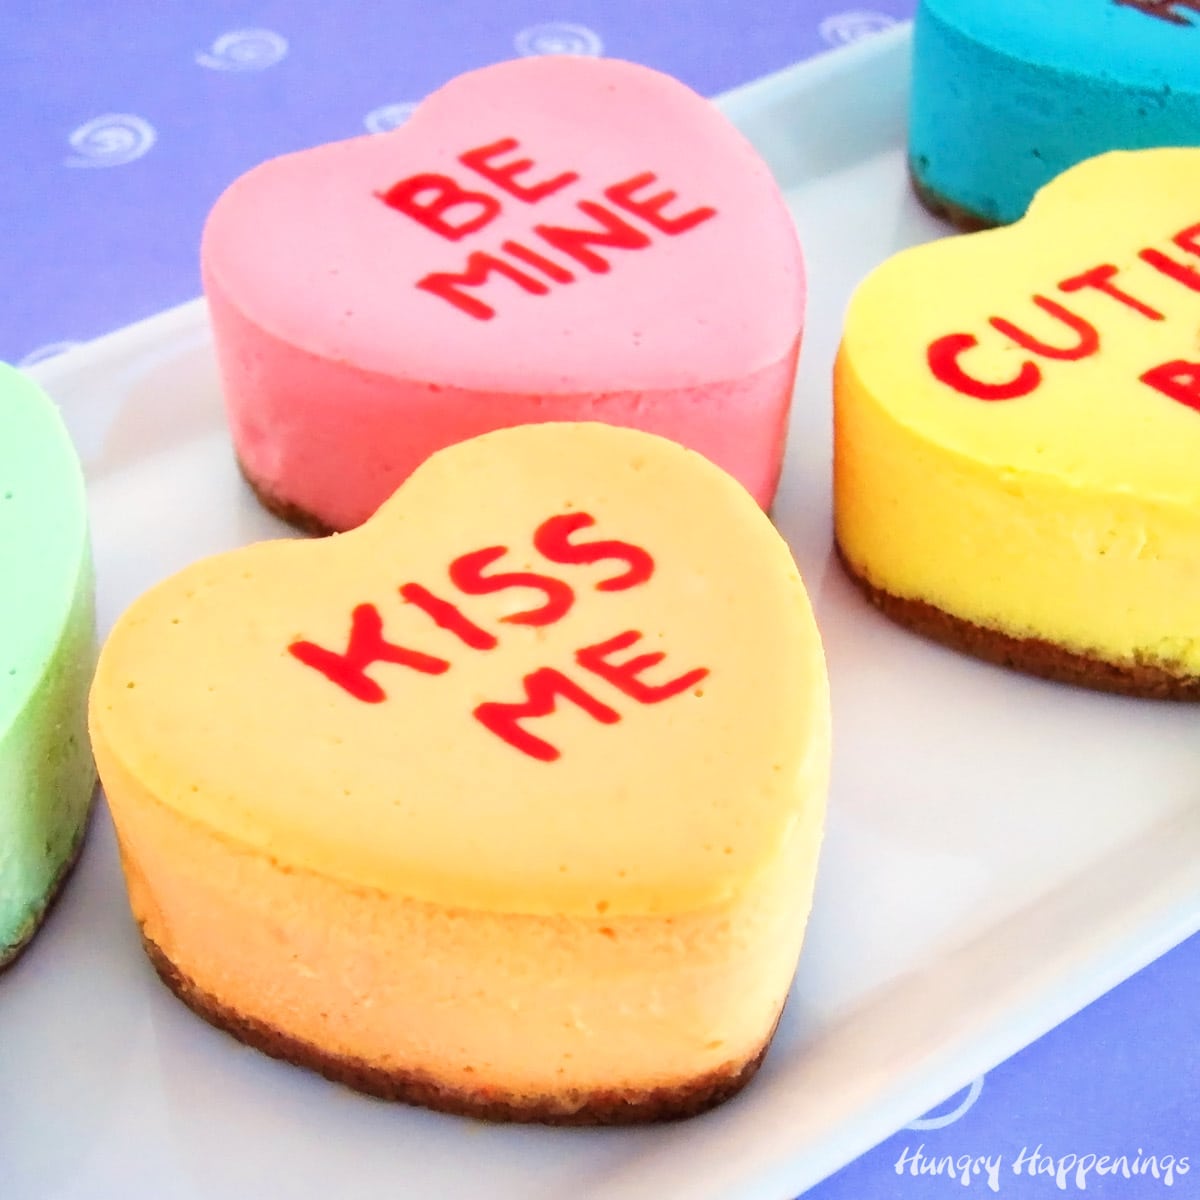
orange, pink, yellow, and blue heart-shaped conversation heart cheesecakes personalized with Valentine's Day messages

I’ve heard people, including my husband, say, “I’ve never met a cheesecake I didn’t like.” Well, I can’t say the same.

I’ve been known to pay upwards of $10 for a slice of cheesecake and take one bite and shove it aside.

To me, cheesecake should be lusciously creamy and smooth with a bit of crunch from the graham cracker crust. I love it when it just melts on my tongue. It should taste delicately rich with just a hint of tang from the cream cheese. I won’t settle for dense, spongy, crumbly, and or sour cheesecake; it better be good if I’m going to indulge.  If it’s not perfection, I don’t want it.

Do you feel the same?

pink heart-shaped conversation heart cheesecake with

Well, I have the perfect cheesecake recipe for you.

Many years ago, after many failed attempts at finding a cheesecake with just the right texture and taste, I discovered Tyler Florence’s Ultimate Cheesecake. It is the best I’ve ever tried. I’ve perfected the recipe and share tips and tricks for making it creamy and smooth. You can see my Classic Cheesecake Recipe, here.

I’ve used his cheesecake recipe dozens of times and my family and friends all rave about it.

You can imagine how they reacted when I turned that wonderful dessert into cute Conversation Heart Cheesecakes for Valentine’s Day.

Video

Watch this video to see how to make these cute Valentine’s Day desserts.


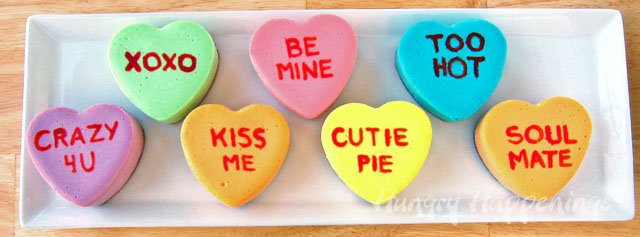
Each sweet little dessert was brightly colored and personalized with a special message printed on the top just like the candy conversation hearts.

The cheesecake hearts made for the perfect ending to a lovely Valentine’s Day meal.

Yellow conversation heart cheesecake imprinted with

These desserts are really fun to make and only take about an hour of actual prep time but do require several hours, from start to finish. You need time to bake, cool, freeze, un-mold, and decorate them before serving.

Each of the cheesecakes is colored pink, orange, yellow, blue, purple, and green using food coloring. You can use the liquid food coloring you find in the grocery stores or any icing or candy coloring you might have on hand. Just be aware that the color will intensify as the cheesecakes bake.

If you prefer to use natural coloring, you can either purchase bottles of natural food coloring or use fruit and vegetable purees.

naturally colored conversation heart cheesecakes

A few years after making my original Conversation Heart Cheesecakes, I created a batch of naturally colored conversation heart cheesecakes using fruit purees (pictured above.) The cheesecakes are flavored and colored with blueberries, raspberries, lemon, and orange/carrot.

If you enjoy fruit-flavored cheesecakes, this is a wonderful, natural, alternative. They taste great and, although the colors are a bit more muted than the original cheesecakes, they look equally festive.

You will also notice, the lettering on those conversation heart cheesecakes is a lot nicer. Check out the other tutorial to see how to achieve this really clean look using cookie stamps.

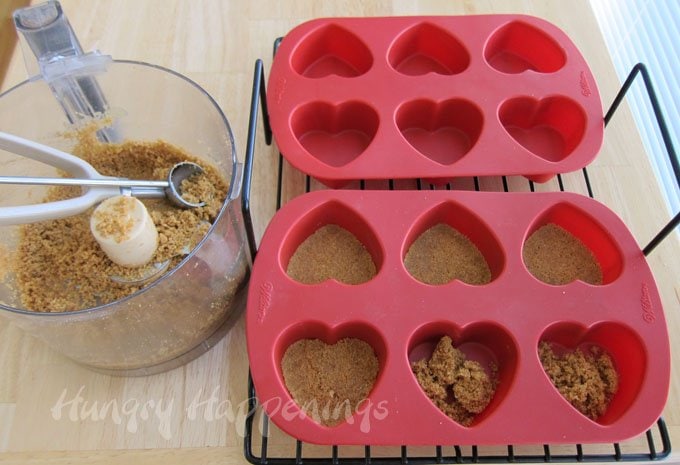
Wilton Silicone Heart MoldTo make these heart-shaped cheesecakes, you will need three Heart-Shaped Silicone Molds. The molds are the perfect size to make an individual serving of cheesecake.

I only had 2 of the molds at the time I made these hearts and ended up using the extra cheesecake filling to make some mini cheesecake hearts. The bite-sized treats were cute, but I would have preferred having 3 of the larger hearts in each of the six colors.

pink

Conversation Heart Cheesecakes

 Supplies Needed:

Items I used to create this project are available on Amazon.com (commission earned for sales).


stand mixer or a mixing bowl and handheld mixer
rubber spatula
3 Heart-Shaped Silicone Molds
fine tip paintbrush (new or food only brush)
roasting pan big enough to fit your heart-shaped molds
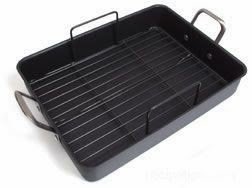
 

Roasting pan with flat rack insert.

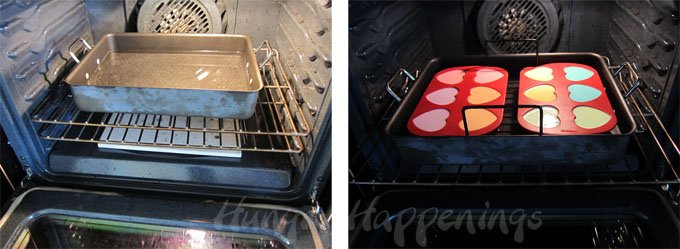
You will need a water bath to bake your cheesecakes, so either set your roasting pan in the oven filled with enough water to go halfway up the sides of your heart molds and allow the water to heat along with the oven or bring some water to a boil in a teapot or the microwave then pour it in the bottom of the pan.

My roasting pan has a flat rack that fits inside. I set two heart molds on the rack, filled them, then used the handles to help me lower the molds into the hot water.

After the cheesecakes bake it’s so easy to lift them out and cool on the rack.

Use a silicone heart mold to create heart shaped cheesecakes for Valentine's Day.

  • Once you have your molds ready to fill, equally divide a mixture of graham cracker crumbs, butter, and cinnamon in the bottom of the heart-shaped cavities.
  • You’ll use about a tablespoon of crumb mixture in each heart cavity. Press the crumbs down making an even crust. Refrigerate until ready to fill with cheesecake mixture.
  • You can bake this crust for 8-10 minutes if you want it to be a bit crisper. Either way works fine.

Make the best cheesecake you've ever tasted using Tyler's Ultimate Cheesecake Recipe.

  • In the bowl of a stand mixer, or in a mixing bowl using a handheld mixer, beat the cream cheese on medium-high until smooth, scraping down the sides of the bowl as needed.
  • Be sure to scrape the cream cheese out of the mixing blade as well. You don’t want lumps in your cheesecake.
  • Add sugar and beat for one minute.
  • Add eggs and beat until creamy, 1 to 2 minutes, scraping the sides of the bowl once.
  • Add the sour cream and vanilla and mix just to combine.
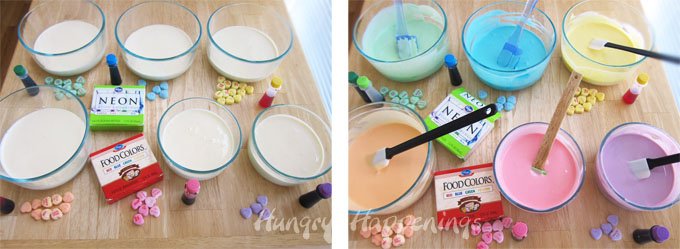
Color cheesecake filling to make Conversation Heart Cheesecakes.

  • Equally divide the filling among 6 bowls.
  • Add food coloring to create the colors you’d like.
    • The colors will intensify a bit once baked, so make them a little less bright than you want them. I was not happy with how intense the blue cheesecakes turned out. I would only a few drops of blue.
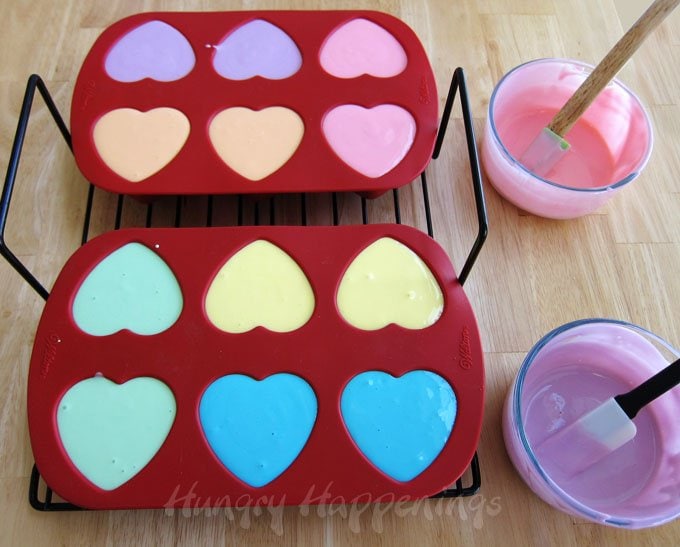
Fill a heart shaped silicone mold with colorful cheesecake filling and turn them into Conversation Heart Cheesecakes.

  • Pour the colored cheesecake filling into the heart-shaped cavities in your Wilton silicone molds.
  • If you are using 3 heart molds and making 18 cheesecakes, equally divide each color among 3 hearts.
    • The cavities will be a little over 3/4 full.
    • I filled mine completely, as I only made 12 of this size. I then used the remaining batter to make some mini hearts (see image below.)

Bake Conversation Heart Cheesecakes in a water bath.

  • Bake the cheesecakes in a water bath for 18-22 minutes.
    • When baked thoroughly, the cheesecakes should still jiggle, but not look wet.

Notes:

  • Use a roasting pan with a removable rack to make it easier to remove cheesecakes.
  • You can set your heart molds in your roasting pan, then carefully pour boiling water around the heart molds.
  • If baking tiny cheesecakes, bake for 10-14 minutes.
  • If you bake one large heart-shaped cheesecake, it should take between 42-50 minutes.
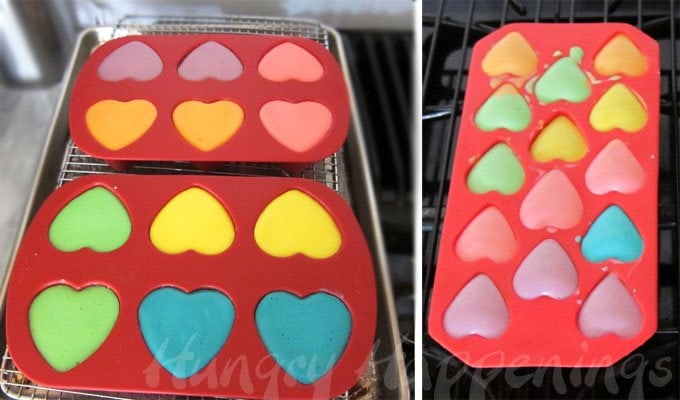
Bake brightly colored conversation heart cheesecakes in silicone molds.

  • Remove your baked cheesecakes from the oven and water bath and allow them to cool at room temperature for an hour.
  • Then cover the mold with a piece of paper towel and wrap in plastic wrap.
  • Freeze for at least 2 hours or up to several weeks.
  • It’s easiest to remove the cheesecakes if they are frozen solid.
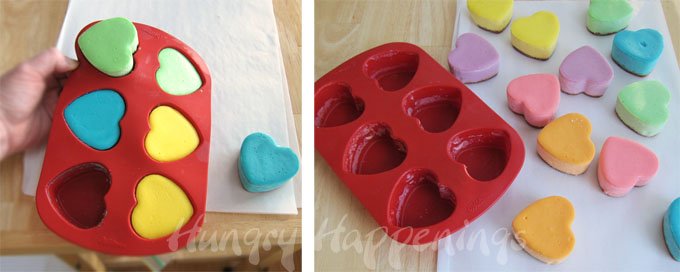
How to make heart shaped cheesecakes.

  • Remove from the freezer, uncover, then push on the underside of each heart mold, releasing the cheesecakes.
  • Carefully lift them out of the mold. If they don’t pop right out, you need to freeze them longer.
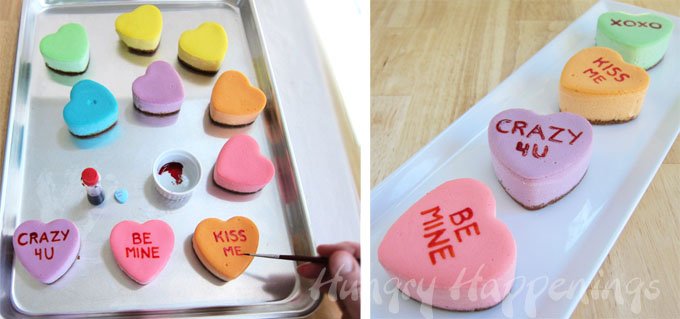
hand-paint special messages on conversation heart cheesecakes using red food coloring

  • To add the conversation heart phrases, squeeze a few drops of red food coloring into a small bowl.
  • Use a fine-tip paintbrush to paint the words onto each cheesecake heart.

Notes:

  • Traditional conversation heart sayings are printed in all capital letters.
  • Don’t worry if your words are off-center, as many conversation hearts are printed that way.
  • If you have too much food coloring on your brush, your letters will bleed.
  • The food coloring will dry if you refrigerate your cheesecakes for a while.

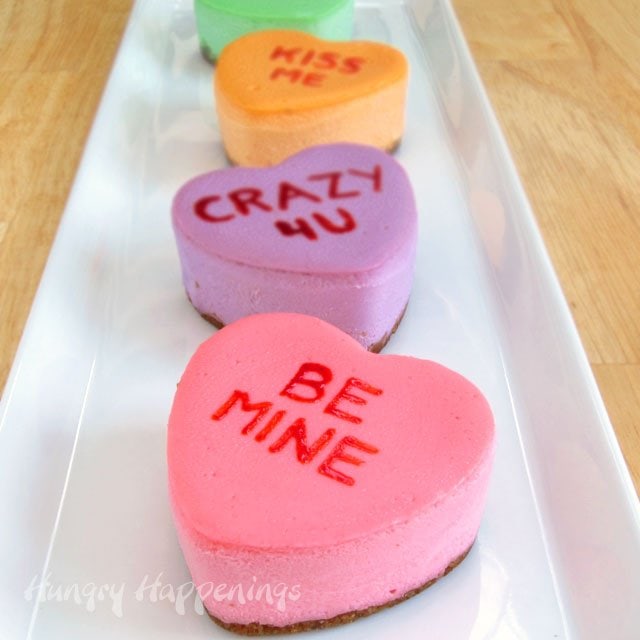
purple, green, orange, pink, yellow, and blue conversation heart cheesecakes on a long white plate

  • Store in the refrigerator for up to several days or freeze for up to a month.
    • I suggest storing them in an airtight container. To keep the condensation from developing on the tops of the cheesecakes, set a piece of paper towel, that is larger than the container’s lid, across the underside of the lid. Close and seal. The moisture will get wicked up by the paper towel.
Printable Recipe

5 from 4 votes
Print
Conversation Heart Cheesecakes
Prep Time
30 mins
Cook Time
25 mins
Total Time
55 mins
 
Brightly colored heart shaped cheesecakes decorated to look like conversation hearts.
Course: Dessert
Cuisine: American
Keyword: baby cheesecake, conversation heart cheesecake, valentines day cheesecake
Servings: 18
Author: Beth Jackson Klosterboer
Ingredients
Crust
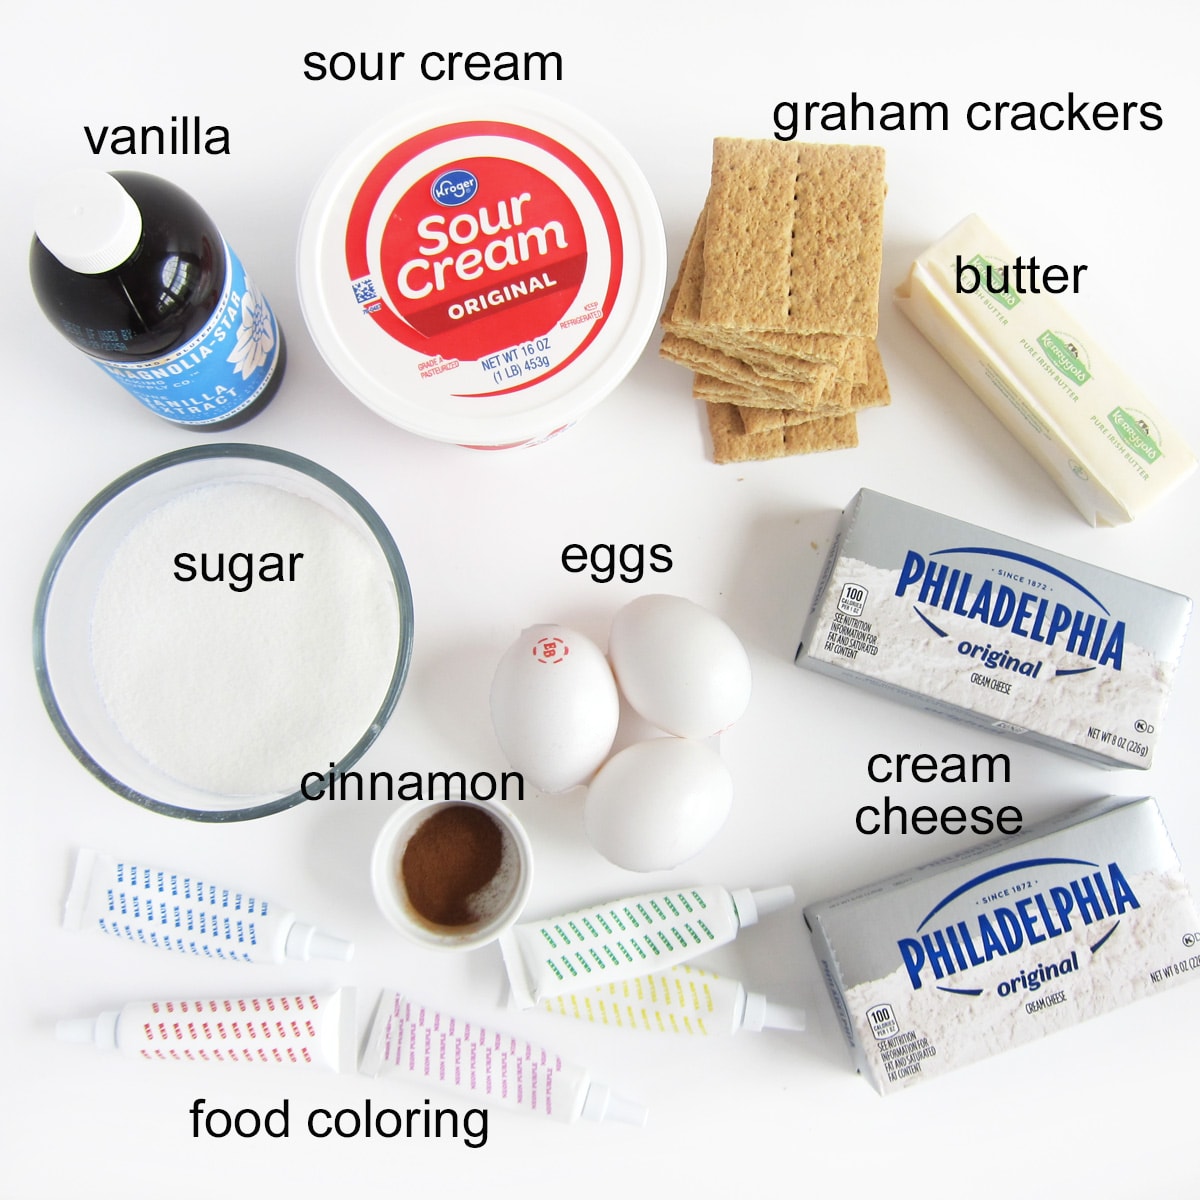
  • 1 cup graham cracker crumbs 15 squares
  • pinch of cinnamon
  • 4 tablespoons 1/2 stick butter, melted
Cheesecake
  • 16 ounces 2 blocks cream cheese, softened
  • 1 cup sugar
  • 3 large eggs
  • 1 pint sour cream (1 pint = 16 ounces or 2 cups of sour cream)
  • 1 teaspoon vanilla extract
  • food coloring - pink purple, blue, green, yellow, and red
Instructions
  1. Fill a roasting pan with enough water to come half way up the sides of the silicone heart molds.
  2. Set pan in oven.
  3. Heat oven to 325 degree Fahrenheit.
  4. Mix together the graham cracker crumbs, cinnamon, and melted butter.
  5. Equally divide the crumbs among 18 heart shaped silicone mold cavities.
  6. Press the crumbs into an even layer and refrigerate until needed.
  7. Beat cream cheese until creamy and smooth.
  8. Add sugar and beat until incorporated.
  9. Beat in eggs then add sour cream and vanilla and mix just to combine.
  10. Equally divide batter into 6 bowls.
  11. Color one bowl of filling pink,another lavender, yellow, orange, green, and blue using food coloring.
  12. Equally divide each color of filling among 3 heart cavities.
  13. Bake cheesecakes in a water bath for 18-24 minutes until the edges look set but the center is jiggly but not wet.
  14. Remove from oven and water bath and allow to cool at room temperature for an hour.
  15. Freeze for at least two hours then remove and un-mold.
  16. Paint conversation heart phrases onto the tops of the cheesecakes using red food coloring.

Naturally colored Conversation Heart Cheesecakes are flavored with raspberries, lemon, blackberries and orange.

If you’d prefer a naturally colored version of this Conversation Heart Cheesecake recipe, check out my tutorial and recipe for heart cheesecakes colored using fruits and vegetables. In that tutorial I will show you how to imprint the words using stamps to make a nicer looking design on top of each cheesecake. 

If you are looking for other treats or gifts to make for Valentine’s Day,
you might like these other recipes too.

Have fun making food crafts and Valentine's Day treats. See recipes to make chocolates, cookies, cupcakes, and more at HungryHappenings.com.

Reese’s Cup Teddy Bear Cupcakes • Conversation Heart Piñata Cake
Creamy Coconut Candy Hearts • Chocolate Buckeye Bears
Mozzarella Cheese filled Heart Pastries • Sweet Chocolate Cherry Bombs
Warm Fuzzy Cake Balls and Cupcakes • You Make My Heart Roar Lion Cupcakes

Filed Under: Cheesecake Recipes, Valentine's Day Recipes Tagged With: Cake, Cheesecake, conversation hearts, Winter

The Sugar Academy Chocolate Making Courses
Previous Post: « Valentine’s Day Recipes Recap – Edible Crafts for Kids and Adults
Next Post: Teddy Bear Taco Tart- Valentine’s Day Dinner »

Reader Interactions

Comments

  1. Claudia

    February 12, 2021 at 11:04 am

    Hello, I have a quick question. Just wondering why my cheesecakes leak water after they’ve been in the fridge? It doesn’t happen to all of them but to most of them it does. Thank you!

    Reply
    • Beth

      February 12, 2021 at 11:51 am

      Hi Claudia, I know what you are talking about. If you put the cheesecakes in the refrigerator before they have cooled completely they can seep water so I recommend you allow them to cool completely. Because cheesecakes are very moist, condensation will form around them too. To wick up this moister, you can set your cheesecakes directly on a piece of paper towel. I also recommend draping paper towels on the underside of the lid of your airtight container (do not let it touch the cheesecakes). I lay my paper towels over the inside lid, then flip it upside down, and seal the container with the paper towel hanging out around the edges. It keeps the paper towel away from the cheesecake but allows it to wick up any excess moisture. I hope this helps! Enjoy your cheesecakes.

      Reply
    • Marvette Perry

      January 23, 2022 at 9:19 pm

      Hello there Claudia- How many weeks can I freeze the hearts for? Can I freeze them with the sayings on them?

      Reply
      • Beth

        January 24, 2022 at 10:29 am

        You can freeze the cheesecake hearts for up to 3 months. Do not freeze them with the sayings on them. It’s best to write on the hearts the day you plan to serve them. Enjoy!

        Reply
  2. Pamela

    February 4, 2021 at 10:15 pm

    Hi Beth,

    I’m excited to make these for V day in 10 days. Question: Do you need to have a flat rack in the roasting pan for the molds to sit upon, or can they be placed in the pan directly, making sure the water level doesn’t go higher than the molds? I don’t have a flat rack; mine is curved at both ends.

    Thank you

    Reply
    • Beth

      February 5, 2021 at 12:47 pm

      Hi Pamela, I hope you enjoy these Conversation Heart Cheesecakes! You do not need the flat rack, you can simply set the silicone mold directly on the bottom of the roasting pan so that the water goes at least halfway up the sides of the heart mold. The rack just makes it easier to get the silicone mold in and out of the pan. Have a wonderful Valentine’s Day!

      Reply
  3. Leticia

    January 17, 2021 at 11:54 am

    Can you show a picture of how you froze them once at room temperature. If I put a napkins on top won’t it stick to the cheesecake?

    Reply
    • Beth

      January 17, 2021 at 1:27 pm

      Sorry, Leticia, I don’t have a picture. If your cheesecakes come up to the very top edge of your silicone mold, you can set the mold into a 9×13 inch pan. Then lay the paper towels across the top of the pan and cover the pan with tin foil or the pan’s lid. My cheesecakes did not quite come to the top edge, so I simply laid the paper towels across the silicone mold and it did not touch the cheesecakes.

      Reply
  4. PRISCILLA

    December 27, 2020 at 12:14 pm

    hi, love the recipe, but for the sour cream is only 16 oz or 1 pint, sorry i have a differents metric system

    Reply
    • Beth

      December 27, 2020 at 1:30 pm

      Thanks, Priscilla! You’ll want to use 1 pint of sour cream which equals 16 ounces (454 grams) or 2 cups. Enjoy!

      Reply
  5. Simran

    February 27, 2020 at 2:34 pm

    😀 I love these! Those cheesecakes Valentine desserts are brilliant! I’m not going to show my wife this post, I’m just going to make some and stick them in his lunch box as a surprise, heeee! Nice one 😉

    Reply
    • Beth

      February 27, 2020 at 3:09 pm

      How fun! I hope she enjoys them.

      Reply
  6. Daniela Cabrera

    February 4, 2020 at 12:10 am

    Love the recipe and the taste, just had some trouble getting the cheesecake out of the heart shape silicon mold, any tips?

    Reply
    • Beth

      February 4, 2020 at 10:12 am

      I’m glad you enjoyed the recipe and flavor! To make it easier to remove from the mold freeze the cheesecakes until they are really solid. They will push right out of the mold.

      Reply
  7. ERIN

    November 16, 2019 at 8:12 am

    Hi BETH, I can’t believe how good this looks. Definitely trying this weekend.

    Reply
  8. Kristie

    January 27, 2019 at 8:18 am

    I meant to say congratulations for being featured on Happiness is Homemade Link Party. I saw them for the first time at the Snickerdoodle Party. They’ll probably be featured at all the parties you’ve visited. Have a great week!,

    Reply
    • Beth

      January 27, 2019 at 9:18 am

      Thanks Kristie, these Conversation Heart Cheesecakes are one of my most popular recipes and I’m so happy to see they were featured on the link party!

      Reply
  9. Kristie

    January 27, 2019 at 8:15 am

    Congratulations on being featured at the Snickerdoodle Link Party- these look great! The design is very clean-looking and well done.

    Reply
  10. Elizabeth

    January 25, 2019 at 12:26 pm

    Do you need to use cooking spray for easier release after frozen?

    Reply
    • Beth

      January 25, 2019 at 1:49 pm

      No cooking spray is not necessary. Also if you coat a silicone mold with cooking spray you will get a build up on the mold that won’t come off. If I really want to make sure something will release I will butter the mold, but these cheesecakes will pop right out once frozen solid.

      Reply
  11. Carolyn L Bogart

    January 20, 2019 at 2:22 pm

    Hi Beth, as I was browsing for Valentine options I came across your site. I love these and I can’t wait to share. I usually make dark chocolate filled cakes to give away but this year I’m trying yours.
    Happy Valentines Day early..and thanks

    Reply
    • Beth

      January 22, 2019 at 5:38 pm

      I’m so happy you found these conversation heart cheesecakes. I hope you enjoy making them and that everyone you share them with loves them! Happy Valentine’s Day to you too. 🙂

      Reply
  12. Jean Shea

    November 25, 2018 at 2:54 pm

    I have to admit that I’m on your husband’s side – I am yet to meet a cheesecake I don’t like. Still, I don’t mind the perfect one 😀 I’ll give these a go – they sound heavenly.

    Reply
    • Beth

      December 1, 2018 at 9:44 am

      LOL! I totally get it. Cheesecake is generally pretty darn good. I do hope you try this recipe. I know you’ll love it.

      Reply
  13. Kristen

    August 30, 2018 at 8:14 pm

    I have a nordic ware heart pan (6 small hearts). What would I adjust to do these in that pan?

    Reply
    • Beth

      August 31, 2018 at 8:48 am

      Hi Kristen,

      You really need to use the silicone molds or a pan with a push bottom. I don’t think you will be able to get the cheesecakes out of a metal Nordic Ware pan unless you completely cover the sides of the pan with crust. Even then I’m not sure how easily they will come out.

      Beth

      Reply
  14. McKenna

    February 6, 2018 at 3:13 pm

    Is there a way to prevent the writing from bleeding once they go in the fridge afterwards?!

    Reply
    • Beth

      February 6, 2018 at 4:25 pm

      The best thing to do is to place them in a box or container and drape a piece of paper towel on the underside of the box lid. You don’t want the paper towel touching the cheesecakes. This will help absorb the condensation which should help to keep the lettering from bleeding. I use a big Rubbermaid container and drape the paper towel over then set the lid over top. It works great.

      Reply
  15. Robyn

    January 6, 2018 at 8:00 am

    I am wondering if these molds make a decent sized cheesecake worth selling. If you were going to make them to sell, would you still use this same pan?

    Reply
    • Beth

      January 6, 2018 at 3:27 pm

      They make a nice size dessert for one person. So it would be like selling a gourmet cupcake if you use these molds. You could also make them in small heart shaped sprinform pans. They are a bit larger and would be a two person dessert that way.

      Reply
  16. Anders Fredlund

    September 13, 2017 at 2:32 pm

    Wow, Looks amazing!

    Reply
    • Beth

      September 15, 2017 at 5:51 pm

      Thanks!

      Reply
  17. elenia

    February 13, 2016 at 11:27 am

    Thank you so much! Great idea! I made these this past Friday for about 20 people and everyone loved them. I can’t tell you how happy it made me feel! Mil gracias!

    Reply
    • Beth

      February 14, 2016 at 2:47 am

      That makes me so happy to know that you made these and shared them with so many people. I’m glad they were a hit. Happy Valentine’s Day.

      Reply
  18. Aly

    February 9, 2016 at 5:38 pm

    How long should I bake just one heart mold of 6? Okay to make days in advance and thaw out day before in fridge ? Does the writing stay intact when frozen or bleed?

    Reply
    • Beth

      February 9, 2016 at 11:09 pm

      The baking time should be the same. You can make these up to a month ahead, and keep frozen until the day before you need them. Then remove them from the molds and thaw in the refrigerator until you are ready to serve. The lettering bleeds just a little bit which makes it look like real conversation hearts. Have fun and Happy Valentine’s Day!

      Reply
  19. Tasha

    October 8, 2015 at 1:21 pm

    My sister loves these cheesecakes. She wants me to make them for her in the shape of a lion. Do you think they would do okay without the crust, so that I can have the design from the mold of the lion? And this might be dumb, but would it turn out okay if the crust was baked on top and not bottom?

    Reply
    • Beth

      October 8, 2015 at 1:37 pm

      I’m so happy to hear you are going to make some fun cheesecakes for your sister. I have actually made them crustless many times. I’ve even painted into the mold using colored cheesecake.

      Here are a few links of cheesecakes on my blog that will give you guidance.

      https://hungryhappenings.com/2012/11/festive-fall-cheesecake-leaves-and.html/ (autumn colored leaves with no crust)
      https://hungryhappenings.com/2013/03/cheesecake-easter-eggs-easter-dessert.html/ (painted Easter egg cheesecakes no crust)
      https://hungryhappenings.com/2015/03/raspberry-blueberry-lemon-cheesecake-peeps.html/ (naturally colored Peeps cheesecake minis)

      I’ve not yet tried adding a crust on top. I’ve thought about it a lot, just haven’t attempted it yet. If you don’t add a crust, be sure to put the cheesecakes on the plates you’ll serve them on while frozen and they are hard to move when they soften. I buy small plastic appetizer plates which are the perfect size.

      I love the basic cheesecake recipe and have had so much fun decorating them. If you have any questions while you are working, don’t hesitate to ask.

      Reply
  20. Sandra Covarrubias

    February 12, 2015 at 9:35 pm

    So cute! Can I use springform pans?

    Reply
  21. Sandra Covarrubias

    February 12, 2015 at 9:34 pm

    So Cute! Can I use springform pans? I found heart shaped ones!

    Reply
  22. Allie Bobe

    January 28, 2015 at 10:56 pm

    One day I'll make these, but until then I'll feature them on gift round up. The post should be live tonight sometime.
    ~Allie at craftyallieblog.com

    Reply
  23. Siti Asiah

    June 4, 2014 at 1:18 am

    so sweet…:)

    Reply
  24. Rosemary

    March 22, 2014 at 6:46 am

    An idea for wedding anniversary too.

    Reply
  25. Anonymous

    February 14, 2014 at 6:13 pm

    i like this recipe but, you might want to add more chocolate and i love cheesecake!!!!!!!!!!!

    Reply
  26. Becki Steel

    February 14, 2014 at 3:03 am

    Hi, great recipe! just one question, do you write on them after they have thawed or before?
    Thanks and Happy Valentines day 🙂

    Reply
    • beth

      February 14, 2014 at 3:39 am

      You can do it either way, but it's just a bit easier when they are frozen, as the coloring goes on really nicely that way.

      Reply
  27. Anonymous

    February 7, 2014 at 6:02 pm

    These are insanely adorable!! Can't wait to make these as a treat for my single girl friends!
    But before I get on that, where did you find the heart mold?

    Thanks!

    xx
    Erika

    Reply
    • beth

      February 7, 2014 at 6:13 pm

      Thanks, Erika. I bought my molds from Amazon. There is a link at the end of the post. You can oftentimes find them at craft stores around Valentine's Day too. I've not been in any this month, but I've seen them at Michael's and JoAnn's in previous years. It's been a while but I've also seen them at Target and WalMart.

      Reply
  28. Carmen Anderson

    February 5, 2014 at 2:45 am

    This really is the best cheesecake recipe I had ever tried! I made some today, and they came out beautifully. (not as beautiful as yours, but they are super cute! and my husband love them! ) And they taste fantastic! Thank you so much for sharing the recipe!!!! x

    Reply
    • beth

      February 14, 2014 at 3:40 am

      I'm so glad you like them!

      Reply
  29. Peter @Feed Your Soul Too

    February 3, 2014 at 7:44 pm

    These look great and you must have a good sense of humor too. I featured them on my Friday Five – Valentine's Day addition over at Feed Your Soul Too.

    Reply
  30. Catherine Holt

    January 30, 2014 at 11:43 pm

    These are so adorable….a little bit of heaven on a plate 🙂 Looks like a great recipe to try and I love how they look so simple yet really effective.

    Reply
  31. Felicia

    January 28, 2014 at 7:48 pm

    My 2 year old and I made these today, and they turned out amazing!! Thank you for this great idea!

    Reply
  32. Baking Friends Forever

    January 25, 2014 at 11:17 am

    I love these, they are pure genius and look delicious!

    Reply
  33. Shrey Patel

    January 23, 2014 at 9:53 am

    So many great ideas! Everything looks so appetizing!Can’t wait to try it!
    Beautiful!
    fabulously photo shoot!

    Reply
  34. Aharon

    August 17, 2013 at 8:53 pm

    Hi,

    you convinced me at:
    "To me, cheesecake should be so lusciously creamy and smooth that it just melts in my mouth, and tastes delicately rich with just a hint of tang from the cream cheese"

    this looks great!
    Thanks for sharing:)

    Reply
  35. Anna

    August 7, 2013 at 12:15 am

    Hi, these are gorgeous! I am looking forward to trying your cheesecake recipe. I don't live in America, so how many grams is 1/2 a stick of butter?

    Reply
    • beth

      August 8, 2013 at 12:38 pm

      Thanks, Anna. There are 56.5 grams in a 1/2 stick of butter.

      Reply
  36. Anonymous

    February 15, 2013 at 6:47 am

    Just made these today for my hubby for Valentine's Day! He LOOOOOVED them and thought they were adorable. For him he said they were the perfect bite size dessert. haha. Thank you soooo much for this recipe. It was super easy and fun to make. I found my molds at Joanns for those that haven't been able to find them.

    Reply
    • Beth Jackson Klosterboer

      February 15, 2013 at 1:44 pm

      Happy to hear your husband enjoyed the cheesecakes. I saw the molds at JoAnn's this year too. I love using the silicone molds for desserts and did two more recipes using the heart molds.

      Reply
  37. Shaniqua Kilburn

    February 13, 2013 at 6:29 am

    i attempted to make these today and sadly i failed 🙁 they fell apart

    Reply
    • Beth Jackson Klosterboer

      February 13, 2013 at 4:54 pm

      Sorry to hear that Shaniqua. When I first attempted to make a cheesecake in a silicone mold, mine fell apart too. That's when I realized they need to be really frozen in order to pop out of the mold easily.

      Reply
  38. Anonymous

    February 13, 2013 at 12:26 am

    when you say half a stick of butter, do you mean a quarter of a cup?? just checking…

    Reply
    • Beth Jackson Klosterboer

      February 13, 2013 at 4:55 pm

      Yes, a quarter of a cup/4 tablespoons.

      Reply
  39. Jen gamboa

    February 12, 2013 at 10:50 pm

    So I don't have a silicone mold but I do have a plastic one I bought from Walmart will that work?

    Reply
    • Beth Jackson Klosterboer

      February 13, 2013 at 4:56 pm

      Hi Jen, I'm not sure you would be able to get the cheesecake out of the mold if it isn't flexible. The great thing about the silicone molds is that the cheesecakes, once frozen, can be pushed out of the mold, but the mold needs to bend.

      Reply
  40. Jessica

    February 12, 2013 at 9:30 pm

    These turned out wonderful!!! I only had one silicone heart tray to work with, so I only colored enough of the filling to make just more than six hearts. I will give these to my husband for Valentine's day. I used the rest to simply make a cheesecake, but I swirled the leftovers of each color into it! We'll have it tonight for Mardi Gras! So fun. Thank you again.

    Reply
    • Beth Jackson Klosterboer

      February 13, 2013 at 4:57 pm

      I'm glad to hear you had success with your cakes. I think swirling the left over colors into a Mardi Gras cake is a fantastic idea. I hope your family enjoyed and will enjoy the cakes.

      Reply
  41. Jasmine Ford

    February 12, 2013 at 2:26 am

    Hello Beth, it's me again! I really want to make these cheesecakes for Valentines Day and but this is the recipe that I have always used. http://www.cookingforengineers.com/recipe/89/Cheesecake-Plain-New-York-Style
    I was just wondering if you could convert the cooking times for me, like you did for this one. I don't want to screw it up too bad.
    For instance, my recipe says bake at 500 degrees Fahrenheit for ten minutes and then for 140 minutes at 200 degrees. Since the cakes are so much smaller, these times would be way off. Do you think you could help me?
    Thanks for your time.
    -Jasmine

    Reply
  42. Mapu04

    February 12, 2013 at 12:08 am

    What if i only use 8 oz. of soyur cream (i think it's about 1 cup). That ingredient it's a little two much expensive here in my country. What can i use instead of sour cream.

    Reply
    • Beth Jackson Klosterboer

      February 12, 2013 at 12:26 am

      You could use thick yogurt (we call it Greek style yogurt) in place of some of the sour cream. It might change the flavor a bit, but should be a good substitute. If your yogurt is thin, pour it over a piece of cheese cloth or a linen towel and let it sit for 30-60 minutes allowing the excess moisture to drain off.

      Reply
  43. Mapu04

    February 12, 2013 at 12:08 am

    What if i only use 8 oz. of soyur cream (i think it's about 1 cup). That ingredient it's a little two much expensive here in my country. What can i use instead of sour cream.

    Reply
  44. Mapu04

    February 12, 2013 at 12:05 am

    What if i only use 8 oz of sour cream (i think it's about 1 cup). That ingredient it's a little expensive here in my country… what can i used instead of another cyup of sour cream.

    Reply
  45. Jasmine Ford

    February 11, 2013 at 9:36 pm

    Hello Beth, its me again. This is the recipe I use (http://www.cookingforengineers.com/recipe/89/Cheesecake-Plain-New-York-Style) and I really want to do this but I can't figure out the timing. If it is not too much trouble, I was wondering if you could take a look at it. For example, it says bake at 500º f for 10 mins and then 200º f for 1hr and 20mins.. I wouldn't do it that long since they are smaller right?

    Reply
    • Beth Jackson Klosterboer

      February 11, 2013 at 10:17 pm

      HI Jasmine. The recipe you are looking at makes a New York Style Cheesecake which is a bit different than what I made. Once baked it will have a browned exterior and a creamy interior, so your colored hearts will look brown especially around the edges. I'm sure your recipe will work, I just don't know how you'll like the look of the cheesecake hearts. As far as baking them, I would say bake at 500 for 4 minutes, then reduce the temp and bake 12-15 minutes. Check the internal temperate of one of the cheesecakes to see how much more they need to be baked. Your oven won't cool down that much in that short amount of time and you don't want to over bake the cakes. You want them to reach an internal temperature of 150 degrees Fahrenheit. Your best bet would be to use a probe thermometer and put it in one of the cakes to monitor the temperature. Good luck.

      Reply
  46. Shaniqua Kilburn

    February 11, 2013 at 6:20 am

    oh my goodness im going to attempt to make these for this valentines day to surprise my boyfriend…might have a little trouble hiding them from him tho since he's off before me :/

    Reply
  47. Anonymous

    February 10, 2013 at 7:40 pm

    Do you have to use sour cream???

    Reply
    • Beth Jackson Klosterboer

      February 10, 2013 at 7:57 pm

      The sour cream makes these cheesecakes ultra smooth and creamy. If you prefer, you can use the recipe I used to make my Swirled Cheesecake Leaves. It is very good too, just not quite as rich and creamy.

      https://hungryhappenings.com/2012/11/festive-fall-cheesecake-leaves-and.html

      Reply
  48. Anonymous

    February 10, 2013 at 5:34 am

    Hello,

    I really love this idea and I want to try it out for valentines day (: it's so cute and creative! I was just wondering if you think minis would come out as good if they were made with a non-bake cheesecake recipe. I don't have a large roast pan and I'm worried my heart tray will melt, I'd really appreciate your opinion and help ^^

    Reply
    • Beth Jackson Klosterboer

      February 10, 2013 at 1:48 pm

      I'm not sure how the no-bake cheesecake will work, but assume if you can get it frozen hard enough so that it comes out of the mold nicely, it will be fine. If you do make then, I'd love to hear how they turn out.

      If you use the baked cheesecake recipe, you can set your heart pan in a 9"x13" baking dish and fill it with water. You'll only be able to bake one heart tray at a time, but that is fine. If your heart tray is silicone, it won't melt. You can also just bake your cheesecakes without a water bath. The texture of the cakes will be less creamy, but still very good. Just be sure that you don't over bake then as the tops of the cakes can crack.

      Reply
  49. Sarah

    February 10, 2013 at 3:27 am

    These are so adorable! I will be making a bunch of these (probably about 4 dozen) for my law school friends for V-day this week. I'm doing a test run as we speak! 🙂 I was able to pick up some similar silicone heart molds at Walmart for $3.50. They have a ruffle edge but are otherwise identical to the Wilton ones, and more inexpensive 🙂 I plan on putting these in Valetine-themed treat cups, wrapping them up in red saran wrap, and tying a fork to it with some white yarn. I am so excited to work on these! Thank you so much for sharing your wonderful idea!

    Reply
    • Beth Jackson Klosterboer

      February 10, 2013 at 1:54 pm

      Thanks Sarah. I too saw the molds at Walmart and at Target also. Your heart will be very pretty with the ruffled edge. Just be sure you freeze them well so they come out of the molds nicely.

      I'd love to see pictures of your Valentine's packages. I've had several people ask for creative ways to package them. If you snap any photos, send one to me at beth@hungryhappenings.com so I can share it with everyone in my Reader's Gallery.

      Have fun!

      Reply
  50. Cheryl Kirkness

    February 8, 2013 at 1:45 pm

    These look absolutely delicious! I really love cheesecake and these would be the perfect addition to the dessert table on Valentine's Day! Thanks for linking up to Family Fun Friday! You have so many delicious & adorable ideas!

    Reply
  51. Juanita

    February 8, 2013 at 9:03 am

    Delicioso, muchas gracias por compartir.
    un abrazo desde Copenhague

    Reply
  52. crazyBFF

    February 8, 2013 at 2:46 am

    This looks wonderful! Definitely going to make them for my family.

    Just a quick question, is there any alternative to a water bath? I don't have a roasting pan with a tray that won't drown the cupcakes.

    Thank you!

    Reply
    • Beth Jackson Klosterboer

      February 8, 2013 at 2:58 am

      Thanks, I'm glad you like them.

      If you don't have a pan to use for the water bath, the next best thing is to add a baking tray filled with water on the rack below the cheesecakes. It isn't a perfect solution, but it will at least add moisture to your oven.

      Reply
  53. Vanessa (from BlogFrog)

    February 6, 2013 at 7:57 pm

    Wow wow wow! I'm so impressed.

    Reply
  54. Danielle R.

    February 6, 2013 at 2:19 pm

    First, these are absolutely adorable! I also agree with the cheesecake flavor/texture. I will say I was wholly unimpressed by a certain "Factory"'s cheesecake–especially for the price!! Anywho, I was thinking these would be perfect to send with hubby for his work's bake sale. Any suggestions on cute ways to package them so that they're manageable but also stay looking so pretty? Thanks in advance! (I was thinking maybe keep them in the mold and send them that way, then they could just be popped out as purchased?)

    Reply
    • Beth Jackson Klosterboer

      February 6, 2013 at 7:19 pm

      Hi Danielle,

      You can buy small bakery boxes from a restaurant supply store or from a craft store. I would not suggest sending them in the mold and having them popped out as purchased, as they really need to be frozen in order to come out really nicely. I've brought them places before and just put them in a Rubbermaid container, then used a spatula to lift them out of the container when I want to serve them.

      Reply
  55. Chanelle Caldron

    February 5, 2013 at 5:32 pm

    I have 3 small heart shaped springform pans…Would I follow the recipe the same way?

    Reply
    • Beth Jackson Klosterboer

      February 5, 2013 at 6:09 pm

      Yes, you can use heart shaped springform pans instead. There are a few things to consider. First make sure you wrap the bottom of each pan with a few layers of tin foil to keep the water from entering the pans. Second depending on the size of the pans, you'll need to watch how long you bake them. The total time will be different. A whole cake takes 45 minutes and the small heart cakes for 20-25 minutes, so you're cakes will take somewhere between 25-45 minutes. I hope this helps.

      Reply
  56. Chanelle Caldron

    February 5, 2013 at 5:31 pm

    I have 3 small heart shaped springform pans…Would I follow the recipe the same way?

    Reply
  57. Vicky @ Mess For Less

    February 1, 2013 at 9:19 pm

    Wow, 200 comments! This must be a popular post for you and for good reason. They are adorable. Just pinned!

    Reply
    • Beth Jackson Klosterboer

      February 1, 2013 at 11:02 pm

      Thanks Vicky. Yes, it is currently my most popular post ever. It is so nice to get so many amazing comments.

      Reply
  58. Michelle

    January 30, 2013 at 3:06 pm

    Hi,

    This might seem a bit random to you in terms of questions I ask, but just bare with me 🙂

    1. Is it possible for you to sell me the silicone moulds (heart-shaped) ones that you have, because i cant seem to find good ones online and in stores. And it would mean a lot to me if I could get my hands on them, because im planning something special and I require it. Please?

    In the recipe:

    2. when you say graham cracker crumbs, can I just use the biscuits that I normally use for cheesecakes? and can i have measurements in grams? because its easier for me to do things~

    3. how many grams is half a stick of butter?

    4. my oven doesnt go up to 300 degrees celcius…is there another temperature I could use that could work?

    5. what is the reason of having a water bath? because I've never made any cheesecakes with a water bath before.

    6. how do I change the cream cheese fillings into fruit purees? Because won't the purees be heavier than the cream cheese filling?

    Have a good day.
    Michelle

    Reply
    • Beth Jackson Klosterboer

      January 30, 2013 at 3:10 pm

      1. You can buy the same silicone molds that I purchased from Amazon.com. They are made by Wilton and they work great. Click here and you'll go directly to the product page.

      2. You can use any type of biscuit or cookie for the crust.

      3. 1/2 stick of butter is 56.7 grams

      4.The oven temperature is 300 degrees fahrenheit or 148.889 in celcius

      5. Water baths help bake the cheesecake more evenly, so the finished cake is creamy and smooth. You can bake these cheesecakes without a water bath, but there is the possibility that the tops of your cakes will become uneven and bumpy and even crack.

      6. If you use fruit purees instead of cream cheese you will be making a completely different recipe. You might want to try making a fruit mousse.

      Hope this helps.

      Good luck and Happy Valentine's Day,

      Reply
  59. Meg Hodson

    January 29, 2013 at 5:37 pm

    Hi. I am your newest follower via GFC and Twitter.

    I would love to have you as a guest blogger; I am dropping you an email shortly.

    Thanks so much!

    http://www.happykidsinc.blogspot.com

    Reply
    • MERY BADALYAN

      January 30, 2013 at 1:16 am

      PRIVET DOROGAYA BET…MNE OCHEN PONRAVILOS..SPASIBO.SKAJI POJALUSTA GRADUS DUXOVKI SKOLKO

      Reply
  60. Krista

    January 28, 2013 at 10:25 pm

    I just tried out this recipe and the cakes were absolutely delicious! However, the tops turned out uneven and unsuitable for writing on. Would you have any suggestions on how I could achieve perfect tops like the ones in your photos? Thanks, Beth!

    Reply
    • Beth Jackson Klosterboer

      January 28, 2013 at 10:45 pm

      Hi Krista,

      Sorry you had trouble with the tops of the cakes. The only reason I can think of that would cause this problem is if the cakes got too hot or were over baked. If you use a water bath the cakes should bake really evenly. Without the water bath they can rise in the middle and even crack.

      Reply
    • Krista

      January 28, 2013 at 10:49 pm

      That sounds a lot like what happened. Hmm, perhaps I didn't fill the roasting pan with enough water. I'll have to try again and see! Thank you!

      Reply
    • Beth Jackson Klosterboer

      January 28, 2013 at 11:57 pm

      That is quite possibly the issue. I'm glad I could help. Good luck if you try again.

      Reply
  61. Wanda Ann Olsen

    January 28, 2013 at 12:24 am

    Beth,
    I am so impressed, Wow, these look yummy and cute and your pictures are great. I pinned and pinned and shared on goodle+. I would love for you to share on my link party Tuesday at http://www.memoriesbythemile.com
    Have a beautiful week. By the way I am a new follower and can't wait to follow you.
    Wanda Ann @ Memories by the Mile

    Reply
  62. Designed Decor

    January 27, 2013 at 1:01 pm

    Amen, to your words on Cheesecake. I too am VERY picky about my chessescake, if it does not meet my standards, I give it to my husband. My grandmother made the best cheesecake, which set my standards. I have her recipe and everyone raves about it! I love your hearts and I am going to make these for V-day! I just started a new link party and would love for you to come over and share your post or any social media sites. Talkin’ About Thursday – http://designeddecor.com/talkin-about-thursday-link-party4/
    DeDe@DesignedDecor

    Reply
  63. CarolH

    January 26, 2013 at 1:53 pm

    Martha Stewart just repinned this! That's cool

    Reply
    • Beth Jackson Klosterboer

      January 26, 2013 at 2:01 pm

      OMG!!!!!!!!!!!!!!!!! That is so cool. Thank you so much for letting me know:) How did you know? Does she follow you?

      Reply
    • CarolH

      January 28, 2013 at 4:31 pm

      Hi! Well I almost fell over when I read your email today. You made my day!!!!! I just saw it on Pinterest randomly. No Martha does not follow lil ole me. You're an awesome talent and its fun to watch your star rise.

      Reply
  64. Michelle @ yagottahaveahobby

    January 26, 2013 at 1:17 am

    I'm obsessed with anything Conversation Hearts themed, so naturally, this is right up my alley! I love them. They look delicious!

    Reply
  65. Jasmine Ford

    January 23, 2013 at 12:17 am

    Could I use a recipe that I am familiar with and this still work? Love the idea btw, thanks! (:

    Reply
    • Beth Jackson Klosterboer

      January 23, 2013 at 1:58 pm

      I think most any cheesecake recipe that you like should work just fine.

      Reply
    • Jasmine Ford

      January 23, 2013 at 4:27 pm

      Thanks, you're the best! Definitely doing this for Valentine's day

      Reply
  66. Lau Lotte

    January 22, 2013 at 12:44 pm

    Ho ! It's so beautiful ! Wonderful ! I will try it soon ! 😀

    Reply
  67. Anonymous

    January 21, 2013 at 4:56 pm

    Sorry if my comment is going through twice–couldn't remember my google password, so not sure if it went through. Anyway, I would LOVE to make this recipe but I do not have a hand held mixer or a roasting pan (college life haha). could i hand mix the ingredients? and would a casserole dish be ok instead of a roasting pan? Thanks so much!

    Reply
    • Beth Jackson Klosterboer

      January 21, 2013 at 5:48 pm

      You can certainly make this recipe using just a mixing spoon or spatula, just be sure that the cream cheese and sugar are very well blended so you don't end up with lumps in your cheesecakes once you add the other ingredients. Any pan that will hold water and is larger than the silicone mold will work as well as a roasting pag. A cake pan or casserole dish will work just fine. Good luck with your cakes and have fun decorating them!

      Reply
  68. Anonymous

    January 18, 2013 at 5:44 am

    Do you have any high altitude changes?

    Reply
    • Beth Jackson Klosterboer

      January 18, 2013 at 1:53 pm

      I have never had to cook and use high altitude adjustments, but I found a website that seems to have a lot of good information. http://www.highaltitudebaking.com/

      Reply
  69. Kaylee Elizabeth

    January 17, 2013 at 7:37 pm

    What if I wanted to make a cookie dough cheesecake? Could I just put cookie dough in the pans?

    Reply
    • Beth Jackson Klosterboer

      January 17, 2013 at 9:11 pm

      Hi Kaylee, I've not ever made cookie dough cheesecake, but you can bake anything in the silicone molds including cookies and cakes. If you want to have a cookie dough crust, just press the dough into the pan and bake as you would in your recipe. If you want the cookie dough to be uncooked, I really don't know how you would add it unless you make a no-bake cheesecake. If you do that, just freeze your no-bake cheesecake then you'll be able to push them out of the silicone molds.

      Reply
  70. Taneith Lanyon

    January 17, 2013 at 1:36 am

    hi there
    i'm a new follower to your blog and i must say these little guys are adorable. what a gorgeous, clever idea.
    Happy Thursday
    xxxx

    Reply
    • Beth Jackson Klosterboer

      January 17, 2013 at 1:47 am

      Welcome, Taneith. I'm glad you have found my blog and like the cheesecakes:)

      Reply
  71. Nikole Lewis

    January 5, 2013 at 6:50 pm

    Love this cute idea. I want to do this for my fiance. Im going to make a box and make it look like the sweatheart box to put them in. What size mold did you use? 6'-8'

    Reply
    • Beth Jackson Klosterboer

      January 5, 2013 at 7:03 pm

      Sounds like a great idea. The Wilton silicone mold I used for this project has 6 heart shaped cavities and they are only about 3" wide. They make individual size cheesecakes, which is really nice. You could use a heart shaped springform pan, if you prefer, you just will have fewer hearts of various colors.

      Reply
  72. Nikole Lewis

    January 5, 2013 at 6:49 pm

    This is such a cute idea, i want to do this for my fiance. Im going to take a box and made it look like the sweatheart box to put them in. What size mold did you use? 6'- 8'

    Reply
  73. Anonymous

    December 21, 2012 at 7:40 am

    This is such a cute idea! Would it work with a cake mix?

    Reply
    • Beth Jackson Klosterboer

      December 21, 2012 at 4:09 pm

      You could certainly bake cakes in the heart shaped silicone molds, You would just have to write the conversation heart phrases on with frosting, chocolate, or perhaps the food coloring, but I'm not sure how that would work. If you give it a try, I'd love to see a picture!

      Reply
    • Anonymous

      December 21, 2012 at 8:03 pm

      I think little hershey kisses or chocolate chips would be awesome for putting the phrases! Is there something else i could use other than the heart shaped silicone molds?

      Reply
    • Beth Jackson Klosterboer

      December 21, 2012 at 8:40 pm

      There are metal heart shaped cake pans you could use.

      Reply
  74. Anonymous

    July 1, 2012 at 1:19 am

    Hi! I am in the process of making these for the second time. I love them! They are so easy and delicious! I was always scared to attempt cheesecake before- but I absolutely love this recipe and will use it again and again! Love your website too! Thanks!

    Reply
    • Beth Jackson Klosterboer

      July 1, 2012 at 1:46 am

      I'm so happy to hear that! Enjoy making and eating your cheesecakes.

      Reply
  75. Raspbreeze

    May 5, 2012 at 3:48 am

    Hi, I've been trying to find a cheesecake idea that will really work for the mother's day brunch I'm planning, and these are just too adorable.
    I can't wait to make them
    I do however have one question, What is the appropriate cooking time if i were to make a dozen mini hearts rather than these medium sized ones?
    Please do let me know as soon as possible
    Thanks 🙂

    Reply
    • Beth Jackson Klosterboer

      May 5, 2012 at 12:17 pm

      I used a mini heart shaped silicone ice cube tray to make my small cheesecakes and baked them for about 15 minutes. I'd set the timer for 12 minutes and check on them.

      Reply
  76. Aida Sofía Barba Flores

    April 28, 2012 at 7:22 pm

    I will do this recipe today! why the recipe says we should bake them with some water? is it for a better cheesecake texture? or maybe it's the perfect way to bake cheesecakes.

    Reply
    • Beth Jackson Klosterboer

      April 28, 2012 at 10:37 pm

      Hi Aida, yes baking cheesecakes in a water bath helps the cakes bake evenly creating a really creamy texture throughout the entire cake. Being these are small cheesecakes, you could skip the water bath, but the edges will cook faster than the center.

      Reply
  77. Aida Sofía Barba Flores

    April 28, 2012 at 7:21 pm

    I will do this recipe today! why the recipe says we should bake them with some water? is it for a better cheesecake texture? or maybe it's the perfect way to bake cheesecakes.

    Reply
  78. jmwhite60

    March 26, 2012 at 12:17 am

    Absolutely adorable! Wish I'd seen them in time for Valentine's Day, but I'll be sure to try them next year!!

    Reply
  79. annenime

    February 29, 2012 at 6:18 am

    your idea started me on baking cheesecake hearts. its amazing 🙂 have yet to try the actual conversation hearts though, but will do so, when i get a hand on cheap food coloring stocks.

    i have the very same molds and would like to ask you the following:

    1. does the cinnamon stick to your molds? i have a problem taking the cinnamon smell off the molds. do you have a trick to clean it?

    2. waterstains: got lazy on drying one of the mold, and now, i have waterstains. do you know of a way to take them out?

    i hope you could help out. im planning to buy another set of silicone heart molds to be able to bake bigger batches, and i dunno if its an investment, or if im just throwing money away on inferior bakeware?

    thank you!
    anne nime

    Reply
    • Beth Jackson Klosterboer

      February 29, 2012 at 12:12 pm

      Hi Anne,

      I'm glad you've enjoyed making the cheesecake hearts.

      I have not used cinnamon directly on any of my molds but there is some cinnamon in the cheesecake crust. I haven't noticed that my molds smell of cinnamon nor have I ever had anything really stick to these molds. If your molds smell like cinnamon, you could try a few things to get rid of the smell. You could make a paste out of baking soda and water and scrub the mold with it, allow it to dry, then wash it off. If that doesn't work you could try rubbing the inside of the mold with lemon juice or perhaps some diluted bleach. I don't know if either will work, but they might be worth a try.

      As far as the water stains go, I do experience this all the time. Just take a damp paper towel and wipe them off or rewash them just before you plan to use them. The stains aren't permanent. I can wash my molds and they will look perfectly fine, then I store them and after time they get a white film on them, so I just always plan to wipe them clean before use.

      I just bought a shamrock mold and a bunny mold. I think they are great molds and have quite a collection.

      Reply
  80. Anonymous

    February 26, 2012 at 6:02 am

    I made this recipe tonight and it turned out beautifully! I only wished that I had a roasting pan with the handles like yours has. Mine worked fine though–just had to be extra careful. Thanks for sharing!! I also linked this page on my personal xanga page. Take care!

    Reply
    • Beth Jackson Klosterboer

      February 26, 2012 at 1:04 pm

      I'm happy to hear they turned out well for you. When I made these hearts and was pulling out my roasting pan, I went to take out the rack and realized it would work perfectly to hold the wiggly molds. As you found it isn't necessary, but it is nice to have. Thanks for linking this recipes on your xanga page (what is that by the way?)

      Reply
  81. Anonymous

    February 17, 2012 at 11:19 pm

    Can I make the batter and leave it in the fridge for a few hours? I want to make the hearts but I only have one pan. Would the batter be okay while the first pan bakes, cools and freezes? or could I half the recipe?

    Reply
    • Beth Jackson Klosterboer

      February 18, 2012 at 1:22 am

      I would think you could refrigerate the batter. I think you'd have to bake it a few minutes longer as it will be cold going into the oven so it will take longer to heat up.

      Reply
  82. Caitlin

    February 16, 2012 at 11:31 pm

    These are the best ideas ever! My valentine and I are celebrating Saturday and the only molds I've been able to find are small metal ones – do you think if I smoothly lined them with buttered foil and froze them, I'd be able to lift them out alright?

    Reply
    • Beth Jackson Klosterboer

      February 16, 2012 at 11:50 pm

      Thank you Caitlin. I think you could get it to work. If you can find non-stick foil, that might work best, but buttered foil should work too. Once you remove the hearts from the pan, you can even use a knife or metal spatula to smooth out the sides of the cheesecakes. Just dip the spatula in hot water, dab with a paper towel, and run along the edges of the cakes. Good luck and let me know how they turn out for you.

      Reply
  83. Lady With the Red Rocker

    February 16, 2012 at 4:17 am

    Beth, these are the cutest cheesecakes… EVER!!! I also have paid big bucks for a piece of cheesecake only to be disappointed. I feel your pain! 😀 I am pinning this! Thanks for sharing! 😀

    Stephanie Hill @ Ladywiththeredrocker.com

    Reply
    • Beth Jackson Klosterboer

      February 16, 2012 at 3:45 pm

      Thank you Stephanie and thanks for the pin!

      Reply
  84. Jessica G.

    February 16, 2012 at 4:00 am

    I made these yesterday and really knocked the socks off my dinner guests! Thank you thank you thank you for all the tips and your fabulous tutorial! I'm totally going to web-stalk you now. 🙂

    Reply
  85. Anonymous

    February 14, 2012 at 7:16 pm

    Thanks for the tutorial, I just saw today, now I have to go buy the molds and try it. What a great idea.

    Reply
  86. Keisha - Cupcake Wishes & Birthday Dreams

    February 14, 2012 at 6:05 pm

    WOW! This is by far the smartest thing ever! I am sooo pinning it!

    Reply
  87. Natural-Nesters

    February 14, 2012 at 2:23 pm

    Hey we love your conversation heart cheesecakes so much that we featured you on our favorites for this week! Come by and check it out and link up again! O and grab a button while you are there!

    http://natural-nester.blogspot.com/2012/02/naturally-nifty-linky-party-2-features.html

    Reply
    • Beth Jackson Klosterboer

      February 14, 2012 at 2:49 pm

      Thank you for the feature. I'm so happy you like the cheesecakes.

      Reply
    • Natural-Nesters

      February 14, 2012 at 3:00 pm

      Beth,
      Sorry you had trouble getting the button to your blog. I found the problem and it should be fixed now. Please try again! Thanks so much!

      Reply
    • Beth Jackson Klosterboer

      February 14, 2012 at 3:34 pm

      It's working now. I added the button to my Featured On page.

      Reply
  88. Life In The Thrifty Lane

    February 14, 2012 at 4:35 am

    This is genius!!! So pretty!! Wish my hubby would give me one of those instead of a plant!!! Visiting from I SHould Be Mopping The Floor. Pinning this!!!!

    Reply
  89. Linsey @ Credit Sesame

    February 13, 2012 at 10:02 pm

    Adorable! We featured in our on Facebook page and also in today's roundup. Thanks for making us hungry 😉

    http://www.creditsesame.com/blog/this-week-in-money-management-valentines-tips-too-sweet-not-to-share/

    Reply
    • Beth Jackson Klosterboer

      February 13, 2012 at 10:12 pm

      Thanks so much Linsey. I really appreciate you sharing this with your readers.

      Reply
  90. Desi

    February 13, 2012 at 9:24 pm

    Absolutely adorable! Pinned this to my Valentine's board!

    Reply
    • Beth Jackson Klosterboer

      February 13, 2012 at 10:12 pm

      Thanks for the pin Desi.

      Reply
  91. Susan @ Oh My! Creative

    February 13, 2012 at 8:24 pm

    Wanted to let you know I featured your dessert in a Valentine's Sweets post today. I would love if you stopped by and grab a button! I also would love for you to join the creative community and post this and other creative things you do!

    Susan,
    http://www.ohmy-creative.com/
    A community to Create – Share – Inspire

    Reply
    • Beth Jackson Klosterboer

      February 13, 2012 at 10:13 pm

      Thank so much for the feature, Susan. I added a button to my Featured On page and will be sure to check out your creative community.

      Reply
  92. Anna

    February 13, 2012 at 4:44 am

    Wow! These look amazing. I think it would be a bit overambitious for me to try these but maybe one day 😉

    Reply
  93. Jo and Sue

    February 13, 2012 at 3:48 am

    Sue and I gave these a go for Valentine's dinner. We made them with a no-bake cheesecake though – we don't have the bendy pans and were afraid we wouldn't be able to get them out of our metal pans! They looks so cute. Thank yo for another great idea! (http://joandsue.blogspot.com/2012/02/valentines-food-ideas.html)

    Reply
    • Beth Jackson Klosterboer

      February 13, 2012 at 1:44 pm

      Your no-bake cheesecakes look great. Yeah, I don't think you'd have been able to get the cheesecakes out of a metal pan, so it was a good idea to do it the way you did. How did you get the words on the cakes? Did painting with food coloring work? I posted pictures in my Reader's Gallery. Thanks so much for sharing. I would love to be invited to one of your holiday dinners. You two look like you have so much fun in the kitchen together. I'm sure your guests have a ball at your parties.

      Reply
    • Jo and Sue

      February 13, 2012 at 2:10 pm

      We did do the painting with food coloring and it worked great. We just had to wipe off the paintbrush between letters as the soft cheesecake goo tended to accumulate on the brush fairly quickly. We used a flat, fairly stiff, small brush and gently dabbed it, like connect-the-dots. We have so much fun putting together holiday dinners 🙂 Thank you for inspiring us with your fantastic ideas. Your step-by-step instructions make everything seem more "do-able". (Oh, and we would love to have you at any of our dinners. Anytime you are in Lillooet lol!) 🙂

      Reply
  94. Kristi

    February 13, 2012 at 12:18 am

    Beth, I just can't quit thinking of all of the adorableness of these. I featured you on this week's Mop It Up Mondays: http://www.ishouldbemoppingthefloor.com/2012/02/mop-it-up-mondays-3.html.

    Feel free to stop by and link up some more fabulousness if you get a chance!
    {HUGS},
    kristi

    Reply
    • Beth Jackson Klosterboer

      February 13, 2012 at 12:23 am

      Thanks for the feature Kristi. I'll be sure to stop by and link up my new recipes.

      Reply
  95. eaguerin

    February 12, 2012 at 2:20 am

    Im using a springform pan and was trying to use a roasting pan but water fills into the pans. Is there something different I can do?

    Reply
    • Beth Jackson Klosterboer

      February 12, 2012 at 2:52 am

      Sorry I didn't respond sooner, I was out for the evening. If you are using a springform pan, you need to wrap the bottom of it with a few layers of tin foil to keep the water from entering the pan or set it in a pan that is just a bit bigger than the springform pan itself and set that bigger pan down into the water. I have even had success putting the pan of water in the oven on a rack below my cheesecake. I hope it worked out for you.

      Reply
  96. hankerie

    February 12, 2012 at 12:47 am

    Wow, this is so fabulous!
    http://hankerie.blogspot.com

    Reply
  97. MrsAndrado

    February 12, 2012 at 12:09 am

    THESE ARE AWESOME! Will attempt to make them 😀
    Also any ideas on what I could do if I don't have a roasting pan??

    Reply
    • Beth Jackson Klosterboer

      February 12, 2012 at 3:04 am

      Thank you. If you have a 9"x13" casserole pan, you can set one of the heart molds down into it. You'll have to bake just one heart mold at a time that way, but that is fine. You can also set a baking sheet on the lowest rack in the oven and fill it with water then set the heart molds on the shelf above it. It's not a perfect option, but it will allow steam to fill the oven which will help the cakes bake without drying out.

      Reply
  98. Andrea

    February 11, 2012 at 8:09 pm

    Absolutely love these! They look just perfect, great job. Your site is really cute (following now); I'm looking forward to looking around it more.

    www.mycakecorner.blogspot.com

    Reply
  99. Beth Jackson Klosterboer

    February 11, 2012 at 4:23 pm

    I'm so happy to hear they turned out so well for you. Yeah, it is much easier to un-mold them if they are really frozen. You can even leave them in the freezer overnight or longer. I made my hearts pretty bright so they'd show up nicely in pictures, but I agree with you that you don't really need to add much food coloring in order to get nice pastel hearts. If you took pictures and would like to share them in my Reader's Gallery, send them to beth@hungryhappenings.com

    Reply
  100. Anonymous

    February 11, 2012 at 4:03 pm

    I made these yesterday and they turned out great. you definitely need to leave them in the freezer for the full two hours! also, you don't need much food coloring. thanks fir the great idea…I'm sure everyone will love them.

    Reply
  101. Brandi

    February 11, 2012 at 4:55 am

    Love your blog! I fancy myself a baker and I can't wait to try your recipes! I adore cheesecake so I am tackling the conversation hearts this weekend!

    Reply
    • Beth Jackson Klosterboer

      February 11, 2012 at 2:24 pm

      Thanks Brandi. Have fun in the kitchen this weekend and be sure to snap some photos. I'd love to share them in my Reader's Gallery. Enjoy.

      Reply
  102. eaguerin

    February 11, 2012 at 2:04 am

    How long would you cook this if you were making one big cheescake in a springform pan? Can't wait to try!

    Reply
    • Beth Jackson Klosterboer

      February 11, 2012 at 2:44 am

      You'll want to bake a whole cheesecake for about 45 minutes. Just make sure to double the crust ingredients for a whole cake. Enjoy!

      Reply
  103. Michelle

    February 11, 2012 at 12:09 am

    Oh my this recipes looks divine! And these are sooooo cute that I just had to feature you today in my favourite Valentines Days Crafts post.
    http://michellescraft.blogspot.com.au/2012/02/favourite-valentines-crafts.html
    thanks so much for sharing the recipe

    Reply
    • Beth Jackson Klosterboer

      February 11, 2012 at 3:10 am

      Thanks Michelle. I appreciate being including in your list of Valentine's Day favorites.

      Reply
  104. Amy

    February 10, 2012 at 11:50 pm

    absolutely so cute & romantic….would love if you link with Decorating Challenge-Valentine’s day Ideas

    Reply
    • Beth Jackson Klosterboer

      February 11, 2012 at 12:43 am

      Just linked up. Thanks for the invite.

      Reply
    • Amy

      February 13, 2012 at 9:06 am

      Thanks for linking with my event….Now I cant wait until I try them.They are so cute….

      Reply
  105. Lindsi B

    February 10, 2012 at 11:47 pm

    oh yuuuuuuuuuuuuuuuuuuuuuuuuuuum!I love this! So cute! I saw this on Skip to My Lou I would love it if you would share this with our readers too for Fun Stuff Fridays! http://www.toysinthedryer.com/2012/02/14-days-of-valentines-fun-stuff-fridays_10.html

    Reply
    • Beth Jackson Klosterboer

      February 11, 2012 at 12:44 am

      Ooops, thought I had done that last Friday. Well, I did it just now and added my newest recipe for Fudgy Peanut Butter and Chocolate Hearts too.

      Reply
  106. Teena Mary

    February 10, 2012 at 11:09 pm

    OMG! they look so cute & amazing! Loved the colours & the perfection:) If you are willing, you can link this with my ongoing-''Valentine's Day Event''(till Feb 20th)
    So glad to follow you!!

    Reply
    • Beth Jackson Klosterboer

      February 11, 2012 at 12:46 am

      Thanks Teena. If you want to grab a picture and link, you can add it to your event or let me know and I'll send it to your e-mail.

      Reply
    • Teena Mary

      February 12, 2012 at 7:27 am

      Oh thank you so much! In that case, i'll link it myself. You don't need to mail me. I'll e-mail you once i post the round-up 🙂 Could i link few of your other Valentine treats too? Coz everything is absolutely gorgeous!

      Reply
    • Beth Jackson Klosterboer

      February 12, 2012 at 1:58 pm

      Absolutely. Thanks for sharing my recipes with your readers.

      Reply
    • Teena Mary

      February 23, 2012 at 10:35 pm

      Thanks a ton Beth! I'll email you once i post the roundup 🙂 Have a great day!

      Reply
  107. Kristy Lynn

    February 10, 2012 at 9:52 pm

    dude. these. are. awesome.

    ….people think they're posting valentines day recipes??? holds nothing compared to this. THIS is a valentines day recipe. Well done!

    Reply
    • Beth Jackson Klosterboer

      February 11, 2012 at 12:46 am

      Wow, thanks. What a great compliment:)

      Reply
  108. Susie

    February 10, 2012 at 9:36 pm

    Love this! I saw heart-shaped molds in my local Target the other day, btw. Thanks for sharing this great idea.

    Reply
    • Beth Jackson Klosterboer

      February 11, 2012 at 12:48 am

      Thanks for letting us know about the molds Susie. I appreciate it. I haven't been out shopping at all for Valentine's Day but figured Target might have something that would work – you can always count on them!

      Reply
  109. Anonymous

    February 10, 2012 at 5:54 pm

    These look amazing. Do you know of anywhere I can find the heart molds? Like in a store? maybe walmart? I would rather not buy online and pay for shipping.

    Reply
    • Beth Jackson Klosterboer

      February 10, 2012 at 8:29 pm

      Thanks! You can usually find these molds at Michael's, JoAnn Fabrics, Hobby Lobby, and other craft stores. I wouldn't doubt that Target or Walmart has them or something similar in stock for Valentine's Day. If you find them somewhere else, let me know so I can share it with everyone.

      Reply
    • Beth Jackson Klosterboer

      February 11, 2012 at 12:48 am

      Another reader just posted that she found some molds at Target.

      Reply
  110. Natural-Nesters

    February 10, 2012 at 3:18 pm

    These are AMAZING!!!! Will you link up over at our party? You may be featured next week!! Thanks
    http://natural-nester.blogspot.com/2012/02/naturally-nifty-party-1.html#idc-container

    -Your Newest Follower

    Reply
    • Beth Jackson Klosterboer

      February 10, 2012 at 3:40 pm

      Thank you and welcome to my blog. I linked up at your party and added your button to my Featured On page.

      Reply
  111. Brooke

    February 10, 2012 at 3:08 pm

    These are so incredibly cute! I am so glad that I saw these before Valentine's day! I am definitely making them this weekend! Thanks for the awesome idea! =)

    Reply
    • Beth Jackson Klosterboer

      February 10, 2012 at 3:33 pm

      Thank you and have fun making your cheesecakes. Be sure to snap some pictures and send them to me at beth@hungryhappenings.com so I can share them in my Reader's Gallery.

      Reply
  112. Diana - FreeStyleMama

    February 10, 2012 at 2:21 pm

    Those are absolutely adorable!

    Reply
  113. JavelinWarrior

    February 10, 2012 at 1:45 pm

    Your conversation cheesecakes are incredible! I've never seen this done before and that's a real shame because I LOVE cheesecake… I have featured this post in today's Friday Food Fetish roundup. Let me know if you have any objections and thanks for the inspiration

    Reply
    • Beth Jackson Klosterboer

      February 10, 2012 at 3:32 pm

      Of course, I am very please that you featured this recipe on your Friday Food Fetish. Thank you! I'm glad you like them.

      Reply
  114. Beth (www.livinglifeintentionally.blogspot.com)

    February 10, 2012 at 11:12 am

    Beth, I LOVED these SO much I featured them at TGIF this week (http://livinglifeintentionally.blogspot.com/2012/02/tgif-linky-party-16.html) – Come stop on by and link up what you've been up to this week. Thanks for sharing your creativity with all of us!! (By the way this has been being repinned like CRAZY on my Pinterest page =-)
    Beth =-)

    Reply
    • Beth Jackson Klosterboer

      February 10, 2012 at 12:42 pm

      Thank you so much Beth. I really appreciate being featured. This recipe has turned out to be my most popular one to date, by a huge margin. I am shocked and excited to see how many people have stopped by my blog to see the tutorial. I'll be sure to link up on your site.

      Reply
  115. pixelhazard

    February 10, 2012 at 10:14 am

    This is fantastic! I am absolutely trying this!

    Bright Green Laces

    Reply
    • Beth Jackson Klosterboer

      February 10, 2012 at 12:44 pm

      So glad to hear it. I'd love to share pictures of your cheesecakes in my Reader's Gallery if you want to send them to beth@hungryhappenings.com.

      Reply
  116. Yvonne

    February 8, 2012 at 8:45 pm

    These are the cutest cheesecakes I have ever seen! I LOVE cheesecakes and can't wait to try a new recipe! Looking forward to making these for my hubby and 3 kiddos for Valentines Day! Thank you so much for this awesome idea!

    Reply
    • Beth Jackson Klosterboer

      February 8, 2012 at 9:18 pm

      Thanks Yvonne. I'd love to share pictures of your cheesecakes in my Reader's Gallery if you snap a few. I hope your family enjoys their sweet Valentine's Day treat.

      Reply
  117. Trish - Mom On Timeout

    February 8, 2012 at 8:04 pm

    Thanks so much for sharing these amazing recipe at Taking A Timeout Thursday! I've had this repinned so many times….Just wanted to let you know that you are being featured this week! Thank you for the inspiration 🙂

    Reply
    • Beth Jackson Klosterboer

      February 8, 2012 at 9:19 pm

      Thanks so much for the feature Trish. I hope your readers enjoy them too.

      Reply
  118. Vere Perez

    February 8, 2012 at 6:57 pm

    Soo cool! I have similar molds and I have been saving them for a special recipe, well I my search is over.

    Reply
    • Beth Jackson Klosterboer

      February 8, 2012 at 9:19 pm

      The silicone molds are perfect for this and I hope you enjoy making them. Thanks Vere.

      Reply
  119. Brandi

    February 8, 2012 at 3:49 pm

    I love it! Such a creative and unique idea! I love your mini cheesecakes!

    Reply
  120. OneMommy

    February 8, 2012 at 2:58 pm

    Those are pretty cute! Makes me think I should go find some heart cupcake molds!

    Reply
  121. Carrie

    February 8, 2012 at 2:58 am

    Unbelievable!! This are perfectly amazing! I have never attempted a normal cheesecake much less something so fabulous…GREAT JOB!

    Reply
  122. Maria

    February 7, 2012 at 11:15 pm

    Wow these are absolutely amazing! I've never seen anything like this, and how perfect for Valentine's Day! These look like they came straight from a page from a magazine! AMAZING!!!!

    Reply
    • Beth Jackson Klosterboer

      February 7, 2012 at 11:35 pm

      Wow, right back at ya. What an amazingly nice comment. My dream would be to have one of my edible craft recipes in the pages of a magazine. Someday, perhaps.

      Reply
  123. Julie @White Lights on Wednesday

    February 7, 2012 at 2:48 pm

    This is such a cool idea. I LOVE cheesecake. It's nice to see a different way to do conversation hearts that aren't cookies or cupcakes. A big thumbs up!

    Reply
    • Beth Jackson Klosterboer

      February 7, 2012 at 5:54 pm

      Thanks for the thumbs up. I try hard to not do the same thing everyone else is doing and appreciate you noticing.

      Reply
  124. terriavidreader (IN-USA)

    February 7, 2012 at 2:38 pm

    This is so cute, I'd love to do it, but my boys and hubby would have a hissy fit if I changed my recipe after all these years. they won't allow it. I tried a few times mixing things up a little with different flavors, etc., and they wouldn't eat it. Same with my deviled eggs – only the old way will work.

    Reply
    • Beth Jackson Klosterboer

      February 7, 2012 at 5:52 pm

      Hey, I'm with them, when you find a recipe you like, stick with it. Just use your cheesecake recipe for this project and I'm sure they'll love it. I'm picky about deviled eggs too, so I totally understand!

      Reply
  125. 4you-withlove

    February 7, 2012 at 1:34 pm

    This is AWESOME…my guys LOVE cheesecake!!! Were they hard to get out of the molds?

    Reply
    • Beth Jackson Klosterboer

      February 7, 2012 at 1:55 pm

      Thank you and no, the cheesecakes were not difficult to get out of the mold because I froze them for a few hours. They really pop right out when you turn the silicone mold inside out. If you don't freeze them, you'll still be able to get them out, they just might not come out as perfectly.

      Reply
  126. von Hand zu Hand

    February 7, 2012 at 8:53 am

    oh that's such a lovely idea! i often color dought but i've never baked a colored cheesecake!
    i love it!

    I linked to your recipe on my blog – thanks for sharing!

    doro K.

    Reply
    • Beth Jackson Klosterboer

      February 7, 2012 at 2:24 pm

      Danke Doro,

      Thank you for featuring my Conversation Heart Cheesecakes on your blog. Some of your readers have stopped by already.

      Reply
  127. Beth Jackson Klosterboer

    February 7, 2012 at 4:32 am

    Wow, so many nice comments. Thank you so much for visiting my site and taking time to comment. It's amazing to see so many new people stopping by to check out these cheesecakes.

    Reply
  128. Russell at Chasing Delicious

    February 7, 2012 at 4:31 am

    These are the cutest things I've seen for valentines day yet. Love 'em!

    Reply
  129. Anonymous

    February 7, 2012 at 3:03 am

    I really want to make these. Is there something else I could use instead of a roasting pan? Or suggestions of where to buy one that is super expensive?

    Reply
    • Beth Jackson Klosterboer

      February 7, 2012 at 4:22 am

      You just need a pan that is big enough to fit at least one of your heart shaped silicone molds. A 9"x13" casserole dish will work fine. If you don't have one of those, you can buy a tin foil roasting pan for a few dollars. You don't absolutely need to bake the cheesecakes in a water bath, but there are two reasons it's better to do so: the texture of your cheesecake will be creamier and the top of the cheesecake wont crack.

      Reply
    • Alejandra Godoy

      May 12, 2014 at 6:04 am

      I just baked this without the water bath and it turned out just fine. I did one big hearth cheesecake for my boyfriend and he absolutely loved it! thank you very much for the recipe!

      Reply
    • Alejandra Godoy

      May 12, 2014 at 6:05 am

      I just baked this without the water bath and it turned out just fine. I baked one big hearth cheesecake for my boyfriend and he absolutely loved it! Thank you for this amazing recipe and idea!

      Reply
  130. Jill @ KitchenFunWithMy3Sons.com

    February 7, 2012 at 2:21 am

    These little cheesecakes are lovely Beth! You are such a perfectionist..love it! I even had to pin these. By the way…we are hosting our first Kitchen Fun and Crafty link party this Friday (the 10th) and would love for you to share this and everything else you make! Feel free to stop by and grab a party button if you would like! http://kitchenfunwithmy3sons.blogspot.com/

    Reply
    • Beth Jackson Klosterboer

      February 7, 2012 at 4:25 am

      Oh Jill, you are so right. I am a total perfectionist. I spent a few hours this afternoon working on my next Valentine's Day recipe, but wasn't totally happy so I'm re-doing it again tomorrow. I'll be sure to stop by your linky party on Friday.

      Reply
  131. Connie @ Daydream In Color

    February 7, 2012 at 1:48 am

    These are so adorable I can't stand it!

    Reply
    • Beth Jackson Klosterboer

      February 7, 2012 at 4:26 am

      Thanks Connie. I love the name of your blog!

      Reply
  132. Kristi

    February 6, 2012 at 11:53 pm

    These are show stoppers, Beth. I appreciate the time you put into the fabulous tutorial (I know that's time consuming…but appreciated!). They are just beautiful. Would be delighted for you to link this up (as well as any other fun things you've been working on) at this week's Mop It Up Mondays: http://www.ishouldbemoppingthefloor.com/2012/02/mop-it-up-mondays-party-2.html
    {HUGS},
    kristi

    Reply
    • Beth Jackson Klosterboer

      February 7, 2012 at 4:27 am

      Thanks so much Kristi. It's nice to hear how much my effort is appreciated. I spend more time than I ever imagined I would on my tutorials, but I love it. I linked up on your site and grabbed your button and added it to my Featured On/Linky page.

      Reply
  133. Heather

    February 6, 2012 at 10:28 pm

    What a great idea, and what a good use for the heart shaped pan!

    Reply
    • Beth Jackson Klosterboer

      February 7, 2012 at 4:28 am

      Thanks Heather. I've had those heart pans for years and this is my favorite use so far.

      Reply
  134. North of Wiarton & South of the Checkerboard

    February 6, 2012 at 5:36 pm

    Thanks for your recipe/method, these are so colourful and appealing. Shared your "link" to my recipe exchange on Facebook.

    Reply
    • Beth Jackson Klosterboer

      February 7, 2012 at 4:29 am

      Thanks for sharing with your friends:)

      Reply
  135. Natalie Dixon

    February 6, 2012 at 4:19 am

    Thanks so much for sharing! I'm seriously in love with these and just featured you in my wrap-up post! http://www.aturtleslifeforme.com/2012/02/sunday-spotlight.html

    Reply
    • Beth Jackson Klosterboer

      February 7, 2012 at 4:30 am

      I really appreciate being featured Natalie. Thanks!

      Reply
  136. Jamie

    February 6, 2012 at 1:58 am

    WOW! These are awesome! There are so many cheesecake possibilities with using different mold shapes! Love the colors!!!

    Reply
  137. Mandy

    February 5, 2012 at 11:34 pm

    This looks absolutely wonderful! I may attempt to make it for an upcoming Valentine's party and then I'll post pictures (and credit you, of course!) on my blog: welovefoodblog.com

    Reply
    • Beth Jackson Klosterboer

      February 6, 2012 at 12:20 am

      Thanks Mandy, I'd love to post your pictures in my Reader's Gallery along with a link to your blog. Have fun in the kitchen and enjoy your party.

      Reply
  138. Rachel @ Baked by Rachel

    February 5, 2012 at 7:55 pm

    I just saw these on foodgawker – adorable idea!

    Reply
  139. Jessica

    February 5, 2012 at 5:49 pm

    I love any and all things cheesecake, so Im definitely going to be making these! Pinning them now!

    Reply
  140. Made in Sonoma

    February 5, 2012 at 5:06 pm

    This is amazing! What a great idea!

    Reply
  141. Sayadi

    February 5, 2012 at 7:58 am

    i love ur page..u giv me idea to update my biz..thanks a lot.. 🙂

    Reply
  142. Dora

    February 5, 2012 at 6:31 am

    I just found this page by accident and am glad that I did. I love baking cheesecakes and can't wait to try these. My daughter is getting married on March 31 with just a few friends and family so I thought I would make one for each of the guests. I will try them out on others first though just in case mine don't turn out like yours. lol I can't wait to go and check out the rest of your page. Thanks once again.

    Reply
  143. CuteEverything.com

    February 5, 2012 at 6:05 am

    Pinned, of course!!!

    Reply
  144. The Wimpy Vegetarian

    February 5, 2012 at 6:00 am

    Just saw these on foodgawker – they are AMAZING! I love the silicone molds – they're so easy to work with, but have never used ones for cheesecake. Thanks for the freezing tip for getting them out. Love, love these.

    Reply
  145. CuteEverything.com

    February 5, 2012 at 5:59 am

    Wow, Beth, great job! Those turned out just fantastic! I love them, can't wait to try them. Thanks so much for the excellent idea!

    Reply
  146. kathy

    February 5, 2012 at 4:06 am

    genius!! love this!! great job with the colors.

    Reply
  147. ButterYum

    February 5, 2012 at 3:07 am

    PS – I use my BeaterBlade attachment in my KitchenAid to make cheesecake. No scraping of the bowl required. Love it!

    🙂
    ButterYum

    Reply
  148. ButterYum

    February 5, 2012 at 3:04 am

    Hi Beth – these are so darn cute! Love, love, love, love, love them!!! Fabulous photos too – so glad you documented the process for us. Will have to keep these in mind for the family – I make all kinds of cheeseake, but none as impressive as these little cuties.

    I'm off to check out more of your blog.

    🙂
    ButterYum

    Reply
  149. Sweet Tooth

    February 5, 2012 at 2:54 am

    Ohh what a wonderful idea! I love that roasting pan trick 😛

    Reply
  150. Carrie

    February 5, 2012 at 2:46 am

    Theses look delicious and adorable! Thank you so much for sharing at Sharing Saturday! We look forward to seeing what you will share next week.

    Reply
  151. Kathy

    February 5, 2012 at 2:17 am

    These are SO cute!! I would definitely make these for Valentines!
    You know…maybe buying that springform pan I saw today would've been a good idea!

    http://milk-and-tea.blogspot.com

    Reply
  152. Dorothy @ Crazy for Crust

    February 5, 2012 at 12:10 am

    Those are awesome! Pinning for future use. 🙂

    Reply
  153. Megan

    February 4, 2012 at 8:06 pm

    Do you know if these will turn out as well with aluminum muffin pans? 🙂

    Reply
    • Beth Jackson Klosterboer

      February 4, 2012 at 10:50 pm

      The advantage to silicone is that is is pliable enough to turn inside out, which helps when removing the cheesecakes. I do think using disposable aluminum pans would work, you'd just have to cut the pans off with scissors and pull the pan away from the cakes. Let me know how it turns out and I'll share that suggestion.

      Reply
  154. Susan-The Weekly Sweet Experiment

    February 4, 2012 at 8:06 pm

    Super cute! I love it. Have never made cheesecake before but I may try soon.

    Reply
  155. Amy

    February 4, 2012 at 7:27 pm

    WOW! These look fantastic! I'm not a fan of the 'real' conversation hearts, but cheesecake?! Yes, please!! Would you pretty please share this yummy idea here?

    http://oneartmama.blogspot.com/2012/02/shine-on-fridays-13-and-some-fabulous.html

    Reply
    • Beth Jackson Klosterboer

      February 4, 2012 at 10:56 pm

      Thanks Amy, I linked up the recipe and tried to follow, but the button wasn't working. I'll try to stop by again and see if it's working.

      Reply
  156. Mindie Hilton

    February 4, 2012 at 6:05 pm

    Beautiful cheesecakes. Good luck once again from Bacon Time.

    Reply
  157. Janie

    February 4, 2012 at 5:57 pm

    I too am pinning photo and link. Hope to make this for v-day. I love cheesecake too, but it has to be good! I have a great recipe handed down to me from a little ole italian lady in NY, a real NY cheesecake, really the only one I make. I will give this one a try.

    Reply
  158. Beth (www.livinglifeintentionally.blogspot.com)

    February 4, 2012 at 12:01 pm

    Oh WOW!! These look as delicious as they look pretty!!! LOVE them!! Thanks for linking up to TGIF! Have a GREAT weekend!
    Beth =-)

    Reply
    • Beth Jackson Klosterboer

      February 4, 2012 at 2:55 pm

      Thanks Beth. I hope you have a great weekend too. Good luck to your favorite team, if you're cheering anyone on at the Super Bowl. I'll probably be busy in the kitchen tomorrow. I don't have too many days left to get more Valentine's Day stuff made and posted.

      Reply
  159. Sugar Glitz

    February 4, 2012 at 4:57 am

    OMG!!! I love your blog! Such creativity!! I am going to check out your book 🙂 Wow I can't wait to see all of your goodies! Do you sell them/have a bakery/online store? You go girl!! <3

    Reply
    • Beth Jackson Klosterboer

      February 4, 2012 at 2:59 pm

      OH, that is so nice to hear. I'm sure you'll love Hungry Halloween. It is packed with some really clever Halloween recipes. I do sell my goods in Ohio only – unfortunately I'm not allowed to sell out of state.

      Reply
  160. Laura@Corner House

    February 4, 2012 at 4:51 am

    I love these. They are so cute. I can't wait to make them for my family. I featured them on my blog tonight.

    Reply
    • Beth Jackson Klosterboer

      February 4, 2012 at 3:04 pm

      Thanks for the feature Laura! I'll add your button to my Featured On page. If you do make these for your family, be sure to send me a picture so I can feature it in my reader's gallery along with a link to your blog.

      Reply
  161. Trish - Mom On Timeout

    February 4, 2012 at 3:44 am

    Pinned! This is just AMAZING! I am your newest follower 🙂 I'd love for you to share this with my readers if you have a chance. Love! Have a great weekend! http://www.momontimeout.com/2012/02/taking-timeout-thursday-no-15.html

    Reply
    • Beth Jackson Klosterboer

      February 4, 2012 at 3:08 pm

      Thanks for the Pin Trish. I just added a link to your Taking Timeout Thursday linky party. Hope you and your kids have a great weekend, too.

      Reply
  162. digraziarosa

    February 4, 2012 at 3:02 am

    These are so cute – I really hope I can make some time to try these! I pinned this and am now following your blog & following on FB. It looks like you have tons of great ideas!

    Reply
    • Beth Jackson Klosterboer

      February 4, 2012 at 3:09 pm

      I'm so happy you have joined in on the fun here at Hungry Happenings:)

      Reply
  163. Jenn

    February 4, 2012 at 2:56 am

    Oh wow – you are a genius! I love this idea.

    Reply
    • Beth Jackson Klosterboer

      February 4, 2012 at 3:10 pm

      Thank you Jenn, it is so amazing to be called a genius:)

      Reply
  164. tiffany@vintagemarigold

    February 4, 2012 at 2:48 am

    love! those are so adorable! awesome job!

    Reply
    • Beth Jackson Klosterboer

      February 4, 2012 at 3:10 pm

      Thanks Tiffany:)

      Reply
  165. Natalie Dixon

    February 4, 2012 at 2:07 am

    These are beyond awesome! I mean, I am seriously in awe and just keep going back and forth over your pictures! This might actually make me break down and buy those silicone pans. And now I'm seeing the thumbnail up above for a Chocolate Caramel Apple Cauldron and my jaw just dropped again! I would love it if you would come link up to my party, and actually… let me know if you ever want to do a guest post! You could even repost this if you wanted to get some views! Off to pin it! http://www.aturtleslifeforme.com/2012/02/share-wow-wednesday.html

    Reply
    • Beth Jackson Klosterboer

      February 4, 2012 at 2:19 am

      Hi Natalie. I'm so happy you found my blog and like my recipe ideas. I linked up and added your button to my Featured On/Linky page. I wish I had extra recipes to do guest posts, but I work on one idea at a time and spend 2-3 days working on each. I need to get ahead someday, so I can honor all the guest post requests I get. I'd be happy to re-post this recipe on your site next week, if you'd like. Thanks!

      Reply
    • Natalie Dixon

      February 6, 2012 at 4:21 am

      Hi Beth! I'm so sorry, but I just saw this reply now! Absolutely you can re-post this on my site (or if there's another post you wanted to promote more, I'm cool with that too!). Just let me know and if you're interested, send me the HTML code. I'm not too picky with making sure it's new content or anything! I figure, even an old post that's posted on a new site can get you more traffic! aturtleslifeforme at gmail dot com

      Reply
  166. sugarswings

    February 4, 2012 at 1:46 am

    Awesome!!! They look great, and cool directions!!

    Reply
    • Beth Jackson Klosterboer

      February 4, 2012 at 2:21 am

      Thanks Sugarswings. I do try to give pretty detailed directions and appreciate you noticing:)

      Reply
      • Amber

        February 23, 2019 at 8:20 pm

        I recently acquired 2 silicon heart molds with words already indented, I dont want to put my crust down first, any suggestions?

        Reply
        • Beth

          February 23, 2019 at 9:37 pm

          How cool! I’ve never seen silicone molds with the words indented. I can’t wait to find some!

          You can make your conversation heart cheesecakes without crusts then add a crust after the cheesecake is baked. I’ve only ever done this with a chocolate crust made with chocolate ganache and oreos but that would work fine. You can see my Mickey Mouse Cheesecake recipe for instructions. https://hungryhappenings.com/mickey-mouse-cheesecake-recipe/

          Reply
  167. Lina - Fancy Frugal Life

    February 4, 2012 at 1:18 am

    Oh these are so neat! And they look delishious 🙂
    Lina

    Reply
    • Beth Jackson Klosterboer

      February 4, 2012 at 2:20 am

      Thanks Lina.

      Reply
  168. Chelsea @ {twotwentyone}

    February 4, 2012 at 1:15 am

    Oh my goodness! These are absolutely adorable! Thanks for the ultimate cheesecake recipe. Making a cheesecake from scratch is on my baking to-do list.

    Reply
    • Beth Jackson Klosterboer

      February 4, 2012 at 2:20 am

      Thanks Chelsea, if you are going to try your hand at making a homemade cheesecake, this is the right recipe. Tyler did a good job with this one.

      Reply
  169. Kristina

    February 4, 2012 at 12:51 am

    LOVE this idea– an I am so with you on how cheesecake should taste! Pinning this : )

    Reply
    • Beth Jackson Klosterboer

      February 4, 2012 at 2:19 am

      Hi Kristina, thanks for the Pin. I'm happy you love the idea!

      Reply
    • Anonymous

      May 5, 2012 at 5:17 pm

      i love this idea! i only have one question, i live in colorado and have issues with baking in this altitude, any suggestions? Sites i can use to help get the hang of baking on the altitude?

      Reply
    • Beth Jackson Klosterboer

      May 6, 2012 at 3:02 am

      Unfortunately, I've never done any baking at higher altitudes and don't know anything about it. I'm sure there are sites that can help, I just don't know of any. Sorry I'm no help with this one.

      Reply

Leave a Reply Cancel reply

Your email address will not be published. Required fields are marked *

Recipe Rating


This site uses Akismet to reduce spam. Learn how your comment data is processed.

Primary Sidebar

WELCOME!

See all recipe categories

The Sugar Academy Chocolate Making Courses

Footer

Popular Kid Friendly Recipes

Cookie Monster Rice Krispie Treats with candy eyes, Tootsie Roll mouths, and mini Nutter Butter Cookies
Halloween Mickey Mouse Oreo Cookies decorated using candy clay are fun to make for your Halloween parties.
Turn Reese's Cups into sweet little otters then use them to create some adorable Sea Otter Cupcakes. These treat will be perfect for you Finding Dory Party.
Mickey Mouse Galaxy Cookies - chocolate cookies topped with chocolate ganache and galaxy sprinkles.
Decorate this cute Olaf Mickey Cake for your Disney Frozen party. It's easy to create using a simple cake decorating technique.
This Winter Wonderland White Chocolate Popcorn speckled with candy snowflakes and blue sprinkles would make a great treat for a Frozen party, a nice gift for Christmas, or a wintertime snack.

Hungry Happenings is a participant in the Amazon Services LLC Associates Program and occasionally writes sponsored posts which will be disclosed within the post. We value your privacy. Please read our Privacy Policy, Disclosure, and Terms of Service.

Copyright © 2022 Hungry Happenings