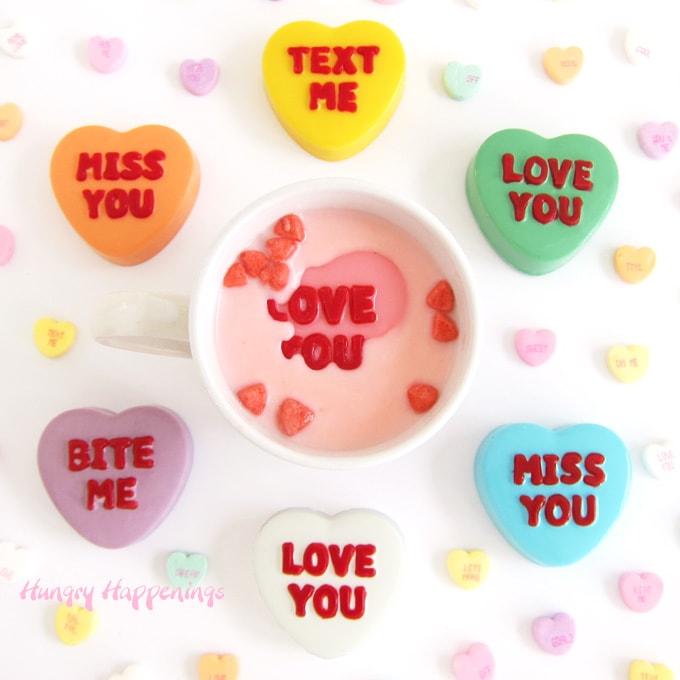
Celebrate Valentine's Day by baking these Naturally Colored Conversation Heart Cheesecakes for your loved ones. These heart-shaped cheesecakes are colored and flavored using fruits and vegetables.

It is hard to believe that I created my original Conversation Heart Cheesecakes two years ago. Time goes by so quickly. It was my second Valentine's Day as a blogger and I thought to make cheesecakes to look like conversation hearts was a cute idea.
I never imagined it would become my most popular recipe.
A few of my readers complained that they were made with food coloring, so I wanted to find a more natural way to color and flavor these cheesecakes.

When I made my first batch of heart-shaped cheesecakes I colored them with store-bought food coloring.
I know I use it a lot when making my edible crafts. I've been adding coloring to my white chocolate, which I use to paint lollipops, for so many years, that it just seems like a normal thing to do.
I do, however, realize there are more natural and healthier ways to color our food using fruits and vegetables.
When I wrote my original post about these cute little cakes, I even suggested it. So, now finally, two years later, I've taken my own suggestion and made a batch of Naturally Colored Conversation Heart Cheesecakes.

How to pureé raspberries?
I started by making fruit and vegetable purees. This did take quite a bit of time. For the second time in a few months, I wished I owned a juicer, or at least had a blender. I made do with what I had on hand.
I used mostly frozen fruit, as winter in Ohio isn't the best time to find great produce.
I took about a cup of fruit, in this case, raspberries, heated them over medium heat until they began to break down, smashing them as they cooked.

Removing the seeds.
To remove all the seeds, I then pressed the fruit through a fine-mesh strainer. I really didn't want any seeds in my smooth and creamy cheesecakes, so I pressed the fruit puree through the strainer a second time.
I used this method for my raspberries, blueberries, and blackberries. I even tried strawberries, looking for a nice red with which to paint the sentiments onto the conversation hearts. I realized the blackberries made the brightest red, so I used them for my paint.
I ended up with a bit more puree than needed to color my cheesecakes, so I just mixed all the extras together and enjoyed a nice glass of juice.

Natural Orange Coloring
Orange was one of the most challenging colors to achieve. I recently used carrots to color the orange layer in my naturally colored rainbow cake, so I tried it. I pureed the carrots using a stick blender but I would recommend using an actual blender if you have one. I added some orange juice to the carrots just to make them easier to blend and to add some flavor. Then I pressed it through a fine-mesh strainer.
It worked great, and shockingly the final cheesecake had a nice pleasant sweet flavor. The cakes had just the slightest hint of carrot flavor. A little orange zest would have been a nice addition, but I had just used orange juice from a bottle.

Flavor and color cheesecake batter using fruit pureé.
So, I had raspberry puree to make pink cheesecakes, blueberry for purple, carrots, and orange juice for orange, I thought about using mango or even peach for yellow but opted instead to go with lemon zest and juice. To punch up the yellow color I added an extra egg yolk.
Green was the biggest challenge. I should have gone with lime, but I hate lime, so I tried kiwi. It did not work, at all. The baked kiwi cheesecakes ended up in the trash. The acid in the kiwi really broke down the cheesecakes. They were runny and they had a terribly bitter, almost metallic taste.
My husband wants me to try making the green with spinach. I used it to make the green layer of my rainbow cake and was surprised that the cake had no spinach flavor. I'll have to give it a try and I'll let you know how it turns out.
Being I was adding juice to my cheesecake batter and trying to achieve nice pastel colors, I reduced the amount of sour cream and eliminated the vanilla. I was pleased with all of the colors except the green.
Equipment and supplies:
- 3 heart-shaped silicone molds
- fine tip paintbrush (new or food only brush)
- roasting pan big enough to fit your heart-shaped molds
- optional, Chicago Metallic Conversation Heart Cookie Cutters/Stamps
This is an abbreviated version of this recipe.
For more detailed instructions, and tips see the original Conversation Heart Cheesecake recipe, here.

Graham Cracker Crust
- Preheat oven to 325 degrees.
- Mix graham cracker crumbs, cinnamon, and melted butter together.
- Equally divide among 18 heart cavities and press down into an even layer.

Cheesecake Filling
- Beat cream cheese.
- Add in sugar and beat until light and fluffy.
- Add sour cream and eggs.

Color cheesecake filling with pureés.
- Divide the cheesecake batter into 6 bowls.
- Add fruit purees, in the amount listed in the ingredients to the bowls, to achieve the desired shade.
- Keep one bowl plain, for white cheesecakes.

- Equally, divide each color into 3 of the heart cavities.

Bake cheesecakes in a water bath.
- Bake in a water bath for 22-25 minutes.
- When done the cheesecakes will look set but will still jiggle in the center.
- I share lots of tips and details about the water bath in the original conversation heart cheesecake post.

Freeze cheesecake hearts.
- Allow to cool for an hour at room temperature, then freeze for at least 2 hours.
TIP: One trick I learned while making these cheesecakes is to cover the molds with a piece of paper towel before freezing. The paper towel will wick up the moisture so that you don't end up with beads of condensation on the cheesecakes.

- Unmold the cheesecakes.
- If they don't come out nicely, freeze longer.
- I actually froze mine overnight and they popped right out of the molds.

Paint on Messages
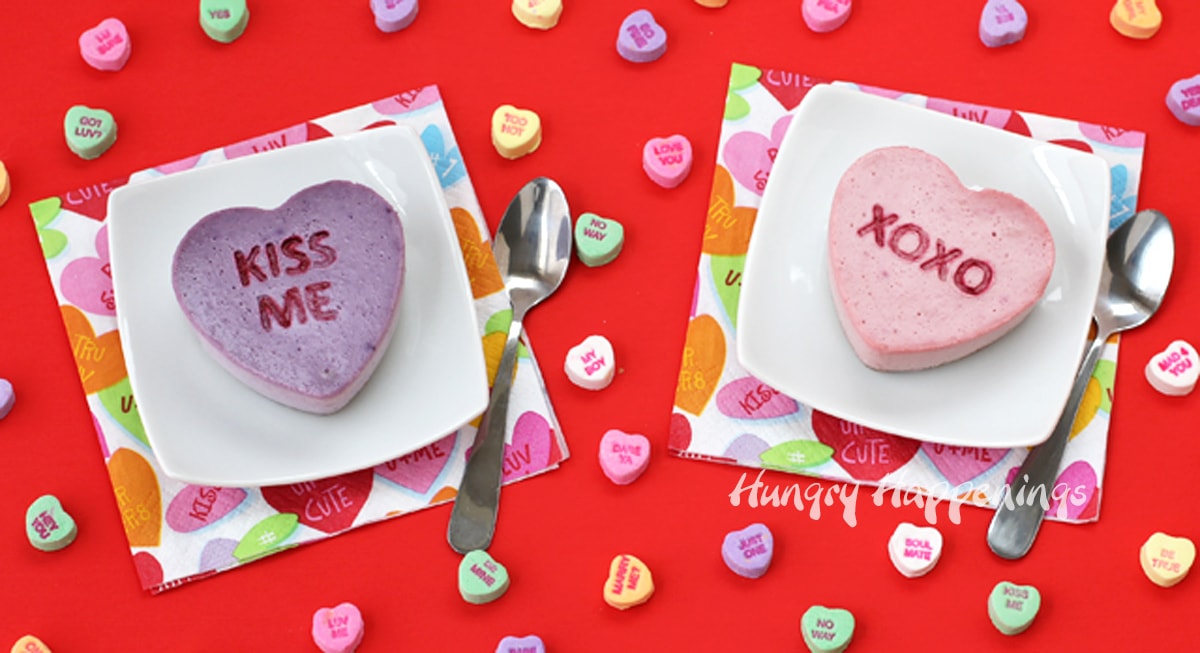
You can use either raspberry or blackberry puree to paint on the conversation heart sentiments, using a fine-tip paintbrush. I tried both and they both looked nice. The blackberry (two hearts on the right) was darker than the raspberry.
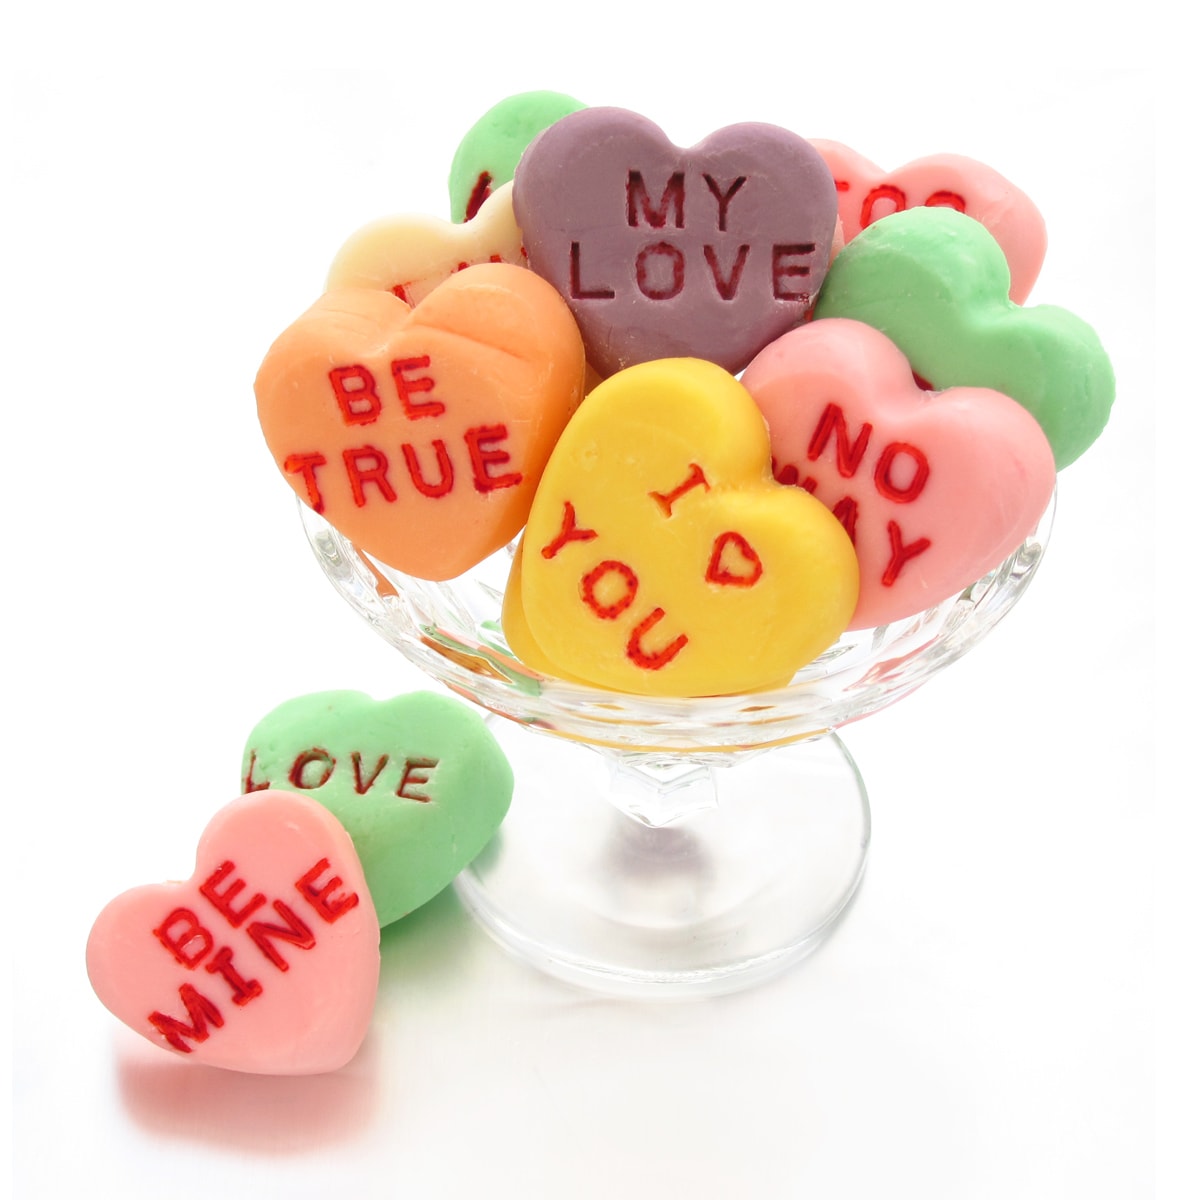
I don't have a very steady hand, so painting letters is a challenge for me. I recently bought a set of Chicago Metallic Conversation Heart Cutters that are cutters on one side and stamps on the other side. I will be showing you a few more ideas using them later this week. I pressed them onto my frozen cheesecakes and they left the perfect impressions. I painted over the letters and I ended up with perfectly spaced printed words. I love it.
If you use the stamps, just be sure to stamp all of the cheesecakes right after they come out of the freezer, then paint. I waited and messed up a few. The stamps stuck to the thawed cheesecakes.

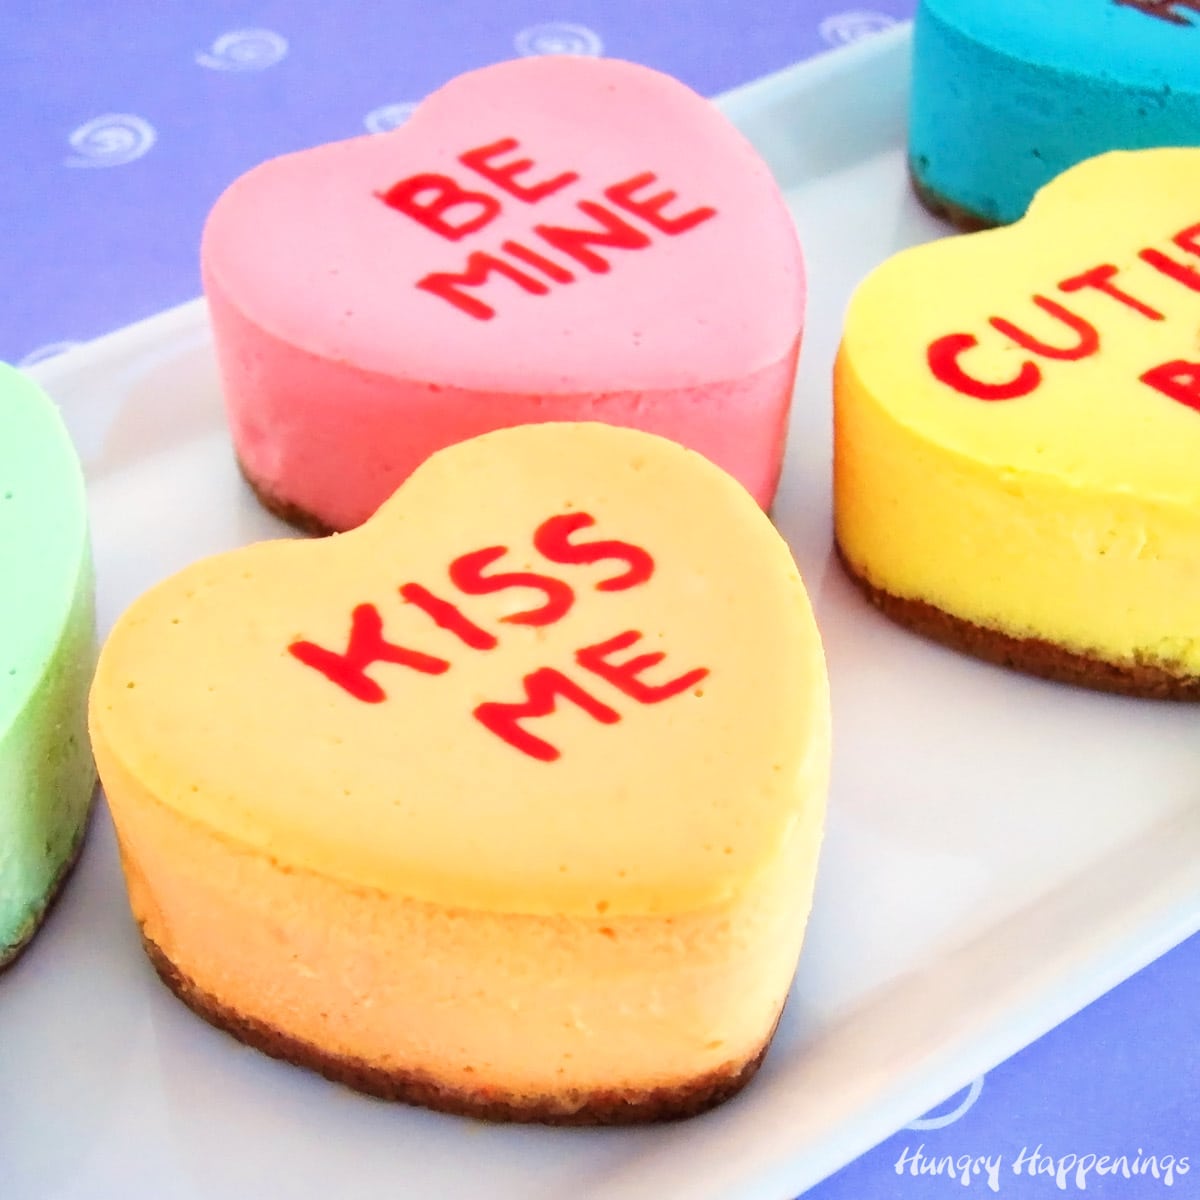
You can see all the pretty pastel colors. The purple might be a bit too bright, but I really loved the flavor of the blueberry cheesecake. It was my favorite. My husband loved the lemon and raspberry. I did too.
As the cheesecakes thaw the colors will intensify. See the difference between the picture of the cheesecakes above and the picture below.

Would I do this again?
Definitely.
They may have been a bit more work than the first time around, but I think the time was well spent.
Related Recipes
You may like to make these other conversation heart-themed Valentine's Day recipes.


Recipe
Originally published on February 3. 2014.
Get the SILICONE HEART MOLD from Amazon. I earn a small commission if you make a purchase using my affiliate links at no extra cost to you.

Use natural flavors to create these cheesecakes shaped like conversation heart candies for your Valentine's Day celebration.
- 1 cup graham cracker crumbs 15 squares
- pinch of cinnamon
- 4 tablespoons ½ stick butter, melted
- 16 ounces 2 blocks cream cheese, softened
- 1 cup sugar
- 3 large eggs
- 1 ¼ cups sour cream
- blue - 1-2 tablespoons blueberry puree
- pink - 1-2 tablespoons raspberry puree
- yellow- the zest from one lemon 1 teaspoon lemon juice, and 1 egg yolk
- orange - 1 ½ tablespoons carrot puree and 2 teaspoons orange juice
- white - just plain cheesecakes
- green - zest from two limes and lime juice
- red- for painting on the words either blackberry or raspberry puree
-
Combine graham cracker crumbs, cinnamon, and butter.
-
Spoon about a tablespoonful into each heart cavity. Press down into an even crust. Refrigerate until needed.
-
Beat cream cheese. Add sugar and beat until light and fluffy. Beat in eggs and sour cream.
-
Equally, divide cheesecake batter into 6 bowls.
-
Add fruit purees into bowl to create a bowl of blue, pink, yellow, orange, green and white batter.
-
Pour colored batter into heart molds, making three of each color.
-
Bake in a water bath at 325 degrees Fahrenheit for 22-25 minutes.
-
Cool at room temperature for an hour then freeze for at least 2 hours.
-
Un-mold and use red puree to paint sentiments onto the hearts.
-
Keep refrigerated until serving.

- Banana Split Bars – A Fun and Easy Summer Dessert - March 4, 2026
- Pineapple Fudge (No Candy Thermometer Needed!) - March 4, 2026
- No-Bake Peanut Butter Pie Recipe - March 3, 2026


Gail says
Can you please tell me how far up you filled your molds as mine might not be the same size. Actually, if you could tell me how many oz. of water they hold so I could adapt everything accordingly, I'd really appreciate it. I have a few different kinds of the molds.
Thanks!
Maggie says
how do you know when they are fully cooked? I did 12 regular hearts and 6 mini hearts and i just tasted the mini - (after letting it rest at room temp and freezing for 2 hours) - it's pretty liquidy and not firm at all
is it too late to pop the rest back in the overn?
Beth says
Hi Maggie, the cheesecakes should no longer look wet on top. The centers will still jiggle a bit when you shake the pan but not look like they are sloshing around. If you remove them from the oven too soon but they are still warm you might be able to return them to the oven for a few more minutes to finish cooking them. Once the cool this would not work. You may find that once you chill the cheesecakes they firm up a bit too.
Rosanna says
I wonder if you could use green jello without causing an odd flavor.
Beth says
Hi Rosanna,
The green gelatin will definitely add some flavor to the cheesecake and it will also change the texture. I've tried using gelatin in a cheesecake recipe before and felt the texture was too gummy but I used a whole box. If you just add a small amount it might work but you will taste the lime or green apple depending on which green Jell-O you use. Be sure to dissolve the Jell-O before mixing it into the cheesecake.
Gail says
My Mom used to make a good cheesecake that used lemon jellow in it so it just might be worth experimenting with.
Beth Klosterboer says
These naturally colored conversation heart cheesecakes are a bit thinner than those that I made using food coloring. The heart molds hold just over 3 fluid ounces. You can use anywhere between 1.5 and 2.5 ounces of cheesecake filling. If you add a crust, like I did for these mini cheesecakes, you'll probably use just over 1 1/2 ounces of filling. It's been many years since I've made this recipe, so I'm not 100% positive, but that is a good estimate.
Beth Klosterboer says
I've made a cheesecake using Jello and didn't love the flavor or texture. I think you'll like using natural flavorings better.
Crystal says
May I suggest spiralina powder may be a possibility for green? 🙂
Beth says
Thanks for the suggestion. I've never tried spiralina powder but it definitely looks like it has a good green color. I'm not sure if it will dissolve in the cheesecake batter and make a smooth cheesecake but it sure would be worth trying. If you do, let me know how it turns out!
Rosanna says
I wonder if you could use green jello without causing an odd flavor.
Gail says
Sorry, the email had a typo.
Celeste says
If I were to only make 6, how much of each ingredient would I need?
Beth says
You'll need to divide the amounts by 3 in order to just make 6 cheesecakes.
BL says
Cool
Moonflower says
I'll be doing this today! Thanks for the natural alternative. Have you though of using the stuff they use to make green tea ice cream for the green?
beth says
I have not tried green tea, but do think it's a great alternative if you like the flavor. If you use it, I'd love to hear what you think. Have fun making your cheesecakes.
Allie Bobe says
Hi there! I'll be featuring this tomorrow! Thanks for sharing it on Worthwhile Wednesdays!
~Allie @ http://thecraftiestallie.blogspot.com/
beth says
Thanks so much for the feature, Allie. Have a sweet Valentine's Day!
Laurie says
This is super cute!
You ROCK for linking up this week to Tip Me Tuesday. {high fives}
Just a heads up, Tip Junkie can help you index your blog more effectively if you upload at least 2 images, 2 steps, and blog post URL into your Tip Junkie craft room!
Simply login and click "add a project" on your profile page to get started. {yep I've got your back!}
~ Laurie {a.k.a. the Tip Junkie}
Link ~ http://www.tipjunkie.com/how-to-add-a-craft-room-project-on-tip-junkie
beth says
Thanks so much, Laurie.
Heather {Woods of Bell Trees} says
Wow these look so cute and yummy!
Elyse says
Hi, I found your recipe and I'm going to try them out for Valentine's day this year. Just a thought, maybe you could use green tea for the green 🙂
beth says
Elyse, that is a great suggestion. I've seen people use matcha tea to color cakes. I'll have to buy some and give that a try. Thanks!
Allie Bobe says
I love these!!! Will you share these too! I am so going to have to make these, man too bad I won't get the conversation imprints in time 🙁
beth says
If you ordered them from Amazon, maybe they'll get to you sooner than they said. It happens sometimes. I got mine at a local cooking store, but haven't seen them any place else. I just used them again today to make some fun treats.
Chrissy says
Hi Beth! These look so adorable and I love that you're going for natural coloring! I just wanted to comment about kiwi. Certain tropical fruits like kiwi and pineapple have enzymes that break down protein. It's the main reason why you can't use fresh pineapple or kiwi in gelatin. The protease enzymes break down the protein so the jello never sets. Something similar is probably happening to your cheesecake batter. It'd be really interesting if you can hide spinach in cheesecake though! Hiding vegetables in dessert is just genius!
beth says
Hi Chrissy, I knew that about pineapple, but didn't realize kiwi acted the same way. Lesson learned! I am going to try the spinach, but it may be a few days before I get to it. My husband keeps talking about it, so I think he is very interested to see how it turns out, plus he wants more cheesecake!
Corey W. says
These are so cute! And I'm loving that there is a way to color them naturally. This would be a hit around my house since cheesecake is my hubs and daughter's favorite dessert. Thanks for linking up at The Makers!
Corey @ TinySidekick.com
beth says
Thanks Corey. My husband loved these cheesecakes, especially the lemon:)
Janine Eshelbrenner says
Wow, so cool that you used only natural coloring. I can't believe how spot on the colors are to actual conversation hearts! I'm lovin those cutters too!
beth says
I was so surprised by how easy it was to get pretty colors using the fruits. They are equally as pretty as those made with food coloring.
The Partiologist says
As always, I love your cheesecakes and would you believe I have those same cutters for the same reason!
beth says
I was so excited to find these cutters/stamps. They are perfect and will be so useful for so many conversation heart recipes.
Anonymous says
Obrigada!
Traduzindo e adaptando para os ingredientes do meu país, mudando uma coisinha daqui e dali vou tentar fazer por aqui.
Achei lindo!
Giselle
Comi com os olhos!!
LIndos!Saborosos!
beth says
Hi Giselle,
I do hope you are able to find all the ingredients needed to make these cheesecakes. If you have any questions, just let me know.
Heather - Chickabug says
Thank you, Beth! These are wonderful! : )