• Skip to primary navigation
  • Skip to main content
  • Skip to primary sidebar
  • Skip to footer
Hungry Happenings
  • RECIPES
    • All Recipes
    • Dessert Recipes
    • Decorated Cookies
    • Decorated Cakes
    • Cheesecake Recipes
    • Everyday Desserts
    • Homemade Candy
    • Everyday Meals
    • Readers’ Gallery
    • Hungry Happenings Blog Posts
  • HOW TO
    • Chocolate Making Tips
    • Chocolate Making Course (video lessons)
    • Make Modeling Chocolate
      • Modeling Chocolate Recipe and Tutorial
      • How to Color Modeling Chocolate
      • How to Store and Work with Modeling Chocolate
      • How to Fix Greasy Modeling Chocolate
      • How to Fix Dry Modeling Chocolate
      • Use Colored Candy Melts to Make Candy Clay
    • Candy Clay Creations
    • How To Color White Chocolate and Candy Melts and Paint Candy Molds
    • How to Use Food Coloring Markers
  • HOLIDAYS
    • ALL HOLIDAY RECIPES
    • Valentine’s Day
    • St. Patrick’s Day
    • Easter
    • 4th of July
    • Halloween
      • Hungry Halloween
    • Thanksgiving
    • Christmas
    • New Year’s Eve
    • MORE HOLIDAYS
      • Mother’s Day
      • Father’s Day
      • April Fools
      • Chinese New Year
      • Cinco de Mayo
      • Day of the Dead
      • Earth Day
      • Hanukkah
      • Mardi Gras
  • PARTY FOOD
    • Super Bowl
    • Graduation
    • Birthday Party
    • March Madness
    • Summer Fun
    • Baby Shower
    • Wedding Shower
    • School/Teacher
    • Movie and T.V. Characters
    • Kid’s Treats
    • Fun Party Recipes
  • BUY MY COOKBOOKS
  • ABOUT/CONTACT

STARFISH S’MORES – Fun Summer Treats

April 24, 2021 This post may contain affiliate links.

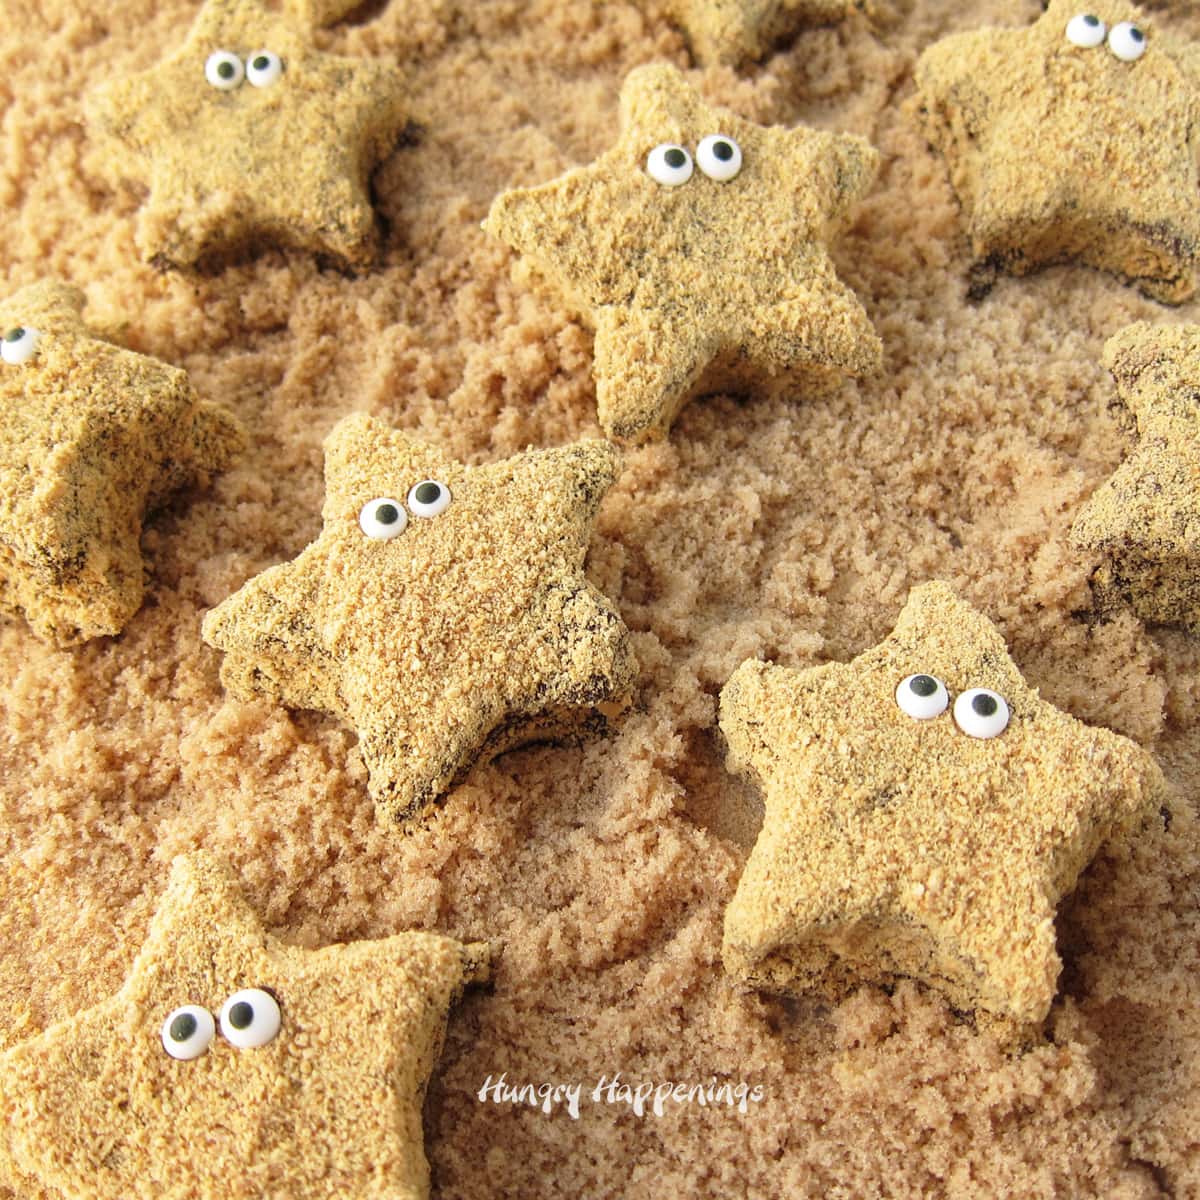
Make homemade marshmallows then turn them into adorably cute Starfish S’Mores.

This fun twist on a summer classic will add a touch of whimsy to any pool party or day at the beach.
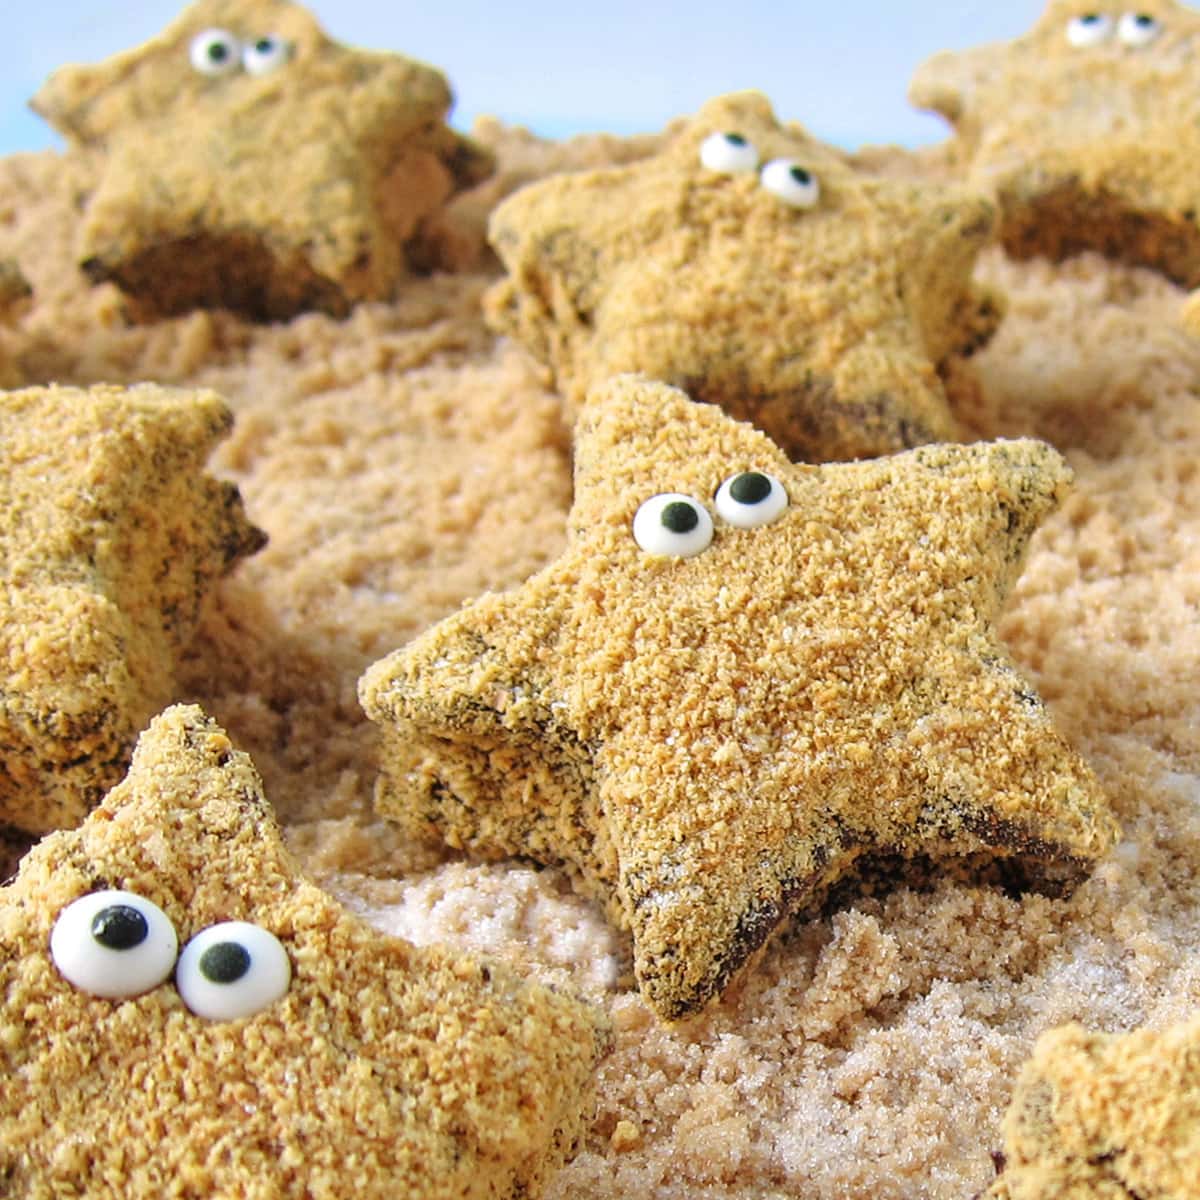
Turn homemade marshmallows into adorably cute Starfish S'mores. These chocolate and graham cracker coated treats will be fun to serve at your next pool party or beach outing.
When I did a Google search on S’Mores, I was astonished at all of the ways you can use the basic combination of chocolate, graham crackers, and marshmallows.

I found s’mores pies, cakes, cupcakes, lollipops, bars, cake pops, cookies, caramel apples, truffles, ice cream, pizza, trifles, parfaits, breakfast pastries, pudding, fudge, whoopee pies, cereal treats, crepes, sundaes, cheesecakes, brownies, tarts, and moon pies. I even found recipes to make s’ mores in a jar.

I challenged myself to find a new and exciting way to make s’mores and came up with these Starfish S’Mores. Aren’t they cute?

Video

Watch this new video tutorial to see how to make these cute Starfish S’Mores then scroll down to see the recipe at the end of the post.


Turn homemade marshmallows into adorably cute Starfish S'mores. These chocolate and graham cracker coated treats will ad a touch of whimsy to your pool party food.

To make my little starfish s’mores, I whipped up a batch of homemade marshmallows, cut them out with a star-shaped cookie cutter, dipped them in some melted chocolate, sprinkled on crushed graham crackers, and added two silly little edible eyes.

You don’t have to be an expert candy dipper to make these, as the more lumpy and messy they are, the better they look.

To make these Starfish S’mores you’ll need some equipment…

stand mixer
small saucepan with lid
candy thermometer
9″ x 13″ pan
rubber spatula and/or an offset spatula
star cookie cutter (I used the 3″ cutter)
dipping fork or kitchen fork
parchment paper or wax paper
baking sheet or cutting board
toothpick

Turn star shaped homemade marshmallows into Starfish S'mores for your next beach or pool party. These chocolate dipped marshmallows coated in graham cracker crumbs are so much fun. Starfish S’mores

Pan Prep

  • butter or non-stick baking spray – Grease the inside of a 9X13-inch pan well. I prefer the flavor of butter but the non-stick baking spray works well too.
  • a blend of powdered sugar and corn starch – Some recipes tell you to dust your marshmallows with just corn starch. I’m not a fan of the flavor, so I blend my corn starch with powdered sugar. Powdered sugar already has corn starch in it, but it’s best to add a bit more.

Homemade Marshmallows

  • water – You will dissolve the gelatin in water then use more water to make a sugar syrup.
  • gelatin – Use unflavored gelatin. You’ll need 2 1/2 tablespoons for this homemade marshmallow recipe. It’s best to measure the gelatin as packages don’t always contain the same amount from brand to brand.
  • granulated sugar – Adds sweetness and structure to the marshmallows.
  • light corn syrup – This will not only add sweetness but will also keep the sugar from crystalizing. Crystalized sugar will make your marshmallows gritty. By adding corn syrup your marshmallows will be smooth.
  • vanilla – I suggest you use pure vanilla extract or vanilla bean paste for the best flavor. I love using vanilla bean paste as it loaded with real vanilla bean seeds. When you make your marshmallows with the paste they will be speckled with vanilla bean seeds.

S’mores Toppings and Decorations

  • semi-sweet chocolate – You’ll make the marshmallows then dip them in dark chocolate. Choose your favorite semi-sweet (or bittersweet) chocolate.
  • graham crackers – Crush 50 graham cracker squares (or 25 whole crackers) to make the crumbs to coat your chocolate-dipped marshmallow stars. You may also want to crush more crackers to use as sand to display your starfish s ‘mores.
  • candy eyes – Not all candy eyes are created equal. I use 3/8 inch royal icing eyes. They look really cute. Some brands of candy eyes are a bit too bug-eyed-looking for my taste.

You can find items to make these Starfish S ‘Mores from Amazon. I earn a small commission when you use the affiliate links in this post at NO extra cost to you.


Instructions:

Make homemade marshmallows (recipe adapted from Alton Brown’s Good Eats)

OR use click on this link to see how to make this recipe using store-bought marshmallows

Homemade marshmallow recipe.

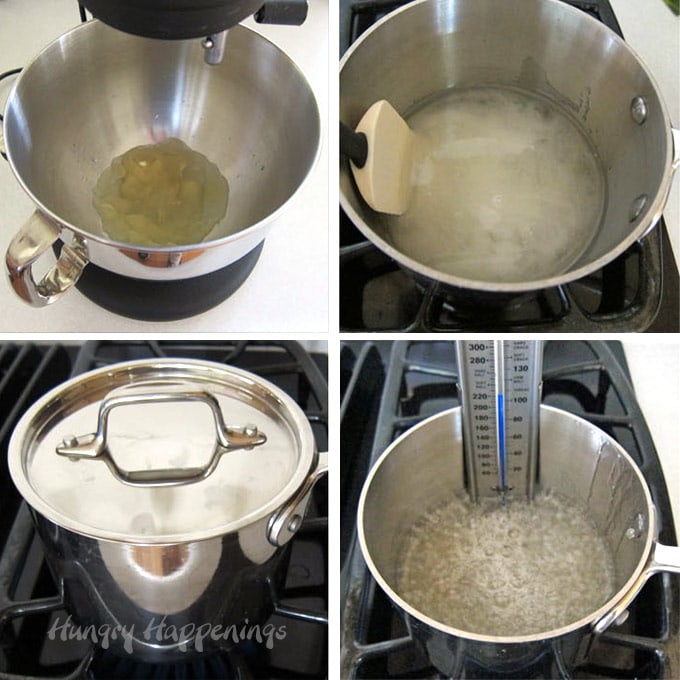
Bloom the gelatin and boil the sugar syrup.

    • Pour 1/2 cup of water into the bowl of a stand mixer.
    • Sprinkle 2 1/2 tablespoons of gelatin over the top of the water and allow it to soften (bloom) for 5 minutes.
    • Meanwhile, pour the remaining 1/2 cup water, 1 1/2 cups granulated sugar, 1 cup corn syrup, and a pinch of salt into a small saucepan.
    • Stir just to combine ingredients. You don’t want to get sugar crystals on the side of the pan, so stir slowly.
    • Cover saucepan, place over medium heat, and bring to a boil. This will take about 4-5 minutes. Condensation will build up in the pan and when you remove the lid, the water will help to wash down any sugar crystals on the side of the pan. If you notice lots of sugar crystals, you can put the lid back on the pan for a few more minutes or you can dip a pastry brush in water and brush the water around the side of the pan to each the crystals back into the boiling sugar syrup.
    • Remove the pan lid, and clip a candy thermometer onto the side of the pan.
    • Continue to cook, without stirring, until the mixture reaches 240 degrees Fahrenheit (about 7-8 minutes.)
      • Be very careful not to touch or spill any of this hot syrup on your skin – it will burn badly!

Homemade marshmallow recipe.

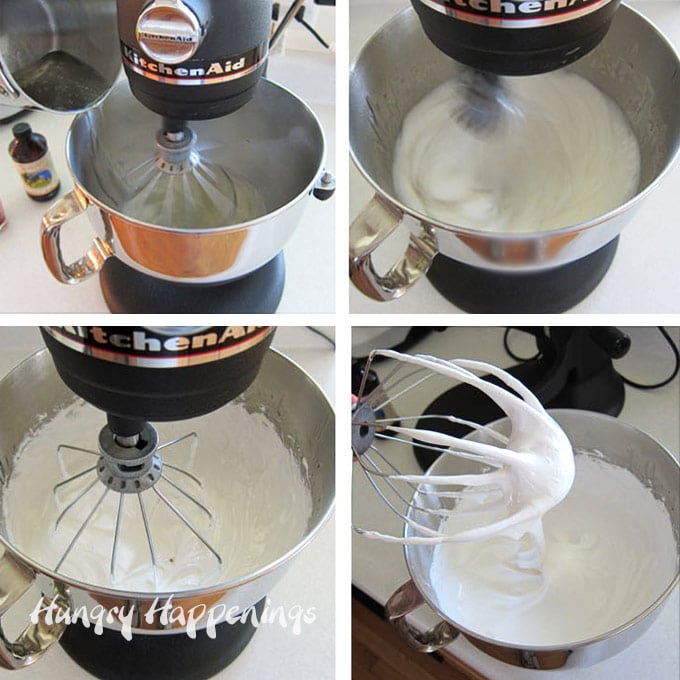
Whip the marshmallows until light and fluffy.

  • Place the whisk attachment on your stand mixer.
    • You will need to whisk this marshmallow mixture at high speed for about 15 minutes so it is imperative that you use a strong stand mixer, not a handheld mixer.
  • Turn the stand mixer onto low speed.
  • Very carefully and slowly pour the hot sugar syrup down the side of the bowl into the softened gelatin.
    • This hot liquid can burn your skin badly, so be very careful with this step.
  • Once all of the sugar syrup is in the bowl, increase the mixer speed to high (going up a few steps at a time).
  • Whip until the marshmallow becomes very thick and cools to a lukewarm temperature, about 12-15 minutes.
  • Add the vanilla (use vanilla bean paste for the best flavor) and whip just to combine.
Homemade marshmallow recipe.
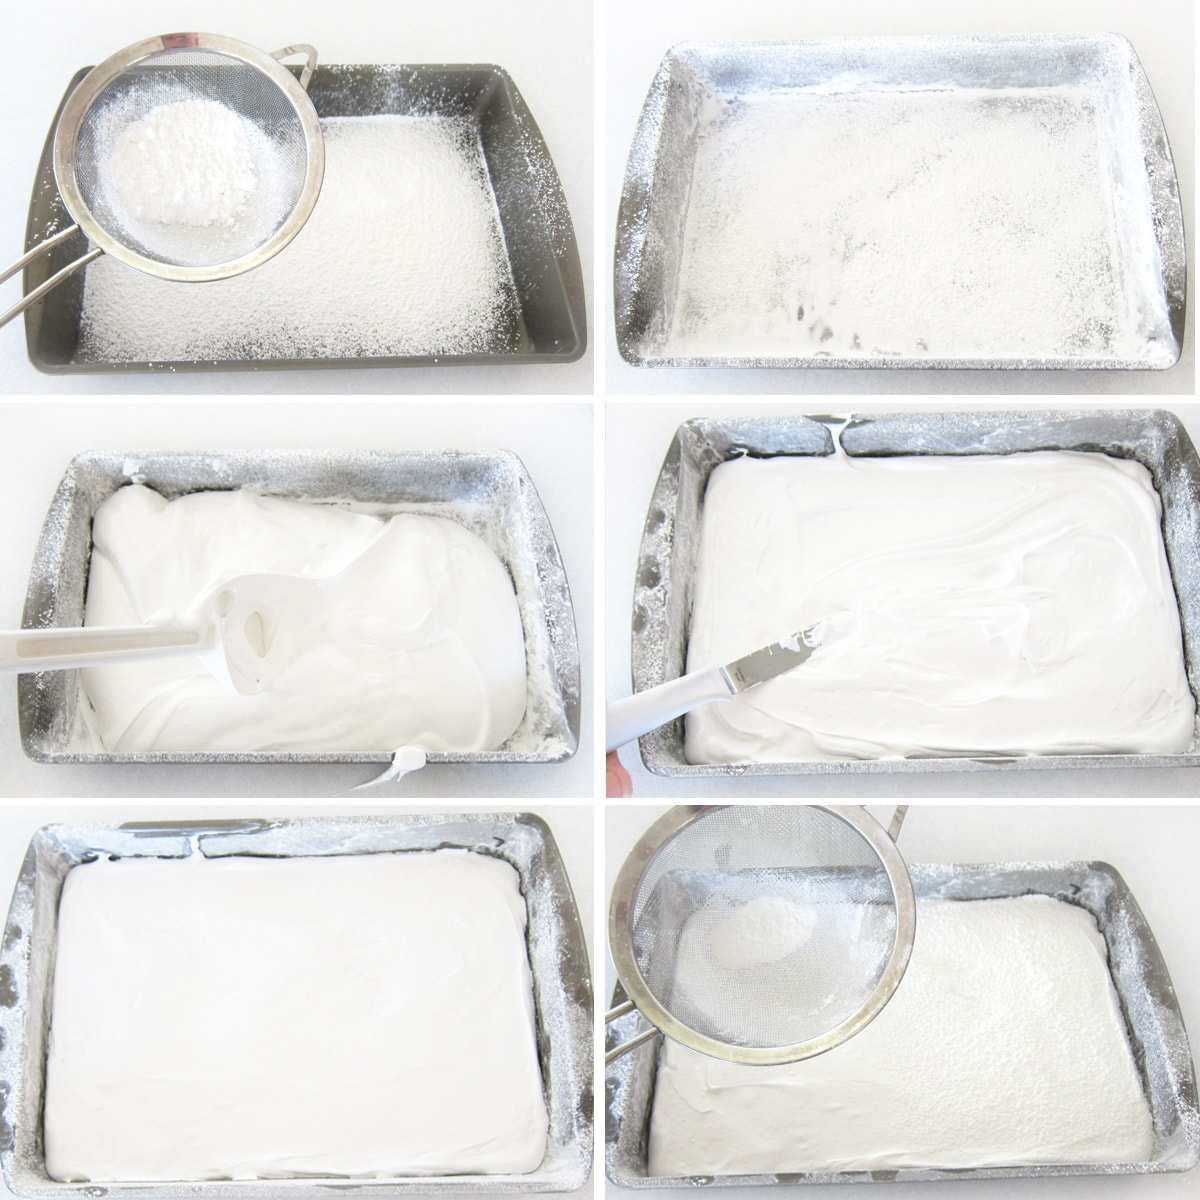
Spread Marshmallows in a 9X13-inch pan.

  • While the marshmallow is whipping, prepare your pan.
  • Butter the bottom and sides of a 9″ x 13″ pan.
  • Combine the powdered sugar and cornstarch in a bowl.
  • Pour about half of the powder blend through a fine-mesh sieve evenly over the bottom and sides of the pan.
  • Tap pan to remove excess.
  • Save remaining powder for later.
  • Butter or spray a rubber spatula and use it to remove the marshmallow from the bowl.
  • Spread the marshmallow evenly in the pan.
  • Use a buttered offset spatula to smooth the surface.

Homemade marshmallow recipe.

Dust marshmallows with powdered sugar and corn starch.

  • Dust the top of the marshmallow with enough of the remaining sugar and cornstarch mixture to lightly cover.
    • You can now use your hands to really flatten out the marshmallow.
  • Cover any remaining powdered mixture for later use.
  • Allow the marshmallows to sit uncovered for at least 4 hours and up to overnight.
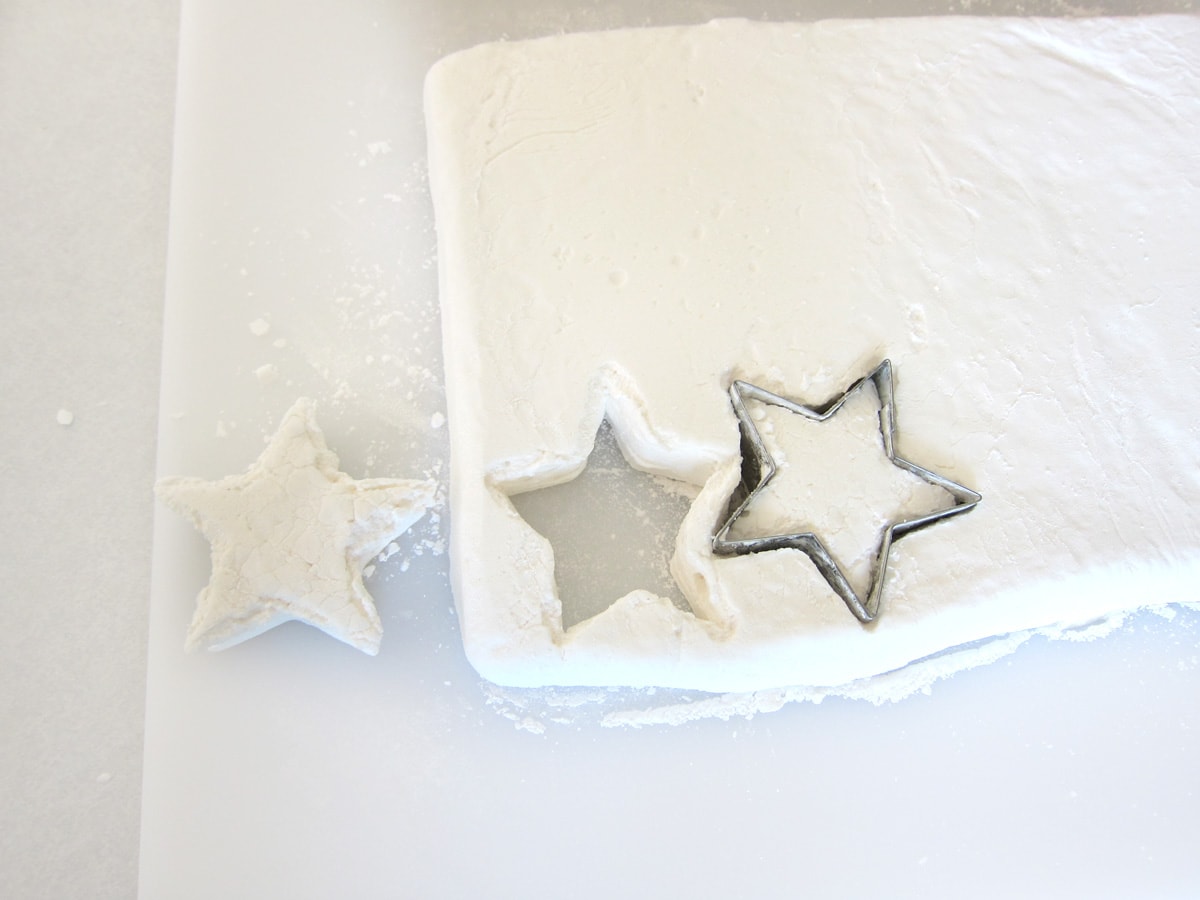
Homemade marshmallow stars can be dipped in chocolate and rolled in graham crackers to make Starfish S'mores.

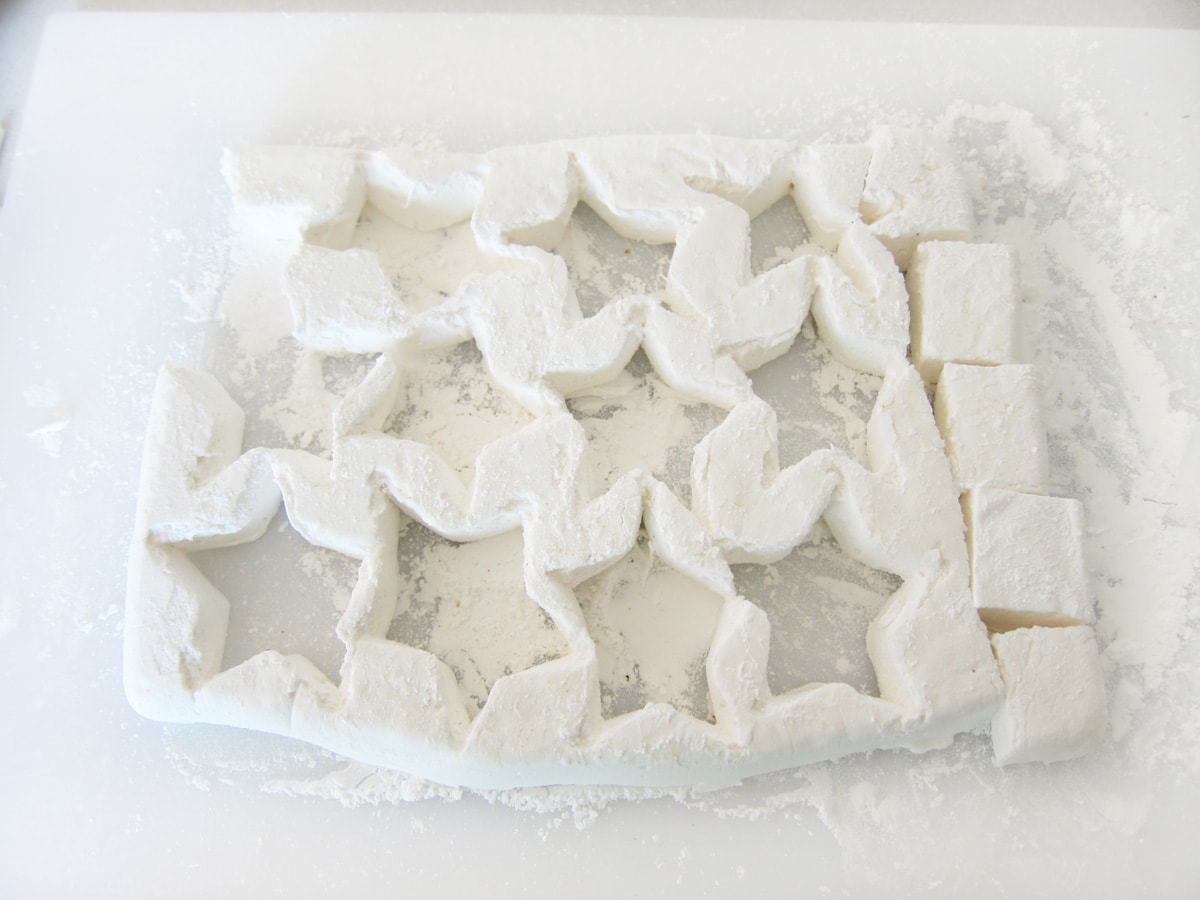
Cut out marshmallow stars.

  • Set a large cutting board on top of the pan of marshmallows.
  • Turn both the board and pan upside down.
    • The marshmallow should fall right out of the pan onto the board. If it doesn’t, help it along.
  • Dust a star-shaped cookie cutter with some of the powdered sugar/cornstarch mixture.
  • Press the cookie cutter into the marshmallow, remove, and press the marshmallow out.
  • Dust the cutter again, and continue to cut stars until you can’t cut anymore.

As you can see, you will have a lot of marshmallow scraps. Either dust them with more powdered sugar/cornstarch or dip them in any leftover chocolate.

How to melt chocolate to dip Starfish S’mores:

  • Pour chopped chocolate into a microwave-safe bowl.
  • Heat on high power for 30 seconds.  Stir.
  • Heat on high power for 20 seconds. Stir vigorously.
  • Heat on high power for 15 seconds.  Stir vigorously.
    • If not melted, continue to heat for 10-second increments, stirring after each, until melted. For more detailed melting instructions, read my chocolate-making tutorial.

NOTE: you don’t need to temper this chocolate because the graham crackers will completely coat the chocolate, therefore you can use good quality pure chocolate for this recipe.  You can, if you prefer, use confectionery coating/candy melts. You do need to make sure, however, your melted chocolate is not too hot, somewhere between 90 and 97 degrees Fahrenheit, so you don’t melt your marshmallows.

Dip Marshmallow Stars into Chocolate and Graham Cracker Crumbs:
Homemade marshmallow stars can be dipped in chocolate and rolled in graham crackers to make Starfish S'mores.

  • Pour graham cracker crumbs into a shallow dish.
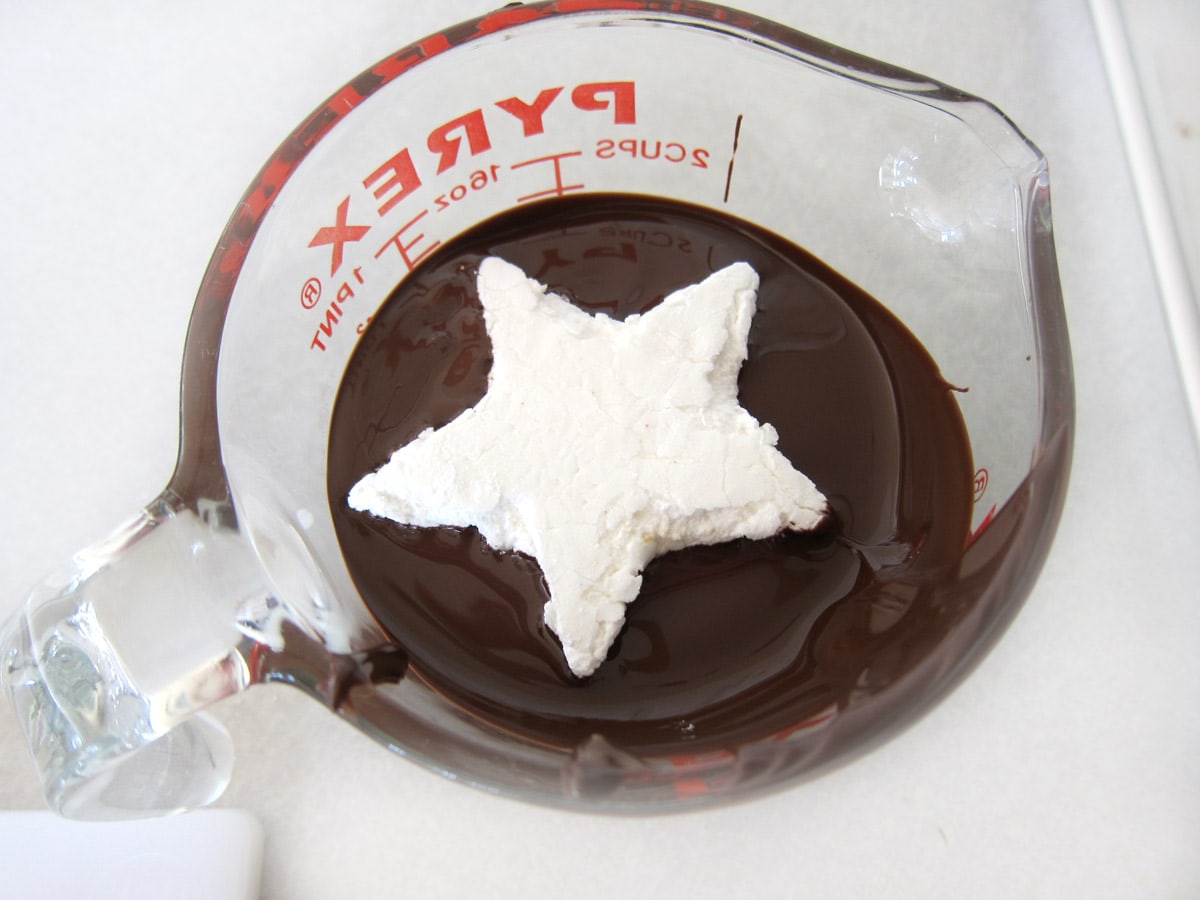
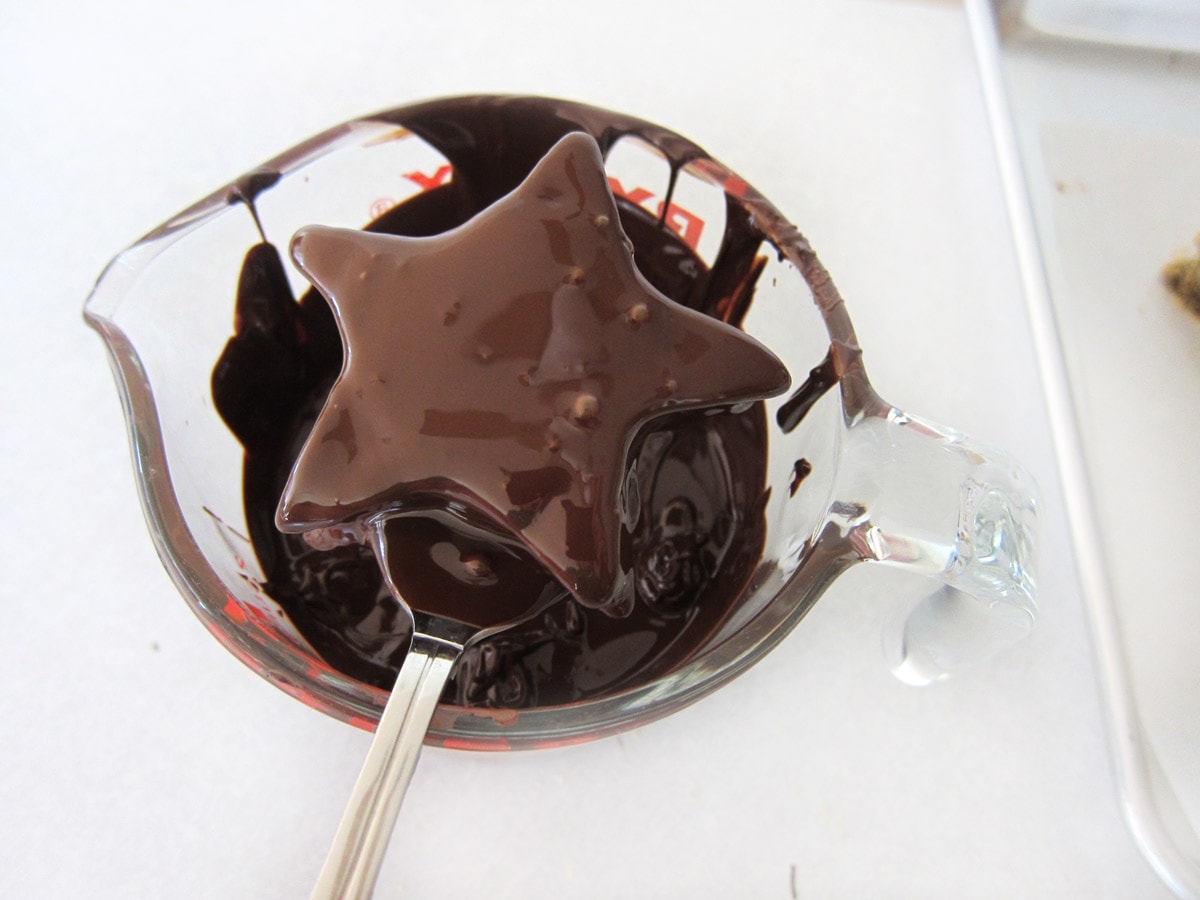
  • Place one marshmallow star in the melted chocolate.  Use a fork to press the marshmallow into the chocolate, covering the top and all sides of the star.
  • Place the fork on the underside of the marshmallow and use it to lift the marshmallow out of the chocolate.
  • Shake the marshmallow to allow any excess chocolate to fall off.
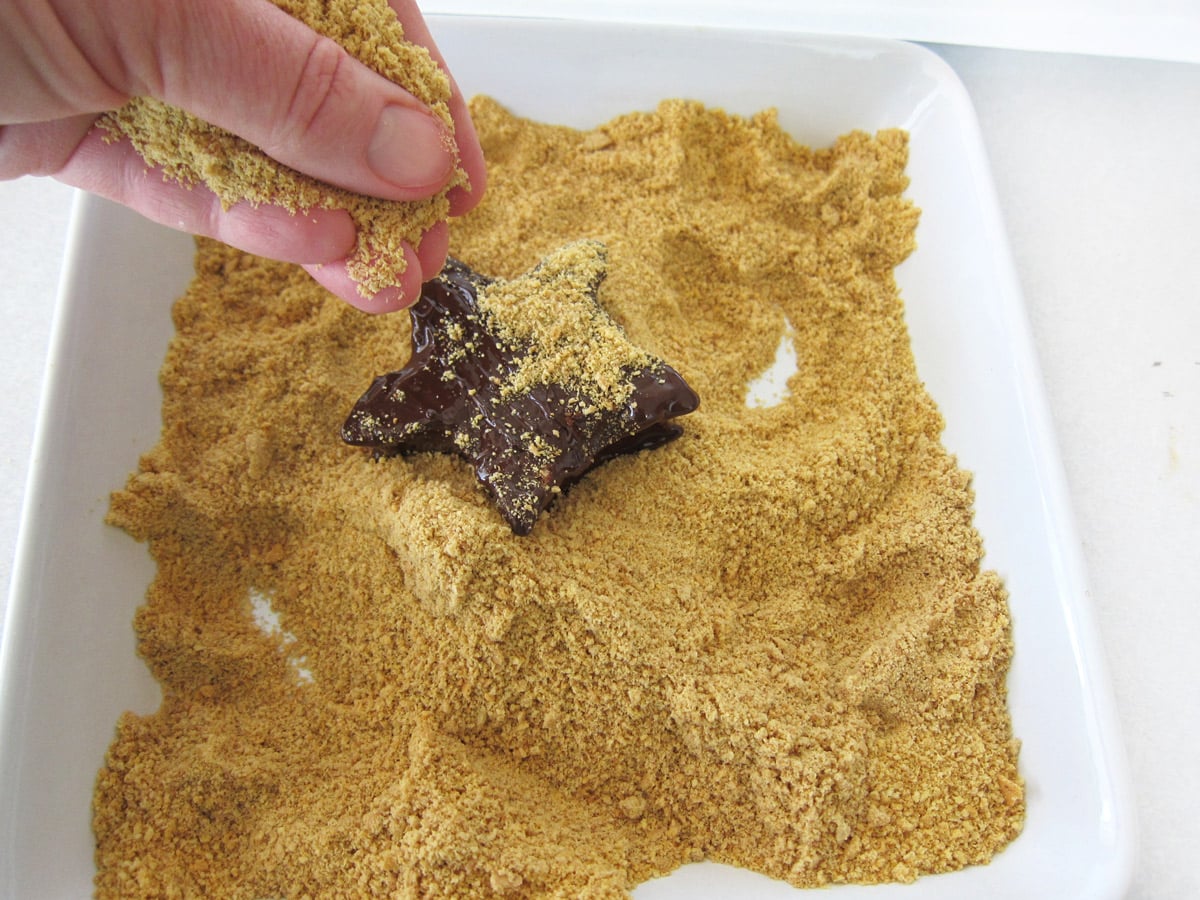
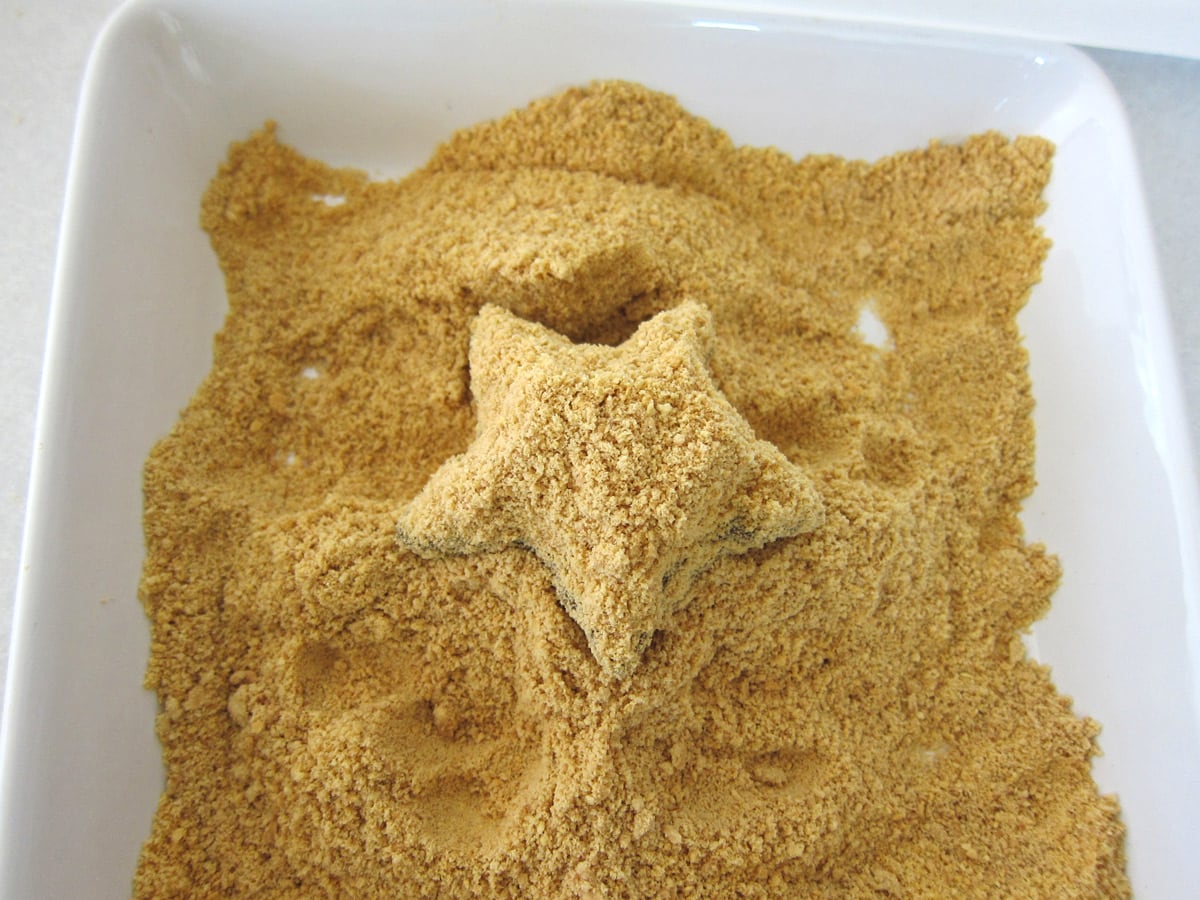
  • Set the marshmallow in the graham cracker crumbs.
  • NOT PICTURED (but shown in the video tutorial above) – attach two candy eyes now.
  • Sprinkle and push the crumbs over and up against the marshmallow star.
  • Completely cover the star with crumbs and allow to dry for 1-2 minutes in the crumbs.
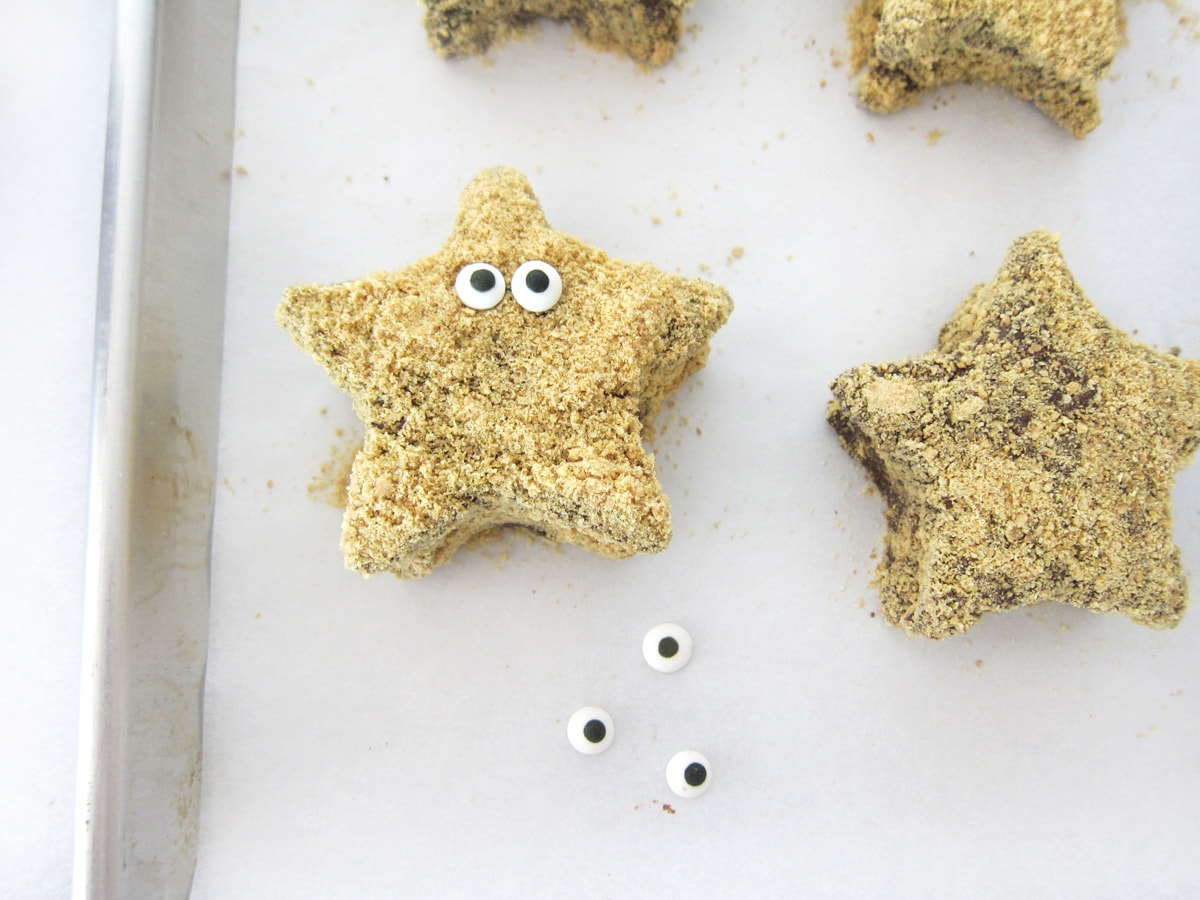
  • Remove from crumbs and set on a parchment paper-lined baking sheet or cutting board.
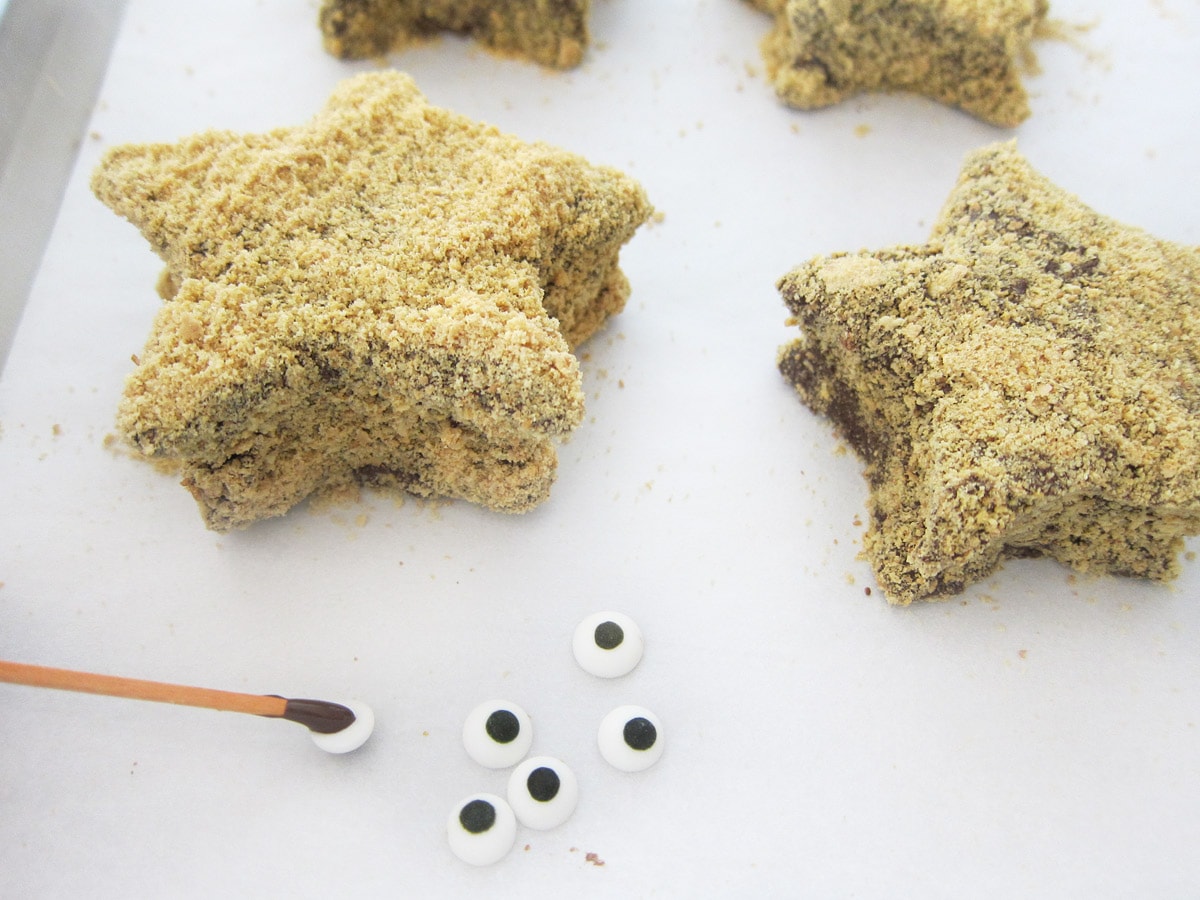
Homemade marshmallow stars can be dipped in chocolate and rolled in graham crackers to make Starfish S'mores.

I originally added the candy eyes to the graham cracker coated marshmallow starfish but found when creating my video that I could add them to the wet chocolate before sprinkling on the graham crackers.

If you don’t attach them to the wet chocolate you can use a toothpick to dig out small circles of the graham cracker crumbs where the eyes will be on each starfish. Add a dab of chocolate to the holes and place an eye on top.

How to store Starfish S’mores:

  • Store your marshmallow starfish in an airtight container for up to 1 week.
  • Package individual starfish in cellophane bags to give as party favors or gifts.
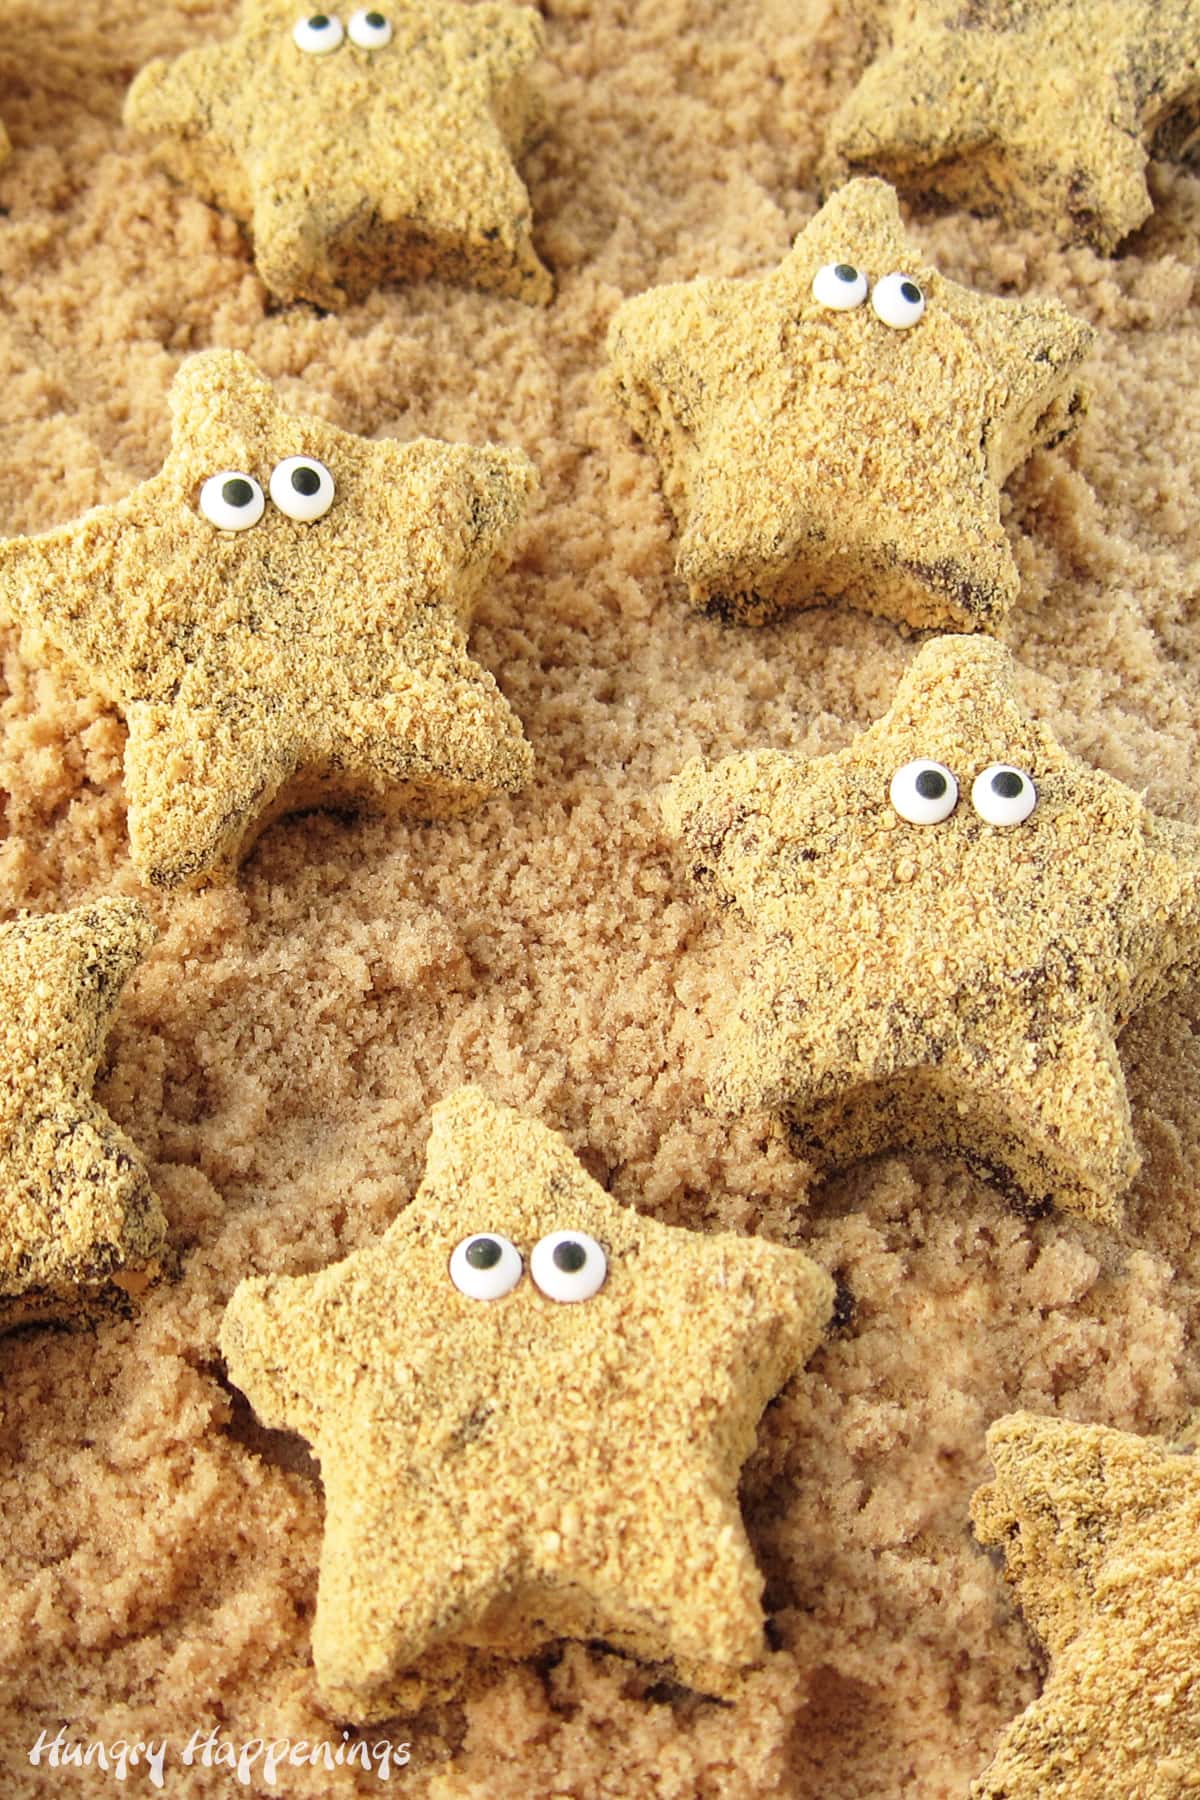
Before you head to the beach, make some sweet little Starfish S'mores to take along to snack on.

You will have lots of extra scrap pieces of marshmallow once you cut out all of your stars. I saved some to eat and dipped some in chocolate.

If you create a beach scene to display your starfish, you can use some of the chocolate-dipped scraps as big rocks. I didn’t mind having scraps, but if you need a lot of starfish and don’t want any scraps, you can put your marshmallow in a large pastry bag and pipe out stars on a cornstarch/powdered sugar lined baking sheet.

Just be sure to pipe a few layers of marshmallow, so each of your starfish is thick.

I created my beach scene using brown sugar sprinkled with a bit of white sugar – a bit messy, but it looked great.

Printable Recipe

Don’t forget to watch the video!

Starfish S'mores - Chocolate dipped homemade star shaped marshmallows coated in graham crackers crumbs.
Print
STARFISH S'MORES
Prep Time
45 mins
Cook Time
8 mins
Total Time
53 mins
 
Homemade star shaped marshmallows dipped in chocolate and graham cracker crumbs are decorated like starfish.
Course: Dessert
Cuisine: American
Keyword: beach party, s'mores starfish
Servings: 12
Author: Beth Jackson Klosterboer
Ingredients
Pan Prep
  • 1-2 teaspoons butter or non-stick cooking spray
  • 1/3 cup powdered confectioners sugar
  • 1/4 cup corn starch
Homemade Marshmallows
  • 1 cup water divided
  • 2 1/2 tablespoons unflavored gelatin (about 3 packages)
  • 1 1/2 cups granulated sugar
  • 1 cup light corn syrup
  • pinch of salt
  • 1 teaspoon pure vanilla extract
S'mores Toppings and Decorations
  • 50 squares of graham crackers crushed into fine crumbs
  • 16 ounces semi-sweet chocolate melted
  • 24 candy eyes
Instructions
Pan Prep
  1. Grease the bottom and sides of a 9" x 13" with butter or cooking spray.
  2. Combine the powdered sugar and corn starch and dust the inside of the pan.
Homemade Marshmallows
  1. Sprinkle gelatin over 1/2 cup of water in the bowl of a stand mixer.
  2. Let sit 5 minutes.
  3. Stir together remaining water, sugar, corn syrup and salt in a small saucepan set over medium heat.
  4. Cook, covered for 4 minutes.
  5. Remove lid and cook, without stirring until the mixture reaches 240 degrees Fahrenheit (about 7-8 minutes.)
  6. Slowly pour hot liquid into the gelatin with the mixer turned on low speed.
  7. Increase mixer speed to high and whip until the marshmallow becomes very thick and cools to a lukewarm temperature, about 12-15 minutes.
  8. Add the vanilla and whip just to combine.
  9. Spread the marshmallow into an even layer in the pan.
  10. Dust top with powdered sugar/corn starch.
  11. Let cool for 4 hours.
S'mores Toppings and Decorations
  1. Turn out onto a cutting board, cut into star shapes.
  2. Dip in melted chocolate, attach two candy eyes, and coat in crushed graham crackers.

  3. Set on a parchment paper lined baking sheet and allow the chocolate to harden before serving. 

This Starfish S’Mores recipe was originally published on July 14, 2011.
Embrace the beautiful weather that we are having and make some of these gorgeous and scrumptious Summer Fun Recipes.

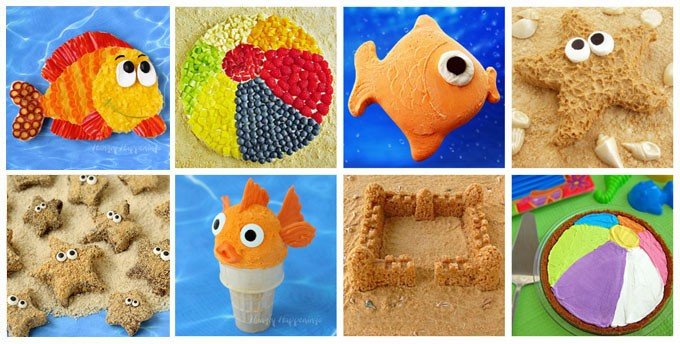
Make a splash at your next pool party by serving these fun food crafts.

Veggie Pizza Fish, Fruit Pizza Beach Ball, Goldfish Marshmallow, Peanut Butter Fudge Starfish
S’mores Starfish (made using store-bought marshmallows)
Ice Cream Cone Goldfish, Rice Krispie Treat Sand Castle, Beach Ball Pie

If you recreate these Starfish S’mores with Homemade Marshmallows
be sure to link to this tutorial and send a picture to beth@hungryhappenings.com,
so I can share it in my Readers’ Gallery.

Filed Under: Kid's Treats, Summer Fun Recipes Tagged With: animal themed food, animal themed treats, Beach-and-Pool-Party, Chocolate, Summer

The Sugar Academy Chocolate Making Courses
Previous Post: « Neapolitan Pudding Parfaits
Next Post: Marshmallows »

Reader Interactions

Comments

  1. Karen

    May 4, 2021 at 4:36 pm

    Yes!! Love that they are made with homemade marshmallows. The video and photos are excellent. Thanks for all your work to make sure we can make these easily!

    Reply
  2. Diane Miller

    April 4, 2016 at 2:41 pm

    This is the cutest idea ever .I just sent a family memember who makes the best homemade marshmallow this recipe Thank im going to make these

    Reply
    • Beth

      April 4, 2016 at 7:00 pm

      Thanks so much, Diane. I’m happy you are going to share the recipe! 🙂

      Reply
  3. Christy

    February 16, 2016 at 11:00 pm

    About how many does one recipe make?

    Reply
    • Beth

      February 17, 2016 at 6:03 pm

      I got one dozen stars cut out of one pan of homemade marshmallows, but you could make more or less depending on the size of the cookie cutter you use.

      Reply
  4. Jennifer Prior

    June 14, 2015 at 5:41 am

    These are sooooo cute! Thanks for the idea and tutorial.

    By the way, I'd like to invite you to post on my new blog hop (www.myflagstaffhome.com) that is open all weekend, if you're interested.

    Jennifer

    Reply
  5. Kati

    June 10, 2015 at 12:39 am

    I love homemade marshmallows. But your stars are too cute, I would feel guilty eating them! Maybe I'll have to try them for our 4th of July party!

    Reply
  6. Kim Denne

    July 4, 2014 at 1:22 am

    These are RIDICULOUSLY cute!!! Such a clever and fun idea 🙂

    Reply
  7. Kat@Home. Made. Interest.

    June 17, 2014 at 7:49 pm

    What a cute and delicious idea. I'm pinning this…now I just have to convince someone to have a beach htemed birthday! 😉

    Reply
  8. April Lord-Brown

    September 20, 2013 at 4:56 pm

    I have failed at this twice. Been trying all week. I tried to make the easy premade marshmallow version, but my microwave is broke. I tried to heat the marshmallow on the stove the way I would for rice crispy treats. Burnt them. On the upside, they tasted like a marshmallow that had been roasted on a fire, so I thought they tasted yummy.. but I will be serving to a bunch of city people who would taste burn and have no context of a real smore. Then I tried melting them over boiling water, uhh they didn't melt much and I was unable to press them into pan. I'm doing one more desperate attempt tonight before I give up… I really really wanted these for my daughter's underwater clifford birthday party. Which is Tomorrow. Sigh. It looks so easy and so beautiful and fun. Sadness.

    Reply
    • beth

      September 21, 2013 at 2:37 am

      Sorry to hear about all your mishaps. I would have probably tried the same things you did. I don't really know another way to melt store bought marshmallows. I do love the homemade marshmallows and do recommend them for this recipe. I hope you are able to get this to work for your party.

      Reply
  9. Anonymous

    July 10, 2013 at 2:37 am

    They actually sell star-shaped marshmallows. Already made.
    I bought some in red, white, and blue for the 4th of July and
    am going to use the leftovers to make these cute starfish.

    Reply
    • beth

      July 11, 2013 at 12:02 pm

      Yes, I saw those in the stores here this year and bought some too. I saw large ones that would be perfect for these starfish and some really small ones that I don't think would look much like stars once they were dipped in chocolate. I always love when a product comes on the market that makes creating one of my project easier! Have fun making the starfish.

      Reply
  10. MamaBenson7

    June 28, 2013 at 12:46 am

    What a great idea! I am definitely going to be doing these this weekend with my girls. Thanks so much. How fun!

    Reply
  11. Amanda

    May 30, 2013 at 7:35 am

    I tried to make these tonight. My son's first birthday is in a couple of weeks and we are doing an under the ocean themed party for him and I thought these were ADORABLE so I decided to do a trial run.. I'm not too great with baking or being creative but I'm pretty good at following directions. I don't have a mixture so I used store bought marshmallows. The first part seamed easy enough all the way to putting the marshmallows in the pan to cool. I let them cool for an hour but they still seamed way too sticky. I was impatient so I stuck them in the freezer for a few minutes which seemed to help when it came to cutting out the star shapes. Although I quickly realized I think I had the wrong type of cookie cutter? Mine is plastic and small… I thought I had a different one also but I don't know what happened to it 🙁 anyways it was a pain because the cutter I had wouldn't cut all the way through the marshmallows. So I had to cut them all out with a knife. Once I did that, I melted the chocolate as directed on here, but then as the comment above, mine turned into blobs also 🙁 I was so sad because they're so cute I really want them at his party! Do you have any suggestions? Also even after they cooled they were pretty messy and seemed just too gooy and nothing like your photos!! Maybe they were just too small? I'm not sure :/ I want to make them again but I'm scared they wont turn out again!

    HELP.

    Reply
    • Beth Jackson Klosterboer

      May 30, 2013 at 12:01 pm

      Hi Amanda,

      I know how frustrating it can be trying to re-create a recipe without the proper tools and ingredients. I used homemade marshmallows because I think they taste great and are easier to work with, but have had success with store bought marshmallows too. They are stickier and have a more rubbery consistency. You can cut through them, but you do need to have a cookie cutter that has inch high sides and are made of thin material. Plastic cutters, as you found, do not have very high sides and are rather thick. A metal cutter definitely works better.

      The only reason I know why the marshmallows turned into blobs is that the chocolate was too hot, as mentioned above. If you don't have a thermometer, the best way to test the chocolate is to put a dab on your lip. You want it to feel cool, yet still be liquid. It's best to cool the chocolate to about 90-91 degrees which is about 8 degrees cooler than body temperature. If you dip your marshmallow stars into cooler chocolate, they will not melt then they will hold their shape nicely once coated in the crumbs.

      I do hope you give this another try with the metal cookie cutter. They really are cute and would make a great addition to your ocean themed birthday party. If you have any other questions, don't hesitate to ask.

      Reply
  12. Reagan Leigh

    March 13, 2013 at 11:20 pm

    I want to know how anyone was able to make these?!?! My stars turned to blobs in the chocolate!!! My kitchen is a mess and I've spent $ and all day trying to make these stupid things!! Cute, but impossible (at least with store bought marshmallows)!

    Reply
    • Beth Jackson Klosterboer

      March 14, 2013 at 2:31 am

      Hi Reagan, I'm so sorry to hear it didn't go well for you. Your chocolate must have been too hot which melted the marshmallows. I apologize for not covering that in my tutorial. No one has mentioned it before, so I hadn't even thought about it. When you melt chocolate, it's best to not let it get above 115 degrees Fahrenheit, but it's best to use even cooler chocolate when you dip something into it. I usually use tempered chocolate which is 90 degrees and had no trouble with my marshmallows melting. I am going to add note to the tutorial above about checking the temperature.

      If you are ever working on one of my recipes again and are having trouble with something, please let me know and I'll try to help you through it.

      Reply
  13. TalisHa Vining

    December 9, 2012 at 9:52 pm

    Hi luv it how far in advance can I make the starfish s'mores and how can I store them to sty fresh

    Reply
    • Beth Jackson Klosterboer

      December 10, 2012 at 12:26 am

      Keep them stored in an airtight container, like Tupperware or a Rubbermaid container. Just leave them at room temperature and they will keep for at least one week.

      Reply
  14. melissa @ mamamiss.com

    August 1, 2012 at 6:32 am

    I LOVE THESE!!! so adorbs – I just pinned them! They are genius 🙂 Found you on Trick or Treat Tuesday! Thanks for sharing 🙂

    xx melissa @ mamamiss

    Reply
  15. Megan's Cookin'

    May 29, 2012 at 2:23 pm

    These have to be made this Summer!!!

    Reply
  16. Madeleine

    April 27, 2012 at 3:44 pm

    Just made these for my daughters under the sea themed birthday party. A BIG mess.. crazy sticky.. lol. But they turned out really cute and I know everyone will love them. Thank You 🙂

    Reply
  17. Beth @ Hungry Happenings

    August 8, 2011 at 10:20 am

    Hi Anonymous, yes you can use store bought marshmallows to create these starfish. Go to…

    https://hungryhappenings.com/2011/07/use-store-bought-marshmallows-and-sand.html

    to see how!

    Reply
  18. Anonymous

    August 8, 2011 at 5:38 am

    Can ready made marshmallows be used? Is it possible to melt them and then let it set?
    Thanks!

    Reply
  19. Sarah Rice

    August 4, 2011 at 9:03 pm

    Holy cuteness!! I just pinned this for muffin tin meals. So adorable

    Reply
  20. Erin

    August 2, 2011 at 8:02 pm

    Oh my gosh! These are so darn cute! I'm pinning these =o)

    Reply
  21. Sommer

    July 30, 2011 at 4:04 pm

    Wow what a neat idea! Lots of work but very cute end product! Would love to have you link to my party this weekend too! http://designergarden.blogspot.com/2011/07/vip-party-21.html

    Reply
  22. Rachel at Sun Scholars

    July 30, 2011 at 12:41 am

    Awesome!!!! Featured these too! Thanks so much for sharing at Sun Scholars!

    Reply
  23. bridget {bake at 350}

    July 24, 2011 at 8:29 pm

    These are so incredibly darling!

    Reply
  24. Beth Jackson Klosterboer

    July 22, 2011 at 4:07 pm

    mommy2luke2008 – Thanks for posting a link!

    Reply
  25. Beth @ Hungry Happenings

    July 22, 2011 at 1:37 am

    Hi Michelle,

    As a matter of fact I just wrote a new post showing you how to use store bought marshmallows to make the starfish and other sea creatures. Go to https://hungryhappenings.com/2011/07/use-store-bought-marshmallows-and-sand.html

    Reply
  26. Michelle

    July 22, 2011 at 1:25 am

    I LOVE these! Do you think there is an alternative to making your own marshmallows? Would marshmallow fluff work at all? I don't know if there's a way you could firm up the fluff…?

    Reply
  27. Mindie Hilton

    July 21, 2011 at 7:22 pm

    Following you with GFC and just liked you on fb too! These rock! Thanks for linking to Bacon Time, hope to see you this week too.

    Reply
  28. Beth @ Hungry Happenings

    July 20, 2011 at 10:01 pm

    horseygal – the eyes are storebought edible candy eyes. Wilton makes them, as well as, a few other companies. You can find them at craft stores and cake/candy decorating stores. There is also a link above in the ingredients list so you can buy them from Amazon.com.

    You could make your own using royal icing, modeling chocolate or fondant.

    Reply
  29. Heather

    July 20, 2011 at 7:25 pm

    These are totally awesome!

    Reply
  30. horseygal

    July 20, 2011 at 3:56 pm

    very cute, how did you make the eyes?

    Reply
  31. InMyOwnStyle

    July 19, 2011 at 3:33 pm

    Hi Beth-

    I love these and posted about them on my blog today. I also included them on my DIY daily link page. Soooooo cute and yummy too.

    My best-Diane

    Reply
  32. Diane {Created by Diane}

    July 19, 2011 at 6:22 am

    These are adorable!!!

    Reply
  33. Charissa

    July 18, 2011 at 8:54 pm

    Haha, I love it! I'm definitely not a kid, but I'm in love…and could eat a dozen, I'm sure!

    Reply
  34. Jenn Erickson

    July 16, 2011 at 5:22 pm

    Wow! Absolutely whimsical and brilliant! I shared a link with my readers on Facebook and can't wait to see what other creative recipes are in store!

    New follower,
    Jenn/Rook No. 17

    Reply
  35. criticsinmykitchen

    July 16, 2011 at 10:03 am

    Wow, these look amazing! They are so adorable! Thanks for sharing!

    Reply
  36. Sherri

    July 16, 2011 at 2:26 am

    This is seriously the cutest thing ever! I am so excited to be your newest follower!

    Reply
  37. Tami

    July 16, 2011 at 2:22 am

    These are sooo adorable! Just can't help but smile when looking at them!

    Reply
  38. Suzy

    July 15, 2011 at 10:09 pm

    I don't know why I came here when I am on a diet, and I LOVE s'mores. Those are so stinking cute, and I'm sure they are delicious, too. What a creative girl you are.

    Reply
  39. Beth Jackson Klosterboer

    July 15, 2011 at 9:57 pm

    Thanks Trish.

    Thanks so much Chic Cookies! I always appreciate being featured on ediblecrafts.craftgossip.com.

    Hi Heidi, If you make homemade marshmallows using a hand held mixer, you need one that is pretty powerful (not the cheap $10 kind.) When you make them, give your mixer a break a few times during the mixing process or your mixer could overheat and die on you. Mix for maybe two minutes then let it rest for a minute or two, and repeat until you have whipped marshmallows. In the next few days, I'll be posting a way to make these using store bought marshmallows. Stay tuned!

    Reply
  40. Chic Cookies

    July 15, 2011 at 6:40 pm

    These are so so awesome. Love the googly eyes! I posted on ediblecrafts.craftgossip.com!

    Reply
  41. Heidi @ Food Doodles

    July 15, 2011 at 7:05 pm

    So cute! Oh my goodness! I love these 😀 The little eyes are awesome. I've wanted to make my own marshmallows for so long now but I don't have a mixer like that, do you know if they can be made with a hand mixer? I will try them some time! 😀

    Reply
  42. Trish - Sweetology101

    July 15, 2011 at 2:11 pm

    these are the cutest things ever….

    Reply
  43. The Procrastobaker

    July 15, 2011 at 1:36 pm

    These are AMAZINGLY cute! I dont know anyone that wouldnt be over the moon to receive one of these lovelies, what a gorgeous idea and your photos are simply wonderful 🙂

    Reply
  44. Michaela (Recepty z Indie)

    July 15, 2011 at 12:03 pm

    Hahaha that looks great! So funny 🙂

    Reply
  45. Lucy

    July 15, 2011 at 11:46 am

    This is such a cute idea! Love the step-by-step too 🙂

    Reply
  46. Beth @ Hungry Happenings

    July 15, 2011 at 2:03 pm

    Thanks Procrastokaer, it is so nice to get a compliment on my photos. I've been working very hard to learn photography, which is, in my opinion, much harder than creating and making my recipes. I'm glad all of my hard work is paying off.

    Reply
  47. Kristen

    July 15, 2011 at 1:18 pm

    What a fun, and not to mention adorable, recipe!

    Reply
  48. Nicole @ It's Feeding Time at the Zoo

    July 15, 2011 at 9:09 am

    These are so adorable. I love all of your creations. I don't have kids, but that's not going to stop me from making cute food!

    Reply
  49. Beth @ Hungry Happenings

    July 15, 2011 at 12:51 pm

    Thanks everyone. I think it is just so wonderful to have so many readers from all over the world. I'm so glad you have all found my blog.

    Gerry, do you roast your marshmallows over the fire? I love them roasted:)

    Nicole, I don't have kids either, and I love creating all of this fun food. I share it with family, friends, and neighbors and that makes a lot of people happy!

    Reply
  50. Gerry/Gewoon Lekker Gewoon

    July 15, 2011 at 7:14 am

    Hello, I'm from Holland and saw your blog on Tastespotting. Fantastic, lots of great idea's. I'm not sure wether I'm ever gone use them but love them. In Holland we only use marhmallows for the BBQ. Bye, Gerry

    Reply
  51. linda

    July 14, 2011 at 7:16 pm

    An idea for the left over marshmallow pieces – rocky road! You could cut the marshmallows in pieces and mix with toasted walnuts or pecans and melted chocolate. Put in a pan, chill and cut into squares.
    Just a thought! (o;

    Reply
  52. Beth @ Hungry Happenings

    July 14, 2011 at 9:47 pm

    Thanks Jill.

    Great suggestion Linda. I think the Rocky Road bars would be a perfect way to use up the marshmallow scraps.

    Reply
  53. Jill @ KitchenFunWithMy3Sons.com

    July 14, 2011 at 5:36 pm

    Very cute!!

    Reply

Leave a Reply Cancel reply

Your email address will not be published. Required fields are marked *

Recipe Rating


This site uses Akismet to reduce spam. Learn how your comment data is processed.

Primary Sidebar

WELCOME!

See all recipe categories

The Sugar Academy Chocolate Making Courses

Footer

Popular Kid Friendly Recipes

Cookie Monster Rice Krispie Treats with candy eyes, Tootsie Roll mouths, and mini Nutter Butter Cookies
Halloween Mickey Mouse Oreo Cookies decorated using candy clay are fun to make for your Halloween parties.
Turn Reese's Cups into sweet little otters then use them to create some adorable Sea Otter Cupcakes. These treat will be perfect for you Finding Dory Party.
Mickey Mouse Galaxy Cookies - chocolate cookies topped with chocolate ganache and galaxy sprinkles.
Decorate this cute Olaf Mickey Cake for your Disney Frozen party. It's easy to create using a simple cake decorating technique.
This Winter Wonderland White Chocolate Popcorn speckled with candy snowflakes and blue sprinkles would make a great treat for a Frozen party, a nice gift for Christmas, or a wintertime snack.

Hungry Happenings is a participant in the Amazon Services LLC Associates Program and occasionally writes sponsored posts which will be disclosed within the post. We value your privacy. Please read our Privacy Policy, Disclosure, and Terms of Service.

Copyright © 2022 Hungry Happenings