Learn how to decorate these Cute Smiling Graduates using delicious modeling chocolate. These Graduation Cookies will get an A+ from all of your graduation party guests.

Our next-door neighbor graduated from high school recently, and I helped create desserts for his party. These Graduation Cookies were my favorite of the desserts, and the party guests all agreed that they deserved an A+.
Each cut-out cookie was flavored with a splash of almond extract to give it a lovely flavor, and then the cookie was decorated with modeling chocolate.
I could have used royal icing like I did when I decorated my Basketball Piñata Cookies and my Apple Piñata Cookies, but I'm not that skilled with royal icing, and I love working with modeling chocolate.
Plus, I just love the soft texture and the white chocolate flavor of modeling chocolate in combination with a crunchy sugar cookie.

And, of course, the cookies are darn cute too!
I kept the design super simple by drawing a simple smiley face, using a black food coloring marker, onto a peach-colored modeling chocolate face. Each of my graduates is wearing a blue grad cap, but you can color your grad caps to match your school colors.
The tassels can also be colored accordingly. I chose to make my tassels gold. I colored the white modeling chocolate with some gold gel food coloring, then added a bit of gold luster dust to make it shimmer slightly.
What is modeling chocolate?
- Modeling Chocolate is a blend of corn syrup and chocolate (in this case, white chocolate) that comes together to create a candy clay that can be used to decorate cookies, cupcakes, or cakes.
- It looks similar to fondant, but it tastes like chocolate.
- It can be colored using any type of food coloring, or it can be made using colored confectionery coating (Candy Melts).
How to make modeling chocolate?
- Melt white chocolate.
- Allow it to cool to about 91-92 degrees, stirring it as it cools.
- Stir in corn syrup until it thickens.
- Place it in a zip-top bag and allow it to cool for at least an hour.
- Break off pieces and knead it until smooth.
You can find a very detailed tutorial and a full recipe to make modeling chocolate on my How to Make Modeling Chocolate Page.
You'll also find instructions for coloring, modeling chocolate, and fixing it if it becomes greasy, dry, or crumbly.
Modeling Chocolate is known as Candy Clay when it's made using Candy Melts or any Confectionery Coating.
- If you are making large batches of a certain color (like the blue I used for my grad caps), I suggest using colored Candy Melts to make candy clay.
If you love working with modeling chocolate (Candy Clay), then you might really enjoy my book, Candy Clay Creations, which is filled with detailed step-by-step instructions for making the cutest treats using candy clay. There are 102 pages filled with tips on making candy clay decorations that will turn ordinary treats into amazing, show-stopping desserts.
If you'd like more information, check out my Candy Clay Creations page. The book is available in both printed and ebook formats.

Instructions
- Start by making my favorite cut-out cookie dough. See the recipe at the bottom of the post.
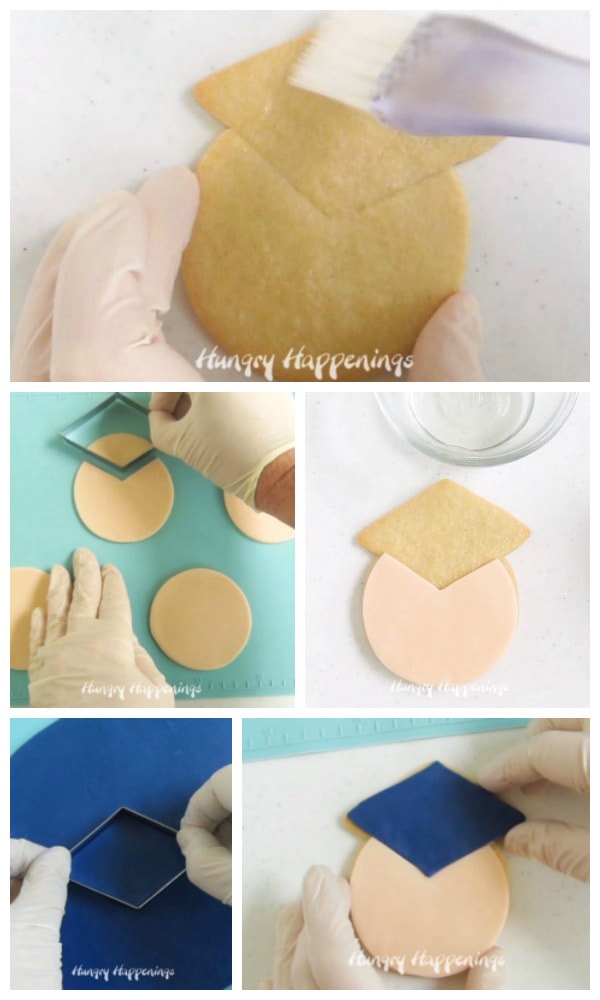
- Cut twelve 3-inch circles out of the cookie dough.
- Cut twelve diamond-shaped grad caps out of the dough.
- Use the same diamond-shaped cookie cutter to cut a triangle-shaped notch out of the circle of dough.
- Then brush two long edges of the diamond-shaped dough and insert it into the notch in the circle of dough.
- Use your finger to press the seams together.
Pro Tips
- This dough seriously doesn't spread much at all, that's why I love it, but I also like to pop my cookies in the fridge for about 15 minutes before baking just to make sure they don't spread.
- If you roll out your dough on a silicone mat, you can use just the tiniest bit of flour to dust the mat. The dough really won't stick.
- I also lightly dust a silicone rolling pin, and it won't stick either.
- Be sure to pick up your dough before you've given it its last roll to ensure it isn't sticking.
- You can even bake your cookies right on your silicone mats.
- If you don't have a silicone mat, then dust your counter or cutting board liberally with flour and roll out the dough. Transfer your cookies to a parchment paper-lined baking sheet before baking.
Decorate with modeling chocolate.
- Make one batch of modeling chocolate.
- Reserve about 2 tablespoons of white modeling chocolate to color to make the tassels.
- Color about ⅔ of the white modeling chocolate using flesh tone food coloring. See instructions here.
- Color the rest using whatever color you want to make your grad caps; in this case, I used royal blue.
- Let the colored modeling chocolate rest at room temperature for about 30 minutes.
- Your modeling chocolate will become warm as you knead in the color so it's best to let it cool down.
- Roll the flesh tone modeling chocolate out to about 1/16th inch thickness.
- If using a cutting board or your countertop, you'll need to dust it with corn starch or powdered sugar.
- If using a silicone mat and a silicone rolling pin, you can simply roll it out.
- Cut out twelve 3-inch circles.
- Then roll out the blue modeling chocolate to the same thickness.
- Cut out twelve diamond-shaped grad caps.
- I flattened a square cookie cutter into a diamond to make my grad caps.
- Use that same diamond cutter to cut a triangle-shaped notch from each circle.
- Brush a light coating of corn syrup over a cookie.
- Place the circle and the diamond over the cookie, pressing the seams together.

Add the tassels and smiles!
You can hand-roll the modeling chocolate to create these tassels, but it is so much quicker and easier if you use a clay extruder.
- Color your modeling chocolate appropriately for your tassels. I added some gold gel food coloring and a bit of edible gold luster dust to get a nice gold colored modeling chocolate.
- Roll the modeling chocolate into a tube.
- Insert into the barrel of a clay extruder.
- Attach a single-hole disc and screw on the cap.
- Push the chocolate clay through the extruder to create a single strand, then cut it into twelve 1-inch pieces for the top section of the tassel.
- Brush a dot of corn syrup in the center of each grad cap.
- Attach the single strand to the corn syrup.
- Then attach a multi-hole disc to the extruder.
- Push the candy clay through the multi-hole disc to make lots of little strands.
- Cut the strands at about ¾ of an inch.
- Pinch together the strands on one end and attach them to the single strand using corn syrup.
- Pinch off a small piece of modeling chocolate that matches your grad cap (in my case, royal blue) and roll it into a ball, and flatten it in the center of the grad cap over the end of the single strand.
I'm sorry if that sounds a bit confusing. It is hard to explain how to decorate these Smiley Face Graduate Cookies, so just watch the video to see how it's done!
Related Recipes
Recipe

Cute smiley face graduate cookies decorated with modeling chocolate make great desserts for your graduation party.
- 2 cups all purpose flour plus more if needed
- ¼ teaspoon salt
- ¼ teaspoon baking powder
- ½ cup butter softened slightly
- ¾ cups sugar
- 1 large egg
- ¾ teaspoons pure vanilla extract
- ½ teaspoon almond extract
- 16 ounces white chocolate
- ⅓ cup light corn syrup plus more if needed
- food coloring flesh tone and other color for your grad caps
-
Preheat oven to 350 degrees Fahrenheit.
-
Mix the flour, salt, and baking powder together in a bowl.
-
Set aside.
-
Cream butter and sugar until light and fluffy.
-
Stir in egg, vanilla, and almond extract.
-
Add dry ingredients and stir just until combined.
-
If the dough is sticky, add a small amount of flour.
-
Roll out cookie dough, on a floured surface, to about ⅛th inch thickness.
-
Cut twelve 3 inch circles out of the cookie dough.
-
Cut out twelve diamond-shaped grad caps out of the dough.
-
Use the same diamond-shaped cookie cutter to cut a triangle shaped notch out of the circle of dough.
-
Then brush two long edges of the diamond-shaped dough and insert it into the notch in the circle of dough.
-
Use your finger to press the seams together.
-
Bake for 10-14 minutes until the edges look set and the tops no longer look wet.
-
Allow cookies to cool completely before decorating.
-
Reserve about 2 tablespoons of white modeling chocolate to color to make the tassels.
-
Color about ⅔ of the white modeling chocolate using flesh tone food coloring.
-
Color the rest using whatever color you want to make your grad caps.
-
Let the colored modeling chocolate rest at room temperature for about 30 minutes.
-
Roll the flesh tone modeling chocolate out to about 1/16th inch thickness.
-
Cut out twelve 3 inch circles.
-
Then roll out the blue modeling chocolate to the same thickness.
-
Cut out twelve diamond shaped grad caps.
-
Use that same diamond cutter to cut a triangle shaped notch from each circle.
-
Brush a light coating of corn syrup over a cookie.
-
Place the circle and the diamond over the cookie pressing the seams together.
-
Repeat.
-
Color your modeling chocolate appropriately for your tassels.
-
Roll the modeling chocolate into a tube.
-
Insert into the barrel of a clay extruder.
-
Attach a single hole disc and screw on the cap.
-
Push the chocolate clay through the extruder to create a single strand then cut it into twelve 1-inch pieces for the top section of the tassel.
-
Brush a dot of corn syrup in the center of each grad cap.
-
Attach the single strand to the corn syrup.
-
Then attach a multi-hole disc to the extruder.
-
Push the candy clay through the multi-hole disc to make lots of little strands.
-
Cut the strands at about ¾ of an inch.
-
Pinch together the strands on one end and attach it to the single strand using corn syrup.
-
Pinch off a small piece of modeling chocolate that matches your grad cap and roll it into a ball and flatten it in the center of the grad cap over the end of the single strand.
Recipe Video
Store your cookies at room temperature for up to 7 days.

- Banana Split Bars – A Fun and Easy Summer Dessert - March 4, 2026
- Pineapple Fudge (No Candy Thermometer Needed!) - March 4, 2026
- No-Bake Peanut Butter Pie Recipe - March 3, 2026

Rosa says
Excelentes recetas voy hacer algunos esos gracias por compartir recetas
Beth Klosterboer says
You are welcome. Have fun making the cookies. (De nada. Diviértete haciendo las galletas.)
Jan Marsicek says
Where does the cookie recipe mention oven temp and baking time?
Beth says
Hi Jan. Bake the cookies at 350 degrees Fahrenheit for 10-14 minutes. If you make your cookies a different size you may need to adjust the baking time.
Alison says
I love the look of the grad party cookies. Can I freeze them? Thank you.
Beth says
Thanks, Alison. You can bake then freeze the cookies but you will need to add the modeling chocolate decoration after you thaw the cookies. Modeling chocolate tends to get sticky when it's been frozen or refrigerated. I would make the modeling chocolate decorations, then place them in zip-top bags and store them at room temperature for up to a month. Then place the decorations on the cookies up to 4 days before you plan to serve them.
The Partiologist says
So cute, they will definitely put a smile on every Graduate!
Pamela says
I agree they are very cute. They remind me of a series of ceramic figures doing a vast number of activities which could be chosen and painted. In the mid 1970s painting and glazing ceramics was quite a popular hobby. I discovered the shop (I was in high school) and very soon my mom and little brother were going also. My brother lasted about a year, my mom went for years and my folks still have the three mice he glazed sitting in a sunken area on the top of their grandfather clock. I'm sure you get it, hickory, dickory, dock.....there are still pieces around we did for serving, turkey covered soup bowls, beautifully muted deep orange terrine or punch bowl and ladle. Anyway, I did several of those Smiley characters. I dated a boy whom I made the baseball player. My best friend went to nursing tech our last two years of high school and had a capping ceremony. I made her a nurse. I did others, just can't remember what any more. There were gradutes which were VERY popular which people did. In fact, some only came to the shop to do that piece and when finished, they were gone. I actually miss doing that hobby. Maybe one day it will have a revival, like platform shoes and 70s clothes. Its a shame it died away. Besides endless decorative items which could be done there were numerous useful items such as those mentioned. A person could create things for years and never run out. I believe most popular were the Christmas trees which had a light and plug installed. Then, colored lights were placed in dozens of tiny holes and when switched on, the lights are lit. I bet every person who reads this blog has seen one in their life at some point. I see many out in yard sales today. Its a shame, someone worked hard on that. But these cookies are every bit as adorable as those figurines.
Beth says
I don't remember the figurines but I definitely remember the Christmas trees. I had one until a few years ago.