Looking for an amazing dessert to make for your kid's graduation party?
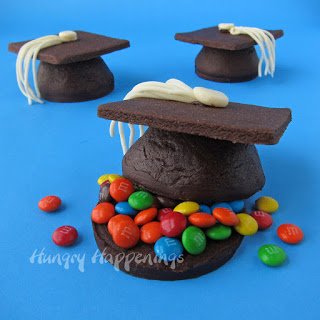
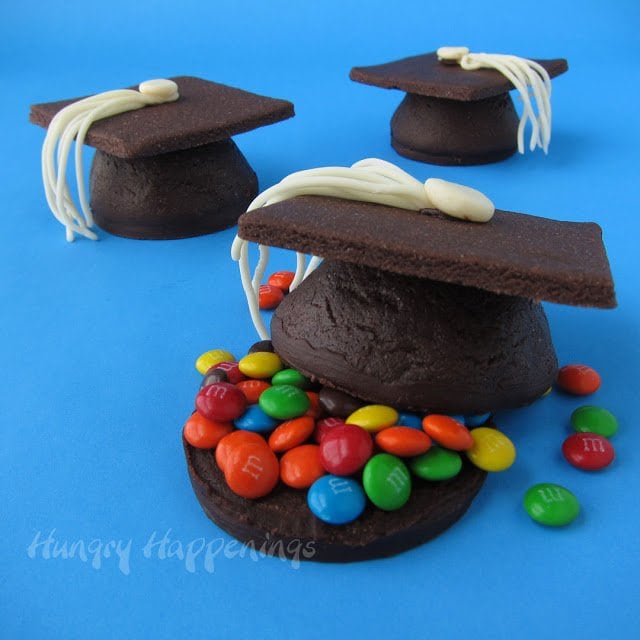
These decadently creamy Flourless Chocolate Cake Graduation Caps will not disappoint! Each mini chocolate cake topped with a square of chocolate is decorated with white modeling chocolate to look like a mortarboard.
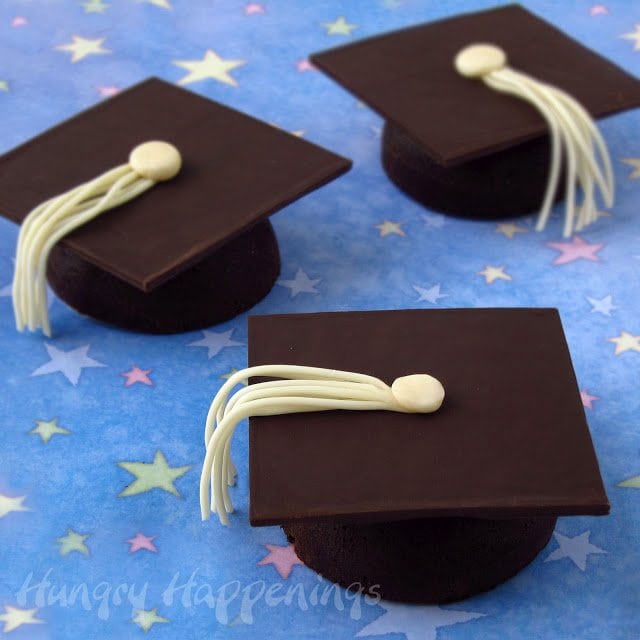
Graduation is a big deal, whether it's a high school or college commencement, so the dessert you serve at your party should be worthy of the occasion and these Flourless Chocolate Cake Graduation Caps are just that.
They are seriously amazing. The base of these grad caps is a flourless chocolate cake that is topped with a square of dark chocolate and white modeling chocolate tassels.
The flourless chocolate cakes are so creamy and smooth that each bite will melt in your mouth and they have an intense chocolate flavor so a few bites are all anyone will need to satisfy a chocolate craving.
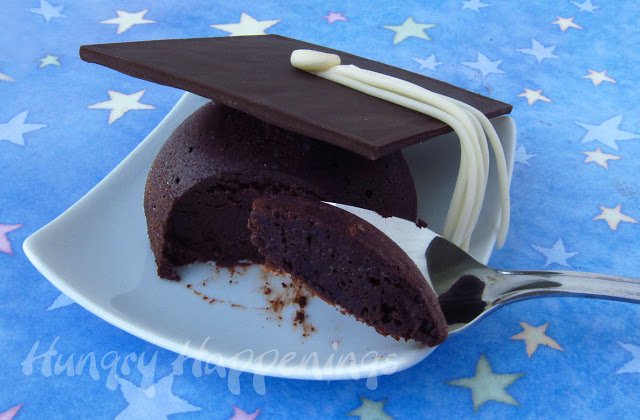
If you have ever had a flourless chocolate cake that was lacking in chocolate flavor or worse yet dry, you are going to fall in love with this recipe. I can't tell you how many bad flourless chocolate cakes I have had at restaurants.
I honestly don't know why so many recipes produce a dry cake. This recipe, adapted from America's Test Kitchen, is one of my absolute favorite desserts. It produces a cake that has a texture somewhere between a cheesecake and a creamy chocolate truffle.
It's decadently rich and incredibly creamy.
Whether you are making desserts for a graduation party or not, I highly recommend you make these flourless chocolate cakes. You don't need to decorate them to look like a graduation cap if you want to serve them for dessert tonight.

Before you begin, you'll need to make a small batch of white modeling chocolate, which can be colored to match your graduate's school colors or tassel colors, and you'll need to prepare some dark chocolate or confectionery coating.
For instructions and recipes, read my Chocolate Making Tips tutorial.
Ingredients
Flourless Chocolate Cake:
- semi-sweet chocolate - Use good quality chocolate with a flavor that you really like as this cake will taste like a creamy version of the chocolate bar you use.
- unsalted butter - Cut into small cubes.
- eggs
Decorations:
- 16 ounces melted and tempered pure dark chocolate (or use confectionery coating/candy melts)
- white modeling chocolate (recipe here) or fondant
- 1-2 tablespoons chocolate frosting or Nutella
Supplies
I earn a small commission when you make a purchase using any affiliate links on this page at no extra cost to you.
3 half sphere silicone molds (2 ¾" round)
roasting pan or 9" x 13" baking pan
digital thermometer
pizza wheel or knife
2 or 4 baking sheets that are the same size
parchment paper
clay extruder, optional - but makes creating the tassel so much easier!
You can find some of the supplies on Amazon.
 for Chocolate, Cake, Jelly, Pudding, Handmade Soap") 3 Pack 6 Holes Large Hemisp...Shop on Amazon
3 Pack 6 Holes Large Hemisp...Shop on Amazon  COMIART Extruder for Potter...Shop on Amazon
  Chicago Metallic Profession...Shop on Amazon
  10 Pack") Hygloss 8.5" x 11" Acetate ...Shop on Amazon
Hygloss 8.5" x 11" Acetate ...Shop on Amazon  Peter's Burgundy Semisweet ...Shop on Amazon
Instructions
Preheat oven and a roasting pan filled with enough water to go halfway up the sides of the silicone mold, at 325 degrees Fahrenheit.
NOTE: You will want to bake your cakes in a water bath so that they will bake evenly and be creamy and smooth. I found it easiest to use a roasting pan with a removable rack for this job.
It isn't necessary, but it sure is handy. I filled my roasting pan with about an inch of water and set it in my oven. Then I preheated my oven to 325 degrees Fahrenheit and allowed the water to get hot.
When it came time to place my filled silicone molds in the water-filled roasting pan, I set one on the rack and simply lowered it into the pan. I could only fit one silicone mold on the rack at a time, so I baked 6 cakes at a time.
Flourless Chocolate Cake Batter
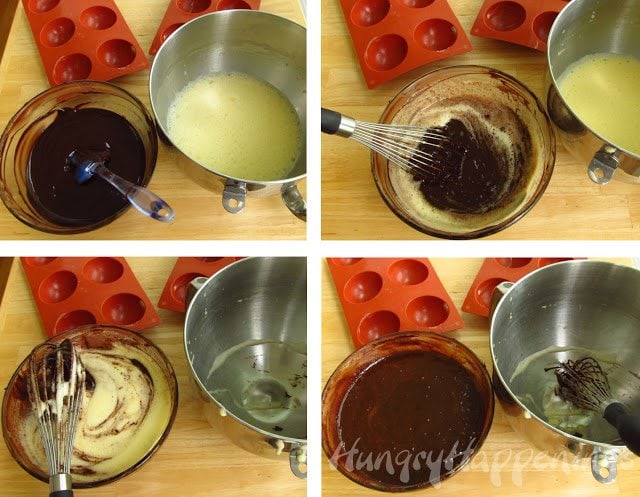
Melt chocolate & butter.
- Place chopped chocolate and butter in a microwave-safe bowl.
- Heat on high power for 25 seconds. Stir.
- Heat for 20 more seconds, stir.
- Heat on 50% power for 15-20 second increments, stirring vigorously after each, until melted.
- Do not overheat or you will burn the chocolate.
- Alternatively, you can melt this in a double boiler set over low heat.
Whisk eggs.
- Whisk eggs in the bowl of a stand mixer on medium, in a mixing bowl with a handheld mixer on medium-high, or in a mixing bowl with a whisk until your arm hurts - until the eggs double in volume.
- Stir one-third of the eggs into the melted and warm chocolate to loosen the chocolate.
- You'll want the chocolate to be warm at this point, so make sure it is warm to the touch.
- Fold in the remaining eggs.
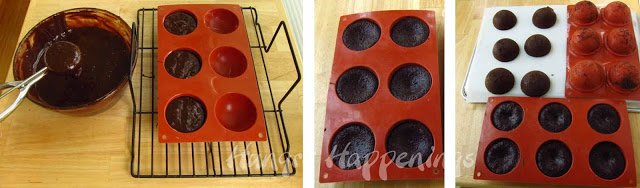
Fill dome-shaped molds with cake batter.
- Butter your silicone molds.
- Equally, divide the batter among 18 half-sphere silicone mold cavities.
- Bake for 10-14 minutes until the cakes still look moist but are set.
- Insert a digital thermometer into a cake. Once the cakes reach 140 degrees Fahrenheit, remove them from the oven and set them on a cooling rack.
- Using a thermometer is the best way to tell if your cakes are done. Don't overcook them, or they will become dry.
- If you, like me, bake these in three batches, just be sure the water doesn't evaporate too much.
- If it does, just add more water to the roasting pan and allow it to heat up for a few minutes.
- Allow cakes to cool completely.
- Wrap the molds in plastic wrap and refrigerate the cakes for at least 4 hours or overnight.
- Un-mold by turning the silicone mold upside down and pressing the cakes out while turning the mold inside out.
- Keep the cakes refrigerated until ready to decorate.
Actually, you can keep these cakes stored in an airtight container in the refrigerator for up to 5 days, then decorate them just before your party.
Don't refrigerate the graduation cap cakes once decorated or the chocolate and modeling chocolate will end up with condensation on them.
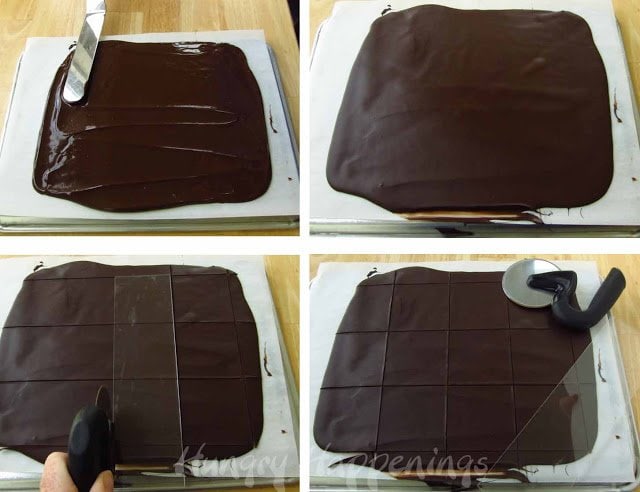
Make chocolate squares.
- Turn a rimmed baking sheet upside down and set a piece of parchment paper on top.
- Spread half of the chocolate into a thin layer on the parchment paper.
- Set it in the refrigerator for about 3 minutes, just until it loses its shine but isn't completely set.
- It needs to be soft enough to cut through.
- Cut into 3" squares using a straight edge and a pizza wheel or knife.
- I have a 3" wide piece of Plexiglas that I use to cut my chocolate barks into squares, so I used it here.
- Set another piece of parchment paper on top of your chocolate and set a baking sheet on top of it.
- This will keep your chocolate squares flat.
- Refrigerate the chocolate until set for about 10 minutes.
- Reserve a small amount of melted chocolate to attach the tassels to the caps, and repeat with the remaining chocolate.
- If you only have two baking sheets, proceed with the next step, then come back to this step.
- Once the chocolate is set, remove it from the refrigerator and peel it from the parchment paper away from the chocolate squares.
- Remove the scrap pieces, which can be used for another project or enjoyed as a snack.
NOTE: If you want your chocolate squares to have more of a shine to them, use a sheet of clear acetate instead of parchment paper.
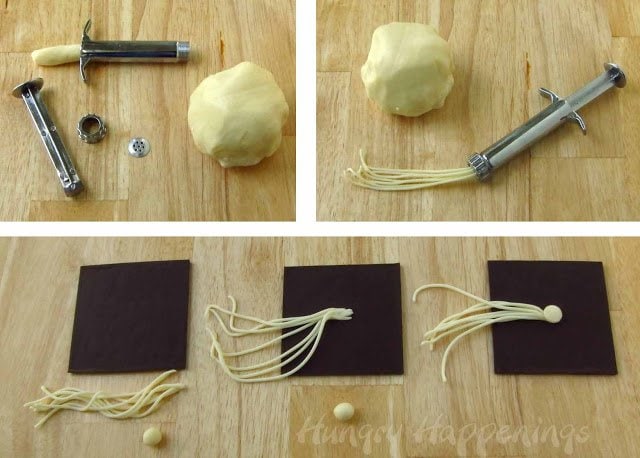
Make white modeling chocolate tassels.
It is easiest to use a clay extruder to make edible tassels.
- Use one of the discs that have at least 7 holes for the best results.
- Knead white modeling chocolate until soft.
- Pinch off about a tablespoonful and roll it into a log.
- Press the log into the clay extruder.
- Extrude a few inches of the clay then make a cut using a sharp knife for each tassel.
- If you don't have a clay extruder, you can roll thin logs of modeling chocolate to make your tassels.
Attach the tassels.
- Use some melted chocolate to attach the tassels to each chocolate square - place one end in the center of each square.
- Pinch off a small piece of the modeling chocolate and roll into a ball.
- Flatten it and use a dab of melted chocolate to adhere it to the center of the chocolate square covering the end of the tassel pieces.
- If you don't have any melted chocolate, you can use corn syrup or clear piping gel to attach your pieces.
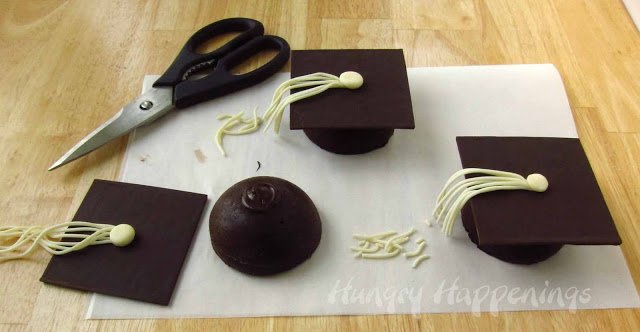
Attach the chocolate squares to the cakes.
- Just before serving use a small dab of chocolate frosting or Nutella to adhere the chocolate squares to your cakes.
- Cut the ends of the tassels off if they are too long.
As I said earlier in this post, do not refrigerate these cakes once the chocolate decorations are added.
It won't take long at all to top each cake with the squares.
You can add the tassels to your squares and store them on your baking sheets until you are ready to attach them to the cakes.
If your home is cool (72 degrees or less,) you can remove the cakes from the refrigerator and decorate up to 4 hours before serving.
It is not a great idea to serve these at an outdoor party unless you can keep them cool until you are ready to serve them.
Recipe
This recipe was originally published on May 16, 2012.

Half-sphere flourless chocolate cakes are topped with a square of chocolate and white modeling chocolate tassels to look like graduation caps.
- 18 ounces semi-sweet chocolate, finely chopped
- 2 sticks of butter (½ lb.), cut into small cubes
- 8 large eggs
- 16 ounces melted and tempered pure dark chocolate (or melted confectionery coating/candy melts)
- 4 ounces white modeling chocolate or fondant
- 2 tablespoons chocolate frosting or Nutella
-
Preheat oven and a roasting pan filled with enough water to go halfway up the sides of the silicone mold, at 325 degrees Fahrenheit.
-
Place chopped chocolate and butter in a microwave-safe bowl.
-
Heat on high power for 25 seconds then stir.
-
Heat for 20 more seconds, stir.
-
Heat on 50% power for 15-20 second increments, stirring vigorously after each, until melted.
-
Alternatively, you can melt the chocolate and butter in a double boiler set over low heat.
-
Whisk eggs until doubled in volume.
-
Stir one third of the eggs into the warm, melted chocolate.
-
Then fold in the remaining eggs.
-
Butter your silicone molds.
-
Equally, divide batter among 18 half-sphere silicone mold cavities.
-
Bake for 10-14 minutes until the cakes still look moist but are set.
-
Insert a digital thermometer into a cake. Once the cakes reach 140 degrees Fahrenheit, remove them from the oven and set on a cooling rack.
-
Allow the cakes to cool completely.
-
Wrap the molds in plastic wrap and refrigerate the cakes for at least 4 hours or overnight.
-
Un-mold the cakes.
-
Turn a rimmed baking sheet upside down and set a piece of parchment paper or acetate paper on top.
-
Spread half of the chocolate into a thin layer on the parchment paper.
-
Set it in the refrigerator for about 3 minutes, just until it loses its shine but isn’t completely set. It needs to be soft enough to cut through.
-
Cut into 3″ squares using a straight edge and a pizza wheel or knife.
-
Set another piece of parchment paper on top of your chocolate and set a baking sheet on top of it.
-
Refrigerate the chocolate until set for about 10 minutes. Reserve a small amount of melted chocolate to attach the tassels to the caps, and repeat with the remaining chocolate.
-
Once the chocolate is set, remove it from the refrigerator and peel it from the parchment paper away from the chocolate squares.
-
Remove the scrap pieces, which can be used for another project or enjoyed as a snack.
-
Knead white modeling chocolate until soft.
-
Pinch off about a tablespoonful and roll it into a log and insert it into a clay extruder fitted with a multi-hole disc.
-
Extrude a few inches of the clay then cut with a sharp knife.
-
If you don’t have a clay extruder, you can roll thin logs of modeling chocolate to make your tassels.
-
Use some melted chocolate to attach the tassels to each chocolate square – place one end in the center of each square.
-
Pinch off a small piece of the modeling chocolate and roll into a ball.
-
Flatten it and use a dab of melted chocolate to adhere it in the center of the chocolate square covering the end of the tassel pieces.
-
Use a small dab of chocolate frosting or Nutella to adhere the chocolate squares to your cakes just before serving.
-
Cut the ends of the tassels off if they are too long.
- You can refrigerate the undecorated flourless chocolate cakes for up to 5 days.
- Do not refrigerate these cakes once the chocolate decorations are added.
- It won't take long at all to top each cake with the squares.
- You can add the tassels to your squares and store them on your baking sheets until you are ready to attach them to the cakes.
- If your home is cool (72 degrees or less,) you can remove the cakes from the refrigerator and decorate up to 4 hours before serving.
If you are hosting a graduation party you might also like to make these recipes...

Graduation Cookies with modeling chocolate graduates

Graduation Pretzel Pops can be personalized with names, dates, and school initials.
See all my graduation party recipes, here.
You can use the same silicone sphere molds to make homemade hot chocolate bombs too!
I hope you enjoy making these Flourless Chocolate Cake Graduation Caps.

- Banana Split Bars – A Fun and Easy Summer Dessert - March 4, 2026
- Pineapple Fudge (No Candy Thermometer Needed!) - March 4, 2026
- No-Bake Peanut Butter Pie Recipe - March 3, 2026

Trish - Mom On Timeout says
So fabulous! You are just a food genius! Thanks so much for sharing at Mom On Timeout!
Carolyn says
Oh my goodness - these are brilliant! My link party [The Inspiration Board] is up right now. I would love for you to stop by and consider linking this up! My readers would love it.
http://carolynshomework.blogspot.com/2012/05/inspiration-board-link-party-51.html
Michelle says
It looks great~! Maybe I will make this for our schools preschool graduation! Thanks for sharing and I am a new follower!
Hope you have a great week!
Michelle
www.delicateconstruction.com
Beth Jackson Klosterboer says
Thanks and welcome Michelle.
natalia says
What a cute idea, I love this! Great job! Stopping by from Tip Junkie
Jill @ KitchenFunWithMy3Sons.com says
These are awesome!!
Kristi says
Beth, these are so cute!! I may have to attempt them...my son graduates pre-k on Thursday! And we do gluten-free, so I love the flourless part!! So happy you linked up! Have a great week!!
{HUGS},
kristi
MyFudo™ says
Cheers to the graduates. This is so cute!
Brenda says
Perfect ... absolutely perfect! I have got to get an extruder.
Jane Craske says
This is beyond delicious and now I have an excuse to get the pans that I've been eyeing for awhile. Thanks so much for taking the time to share your fab tutorial at our Pin'inspiration Party. Very happy new follower here C:
Gastronomia Castellani !!! says
Excelente trabalho e decoração.
Dorothy @ Crazy for Crust says
Yummy! These are gorgeous too. What a great dessert. I need that pan, LOL.
CuteEverything.com says
Beautiful, and I bet they taste great! I'd love for you to link them up if you get the chance!
Earning My Cape says
Those look GREAT!!!
I'd like to invite you to link this (and your Cookies & Cream Garden Stone- so cute!!!- and any other projects/recipes you'd like) up on my first link party.
Your readers are welcome, as well!
http://earning-my-cape.blogspot.com/2012/05/super-link-party-1.html
I hope to see you all there! 🙂
~Susie~
Kimberly Chapman says
I need to hurry up and find someone who's graduating something.
Patricia @ ButterYum says
Totally adorable!
Faygie Fellig says
u are off the charts as usual
ThisGirlBlogs says
They look super cool. My brother is graduating this year and these would be perfect! 🙂
Jen says
This is perfect timing since my daughter is graduating in a couple of weeks! I will be making these for her party. Thank you very much.
Nicola says
Oh, my. These are incredible! They look perfect - you must have spent so much time on them.
mesilda says
Fantasticos!!!Me encantan.
Bessets.