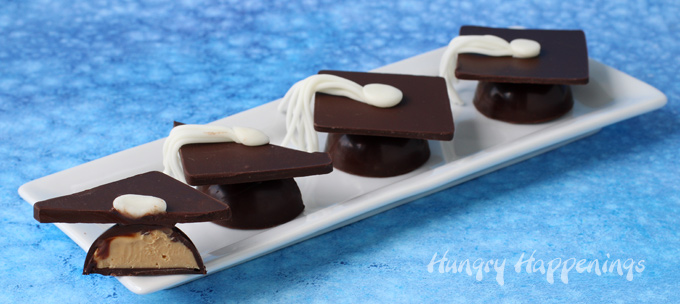
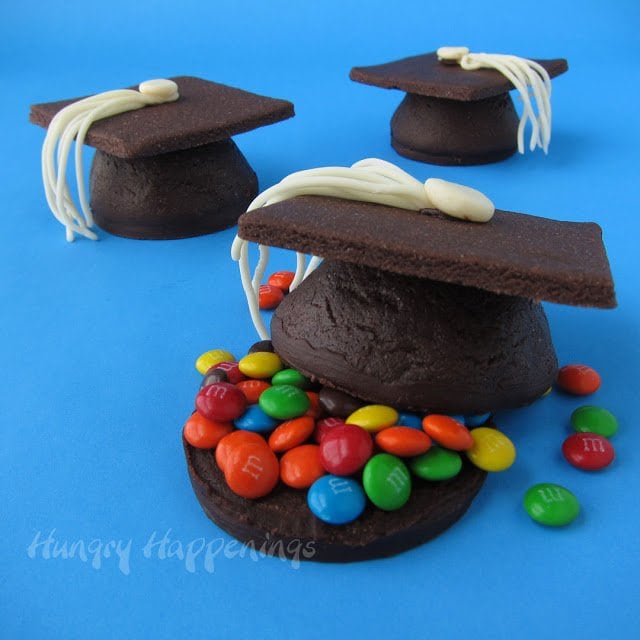
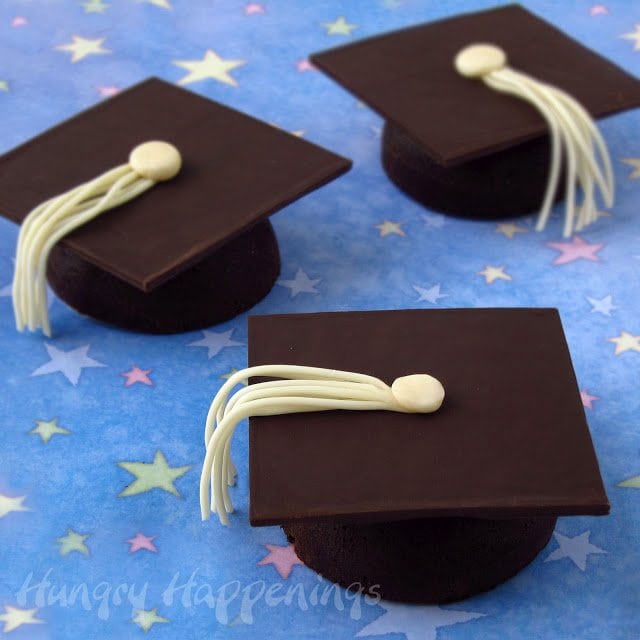
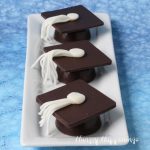
Celebrate your grad by serving these Chocolate Peanut Butter Cup Graduation Caps. Each mortar board-shaped chocolate is filled with the most amazingly creamy peanut butter filling and is decorated with a white modeling chocolate tassel.
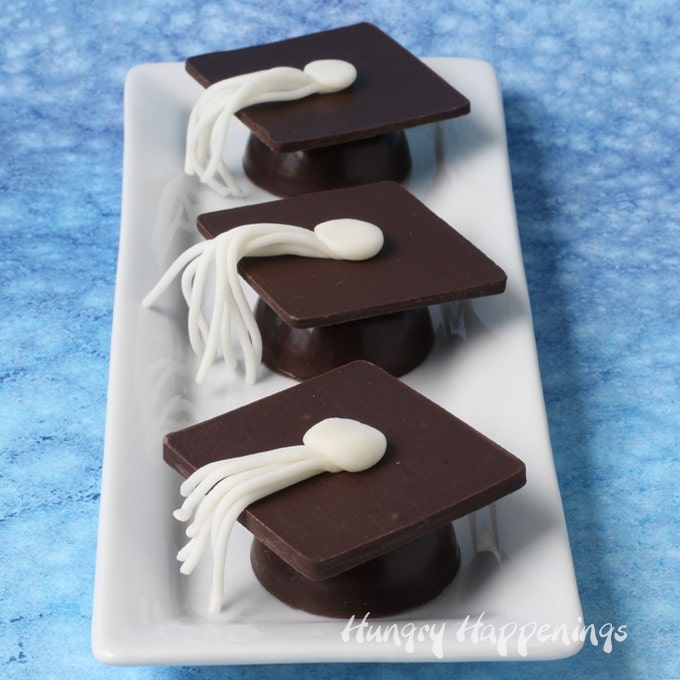
I'm sure you've seen Reese's Cup Graduation Caps. Each little treat is made by topping a Reese's Miniature Peanut Butter Cup with a square of chocolate and a candy tassel. They are really cute, but I knew that I could kick these up a notch by making an even better homemade version of the Peanut Butter Cup Graduation Caps.
Each of my chocolate grad caps is filled with my favorite peanut butter fudge. If you've followed me for a while, you know what I'm talking about because I've used it in so many recipes here at Hungry Happenings.
The filling is made with Nestle White Chips, Reese's Peanut Butter Chips, salt, and some Jif Creamy Peanut Butter and is the most amazingly creamy, peanut butter cup filling you'll ever taste.
The filling simply melts in your mouth. A traditional peanut butter filling can be dry because it's made with powdered sugar. It can also be a bit too sweet. This peanut butter filling is perfection!
To make these Chocolate Peanut Butter Cup Graduation Caps, you'll also need some dark chocolate. I used pure, melted, and tempered dark chocolate.
You may ask...
"Do I have to temper chocolate to make these Peanut Butter Cup Graduation Caps?"
- Yes, if you are using pure chocolate (made with cocoa butter).
- In order for any pure chocolate to set properly, it must be tempered.
- Tempered dark chocolate has a nice sheen, snaps when broken, and is free of white spots or streaks (bloom).
- No, if you are using confectionery coating, almond bark, or Candy Melts.
- If using any of these products, usually made with palm kernel oil, you can simply melt the candy and use it in the recipe below.
See my Chocolate Making Tips page for further instructions on working with chocolate.
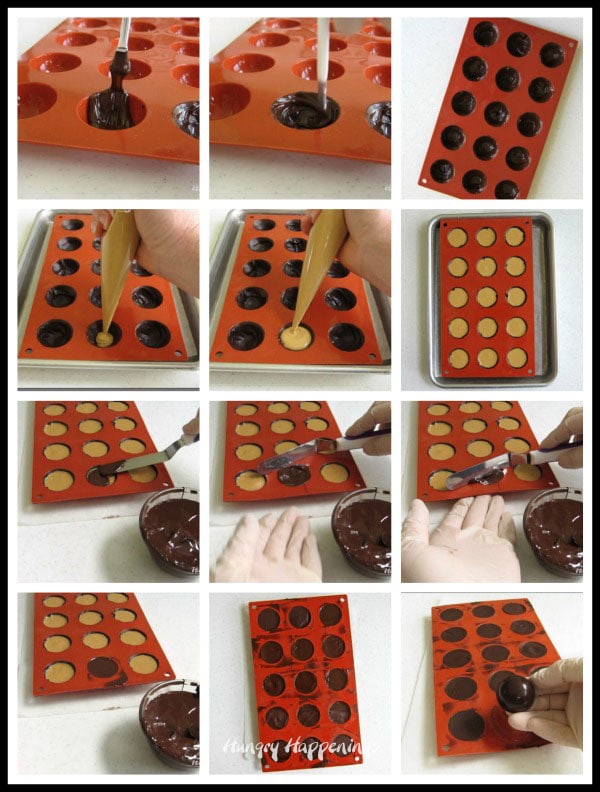
👩🍳How to make homemade peanut butter cups using a silicone mold:
- Coat all the cavities in your mold with a thin layer of chocolate.
- Spoon some chocolate into your mold and use a food-use-only paintbrush to spread the chocolate in a thin layer over the surface.
- I used a half sphere mold, but you can use a traditional peanut butter cup mold.
- Allow that chocolate to set.
- You can allow pure chocolate to set at room temperature or chill it in the refrigerator for about 5 minutes until hard.
- If using confectionery coating, place the filled mold in the freezer for 3-5 minutes.
- Pipe peanut butter fudge filling into the chocolate shells, leaving about 1/16th - ⅛th of an inch space at the top of the mold.
- Allow the peanut butter fudge to firm up.
- You can place the mold in the refrigerator for about 15 minutes or just allow the fudge to firm up at room temperature.
- Before you add the top layer of chocolate, allow the mold to come to room temperature.
- Spread a thin layer of chocolate over the top of each piece of candy, scraping off any excess chocolate.
- Let the chocolate harden.
- Pop the chocolate peanut butter cups out of the mold.
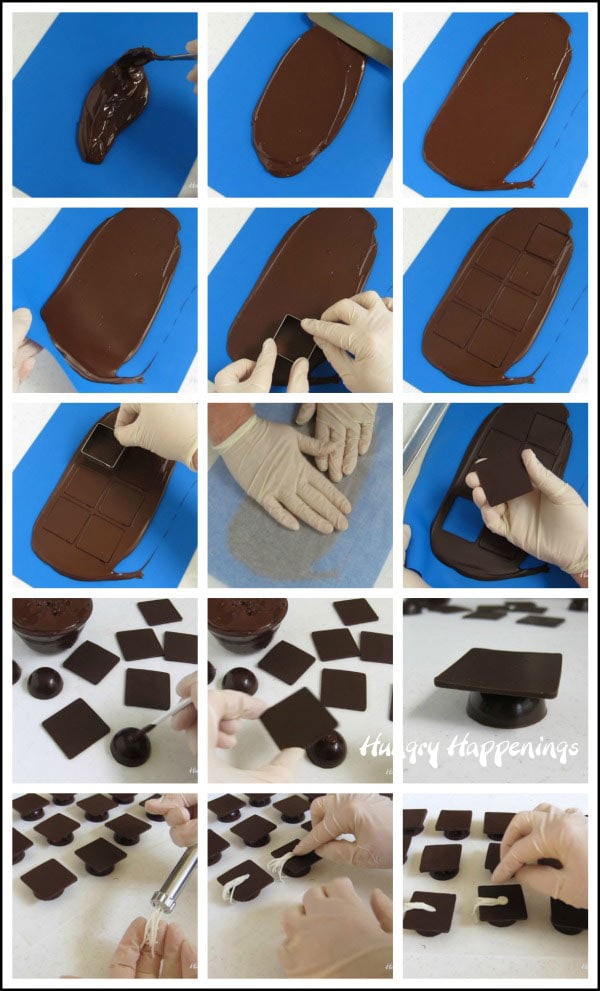
🎓Decorate Chocolate Grad Caps:
- Spread some chocolate into a thin layer on a silicone mat or a parchment paper-lined baking sheet.
- Allow it to air dry just until it is starting to set, but is still flexible.*
- Cut using a square cookie cutter.
- You want the square to be larger than the base of your peanut butter cup.
- I used a 2-inch square cutter to go over my peanut butter cups, which were 1 ⅝ inches in diameter.
- Attach one square to the top of a peanut butter cup using melted chocolate.
- Let dry for 10 minutes. Then attach a modeling chocolate tassel.
- Press white modeling chocolate (candy clay) through a clay extruder fitted with a tiny multi-hole disc.
- Cut off the strands of candy clay and squeeze one end together, then press it down onto the chocolate square. Allow the strands of candy clay to fall over the side of the chocolate square, forming the tassel.
- The candy clay should stick to the chocolate square, but if it does not, you can use a small dab of clear piping gel to attach it together.
- Pinch off a small piece of the white candy clay, roll it into a ball, then press it onto the center of the chocolate square, covering the pinched ends of the tassel.
*If you are using confectionery coating instead of pure melted and tempered chocolate, you will need to refrigerate the candy coating for 1-3 minutes, watching it to see when it begins to set up. As soon as it's ready, cut out your squares. The edges may be set too firmly, and you may only be able to cut them out from the center. If you allow the confectionery coating to air dry, it will probably develop white spots or streaks.
Another option is to pour the candy inside the cookie cutter, pop it in the freezer, let it harden, then push it out of the cutter. This will take longer if you only have one square cutter.
Related Recipes

Recipe
Peanut butter fudge filled chocolate graduation caps taste so much better than those made using store bought candies. These treats are perfect desserts for your graduation party.
- 16 ounces pure, melted and tempered dark chocolate (or dark confectionery coating)
- 2 ounces Nestle White Morsels, (5 level tablespoons)
- 1 ounce Reese's Peanut Butter Chips, (2 ½ level tablespoons)
- 1 pinch table salt
- 3 ounces Jif Creamy Peanut Butter (about 5 tablespoons)
- 3 ounces white modeling chocolate (candy clay)
-
Spread a thin layer of chocolate inside the cavities in a silicone half sphere mold or a plastic peanut butter cup mold.
-
Allow the chocolate to harden (chill in the refrigerator for a few minutes, if desired).
-
Combine the Nestle White Chips with the Reese's Peanut Butter Chips in a microwave safe bowl.
-
Heat on high power for three 30 second increments, stirring after each until melted. If needed heat additional 10 second burst of power, stirring after each, until melted.
-
Stir in the salt and creamy peanut butter until smooth.
-
Allow to cool 10 minutes then pour into a disposable pastry bag or squeeze bottle.
-
Pipe peanut butter fudge filling into the chocolate shells, leaving 1/16 - ⅛th of an inch of space at the top.
-
Allow fudge to firm up.
-
Spread a thin layer of chocolate over top of each candy.
-
Let harden.
-
Pop out of molds.
-
Spread remaining chocolate out to about ⅛th of an inch thickness on a silicone mat.
-
Let sit just until dry, but still flexible.
-
Cut out fifteen 2 inch squares using a metal cookie cutter then press a sheet of parchment paper over top and cover with a heavy cookie sheet.
-
Allow to harden then break off excess chocolate.
-
Re-melt the scraps of chocolate and use to attach one chocolate square to the tops of each peanut butter cup.
-
Let dry.
-
Press white modeling chocolate out through a clay extruder fitted with a multi hole disc. Cut off 1 ½ inch groupings of the white modeling chocolate strands and pinch together one end.
-
Press the end into the center of a chocolate square forming the tassels.
-
Press a small ball of white modeling chocolate over the center of the chocolate graduation cap covering the tips of the tassels.
Recipe Video
Each graduation cap will use just a little over a half an ounce of chocolate, but as you make the chocolate square tops you will have waste, so it's best to start with 16 ounces of melted and tempered pure chocolate.

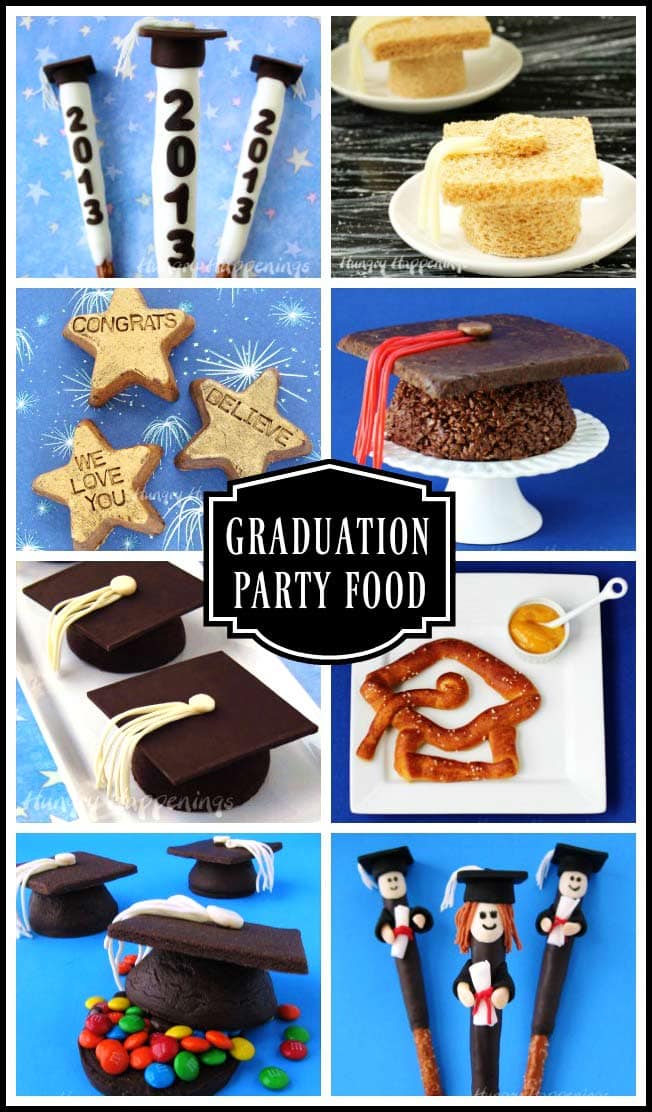
If you are looking for more ideas for your graduation party, be sure to check out my Graduation Party Recipes.

- Banana Split Bars – A Fun and Easy Summer Dessert - March 4, 2026
- Pineapple Fudge (No Candy Thermometer Needed!) - March 4, 2026
- No-Bake Peanut Butter Pie Recipe - March 3, 2026

Jimmie Haralson says
Beth, with your 30years of creating fun food, could you please share where one could purchase the "clay candy" and "clay extruder" to make the strands forming the tassel for the Peanut Butter Cup Graduation Caps?
Beth says
Hi Jimmie, I actually make the candy clay. You can find that 2-ingredient recipe here - https://hungryhappenings.com/chocolate-making-tips/modeling-chocolate-recipe-candy-clay/
If you don't want to make your own you can order it from amazon - https://amzn.to/2QDMK3T
That's a link to Hot Hands Modeling Chocolate which I have heard is really good.
The clay extruders are easy to find at most craft stores in the clay aisle. I usually get mine from JoAnn's or Michaels. You can also find them on amazon here - https://amzn.to/2WhhsWS
Kristina says
I didn’t want to spend money on another decorating tool so used my garlic press (thoroughly cleaned of course) For the tassels and it worked great!
Beth says
That is a great idea! I'm so glad it worked well for you. The holes in a garlic press are the perfect size.
Karen @ Sugartown Sweets says
You had me at peanut butter, and your recipe sounds so yummy! I've missed your sweet creations! 🙂
Beth says
I've been traveling a lot over the past five months (5 cities in 5 months) so I've been posting less frequently. I hope to get more done this summer.
The Partiologist says
What a fun surprise to bite into a graduation cap and find peanut butter!
Beth says
I made these for my neighbor's graduation party and it was fun to watch as people bit into them. Everyone loved them!