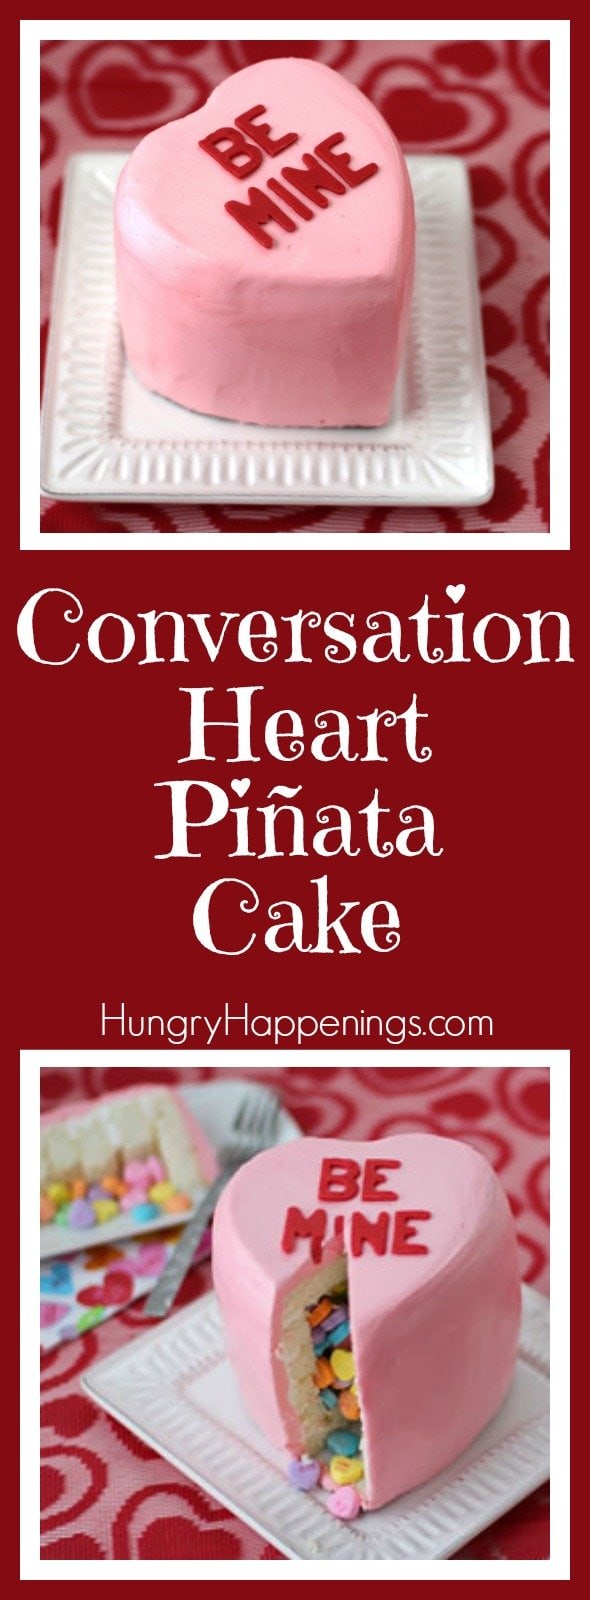
Cut into this pretty pink Conversation Heart Piñata Cake to find candy hearts hiding inside. This Valentine's Day cake can be personalized with your favorite conversation heart message like "Be Mine."

I love surprises, especially those that involve candy. If you show up at my door, unexpectedly, with a box of chocolate truffles or even a bag of Twizzlers, I'm gonna be very excited and give you a great big hug.
Candy has been cause for a lot of happiness in my life. Having owned two candy shops, I used to spend my days scooping candy for customers and watching the joy it brought them.
So, you can only imagine how much fun it is for me to make and serve a piñata cake and watch the reaction of friends and family when the candy comes falling out after cutting the first slice.

Rainbow Piñata Cake Pumpkin Piñata Cake Turkey Piñata Cake
I've had the pleasure of making several piñata cakes for my gig over at Tablespoon.com, but had yet to make one to post here on my own blog.
I figured it was about time and decided a conversation heart cake filled with conversation heart candies would be perfect for Valentine's Day.
If you've not made a piñata cake yet, this is a great one to start with. It's pretty easy compared to the other ones I've created. The design is simple, and there is no carving involved.
My original plan was to bake my cake mix using three heart-shaped pans. I'd simply cut a hole in one cake, stack them, fill the hole with candy, and decorate.
After I made the cake batter, I tore apart my kitchen looking for my heart pans. I have a vague recollection of donating them a few years ago, thinking I may never need them again. That was before blogging!
So, without my heart pans, I had to improvise. I baked a large cake and cut it using heart-shaped cookie cutters. It worked great. I ended up with a very tall cake, which may have been a bit more challenging to frost, but in the end, I loved it. Cutting into it was quite dramatic.
UPDATE: When I made the video in 2020 for this heart-shaped cake, I bought myself some new cake pans. You can watch the video to see how I used them to make this cake.

Conversation Heart Piñata Cake
Ingredients:
piñata cake -
1 cake mix and the ingredients listed on the package
3 tablespoons white chocolate or vanilla instant pudding mix (powder)
3 tablespoons sour cream
optional, Wilton Spray and Seal
4 cups frosting
7 ounces Conversation Hearts
pink coloring (or whatever color you want to make your cake)
lettering -
red modeling chocolate, fondant, or frosting
Supplies:
18 x 13-inch baking pan
non-stick tin foil or parchment paper
5-inch or 6-inch heart cookie cutter or 3 (6-inch) heart-shaped cake pans (see the video)
2 ½ -inch or 3-inch heart cookie cutter
1 small cardboard cake round
optional: alphabet cutters
Instructions:

Making the cake:
- Heat oven to 350 degrees.
- Make cake batter using the package instructions, adding 3 tablespoons of instant pudding mix and 3 tablespoons of sour cream.
- In the video, you will see that I used a NutriMill Artiste Kitchen Stand Mixer. I love the open bowl mixer. It's so easy to add ingredients, and it mixes cake batter really well.
- Line a baking sheet with non-stick tin foil or parchment paper.
- Spread cake batter in an even layer in the pan.
- If using heart-shaped cake pans, pour the batter into well-greased and floured pans.

Bake, Cool, Cut Cakes:
- Bake the cake for 18-22 minutes OR bake the heart-shaped cakes for 24-30 minutes until lightly golden brown.
- The cake should spring back when you press on it in the center and a toothpick should come out clean.
- Allow the cake to cool completely.
- Lift the cake out of the pan.
- Use the 5-inch cookie cutter to cut 6 hearts.
- If you baked heart-shaped cakes, cut off the domed tops of the cakes, then cut the cakes into two equally thick hearts.
- Use the smaller cookie cutter to cut the centers out of 4 of those hearts, leaving 2 heart cakes intact.
NOTES: When I made this cake the first time, I used a 3-inch cutter, which allowed for a larger amount of the candies. When I recreated the cake for the video, I chose to use a smaller 2 ½-inch cutter, which allowed for a bit more cake inside.
Either works fine. You can decide which one you prefer.

Assembling the Heart-Shaped Cake:
- Cut a small cake board into a heart shape, which is at least ¼-inch larger than your heart cake.
- Set one full cake on the cake board.
- Pipe some icing around the edge of the cake, then stack a cake with a heart-shaped hole in the center on top.
- Repeat, frosting, and stacking the remaining cut-out cakes.
- Be sure you don't add too much icing; you don't want it to ooze into the center of the hearts.
- If the frosting does ooze inside the hole, scrape it off.
- Pour conversation heart candies into the center of the cake.
- Pipe frosting around the edge of the top cut-out cake, and set the remaining whole cake on top.
- Use any remaining icing to fill in between the layers around the outside of the cake.
- Using a tube of Betty Crocker Icing to do this job was perfect. I used up my entire tube. If you make homemade frosting, I'd suggest doing this step using a piping bag.

Frosting the Cake:
- Color white frosting using pink coloring, or whatever color you choose.
- Spread over the cake, then smooth out.
- You'll notice in the video that I crumb coated the cake, which is an additional step that helps to keep the cake looking nice, but it isn't absolutely necessary.
- To get a really smooth cake, I froze it for 30 minutes, then removed it and used a Viva towel to smooth out the surface of the frosting.
- This cake would also look really nice covered in fondant.

Add lettering:
- To add a phrase to the top of your cake, you can cut letters out of red modeling chocolate or fondant, or pipe them on using red frosting.
- Choose from traditional or contemporary conversation heart phrases like:
- Be Mine • Love You • Kiss Me • Hugs • LOL • Love • Get Real • Love Bug • You Rock • Soul Mate
- Tweet Me • Text Me • Puppy Love • Sweat Pea • Call Me • Real Love • All Mine • Me & You
- First Kiss • Too Sweet • Say Yes • For Ever • Hot Stuff • My Baby • You & Me • Let's Kiss • Only You

Cut & Serve:
- Just before serving, cut into the cake and allow the candy to fall out.
Any cake that has candy hiding inside should be decorated the day you plan to serve it for best results, because the longer the candy is inside the cake, the softer and stickier it will get.
You can bake, cut, and stack the cake ahead of time. You can even crumb coat the exterior. Then on Valentine's Day, pour the candy inside the cake, add the top piece of cake, frost, and decorate the cake.
You can find items used to create this cake on Amazon. I earn a small commission for any sales at no extra cost to you.
 Fat Daddio's PHT-63 Anodize...Shop on Amazon
  Wilton 5 Layer Heart Cake P...Shop on Amazon
  R&M International Heart Coo...Shop on Amazon
  Heart Cookie Cutter Set - 6...Shop on Amazon
 ") Mini Alphabet and Number Co...Shop on Amazon
Mini Alphabet and Number Co...Shop on Amazon  Americolor Soft Gel Paste F...Shop on Amazon
 , Heart 2 Heart (14 oz), Sweet and Sour (12 oz), and Very Berry (12 oz) - 52 oz Total") Brachs Conversation Hearts ...Shop on Amazon
Brachs Conversation Hearts ...Shop on Amazon  Wilton Decorator Preferred ...Shop on Amazon
 ") NutriMill Artiste Kitchen E...Shop on Amazon
NutriMill Artiste Kitchen E...Shop on AmazonPrintable Recipe

Cut into a Conversation Heart Pinata Cake to find conversation heart candies hiding inside. Personalize this heart-shaped cake for your Valentine.
- 1 cake mix and the ingredients listed on the package
- 3 tablespoons white chocolate or vanilla instant pudding mix powder
- 3 tablespoons sour cream
- 4 cups frosting
- 7 ounces Conversation Hearts
- food coloring
- red modeling chocolate fondant or frosting
-
Heat oven to 350 degrees.
-
Make cake batter using the package instructions and ingredients (oil, water and egg whites) adding 3 tablespoons of instant pudding mix and 3 tablespoons sour cream.
-
Line a baking sheet with non-stick tin foil or parchment paper OR grease and flour 3 (6-inch) heart pans.
-
Spread cake batter in an even layer in pan/s.
-
Bake sheet cake for 18-22 minutes OR bake heart cakes for 24-30 minutes until lightly golden brown.
-
Allow the cake to cool completely then remove cake/s from pan/s.
-
If using a sheet cake cut 6 hearts out using a 5 or 6-inch heart-shaped cookie cutter.
-
If you baked heart-shaped cakes, cut off the domed tops of the cakes, then cut the cake into two equally thick layers.
-
Use the smaller cookie cutter to cut the centers out of 4 of the hearts, leaving 2 heart cakes intact.
-
Cut a small cake board into a heart shape, that is at least ¼-inch larger than your heart cake.
-
Set one full cake on the cake board.
-
Pipe some icing around the edge of the cake, then stack a cake with a heart-shaped hole in the center on top.
-
Repeat, frosting and stacking the remaining cut-out cakes.
-
Pour conversation heart candies into the center of the cake.
-
Pipe frosting around the edge of the top cut-out cake and set the remaining whole cake on top.
-
Color the remaining white frosting using pink coloring, or whatever color you choose.
-
If desired, crumb coat the cake then frost the cake with a thick layer of frosting.
-
To add a phrase to the top of your cake, you can cut letters out of red modeling chocolate or fondant, and place them on top of the cake or use red frosting to pipe them on the cake.
-
Just before serving, cut into the cake and allow the candy to fall out.
Recipe Video
UPDATE - New video tutorial. This recipe was originally published on February 8, 2014.
![]() Did you make this recipe? Let me know by leaving a comment and rating the recipe below.
Did you make this recipe? Let me know by leaving a comment and rating the recipe below.
I hope you enjoy making this fun Conversation Heart Cake.

I'd love to see pictures of your decorated desserts. You can share in our How to Make Fun Food Facebook group. It's a great place to ask questions and learn from others.
If you love making chocolate, be sure to check out my Chocolate Making Courses at The Sugar Academy.
Have a sweet day,
Beth
More Conversation Heart Desserts from Hungry Happenings


Naturally Colored Conversation Heart Cheesecakes


Conversation Heart Cheesecakes

If you are looking for other treats or gifts to make for Valentine's Day,
you might like these other recipes too.

- Banana Split Bars – A Fun and Easy Summer Dessert - March 4, 2026
- Pineapple Fudge (No Candy Thermometer Needed!) - March 4, 2026
- No-Bake Peanut Butter Pie Recipe - March 3, 2026
Karen @ Sugartown Sweets says
I love surprises too and I LOVE your pinata cake!! Oh how I wish I'd had the chance to visit your candy shop!!
Beth says
Thanks, Karen. I wish I could have met you at my candy shop too!
Michelle says
Adorable! But i have to know where that mixer came from!?
Beth says
Thanks, Michelle! I used a NutriMill Artiste Kitchen Stand Mixer. I love it! It's made by Bosch, but it's a more affordable model than their signature line of Bosch Mixers. You can find them on Amazon here (ad) - https://amzn.to/2H69g1G
Anonymous says
thanks for the amazing idea! my girlfriends and i are having a baking party using this recipe for "galantine's day" 😉
Anonymous says
How tall did this cake turn out to be?
beth says
It's about 7-8 inches tall.
Laurie says
This is gorgeous!
Candy makes me happy too by the way 🙂
Thanks for linking up to Tip Me Tuesday linky party this week. {knuckle bumps}
Did you know that I can "lend" your blog posts my Google page rank for better search engine traffic? {fabulous}
If you upload at least 2 images, 2 steps, and blog post URL into your Tip Junkie craft room, you'll be in business!
{wink} ~ Laurie {a.k.a. the Tip Junkie}
http://www.tipjunkie.com/post/how-to-add-a-craft-room-project-on-tip-junkie/
Julie Verville says
I am definitely going to make this cake for my kiddos!!
Joy Joyslife says
This turned out great! I love it! Sooooo pinning it! 🙂
robin lorraine williamson says
I love this you are so talented I will put it on my to do list but have to be feeling very brave to do it. Thanks for sharing visiting from moon light and mason jars have a great day
beth says
Thanks for stopping by from the linky party and thanks for your kind words!
1FineCookie says
Smoothing the frosting has been one of my biggest challenges. Yours looks great!
beth says
Oh, for me too! I have finally discovered that if I freeze the cake for a while to get a crust on the frosting then use a damp paper towel to smooth out the frosting, it works great.
Ragna Kawii says
Did anyone else see the "No Way" candy in the first pic? I laughed.
Ragna Kawii says
Did anyone else see the "No Way" candy in the first pic? I laughed.
beth says
Some of the new conversation heart phrases are pretty funny!
Remy says
This is AWESOME! First time seen a cake like this. I need to try this ASAP! Thanks for sharing & the pictures were great tutorial.
Missy says
This cake would blow my daughters mind! How fun!
Suzanne says
I love this! I can't wait to make a pinata cake!
Amber L. says
That is one adorable cake!!! Love it!
Tiffany@Fizzy Party! says
Cute cake! Wouldn't it be adorable to serve mini piñata Conversation Heart cakes to each guest. This I will have to try.
Audra Renewed Projects says
yum! These are my favorite candies. Wonderful tutorial, too. You make it look super easy.