Celebrate Earth Day by making Chocolate Popcorn Trees! They are easy enough to create that your kids can even help. Plus, they taste great too!
To celebrate the warm porch sitting weather and the new life of spring, I created some chocolate trees topped with white chocolate popcorn leaves.
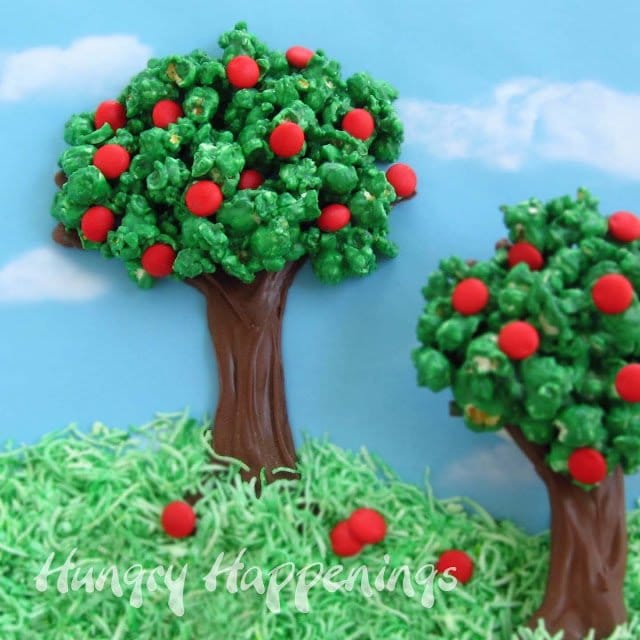
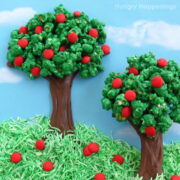
These cute trees are made out of milk chocolate stems and green-colored white chocolate-coated popcorn. Some even are adorned with candy fruit.
They are the perfect treat to make for an Earth Day celebration, a summer party, an apple-picking party, or a garden party.
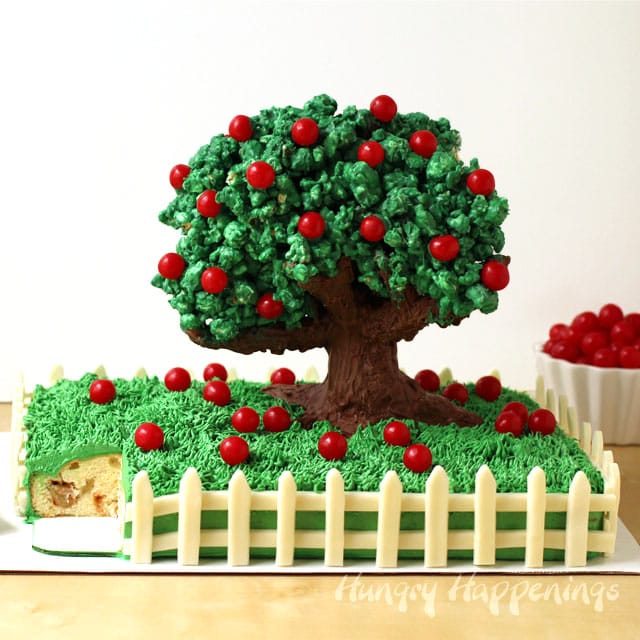
The popcorn trees lay flat and can be packaged to give as party favors. Check out my Rice Krispie Treat Apple Tree tutorial if you'd like to make a 3-D tree that actually stands up.
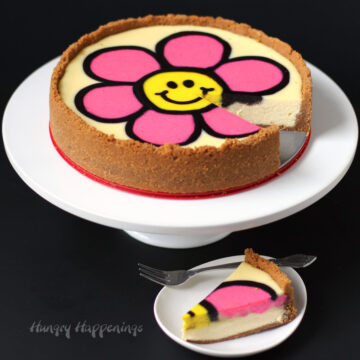
The tree on the Amazing Apple Cake pictured above is made of popcorn using the same technique shown in that tutorial.
Below, I will show you how to make the easy chocolate popcorn trees.
Before you begin If you don't have much experience working with confectionery coating/candy melts, you might want to read my Chocolate Making Tips.
Ingredients
melted light cocoa candy melts/confectionery coating
melted green candy melts
popped popcorn (air popped works best)
colorful candies, optional - Candy Coated Sunflower Seeds, Candy Buttons, or M&M's
The amount of each of these ingredients will depend on the size and quantity of your trees. I used 6 ounces of the light cocoa candy melts to make the trunks and branches of my 5 trees. I mixed 10 ounces of green candy melts with 6 cups of popped popcorn for the leaves.
Supplies
baking sheets
parchment or wax paper
disposable pastry bag or zip top bag
Instructions
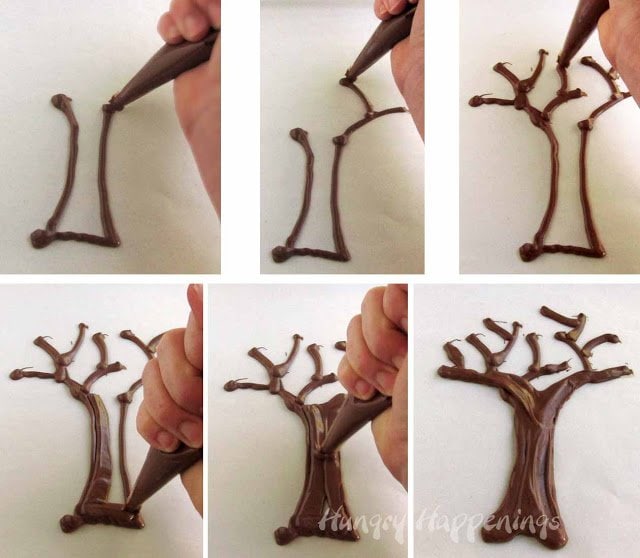
Pipe chocolate tree trunks and branches.
Line baking sheets with parchment or wax paper. Pour melted light cocoa candy melts into a disposable pastry bag or zip-top bag.
Pipe a tree trunk with branches onto the parchment paper. My trunks were about 6 inches long by 2 inches wide with the branches coming out about 2 ½ inches from the top.
Refrigerate for 3-5 minutes, just until hardened.
Continue to pipe trees until you have the desired number of trees.
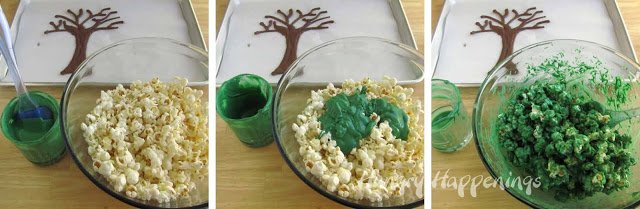
Make green-colored white chocolate popcorn.
Pour popped popcorn into a large mixing bowl.
Pour melted green candy melts over popcorn and stir and toss until well combined.
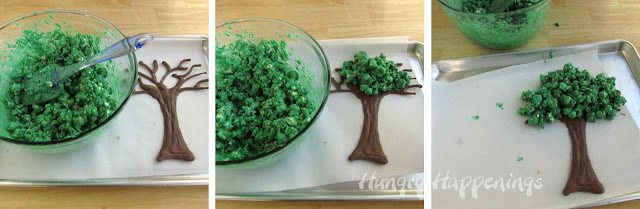
Add popcorn leaves to the tree trunk.
Immediately spoon green popcorn over the branches of your trees.
If you don't work quickly, and the popcorn hardens in the bowl, heat it in the microwave for 10 seconds, then stir. Heat more if needed.
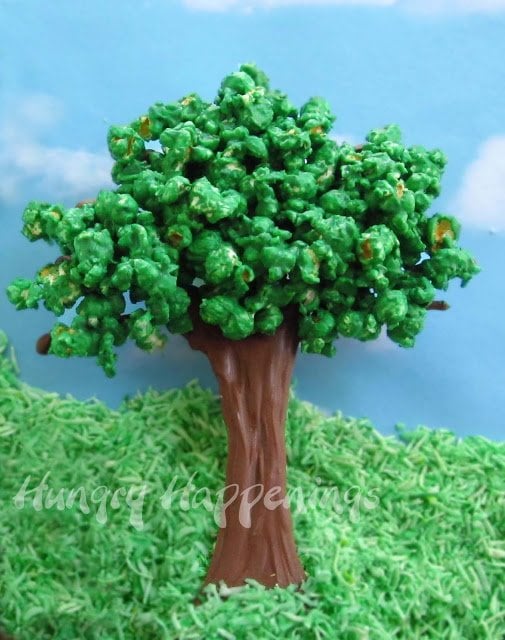
Plain popcorn trees.
The trees look great just as they are. I set them on a sheet of paper that looked like a blue sky and added some green coconut grass.
You could make fall trees by coloring your popcorn with red, yellow, and orange candy melts.
Or you could add some candy fruit.
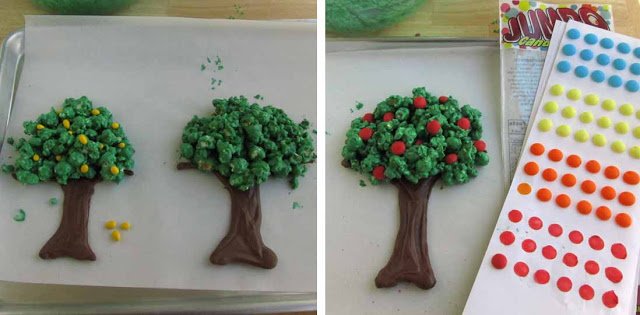
Adding candy apples, lemons, and oranges.
While the popcorn is still wet, add colored candy pieces to create fruit trees if desired. Refrigerate your trees for about 5 minutes until hardened.
I used yellow candy-coated sunflower seeds to make lemon trees, and jumbo candy buttons to make the apples and oranges.
You could use M&M's, Reese's Pieces, confetti decorations, or even make your own using candy melts.
Making the trees sturdier.
You can make your trees thicker by turning them over, piping chocolate on the back of the tree trunk, and adding more popcorn to the backside.
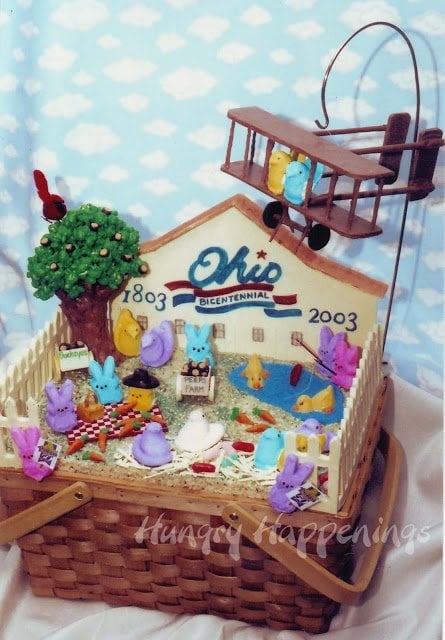
Chocolate Buckeye Tree
In 2003, I created a chocolate popcorn tree filled with teeny tiny chocolate peanut butter buckeyes. I set the tree on top of a sheet of rice krispies and surrounded it with Peeps and other edible props like a chocolate cart, a chocolate picnic blanket, chocolate ducks swimming in a candy pond, and more.
The barn, fence, and airplane were all made out of chocolate too. I won the Ohio division of the contest with this clever creation.
Related Recipes
Be sure to check out all of my other Earth Day recipes.
Recipe
These cute chocolate popcorn trees have milk chocolate chunks and branches and green-colored white chocolate popcorn leaves and candy fruit.
- 6 ounces light cocoa candy melts melted
- 10 ounces green candy melts melted
- 6 cups popped popcorn (air-popped popcorn works best)
- colorful candies like jumbo red candy buttons apples, orange M&M's (oranges), or yellow candy-coated sunflower seeds (lemons)
-
Line baking sheets with parchment or wax paper. Pour melted light cocoa candy melts into a disposable pastry bag or zip-top bag.
-
Pipe a 6-inch tall by 2-inch wide tree trunk with branches coming out of the top onto the parchment paper.
-
Refrigerate for 3-5 minutes, just until hardened.
-
Continue to pipe trees until you have the desired number of trees.
-
Pour popped popcorn into a large mixing bowl.
-
Pour melted green candy melts over the popcorn and stir just until well combined.
-
Working quickly, spoong the green popcorn over the branches of your trees.
-
If you don't work quickly, and the popcorn hardens in the bowl, heat it in the microwave for 10 seconds, then stir. Heat more if needed.
-
If desired, you can add candy fruit to your trees while the popcorn is still wet.
-
Refrigerate your trees for about 5 minutes until hardened.
Store your popcorn trees in an airtight container, preferably a metal cookie tin, at room temperature for up to 2 weeks.

- Banana Split Bars – A Fun and Easy Summer Dessert - March 4, 2026
- Pineapple Fudge (No Candy Thermometer Needed!) - March 4, 2026
- No-Bake Peanut Butter Pie Recipe - March 3, 2026


gmail email login says
Wow! So creative! Thank you for sharing the idea. You blog is full of inspiration :3 I really like seeing your work.
Beth says
Thanks, so much. 🙂
Anonymous says
love the idea. perfect for the birthday cake I'm making
Anonymous says
I forgot to mention the Wright Brother plane with the Peep aviators. Your modeling chocolate sure can be use for a lot of things. The flying Peeps are too funny.
Tavette
Beth Jackson Klosterboer says
The airplane is actually made completely out of poured chocolate. Like with the fence posts I poured out a thin layer of chocolate on a pan then cut out all the pieces. It would have been much easier to create out of modeling chocolate! I wish I would have thought of that back then:)
Anonymous says
You certainly SHOULD have won the $10,000 for your Peep scene. I can't fathom how a scene with Presiential Peeps would have won anything, let alone the grand prize. We demand a recount!
After you mentioned the long shelf life of Peeps - I saved the Ms. Kitty Peeps I found at Easter.
Your picket fence has me particularly intrigued. How did you cut and attach the slats? Each slat is identical. Looks like a tremendous amount of work, but the result is very effective.
Popcorn trees have that wonderful 3-D effect & can be used year round. In the fall we could color the popcorn brown, gold & reddish. Thanks for mentioning the amount of chocolate need. 6 oz makes 5 trees that are how tall?
Glad you're passing along the suggestion for everyone to recycle. Even plastic bags your newspaper comes in & styrofoam coffee cups can be returned to the grocery store recycle bins. One container says egg cartons - but hey, lots of other food comes in styrofoam also. They should teach recycling in elementary school. Make it a fun event - see how much you can think of to recycle.
Tavette
Beth Jackson Klosterboer says
Thanks for your vote! I sure would have loved to have won that grand prize. I've not every seen Ms. Kitty Peeps. I bet they are cute.
To make my picket fence, I poured white chocolate out on a pan and smoothed it out. Before it set too hard I hand cut each fence post. It was quite a lot of work, but I loved how it looked. I did break a few while I was cutting.
I thought about making fall trees this past November but ran out of time. i hope to find the time to make them this year. The trees were about 7 or 8 inches tall and some were quite wide.
We recycle everything we possibly can. I'm proud when we put our garbage on the curb every week, that our recycle bin is three times as full as our garbage cans. I wish more people took recycling seriously. Some of my family and friends feel it is too much work to bother and I think that is sad.
Naomi Kitchen says
Dear Beth,
This is Patsy. Thought I should show you what I created for my boy's birthday. Thank you so much for your great advice. I couldn't have done this without your ideas, suggestions. The kids absolutely LOVE the cake and had fun gobbling up the stuff.
I did the popcorn trees and make all those edible decorations on the cake using modelling chocolate. I didn't had Peeps so I made vanilla cookies and ice them to make the bunnies. As my boy was born in the year of rabbit (chinese horoscope), we had a bunny theme party. I even served those carrot crescent rolls you taught with egg salad for the kids and they loved it too. None was left for me. 🙁
Here's the link for the cake:
http://www.youtube.com/watch?v=rLgXDDGSWn0&feature=bf_prev&list=ULwv_WHLwSfPE
I enjoyed doing the cake and hope I can do more of these in future.
Thanks again.
Regards,
Patsy
Beth Jackson Klosterboer says
Hi Patsy,
Your cake is amazing. The bunny cookies are perfect and so well decorated. I love all of the farm scenes you created and the popcorn trees and bushes look great. The train in the middle is a whimsical addition. I imagine that everyone that saw the cake just loved it. I'm glad everyone enjoyed the carrot crescent rolls. Too bad they didn't leave any for you, but I guess that means they really liked them. I hope you continue to find inspiration from my projects =)
Naomi Kitchen says
Dear Beth,
Thanks for your reply and advice. I tried your modelling chocolate and it turn out fine. Your tutorial is really helpful with all the troubleshooting.
Now, the saddest thing for me is I cannot find Peeps marshmallow in Singapore, where I am residing. They stopped carrying it ! 🙁
I would have to source for alternatives for the leading character - the bunny! Would you have any ideas to enlighten?
Regards,
Patsy
Naomi Kitchen says
Dear Beth,
Thank you for your help. Now I have another challenge. I tried modeling chocolate using white chocolate and it was fine. But now when I use dark chocolate (to make the trunk), the dough look rough and tattered, not smooth no matter how I knead. But it's now dry as the dough is still rather oily.
What could be the problem? Pls help ! Please.
Thanks a lot,
Patsy
Beth Jackson Klosterboer says
Hi Patsy, Every chocolate has different amounts of sugars and cocoa butter or oils in them so you have to make adjustments to the amount of corn syrup. When my modeling chocolate feels rough like that, I knead in more corn syrup. If the oils really start to seep out, then set it in a plastic bowl for about 10 minutes. Then go back and try to knead it again. I usually wear food handling gloves when I do this as the dough will be very sticky as you knead in the corn syrup. Continue to add corn syrup until you get a smooth modeling chocolate.
Naomi Kitchen says
Dear Beth,
Thank you so much for your reply. I tried making the modelling choc following your tutorial and though it turn out really oily in the beginning (i think the corn syrup?/cocoa butter? was seeping out a lot), it turn out fine after i followed your advice to persist and keep kneading. Boy, was i thrilled ! 😀
I make some carrots and though it don't look half as good & real as yours, i feel great and had fun ! 🙂 Thanks for your detailed tutorial with all the troubleshooting. It REALLY helps !
Wow, you sculpted the trunk! Hmmm, not sure if I can do that. Still, will give it a try for my beloved son's BIG day. 🙂
BUT the saddest thing for me now is I cant find Peeps marshmallow! There used to be a candy store in Universal Studio Singapore (I'm residing in Singapore) carrying it but now they stopped! 🙁
So now I have to look for alternatives for the leading character - the bunny ! Wish me luck I can find 1 soon or would you have any ideas to enlighten?
Really thanks for your advice & help ... 🙂
Regards,
Patsy
Beth Jackson Klosterboer says
Hi Patsy,
I'm happy you found my trouble shooting instructions helpful and were able to fix your oily modeling chocolate. Bunny shaped Peeps are usually only in stores from January until Easter. I would suggest just sculpting them out of modeling chocolate. I don't know of any other alternatives. You can make your own bunny shaped marshmallow peeps if you'd like. Just Google recipes. I know there are several tutorials available. I can't wait to see your creation!
Naomi Kitchen says
Dear Beth,
I stumble upon you web and am so excited to see your creations.
I am planning a bunny theme party for my son's upcoming 1 year old party and would like to create a similar scene like yours.
Wonder if you would share what's were the ingredients/items used ? To make up those picket fence, the wheel barrow, picnic basket etc.
Please please do ... I hope I can get professional advice from you do that I can create something memorable for my son.
Thanks & regards,
Patsy
Beth Jackson Klosterboer says
Hi Patsy, Almost everything that wasn't a Peep in this basket was created with chocolate. I poured white chocolate onto a piece of parchment paper and allowed it to set a bit, then cut out the picket fence and the pieces of the wheel barrow, and the barn. I honestly don't remember how I made the basket but it could be made using modeling chocolate. I made the carrots using modeling chocolate too. You can see a tutorial I did featuring a bunny devouring a bunch of carrots. It might give you some fun ideas too. Go here ... https://hungryhappenings.com/2012/03/ravenous-rabbit-cupcakes-are-sure-to.html. I hope this helps.
Beth Jackson Klosterboer says
Oh, just to let you know the tree in the basket was 3-D. I sculpted the tree trunk using modeling chocolate, painted a thin layer of chocolate over top and allowed it to dry. Then I added the green popcorn. I made buckeyes using peanut butter fudge dipped in chocolate and added them to the tree because the Buckeye tree is Ohio's state tree.
marcie says
Omg, this is the first time I go on your site. I just have to say you are awesome. I love your ideas. I wish I had a friend like you close by. You could help me out with ideas when I get stuck on a project. I love your work. Please continue. God bless your hands.
Beth Jackson Klosterboer says
Thanks Marcie. I'm glad you found my blog and have enjoyed what you've seen. I'm here to help; if you have any questions about a project, let me know.
Pams Party says
Thank you so much Beth for linking up your trees and sun pops on Dare to Share. The kids really want me to try and make some. Since this was one of my family's favorite links you have been featured this week. http://pamspartyplanning.blogspot.com/2012/04/dare-to-share-3-features.html
I hope you come back again and link up some more of your wonderful creations.
Pam
http://pamspartyplanning.blogspot.com/2012/04/dare-to-share-4.html
Beth Jackson Klosterboer says
I'm glad your family liked the trees. Thanks for featuring them on your site. I haven't had time to link up anywhere this week, but will surely be back to link soon.
Trish - Sweetology101 says
just so you know, I think you are a genius! I love your blog, Beth!! I just wish I had endless time to create your fun items!
Printabelle says
Hi Beth, I featured these adorable trees on my printables blog here: http://printabelle.com/?p=2629 I don't know if you have a featured area, but my button is here: http://printabelle.com/?page_id=724 Thanks!!
l.vanderkirk says
Very clever! Great tutorial! Did you know your trees were featured on Sweet Sixteen: Earth Day Collection? Congratulations on being featured! I'm glad I followed the "gps" to find your blog!
Beth Jackson Klosterboer says
Great to know! Thanks.
l.vanderkirk says
Such a fun idea, and a great tutorial. Thanks for sharing! Did you know you were featured on Sweet Sixteen: Earth Day Collection? I followed the "gps" to find your blog, and I'm glad I did! Very clever!