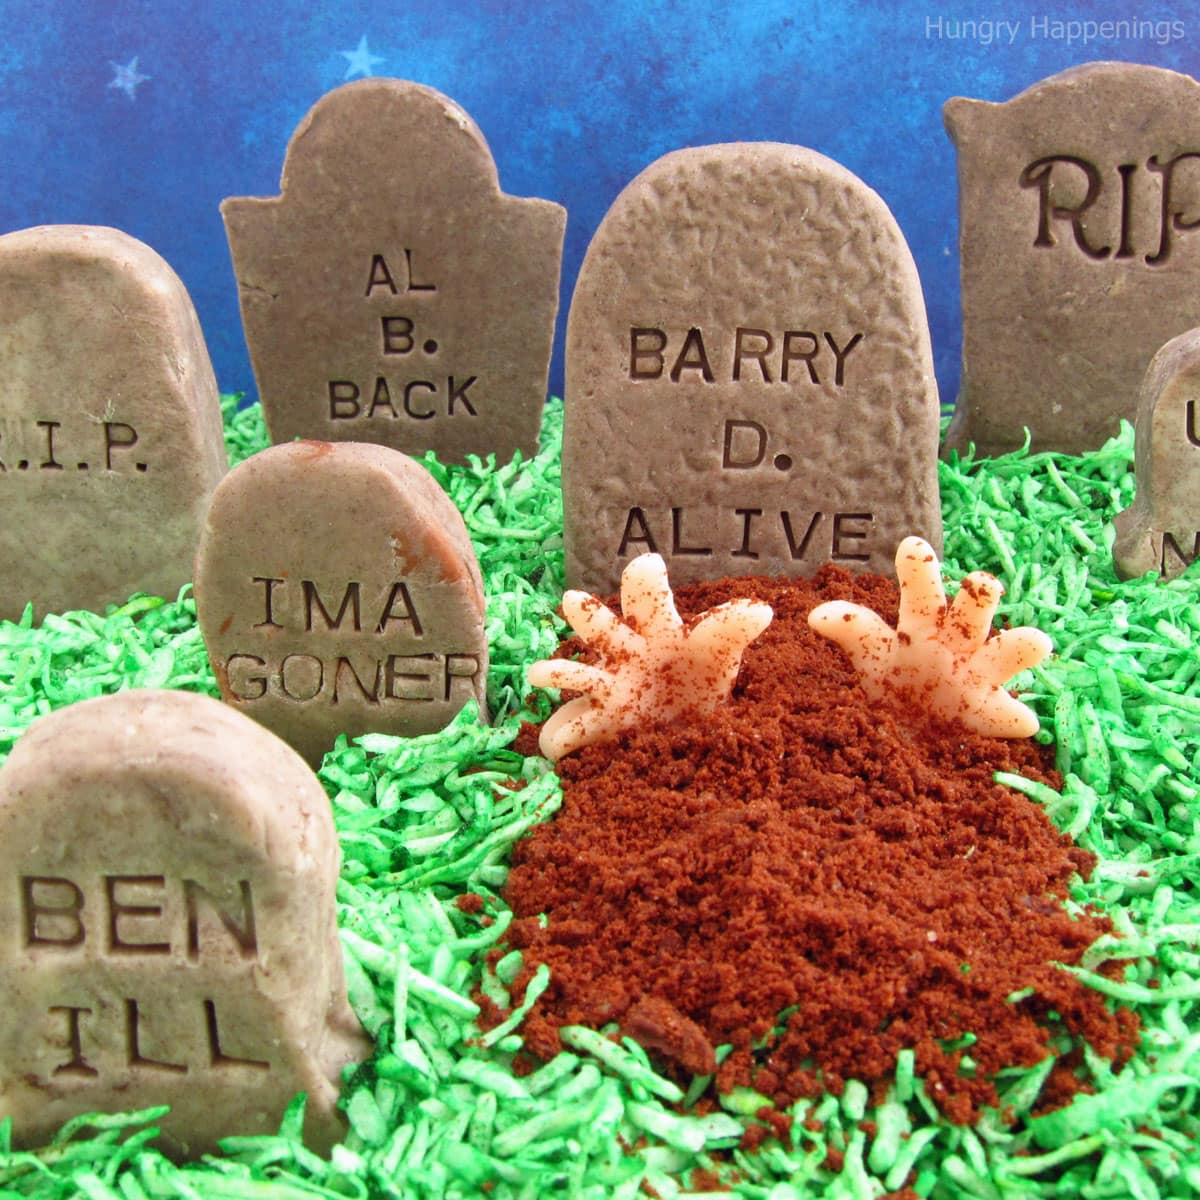
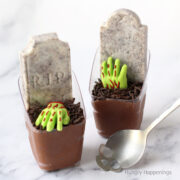
Serve decadent Chocolate Mousse Graveyards to your Halloween party guests. Each cup of chocolate mousse is topped with chocolate sprinkle dirt, a candy zombie hand, and a cookies and cream tombstone.

When I make desserts for our Halloween parties, I am always sure to whip up some of my amazing chocolate mousse. My party guests would be so sad if I did not have any on the dessert table. It is definitely the most popular dessert I serve.
When you make this mousse, you will know why! It is decadently rich, deliciously creamy, and luxuriously smooth. It's also fairly simple to make. I've been using this recipe for more than 20 years, and everyone who tries it agrees it's the best chocolate mousse they've ever tasted.
Each cup of chocolate mousse is decorated with some chocolate sprinkles, a candy zombie hand, and a Cookies and Cream Tombstone.

Ingredients
You can find some of the items needed to make these Chocolate Mousse Graveyards on Amazon. I earn a small commission when you use any Amazon affiliate links to make a purchase at no extra cost to you.
chocolate mousse:
- dark chocolate - When I make this chocolate mousse, I always use Peter's burgundy dark chocolate. It is my favorite, but you can use whatever chocolate you enjoy eating straight out of the package. The chocolate flavor is the star of the show in this dessert, so it's really important you use the chocolate you love to eat.
- water
- sugar
- egg yolks
- heavy whipping cream
cookies and cream tombstones:
- white chocolate - Either use melted compound chocolate (Nestle Premier White Morsels, Peter’s Ice Caps, White Candy Melts, Vanilla Almond Bark, Ghirardelli White Melting wafers) or melted and tempered pure white chocolate. See my chocolate-making tips page for detailed melting/tempering instructions.
- chocolate sandwich cookies - I used OREOs, but you can use any chocolate cookie you like.
decorations:
You can find the sprinkles and zombie hands in Wilton Zombie decorating kits.
Supplies
- mixing bowl
- skillet
- whisk
- fine mesh strainer
- tombstone candy molds
Buy the supplies.
 Candy Decorating Kit-Zombie...Shop on Amazon
 Wilton 2115-2498 Tombstone ...Shop on Amazon
 Wilton 2115-0043 Zombie Han...Shop on Amazon
 Mozaik - MMDTCS48 Mozaik Mi...Shop on Amazon
 DLux 32 x 3 oz Mini Dessert...Shop on Amazon
 Peter's Gourmet Burgundy Di...Shop on Amazon
 ELEFOCUS Stainless Steel Sk...Shop on Amazon
") ZUNKOM Peter's White Caps C...Shop on Amazon
ZUNKOM Peter's White Caps C...Shop on Amazon Nestle Toll House Premier W...Shop on Amazon
Instructions
Make the chocolate mousse.
In my original mousse recipe that I used to create my Chocolate Raspberry Mousse Cake, a Three Layer Chocolate Cherry Mousse Cake, and even a gluten-free Chocolate Peppermint Mousse cake, I simply poured the boiling simple syrup into the egg yolks, then added them to melted chocolate before folding in the whipped cream.
Since a top-notch pastry chef taught me this recipe, I had no reservations about the safety of the eggs, but several of you did, so I developed this method of heating the eggs and simple syrup a bit longer just to ensure the eggs are heated thoroughly.
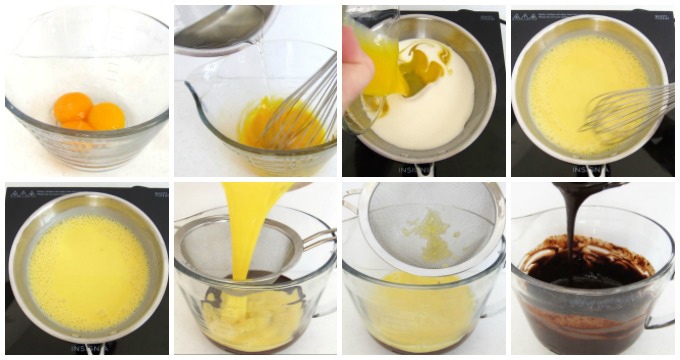
To make the chocolate mousse:
- Simmer the sugar and water until the sugar dissolves.
- Pour this simple syrup into whisked egg yolks.
- Return it to the saucepan and stir in heavy whipping cream and heat until simmering and slightly thickened.
- Pour through a fine mesh sieve into melted chocolate.
- Stir until blended.
- Fold in whipped cream.
Notes about heating the egg yolks and simple syrup:
- In the video below, you'll see that I heated the egg yolk, simple syrup, and cream mixture on the stovetop and allowed it to simmer until slightly thickened.
- The temperature of my egg yolk mixture registered about 160 degrees Fahrenheit. The egg yolks are heated through at this point and are safe.
- You can continue to heat, stirring constantly, until the mixture thickens into a custard. If you stir this thick custard into your melted chocolate, your mousse will set more quickly, but may be slightly more challenging to blend with the melted chocolate.
Notes about making custard:
- Stir the custard constantly. Do not walk away from the stove.
- If you overheat the custard, do not pour boiling custard over the chocolate, or the cocoa butter will separate from the chocolate. Allow it to cool to at least 170 degrees F.
- If your chocolate separates and becomes greasy, pour a tablespoon of cold heavy whipping cream (not whipped) into the chocolate and stir until glossy and smooth. If needed, add a bit more cream.
- To maintain the correct ratio in your recipe, reduce the whipped cream by 2 tablespoons for each tablespoon of cream you add to your separated chocolate.

Make the cookies and cream tombstones.
- Melt white confectionery coating or melt and temper white chocolate. See my chocolate-making tips page for detailed instructions.
- Crush OREO Cookies and stir them into the white chocolate.
- Pour into tombstone candy molds.
- Tap the mold a few times to remove any air bubbles.
- Place the mold in the freezer for 5-8 minutes if using confectionery coating or in the refrigerator for about 10 minutes if using pure white chocolate until the candy hardens.
- Remove from the freezer and carefully turn the mold upside down, allowing the candy to fall out.

Assembling the chocolate mousse cup graveyards.
- Spoon or pipe chocolate mousse into small plastic cups.
- Sprinkle with some chocolate Jimmy's to make it look like you're mousse cups are covered in dirt.
- Then add a candy zombie hand, either sticking out of the chocolate mousse or lying down on the chocolate sprinkle dirt.
- Set a cookies and cream tombstone upright at the back of the mousse cup.
I found small plastic dessert cups that were taller on one side than the other, so the cookies and cream tombstone could lean up against the wall of the cup. If your cups don't have something for the tombstone to lean up against, then just push them down into the chocolate mousse a little farther.
Storage
The chocolate mousse can be refrigerated for up to five days. You can also freeze the chocolate mousse for up to three months.
You can fill your mousse cups and refrigerate them, but don't add the zombie hand or candy tombstones until you are ready to serve. The tombstones may develop beads of condensation if they are refrigerated.
So go ahead and fill the cups and sprinkle on the chocolate jimmies. Up to an hour or so before serving, remove the mousse cups from the refrigerator and let them sit for about 15 minutes before adding the zombie hands and tombstones.
I have allowed the mousse to sit out at room temperature at my Halloween parties for several hours without any issues, but they are always one of the last things I put on my dessert table, and usually the first desserts to get eaten.
Related Recipes
If you are looking for more zombie party ideas or fun Halloween treats, be sure to check out these other recipe ideas.
Recipe and Video
Decorate small cups of chocolate mousse with chocolate jimmies, a candy zombie hand, and a cookies and cream tombstone for Halloween.
- 3 tablespoons water
- 3 tablespoons sugar
- 3 large egg yolks
- ½ cup heavy whipping cream
- 12 ounces melted semi-sweet chocolate
- 2 cups whipped cream made from 1 cup heavy whipping cream
- 12 ounces white chocolate or confectionery coating, melted (and tempered if using pure white chocolate)
- ¼ cup OREO Cookie Crumbs
- chocolate jimmies (sprinkles)
- 12 candy zombie hands
-
Pour water into the bottom of a saucepan set over medium high heat.
-
Add sugar and allow to come to a boil.
-
Boil until all the sugar is dissolved, stirring if needed.
-
Pour egg yolks into a mixing bowl and whisk to break up.
-
Continue whisking while slowly drizzling in the sugar syrup.
-
Pour ½ cup of heavy whipping cream into the saucepan and set it back on the stove on low heat.
-
Stir in the egg mixture and continue to stir for at least 3 minutes until heated through.
-
You may heat until thickened, if desired.
-
Pour through a fine mesh sieve that is set over your bowl of melted semi-sweet chocolate.
-
Discard anything that remains in the sieve.
-
Stir the chocolate until glossy and smooth.
-
Fold in whipped cream then chill until thickened.
-
Spoon or pipe into small plastic dessert cups.
-
Stir cookie crumbs into melted white chocolate.
-
Spoon into tombstone candy mold.
-
Chill in the refrigerator if using pure white chocolate or in the freezer if using confectionery coating (candy melts) for 5-10 minutes just until hardened.
-
Remove and un-mold candy tombstones.
-
Sprinkle some chocolate jimmies over top of each chocolate mousse cup.
-
Insert one zombie hand and one candy tombstone before serving.
Recipe Video
Store the chocolate mousse in the refrigerator for up to five days or freeze it for up to three months. Decorate before serving but don't refrigerate the zombie hands or tombstones.

- Banana Split Bars – A Fun and Easy Summer Dessert - March 4, 2026
- Pineapple Fudge (No Candy Thermometer Needed!) - March 4, 2026
- No-Bake Peanut Butter Pie Recipe - March 3, 2026


The Partiologist says
That would be the only graveyard I would want to dig around in! 😉