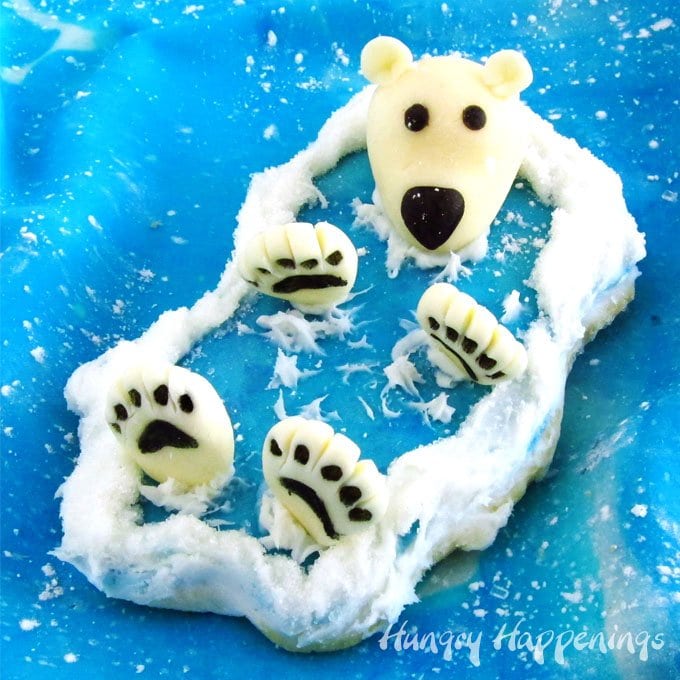
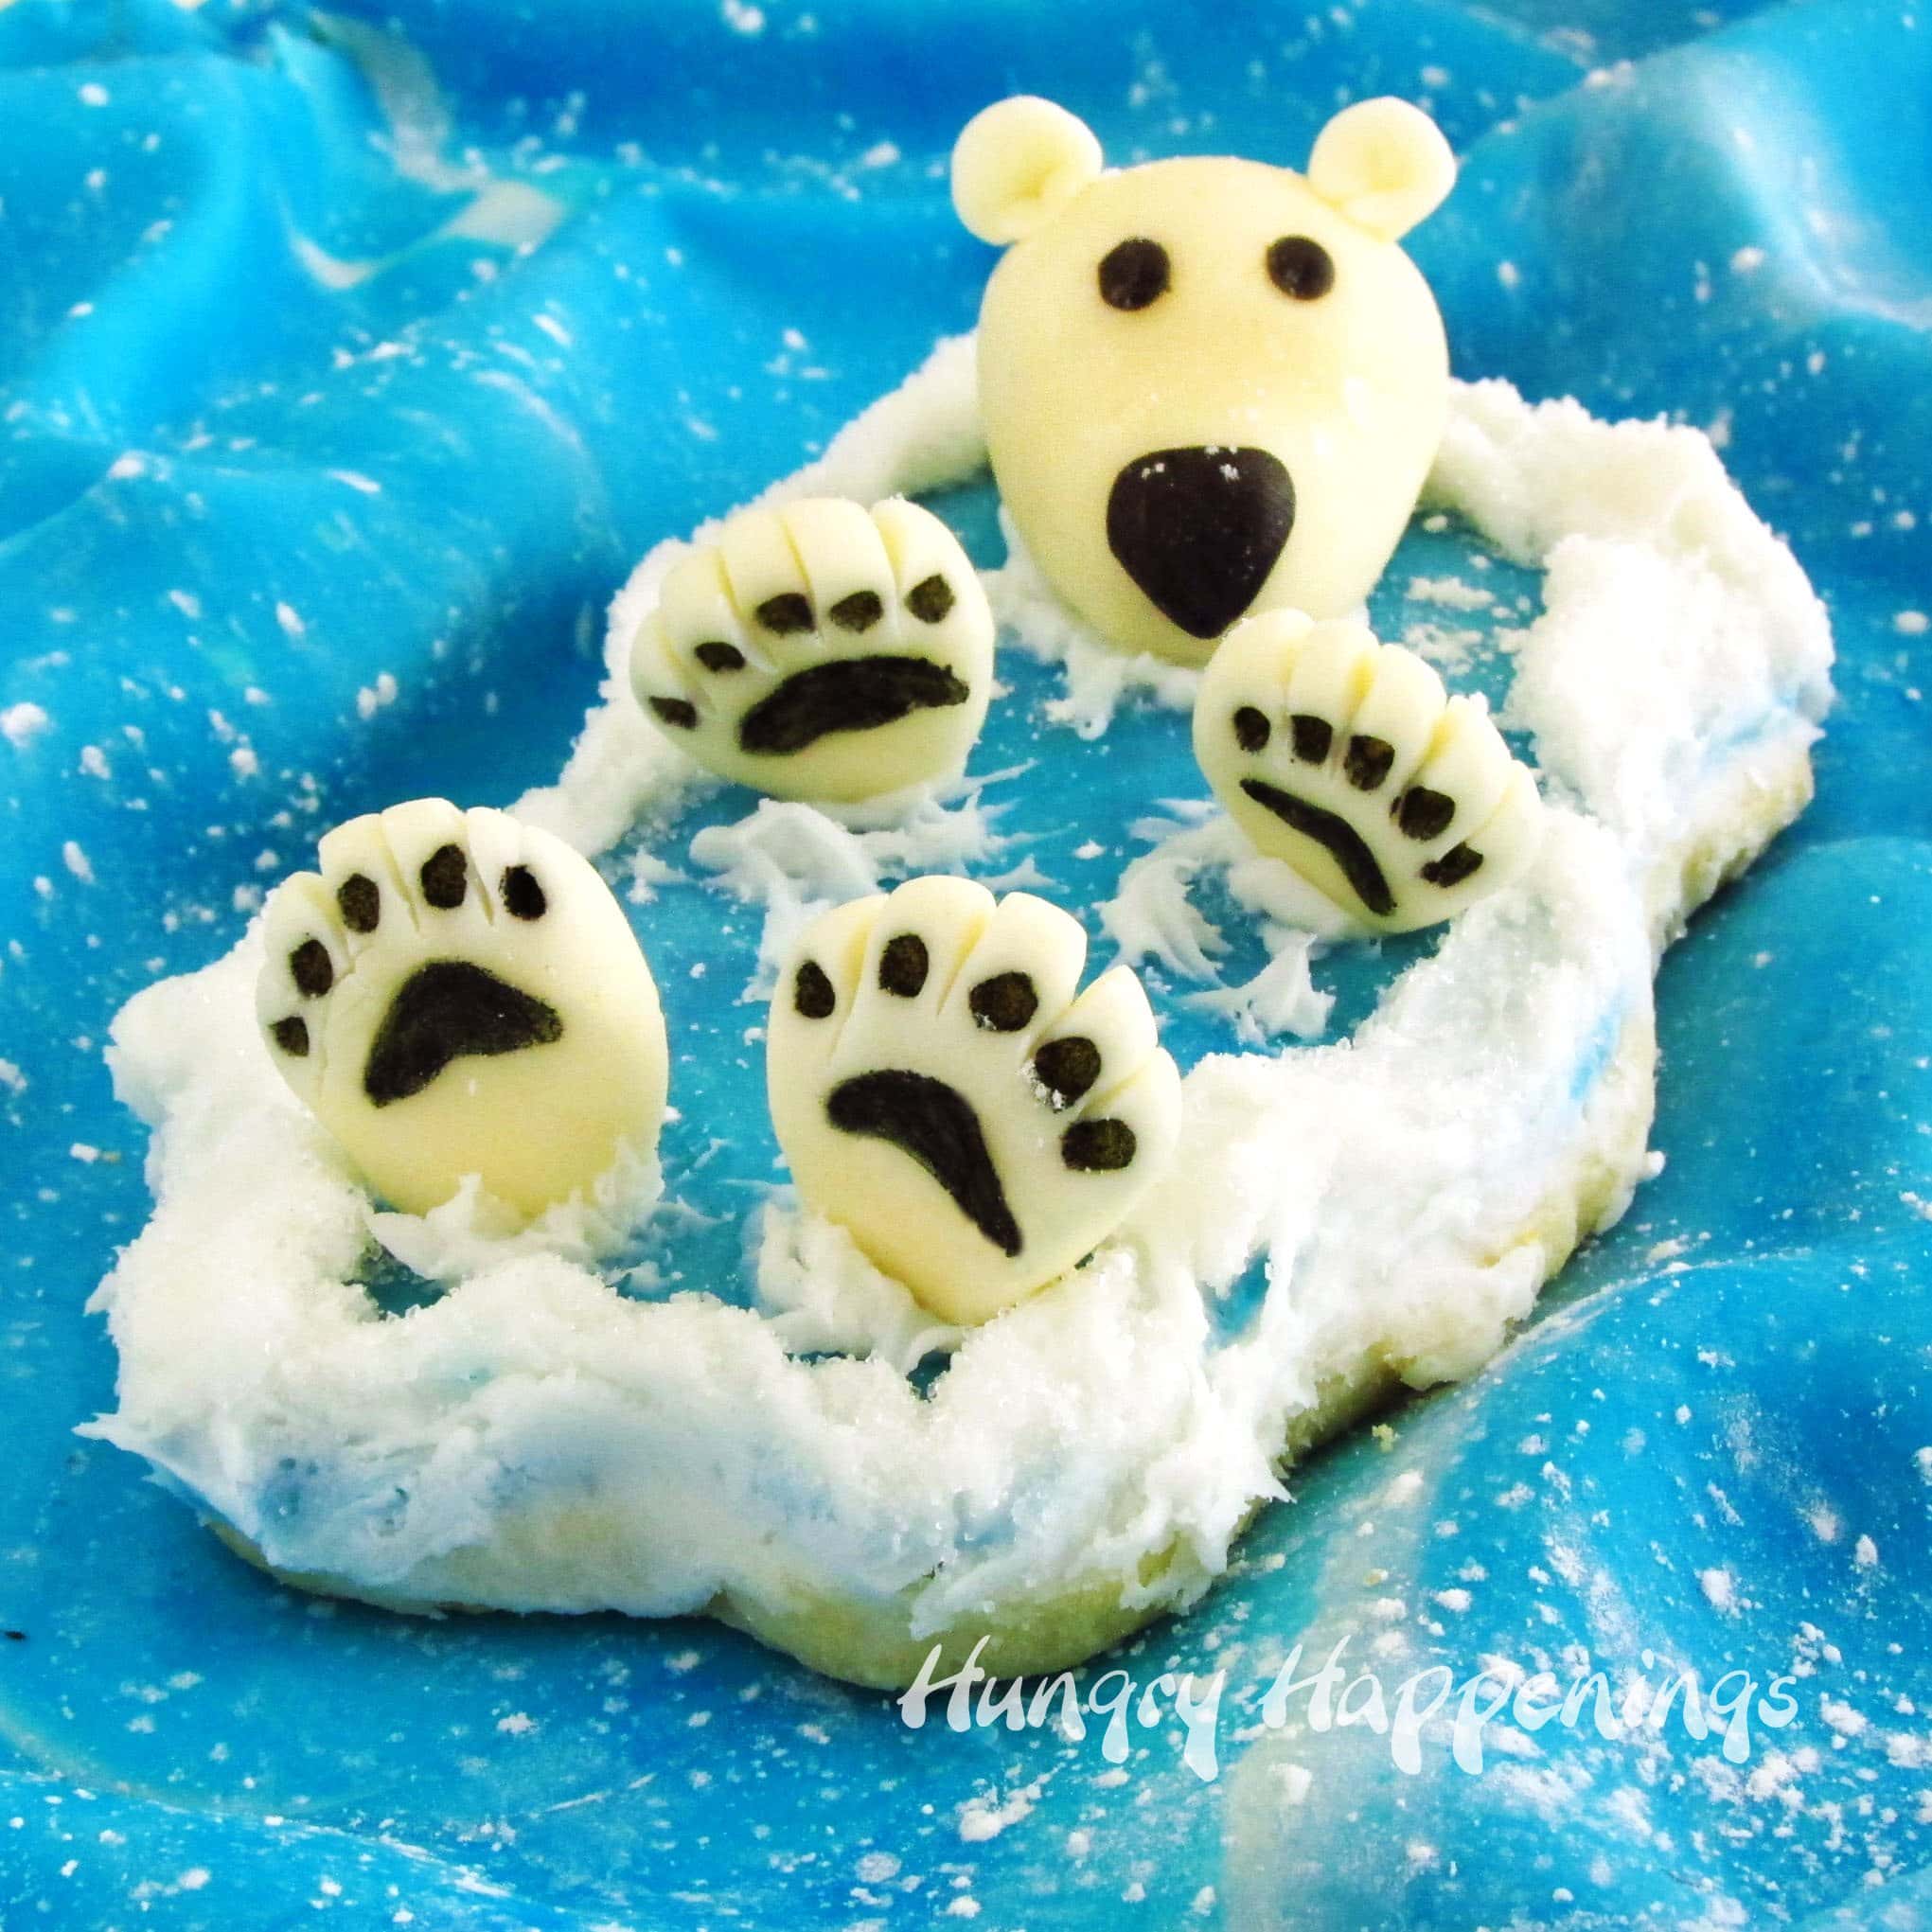
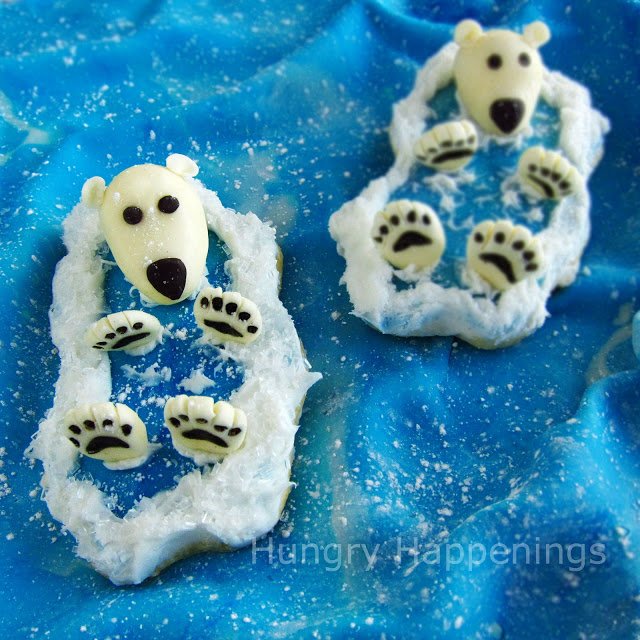
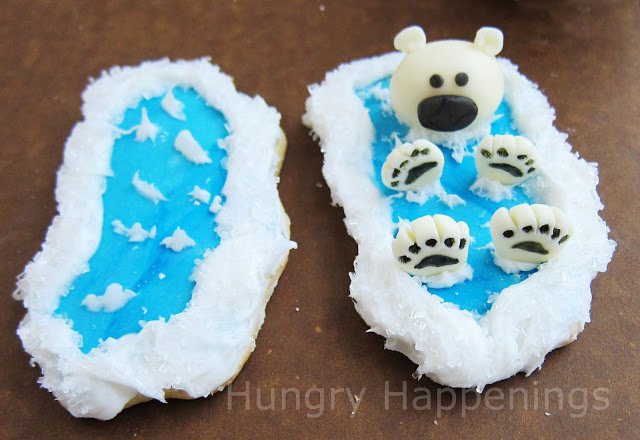
These polar bear cookies are so darn cute. Each has a 3-dimensional polar bear floating on its back in a cookie ocean with its big fluffy paws and head sticking up out of the modeling chocolate water.
My recent visit to the Columbus Zoo inspired me to create a winter-themed sweet featuring a polar bear. The zoo has an amazing exhibit where you can see the polar bears swimming over your head.
I kept thinking about how cute the giant bear paws were and wanted to create something to showcase them, so I decided to replicate a bear floating around on its back with its big floppy paws sticking out of the water.
Being so many of you said you like decorating frosted sugar cookies, I decided to use that as the base for my design. Each cookie is frosted before some modeling chocolate water is added. More frosting and some white sanding sugar create an icy effect around each cookie.
Then modeling chocolate and a black food coloring marker are used to make the polar bear's head and paws.
These cookies are a bit time-consuming, but they are so darn cute, that I believe they are worth the effort.
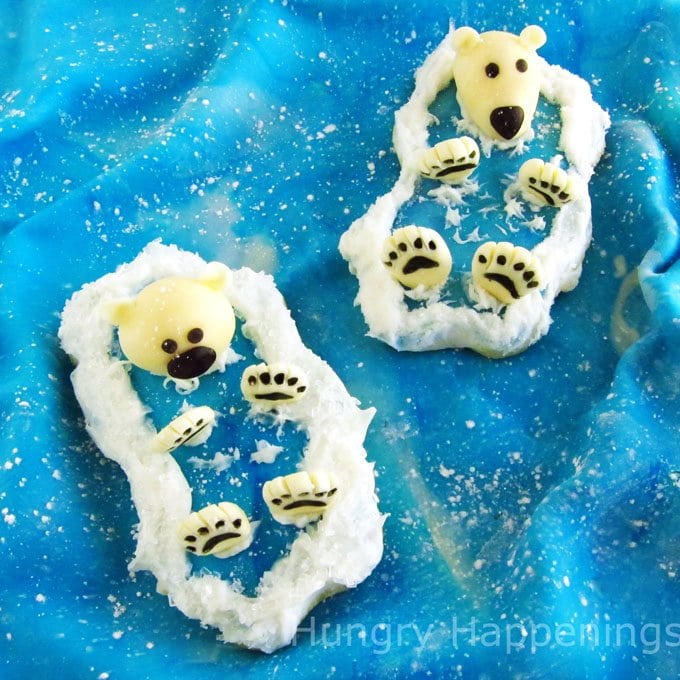
When I set out to take pictures of my cookies, at first I grabbed some background paper, but it just didn't have the effect I was looking for, so I rolled out a big piece of modeling chocolate water, created some waves, set the cookie on top, and sprinkled on some powdered sugar snow so it looks like my bears are floating around in the big blue sea amidst snow flurries.
Polar Bear Cookies (makes 12-15 cookies)
Ingredients
Cookies:*
½ cup salted butter, softened
½ cup powdered sugar
1 egg yolk
1 ½ teaspoons almond (or vanilla) extract
1 ¼ cup all purpose flour, plus more for dusting
1 tub vanilla frosting (or use your favorite very white frosting recipe)
white sanding sugar, optional
1 recipe of white modeling chocolate (recipe here)
powdered sugar for dusting
blue and black food coloring (grocery store variety is fine)
black food coloring marker
food handling gloves (wear when coloring modeling chocolate)
* I've been trying out different cut out cookie recipes and this one was shared by my sister who used to make it when she was a Tupperware consultant. It was a recipe used by Tupperware, but I'm not sure of the actual origination of the recipe.
Supplies
plastic wrap
rolling pin
cutting board
sharp knife
parchment paper lined baking sheets
Instructions
Make cookies: Cream butter and powdered sugar together until light and fluffy. Add egg yolk and almond extract and beat to combine. Add flour and beat just until the dough comes together. Roll into a ball, flatten into a disc, and wrap in plastic wrap. Refrigerate for at least an hour.
Preheat oven to 375 degrees.
Cut out the cookies.
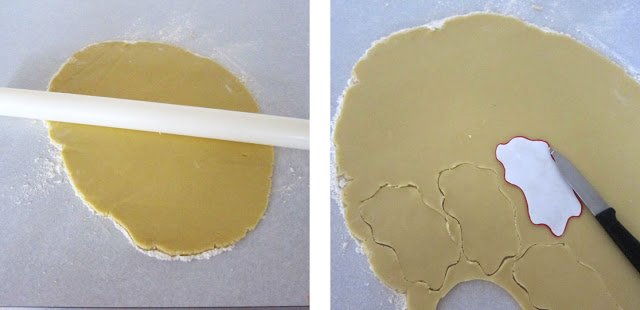
Dust the cutting board with flour. Roll out cookie dough to ¼"-⅓" thick. Draw a wavy water template that is about 4" long and 2 ¼" wide on a piece of paper. Cut it out. Set the template over the dough and cut out around it. Re-roll dough as needed until you have 12-15 cookies. Save the template.
Place the cookies on parchment paper-lined baking sheets and bake for 8-10 minutes until they are set but not browned. Allow cookies to cool completely.
Meanwhile, prepare the modeling chocolate decorations:
Pinch off a small amount of white modeling chocolate and color it black.
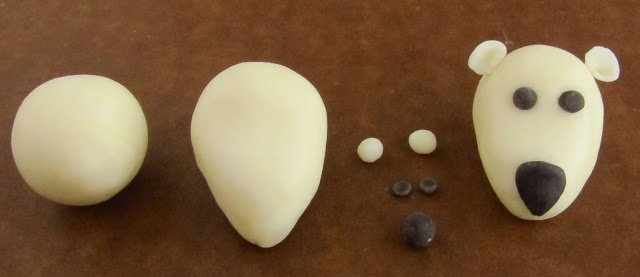
Shape the polar bear's head.
To create a realistic-looking polar bear head, pinch off about two teaspoons of white modeling chocolate and roll it in a ball. Shape the ball into a pointed oval.
Pinch off a small piece of black modeling chocolate and shape it into a rounded triangle for the nose.
Dab a very small amount of water on the back side of the nose and press it onto the pointed end of the bear's head.
Pinch off two tiny pieces of modeling chocolate roll them into balls and attach them to the face for the bear's eyes. (I like to use tweezers for such small detail work. You could also just draw on the eyes with the food coloring marker if you prefer.)
Pinch off two small pieces of white, roll them into balls, and flatten them into circles.
Pinch together the bottom of each circle to create a rounded ear. Dab the pinched bottom edge with water and press it onto the head. Make enough heads to go on all of your cookies.
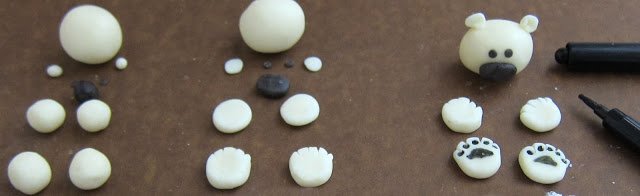
Shape the feet and paws.
To create a more cartoon-looking polar bear, roll some white into an oval, add the eyes, and ears, and a big oval nose.
At first, this was how I planned to make the bears, and took several pictures using these heads, but after creating the more realistic-looking head, I decided I liked it better. But both are cute, so you can decide which to make.
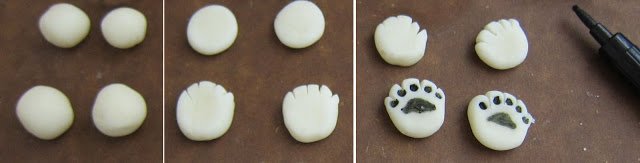
To make the paws pinch off and roll two small balls of white and two that are just slightly larger.
Flatten the two smaller balls and keep them in a round shape. Flatten the two larger pieces making them more elongated.
Use a sharp knife to make four slits in each paw for the toes.
Use a black food coloring marker to draw a spot on each of the five toes on each paw and one pad on each paw. Allow the ink to dry before handling the paws. Make four paws for each bear cookie.
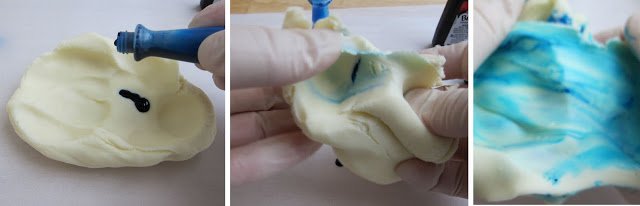
Color the modeling chocolate ocean.
Add some drops of blue coloring into the remaining white modeling chocolate and knead leaving streaks of white and dark blue throughout.
Set it aside for about 5 minutes to allow the food coloring to dry.
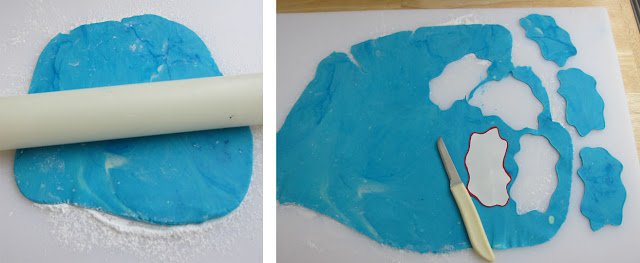
Cut out the modeling chocolate ocean.
Dust your cutting board lightly with powdered sugar.
Roll out the blue modeling chocolate as thin as you can get it.
Take the template you used to cut out the cookies and cut off about ⅛"-¼" all around the edge.
Set the template on the blue modeling chocolate and use it as a guide to cut out the water for each cookie.
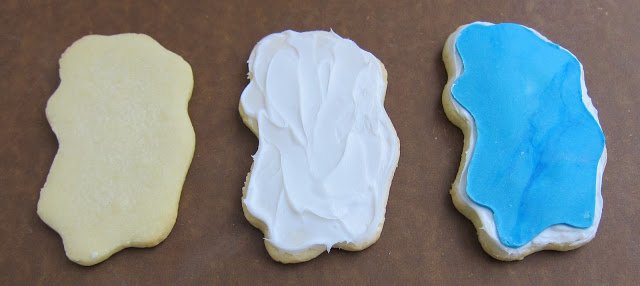
Frost the cookies.
Frost each cookie with a thin layer of vanilla frosting.
Press one piece of modeling chocolate water on top of each cookie.
Add a border (white caps in the waves).
Add a border of frosting all around the edge of the cookie. Don't smooth it out, you want it to look like waves. The reason I made the blue water a bit smaller than the cookie was so it wouldn't show through the frosting here. I wanted the edges of the cookie to be white, not blue.
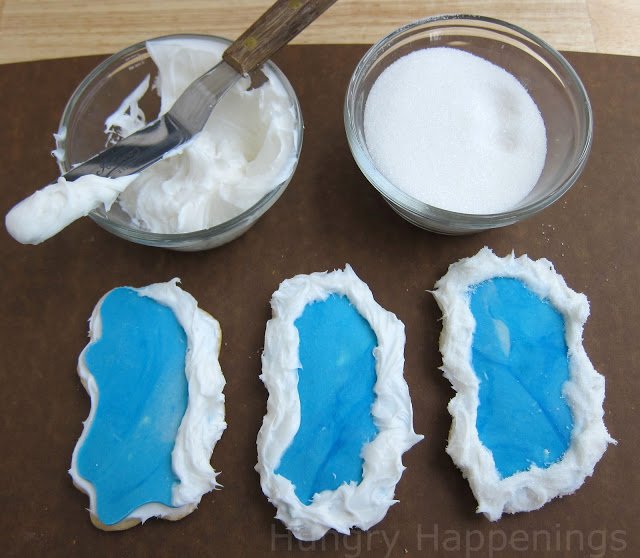
Sprinkle white sanding sugar all over the frosting.
Just a note: The cookie pictured above has regular sugar on it. I didn't think it sparkled enough so I found some big crystal sanding sugar and used it for the rest of the cookies which you'll see in the next picture. I liked it better but didn't think to retake the picture above.

Add more frosting white caps.
Add some frosting white caps (the top of a wave) to each of the cookies.
Press a small amount of frosting onto the blue modeling chocolate water and pull up creating peaks. Add as many as you'd like.
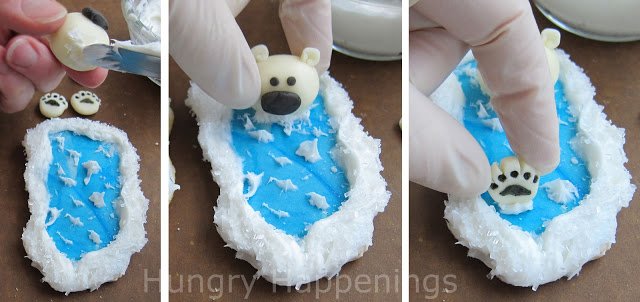
Attach the polar bear to the cookie.
Use frosting to attach the head and paws to the modeling chocolate water. Spread some on the bottom of the head and press it onto the water.
You want the frosting to look like white caps around the head and paws, not just a blob of frosting, so use a knife to make some peaks out of the frosting.
Decorate the polar bear cookies.
Aren't they adorable?
So, I'm curious. Which polar bear do you like better, the more realistic-looking one or the more cartoon-looking one?

If you'd like to have the ultimate guide to working with Candy Clay (modeling chocolate) be sure to get your printed or e-book copy of Candy Clay Creations. This 102-page book is filled with tips and tricks for making and working with candy clay along with 17 step-by-step tutorials for decorating cupcakes, cookies, and more using candy clay. It's a fantastic resource for anyone who wants to make festively decorated treats.
If you like these you might also like these other polar bear treats.
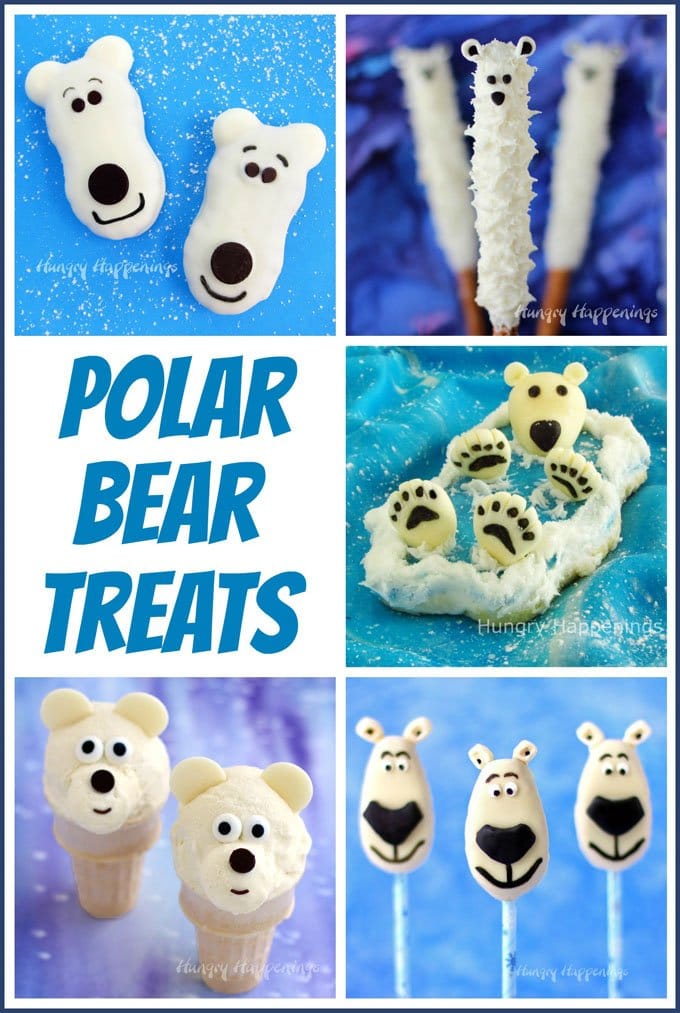
Nutter Butter Polar Bears • Ice Cream Cone Polar Bears
Ice Cream Cone Polar Bears • Polar Bear Lollipops
If you make and share these polar bear cookies on your own website be sure to link back to this post and credit Hungry Happenings. Thanks!
Be sure to check out all my fun Christmas Recipes!

- Banana Split Bars – A Fun and Easy Summer Dessert - March 4, 2026
- Pineapple Fudge (No Candy Thermometer Needed!) - March 4, 2026
- No-Bake Peanut Butter Pie Recipe - March 3, 2026

Susan-The Weekly Sweet Experiment says
I found you at Toys in The Dryers link party. So glad I did. Your cookies are so adorable. Thanks for the tutorial on how to make them. So cute!
laura@imnotatrophywife.com says
Darn! These are the cutest ever! Newest follower! We loved the Columbus Zoo when we lived there !
laura@imnotatrophywife.com
Bekah says
Wow! I'm so glad I found your site through Fun Finds Friday!!! These cookies are outstanding - definitely going to try this! Thank you for sharing - new follower of your blog, be back quite often! 🙂
~Bekah
Jo says
You're amazing! Can we have the whole collection please. 🙂
Farmhouse Style Living says
I swear you come up with the cutest ideas! How cute would this be for a winter table? I dont know how you do it. You are truly a food genius!
Dorothy @ Crazy for Crust says
Those are SO adorable! You are so creative. I'd love for you to share these on Crazy Sweet Tuesday!
Suzy - Sudden Lunch says
Wow - you're brilliant!
Beth Jackson Klosterboer says
Thanks for the link Meaghan.
Dorothy, thanks. I linked up at Crazy Sweet Tuesday.
the decorated cookie says
These are incredible! So so genius. Just posted a link on edible crafts :).
Sue says
This is "over the top" adorable and CLEVER!
melaniemusings2 says
I love your polar bears..for me the realistic one is my fave..but they are all cute. I would use them for a center piece too. Love them.
The Partiologist says
What a cute idea!!
Beth Jackson Klosterboer says
Thanks everyone!
Pam, how wonderful that you got to meet Jack Hannah. He has been such a great asset to the Columbus Zoo. If you haven't been to the zoo in a while, it has gone through an amazing transformation in the past few years. I wish we lived much closer as I'd go all the time. I really love visiting there. It is now the number one rated zoo in America and I can see why.
Jo and Sue - super genius - how sweet!
Dave, yes I agree they are too pretty to eat, but somehow I've managed to snack on two of them. They taste as sweet as they look.
Inspired by eRecipeCards says
Well first, too pretty to eat, either one. Wonderful work. Me, I like the pointy nosed guy, but love em both
Dave
Jo and Sue says
Oh my goodness! This just goes to prove that you truly are a super genius! So so so cute 🙂
Kieli_Heart says
These are just too adorable! And so yummy too. I love Polar bears ♥
~ Kieli ~
Jill @ KitchenFunWithMy3Sons.com says
Love them...very cute!
Pams Party says
I grew up in Ohio and LOVE the Columbus Zoo! Once when we were there we even met Jack Hanna. My now 15 yr old had her picture taken with him when she was 9 months old. =) I love both of the bears, but I think I like the more realistic one a teeny bit better.
Trish - Sweetology101 says
very very clever!
Tiffany Yang says
Aaah, they are both so cute! Can't decide which one I like more. Love how they are sitting in the water! Adorable 😀