• Skip to primary navigation
  • Skip to main content
  • Skip to primary sidebar
  • Skip to footer
Hungry Happenings
  • RECIPES
    • All Recipes
    • Dessert Recipes
    • Decorated Cookies
    • Decorated Cakes
    • Cheesecake Recipes
    • Everyday Desserts
    • Homemade Candy
    • Everyday Meals
    • Readers’ Gallery
    • Hungry Happenings Blog Posts
  • HOW TO
    • Chocolate Making Tips
    • Chocolate Making Course (video lessons)
    • Make Modeling Chocolate
      • Modeling Chocolate Recipe and Tutorial
      • How to Color Modeling Chocolate
      • How to Store and Work with Modeling Chocolate
      • How to Fix Greasy Modeling Chocolate
      • How to Fix Dry Modeling Chocolate
      • Use Colored Candy Melts to Make Candy Clay
    • Candy Clay Creations
    • How To Color White Chocolate and Candy Melts and Paint Candy Molds
    • How to Use Food Coloring Markers
  • HOLIDAYS
    • ALL HOLIDAY RECIPES
    • Valentine’s Day
    • St. Patrick’s Day
    • Easter
    • 4th of July
    • Halloween
      • Hungry Halloween
    • Thanksgiving
    • Christmas
    • New Year’s Eve
    • MORE HOLIDAYS
      • Mother’s Day
      • Father’s Day
      • April Fools
      • Chinese New Year
      • Cinco de Mayo
      • Day of the Dead
      • Earth Day
      • Hanukkah
      • Mardi Gras
  • PARTY FOOD
    • Super Bowl
    • Graduation
    • Birthday Party
    • March Madness
    • Summer Fun
    • Baby Shower
    • Wedding Shower
    • School/Teacher
    • Movie and T.V. Characters
    • Kid’s Treats
    • Fun Party Recipes
  • BUY MY COOKBOOKS
  • ABOUT/CONTACT

Sweet Serenity Stones – Cookies ‘n Cream Fudge Rocks with Inspirational Sayings

June 6, 2012 This post may contain affiliate links.

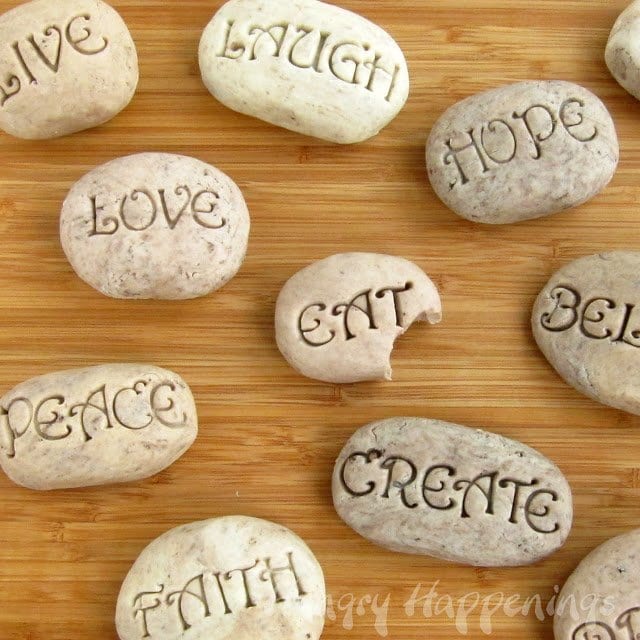
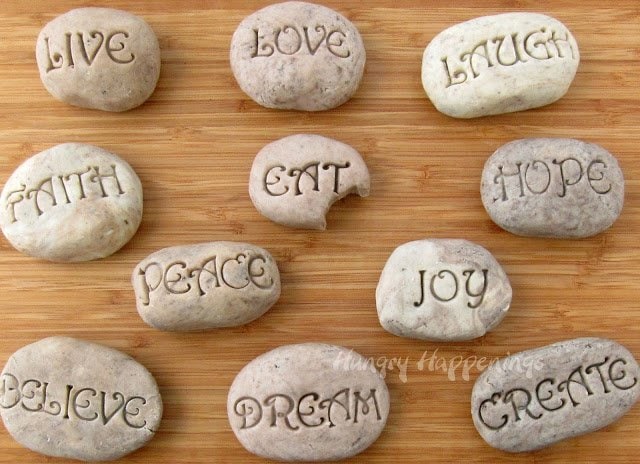
These Sweet Serenity Stones are the perfect treat to make and give to the special people in your life! They are delicious and unique, the best part of any gift you give!

These Sweet Serenity Stones are the perfect treat to make and give to the special people in your life! They are delicious and unique, the best part of any gift you give!

Just a few days ago I shared with you a recipe to make cookies ‘n cream fudge rocks for a fun Father’s Day project. While I was creating my sweet stones, this idea popped into my head and I just had to share it. I know this is the third edible rock recipe to grace these pages in the past month and some of you may be saying, “enough already,” but I think this one is really great and worth sharing. I promise I’m done with this idea, for a while anyway!

Milestones Stone Stamps


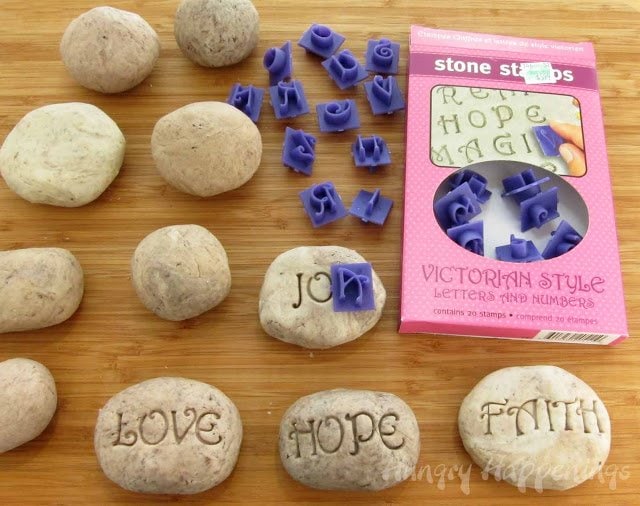
I had just purchased some stone stamps last week, not really knowing what I’d do with them, but figured sooner or later, I’d have the perfect project idea. These plastic letter stamps can be used to make garden stones or used in any type of clay including the chocolate variety. After I made my stone mountain the other day, I pulled out the stamps and tried them out in my fudge rocks. They worked perfectly. I reworked my original mountain of rocks into 11 large rocks for this project. Then I  spent less than ten minutes adding a nice variety of inspirational sayings.

These stones look and feel like the real deal, but taste divine!
These Sweet Serenity Stones are the perfect treat to make and give to the special people in your life! They are delicious and unique, the best part of any gift you give!


RELATED: Find dozens of easy fudge recipes at HowToMakeEasyFudge.com.

Sweet Serenity Stones (makes 10-12)

You’ll need:

1 batch of cookies ‘n cream fudge stones (find recipe here)

1 set of Victorian Style Letter Stone Stamps

These Sweet Serenity Stones are the perfect treat to make and give to the special people in your life! They are delicious and unique, the best part of any gift you give!

Roll your cookies ‘n cream fudge into various shapes and sizes. You’ll need your edible rocks to be large enough to stamp out your inspirational phrases.

Press the stamps into the candy stones creating whatever sayings you’d like. You may have to hold the fudge as you pull up the stamp so you don’t distort your letters.

Just a note – you can see that the stamps have letters or numbers on both sides. I pressed the “Y” into the stone which featured the word, “JOY,” but you are seeing the “A” that is on the back side of the stamp.

These Sweet Serenity Stones are the perfect treat to make and give to the special people in your life! They are delicious and unique, the best part of any gift you give!

That’s it. You are done! Super easy, isn’t it?

Filed Under: Earth Day Recipes, Everyday Desserts, Mother's Day Recipes Tagged With: Beach-and-Pool-Party, Candy, Chocolate, fudge, Oreos, Spa-Party-Food, white chocolate

The Sugar Academy Chocolate Making Courses
Previous Post: « “My Dad Rocks” – Cookies and Cream Fudge Rocks for Father’s Day.
Next Post: Caramel Rice Krispies Treat Sandcastle »

Reader Interactions

Comments

  1. Varda

    January 11, 2020 at 4:27 pm

    Thank you Thank you Thank you!!!

    I was looking for something to add “happy birthday” to my daughters fossil birthday cake. This is perfect.

    Reply
    • Beth

      January 19, 2020 at 11:43 am

      I’m glad these fudge rocks worked out for you! I hope your daughter loved her cake.

      Reply
  2. Rhianon

    December 28, 2015 at 2:07 pm

    These are adorable!!!! I’m teaching my toddler the fruit of the spirit; love, joy, peace, patience,kindness etc. and this would be perfect to do together! Any idea what I can use for an allergy friendly rock? Cookie or fudge? Gluten, dairy, egg, corn, and soy free, basically Paleo if possible. Thank you!

    Reply
    • Beth

      December 29, 2015 at 12:06 pm

      Hi Rhianon, I’m so sorry, but I really don’t have any experience with ingredients that meet your dietary needs. I don’t want to give you misinformation. I hope you find a way to make them. They would be a fun craft to do together.

      Reply
  3. Dean Moser

    May 4, 2015 at 12:27 am

    Hello Beth, beautiful idea.
    Where can I get the letter stamps, want to make it for a spa party at the school. Thanks

    Reply
    • beth

      May 4, 2015 at 1:34 am

      Thanks, Dean. There is a link at the end of the post to buy the stamps on Amazon. You can also find them in the clay aisle in a craft store.

      Reply
  4. Teinika

    August 15, 2014 at 4:03 am

    Thank you for this wonderful idea! I'm using these for my daughter's spa themed birthday party. Mine don't look as pretty as yours, but i think they turned out okay. You are so creative!!!!!!

    Reply
    • beth

      August 15, 2014 at 4:33 am

      Hi Teinika,

      I'm so happy to hear you made these for your daughter's party. I'm sure they look great and that the guests will love them =)

      Reply
  5. Jennifer Mackenzie

    May 20, 2014 at 6:38 am

    Hi Beth, I want to hand write words onto the rocks but I am finding them too soft? It's almost like working with play dough…Amy advie on how to make them"hard" like rocks?

    Reply
    • beth

      May 20, 2014 at 1:17 pm

      Hi Jennifer, yes these "rocks" being made of fudge are going to be reasonably soft and pliable which makes them easy to stamp. They will stiffen up as they dry in the air. If you want them to be hard you can just let them sit out on the counter for a day or two and the outside will crust over. You can also freeze them and pop them out, write on them, then allow them to thaw.

      Reply
  6. Anonymous

    March 8, 2014 at 8:54 pm

    Sorry but this is nonsense…I came here to learn about how to make the stones now how to stamp things into them like a five year old! Annoying.

    Reply
    • beth

      March 8, 2014 at 10:07 pm

      I've used this fudge rock recipe several times to make different projects and always just link to the recipe instead of repeating it. The recipe is here – https://hungryhappenings.com/2012/06/my-dad-rocks-edible-fudge-rocks-for.html

      Reply
  7. Nikki Cook

    July 6, 2013 at 4:48 pm

    Hi, can you do this ahead of time and then stamp the letters in a day later?

    Reply
    • beth

      July 6, 2013 at 6:11 pm

      I suggest you stamp them the day you shape them into rocks as the fudge will harden as it sits, but I don't see why it wouldn't work a day later. You just might see more cracking around the letters. To keep the fudge soft, store it in an airtight container. That should help.

      Reply
  8. Nikki Cook

    July 6, 2013 at 4:44 pm

    Can you make the rocks ahead of time and then stamp into later? I think this would be a great project to do with my kids yoga class!

    Reply
  9. Nikki Cook

    July 6, 2013 at 4:43 pm

    Can you make the rocks ahead of time and then stamp into later? Think this would be a great project to do with my kids yoga class!

    Reply
  10. Anonymous

    August 9, 2012 at 3:14 am

    This was one of the best projects I have run across will be making them. Thanks cheryl

    Reply
  11. Anonymous

    June 19, 2012 at 9:05 pm

    I made the rock fudge for Fathers Day {and my brother-in-law's birthday}! It was a HUGE hit! He is a rock fanatic! lol. Now I want to do these for our ladies at church!! This is perfect! Awesome. 🙂

    Reply
    • Beth Jackson Klosterboer

      June 19, 2012 at 10:19 pm

      So happy to hear it! I'm glad everyone enjoyed the rocks.

      Reply
  12. Jessica

    June 18, 2012 at 3:12 am

    These are so cute! I think it would be neat to make a small edible zen garden.

    Reply
  13. Bella@artclubblog

    June 15, 2012 at 3:41 pm

    Wow! Those are amazing. They look so much like the real thing.

    Reply
  14. Trish - Mom On Timeout

    June 13, 2012 at 7:03 pm

    Very, VERY, clever! Pinning, featuring and just loving in general 🙂 Thanks so much for sharing at Mom On Timeout!

    Reply
    • Beth Jackson Klosterboer

      June 13, 2012 at 7:53 pm

      I'm so happy to see how much you love this idea. I do too! Thanks for sharing it everywhere:)

      Reply
  15. Sue

    June 12, 2012 at 4:18 pm

    PERFECTION and so fun!!!

    Reply
  16. Erika

    June 11, 2012 at 7:00 pm

    Now this is something great for the kids to do. And I like the addition of the words.

    Erika
    It’s a Wrap Link Party at Artful Rising

    Reply
  17. Maria

    June 11, 2012 at 2:27 pm

    What an awesome idea!!! They look BEAUTIFUL!!!

    Reply
  18. Sher

    June 11, 2012 at 1:51 am

    I've never said this before in my life… I want to eat these rocks. You, my friend, are brilliant!

    I featured you on Momcaster today: http://momcaster.com/2012/06/11/oreo-recipes-desserts.

    🙂

    Reply
    • Beth Jackson Klosterboer

      June 11, 2012 at 12:02 pm

      Thanks for the feature! I'm glad these rocks have tempted you to take a bite:)

      Reply
  19. Donna

    June 9, 2012 at 5:14 am

    Wow! That is totally original! Awesome!

    Reply
  20. Anonymous

    June 8, 2012 at 6:59 pm

    Just purchased the letters… This is a great idea! I can't wait for my letters to come in to make these.

    Reply
    • Beth Jackson Klosterboer

      June 9, 2012 at 3:39 am

      Have fun with your letters. I can't wait to make more projects using mine.

      Reply
  21. greenmm

    June 8, 2012 at 7:37 am

    OMG…every year I tell my kids they are getting rocks for Christmas, this year they will. haha 🙂 and I have the stamps, too.

    Reply
    • Beth Jackson Klosterboer

      June 8, 2012 at 3:40 pm

      That will be hysterical! Great idea.

      Reply
  22. LP @dishclips

    June 8, 2012 at 5:28 am

    So cute and decorative. I bet they are delicious.

    Reply
  23. Heather Kinnaird

    June 7, 2012 at 11:15 pm

    what a fantastic idea!

    Reply
  24. SammiMae

    June 7, 2012 at 9:42 pm

    How clever! I happen to have these stamps, I bought them not knowing what to do with them either 🙂 I guess I found it!

    Reply
    • Beth Jackson Klosterboer

      June 7, 2012 at 11:03 pm

      I'm so happy you now have a fun use for your letters. I wish I had bought them before I made my Mother's Day garden stone. I'm sure I'll find many more uses for them now that I know how great they work.

      Reply
  25. JoanieJ

    June 7, 2012 at 8:08 pm

    What a GREAT idea, Beth! I love it and can't wait to try it… 🙂

    Reply
  26. scrap_boro

    June 7, 2012 at 6:00 pm

    I love these….may have to try this out with my mint recipe for wedding and baby showers. So many ideas!!!!! Just a hint to try powdered sugar to prevent sticking.

    Reply
  27. cupsbykim

    June 7, 2012 at 12:00 pm

    I love these! They would be perfect for a wedding reception or something like that! I'm going to have to go buy me some letters!!

    Reply
  28. Karla

    June 7, 2012 at 4:06 am

    I love this!!! At first I thought they were real rocks lol. Then I saw the "eat" one and was confused for a second. haha. Awesome idea.

    Reply
    • Beth Jackson Klosterboer

      June 7, 2012 at 11:19 am

      Thanks Karla. I knew at first glance people would find that stone odd, especially being it had a bite taken out of it:)

      Reply
  29. Gina

    June 7, 2012 at 3:21 am

    Coming to you from Wow Me Wednesday. Very creative idea.

    Reply
  30. Raspberry Lane Farmhouse Living

    June 7, 2012 at 3:01 am

    Way cool idea!!…love these stone cookies! I'm going to get some of those letters too…would love to use them on baked salt dough…I'd also love to post your tutorial on pinterest, if that's okay. Let me know.
    Thanks so much for this cute idea!
    Patti 🙂

    Reply
    • Beth Jackson Klosterboer

      June 7, 2012 at 3:33 am

      Thanks! I was really happy with how well the letters worked on the fudge and am sure they'd work great on baked salt dough too. I appreciate you pinning any of my projects:)

      Reply
  31. CuteEverything.com

    June 7, 2012 at 12:56 am

    Pinned!

    Reply
  32. CuteEverything.com

    June 7, 2012 at 12:55 am

    These are just wonderful! I saw them today in my email and was just amazed by them. Thanks very much for linking them up! I assume that they turned out at least as well as you had hoped, because they are perfect! The font really makes it for me, and they look just exactly like the real serenity stones, which I love BTW. Fantastic job, Beth!

    Reply
  33. Anonymous

    June 6, 2012 at 9:05 pm

    Very cool!

    Reply
  34. Erin

    June 6, 2012 at 8:40 pm

    OH MY HECK!!! I LOVE these! How fun and so clever!!!

    Reply
  35. sugarswings

    June 6, 2012 at 8:30 pm

    they look so totally real! awesome job 🙂

    Reply
  36. Elizabeth L in Apex, NC

    June 6, 2012 at 5:08 pm

    Can't wait to try this – thanks!!

    Reply
  37. The Partiologist

    June 6, 2012 at 2:43 pm

    Okay, there should be 5,000 comments on how creative these are! You totally ROCKED these!! 🙂

    Reply
    • Beth Jackson Klosterboer

      June 6, 2012 at 4:07 pm

      Thanks! Oh, how I'd love to see 5000 comments on any of my posts. Heck, I'm happy when I get 50!

      Reply
  38. ThisGirlBlogs

    June 6, 2012 at 2:14 pm

    This is such a cute and fun idea! Brilliant! 🙂

    Reply
  39. Danielle

    June 6, 2012 at 1:38 pm

    love this – so creative!

    Reply

Leave a Reply Cancel reply

Your email address will not be published. Required fields are marked *

Recipe Rating


This site uses Akismet to reduce spam. Learn how your comment data is processed.

Primary Sidebar

WELCOME!

See all recipe categories

The Sugar Academy Chocolate Making Courses

Footer

Popular Kid Friendly Recipes

Cookie Monster Rice Krispie Treats with candy eyes, Tootsie Roll mouths, and mini Nutter Butter Cookies
Halloween Mickey Mouse Oreo Cookies decorated using candy clay are fun to make for your Halloween parties.
Turn Reese's Cups into sweet little otters then use them to create some adorable Sea Otter Cupcakes. These treat will be perfect for you Finding Dory Party.
Mickey Mouse Galaxy Cookies - chocolate cookies topped with chocolate ganache and galaxy sprinkles.
Decorate this cute Olaf Mickey Cake for your Disney Frozen party. It's easy to create using a simple cake decorating technique.
This Winter Wonderland White Chocolate Popcorn speckled with candy snowflakes and blue sprinkles would make a great treat for a Frozen party, a nice gift for Christmas, or a wintertime snack.

Hungry Happenings is a participant in the Amazon Services LLC Associates Program and occasionally writes sponsored posts which will be disclosed within the post. We value your privacy. Please read our Privacy Policy, Disclosure, and Terms of Service.

Copyright © 2022 Hungry Happenings