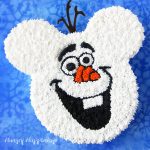
Combine two famous Disney Characters to create one delightful cake. This Olaf Mickey Cake captures the essence of Frozen's Olaf and Mickey Mouse together in one fun cake, and it's easy to make using a simple cake decorating technique.

The world has loved Mickey Mouse for almost a century. Olaf has not been around nearly as long, but he won our hearts immediately. I love that I was able to incorporate both beloved characters into this fun Disney Frozen Cake.
I may not be a kid, but I'm a kid at heart, and I love both of these famous Disney characters. I was so excited to see Frozen II and have to admit that I enjoyed it even more than the original animated movie.
There was more Olaf, and what's not to love about that?
The new Disney Frozen movie inspired me to get into the kitchen to create an Olaf cake, but I wanted to make something that I had not seen before. I remembered all the Mickey Mouse-shaped pins I saw at Walt Disney World recently and thought it would be fun to create a Mickey Mouse-shaped Olaf cake.

I also wanted to keep the cake design really simple.
If you are looking at this Olaf Mickey Cake thinking, "I can't draw Olaf, how am I going to make this cake?" you'll be happy to know that I can't draw him either. I'm going to show you a simple method for transferring a design onto a cake.
You use parchment paper and clear piping gel to create a transfer.

How to create a piping gel transfer:
- Print out the design you want to transfer to your cake in reverse. In this case, I found a picture of Olaf that I liked, and I blew it up so that the size matched the size of my cake.
- It is important that you print the design out in reverse so that when you transfer it onto the cake, it looks correct.
- You'll notice in the image of Olaf above that his smile is going in the opposite direction from the one on the cake.
- Set a piece of parchment paper over your design and tape it in place using removable tape. I used painter's tape.
- Fill a pastry bag, fitted with a #3 tip (a small single hole) with clear piping gel.
- Pipe the gel over the outline of your design.

Transfer the design onto your cake.
- Pick up your transfer and carefully flip it upside down.
- Set it in position on your cake.
- Gently rub over the backside of the transfer, ensuring the piping gel sticks to the cake.
- Don't press too hard or your piping gel will ooze, and you'll lose your defined outline.
- Lift the parchment paper off the cake.
- Your piping gel outline should be easy to see on your cake surface.
NOTES:
You'll notice in the video below that I transferred my design directly onto my cake. You can use this same technique on a cake that is covered in smooth frosting. See my Owl Cake (it's within my Halloween Petal Cake post) to see that process.
I don't bother crumb coating my cake when I'm going to pipe stars of frosting over my cake, but you can, if you like.
You can also just frost the cake with a smooth layer of white frosting, add the piping gel on top, then pipe on the design using black and orange frosting. You'll just need to be careful to completely cover the piping gel so none of it shows.

Pipe your design using frosting.
- Now that you have your design on your cake, you can easily pipe frosting over the outline.
- To create Olaf, pipe black around his smile, teeth, carrot nose, eyes, and eyebrows.
- Then switch to pastry bags fitted with star tips and fill in the colors.
- Pipe black frosting stars to create his smile and his pupils.
- Use orange for his carrot nose and white to fill in his eyes.
- Then pipe white all over the surface and sides of the cake.
NOTE: I chose to leave my Mickey ears white so that this easy Olaf cake would be white, but you can certainly pipe on black mouse ears if you prefer.
Speaking of Mickey Mouse ears, you need to bake a Mickey Mouse-shaped cake.

Bake a Mickey Mouse-shaped cake
- You can use the Mickey Mouse cake rings that I used, or you can bake one round cake and two smaller round cakes for the ears.
- If you are using the ring, you'll want a thick cake batter because there is no bottom to the cake ring.
- I blended together 1 Duncan Hines White Cake Mix with 3 tablespoons instant white chocolate pudding mix, 3 tablespoons sour cream, ¼ cup vegetable oil, 3 egg whites, and 1 cup of water to create my batter.
- This makes a really moist and sturdy cake.
- It's my favorite, go-to cake recipe.
- I used about ⅔ of the batter for the Mickey Mouse cake. You want to fill the Mickey Mouse cake ring ⅔ full of batter.
- The remaining batter was baked into 5 jumbo cupcakes (about 8 regular-sized cupcakes).
- The cake took a full 30 minutes to bake through.
NOTES:
- My cake puffed up over the top edge of the ring slightly, but I didn't feel the need to carve it off, as the surface was nice and flat. I simply cut off the excess around the bottom edge of the pan around the ears.
- If your cake puffs up too much, you can trim off the top before removing it from the cake ring.
- I flipped my cake over and added my decoration to the bottom of the cake.

- Set the cake upside down on a cake plate.
- Use a cake leveler or a long serrated knife to cut the Mickey Mouse-shaped cake in half to create two layers.
- Pick up the top layer using a cake lifter and set it aside.
- Spread a thick layer of frosting on top of the bottom layer.
- Place the top layer on the frosted layer.

- Frost and decorate the cake using the instructions above.
Add Olaf's Twigs.
When you watch the video below, you will notice that I do not show you how to make Olaf's twigs. That is because I actually forgot to add them.
I realized this omission as I was editing my photos, but there was no going back. I had already given the cake to my friend.
I had to use the only magic I know of, and that was to add the twigs using Photoshop. I'm sorry! I hate to ever share anything that has any Photoshop magic involved, but I felt Olaf was not complete without his twigs.
How did I not see it when I was filming? I don't know!
Make chocolate twigs:
- You can simply pipe the twigs onto your cake board using chocolate frosting, or you can use a template and pipe chocolate over top, as you did with the piping gel.
- Then insert the chocolate twigs into Olaf's head.

What do you think? Olaf needed his twigs, right?
He's cute either way, but I do think he looks more Olafy, with his twigs.
Buy Supplies
Items needed to make this Olaf cake can be found at Amazon. If you use the links below, I will earn a small commission at no extra cost to you.
 Funwhale 3 Tier Mouse Multi...Shop on Amazon
 Wilton Adjustable Cake Leve...Shop on Amazon
 Wilton Cake Lifter, 8-InchShop on Amazon
 Wilton 704-9987 Clear Pipin...Shop on Amazon
 Wilton 4-Piece Set, 0.8 x 2...Shop on Amazon
 HIC Kitchen Ateco 870 - 10 ...Shop on Amazon
Recipe
Mickey Mouse shaped Olaf Cake decorated using a piping gel template is the perfect dessert for a Disney or Frozen party.
- 1 box Duncan Hines Classic White Cake Mix
- 3 tablespoons instant white chocolate or vanilla pudding mix
- 3 tablespoons sour cream or Greek yogurt
- 1 cup water or milk
- ¼ cup vegetable oil
- 3 egg whites
- 3-4 cups white frosting
- orange food coloring
- ½ cup chocolate frosting
- black food coloring
- 2-3 tablespoons clear piping gel
- 2-4 ounces candy melts or ¼ cup chocolate frosting
-
Preheat oven to 350 degrees Fahrenheit.
-
Grease and flour a Mickey Mouse cake ring and set on a parchment paper-lined baking pan. (Or use a 6-inch pan and 2 jumbo muffin cups.)
-
Combine all the cake ingredients in a mixing bowl and beat, using an electric mixer, on low speed for 30 seconds.
-
Increase the speed to medium and beat for 2 minutes.
-
Pour batter into pan, filling it ⅔ full. Use the remaining batter to make cupcakes.
-
Bake for 26-34 minutes until a toothpick inserted in the center of the cake comes out clean.
-
Allow the cake to cool completely.
-
Carefully flip the cake upside down and unmold.
-
Cut the cake in half creating two even layers.
-
Spread about 1 cup of white frosting in between the cake layers.
-
Color about 2 tablespoons of white frosting using orange food coloring.
-
Spoon into a pastry bag fitted with a small #14 or #15 star tip.
-
Color the chocolate frosting using black food coloring and spoon into a pastry bag fitted with a coupler and a #3 round tip.
-
Fill a pastry bag fitted with a #3 round pastry tip with the clear piping gel.
-
Set a piece of parchment paper over an image of Olaf (that has been printed in reverse) and pipe the gel over the outline of the mouth, eyes, carrot nose, and eyebrows.
-
Turn the template upside down and set it on the cake.
-
Gently press to adhere the piping gel to the cake.
-
Remove the template.
-
Pipe black frosting directly over top of the piping gel outline.
-
Remove the round tip and replace it with a (#18) star tip.
-
Pipe black frosting inside Olaf's smile then add his pupils.
-
Pipe orange frosting stars into the carrot nose.
-
Spoon white frosting into a pastry bag fitted with a (#18) star tip.
-
Pipe stars into the eyes.
-
Then pipe white stars all over the rest of the cake.
-
If needed, replace the star tip with the round tip on the black frosting and pipe more black frosting over the pupils, eyebrows, and parts of the smile to make them show better.
-
Either use chocolate frosting to pipe some twigs onto your cake board or pipe twigs out of candy melts and allow them to harden before inserting them into the cake between the ears.
Recipe Video
The recipe below makes a really thick cake batter, which is what you need when using a metal Mickey Mouse Cake ring. If you use a thinner batter, you'll need to wrap the bottom of the pan with tin foil to create a sealed bottom for your cake pan.
Related Recipes
If you like making this easy Olaf cake for your Disney Frozen party, you might also like making these other Frozen-themed treats.


- Banana Split Bars – A Fun and Easy Summer Dessert - March 4, 2026
- Pineapple Fudge (No Candy Thermometer Needed!) - March 4, 2026
- No-Bake Peanut Butter Pie Recipe - March 3, 2026
The Partiologist says
Olaf turned out so cute, love how you made the twigs, the perfect touch!
Beth says
Thanks! The thought of making the cake a second time in order to add the twigs just stressed me out, so I'm glad you don't mind how I chose to add them.