Decorate a 6-layer chocolate cake with orange and black petals using buttercream. This fun orange and black petal cake is perfect for Halloween.

I had the opportunity to take a Wilton cake decorating class at JoAnn's last month. On the final day of class, I decorated this simple Orange and Black Halloween Petal Cake using one of the techniques I learned.
Petal cakes are all the rage right now. I see why! They are super easy to make and look great. I love the simplicity of the pulled dot, also known as the petal technique.
I've made and shared a lot of decorated cakes here on Hungry Happenings and was excited to learn new cake-decorating techniques that I can share with you.
I'll show you a step-by-step tutorial below on how to make a petal cake. But, first, let me show you another decorated cake that I created during this class.
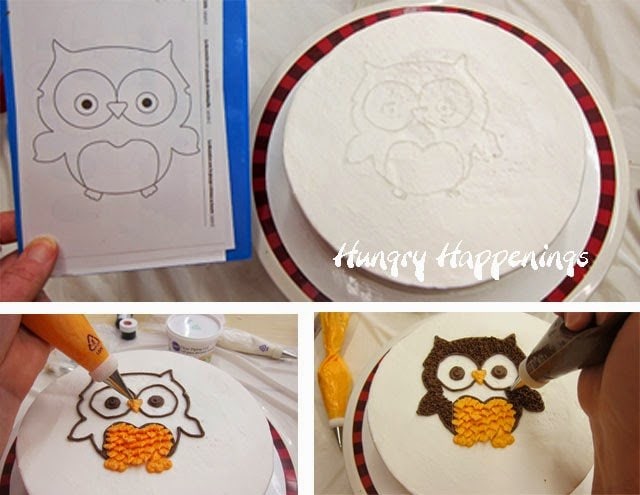
I was so happy to learn a technique for easily transferring an image to the top of a cake using piping gel.
It is really a cool technique, especially for those of us who are artistically challenged. I've always been pretty good at tracing but not freehand drawing so this technique was great for me.
You set a drawing underneath a piece of parchment paper, trace over it with piping gel, turn it upside down, set it on the cake, brush around the edges, lift off the paper, and your design is on the cake. Then you decorate on top of it with icing.

I had this owl decorated within 15 minutes.
I couldn't believe how easy this was. I've since used this technique to decorate an Eagle Scout cheesecake. It worked great on a cheesecake too even with a pretty intricate design.
O.K. back to the Halloween petal cake.

I planned to give this to my husband for our anniversary. I know that seems strange, but we met at a Halloween party and are total Halloween fanatics, so it makes perfect sense, actually.
I made my husband's favorite chocolate fudge cake with chocolate ganache frosting. It was a great base on which to decorate this cake.

Ingredients
Chocolate Fudge Cake:
1 Duncan Hines Chocolate Fudge Cake Mix
1 cup water
¼ cup vegetable oil
3 eggs
2 ounces melted good quality dark chocolate
Chocolate Ganache Frosting:
1 ¼ cups heavy whipping cream
16 ounces semi-sweet chocolate, finely chopped
Orange and Black Frosting:
12 ounces Wilton White Ready-to-Use Decorator Icing
orange gel or paste food coloring
12 ounces Wilton Chocolate Ready-to-Use Decorator Icing
black gel or paste food coloring
optional, water to thin out icing
Notes about Wilton icing.
To add the decorative petals to my cake, I first started by coloring some Wilton White Ready-to-Use Decorator icing using orange coloring. I also colored some chocolate icing using black coloring.
Wilton's tubs of icing have varying thicknesses. Check the front of the tub to see if the icing is thick, medium, or thin. You may need to stir in some water in order to thin out the icing if it is too thick to easily pipe onto a cake.
You can make homemade frosting if you prefer. See my
Supplies
3 6-inch cake pans
optional 3 6-inch round parchment paper lines for your cake pans
baking spray
optional, Bake Even Strips
cake leveler
6-inch cardboard cake round
8-inch cardboard cake round
Items used to create my cakes are available on Amazon.com. I earn a small commission when you use the Amazon affiliate links on this page to make a purchase at no extra cost to you.
 Student Decorating Kit, Cou...Shop on Amazon
  Wilton Clear Piping Gel, 10...Shop on Amazon
  Wilton Creamy White Decorat...Shop on Amazon
  Wilton Ready To Use Decorat...Shop on Amazon
  Wilton 601-1001 Halloween G...Shop on Amazon
 Wilton Performance Pans Alu...Shop on Amazon
  Wilton Bake Even Cake Strip...Shop on Amazon
  Wilton Bake Easy Non-Stick ...Shop on Amazon
  Boao 3 Pieces Kitchen Bakin...Shop on Amazon
Instructions

Bake the cakes.
Preheat oven to 350 degrees Fahrenheit.
Spray baking pans with Bake-Easy non-stick spray.
Combine the cake mix, water, oil, and eggs in a bowl and stir to combine. Add in the melted chocolate and beat for 30 seconds on low. Increase the mixer speed to medium and beat for two minutes.
I love adding melted chocolate to this Duncan Hines Chocolate cake. It really intensifies the chocolate flavor.
Equally, divide the cake batter among cake pans.
Run the Bake Even Strips under some hot tap water, and allow excess to drip off. Wrap each cake pan with a strip, then place the cakes on the middle rack in the oven, with at least 1 inch in between each pan. The bake-even strips help your cakes bake more evenly, so they come out nice and flat.
Bake for 22-26 minutes, until a toothpick inserted in the center of each cake, comes out clean. Allow to cool completely.
While the cakes are cooling, make the chocolate ganache frosting.
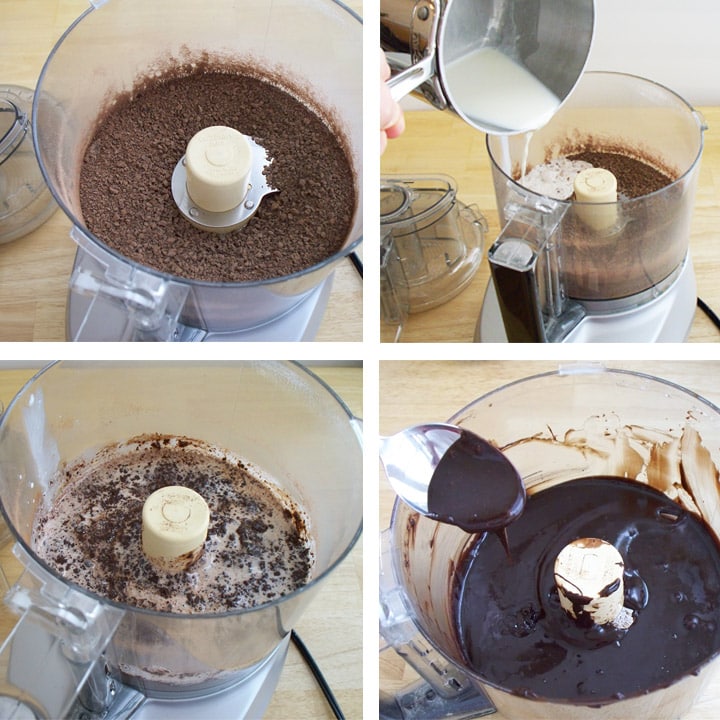
Make chocolate ganache.
Place chopped chocolate in the bowl of a food processor. Pulse until the chocolate is fine crumbs.
Heat heavy whipping cream in a small saucepan over medium heat. Stir often until it just comes to a boil. Pour the hot cream over the chocolate, put the lid on the food processor bowl, and let sit for 2-3 minutes. Pulse for 3 seconds.
Remove the lid and scrape down the sides and bottom of the food processor bowl. Return the lid and pulse for 5 more seconds or until the mixture, which is called ganache, is smooth.
Don't over-mix your ganache or it will turn grainy as it sets up.
Note: A food processor makes easy work of creating a chocolate ganache. If you don't have one, finely chop your chocolate and put it in a microwave-safe mixing bowl. Boil cream as above and pour over chocolate and let sit for 2-3 minutes. Use a whisk to create an emulsion. Begin by stirring just in the center of the bowl, then slowly bring the whisk out to the edge of the bowl. Stir just until combined and the ganache is smooth.
Allow this to cool until it is thick enough to spread. Keep an eye on it. I can't tell you how long this will take. There are too many variables. So, just stir it every 15 minutes or so and keep an eye on it.

Level and torte the cakes.
Once the cakes are cool, use a cake leveler to cut off the domed top, then slice each cake into two even layers.
You can see that I didn't have to cut off much. My cakes had pretty flat tops which was due to using the cake strips.
Cut each of those cakes into two evenly thick slices.

Frost the cake.
Set one cake layer on a 6-inch cardboard cake round. Spread a thin layer of chocolate ganache over that cake layer. Stack another layer on top and repeat until all 6 cakes are stacked.

Smooth the surface of the cake.
Then frost the entire outside of the cake and smooth it out.
You'll notice that the frosting is thick enough that the cardboard cake round is completely covered, so I picked up my cake and set it on an 8-inch round.
I used double stick tape to attach the two pieces of cardboard together and actually covered the 8-inch in purple paper.

Pipe on black frosting dots.
To create the pulled dot design, pipe a row of dots vertically onto your cake.
Try to pipe the dots so they go right up to the top edge and bottom edge of the cake.
I piped 9 dots onto my cake.

Pull the dots into petals.
Now, take an offset spatula and press onto one dot of frosting. Pull back to flatten the dot into a petal.
Pull the spatula away from the dot, thinning out the frosting then lift the spatula from the cake.
Repeat. You can start at the bottom of the cake or the top. I started at the bottom and moved upwards, but either works fine.
I like to wipe my spatula off on a paper towel between each pull to keep the petals nice and smooth.

Add orange dots.
I didn't take a picture of the next step, but I piped another row of dots on top of the frosting that had been pulled from the first dot.
I moved in a circular pattern around the cake, piping and pulling two black dots and then two orange dots.

Pull the dots into petals.
Admittedly I was rushed. We had 35 minutes to decorate our entire cake. So as you can see my dots don't line up perfectly, but in the end, it really didn't matter that much.

Pipe dots and pull petals around the top of the cake.
You can add a design on top of your cake or you can continue to pipe dots and pull them into petals around the top.
Start by piping one black dot on the outer edge of the top of the cake. Then pull it around the outer edge of the cake into a petal. Pipe a second dot over the thin petal part and repeat the process.

I had room on my 6-inch round layer cake for four rows of dots on top. Well, actually the final row was made with one large dot of orange frosting in the center of the cake.
When you make the final petal in each row on the top of the cake, you will have to pull it just to the edge of the petal in front of it. If you look at the top front edge of the cake, you can see the final black petal isn't as neat as the others.
Overall this Halloween cake looks pretty nice, especially considering I decorated the entire thing in 35 minutes.
Storage
You can store your chocolate Halloween cake at room temperature for up to three days. Store leftovers in the refrigerator for another few days. I prefer not to refrigerate my cakes as they tend to dry out.
Related Recipes
If you are looking for more Halloween cake decorating ideas be sure to check out these other tutorials.
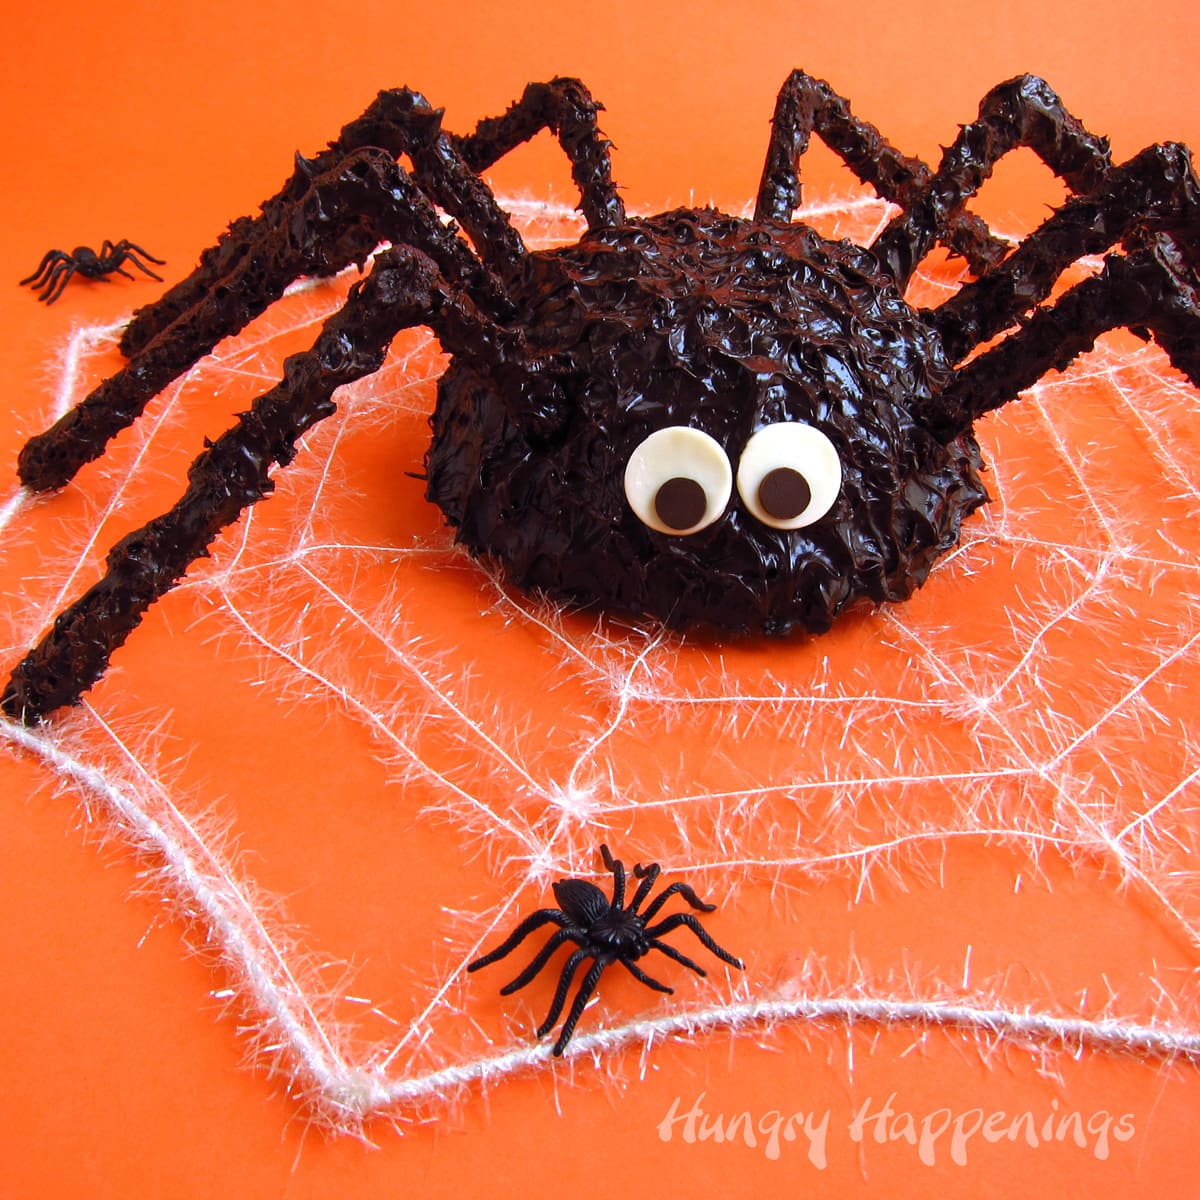
Be sure to check out over 100 festive Halloween food ideas.
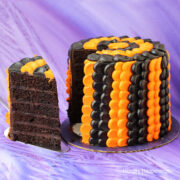
An orange and black petal cake for Halloween has 6 layers of chocolate cake filled with chocolate ganache decorated with orange and black frosting.
- 1 Duncan Hines Chocolate Fudge Cake Mix
- 1 cup water
- ¼ cup vegetable oil
- 3 eggs
- 2 ounces melted good quality dark chocolate
- 16 ounces semi-sweet chocolate, finely chopped
- 1 ¼ cups heavy whipping cream
- 12 ounces Wilton White Ready to Use Decorator Icing
- orange gel or paste food coloring
- 12 ounces Wilton Chocolate Ready to Use Decorator Icing
- black gel or paste food coloring
-
Preheat oven to 350 degrees F.
-
Spray 3 round 6-inch cake pans with non-stick spray or grease with shortening and dust with flour.
-
For best results, line the pans with parchment paper circles.
-
Combine the cake mix, water, oil, eggs in a bowl and stir to combine. Add in the melted chocolate and beat for 30 seconds on low. Increase mixer speed to medium and beat for two minutes.
-
Equally, divide the chocolate cake batter among the three cake pans.
-
If using, wet the bake-even strips and wrap them around the cake pans.
-
Bake the cakes for 22-26 minutes, until a toothpick inserted in the center of each cake, comes out clean.
-
Remove the cakes to a cooling rack and allow them to cool completely.
-
Place the chopped chocolate in the bowl of a food processor. Pulse until chocolate is fine crumbs.
-
Heat heavy whipping cream in a small saucepan over medium heat.
-
Stir often until it just comes to a boil.
-
Pour the hot cream over the chocolate, put the lid on the food processor bowl, and let sit for 2-3 minutes.
-
Pulse for 3 seconds.
-
Remove the lid and scrape down the sides and bottom of the food processor bowl.
-
Return the lid and pulse for 5 more seconds or until the mixture is smooth.
-
Allow the chocolate ganache to cool, stirring every 10 minutes or so, until it is thick enough to spread.
-
Once the cakes are cooled, remove the domed top and cut into two even layers.
-
Set one cake layer on a 6-inch cardboard cake round.
-
Spread a thin layer of chocolate ganache over that cake layer.
-
Stack another layer on top and repeat until all 6 cakes are stacked.
-
Then frost the entire outside of the cake with the remaining chocolate ganache and smooth it out.
-
Set the cake onto an 8-inch cake plate.
-
Color the white icing using orange coloring and color the chocolate frosting wtih black coloring.
-
Fill pastry bags fitted with a large round tip with the icing.
-
Pipe a row of 9 black dots from the bottom of the cake to the top of the cake.
-
Set an offset metal spatula into one of the dots.
-
Flatten the dot as you drag the spatula to the side opposite the dot.
-
Continue pulling until the dot turns into a pretty petal.
-
Repeat, creating petals out of all of the dots.
-
Pipe another row of black dots on the thin part of the petal and repeat the process.
-
Next, add a row of orange dots next to the last row of black petals.
-
Add another row of orange frosting dots and repeat.
-
Continue around the entire cake. When you get to the final row, you'll have to pull the dots into the first row of dots. You'll have a bit of a gap. Just make this the back of your cake.
-
Pipe a black dot on the top outer edge of the cake.
-
Use the spatula to pull that dot into a petal going around the outer edge.
-
Add another dot and pull it into a petal.
-
Repeat this process going around the outer edge of the cake.
-
Then repeat this process creating a row of orange petals then a row of black petals.
-
Pipe a large dot of orange frosting in the center.
Store the cake at room temperatur for up to 3 days. Then, refrigerate any leftovers for up to 3 more days.
Note: A food processor makes easy work of creating a chocolate ganache. If you don't have one, finely chop your chocolate and put it in a microwave-safe mixing bowl. Boil cream as above and pour over chocolate and let sit for 2-3 minutes. Use a whisk to create an emulsion. Begin by stirring just in the center of the bowl, then slowly bring the whisk out to the edge of the bowl. Stir just until combined and the ganache is smooth.

- Banana Split Bars – A Fun and Easy Summer Dessert - March 4, 2026
- Pineapple Fudge (No Candy Thermometer Needed!) - March 4, 2026
- No-Bake Peanut Butter Pie Recipe - March 3, 2026


Marilyn *Pink Martinis and Pearls* says
I love this technique and it's so festive in the Halloween colors! Great job, Beth! Thank you also for the Google + info. I really appreciated it. 🙂
Cathe says
Thank you so much for sharing...You have given me two really great ideas for the near future...
Julie says
Love your website! I like baking cakes and cupcakes, and you have some great tips and designs.
Chichi Dodoo says
Love the colours. Pinned
The Bearfoot Baker says
I love that cake!! The orange and black are amazing! You make it look so simple!
Michelle Medlin says
Love this! You're so talented! I'm super jealous! And impressed! Pinning!
-Michelle @TheGraciousWife.com
The Partiologist says
Now that's my kind of cake! I love the look of the orange and black petals - 35 minutes? WOW!
Danielle Doerr says
You totally outdid yourself with this cake, Beth!! I am so in love with the pulled dot technique - the petals are so pretty!!