Show your dad you think he rocks by making him these Cookies and Cream Fudge Rocks! These candy rocks are easy to make for dessert or a gift. Plus, they are perfect decorations for cakes, cupcakes, and more.
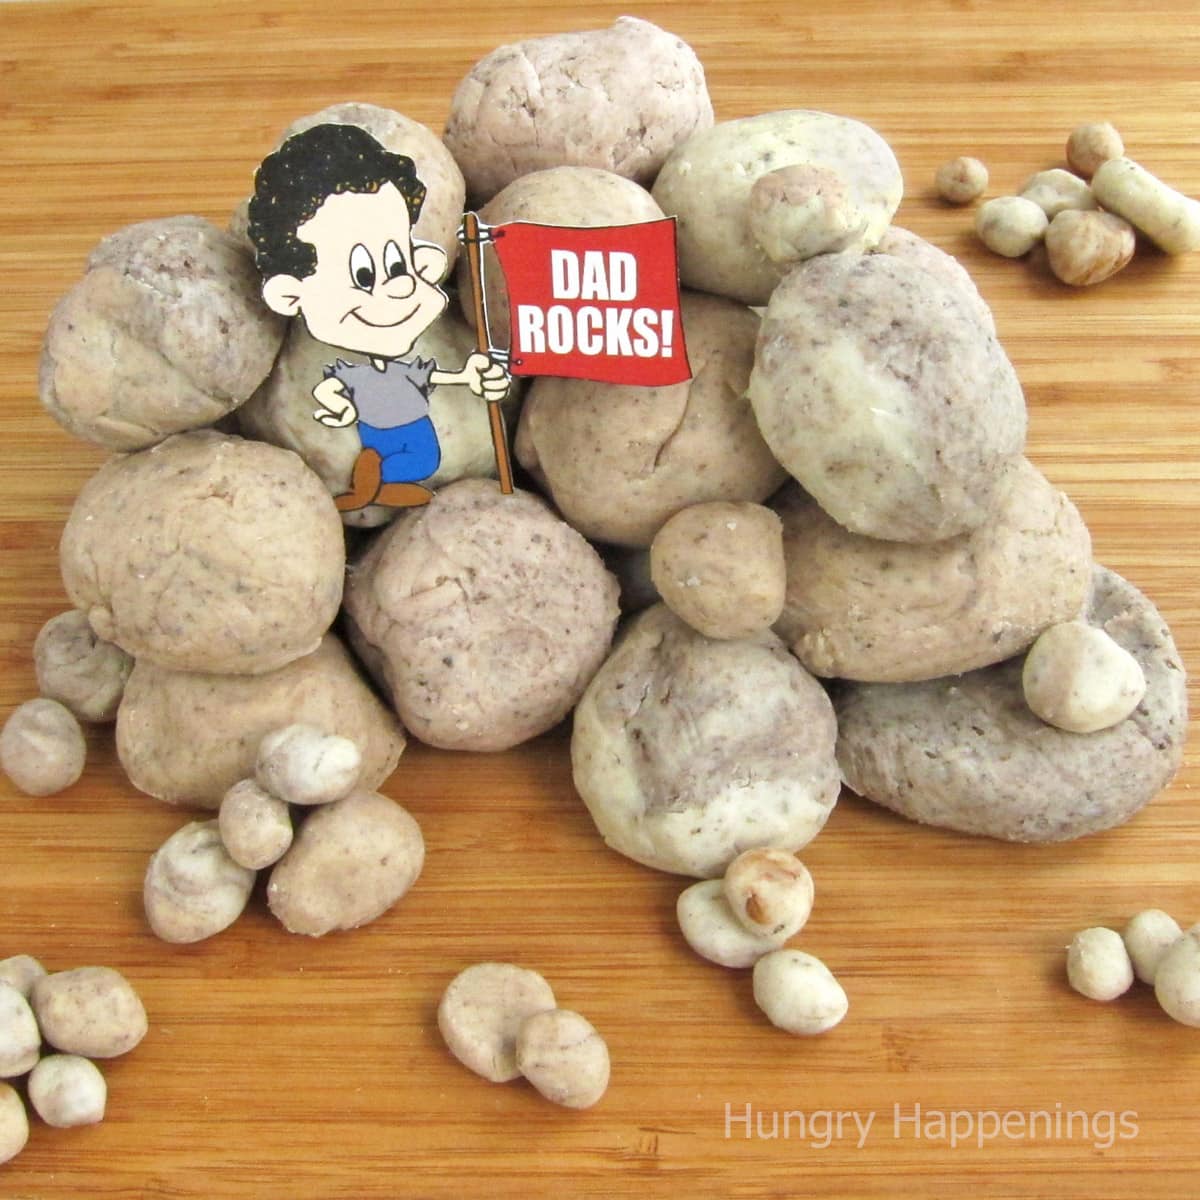
For Father's Day this year, I decided it would be fun to recreate something like the Cookies 'n Cream Fudge Garden Stone I recently made for Mother's Day.
At first, I thought I'd just make a new, more masculine-looking garden stone, but then I came across some crafts that used the phrase "Dad Rocks." I loved the idea of just making a pile of candy rocks with a cute sign that said, "Dad Rocks."
These edible rocks made with white chocolate fudge blended with OREO Cookies are super easy to make and look great on top of cakes, cupcakes, and more. For this project, I just piled them up.
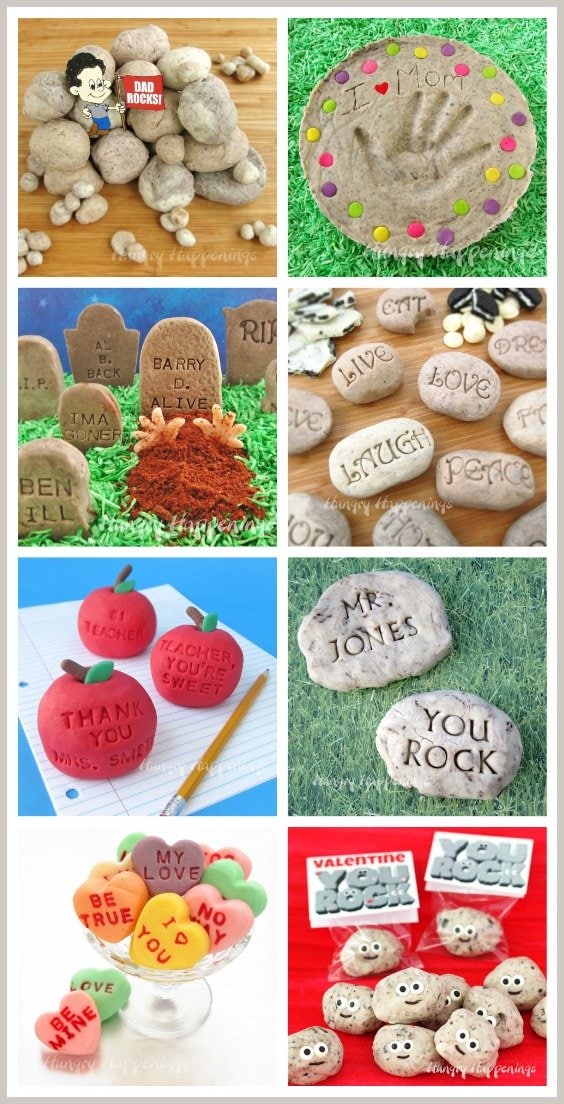
UPDATE: I've used this fun recipe to make so many more projects including my original Fudge Garden Stone, Fudge Tombstones, Sweet Serenity Stones, Fudge Teacher’s Apples, Edible Rocks for Teachers, Fudge Conversation Hearts, and Cookies ‘n Cream Fudge Rocks.
I'll share the simple step-by-step process to make the fudge stones below. Be sure to check out all the ways my readers have used these candy stones to decorate prehistoric cakes, rock-climbing cupcakes, beach cakes, and more below the recipe card.
RELATED: Find dozens of easy fudge recipes on my other blog, HowToMakeEasyFudge.com.
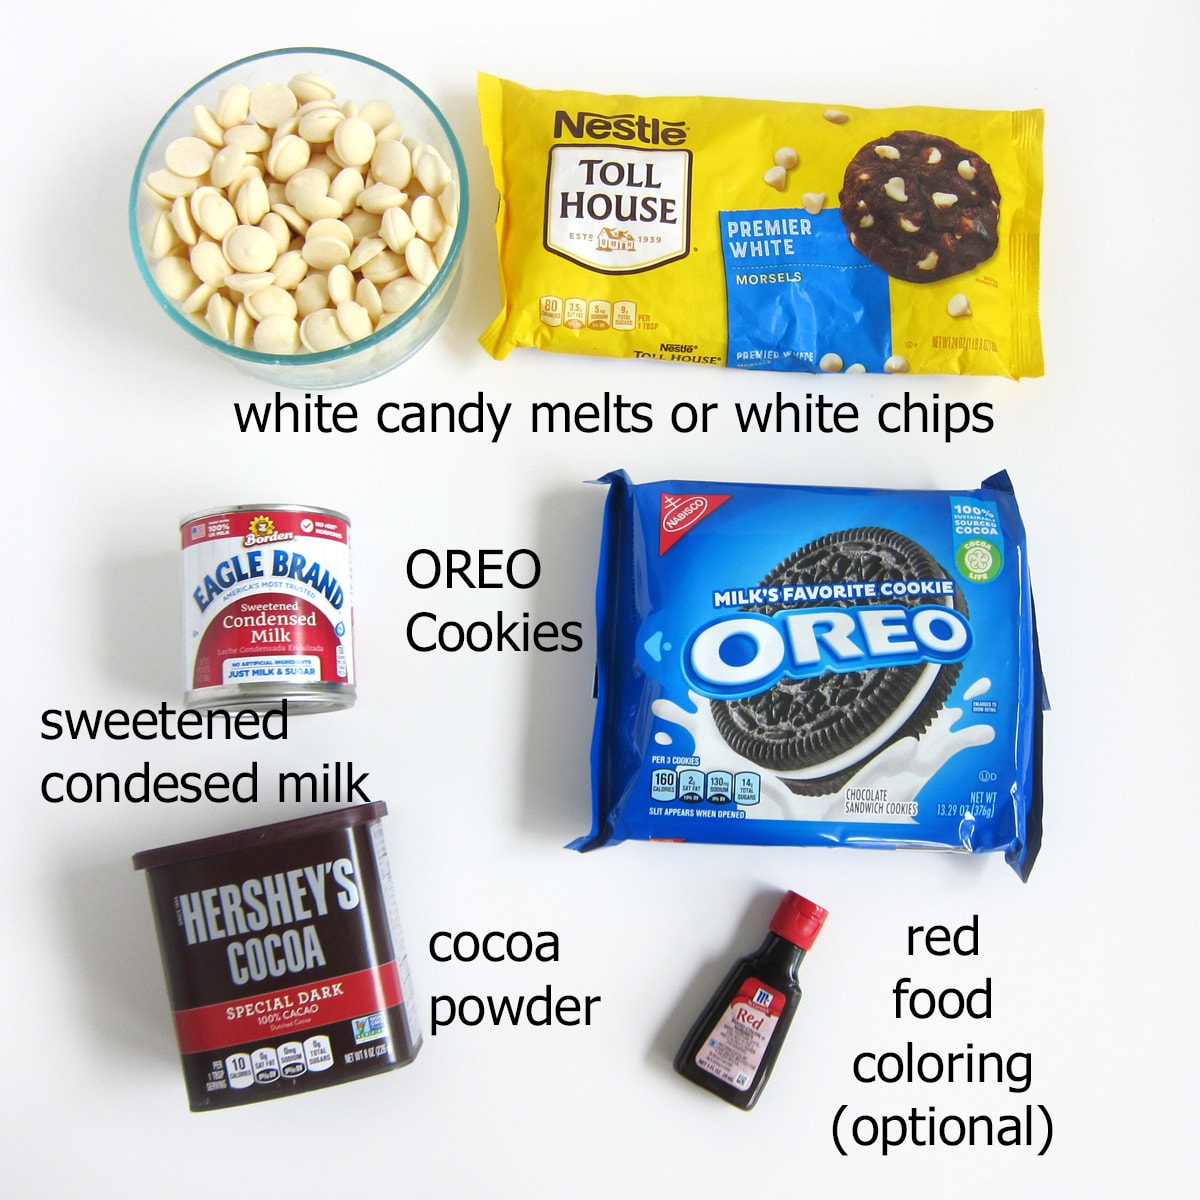
Ingredients
- white candy melts or almond bark, melting wafers, or white chips
- sweetened condensed milk - Using sweetened condensed milk makes creating fudge super easy.
- salt - This ingredient is optional. Add it if you want to balance out the sweetness.
- Oreo Cookie crumbs - You can use any chocolate cookie crumbs.
- cocoa powder optional - You can add some cocoa powder to the fudge to add brown coloring.
- red food coloring, optional - Use this to add color to some of your fudge rocks.
To make the cookies 'n cream fudge on the stove:
You can make your fudge on the stovetop or in the microwave.
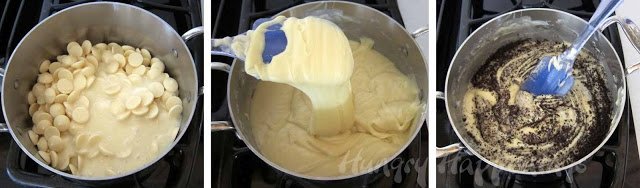
- Stir the chocolate, sweetened condensed milk, and salt if using together in a saucepan and melt it over low heat.
- Once the white chocolate looks like it's about 50% melted, it's best to remove the pan and set it aside for about 5 minutes to allow the residual heat to continue to melt the white chocolate before stirring until smooth.
Tips
I made this recipe three times before creating these edible rocks I used confectionery coating, melted it completely on the stovetop, and every batch has turned out fine.
A reader made hers using pure white chocolate and told me it was greasy.
To make the cookies and cream fudge in the microwave:
- Heat the white chocolate, sweetened condensed milk, and salt for 45 seconds in the microwave.
- Let sit in the microwave for 3-5 minutes.
- Remove and stir.
- Heat for 15-second increments, resting for a minute then stirring after each, until melted and smooth.
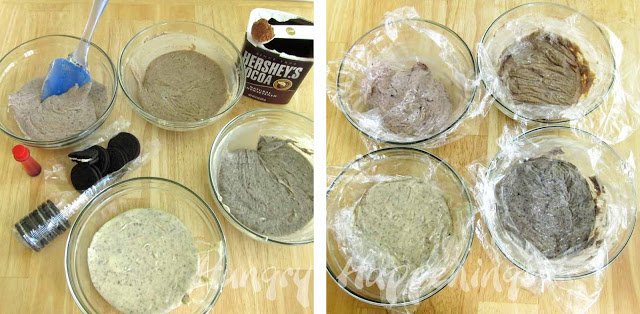
Coloring the cookies and cream fudge.
- Divide the cookies 'n cream fudge among three or four bowls.
- Leave one bowl alone.
- Add most of the remaining Oreo cookie crumbs to one of the bowls.
- Add the cocoa powder to another bowl.
- Add one drop of red food coloring and the remaining crumbs to the last bowl.
- These are just suggestions; you could make your rocks any color you'd like.
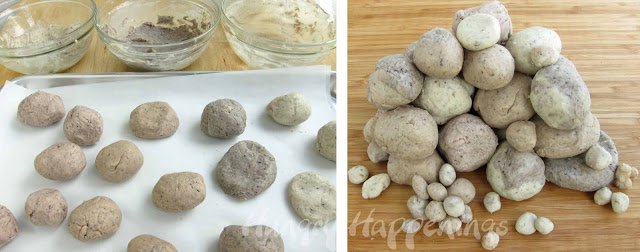
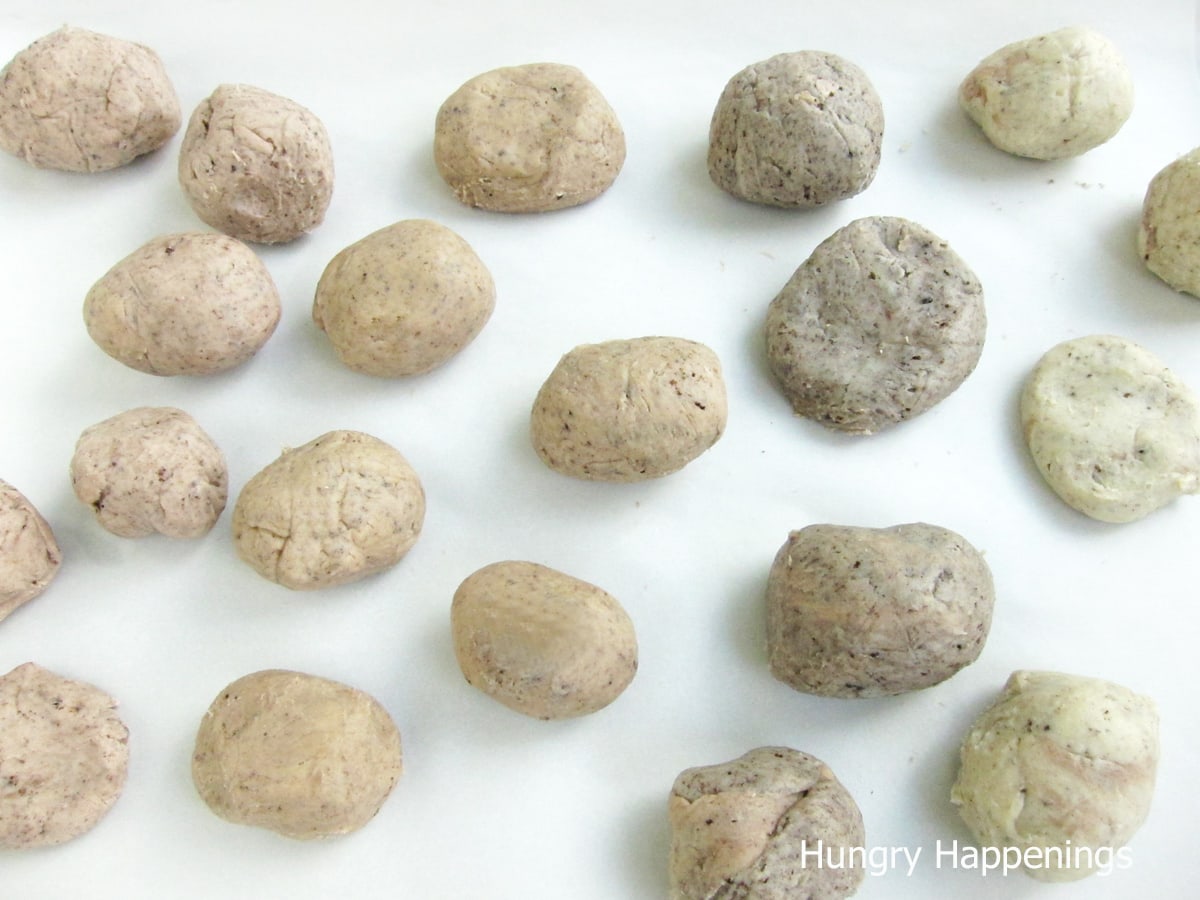
Shape your fudge rocks.
- Pinch off pieces of fudge in varying sizes and roll or flatten them into different-sized rocks. You can make big boulders or tiny little pebbles.
- Arrange rocks in a pile or using any of the other methods I've listed in the post above.

If you'd like, you can copy this image and print the "Dad Rocks" clip art onto card stock. Cut it out and set it on your rock pile.
Variations
Scroll past the recipe card to see all of the fun desserts that my readers decorated using these edible rocks. They are all amazing.
Video
I made a video showing you how to make fudge rocks for Valentine's Day using a similar recipe and technique. Be sure to check it out below.
Recipe

White chocolate fudge speckled with flecks of OREO Cookies formed into rocks make fun treats for Father's Day, a rock climbers birthday, or a science fair bake sale.
- 24 ounces white candy melts, white almond bark, or white chips
- 1 can (14 ounces) sweetened condensed milk
- 1 pinch of salt, optional
- ⅔ cup Oreo Cookie crumbs
- ½ teaspoon cocoa powder optional
- 1 drop red food coloring optional
-
Heat the white chocolate, sweetened condensed milk, and salt if using in a medium saucepan set over low heat stirring often until 50% melted.
-
Remove from heat and let sit for 5 minutes.
-
Add ¼ cup of the OREO cookie crumbs and stir until smooth.
-
Divide the fudge into 3 or 4 bowls and add varying amounts of the remaining cookie crumbs, cocoa powder, and red food coloring to achieve several different colors of fudge for your stones.
-
Press a piece of plastic wrap down onto the fudge in each bowl and allow it to sit at room temperature for about 30 minutes, until it is thick and no longer sticky.
-
Pinch off varying sizes of fudge, roll into odd shaped balls, and set aside to firm up.
-
Display in a dump truck, on a cake, or in a pile.
Recipe Video
These edible fudge rocks will stay fresh for about 2 weeks. The exterior of the rocks may dry out a bit but the center will stay nice and soft. Store in an airtight container to keep the rocks soft inside and out.
My readers rock!!!
Below are pictures from my readers showing how they used the fudge rocks to decorate cakes, cupcakes, and more. I have been blown away by the creative uses of these chocolate rocks. I hope you are inspired by their creativity.

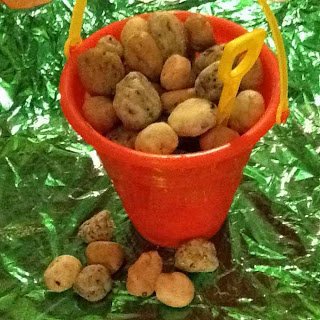
Shang made these Rock Climbing Cupcakes for her coworker's son. She designed a custom cupcake wrapper and flags for her fun cupcakes.
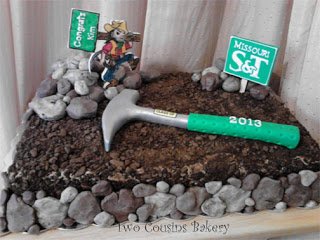
Holly created this cake for a Missouri Science and Technology geological engineering graduate. It featured fudge rocks and a rock hammer.
Sarah made these very realistic-looking rocks to give her daughter's teacher because Teachers Rock!

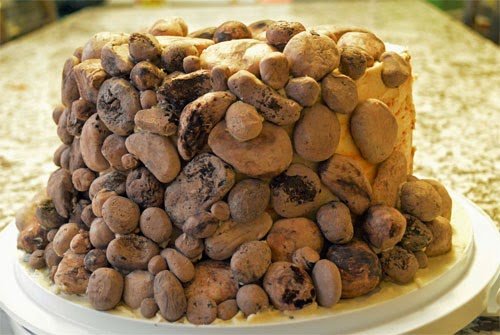
Kelly made these for her husband for Father's Day and she said, "they were yummy!" She did a great job with creating lots of nice variety of colored fudge rocks.
Marie added the candy rocks to this fun prehistoric cake for her grandson's birthday.
The fudge rocks make a great border around the entire cake.
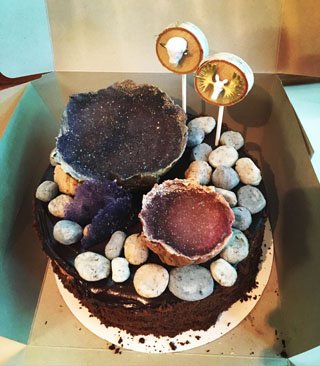
How cool is this cake? Heidi hollowed out two large fudge rocks brushed them with some candy melts and sprinkled on colored sugar to create the geodes on this cake.
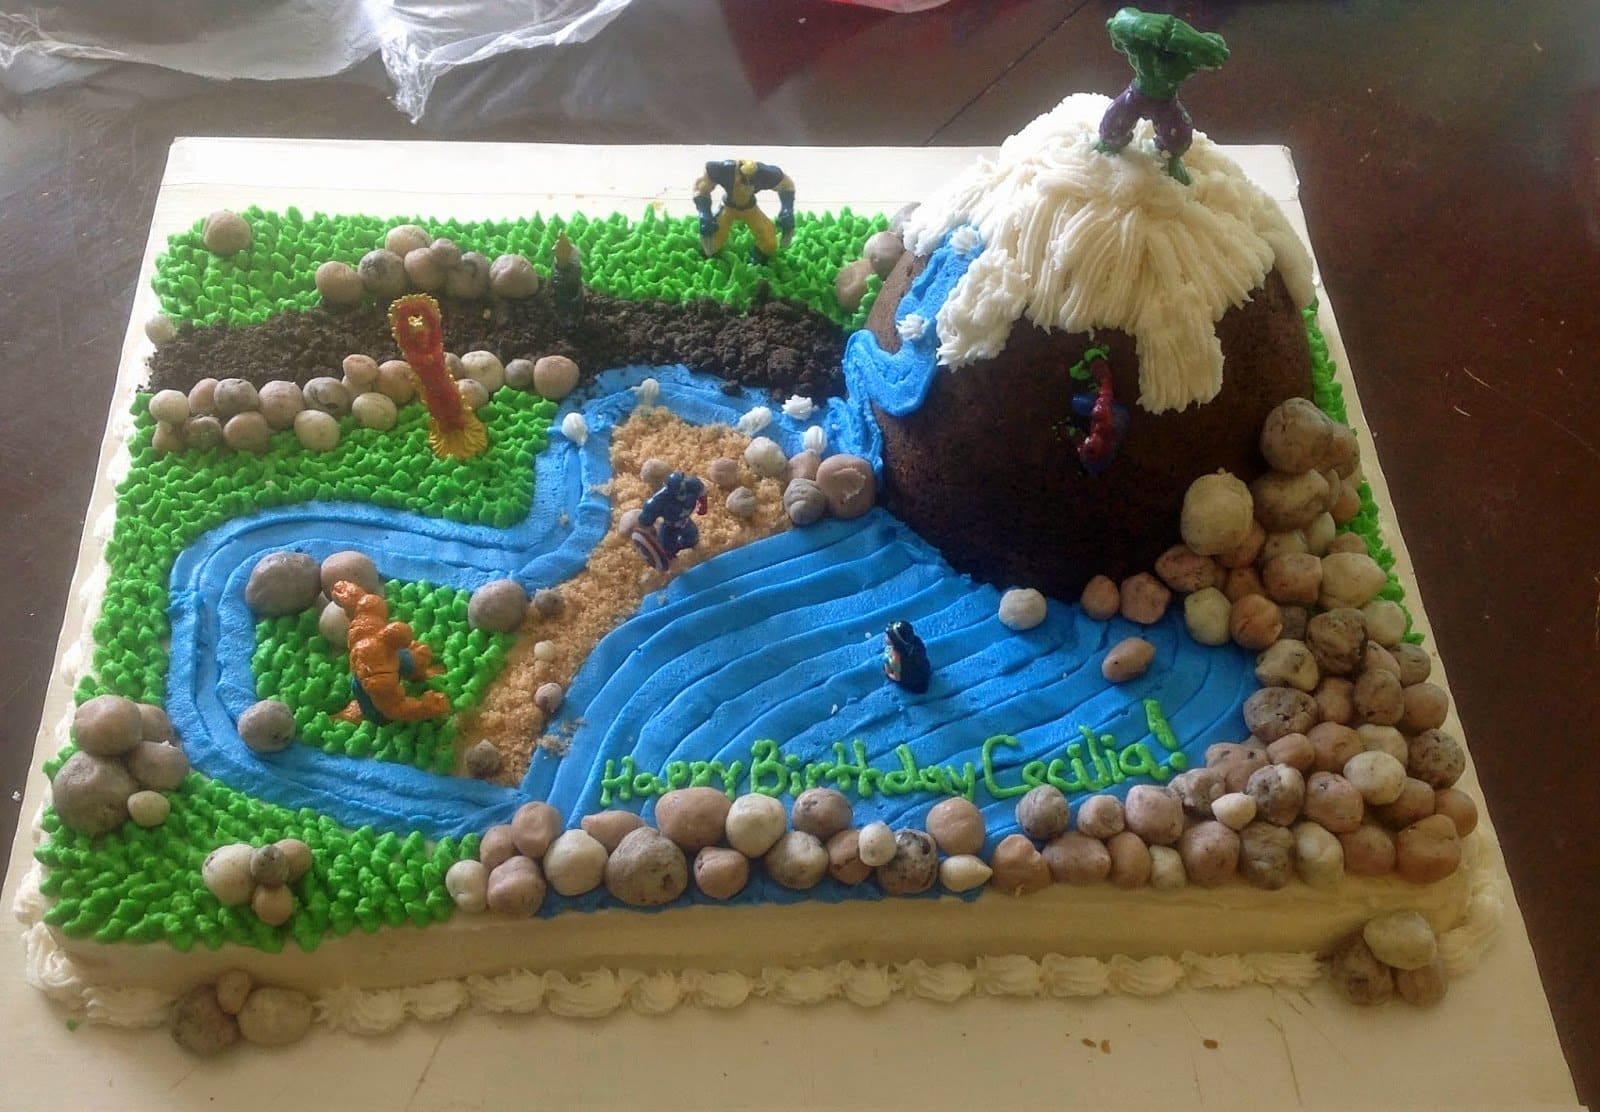
Heather created a cake with superheroes rescuing her daughter from a lake. She added fudge rocks around the lake and a path up to a mountain.
Nadine covered a round layer cake with fudge rocks to celebrate her son's 11th birthday. That had to be one tasty cake!
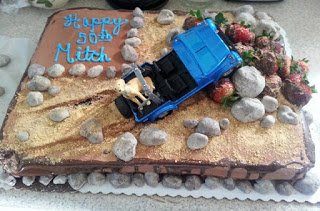
Julianne's husband apparently ran his jeep onto a pile of rocks while at the beach with their dog so she made him this hilarious birthday cake with lots of edible rocks. Check out the skid marks in the sand!
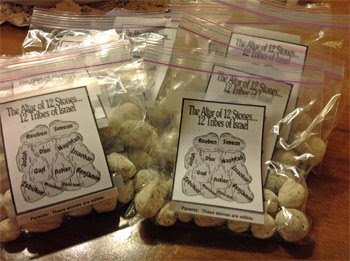
Barbara packaged fudge rocks in bags for her Sunday school kids so they could make their own altar of rocks like the Israelites did after crossing Jordan.
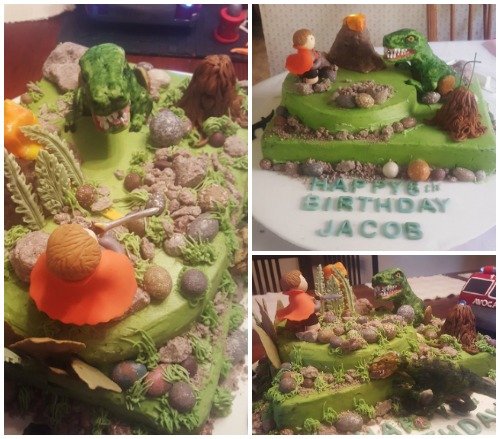
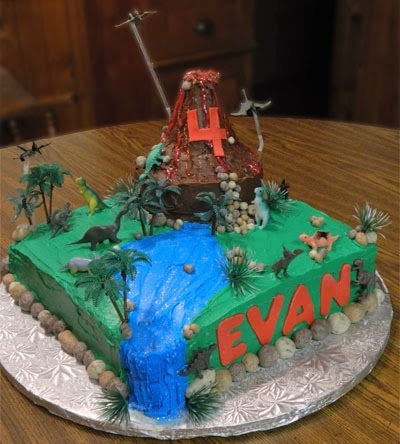
Tina decorated a prehistoric cake with fudge rocks, fondant dinosaurs, and a volcano that lit up. Her son loved his special birthday cake.

Jane created some very realistic-looking sweet serenity stones that are fudge rocks stamped with sweet messages like, "hope," "love," and "joy."
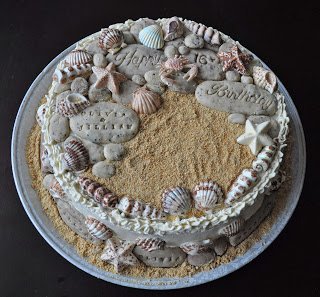
Angela created this amazing cake filled with candy shells, starfish, and cookies 'n cream fudge rocks for two sweet girls who were celebrating a birthday at the beach.
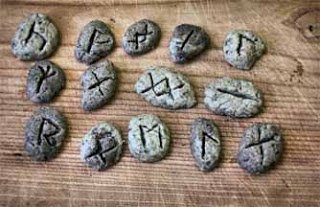
Athina admits that she is a history geek and she was excited to make these edible Anglo-Saxon runes. Her cookies and cream fudge runes could fool anyone. They look incredibly realistic. Everyone enjoyed eating them once they realized they were candy.
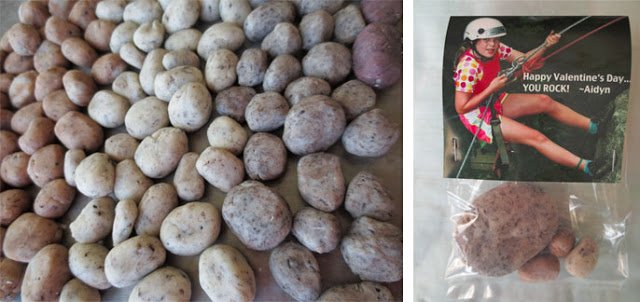
How fun is this? Carla and her rock-climbing daughter, Aidyn, made a huge pile of fudge rocks. Then they creatively packaged the candy rocks in cellophane bags and attached a clever card topper to the bag for Valentine's Day.

- Banana Split Bars – A Fun and Easy Summer Dessert - March 4, 2026
- Pineapple Fudge (No Candy Thermometer Needed!) - March 4, 2026
- No-Bake Peanut Butter Pie Recipe - March 3, 2026


bensmom says
Hi! I made these tonight for my son's birthday party tomorrow. I used white chocolate morsels and followed your instructions and tips above for the white chocolate. I didn't think I overheated them as it looked to be the right consistency when I mixed the colors. However, after letting them cool for 30 min with the plastic wrap, they are now rather greasy. I tried to start making the rocks and they are not keeping their shape. 🙁 Was going to put that in the fridge but then saw you don't recommend that. Maybe leaving them out overnight uncovered so the mixes can dry out a bit? The consistency seems good but it is greasy and "blobbish" when I try to make the rocks. Any tips appreciated. Thank you!!!
beth says
Your fudge did get too hot and the oils seeped out. If, after you let it cool it's still greasy, you can try to knead it on a cool surface like a granite or marble counter top or use a metal baking sheet. If this doesn't help you can knead in some cold whipping cream, just a small amount at a time, this will help cool it down. The fudge will be just a bit softer, but will still taste great. Working with this is a lot like working with greasy modeling chocolate. I have lots of tips and pictures on my Chocolate Making Tips page that should help. I hope you are able to fix it for the party.
bensmom says
Thanks. It all turned out ok. After refrigerating last night for about an hour, I set the mixtures out overnight and this morning they were fine. I was able to form the rocks and they held their shape and were not greasy. They looked and tasted great! Thank you~
Paige Turner says
I love this! but what if you double the recipe? Would I have to allow the fudge to sit twice as long? Or just until to thickens?
Beth Jackson Klosterboer says
If you double the recipe, it might take a bit longer for the fudge to cool enough to make the rocks. To speed things up you can spread the different colors in shallow bowls. A thinner layer of fudge will cool quicker.
Cindy T. says
Such a great idea!! Beth you are such a sweetheart always answering back to comments being made.....I can't wait to see more of your ideas 🙂
Beth Jackson Klosterboer says
Thanks, Cindy. I do always respond to questions and try to comment on lots of other comments as well. I love hearing from my readers. The nice things people say always make my day a little brighter:)
mikayla malone says
Just incase my comment didn't send..would you suggest I crush the oreos with or without the crème center?
thank you!
mikayla malone says
Planning to make these for the upcoming fathers day, so thank you!
Just curious though..should I crush up the oreos with the crème center or without?
Thank you!
Beth Jackson Klosterboer says
I crushed them with the cream center, but you can do it either way. I hope your rocks are a huge hit for Father's Day.
mikayla malone says
Just noticed you replied to my question lol. I just bought my bags of confectioners coating to make these before this sunday.
I'm just hoping mine come out looking like real rocks like yours do in your pics.
Here's to hoping I don't fail! Lol
I'm not a blogger or anything, just a fan who found your site from pinterest, but if I don't fail I could send pics of the finished project if you'd like to see
Beth Jackson Klosterboer says
I'm sure your rocks will turn out great. You can see how other readers have created their rock creations by looking at my Reader's Gallery. If you send a picture of your rocks, I'll be happy to add it to the Gallery too!
I'm so glad you found my blog. Let me know if you have any other questions.
mikayla malone says
I just made the fudge, and they have been sitting in the 4 separate bowls with plastic wrap on them for going on 40mins and I just went to start with one of the bowls and its still super sticky..
I used the white confectioners coating also.
the top layer of the fudge mix looked like it was dried enough to form and once I got below that its still gooey..should I just wait longer with the plastic wrap on or off?
Beth Jackson Klosterboer says
Yes you may need to wait a bit longer. Spread the fudge out a little thinner so it cools quicker. That will help. Keep the plastic wrap on it so it wont dry out.
S.Jung says
Question, planning on making these fudge rocks to place ontop of cupcakes for a boys Rock Climbing party.... Can I make them in advance by 1-2 days and store them? Would they need to be refrigerated?
Beth Jackson Klosterboer says
Sorry for the delay in responding. I've been on vacation and didn't have access to the internet.
Yes, you can make these ahead. They will keep for up to 2 weeks if they are kept in an airtight container at room temperature. I don't recommend refrigerating the fudge.
Anonymous says
I wish I had seen this before, I think the mix would make great dinosaur bones (I ended up having to pipe my dinosaur cake's bones with icing) Great recipe. with a husband and 4 sons, I know I am going to use this one :o)
Anonymous says
I'm a geologist and a roller derby girl. I just made these for a bake sale. These are brilliant! Thank you! You ROCK!! 😀
Beth Jackson Klosterboer says
Perfect! I hope they sold out at your bake sale.
carla says
this is the CUTEST project EVER and so supereasy to do with kids of all ages and abilities! will soon post pics of this recipe disguised as valentines for my daughters' rock climbing team to the readers' gallery. thanks for the amazing recipe - it's such a great one to do with kids! love your creative brain!
Anonymous says
You ROCK!! thanks so much for sharing these great ideas. my first time in a blog fun
Anonymous says
This is perfect, thank you for this idea I would like to application in my kitchen.
Kayley McPhee says
This is so wonderful!
Anonymous says
Thank you very much for sharing this idea. I made the rock fudge for a baby shower on Saturday. People didn't eat them because they thought they were real rocks. Once I told people it was fudge, they gobbled them up. I had put them in a multi-colored toy dump truck and it made an adorable display. The mommy to be wanted the recipe. Thank you!!!!!
Susan K.
Anonymous says
I would like to make this for my vbs kids to make rocks for David and Goliath story. Can I let the mixture sit longer than thirty minutes before shaping it?
Beth Jackson Klosterboer says
Absolutely. The fudge will stay soft and pliable for quite a long time. I actually made these rocks, kept them in a Rubbermaid container for a few days then re-shaped them to create my Serenity Stones. Even over a week after that when we were eating some of them, they were still soft enough to rework the shape.
Have fun with the kids. I'm sure they will have a great time making their rocks.
MissCandiquik says
Genius - love it. So many variations you could make w/ this recipe - I will be doing some in the future and linking back to here! Thanks for sharing. 🙂
Beth Jackson Klosterboer says
I always appreciate such nice compliments=) I kept coming up with ways to use these rocks and am sure I'll post more later too. I can't wait to see what you come up with!
Brittany says
I made this recipe for my dad and I added very finely crushed walnuts to one batch, and crushed almonds to another. I added hazelnut extract to a third. They all came out super yummy and it was fun to think of other additions for next time! Thanks for the recipe!
Beth Jackson Klosterboer says
What a great idea, Brittany. The nuts will color the rocks just like the cookies and I'm sure really tasted great. Thanks for sharing that tip:)
Beth Jackson Klosterboer says
Thanks for the feature, Ginger:)
Brittni P. says
Would using white morsels work just as well? I have those on hand. I've never attempted fudge before, I want to make sure I get it right! 🙂 This is such a wonderful idea! Thank you for sharing your incredible creativity!
Beth Jackson Klosterboer says
Hi Brittni, yes white morsels will work fine. Just follow the instructions for heating, and remove the pan from the heat when half of the chips are melted, allow to sit for 2 minutes, then stir. If all the chips don't melt, heat a bit longer. Have fun!
Beth Jackson Klosterboer says
That is great to hear:) I know it is a challenge to come up with something to give my dad every year, and I'm sure he will love a big mountain of fudge. I'm glad your readers' feel the same.
Sue says
HA HA, I LOVE IT!!!