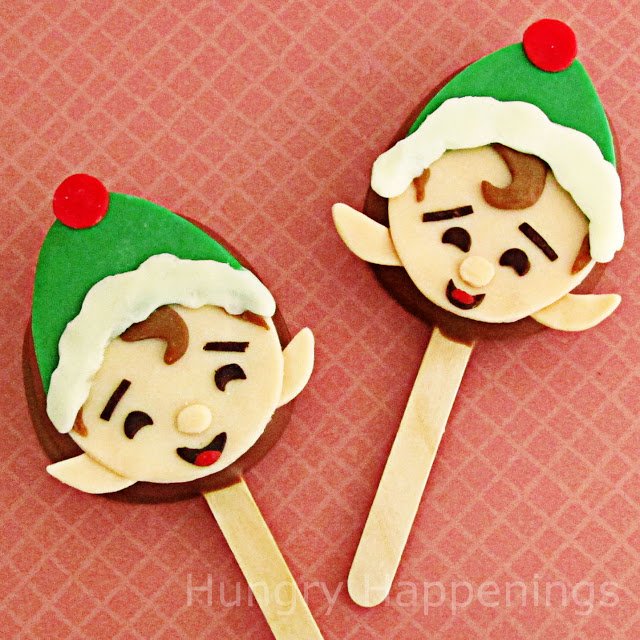
Decorate chocolate-dipped caramel lollipops with modeling chocolate elves. These cute Chocolate Caramel Elf Lollipops will brighten anyone's holiday. Add them to gifts, put them in stockings, or sell them at bake sales or Christmas bazaars.
So, I'm midway through this holiday series. Which is your favorite design so far?
These elves top my list. I know this design has more little pieces to cut out than most of the others, but I just love these little guys and think they are worth the effort.
For those of you visiting for the first time and for those that haven't read my first post in this series featuring Christmas Mouse Cookies and the post that inspired this entire series featuring Chocolate Penguin Rice Krispies Treat Pops, you might want to check them out so you know all of the basics about decorating with modeling chocolate/chocolate clay.
Throughout this series, I have been showing you different sweets that can be topped with these modeling chocolate designs. I started with simple cookies, cereal treats, and brownies and now I am going to start sharing chocolate-dipped sweet treats. First up is caramel.
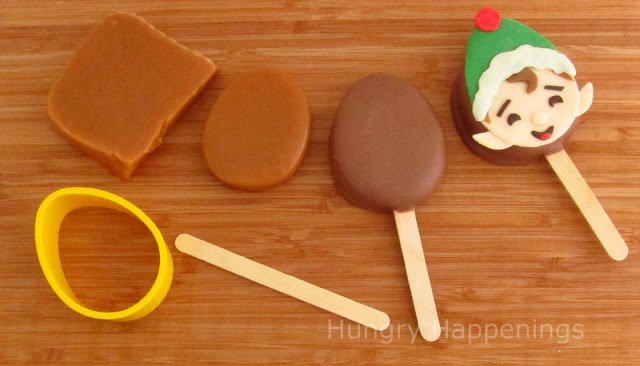
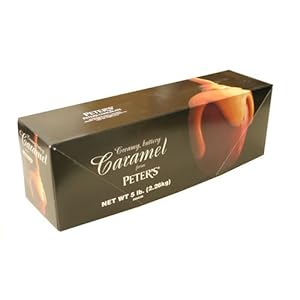 When I made my caramel lollipops, I used a block of Peter's caramel. I actually use this caramel often. It tastes great, is soft, and is so convenient.
For this project, I just cut ¾" thick slices off of the 5-pound block. Then I cut the slices with the egg-shaped cookie cutter and inserted a craft stick to make it a lollipop. Then, I dipped the caramel in chocolate and added a modeling chocolate elf decoration.
If you prefer, you can use my microwave caramel recipe instead. Just pour it into a well-buttered 8-inch square pan and allow it to cool. Then cut it into egg shapes using a cookie cutter.
Chocolate Caramel Lollipop Elves
white modeling chocolate, recipe here*
black, brown, red, green, peach (or orange) candy/food coloring*
food handling gloves (highly recommended to use when adding color)
powdered sugar, to dust work surface
cutting board
rolling pin
egg cookie cutter - 2" wide by 2 ½" tall
#10 round pastry tip
pointed oval mini cutters (or use a knife)
food only paint brush
knife
caramel
melted and tempered pure milk or dark chocolate**
OR melted light or dark confectionery coating/candy melts**
* I used dark modeling chocolate to create the eyes, but you can simply color some white modeling chocolate with black food coloring instead. If you don't have brown food coloring, you can use equal parts red and green to make brown.
** If you aren't experienced with making chocolate, read my chocolate making tutorial which includes information on types of chocolate to use, melting instructions and the recipe for modeling chocolate.
Instructions:
Color your modeling chocolate.
- Color a small amount of white modeling chocolate green for the hat, red for the ball and tongue, brown for the hair, and black for the eyes, eyebrows, and mouth.
- Reserve some white for the fur around the hat then color the rest peach (skin toned) for the elves' faces.
- For detailed coloring instructions, check out my Coloring Modeling Chocolate tutorial. This is where I wear those food-handling gloves, otherwise, my hands turn a rainbow of colors.
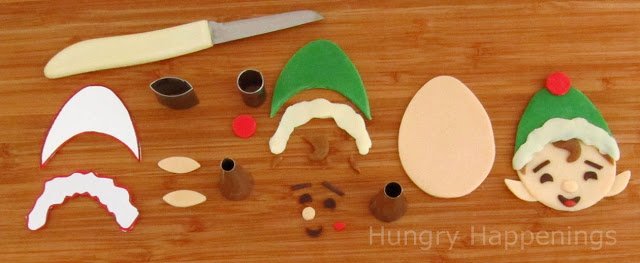
Cut out modeling chocolate elf pieces.
- Dust a cutting board lightly with powdered sugar.
- Roll out the red, green, brown, white, peach, and black (or dark) modeling chocolate to 1/16th of an inch thickness.
- Use the egg-shaped cookie cutter to cut out peach-colored modeling chocolate for each Elf face.
- Use the pointed oval or a knife to cut out two ears for each elf out of peach.
- Use the #10 pastry tip to cut out the noses.
- To do this you'll want to press the pastry tip, tip side down, into the peach modeling chocolate cutting a small circle, then turn the tip upside down and tap on counter and the circles will drop out the larger end of the tip.
- I usually cut a bunch of circles, before turning the tip upside down.
- Use the small end of the #10 round pastry tip to cut two small circles out of black or dark for each of the eyes and the #12 tip for each mouth .
- To make the eyes and mouth moon-shaped press the end of the pastry tip into each dark circle cutting off a small oval piece.
- Cut thin strips of black or dark and cut them into about ¼" pieces of the eyebrows.
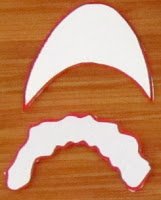
Copy and size the template left or hand-cut your own templates. Cut a hat template that is just a bit larger than the pointed end of the egg.
- Cut a fur template that will fit over the bottom of the hat template.
- Set the hat template on green modeling chocolate and cut around it.
- Set the fur template on white modeling chocolate and cut out around it.
- Use a ⅝" round cutter to cut a red ball for the top of each hat.
- Use a knife to cut a curl and two wisps of hair from the light brown modeling chocolate.
- Attach the modeling chocolate shapes together using water.
- Lightly brush the piece of white fur with water and attach it to the green hat.
- Add the red ball to the top of the hat.
- Turn the hat over and attach the curl and wisps of hair to the backside of the hat.
- Lightly brush water over the top (pointed end) of the peach egg and attach the hat/hair.
- Add the rest of the facial features.
- Attach the ears by brushing one end with water and pressing it onto the backside of the peach egg.
Decorate the caramel pops.
- Use the egg-shaped cookie cutter to cut the caramel.
- Insert a craft stick into the broader end of the egg-shaped caramel.
- Dip in melted and tempered pure chocolate or melted confectionery coating/candy melts.
- For step-by-step dipping instructions with pictures go here.
- Immediately press one of the modeling chocolate elves onto the wet chocolate.
- Chill in the refrigerator if using pure chocolate and in the freezer, if using candy melts just until set.
- Store in an airtight container or package in clear cellophane bags to give as gifts.
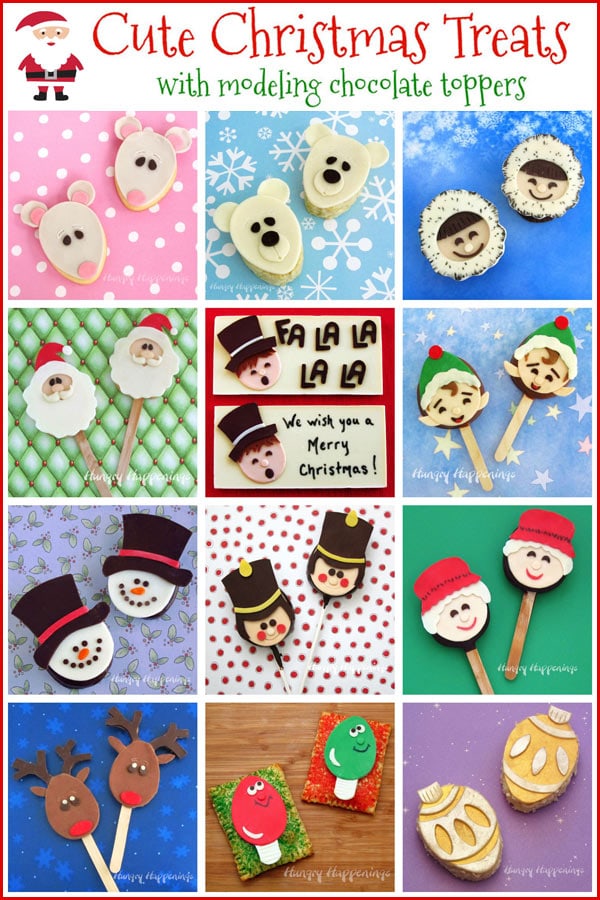
See all of my 12 Modeling Chocolate Christmas Treats.

- Banana Split Bars – A Fun and Easy Summer Dessert - March 4, 2026
- Pineapple Fudge (No Candy Thermometer Needed!) - March 4, 2026
- No-Bake Peanut Butter Pie Recipe - March 3, 2026

Deea says
SUPER CUTE! Found you at erecipecards.com & LOVE your blog! I 2nd the Peter's Caramel, it's delicious!
Haniela says
These are too adorable for words!