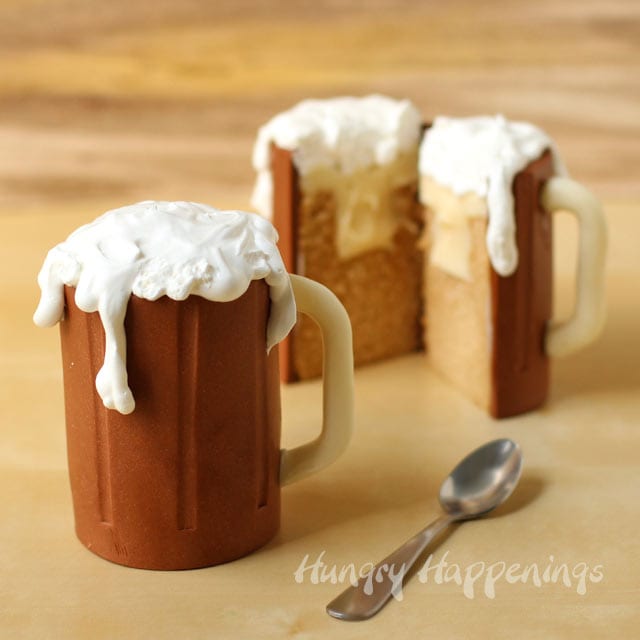
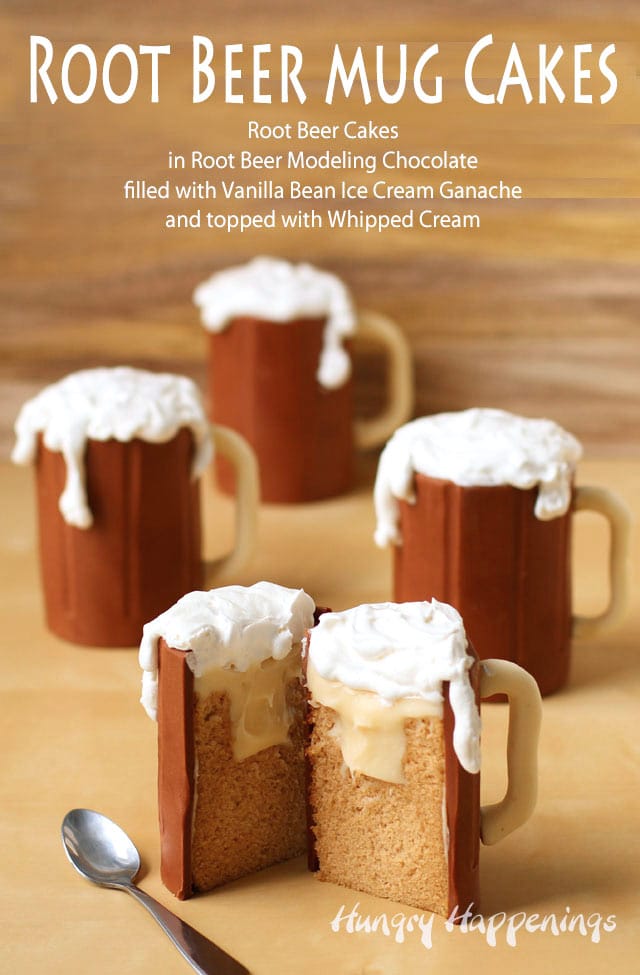
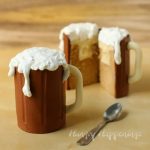
Surprise friends and family when you serve them what looks like a mug of rootbeer but is actually a Root Beer Mug Cake filled with Vanilla Ice Cream Ganache and Whipped Cream.
My beer mug cakes filled with Bailey's Irish Cream filling were so popular that I thought it would be fun to make this kid-friendly version using root beer.
Not only do these look like a frosty mug of root beer, but they also taste like it too.
The cake is made with real root beer and the modeling chocolate which is wrapped around the cake is flavored with root beer syrup.
Each cake is even filled with some luscious vanilla ice cream ganache to make it more like a root beer float.
There is something about the combination of root beer and vanilla ice cream that is almost magical.
I always love watching the ice cream hit the root beer then seeing all the foam rise up and over the sides of the mug.
I tried to recreate that effect here with my cakes.

Root Beer Mug Cakes filled with Vanilla Ice Cream Ganache
Ingredients: (makes 10 cakes)
Root beer cake:
1 vanilla cake mix
root beer ( use this in place of the water called for on the package)
eggs and oil (called for on the package)
2 tablespoons A&W Root Beer Dessert Topper
Vanilla Ice Cream Ganache:
8 ounces white chocolate
⅓ - ⅔ cup vanilla ice cream*
*Every brand of ice cream will have different amounts of air whipped into it and you'll need ⅓ cup of melted ice cream.
Modeling Chocolate Cake Wrappers:
24 ounces white confectionery coating (candy melts)
¾ cup A&W Root Beer Dessert Topper (you may need a bit more)
White Modeling Chocolate Handles:
4-6 ounces white modeling chocolate
Foam:
1 (8-ounce tub) frozen whipped topping, thawed
Supplies Needed:
10 half-pint mason jars
baking sheet
Instructions:
- Before you do anything, grab some non-stick cooking spray, preferably the kind with flour, and give each of your half-pint mason jars a really good spray.
- Do not skip this step. The cakes won't come out in one piece if they stick to the jars.
- Once you get the jars sprayed make your cake mix, swapping out root beer for the water called for on the package and adding the 2 tablespoons of A&W dessert topper.
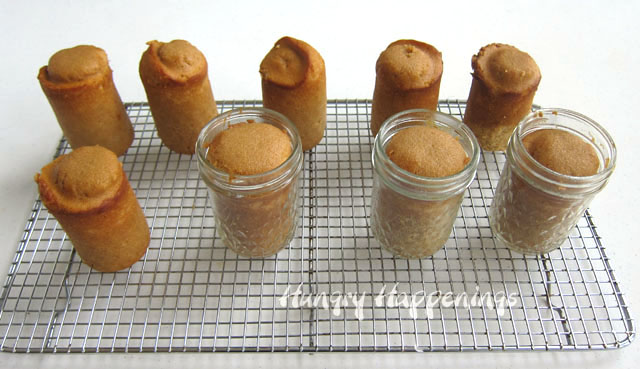
- Equally divide the batter among the 10 Mason jars.
- Place all the jars on a baking sheet and stick them in a 350-degree oven for about 20 minutes.
- Allow the cakes to cool for 10 minutes, then turn the jars upside down, allowing the cakes to fall out. If they stick, run a knife around the edges to help them out.
- Allow them to cool completely.
- Meanwhile, make some vanilla ice cream ganache.
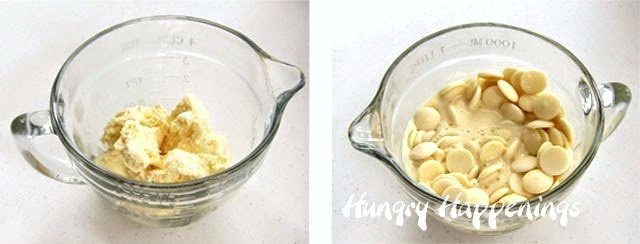
- Pour the ice cream into a microwave-safe measuring cup.
- Heat the ice cream in the microwave just until it melts. Remove all but ⅓ cup then pour in the white candy melts.
- Place the bowl back in the microwave and heat on high for 20 seconds.
- Allow the bowl to sit in the microwave for about 2 min.
- Remove it from the microwave and stir. If the chocolate isn't all melted return to the microwave and heat for 10-15 second intervals, stirring after each until melted.
- Allow the vanilla ice cream ganache to sit at room temperature until you're ready to use it.
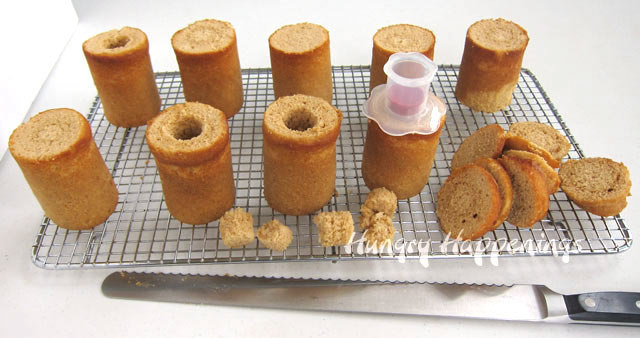
- You want all of your root beer mugs to be the same size, so cut each cake to be 3 inches tall.
- Use a cupcake plunger/corer, apple corer, or a knife to remove some of the center of each cupcake.
- I used a cupcake plunger first then used a knife to cut out some more from each cake.

- Pour some of the ganache into each cake, filling the hole completely.
To Make Root Beer Modeling Chocolate:

- Melt 24 ounces of the white confectionery coating/candy melts in the microwave or in a double boiler.
- If using the microwave, heat on high for 25 seconds, then stir.
- Heat for 20 seconds, then stir vigorously.
- Heat for 15 seconds then stir vigorously.
- If needed, heat for 10-second increments, stirring after each until melted.
- Allow the chocolate to cool to about 91 degrees Fahrenheit, stirring often.
- If you add the Root Beer Float syrup when the candy coating is too hot, the oil will rise to the surface and you will have a greasy mess (if this happens, read this troubleshooting tutorial.)
- If you don't have a thermometer, test the temperature of the melted candy coating by putting a drop on your lip. It should feel cool. If it's hot, let it cool longer, stirring often to make sure the candy coating at the edges of the bowl does not harden. If you allow it to get too cool, warm it back up to 91 degrees, or you may end up with chunks in your modeling chocolate.
- Pour in the A&W Root Beer Float Dessert Topper.
- Stir until well incorporated.
- The mixture will become thick very quickly, so scrape the bottom of the bowl to incorporate all of the melted chocolate.
- Pour the modeling chocolate out onto the counter and knead it just until everything comes together.
- If the modeling chocolate feels dry, knead in some more Root Beer Dessert Topper a little at a time until you get the desired consistency.
- Wrap it in plastic wrap and allow it to sit at room temperature for at least 30 minutes.
- When you are ready to use it, knead it until glossy and smooth.
- My hands tend to be rather warm, so I use a plastic bench scraper to help me knead the modeling chocolate so that I don't overheat it as this can bring out the oils in the chocolate. If you have any issues while making this be sure to check out my troubleshooting tips on my chocolate making tips page.
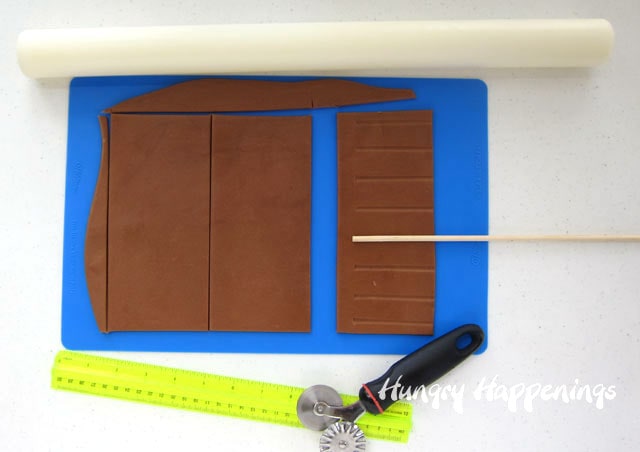
- Roll out the root beer modeling chocolate on a non-stick baking mat (or on a cutting board lightly dusted with powdered sugar or cornstarch) to about ⅜ inch thickness.
- I love using a non-stick silicone mat and a fondant roller. It works great.
- Cut ten rectangles that are 3 ¼ inches wide by about 8 inches long.
- Use a wooden dowel or straw to press indentations about ¾ inch apart all across the brown strip.
- Leave about a ½ border all along one edge. That will become the bottom of your root beer mug.
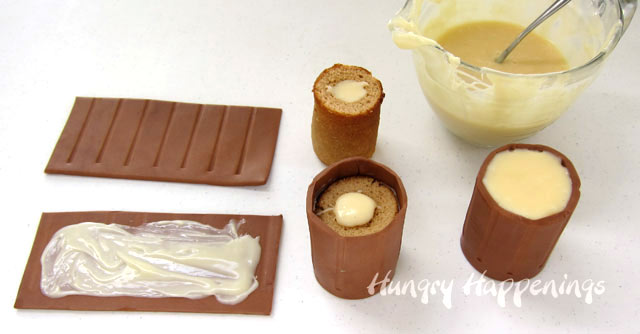
- Flip the modeling chocolate rectangles over and spread on a thin layer of vanilla ganache, leaving ½ inch border all around.
- Then wrap that, ganache side against the cake, around a cake, cutting off excess modeling chocolate so the two seams match up. Rub some water along both ends and press the two seams together.
- You can also use melted white chocolate to seal the seam.
- Let the wrapped cakes sit for about 30 minutes, then spoon some vanilla ice cream ganache over the cakes.
NOTE: The cake pictured above is a bit overfilled. I ended up scooping some out. The ones pictured below are perfect.
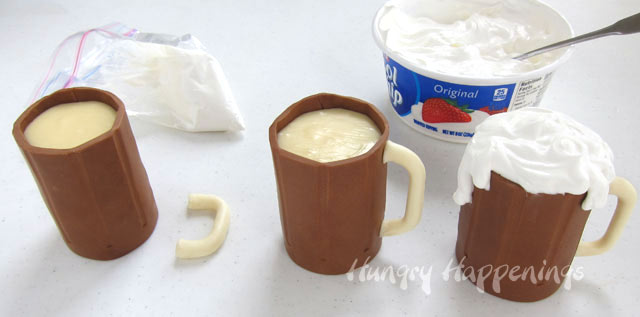
- Pinch off pieces of the white modeling chocolate, roll into logs and bend to form handles.
- Allow the handles to dry for at least 15 minutes, then use some clear piping gel, water, or melted white chocolate to attach the handles to the mugs.
- If using water, just get your finger wet and rub it on the ends of the handle to make the modeling chocolate sticky, then attach it to the mug.
- NOTES: I found it best to set something under the handle until it dried.
- Just before serving, spoon whipped topping over the cakes, allowing some to drip down the sides.

Do NOT store in an airtight container or the refrigerator, as the modeling chocolate will get sticky. I suggest just putting them in a cardboard cake box for up to 2 days.
Items used to create this project that are available on Amazon.com (commission earned for sales)
") A&W Root Beer Float Dessert...Shop on Amazon
A&W Root Beer Float Dessert...Shop on Amazon Ball Regular Mouth Half Pin...Shop on Amazon
 Wilton White Candy Melts, 1...Shop on Amazon
 Wilton Large Fondant Rollin...Shop on Amazon
 Cuisipro Cupcake CorerShop on Amazon
 Pyrex Prepware 1-Quart Meas...Shop on Amazon
RECIPE
Originally published on September 6, 2014.
Root beer cakes wrapped in root beer flavored modeling chocolate and decorated to look like frosty root beer floats.
- 1 white cake mix cake mix
- root beer (use this in place of the water called for on the package)
- eggs and oil (use amounts called for on the cake mix package)
- 2 tablespoons A&W Root Beer Dessert Topper
- 8 ounces white chocolate
- ⅔ cup vanilla ice cream
- 24 ounces white candy melts
- ¾ cup A&W Root Beer Dessert Topper
- 4-6 ounces white modeling chocolate
- 1 8-ounce tub frozen whipped topping, thawed
-
Preheat oven to 350 degrees Fahrenheit.
-
Spray 10 half-pint mason jars with non-stick baking spray.
-
Make the cake mix using the instructions on the package swapping out root beer for water and adding 2 tablespoons of root beer dessert topper.
-
Equally divide the batter among the 10 Mason jars.
-
Place the jars on a baking sheet and bake for about 20 minutes.
-
Allow the cakes to cool for 10 minutes, then turn the jars upside down, allowing the cakes to fall out.
-
Allow them to cool completely.
-
Heat the ice cream in the microwave just until it melts.
-
Measure out ⅓ cup of the melted ice cream (that's all you'll need).
-
Pour in the white candy melts.
-
Place the bowl back in the microwave and heat on high for 20 seconds.
-
Allow the bowl to sit in the microwave for about 4 minutes.
-
Remove it from the microwave and stir until melted and smooth.
-
Set aside until needed.
-
Cut the domed tops off of each cake so that they are all 3 inches tall.
-
Use a cupcake plunger/corer, apple corer, or a knife to remove some of the center of each cupcake.
-
Fill each well with vanilla ice cream ganache.
-
Melt 24 ounces of the white confectionery coating/candy melts in the microwave or in a double boiler.
-
If using the microwave, heat on high for 25 seconds, then stir.
-
Heat for 20 seconds, then stir vigorously.
-
Heat for 15 seconds then stir vigorously.
-
If needed, heat for 10-second increments, stirring after each until melted.
-
Allow the chocolate to cool to about 91 degrees Fahrenheit, stirring and scraping the sides of the bowl often.
-
Pour in the A&W Root Beer Float Dessert Topper.
-
Stir until well incorporated.
-
The mixture will become thick very quickly, so scrape the bottom of the bowl to incorporate all of the melted chocolate.
-
Wrap it in a zip-top bag or plastic wrap and allow it to sit at room temperature for at least 30 minutes.
-
When you are ready to use it, knead it until glossy and smooth.
-
Roll out the root beer modeling chocolate on a non-stick baking mat (or on a cutting board lightly dusted with powdered sugar or cornstarch) to about ⅜ inch thickness.
-
Cut ten rectangles that are 3 ¼ inches wide by about 8 inches long.
-
Use a wooden dowel or straw to press indentations about ¾ inch apart all across the brown strip.
-
Leave about a ½ border all along one edge. That will become the bottom of your root beer mug.
-
Flip the modeling chocolate rectangles over and spread on a thin layer of vanilla ganache, leaving ½ inch border all around.
-
Then wrap that, ganache side against the cake, around a cake, cutting off excess modeling chocolate so the two seams match up.
-
Rub some water along both ends and press the two seams together.
-
Let the wrapped cakes sit for about 30 minutes, then spoon some vanilla ice cream ganache over the cakes.
-
Pinch off pieces of the white modeling chocolate, roll into logs and bend to form handles.
-
Allow the handles to dry for at least 15 minutes, then use some clear piping gel, water, or melted white chocolate to attach the handles to the mugs and set something underneath to prop them up until they dry.
-
Just before serving, spoon whipped topping over the cakes, allowing some to drip down the sides.
More Modeling Chocolate
Wrapped Cupcakes


White Chocolate Football Field Cupcake Wrappers

Milk Chocolate Football Cupcake Wrappers

White Chocolate Cupcake Wrappers

Edible Cupcake Wrappers - Chocolate Pilgrim Suit

Milk Chocolate Rudolph Cupcake Wrappers

Snowflake White Chocolate Cupcake Wrappers

- Banana Split Bars – A Fun and Easy Summer Dessert - March 4, 2026
- Pineapple Fudge (No Candy Thermometer Needed!) - March 4, 2026
- No-Bake Peanut Butter Pie Recipe - March 3, 2026
Suzanne @ Flour Arrangements says
So cute! Huge root beer float fan! Can't wait to try making these.
FoodNerd says
These look great! Would be perfect for my Virtual Bake Sale for Macmillan Cancer Support- check it out here http://www.foodnerd4life.com/virtual-bake-sale-2014/
FoodNerd x
Rochelle Hutchinson says
These cakes areee sooo cool. Love these!