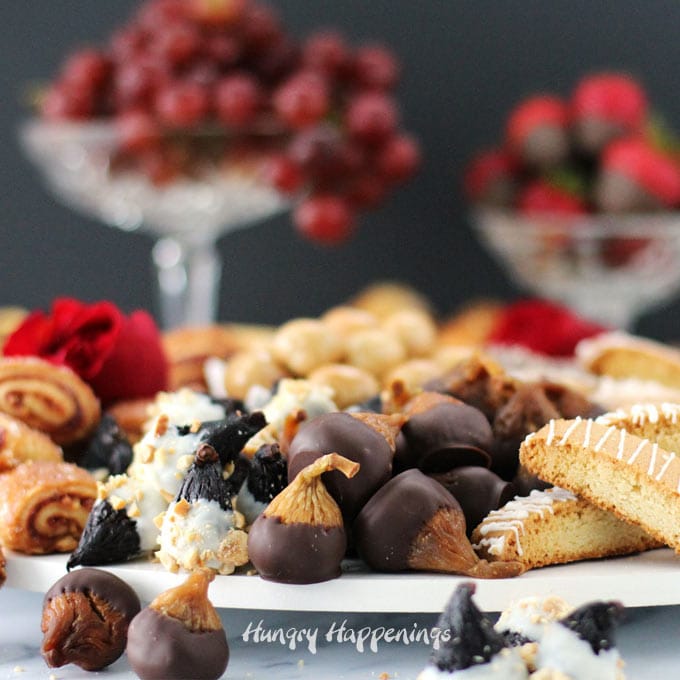
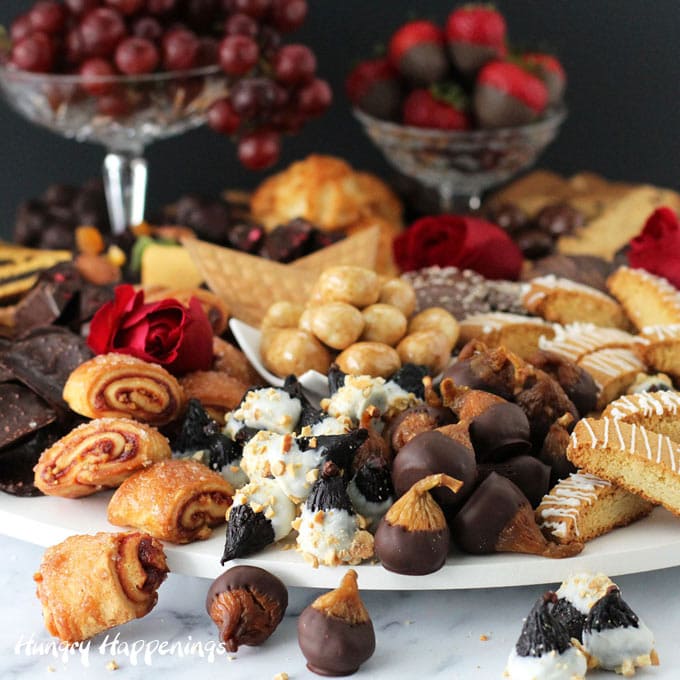
It is so easy to assemble a beautiful dessert board filled with chocolates, cookies, fruits, and chocolate dipped dried figs for any party. Your guests will love being able to choose their favorite treats from the display.
Have you made a charcuterie board for a party? They are so popular and are really easy to make. Typically a charcuterie board is loaded with meat, cheese, nuts, and fruits, but you can create an entirely sweet dessert board too!
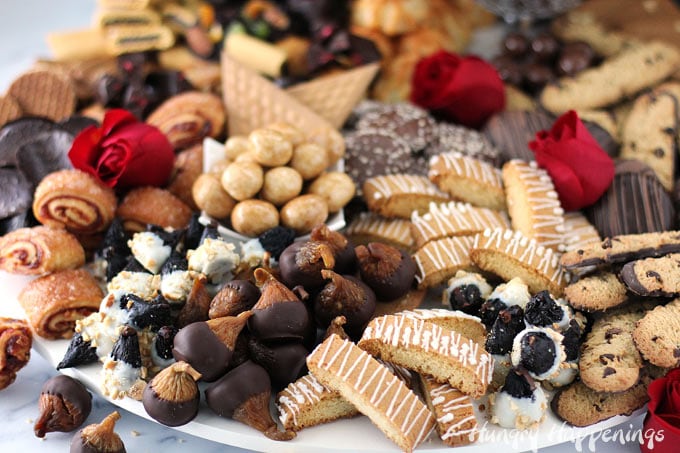
You can go all out and make a nice variety of homemade desserts and homemade candies like Chocolate Peanut Butter Sandwich Cookies, Biscoff Truffles, Chocolate Cherry Bombs, Salted Caramel Truffles, and Cocoa Almond Nougatine Cups, or you can purchase everything at your local bakery or grocery store.
I used some store bought items but also made some white chocolate dipped figs sprinkled with chopped cashews, Figcolates (golden figs filled with honey ganache and dipped in dark chocolate), chocolate dipped strawberries, chocolate cashew clusters, and some French Mediants.
How to make a dessert board:
- Choose a large serving tray or cake board on which to assemble your dessert board.
- My board was really large. I used an Avaré 21.6-inch (55 cm) white cake board with feet.
- You can use a round cutting board, a round marble slab, or any large serving platter.
- Choose a nice variety of desserts that have complimentary colors.
- You can opt for vibrantly colored desserts or items that are more muted in color.
- I chose cookies and candies that were either chocolate brown, tan or off white.
- Be sure to have more desserts than you think you will need. The boards look so much nicer with large groupings of each dessert. You will find you can pile the desserts up on top of each other to create dimension to your board.
- Begin by arranging a few small bowls filled with candies, nuts or fruits on your tray then add groupings of the other cookies and candies around the bowls.
- You can start with a small pile of each dessert but as you fill up the board, go back and add more to the piles, arranging the treats in an aesthetically pleasing way.
- Don't skimp when adding your desserts but be sure that any round items, like chocolate covered cherries, are placed in bowls, otherwise they will roll off the board as people take things off.
- Try to arrange the desserts so that you have some various colors next to each other.
- I placed the lightly golden colored lemon biscotti that's drizzled with white chocolate next to the golden figs that are dipped in dark chocolate and you can really differentiate the two desserts.
- Dark chocolate items set in between tan colored fig cookies and light colored coconut macaroons look really nice.
- Also dark chocolate dipped figs really pop when set next to white chocolate dipped figs.
- This type of arrangement makes for a display that is pleasing to the eye.
- Use various shapes and sizes too.
- I used oblong, triangle, round, short, tall, flat, and curved desserts which added a really nice texture to the whole dessert board.
- Candy dishes add a nice bit of height to your boards and can be filled with fruit, candies, or small cookies.
- Add some pops of color using either colorful desserts, flowers or fruit.
- I set some red roses on the platter and filled candy dishes with vibrant red grapes and some chocolate dipped strawberries.
- I also added raspberry Rugelach, which has pretty red swirls of color, along with some chocolates that had flecks of dried raspberries inside.
- Also my homemade Mediants had bits of dried kiwi and apricots which also added a touch of green and orange to the dessert board.
I love the warm tones offset with the pops of burgundy and red in my dessert board.
This tray was beautiful enough to serve at any elegant affair but was simple enough to create for just about any party.
If you are hosting a birthday party, you may want to fill your tray with all sorts of colorful candies. For a baby shower add candies in pinks and blues and for the Christmas holidays add pops of red and green.
There is no right or wrong way to design your dessert boards, but you do definitely want to fill it with delicious desserts including things like these white chocolate dipped Mission Figs sprinkled with cashew pieces.
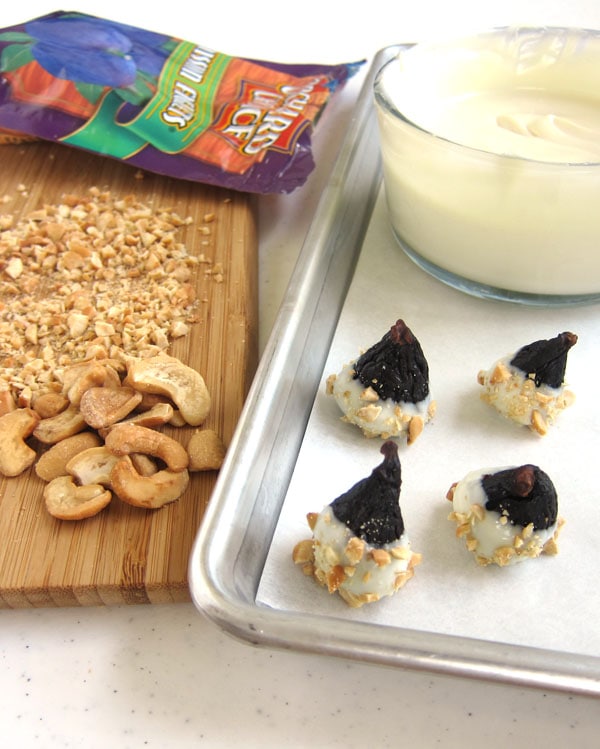
How to make white chocolate dipped figs:
- Melt and temper white chocolate or melt white candy melts (compound chocolates).
- See my detailed information regarding melting chocolate on my Chocolate Making Tips page.
- Dip a dried Mission fig into the white chocolate.
- Lift the fig out of the bowl of white chocolate and allow the excess white chocolate to drip off the fig before sprinkling on finely chopped cashews.
- Set on a parchment paper lined baking sheet.
- Refrigerate until the white chocolate hardens.
- Store in an airtight container at room temperature for up to 3 weeks.
The combination of the chewy fig, creamy white chocolate and salty cashews is amazing! They are so simple to make yet really are a special dessert to add to your board.
TIPS:
- If you purchase figs in a bag, they will have become squished. You can reshape them so that they have a nice pear shape for dipping. Just push them with your fingers into the pear shape and they will hold that new shape.
- Also note that the figs have a small, hard tip at the end of the soft stem.
- You can remove it before placing the figs on your board.
- I did have a few people pop the entire fig into their mouth and they had to spit out the hard bit. You can leave the soft part of the stem and just remove the hard tip.
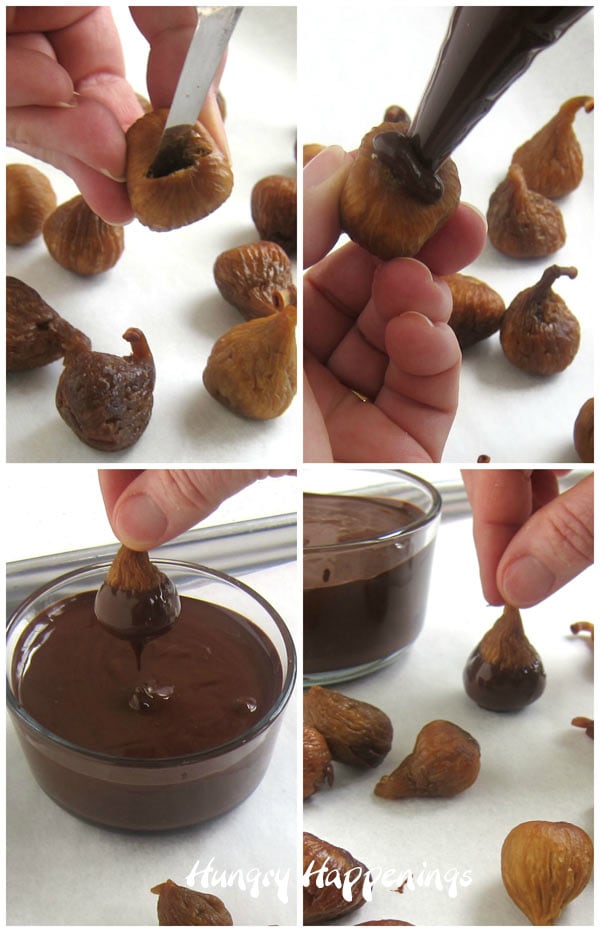
How to make honey infused chocolate ganache filled chocolate dipped figs:
- Heat ¼ cup heavy whipping cream, ½ tablespoon butter, and ½ tablespoon honey in a small saucepan just until it begins to boil.
- Pour over top of 3 ounces of finely chopped chocolate (or ½ cup chocolate chips).
- Let rest for 3-4 minutes then stir from the center out until smooth and creamy.
- Pour into a disposable pastry bag and set aside until thickened enough to pipe.
- Meanwhile, cut a slit in the bottom of 24 California Golden Figs.
- Insert the handle of a wooden spoon into the fig to create an indentation.
- When the ganache is ready, pipe some into the cavity in the fig.
- Press the opening of each fig back together.
- Let the ganache filling firm up for about 30 minutes.
- Dip the figs in melted and tempered dark chocolate or melted dark compound chocolate (confectionery coating/Candy Melts).
- Set on a parchment paper lined baking sheet.
- Chill in the refrigerator for about 5 minutes until the chocolate hardens.
- These ganache filled figs can be kept at room temperature for up to 2 weeks.
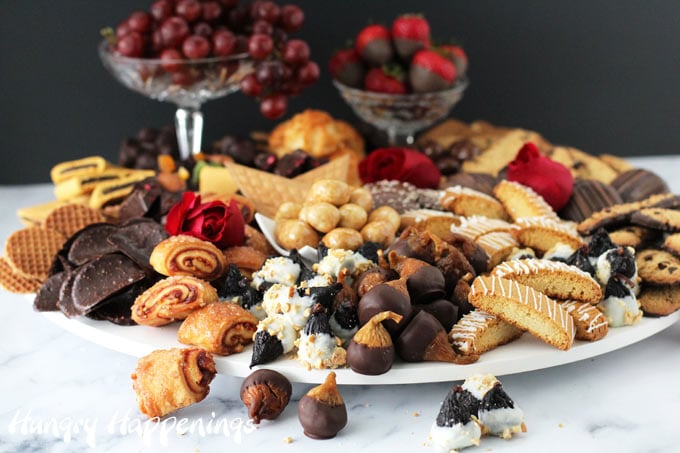
The full view of the board shows you how many different types of desserts I included on my dessert charcuterie board.
Much of what I included on this board was purchased from Trader Joe's. If you are looking to create a really big dessert board that won't blow your budget, I do suggest heading to Trader Joe's. They have great prices on packaged desserts that work really well on a dessert board.
I hope you have fun creating a dessert board for your own party. Let me know in the comments below if you have any tips that worked well when creating your board.

- Banana Split Bars – A Fun and Easy Summer Dessert - March 4, 2026
- Pineapple Fudge (No Candy Thermometer Needed!) - March 4, 2026
- No-Bake Peanut Butter Pie Recipe - March 3, 2026
The Partiologist says
What a beautiful presentation! And with your instruction, it couldn't be easier to put together, just love it!
Beth says
Thanks! I was so happy with how the tray turned out. I'm glad you like it too.
Tavette - S. Florida says
This is just stunning!!! Great for any occasion worth celebrating 🙂 Your instructions are, as usual, very detailed and so easy to follow. I'll be reading this again and again for how to make these cookies/candies/dates.
Just like in nature - you've pointed out how a garden (in this case an edible garden) always looks better when items of dissimilar shape/size/color are placed next to each other. Great tips!
There are things on your board which I've never heard of - i.e. honey infused, chocolate dipped dates. Leave it to you to create such delish items. Thank you very much for sharing lots of new ideas which will have our guests going yum-yum-yum.
Beth says
Thank you! I really loved how this dessert board came together and am really pleased with the pictures too. These charcuterie style boards are so much fun to put together. I even had fun shopping for all the treats to go on the board. Typically I'd make everything on the board, but it's nice, on occasion, to take it easy and just use some tasty bakery items. I can't take credit for the honey infused, chocolate dipped dates. They were actually created by Guittard Chocolates for the Valley Fig Growers website. They are amazing though, and I highly recommend you try them! Here's the link to the original recipe - https://valleyfig.com/recipes/view/figcolates