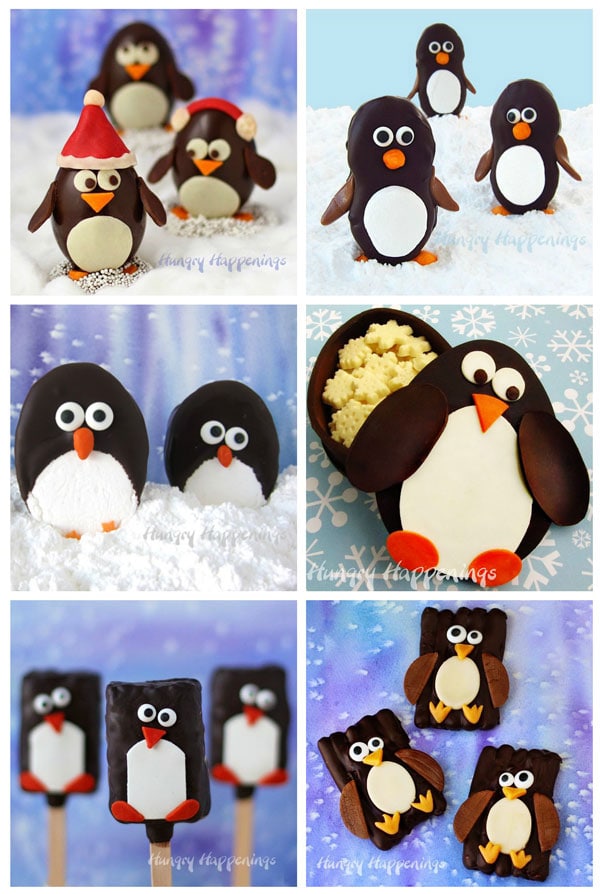
I think that the best container to hold your sweets in is one that you can eat afterward. So, I made this Chocolate Penguin Box with White Chocolate Snowflakes to hold all your goodies.

This past fall I created a chocolate turkey box to bring to my friend's house for Thanksgiving and shared pictures with you, but didn't have an actual tutorial available; so I created this penguin box and a Valentine's Day box, which I'll share later, to show you how to make an entirely edible box out of chocolate for any occasion. The base and lid of the box are made of a thin layer of solid chocolate.
Modeling chocolate or solid chocolate is used to create the sides of the box, as well as, the decorations on top of the box. These boxes can be made in almost any shape and size and can be filled with a variety of candy, nuts, cookies, or chocolates.
Do you remember all of those egg-shaped modeling chocolate designs I did for Christmas last month, or how about the cute Easter Chicks or ladybugs I made last spring?
Well, each and every one of those modeling chocolate designs could be used in place of this penguin to create a chocolate box. There are so many possibilities.
Over the years I have made quite a lot of chocolate boxes. I thought you might like to see a few of my designs. Please forgive the poor image quality.
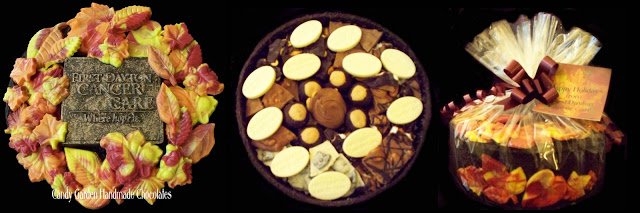
This box was made for a client who was looking for a gift to give to a large staff at an office.
Each box is 10" in diameter, and 3" tall, is filled with a variety of chocolates, and weighs over 7 pounds.
They are decorated with a logo candy bar and swirled white chocolate leaves.
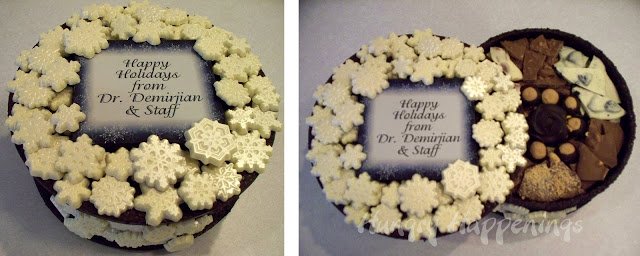
I made these the same way as above, only I used white chocolate snowflakes to decorate the box.
These are the same snowflakes that are inside the penguin box.
The holiday greeting is printed using edible inks on a frosting sheet that is attached to the chocolate lid.
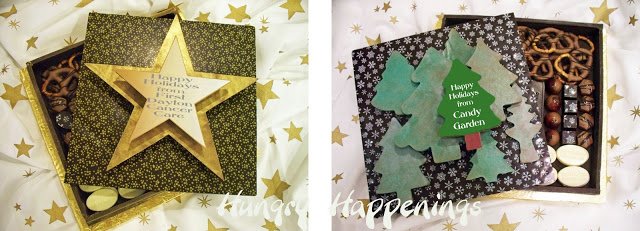
These boxes feature a variety of decorating techniques including the use of chocolate transfer sheets and edible images.
Every piece of these boxes was created using solid chocolate including the trees, stars, and sides.
The chocolate stars and trees are brushed with luster dust to add color and a shimmering effect. Each box is filled with an assortment of hand-crafted chocolates.
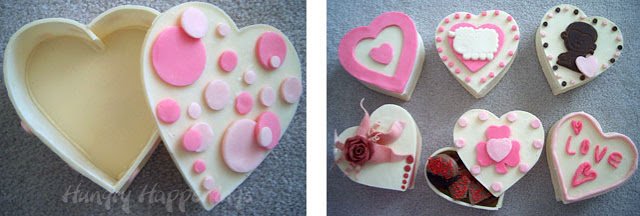
I've taught classes where each student gets to make his/her own box. The boxes pictures above are from a class I taught to kids 8-10 years of age. Each student made all the elements of their box including the modeling chocolate.
My sample box (pictured on the left) had simple polka dots attached. I gave the kids the freedom to create whatever they wanted. Most of them chose to cut their modeling chocolate decorations out using cookie cutters while one chose to roll them into logs and create letters and hearts.
The box that is topped with a rose was my creation. I'll show you how to make a similar box before Valentine's Day.
Chocolate Penguin Box filled with White Chocolate Snowflakes
Before you begin, if you aren't experienced with making chocolate, read my chocolate-making tutorial which includes information on the types of chocolate to use, melting instructions, and the recipe for modeling chocolate.
Ingredients
6 ounces dark chocolate (melted and tempered pure chocolate or
melted confectionery coating/candy melts)
white, orange, and dark modeling chocolate
powdered sugar for dusting the work surface
a small amount of corn syrup (less than a teaspoon)
Supplies
6" egg-shaped cookie cutter*
baking sheet lined with parchment paper
rubber spatula or spoon
kitchen twine or ribbon
scissors
rolling pin
cocoa powder for dusting the work surface
cutting board
pizza wheel or knife
fine tip paint brush (new or one that is used for food projects only)
pastry brush
penguin decoration template
candy, nuts, cookies, or chocolate to fill your box
if making white chocolate snowflakes:
10 ounces melted and tempered white chocolate
or melted white confectionery coating/candy melts
snowflake chocolate molds
disposable pastry bag or spoon
*If you don't have a 6" egg cutter, you can use any size you have. Just adjust the size of the penguin decoration template pieces to fit the egg you use.
Instructions
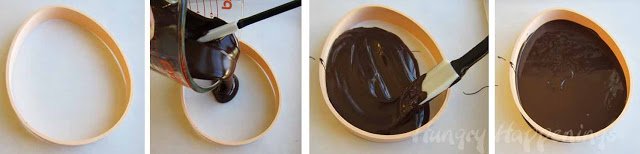
Create the base and top of the box.
- Set your egg-shaped cookie cutter on a baking sheet lined with parchment paper.
- Pour 2 ½ ounces of melted and tempered pure chocolate or melted confectionery coating/candy melts into the middle.
- Use a rubber spatula or spoon to spread the chocolate out into a thin even layer.
- Gently tap the baking sheet to spread the chocolate out and remove any big air bubbles.
- Refrigerate if using pure chocolate, or freeze if using candy melts until the chocolate is set -about 10 minutes.

Remove the chocolate from the cutter.
- Remove the chocolate egg from the cookie cutter by gently pulling the edge of the cutter away from the chocolate. The chocolate egg should fall right out of the cutter.
- You will need to repeat the process above to make the second egg. You need one egg-shaped base and one egg-shaped lid.
- Be sure to reserve about an ounce of melted chocolate to use as the glue that will hold the pieces of your box together.
- Once you un-mold your eggs, turn them upside down and use the smooth side of each egg for the base and top of your box.
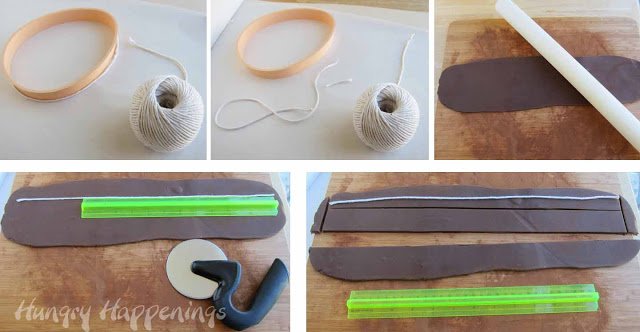
Cut the chocolate walls for the box.
- To determine approximately how long to cut your strip of modeling chocolate, which will form the sides of the box, wrap a piece of kitchen twine or ribbon around your cookie cutter and cut where the edges meet.
- Cut off a little over an inch and use the long piece of twine as your guide.
- Dust a cutting board with cocoa powder.
- Roll dark modeling chocolate into a long rectangle that is ¼" thick. Set the piece of twine across the length of the modeling chocolate.
- Use a ruler as a straight edge and a pizza wheel or knife to cut a rectangle out of the modeling chocolate that is the length of the piece of twine.
- You can make your box shallow (½") or deep (3"), depending on what you'd like to fill the box with - so cut your rectangle accordingly. My box is about an inch deep, so my rectangle is about 15"x1".
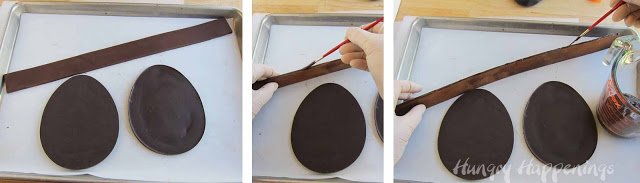
Brush the modeling chocolate strip with chocolate.
- You now want to attach the strip of modeling chocolate to one of the chocolate eggs.
- Choose the nicest-looking chocolate egg to be the top of your box.
- Dip a fine-tip paintbrush into melted chocolate and paint it all along one long edge of the modeling chocolate strip. Work quickly, so the chocolate doesn't harden.
Attach the modeling chocolate strip to the chocolate egg.
- Attach the modeling chocolate strip to your egg-shaped base.
- Pick up the modeling chocolate strip in both hands.
- Set the painted edge down on the chocolate egg.
- Bend the strip to match the shape of the egg.
- Set the strip on the egg about ⅛" inch from the edge.
- Press it down to secure all but one end.
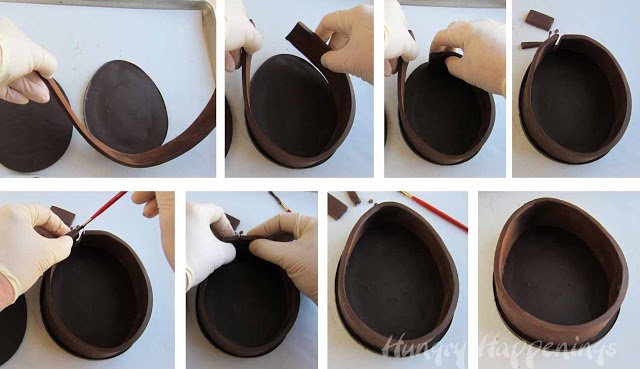
- You will need to cut off some of the modeling chocolate so that the ends meet up together without overlapping.
- Paint some chocolate onto the edge of the modeling chocolate strip to glue the two ends together.
- Press them until they hold together. If your modeling chocolate sides are not securely fastened to the base, paint some chocolate all along the inside edge where the modeling chocolate strip meets the chocolate base.
- This will help secure the two pieces together.
- Use a pastry brush to brush any excess cocoa powder off the modeling chocolate.
- Your modeling chocolate will harden as it sits and will be sturdy enough to hold up the box lid. If you've made your sides really deep (over 2 ½") and you want to make sure they hold up well, you can paint chocolate all over the modeling chocolate to give it more support, just as a precaution.
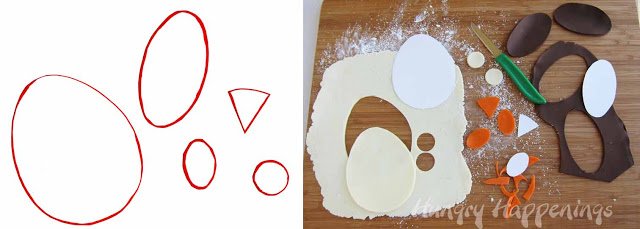
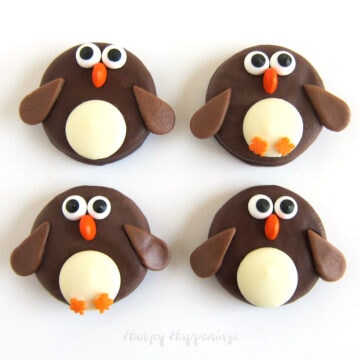
Cut out the modeling chocolate penguin decorations.
Download and print the penguin decorations template on paper or cardstock. Cut out around each shape. If your egg-shaped box is not 6", you will need to adjust the size of the template pieces to fit your egg box.
- Dust a clean cutting board with powdered sugar.
- Roll out some white modeling chocolate to about 1/16" thickness.
- Set the largest cutout oval and the small circle on top.
- Use a knife to cut out around each shape, making one oval for the white on the penguin's body and two circles for the eyes.
- Pinch off a small amount of white modeling chocolate and color it orange (detailed instructions here.)
- Roll out the orange modeling chocolate. Set the smallest oval and the triangle on top.
- Cut out around each shape, making two ovals for the feet and one triangle for the beak.
- Roll out some dark modeling chocolate and cut out two of the medium ovals for the wings.
- To make the pupils of the eyes, pinch off two small bits of dark and roll them into balls.
- Flatten into small circles.
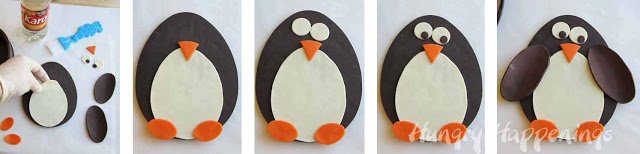
Decorate the chocolate penguin.
- Decorate the chocolate egg-shaped box lid.
- Brush a small amount of corn syrup on the back side of the large white egg and press in onto the chocolate lid.
- Lightly brush corn syrup on the back of the orange ovals and attach them to the base of the white egg, spaced about an inch apart for the feet.
- Attach the orange triangle beak at the very top of the white oval.
- Attach the white eyes, then add the pupils.
- Shape the two dark ovals into wings by curving up the edges.
- Brush corn syrup down the center on the back side of the wings and press them onto the chocolate egg on either side of the white oval. You can attach your pieces using chocolate instead of corn syrup, but it will show through the white decorations slightly.
To make white chocolate snowflakes:
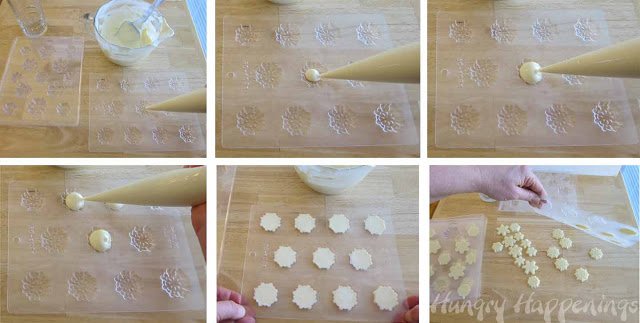
Make white chocolate snowflakes.
- Pour melted and tempered white chocolate or melted white confectionery coating/candy melts into a disposable pastry bag and cut off the tip.
- Pipe white chocolate into the cavities of your snowflake mold. You can spoon the white chocolate into the cavities if you prefer.
- Tap the mold on the counter to level the chocolate and remove any air bubbles.
- Refrigerate if using white chocolate and freeze if using confectionery coating/candy melts just until the snowflakes set up, about 8-10 minutes.
- Turn the mold upside down and allow the snowflakes to fall out onto the counter. You may need to bend the mold or press on the backside of the mold to release the candy.
- If the candy won't release, it may not be set. Chill longer until they do release.
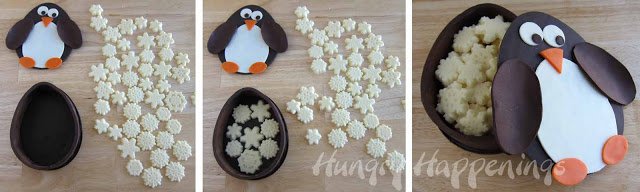
Fill the chocolate penguin box with snowflakes.
- Fill your chocolate box with white chocolate snowflakes.
- Set the lid on top.
- Wrap in clear cellophane or package in a gift box to give as a gift, or simply set out and allow your family and friends to enjoy the candy inside the box.
The entire box can be eaten - just break off pieces and enjoy.
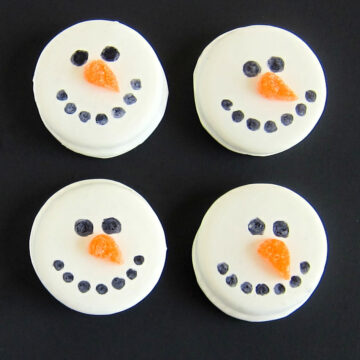
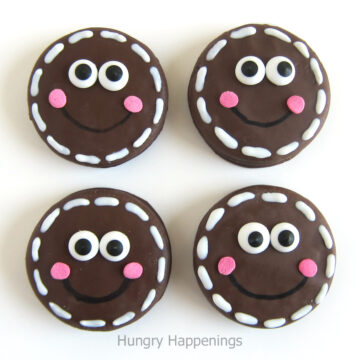
Be sure to check out all my fun Christmas Recipes including these cute penguin treats.

- Banana Split Bars – A Fun and Easy Summer Dessert - March 4, 2026
- Pineapple Fudge (No Candy Thermometer Needed!) - March 4, 2026
- No-Bake Peanut Butter Pie Recipe - March 3, 2026

Bella Vance says
OMG, this is the cutest thing ever! You are so amazingly talented. Thank you for sharing your creativity with all of us.
Beth says
That's so sweet! I'm glad you like this cute penguin.
Beth (www.livinglifeintentionally.blogspot.com) says
Stunning and amazing as always!! You are so talented! Thanks for linking up to TGIF! Have a GREAT week,
Beth =-)
Dorothy @ Crazy for Crust says
What a great tutorial! So creative and yummy too. Thanks for sharing on Crazy Sweet Tuesday!
Carol - jalscakepops.com says
You are definitely the "go to" person for chocolate creations! I love the fact you use so much chocolate modeling clay, that's all I use!
Beth Jackson Klosterboer says
Thanks Carol. I checked out your cake pops - wow, really nice. I love your penguins with the stocking caps. So cute.
Aimee - ItsOverflowing.com says
Fun reply comment feature right? I love your blog! I'm your newest follower!
XO, Aimee
Beth Jackson Klosterboer says
Hi Aimee, Welcome. I am so happy that Blogger finally added the reply functionality!
Kieli_Heart says
This is such a great and cute gift idea! I will have to try it one day :3
~ Kieli ~
Farmhouse Style Living says
I swear you are the most talented person when it comes to food I know! I just love all your ideas. I made your penguin pops for my daughter's class and need I say, they were a hit! I can't wait to make some of your boxes for Valentines Day!
Beth Jackson Klosterboer says
Thank you so much for the kind words! I'm excited to hear that you made the penguin pops and that the kids liked them. If you took any pictures and would like to have them posted in my new reader's gallery, you can send them to me at beth@hungryhappenings.com.
Beth Jackson Klosterboer says
Thank you everyone! My chocolate box is just sitting here awaiting the right occasion to give it away. It's wrapped up and ready to go.
Alice says
Wow, amazing!
Jo Andrade says
boa tarde, cada vez mas fico sua fã. bjs
Trish - Sweetology101 says
oooh geepers these are so darn cute.
Trish - Sweetology101 says
oh geepers..so cute!
Jo and Sue says
All I have to say about that is...wow... that's incredible 🙂
Jill @ KitchenFunWithMy3Sons.com says
Wow...that is very cute!