Make these adorable white chocolate-dipped Ladybug Rice Krispie Treats for Valentine's Day or a bug-themed birthday party. Each lollipop is decorated with delicious modeling chocolate.

I am really not sure why ladybugs are associated with Valentine's Day other than the fact that they are red and kind of cute, at least as cute as a bug can be. But for whatever reason, ladybugs have always been a symbol I think of on Valentine's Day, so I decided to create a ladybug-themed recipe.
Last October, when we were planning our bug-themed Halloween party, I had come up with the idea of making these ladybug lollipops but ran out of time. I thought they'd be fun for Valentine's Day too.
The ladybugs are created by cutting a simple egg shape out of the cereal treats then dipping them in red-colored confectionery coating and decorating them with modeling chocolate ovals and circles.
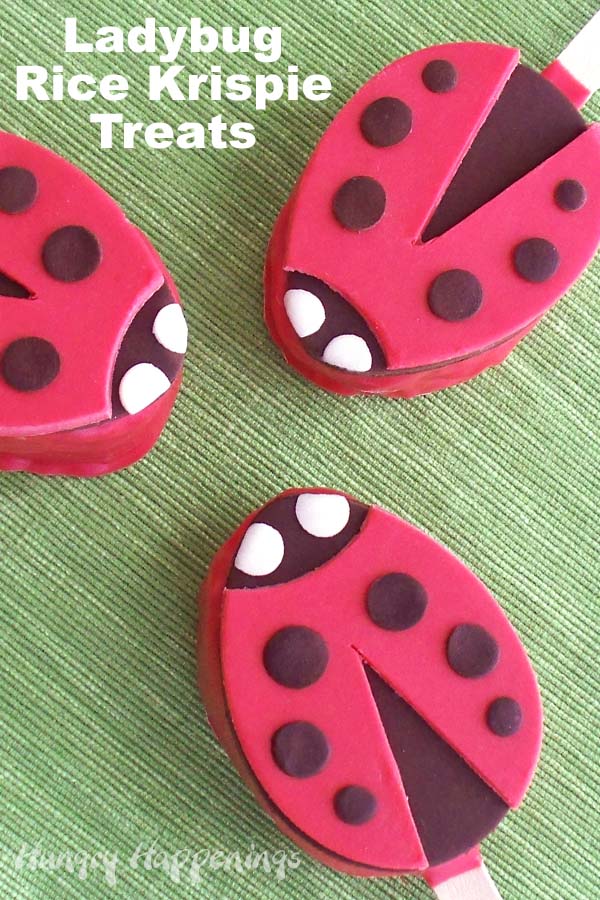
This project would be great to make with kids and will make wonderful treats for this holiday. Wrap your ladybug pops in a clear cellophane bag, tie them with a ribbon, attach a cute card, and give them away as a special Valentine's Day treat.
Ingredients
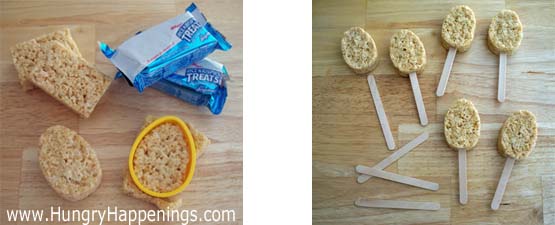
Rice Krispies Treats - You can use store-bought Kellogg's treats or make homemade treats. You can find my BEST Rice Krispie Treat Recipe on my How To Make Cereal Treats website.
red candy melts - I recommend using red-colored confectionery coating (candy melts) wafers as it is difficult to get a really deep red when you color white wafers.
white modeling chocolate (8 oz. white chocolate and 3 tablespoons corn syrup)
red food coloring - You can use red food coloring to color white modeling chocolate but it's better to make red modeling chocolate using red candy melts. You'll get a more vibrant red color. See note below.*
dark modeling chocolate (8 oz. dark chocolate and ¼ cup corn syrup)
water
cocoa powder and powdered sugar to dust the work surface
*Note:
You will have extra melted red coating when you are finished dipping your pops that you can use to make your red modeling chocolate. You will have approximately 4-6 ounces remaining. Stir in 1 ½ tablespoons of corn syrup until thickened then knead. If it is dry, add more corn syrup and knead until smooth.
Supplies
12 wooden craft sticks
rolling pin
egg-shaped cookie cutter (about 2" wide by 3" tall)
pastry brush
round pastry tips #7, #10, #12
2" round cookie cutter
2 baking sheets (that will fit into your freezer)
parchment paper
Instructions
Line baking sheets with parchment paper. Set aside.
To create the rice Krispies treat ladybug bodies:
Unwrap the Rice Krispies treats. Use the egg-shaped cookie cutter to cut each of the treats into an oval shape. If your egg cutter is just a bit bigger than your cereal treat. press the cereal treat into the cutter molding it into an oval shape. Insert a wooden craft stick about 1" into each cereal treat oval.
Egg-shaped bodies:
- Dust the work surface and a rolling pin very lightly with cocoa powder.
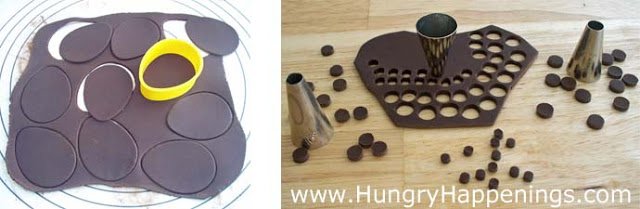
- Roll dark modeling chocolate out to 1/16"-⅛" thickness.
- Use the egg-shaped cookie cutter to cut 12 ovals, re-rolling modeling chocolate as needed.
- Use the pastry brush to brush off any excess cocoa powder from your oval shapes.
Spots:
- You will need 6 spots for each ladybug. I used three different size spots, but you can use just one if you prefer.
- Roll out some dark modeling chocolate.
- Press the tip end of pastry tip #7 into the modeling chocolate.
- Continue to press a few times.
- Then turn the tip upside down and tap it on the counter to release the very small circles of modeling chocolate.
- Create 24 small dots using the #7 tip, 24 medium dots using the #10 tip, and 24 large dots using the #12 tip.
Eyes:
- Dust your work surface and rolling pin with powdered sugar.
- Roll a small amount of white modeling chocolate out and create 24 medium dots using the #10 tip.
Red Ladybug Wings:
- Dust your work surface and rolling pin very lightly with powdered sugar.
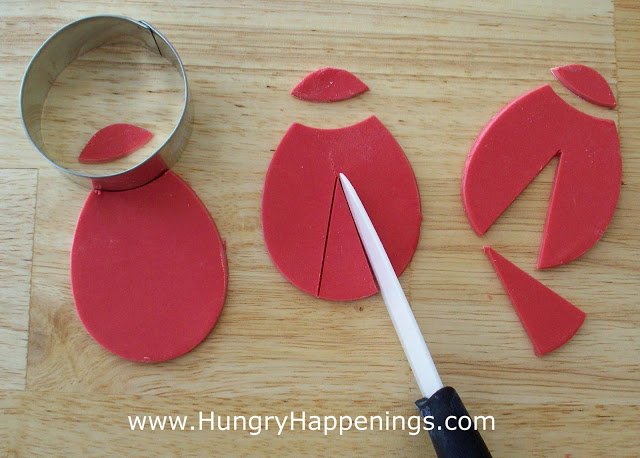
- Roll out your red modeling chocolate to 1/16"-⅛" thickness.
- Use the egg cookie cutter to cut 12 ovals.
- Use the round cookie cutter to cut the tip off of each oval, creating the ladybug's head.
- Use a knife to cut a long triangle out from the bottom of each oval.
- Use a clean pastry brush to brush off any excess powdered sugar.
Melt Candy Melts:
- Melt the red confectionery coating wafers in the microwave. (Click here for detailed melting instructions.)
- Pour wafers into a microwave-safe bowl.
- Heat on high power for 30 seconds, remove from microwave and stir.
- Heat for 20 seconds, and stir. Heat for 15 seconds, and stir.
- Heat for 10-second increments, stirring in between each, until the confectionery coating is melted.
Dip Rice Krispie Treats:
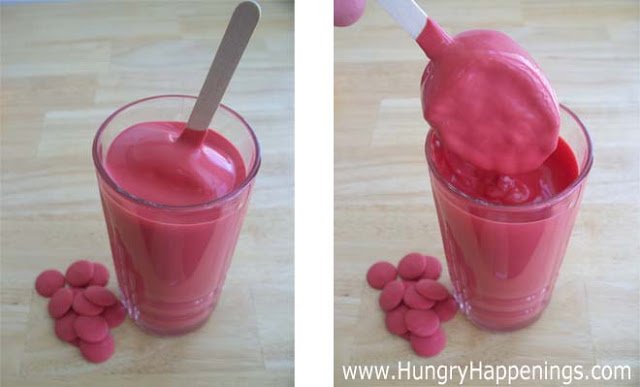
- Pour the candy melts into a tall glass or measuring cup, leaving an inch between the top of the coating and the top of the glass. If you fill it too high, you will spill the coating when you dip your first egg-shaped cereal treat.
- Holding a stick, dip one Krispies treat pop into the red coating.
- Remove the pop from the coating and allow excess coating to drip off.
Pro Tip
Dip just the tip of the pop back into the chocolate several times. This action will help to pull the excess coating off of the cereal treat. Then gently shake the pop a few times to remove the coating that is dripping from the tip of the pop.
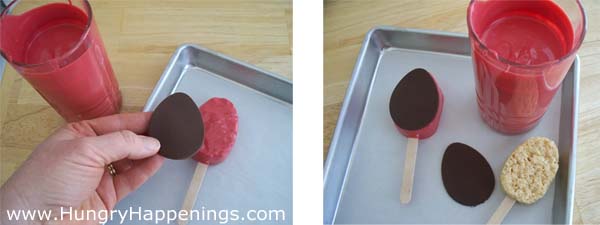
Add the modeling chocolate pieces.
Set the pop on your lined baking sheet. Immediately top with one dark modeling chocolate oval.
You'll want to put your dipped pops into the freezer within a few minutes of dipping them, or you will end up with white streaks on your red pops. So dip a few pops then freeze them.
The number of pops you dip before freezing will depend on how quickly you dip them. Get the pops in the freezer before the red coating becomes hard.
Add more red coating to your glass as needed. If your red coating starts to become thick, reheat in the microwave for 10-15 seconds. Stir the coating and continue dipping your pops.
Once all of your pops are dipped you can begin to decorate. You will have excess red coating (it is necessary in order to dip all of your pops). You can simply spread it on a parchment-lined baking sheet and freeze it for 10 minutes to save for another use. Or you can add corn syrup to it and make your red modeling chocolate. See notes in the ingredients list above.
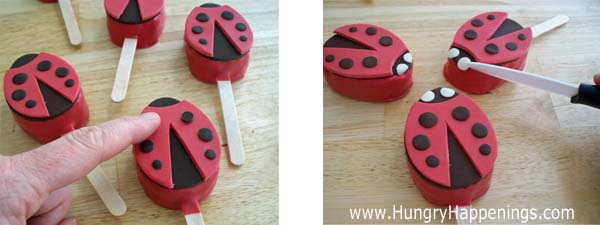
Decorating your pops:
- You will top each ladybug pop with wings, spots, and eyes.
- Use a clean pastry brush to brush a very light coating of water on the backside of the red modeling chocolate wings.
- Press the red wings on top of the dark egg shape on each pop.
- Dab a bit of water onto the modeling chocolate spots and arrange them on the wings. Press gently to flatten the spots.
- Place the smaller spot at the bottom of the wings, the medium spot in the middle, and the large spot at the top.
- Dab a bit of water on each of the white spots and press them onto the dark ladybug head allowing about ⅓rd of the eye to drape over the edge.
- Cut off the excess ⅓rd of each eye.
Serve your Ladybug Rice Krispies Treat Pops at room temperature.
The ladybug-shaped modeling chocolate decorations could also be used to decorate cupcakes, cakes, and cookies.
Related Recipes
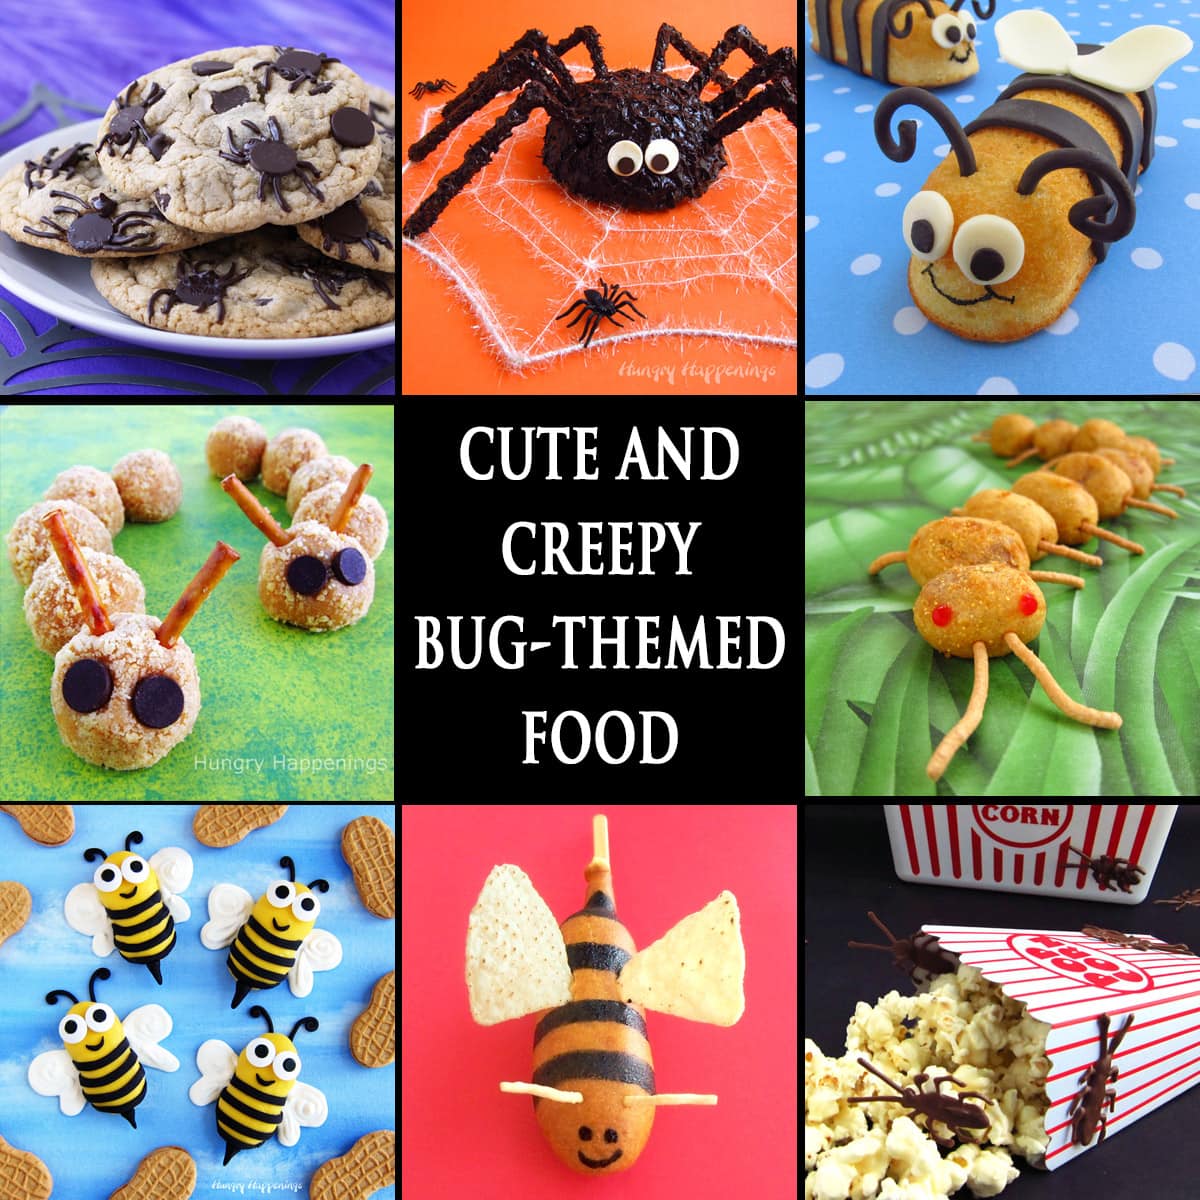
If you are looking for other bug-themed desserts and snacks, be sure to check out all of my Bug-Themed Food ideas.
Recipe

Dip Rice Krispie Treat lollipops in red candy melts then decorate the tops using modeling chocolate to create these cute ladybug treats.
- 12 Kellogg's Rice Krispies Treats
- ½ dark modeling chocolate recipe
- ½ white modeling chocolate
- 16 ounces red candy melts, melted
- red food coloring
- cocoa powder and powdered sugar
-
Line a few baking sheets with parchment paper.
-
Unwrap the Rice Krispies treats and cut them into egg shapes using a cookie cutter.
-
Dust the work surface and a rolling pin very lightly with cocoa powder.
-
Roll the dark modeling chocolate out to 1/16"-⅛" thickness and cut out 12 eggs using the cookie cutter.
-
Cut small cirles for the ladybug's spots.
-
Create 24 small dots using the #7 tip, 24 medium dots using the #10 tip, and 24 large dots using the #12 tip.
-
Use the pastry brush to brush off any excess cocoa powder from your oval shapes.
-
Dust your work surface and rolling pin with powdered sugar.
-
Roll a small amount of white modeling chocolate out and create 24 medium dots using the #10 tip.
-
Roll out your red modeling chocolate to 1/16"-⅛" thickness and cut out 12 eggs.
-
Use the round cookie cutter to cut the tip off of each oval, creating the ladybug's head.
-
Use a knife to cut a long triangle out from the bottom of each oval.
-
Use a clean pastry brush to brush off any excess powdered sugar.
-
Pour the melted red candy melts into a tall glass.
-
Insert a wooden popsicle stick into the treats. If needed, you can dip the stick into candy melts before inserting it. This will hold the stick in place. Let the chocolate harden.
-
Holding a stick, dip one Krispies treat pop into the red candy melts.
-
Remove the pop from the candy coating and allow excess coating to drip off.
-
Set the pop on your lined baking sheet. Immediately top with one dark modeling chocolate oval.
-
Continue to dip your Rice Kripie Treats adding more red candy melts to the glass as needed. Don't let the candy melts get too cool or they will streak once hardened. Reheat the chocolate in the microwave for 15 seconds as needed.
-
Once all of your pops are dipped you can begin to decorate.
-
Use a clean pastry brush to brush a very light coating of water on the backside of the red modeling chocolate wings.
-
Press the red wings on top of the dark egg shape on each pop.
-
Dab a bit of water onto the modeling chocolate spots and arrange them on the wings. Press gently to flatten the spots.
-
Place the smaller spot at the bottom of the wings, the medium spot in the middle, and the large spot at the top.
-
Dab a bit of water on each of the white spots and press them onto the dark ladybug head allowing about ⅓rd of the eye to drape over the edge.
-
Cut off that excess piece.
-
Your ladybug Rice Krispie Treats are ready to serve or to package in bags.
Storage
Store your treats at room temperature for up to two weeks if you used store-bought treats and for up to 5 days if you use homemade treats.
Candy Melts
Melt the candy melts in the microwave using 15-30 second bursts of high power, stirring after each. Use paramount crystals to thin out the candy melts if they are too thick.
You will have excess red coating (it is necessary in order to dip all of your pops). You can simply spread it on a parchment-lined baking sheet and freeze it for 10 minutes to save for another use. Or you can add corn syrup to it and make your red modeling chocolate. See notes in the ingredients list above.

- Banana Split Bars – A Fun and Easy Summer Dessert - March 4, 2026
- Pineapple Fudge (No Candy Thermometer Needed!) - March 4, 2026
- No-Bake Peanut Butter Pie Recipe - March 3, 2026


rose colcas says
muito criativo ..e gostoso..
Anonymous says
yummmm
Cake Fixation says
These are adorable! Thank you for sharing. Just found your blog. I love it!
Carrie says
These are adorable. Your tutorial makes it look so easy. Thank you for sharing at Sharing Saturday!! I think ladybugs have to do with Valentine's Day as we begin to really hope for the start of spring and the ladybugs to come back with the warm weather or at least that is this New Englander's opinion.
Beth Jackson Klosterboer says
Thanks Carrie, I think you are right about hoping for the start of spring. The sun was shining here until after 5:00 p.m. and it made me feel like spring isn't too far away. It was such a nice change from the dreary January weather we have in Ohio.
Tracy @ CraftJunkieToo.com says
FABULOUS tutorial -- I'll be bookmarking and saving for later. :)I invite you to share your fabulous creations at Craft Junkie Too's weekly linking party. Craft Junkie Too Tracy