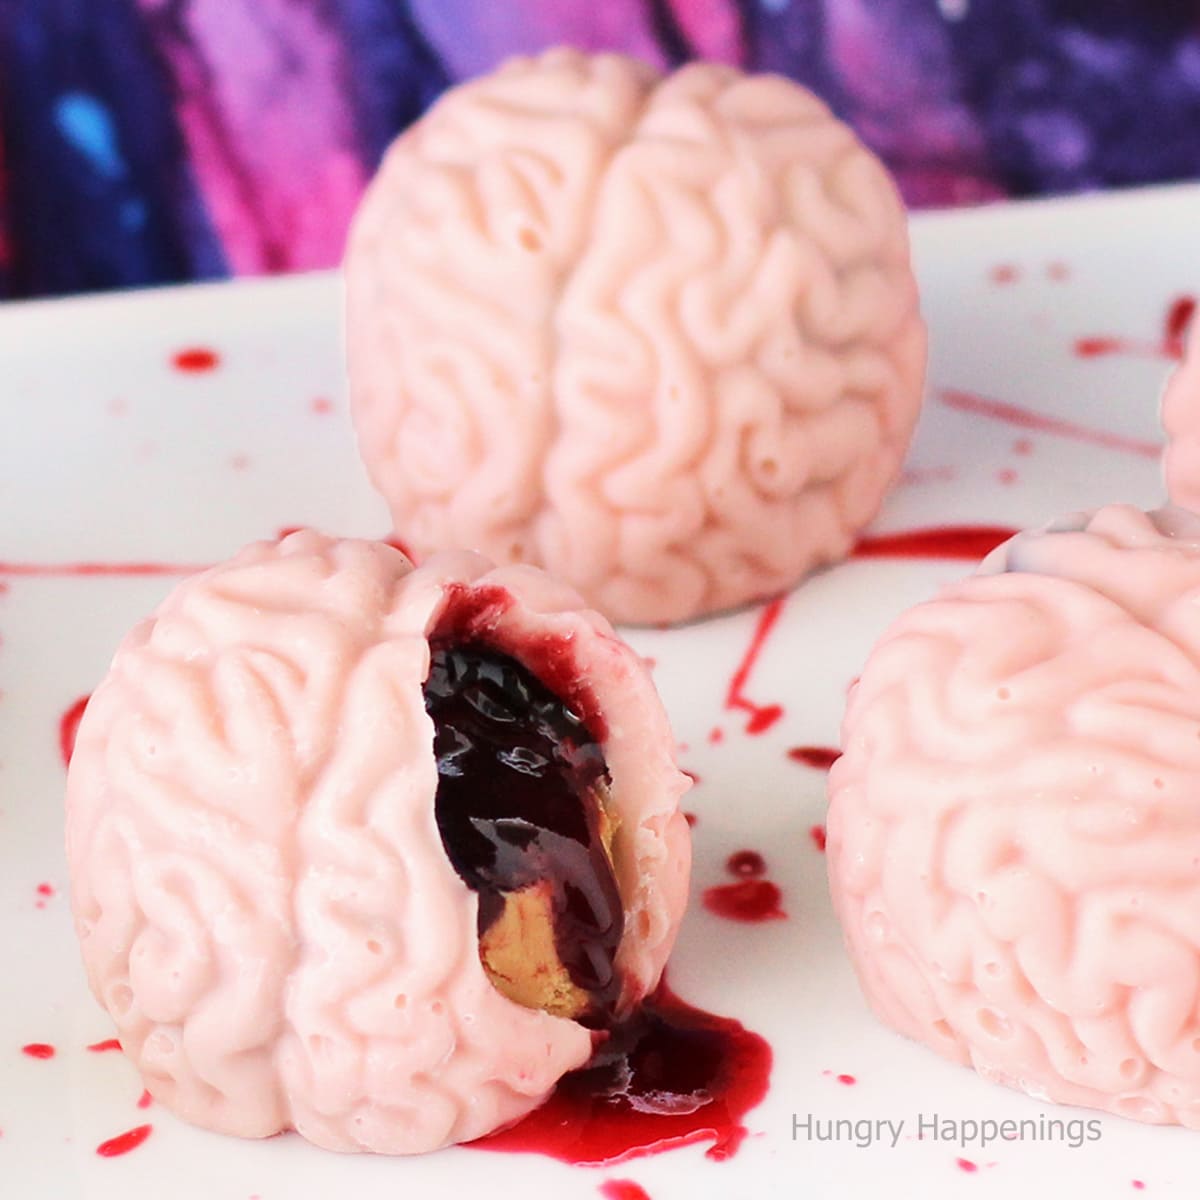
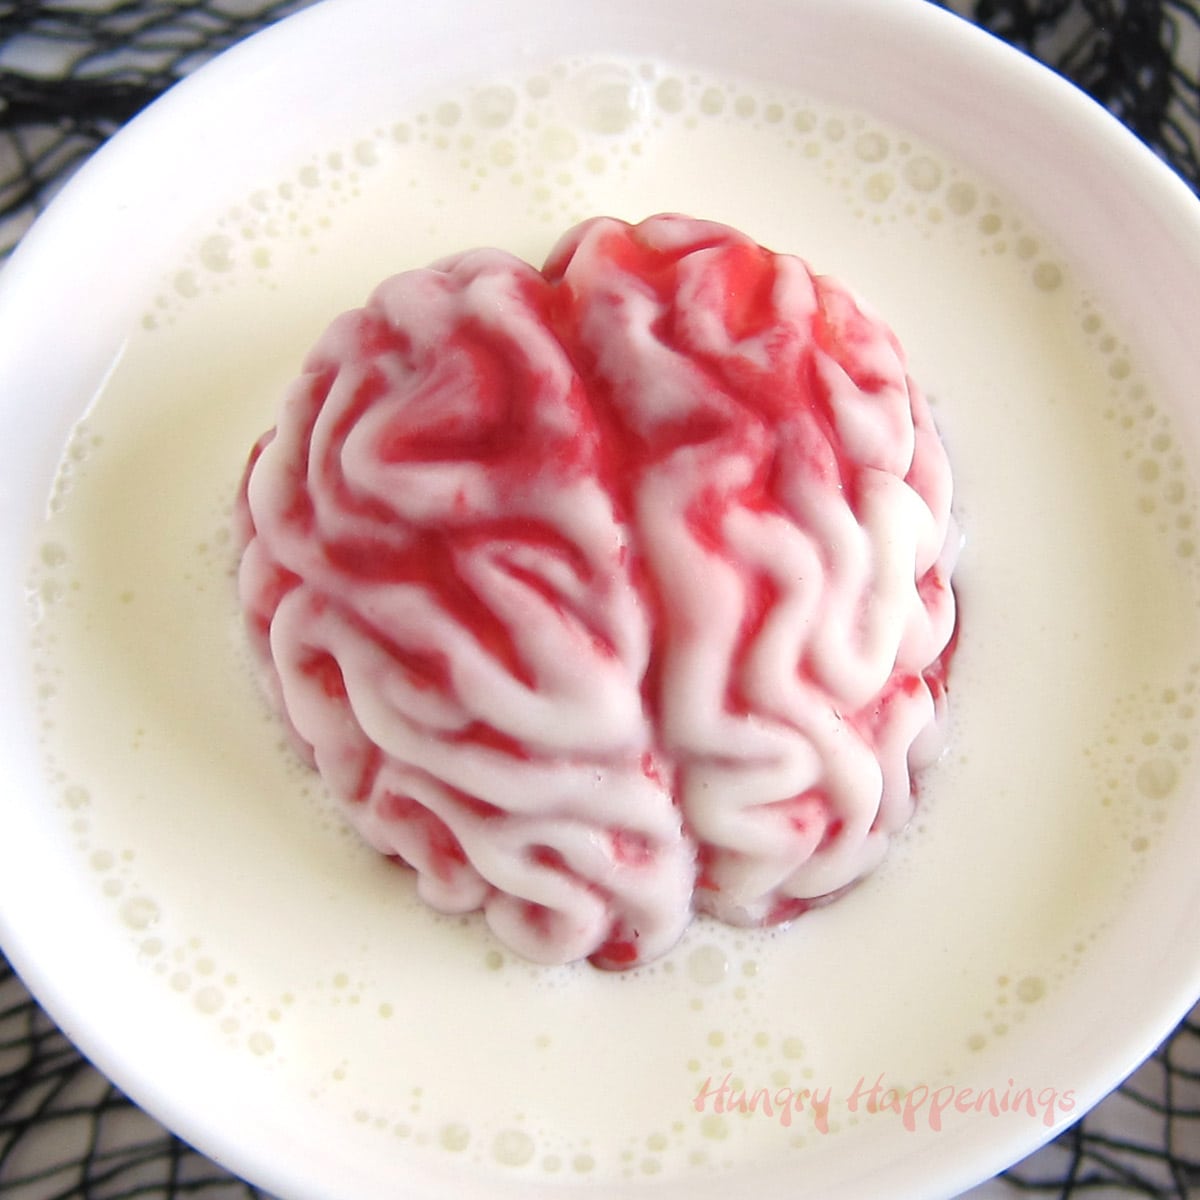
These Cake Ball Brains oozing cherry blood are to die for. The white chocolate-covered chocolate cake balls filled with cherry sauce will be a huge hit at your Halloween party or zombie-themed event.

Transform an ordinary cake ball into something a bit gruesome for Halloween this year. These cake ball brains are filled with a blend of chocolate cake and vanilla frosting with some bloody-looking cherry sauce.
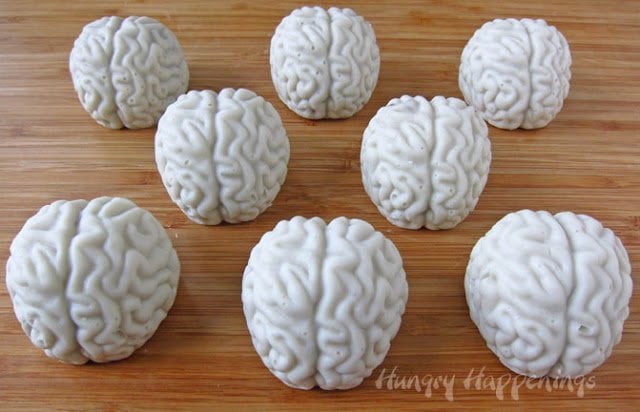
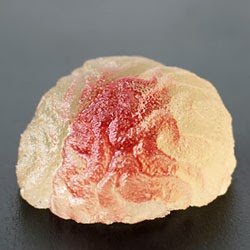
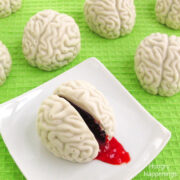
The white chocolate brains look so real and taste so good!
They would make a great dessert for a zombie-themed Halloween party.
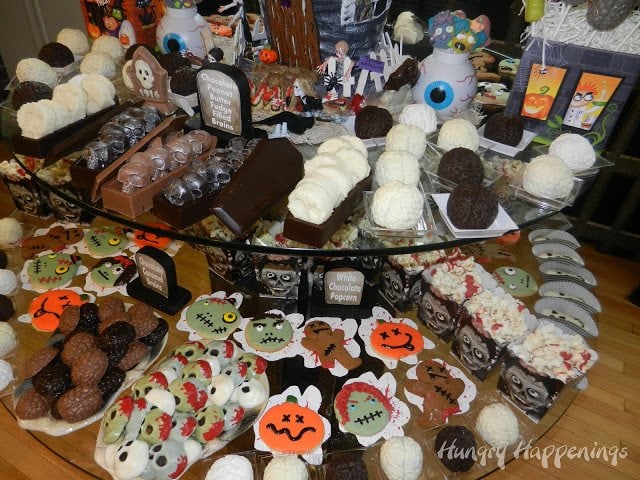
I served them at our party alongside other zombie-themed desserts and chocolates.
Actually, these creepy Halloween desserts have been so popular with my party guests over the years that I've served them at several of our Halloween parties.
More recently, I filled my white chocolate brains with peanut butter fudge and jelly. You can see the recipe and video tutorial to make PB&J Candy Brains here.
My guests always comment on how real the brains look. To get the realistic brain shape, you'll need to use some silicone brain molds.
Cake Ball Brains
(makes 28-36)
Ingredients
- 1 baked chocolate cake
- ¼ - ½ cup vanilla frosting
- 30-38 ounces melted white candy melts or melted and tempered pure white chocolate*
- black candy coloring (if you want your brains to be grey)
- cherry, raspberry, or strawberry preserves, dessert sauce, or ice cream topping (¾ teaspoon per brain)
- red food coloring (if you want to intensify the color or the fruit spread to make it look more like blood)
Update
- I made these and used about one ounce of candy melts per brain and about 2 tablespoons of the cake ball mixture, but I just had some friends over helping me get brains done for our party, and after making 20 brains, had used all the white candy melts but had cake leftover.
- Their candy coating was thicker than what I made. So by the end, they made 36 brains and used much more of the white candy melts.
- So, your quantities will depend a lot on your skill level using candy coating. I added more candy melts to the quantities just to be sure you have enough to make all your brains.
*If you don't have experience working with or melting candy melts, or you would like to use melted and tempered pure white chocolate, read my detailed Chocolate Making Tips page for instructions.
Supplies
- silicone brain molds
You can find silicone brain molds and some of the ingredients needed to make these cake ball brains on Amazon. I earn a small commission when you make a purchase using the affiliate links at no extra cost to you.
 Household Cold Whiskey Kitc...Shop on Amazon
  3Pcs 4 Holes Brain Ice,Ice ...Shop on Amazon
  Wilton Melting Chocolate Br...Shop on Amazon
 ") LaetaFood Wafers Super Whit...Shop on Amazon
LaetaFood Wafers Super Whit...Shop on Amazon Instructions
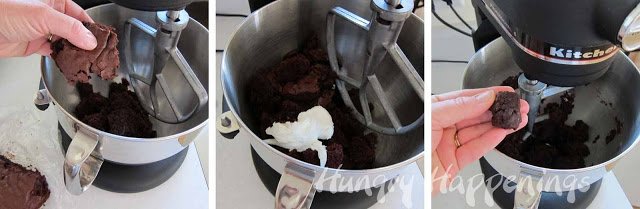
Make the cake ball filling.
- Remove any hard edges from the cake. This will give you a softer cake ball filling.
- Break up the center of the cake into a mixing bowl or the bowl of a stand mixer (my preferred method**) or a food processor.
- Add ¼ cup white frosting.
- Mix to combine.
- If the mixture holds together well and you can easily form balls, then stop; if it crumbles, add up to another ¼ cup of frosting.
- Set aside.
**By using a stand mixer, your cake balls will have a smooth truffle-like consistency. If you do this by hand, you will probably want to mix it with your actual hands to get it smooth.
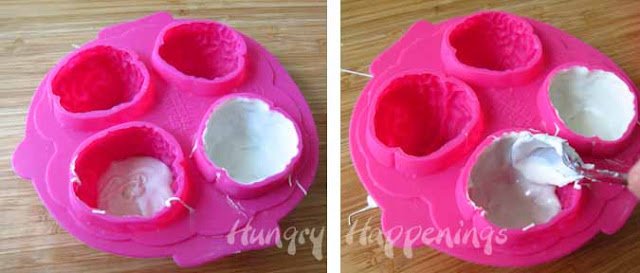
Create white chocolate shells in the brain molds.
- If you'd like your brains to be gray, stir drops of black candy coloring into your melted white confectionery coating until you get the desired shade.
- I made mine a pale gray, but you could go much darker if you prefer.
- You can also make your candy brains pink or green. Just be sure to use oil-based candy colors to color your candy melts or white chocolate.
- Spoon some melted white candy coating into one of the brain mold cavities. Use a spoon or a pastry brush to paint the coating in a thin layer all around the inside of the mold. Be sure you can't see any pink (the color of the mold) through the white. Paint all four brain cavities in your mold.
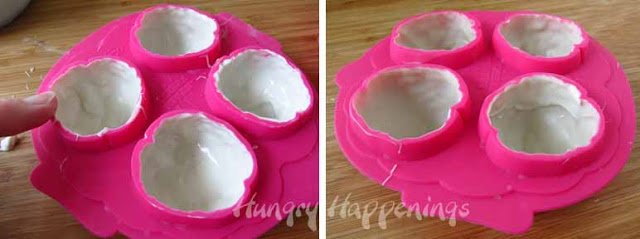
- Wipe off any candy coating around the edges of the mold.
- Freeze for 5 minutes if you are using candy melts or refrigerate for 15 minutes if using pure white chocolate.
- Don't leave them in any longer, or you may get cracks and condensation on your brains, and you wouldn't want that now, would you?
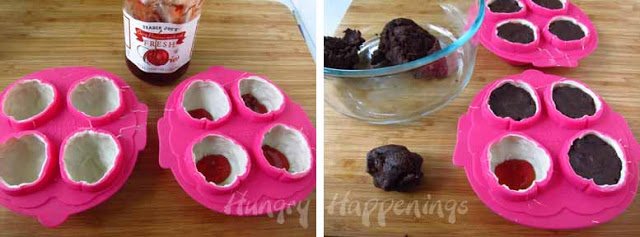
Fill candy brains with cake ball filling and "blood."
- Remove the molds from the freezer.
- If you want your cherry filling to be brighter red, add a few drops of red food coloring.
- Spoon ¾ teaspoon of the cherry filling into each brain cavity.
- Scoop out about 2 tablespoons of the cake ball mixture and press it into a brain cavity, leaving enough room to add a layer of candy coating on top.
How to make the fruity "blood"?
- You can use cherry, raspberry, or strawberry preserves or dessert sauce (ice cream topping) to make your fruit-flavored blood.
- You'll want it to be thin enough to ooze but thick enough that it won't get absorbed into the cake ball filling.
- When I made these back in 2012, I used Trader Joe's Cherry Preserves. I added red food coloring to make them really vibrantly red. By adding the liquid food coloring and stirring the preserves, it became thin enough that it oozed nicely when the cake ball brains were cracked open.
- Raspberry sauce would work beautifully here, too. Just be sure to use seedless sauce or strain out the seeds.
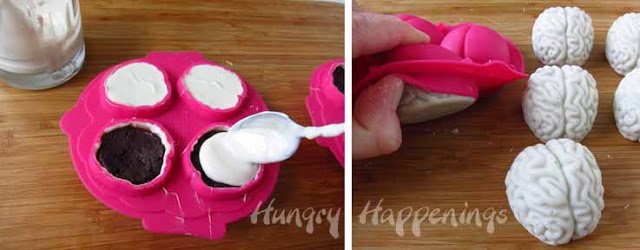
Add more white chocolate.
- Spoon some more white candy coating on top of each cake ball and smooth it out.
- Be sure to wipe off any excess coating around the edge of the mold.
- Freeze for 5 minutes if you used candy melts or refrigerate for about 10 minutes if you used pure white chocolate.
- Remove the cake ball brains from the fridge, turn the mold upside down, then press and pull on the mold until your brains pop out.
- These molds curve inward toward the opening so the candy brains will not just fall out. You need to pull on the molds around the edges to get them out.
Storage
- Store the candy-coated brains in an airtight container for up to a week.
- Just know that the longer they sit, the more likely it is that the cherry jam or sauce will soak into the cake.
- Thin sauces will soak in faster.
- If that happens, just serve them with a bit of extra sauce.
Can I freeze the chocolate brains?
- I don't recommend freezing or storing these in the refrigerator, as the moisture in the fridge will cause beads of condensation on your cake ball brains.
- But if you absolutely do need to make them ahead, wrap each brain in plastic wrap, then place them in a large zip-top bag or airtight container.
- Freeze for up to 3 months.
- To thaw, remove the bag and set it on the counter overnight.
- Then in the morning, you can open the bag and unwrap the brains.
- This should help to eliminate some of the moisture on the outside of the chocolate.
- Just know that the chilled brains might crack if frozen.
Related Recipes
If you plan to host a zombie-themed party or movie night, you might also like to make these other brain-shaped snacks.
Be sure to check out all the Halloween recipes here on Hungry Happenings.
Recipe
This recipe was originally published on October 11, 2012.
White chocolate brains filled with a blend of chocolate cake, vanilla frosting, and oozing fruit-flavored blood (cherry or raspberry preserves or dessert sauce.)
- 1 baked chocolate cake (use either a 9 x 13-inch sheet cake or 2 8-inch round cakes)
- ¼ - ½ cup vanilla frosting
- 30-38 ounces melted white candy melts or melted and tempered pure white chocolate
- optional: black pink, or green oil-based candy coloring
- ⅔ cup cherry, raspberry, or strawberry preserves or dessert sauce (about ¾ teaspoon per brain)
- red liquid food coloring
-
Cut the edges off the chocolate cake and discard.
-
Break up the center of the cake into a mixing bowl or the bowl of a stand mixer.
-
Add ¼ cup white frosting.
-
Mix until it holds together in a soft ball.
-
Add more frosting if needed.
-
Set aside.
-
If desired, stir in drops of oil-based candy coloring to add color to your white chocolate brains.
-
Spoon some melted white chocolate into one of the brain mold cavities.
-
Spread the chocolate around to create a nice, evenly coated, thin shell.
-
Repeat.
-
Wipe off any candy coating around the edges of the mold.
-
Freeze for 5 minutes, if you are using candy melts, or refrigerate for 15 minutes, if using pure white chocolate.
-
Remove the molds from the freezer.
-
Stir a few drops of liquid food coloring into the fruit preserves.
-
Strain out any pieces of fruit or seeds.
-
Spoon ¾ teaspoons of the fruit filling into each brain cavity.
-
Scoop out about 2 tablespoons of the cake ball mixture and press it into a brain cavity leaving enough room to add a layer of candy coating on top.
-
Spoon some more white candy coating on top of each cake ball and smooth it out.
-
Be sure to wipe off any excess coating around the edge of the mold.
-
Freeze for 5 minutes if you used candy melts or refrigerate for about 10 minutes, if you used pure white chocolate.
-
Unmold the candies.
Store the candy-coated brains in an airtight container for up to a week.

- Banana Split Bars – A Fun and Easy Summer Dessert - March 4, 2026
- Pineapple Fudge (No Candy Thermometer Needed!) - March 4, 2026
- No-Bake Peanut Butter Pie Recipe - March 3, 2026


Julie says
I have made these several times and they are awesome! This last time I used red velvet cake and seedless rasberry jam. Fantastic!
Beth says
I am so happy to hear you have enjoyed making these Cake Ball Brains, Julie! I bet they tasted great and looked really amazing with the red velvet cake and raspberry jam.
Patti Phillips says
I know the Christmas is near, but I just love Halloween sweets. These are amaaaaazing. I can't wait for the next Halloween...or should I just serve brains for Christmas...choices, choices....
Beth says
I am with you. I love Halloween too. It's my favorite holiday. I hope you find a fun time to serve these cake ball brains before next Halloween. Have a happy Christmas.
Annie says
Thank you so so much for this! I actually already had the brain molds (for soaps) and have been dying to use them for something disgusting. This is PERFECT!
Beth says
Enjoy making your brains! 🙂
solitairejqk says
Thanks for sharing
Vampy says
These are so cool. I found these molds on eBay and am going to order them there. Wish I had found this sooner because the cheapest price comes from China and has free shipping for only a couple bucks. I had to search for brain ice cube molds to find them. These seem like they'd be huge cubes but what a smart idea. I might try strawberry preserves too.
Beth says
These brain molds are becoming more popular. I even saw them being given away as prizes at Dave and Busters. If you order the molds from China, the wont be here in time for Halloween this year. It usually takes about a month to get anything from China. My husband orders computer parts all the time and it takes quite a while to get his deliveries. I ordered mine from Amazon.com and got them pretty quickly. They would be huge ice cubes. Way too big, in my opinion, but they are the perfect size for cake balls. Have fun making them and Happy Halloween.
happy wheels hacked says
Oh I wish I could be there :p Your website has so many many ideas for Halloween party. Wow~ I can't do it but just see your food, I feel happy, too. Thanks for sharing
The Hobby Collector says
Making Brownie Brain! Will link back to your page!!
beth says
Have fun!
Anonymous says
Ugh. Does the altitude have any affect on chocolate? I hade 8 brains out of 40 brake on me. I didn't have this problem before we moved up to 4500 feet. If so, how can I fix this? Thanks, Trish
beth says
Oh, no, Trish, that is a bummer. I have never heard that altitude has any effect on chocolate making. I think the chocolate coating was probably just too thin. Be sure you can't see through any of the chocolate before you fill the brains. If you can, add more chocolate. Good luck!
Anonymous says
Hi Beth. We finally retired and moved to the mountains. You may have seen them as they have a lot of windmills on them. We are in a secluded valley with deer, elk, bear, pumas and bobcats and a zillion birds. Remember, I made 105 of your oozing brains a few years back? My oldest daughter works for a prison up here and now I have to make another 60 more brains. I hope they turn out as good as the first ones. Thank you so much for your talent. I have so much fun making your creations. You still are and will always be the queen of chocolate and other goodies. Trish Butler
beth says
Sounds like an amazing place to live, Trish. Have fun making your cake ball brains! I'm sure they will turn out great. Happy Halloween
Monica Huddell says
Not sure if you answered this question yet but do you wait for the cake to cool before you make the cake balls or can you use it warm?
beth says
I usually wait until the cake cools, but once I was in a hurry and did it with warm cake.
Anne at Left Brain Craft Brain says
Love these! We love making brain shaped stuff 🙂
Anonymous says
Could you use canned cherry pie filling for the sauce?
beth says
You can use the pie filling, just know that it is usually pretty thick and may not ooze quite as well. But it will give you the right color and will taste good too.
Anonymous says
They look SOOOOO GROSS. 🙂
Elizabeth says
I have to say, the instructions are right on. I ended up using pink confectioners chocolate and a dark red cake truffle mix, just vanilla cake with red dye and I used strawberry whipped topping. I ended up buying a can of cherry pie mix and some maraschino cherries. I put them in the food processor and it was awesome. I can't wait for my employees to freak out when they take a bite.
beth says
Hi Elizabeth,
I am so happy to hear that the instructions were easy to follow. Oooh, your cherry pie filling and maraschino cherries sounds like a great filling! I hope your employees love them:) Have a great Halloween.