These Cookie Googly Eyes actually wiggle just like the plastic craft store googly eyes, but are so much more fun, because you can eat them.

I can't quit playing with these edible googly eyes. They wiggle just like the plastic craft store googly eyes but are so much more fun because you can eat them when you are done shaking them around.
Each eyeball cookie is made with one round cookie that's iced with white royal icing, two cookie rings, candy glass, and a chocolate pupil. They are stacked together to form a googly eye.
I've used clear mint candies to make clear windows for my Mason Jar Cookies, Snowflake-Filled Snowman Cookies, Pot of Gold Cookies, and Magnifying Glass Cookies but for these eyeball cookies, I chose to use Isomalt.
Isomalt is a sugar substitute used by candy sculptors. It is super easy to melt and work with, is structurally strong enough for elaborate sugar sculptures, and hardens crystal clear.

I found a few tricks for making these round isomalt discs for my cookies, which I'll share with you in the tutorial, but all in all, these were pretty simple cookies to make and decorate. They just take time.
You need to be patient and let the royal icing harden overnight then you need to allow the isomalt time to set up as well. I tried to rush a few, and the googly eyes didn't google, instead, they sunk into the icing and stuck there. So, don't be in a hurry.

Ingredients
Cookie Dough:
- all purpose flour I start with 4 cups, then add more if needed
- salt
- baking powder
- butter softened slightly
- granulated sugar
- eggs
- pure vanilla extract
- almond extract
Icing:
- Betty Crocker Cookie Icing or homemade royal icing - To make this project go a little quicker you can use store-bought, Betty Crocker Cookie Icing like I did. It's just one less thing to make and fewer dishes to clean, and honestly, I think it tastes pretty darn good too.
Clear Part of the Googly Eye:
- Isomalt nibs or sticks broken into 1-inch pieces
Pupil:
- Dark Melting Candy Wafers Ghirardelli, Candy Melts, or Merkens
Supplies
3-inch round cookie cutter
2 ¼ inch round cookie cutter
parchment paper
3 sturdy aluminum or metal baking sheets (you don't want to use the kind that warp when hot)
You can find supplies needed to create this recipe on Amazon. I earn a small commission when you use the sales links in this post to make a purchase at no extra cost to you.
 Betty Crocker Cookie Icing,...Shop on Amazon
") Ghirardelli Chocolate Compa...Shop on Amazon
Ghirardelli Chocolate Compa...Shop on Amazon  Wilton Black Candy Melts® ...Shop on Amazon
  SweetGourmet Candy Junior W...Shop on Amazon
Instructions
Make the sugar cookie dough.
- Mix the flour, salt, and baking powder together in a bowl. Set aside.
- Cream butter and sugar until light and fluffy.
- Stir in eggs, vanilla, and almond extract.
- Add dry ingredients and stir just until it's mixed in.

Cut out circle cookies.
- Roll cookie dough out to ¼ inch thickness.
- Cut out 24 circles using a 3-inch cookie cutter.
- Set on a parchment paper lined baking sheet and refrigerate for 30 minutes.

Cut out cookie rings.
- Cut out 24 more round cookies, then using a 2 ¼ inch cutter cut a circle from the center of each of those cookies.
- Re-rolling dough as needed, do this again creating 24 more cookies with holes in them, making a total of 48 holey cookies.
- Refrigerate for 30 minutes.
- Bake cookies in a 375-degree oven for 7-11 minutes until set. You don't want the cookies to get too brown, so keep an eye on them at the 7-minute mark.
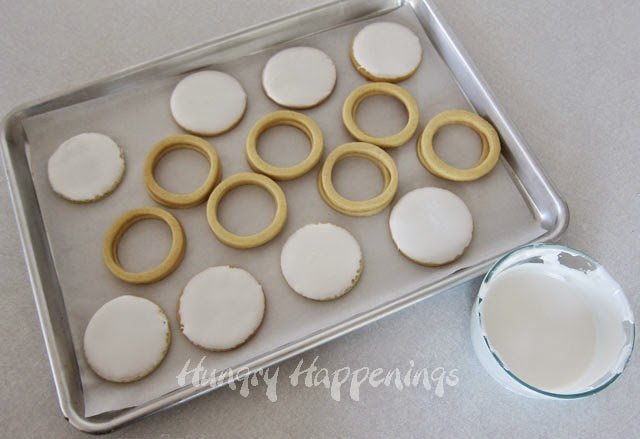
Ice the round cookies.
- Cut open one tube of the Betty Crocker Cookie Icing and pour it into a microwave-safe bowl. Heat it for about 20 seconds until it is thin and pourable.
- Dip the tops of the whole round cookies in the icing so you get a nice smooth surface. If you want, you can pipe it on instead. I just found it easier to dip. R
- Reheat the icing as needed.
- If you need more icing, squeeze some out of your second tube into the bowl. You'll need this tube intact for the next step.
- Allow the cookies to dry for an hour.

- Attach one holey cookie on top of each of the frosted cookies using a thin band of white icing.
- Allow these cookies to dry overnight! Don't rush this. The icing needs to be very hard so the googly eyes can slide around on top.

Isomalt
Place three baking pans in a 350 degree oven and allow them to get good and hot.
Meanwhile, make the clear tops of the googly eyes. Start by placing the Isomalt nibs or broken sticks into a glass microwave-safe bowl with a pour spout.

Melt the isomalt.
- Heat in the microwave until melted and thin.
- I heated mine for 1 minute, then stirred it to incorporate the melted isomalt with any lumps that remained, and then I heated it again for about 20 seconds.
- I let it sit in the microwave until the bubbles disappeared, then I heated it again for 15 seconds, allowed the bubbles to disappear, and was ready to pour.
- It's important that most of the air bubbles are gone, otherwise, you'll end up with lots of bubbles in your candy eyes.
DO NOT TOUCH THIS HOT SUGAR, IT WILL BURN, BADLY. I wear protective gloves, just to be sure it doesn't touch my skin. It will take layers of skin off, and it is incredibly painful.
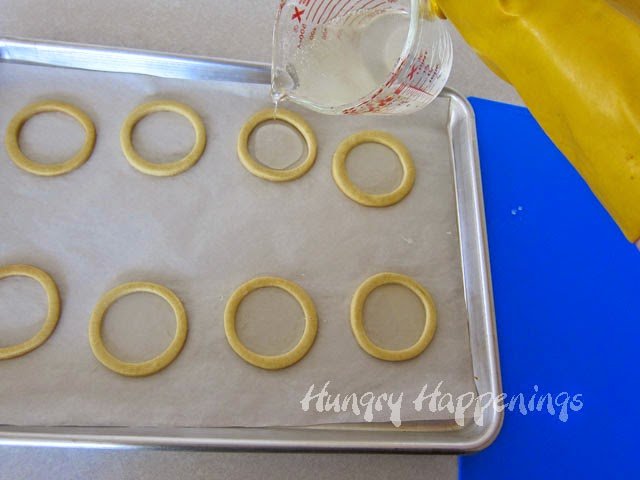
Pour the isomalt into the cookie rings.
- Remove one hot pan from the oven. Set it on a towel or trivets. Place a piece of parchment paper in the pan. Set 8 cookies on the paper.
- Pour some isomalt in the center of each cookie, allowing it to completely cover the center.
- If needed, you can use a toothpick to move some of the sugar out to the edges.
- Allow the isomalt to harden overnight.
Tips
The heat of the pan will help the isomalt spread and get rid of the air bubbles that will form as you pour them. You can use a creme brulee torch to help remove air bubbles, by heating the isomalt once it's poured, I found this hot pan method easier and quicker. A few bubbles are fine, but the first few I poured on a cold pan had a cloudy appearance.
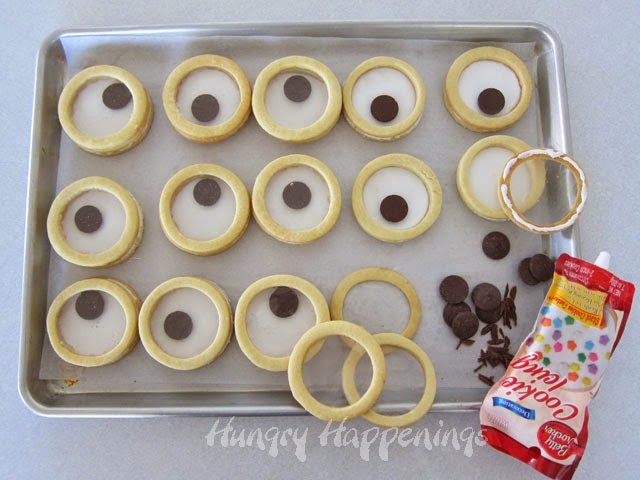
Add the chocolate pupils.
After the icing has dried overnight, you can assemble your Cookie Googly Eyes.
My Ghirardelli Candy Making Wafers and most Candy Melt type wafers have a tip on one side. I used a sharp knife to cut my wafers into thin flat wafers, cutting off the tip.
Set one candy wafer inside the stacked cookies. Pipe some icing on the back side of the candy-filled cookies and set one on each cookie stack.
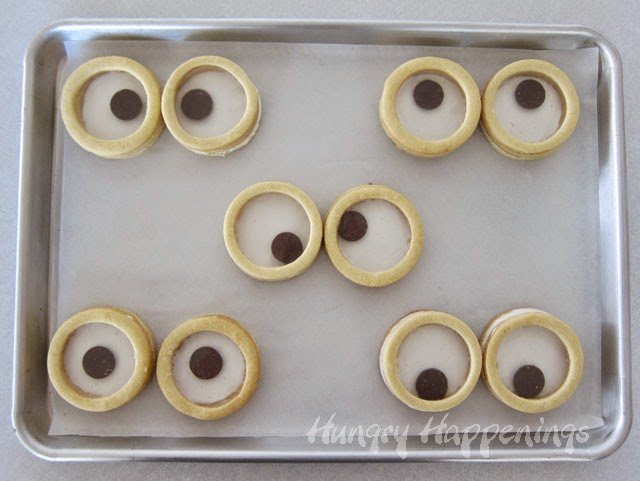
Now go have fun wiggling your cookies.
Storage
Store your cookies in an airtight container (preferably a metal cookie tin) for up to a week.
Related Recipes
Be sure to check out all of my fun Halloween food ideas.
Recipe

These cookie googly eyes really wiggle. Each layered cookie has a clear candy glass window that allows you to see the chocolate pupil wiggling around a white iced cookie eye.
- 4 - 4 ¼ cups all-purpose flour (start with 4 cups, then add more if needed)
- ¾ teaspoon salt
- ¾ teaspoon baking powder
- 1 cup butter, softened slightly
- 1 ½ cups sugar
- 2 large eggs
- 1 ½ teaspoons pure vanilla extract
- ¾ teaspoon almond extract
- 2 tubes Betty Crocker Cookie Icing (or homemade royal icing)
- 10 ounces Isomalt nibs (or sticks broken into 1-inch pieces)
- 24 Dark Melting Candy Wafers (Ghirardelli, Candy Melts, or Merkens)
-
Mix the flour, salt, and baking powder together in a bowl. Set aside.
-
Cream butter and sugar until light and fluffy.
-
Stir in eggs, vanilla, and almond extract.
-
Add dry ingredients and stir just until it's mixed in.
-
Roll cookie dough out to ¼ inch thickness.
-
Cut out 24 circles using a 3 inch cookie cutter.
-
Set on a parchment paper lined baking sheet and refrigerate for 30 minutes.
-
Cut out 24 more round cookies, then using a 2 ¼ inch cutter, cut a circle from the center of each of those cookies.
-
Re-rolling dough as needed, do this again creating 24 more cookies with holes in them, making a total of 48 holey cookies.
-
Refrigerate for 30 minutes.
-
Bake cookies in a 375 degree oven for 7-11 minutes until set.
-
Cut open one tube of the Betty Crocker Cookie Icing and pour it into a microwave safe bowl.
-
Heat it for about 20 seconds until it is thin and pourable.
-
Dip the tops of the whole round cookies in the icing so you get a nice smooth surface.
-
Allow the cookies to dry for an hour.
-
Attach one holey cookie on top of each of the frosted cookies using a thin band of white icing.
-
Allow these cookies to dry overnight! The icing needs to be very hard so the googly eyes can slide around on top.
-
Place three baking pans in a 350 degree oven and allow them to get good and hot.
-
Meanwhile, make the clear tops of the googly eyes.
-
Start by placing the Isomalt nibs or broken sticks into a glass microwave safe bowl with a pour spout.
-
Heat in the microwave until melted and thin.
-
Remove one hot pan from the oven. Set it on a towel or trivets.
-
Place a piece of parchment paper in the pan. Set 8 cookies on the paper.
-
Pour some isomalt in the center of each cookie, allowing it to completely cover the center.
-
Allow the isomalt to harden overnight.
-
Good morning. Now you are ready to assemble your Cookie Googly Eyes.
-
The Ghirardelli Candy Making Wafers and most Candy Melt type wafers have a tip on one side.
-
Use a sharp knife to cut wafers into thin flat wafers, cutting off the tip.
-
Set one candy wafer inside the stacked cookies.
-
Pipe some icing on the back side of the candy filled cookies and set one on each cookie stack.
-
Now go have fun wiggling your cookies.
Recipe Video
Store your cookies in an airtight container, preferably a cookie tin, at room temperature for up to a week.

- Banana Split Bars – A Fun and Easy Summer Dessert - March 4, 2026
- Pineapple Fudge (No Candy Thermometer Needed!) - March 4, 2026
- No-Bake Peanut Butter Pie Recipe - March 3, 2026

Jenn says
How can you properly store the cookies without the isomalt getting damaged, does it get sticky.. do I need to store it in the fridge or individually wrap them , please any advice is greatly appreciated
Beth says
I would place a set of cookies in a clear cellophane bag and tie with ribbon or seal with tape then stack the cookies on top of each other and place them in an airtight container or large zip top bag. The cookies will stay fresh for up to a week. Have fun making these cookies!
Debbie Riffel says
What a great idea! Thank you so much for sharing! (Did I miss the video? Would love to see it!)
Paula says
Just come across this recipe. Gonna have a go at making them for my sons minion party in November. I'm looking to make 30, will this recipe stretch or will I need to use more ingredients? What does the salt do and is it necessary? I live in the uk and wondered if all purpose flour is the same as our plain flour? Thinking about using chocolate buttons for the eye. Looking forward to giving these a go
Beth says
Hi Paula,
If you want 30 of these cookies, I'd make 1 1/2 recipes. I think the cookies might get too thin, otherwise. Salt brings out the sweetness in the cookies. I know that sounds strange, but it works. All purpose flour is the general type of flour you use for most baking, so I'm guessing it is similar to your plain flour.
Have fun making your cookies. I'm sure your son's friends will love them!
Love Of The Hunt says
I have been under the impression that isomalt is not really edible. I have been to more than one event where isomalt decorations are on a cake and they remove them prior to cutting.
Are these nibs different?
beth says
Isomalt is edible and has been used for many years in manufacturing candies and other sweets. Here is link to a great article all about Isomalt - how it's used, how it's made, how it's digested, and more. http://www.caloriecontrol.org/sweeteners-and-lite/polyols/isomalt
Meghan Gray says
Stopping by from Kids in the Kitchen linkup! These are so cute... I've pinned this! Thanks.
beth says
Thanks for stopping by and pinning =)
Melinda says
so flippin amazing! would love if you came by and shared on our kids in the kitchen linky http://lookwhatmomfound.com/2014/10/spicy-oatmeal-raisin-butterscotch-cookies-kidsinthekitchen.html
beth says
Thanks for the invite!
beth says
So many people have said that to me. Next, I need to use them for a minion treat =)
Hani says
You are amazing! The best place for Halloween Treats!
beth says
Thanks, Hani!
Sue says
Okay, that's it...You. Are. Amazing. I LOVE these!
beth says
Thanks, Sue. That's so sweet.
Alexis AKA MOM says
How fun! I love how they came out!
beth says
I do too! They are one of the most fun treats I've ever made.
nana says
So cool, I like your blog
beth says
Thanks, nana, I'm glad you do =)
Sarah @ Snixy Kitchen says
These are SO SO SO creative. I didn't even know Isomalt nibs existed and now I can't wait to start playing around with them! You're brilliant!
beth says
I'm glad I could introduce you to something new. I know I'll be making more treats with them soon.
Kelsey Conant says
soo cool!
The Partiologist says
I think I went all googly when I saw these cookies, Truly one of my favorite of your creations! I love how isomalt melts clear and you can see right through it, so fun to work with.
beth says
Just before I posted them I told my husband these were my new favorite. He didn't agree, but what does he know anyway???? I'm glad you think so too.
Jill @ KitchenFunWithMy3Sons.com says
Amazing idea Beth!
beth says
Thanks, Jill. It's one of my favorite creations, ever!
Michelle Clausen says
so cool! i love them!
beth says
Thanks, Michelle.
Lisa@hooplapalooza says
SQUEEE! you freak me out Beth with your creative genius! you are one heckuva an inspiration! these are freakin' AWESOME! :>D
beth says
I was so excited to share these cookies and am so glad you like them so much =)
Project Denneler says
Super, super, super cool. I've always wondered how to make things with clear/glass sugar - isomalt, huh? Genius, my dear.
beth says
Thanks, Sandra. I read that you can cook sugar really slowly and you can get it clear, but it can take up to two hours. Isomalt took less than two minutes. It's much better!
Catherine says
These cookies are not only delicious but so much fun for the kids and to serve at Halloween. ~ Catherine
beth says
The kids really loved these cookies and I enjoyed watching them play with them!
Karen @ Sugartown Sweets says
Amaze-balls!! Your googly-eyed cookies are crazy cool! I've been trying to be a little more Pinterest-y. These have me renaming a board. Trying not to gush but i Love these!
beth says
You can gush if you want to. I haven't been this excited about something I created in a long time. I am so in love with these cookies=) Thanks for pinning!