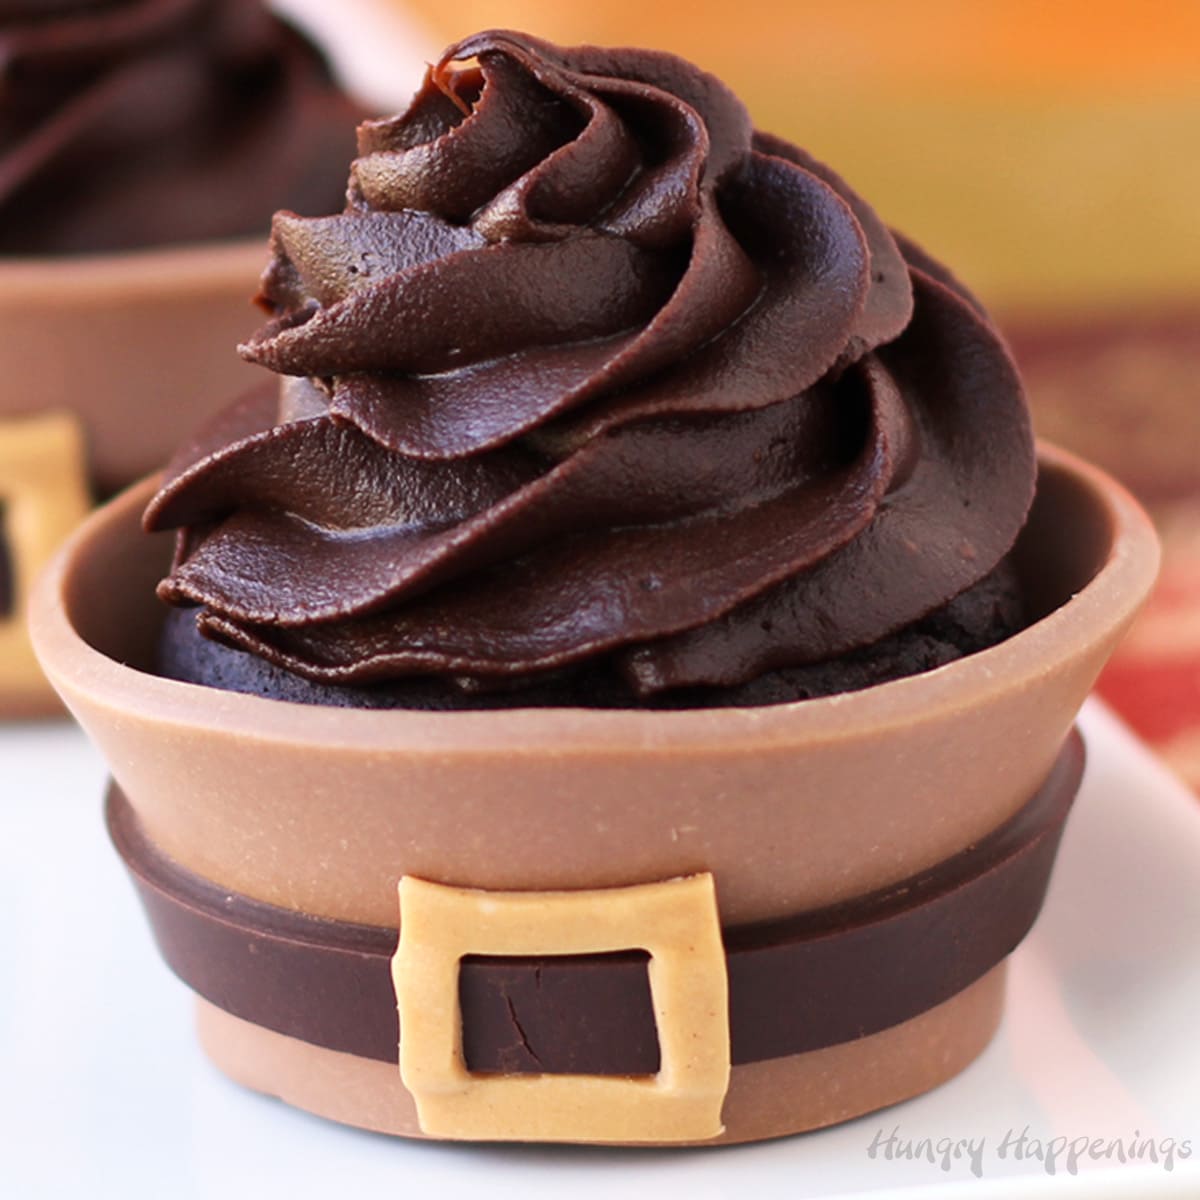
Add a sweet ending to Thanksgiving dinner by serving these cute Chocolate Pilgrim Hats. You can make and fill these chocolate cups with chocolate mousse, pumpkin mousse, cheesecake mousse, or candy & nuts.
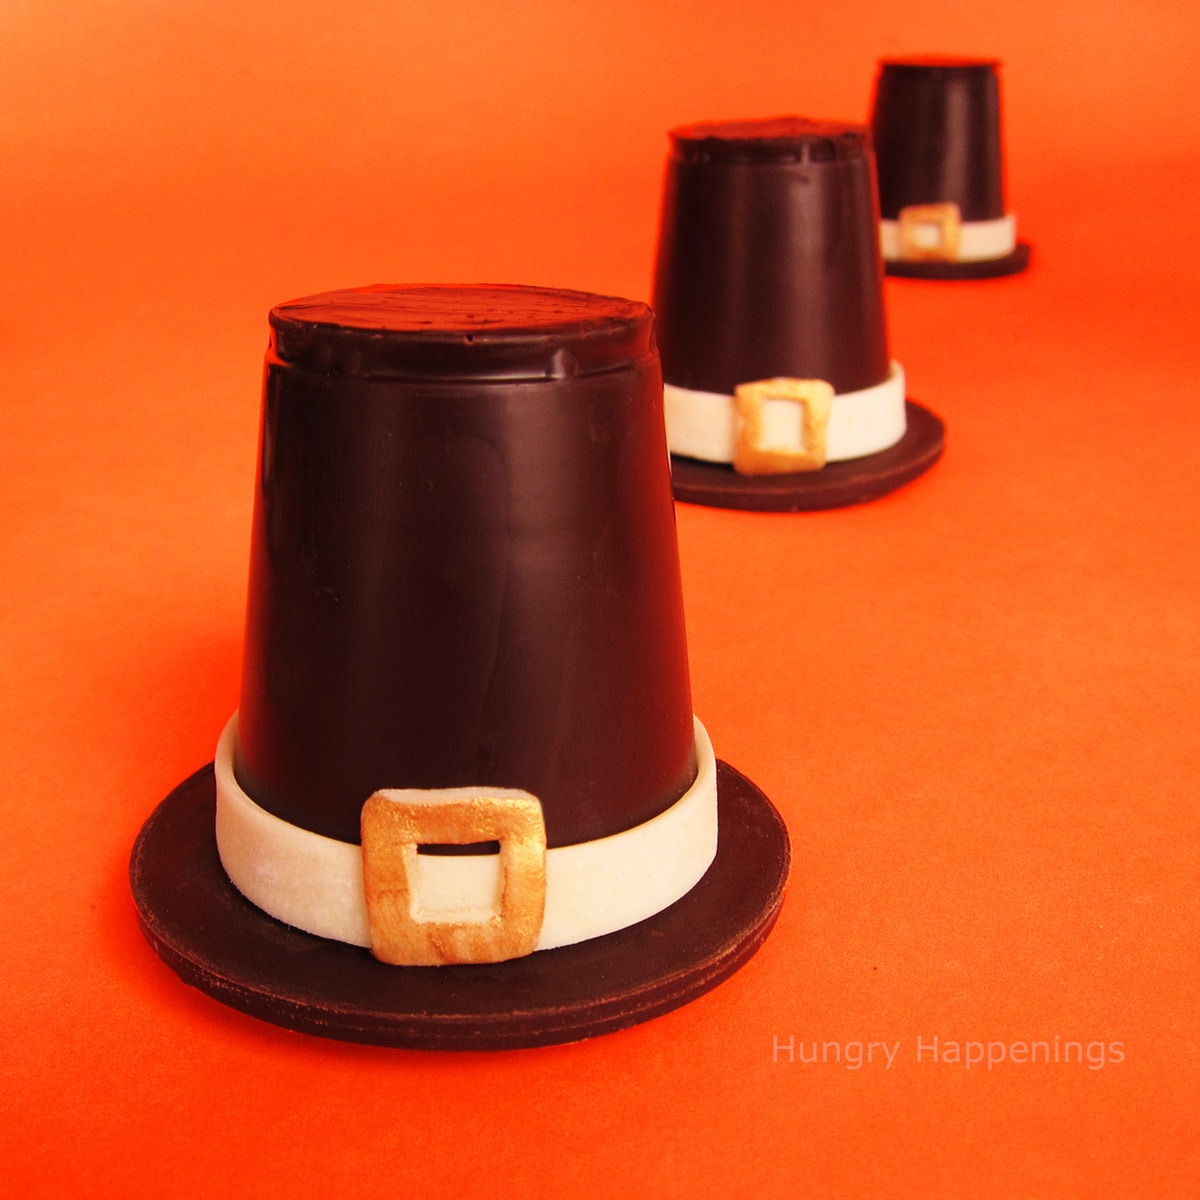
For Thanksgiving this year I've decided to make some chocolate turkeys and leaves, as well as, some chocolate pilgrim hats. I've seen so many cute and clever ways of creating a pilgrim hat out of chocolate candies and decided to try my hand at making a little more elegant version of it.
After playing around with a few techniques I settled on making a hollow chocolate pilgrim hat which I will fill with chocolate mousse. You can fill your hats with candy if you prefer.
I created my hats by filling a small plastic cup with chocolate and then pouring out the excess to create a shell. When it was chilled and un-molded and set on a round of chocolate it made a perfectly shaped hat.
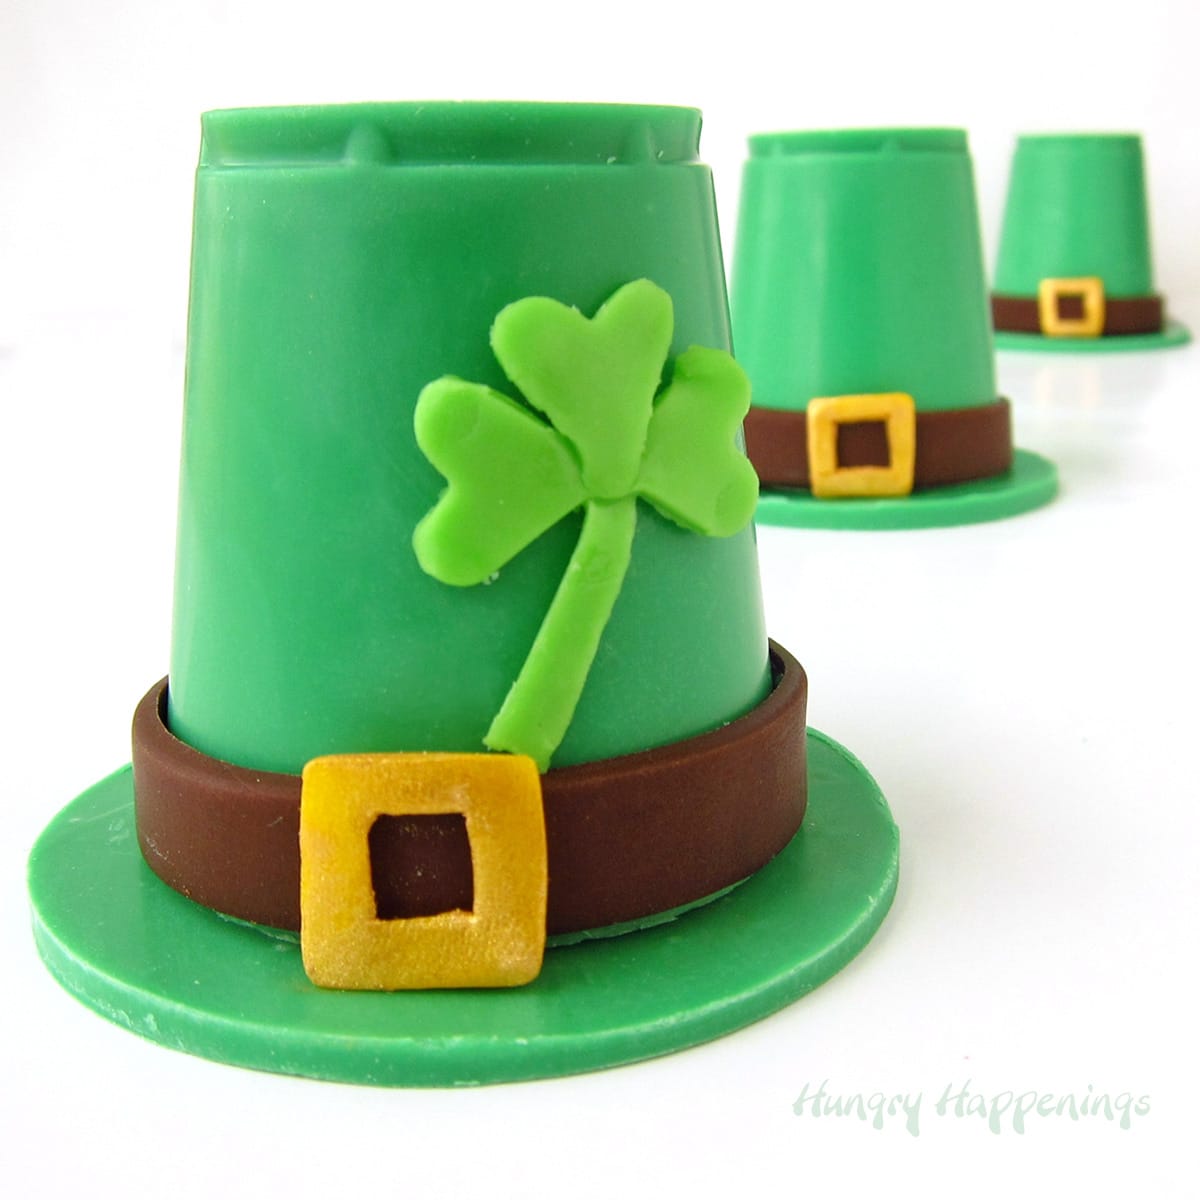
Each hat is decorated with a band and buckle made of homemade white modeling chocolate. I used gold luster dust to make my buckles shimmer, but you can, if you prefer, just color some modeling chocolate yellow.
Let me show you how.
Before you begin, if you aren't experienced with making chocolate, read my chocolate making tipschocolate tutorial which shows you how to chose the right chocolate, how to melt and/or melt and temper chocolate, and more.
Click here to find my recipe for the modeling chocolate or if you prefer, you can simply use store-bought fondant.
Ingredients
16 ounces dark chocolate - melted and tempered if using pure semi-sweet chocolate or simply melted if using confectionery coating/candy melts
2 - 4 ounces white modeling chocolate (make ¼ recipe) or fondant
powdered sugar to dust work surface
gold luster dust or yellow food coloring
Filling:
To serve your hats for dessert you can fill them with:
chocolate mousse, pumpkin mousse, chocolate ganache, cheesecake mousse
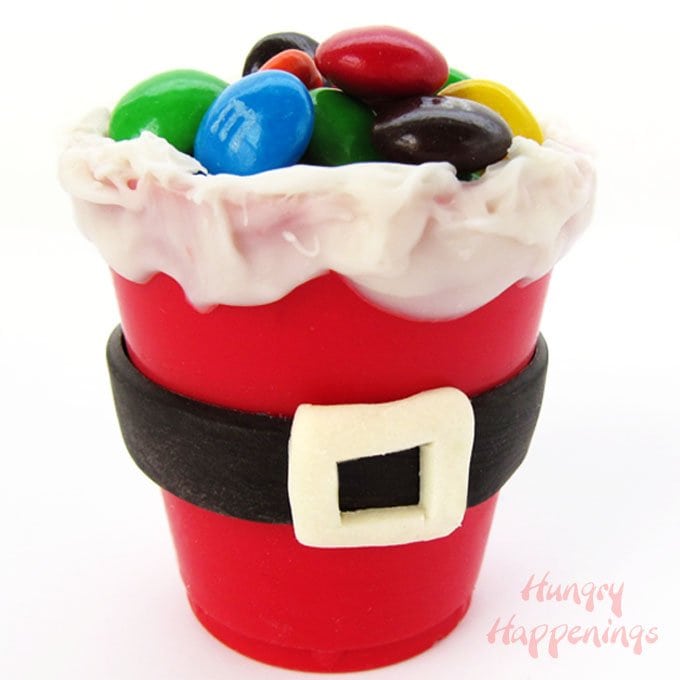
Or you can fill your chocolate pilgrim hats with candy or nuts.
Supplies
12 small plastic* cups (the size of a shot glass - I used Solo kitchen/bathroom cups)
parchment paper lined baking sheet
offset spatula
3 inch round cookie cutter
cutting board
rolling pin
pizza wheel and/or knife
fine tip paint brush (used for food only)
* Don't use paper cups as the chocolate will look dull once removed from the cups.
Items used to create this recipe are available on Amazon.com. I earn a small commission when you use the links below to make a purchase at no extra cost to you.
 Fox Run Circle Cookie Cutte...Shop on Amazon
 ") ChefLand Parchment Paper Pa...Shop on Amazon
ChefLand Parchment Paper Pa...Shop on Amazon Wilton Angled Spatula 8"Shop on Amazon
Instructions
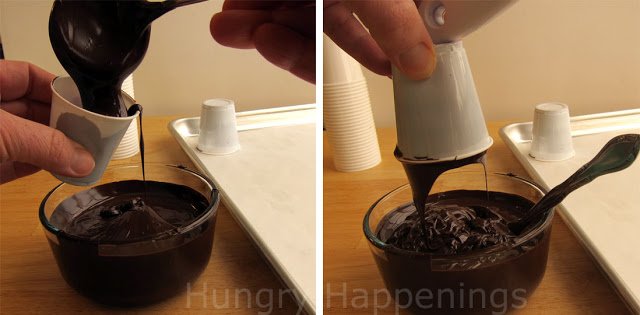
Completely fill a cup with melted and tempered semi-sweet chocolate or melted confectionery coating/candy melts.
Turn the cup upside down over your bowl of chocolate and allow all of the excess to drip out.
My tempered chocolate is fairly thick, so I tap on the bottom of the cup with the end of my spatula to help move the excess chocolate out. If your chocolate is thin, just allow it to drip out.
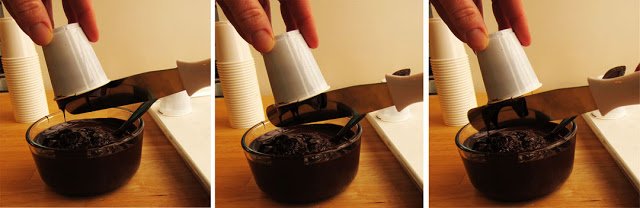
Use a metal spatula to scrape off any chocolate that is dribbling from the cup.
Use your finger to wipe away any excess chocolate along the opening of the cup. Set the cup upside down on a parchment paper-lined baking sheet. Repeat to create 12 chocolate cups.
Chill in the refrigerator if using pure semi-sweet chocolate for 10-15 minutes and in the freeze if using confectionery coating/candy melts for 8-10 minutes until the chocolate sets.
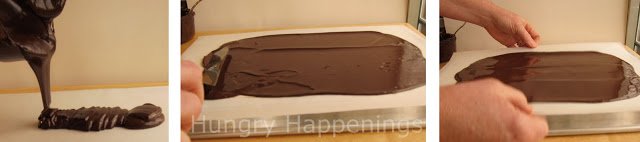
While the cups are chilling, you can prepare the chocolate rounds which will become the hat brims. Reserve about a tablespoon of chocolate for later use, and pour the remaining chocolate out onto a parchment paper-lined baking sheet.
Use an offset spatula to spread it into a thin layer, trying to get it as even as possible. I find it helpful to grab hold of the parchment paper on either side of the chocolate and shake the paper until the chocolate smooths out.
Let the chocolate sit at room temperature until it just sets - it won't look shiny anymore and will be easy to cut. If it gets too hard it will crack when you try to cut it, so keep an eye on it.
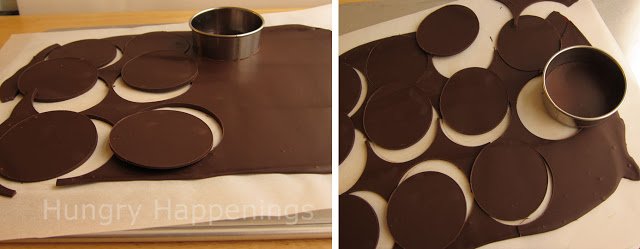
Use a 2 ¾" round cookie cutter to cut out 12 rounds from the chocolate. If the chocolate is too wet and the rounds don't come out nicely, allow the chocolate to set a bit longer.
I like to flip the chocolate rounds upside down on the parchment paper lined baking sheet before putting them in the refrigerator or freezer to allow them to set completely. This keeps them from warping.
You can nibble on the excess chocolate as long as you don't need to re-melt it to make any more rounds.
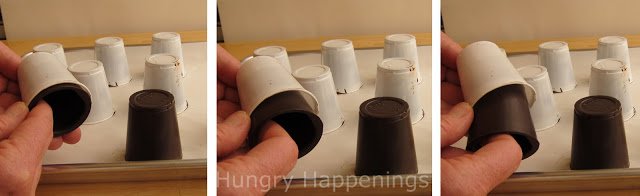
Once your chocolate cups have set, pull them out of the plastic cups. If they won't budge, take a thin knife and run it around the edge of the cup removing any chocolate that may be stuck around the rim.
Then you should be able to easily remove the chocolate from the cups.
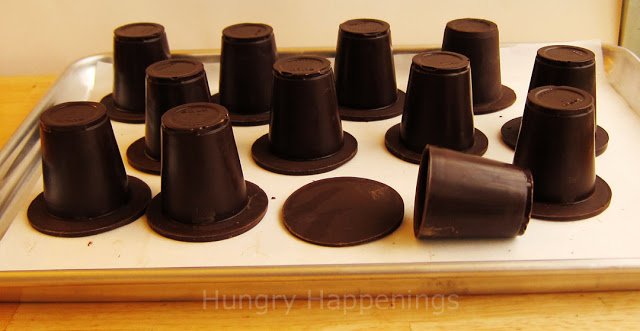
Remove the chocolate rounds from the refrigerator and set the chocolate cups on top.
If your chocolate cups have words imprinted on them (the bottoms of my cups had "Solo" imprinted on them) you can, if you choose, cover it with some chocolate. I smeared a very small amount of chocolate over the words and scraped it flat with a metal spatula.
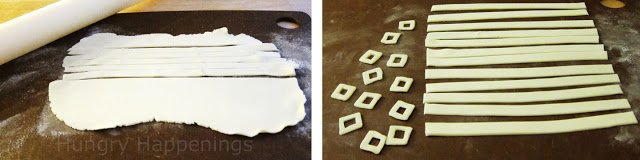
Lightly dust a cutting board with powdered sugar. Use a rolling pin to roll out your modeling chocolate to 1/16th inch thickness. Cut 12 long strips. Each should be about ¼" wide by about 6" long, You'll need a strip long enough to wrap completely around each chocolate cup, so measure one of your chocolate cups before you cut your strips.
Use a knife to cut out squares that are just a bit over ¼".
Cut out a smaller square in the middle of each to create your buckles.
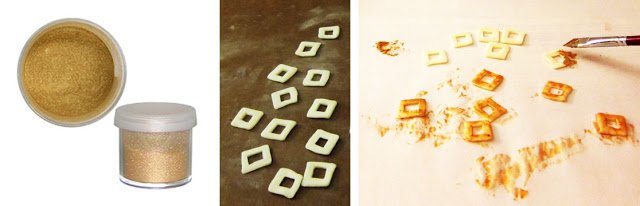
You can dry brush gold luster dust over each of the modeling chocolate buckles, but I chose to dip my brush in some vodka (which will evaporate) and then into the luster dust and paint it on my buckles then allow it to dry.
It gives the buckle a vibrant gold luster. You could, if you prefer, just color some of your white modeling chocolate yellow for your buckles.
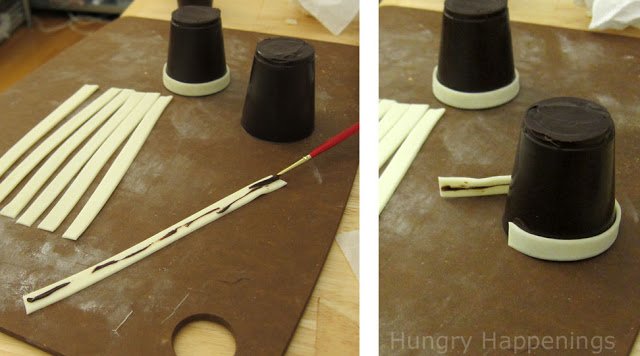
You will need to carefully re-melt the small amount of reserved chocolate (If using pure chocolate, there is no need to temper it for this purpose.)
Use a fine-tip paint brush to brush chocolate down the middle of a modeling chocolate strip.
Wrap the strip around the large end of the chocolate cup (close to the opening.) Press the seam together.
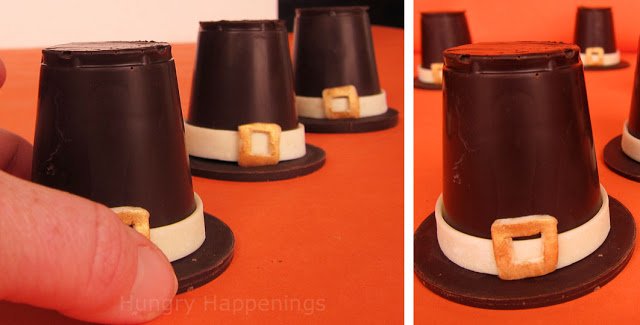
Paint a small amount of chocolate onto the back of a buckle and attach it to each hat. Your hats are now ready to fill with whatever you choose. You can attach the two hat pieces together with a bit of chocolate after filling them. I will make and fill my hats with chocolate mousse on Thanksgiving day.
I will set a hat on a dessert plate, pipe, or spoon in the mousse, and put the two hat pieces back together. The mousse will act as glue to keep the two pieces together. I want it easy for everyone to pick up the top of the hat, turn it over, and use a spoon to eat the mousse so I won't glue them together with melted chocolate.
If you plan to add candy or nuts, it will be a good idea to glue the two hat pieces together after you fill the cups.
Related Recipes
If you have fun making these chocolate pilgrim hat cups, you might also enjoy making these other food crafts.
Be sure to check out all of my amazing Thanksgiving Recipes.
Recipe

Turn dark chocolate cups into pilgrim hats for Thanksgiving. You can fill them with chocolate mousse and serve them for dessert or fill them with candy and give them as a hostess gift or party favor.
- 16 ounces dark chocolate - melted and tempered if using pure semi-sweet chocolate or simply melted if using confectionery coating/candy melts
- 4 ounces white modeling chocolate or fondant
- powdered sugar to dust work surface
- gold luster dust or yellow food coloring
-
Completely fill a small plastic cup with melted and tempered semi-sweet chocolate or melted compound chocolate (candy melts, almond bark, melting wafers).
-
Turn the cup upside down over your bowl of chocolate and allow all of the excess to drip out.
-
Use a metal spatula to scrape off the chocolate along the edge of the cup. Wipe the edge clean.
-
Set the cup upside down on a parchment paper-lined baking sheet.
-
Repeat creating 12 chocolate cups.
-
Chill in the refrigerator if using pure semi-sweet chocolate for 10-15 minutes and in the freeze if using confectionery coating/candy melts for 8-10 minutes until the chocolate sets.
-
Reserve about a tablespoon of chocolate for later use, and pour the remaining chocolate out onto a parchment paper-lined baking sheet.
-
Use an offset spatula to spread it into a thin layer.
-
Let the chocolate sit at room temperature until it just sets - it won't look shiny anymore and will be easy to cut.
-
Use a 2 ¾" round cookie cutter to cut out 12 rounds from the chocolate. If the chocolate is too wet and the rounds don't come out nicely, allow the chocolate to set a bit longer.
-
Flip the sheet over to allow the chocolate disc to harden without warping.
-
Once your chocolate cups have set, pull them out of the plastic cups. If they won't budge, take a thin knife and run it around the edge of the cup removing any chocolate that may be stuck around the rim.
-
Remove the chocolate rounds from the refrigerator and set the chocolate cups on top.
-
If your chocolate cups have words imprinted on them you can spread a thin layer of chocolate over the words so they don't show.
-
Lightly dust a cutting board with powdered sugar or use a silicone mat (no powdered sugar needed).
-
Use a rolling pin to roll out your modeling chocolate to 1/16th inch thickness.
-
Cut twelve ¼-inch wide by 6-inch long strips.
-
Use a knife to cut out squares that are just a bit over ¼".
-
Cut out a smaller square in the middle of each to create your buckles.
-
Brush dry edible gold luster dust over the buckle or wet a paint brush with vodka or a clear extrac, dip it into the luster dust, and brush it over the buckle.
-
Use a fine-tip paint brush to brush melted chocolate down the middle of a modeling chocolate strip.
-
Wrap the strip around the large end of the chocolate cup (close to the opening.) Press the seam together.
-
Paint a small amount of chocolate onto the back of a buckle and attach it to each hat.
-
If desired, attach the chocolate cup to the chocolate disc (hat rim) using melted chocolate.
Store your chocolate cups at room temperature for up to 3 months.
Serve as is or fill the cups with candy or chocolate mousse (fill before attaching the rim to the cup).

- Banana Split Bars – A Fun and Easy Summer Dessert - March 4, 2026
- Pineapple Fudge (No Candy Thermometer Needed!) - March 4, 2026
- No-Bake Peanut Butter Pie Recipe - March 3, 2026
Pamela says
What a BRILLIANT idea. And then, you go on to show them for other holidays. That gets my few gray cells working and I wondered about some other holidays and I see an Easter basket, holiday obvious, Uncle Sam's hat, ditto, champagne bucket for New Year's Eve, even Lincoln's top hat for President's Day. Haven't thought of anything for Valentine's Day though, maybe someone else can come up with something. I love this for Thanksgiving, I HAVE to do these for Thanksgiving dinner. They know I always do crazy things for the holiday meals. They roll their eyes a bit, make some funny noises but I think secretly they love it. If I don't do something I've done before they ask where it is. Especially when things like this become tradition every year it makes a difference, especially for the young generation. When they're older they'll want to do special things for their family holidays. They'll remember the special dishes and bowls and serving pieces (especially if you save special ones for holidays, you'll be surprised how much they'll be treasured after you're gone), the traditional food every year (whether they liked it or not), who used to sit where, and even when the children become adults they don't want those things gone (but they'll still huff and puff that they're "grown up now" but they'll still do it). Now of course it must be practical, no Easter egg hunts for teenagers for example. Now I have to decide if I want to be ambition enough to make some for all of our residents in our retirement unit we own and run. How far in advance can these be made, minus the mousse?
Beth says
I actually have another Thanksgiving idea coming your way soon! I love making these chocolate cups (hats) and hope you enjoy making them too. I get some eye rolls too on occasion. My family loves the special treats but thinks I'm a bit crazy for spending so much time in the kitchen. None of them like to spend much time there. It's my favorite place.
You can make these a few weeks in advance, so you have plenty of time to get some made before Thanksgiving. Enjoy! 🙂
lexie says
this is such a creative idea! i was thinking of filling the hats with cheesecake. I'm so excited for thanksgiving to come just so i can make these!
Beth says
Sounds like a great idea! Enjoy making your hats.
Randa says
woooow i like it
Randa says
woooow realy thats great idea 🙂
Lauren Baur says
I need help thinking of good and travel friendly filling for these guys
Lauren Baur says
I would like to make these to bring to my boyfriend's grandma's for thanksgiving. I think they are adorable! However, she lives about 2 1/2 hours away. Is there a good or better filling idea that you could help me think of that would make the transportation easier?
Beth Jackson Klosterboer says
Hi Lauren,
You can fill them with candy, nuts or mini cookies. You could also make some chocolate turkeys or chocolate leaves to put in them. Pieces of fudge would also work well. I know they aren't as dessert oriented as the chocolate mousse I put in mine (and will put in some again this year) but I think people will love them and enjoy eating them no matter what is in them.