Graham cracker houses don't just have to be for the holidays. You can have fun making this Graham Cracker Barn any time of year. This shop has been compensated by Collective Bias, Inc. and its advertiser. All opinions are mine alone. #HoneyMaidHouse #CollectiveBias
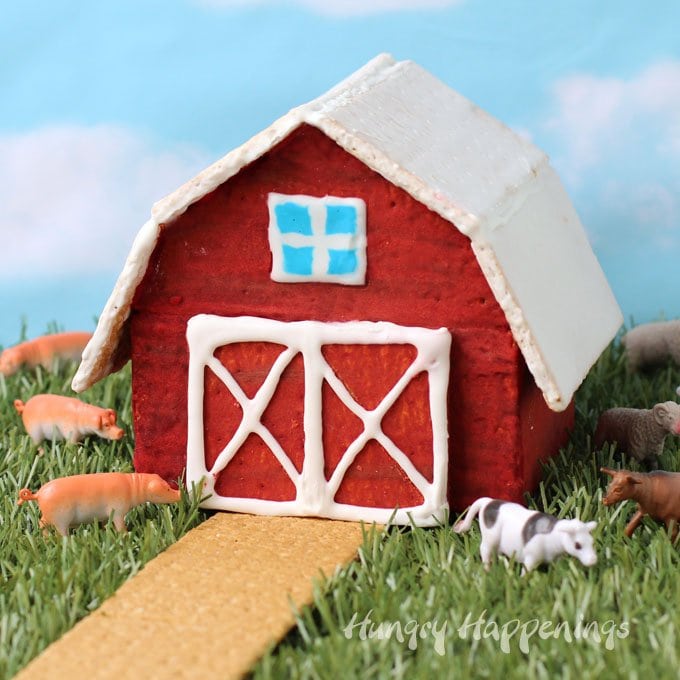
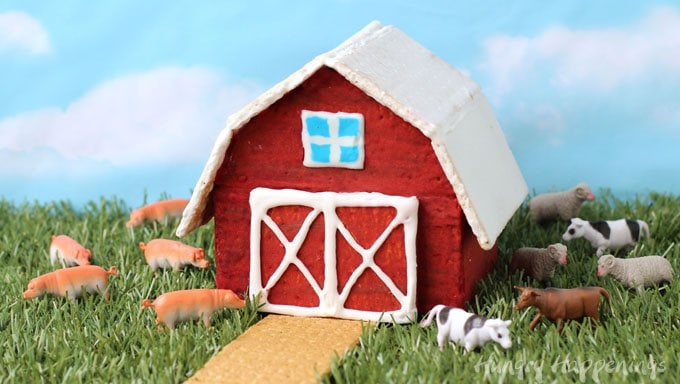
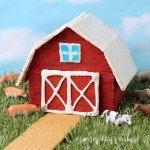
How cute is this red barn built from Honey Maid Graham Crackers?
It reminds me of the thousands of wooden structures in the farmlands of Ohio. They are everywhere,. There is even one across the street from my neighborhood.
These iconic buildings are so much a part of our landscape in America and their simple shape lends itself well to an edible structure made from sweet and crispy crackers.
 Graham Cracker Barn
 Graham Cracker Barn
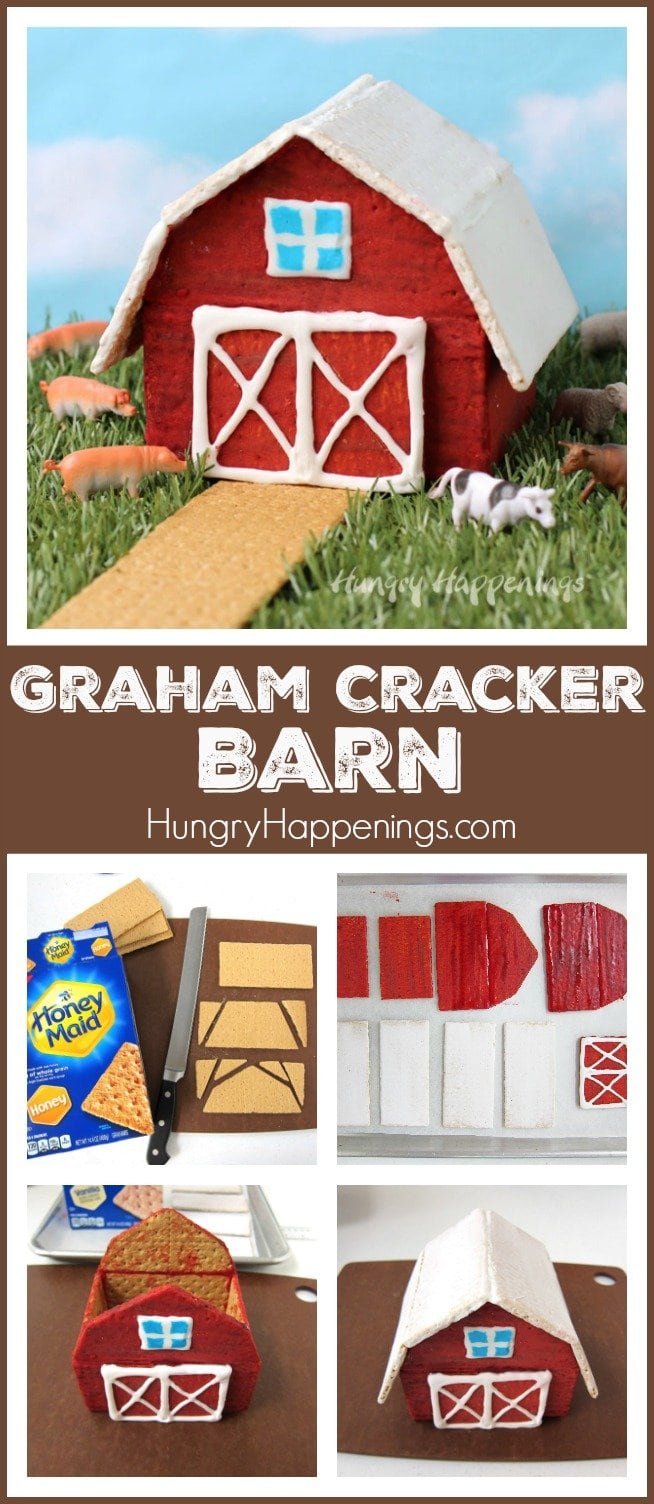
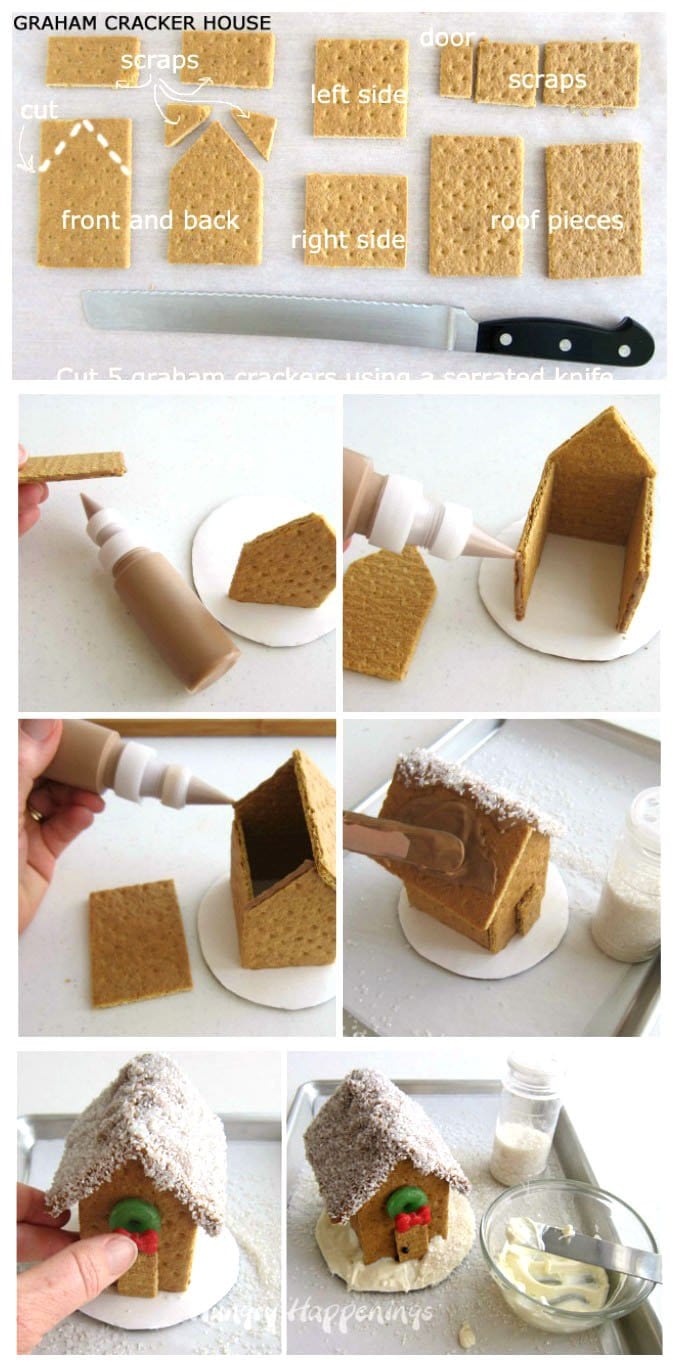
Building the barn is pretty straight forward and I'll show you a step-by-step guide on how to cut out the Honey Maid Graham Crackers and put them together.
If you open your box of crackers and find that they are not all perfectly flat, simply microwave them, one at a time, for 20 seconds. Then let them sit in the microwave for a minute before removing. This is just long enough to soften the crackers and they will become completely flat. Carefully lift them out and set them on your cutting board and allow them to cool for about 10 minutes.
You will have nice flat crackers that will go together perfectly.
The crackers are also a bit easier to cut.
To make the barn, you will need 11 rectangle graham crackers, plus two more if you want to set your barn up with a path, like I did in the picture above.
To create the entire barn yard scene, you'll need a strip of plastic turf to set on your table, a sheet of cloudy sky paper to use as the backdrop, and some plastic pigs, cows, and sheep to set around the barn.
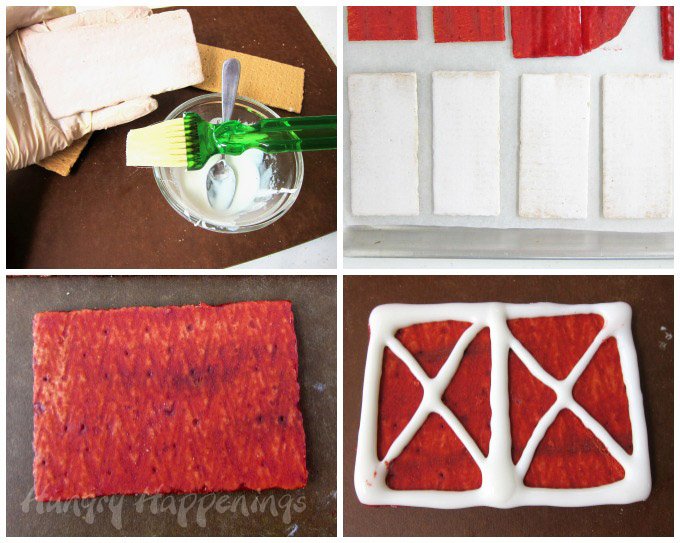
To get the rustic looking red on your edible barn and the white on your roof, you can choose to use homemade royal icing, store bought cookie icing, or candy melts. Any of these can be brushed over top of the graham crackers to give it color.
I chose to use cookie icing because it was quick and easy. I'll show you how to use it below.
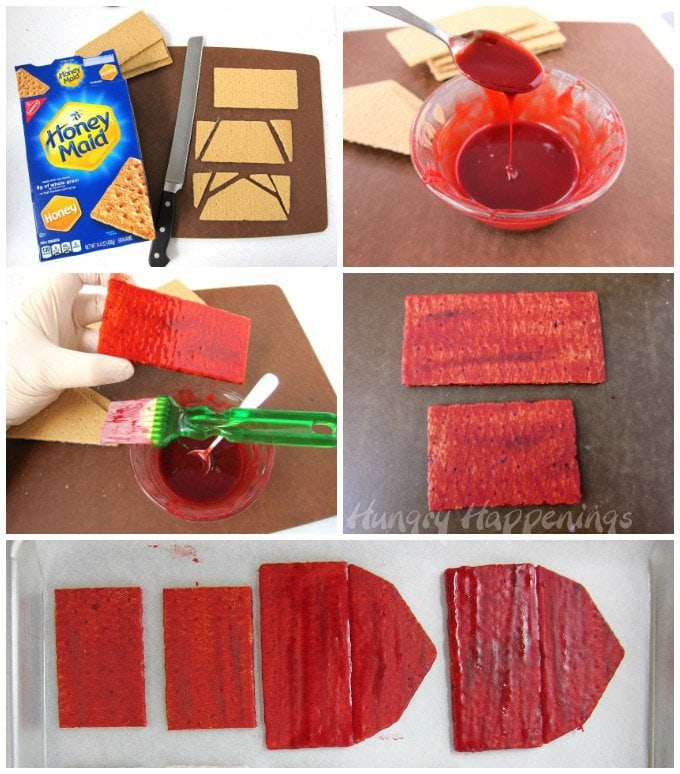
To make your graham cracker barn you'll need:
- 2 whole graham crackers for the front and back of the barn
- 2 graham crackers cut for the front and rear peaks (see picture above)
- 2 graham crackers cut to 3 ¾ inches long for the sides of the barn
- 1 graham cracker cut to 3 ¼ inch long for the doors
To get a really nice red barn color combine ¼ cup red cookie icing with 2 teaspoons of chocolate icing. Then you'll need to thin it out with a ½ - 1 teaspoon of water. The icing should be thin enough to easily brush over the graham crackers.
Brush the red over the top and the sides of all the graham cracker pieces listed above. Use thick red cookie icing to attach the front wall and peak together and the rear wall and peak together. Set on a parchment paper lined baking sheet and allow the icing to dry for about an hour.
To give your red barn an aged appearance, brush the red icing over the graham crackers then pipe on some chocolate icing lines then brush over the lines to smooth them out.
For the roof, you'll need:
- 4 whole graham crackers
- thinned white icing
Brush the white icing over top and on the sides of the 4 graham crackers. Set on parchment paper to dry.
For the doors, you'll need:
- the 3 ¼ inch red graham cracker
- thick white cookie icing
Pipe a line down the middle of the graham cracker. Pipe two X's on either side of the line. Pipe a boarder all around the square. Allow it to dry.
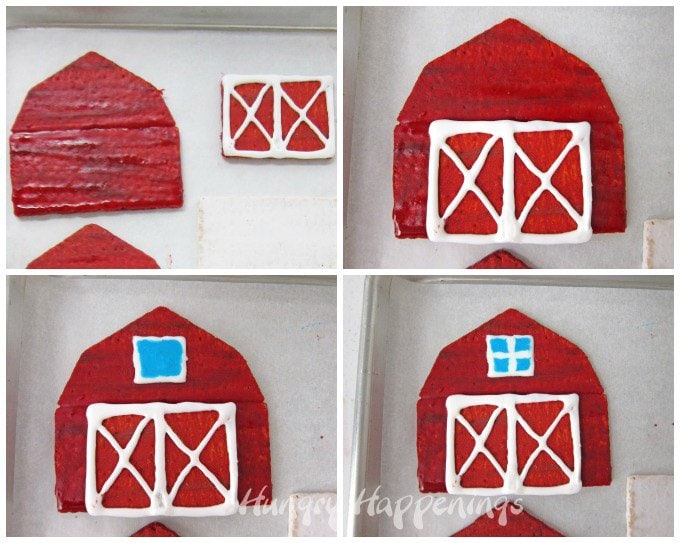
Use thick red cookie icing to attach the doors to the front panel of the barn.
Pipe on the outline of a window above the door with thick white icing. Allow it to dry for 15 minutes.
Tint some white icing light blue and thin it out with some water. Spoon a thin layer inside the white icing window. Pipe the window panes using thick white icing. Let dry for an hour.
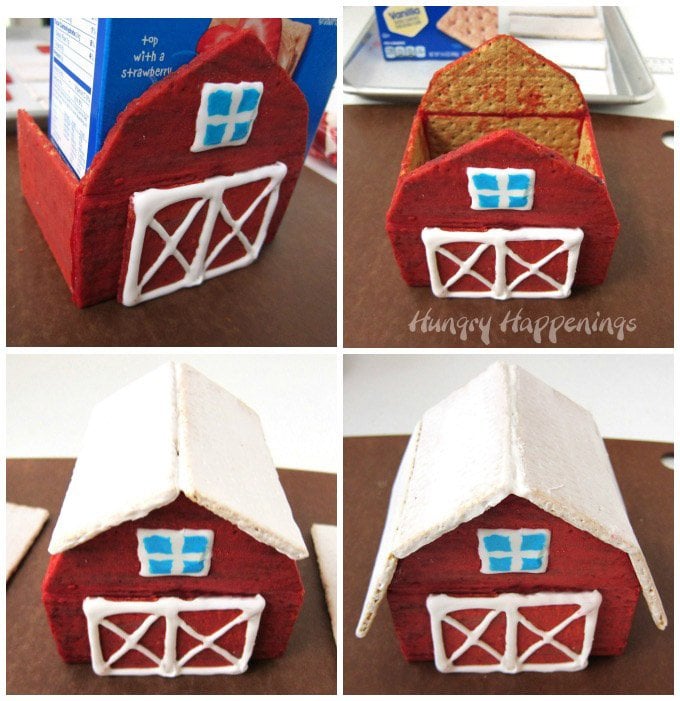
Now, glue all the pieces together using thick cookie icing, allowing each panel to dry before adding the next.
Start by attaching the front to one side. Make sure it is square, then let it dry for 10 minutes. Add the other side and back then let dry completely.
To attach the roof, pipe on some cookie icing along the top edge of the front and rear peaks. Let dry for a few minutes, then set two white graham crackers on either side forming the top peak of the roof. Pipe a bead of icing in between the two graham crackers and smooth it out with your finger. Hold the roof in place for a few minutes, then allow it to dry before repeating the process to add the other two roof panels.
Prop the roof up as it dries, if needed.
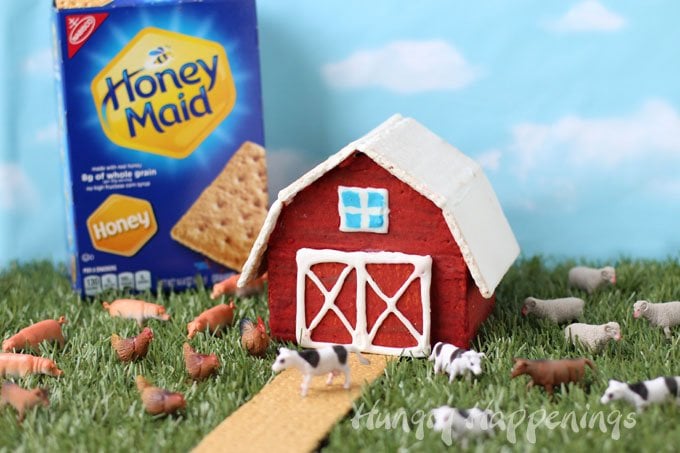
When the graham cracker barn is completely dry, you can move it to your display table and add some farm animals.
This barn does take some time to assemble when using icing because of the drying time needed. If you use candy melts, the drying time will be reduced, as the candy melts harden much quicker.
- 11 whole Honey Maid Graham Crackers
- ¼ cup red cookie icing plus 1 tablespoon more for piping
- 2 teaspoon chocolate cookie icing plus more if desired
- water
- ¼ cup white cookie icing plus 1 tablespoon more for piping
- blue food coloring
-
Cut 2 graham crackers for the front and rear peaks.
-
Cut 2 graham crackers to 3 ¾ inches long.
-
Cut 1 graham cracker to 3 ¼ inches long.
-
Stir together red and chocolate brown cookie icing.
-
Add enough water to thin it out.
-
Brush red icing over 2 whole graham crackers, the two peaks, and the 3 short graham crackers.
-
Thin out white icing with water and brush over the 4 remaining graham crackers.
-
Assemble the graham cracker barn using thick red and white cookie icing, allowing each section to dry before adding the next.
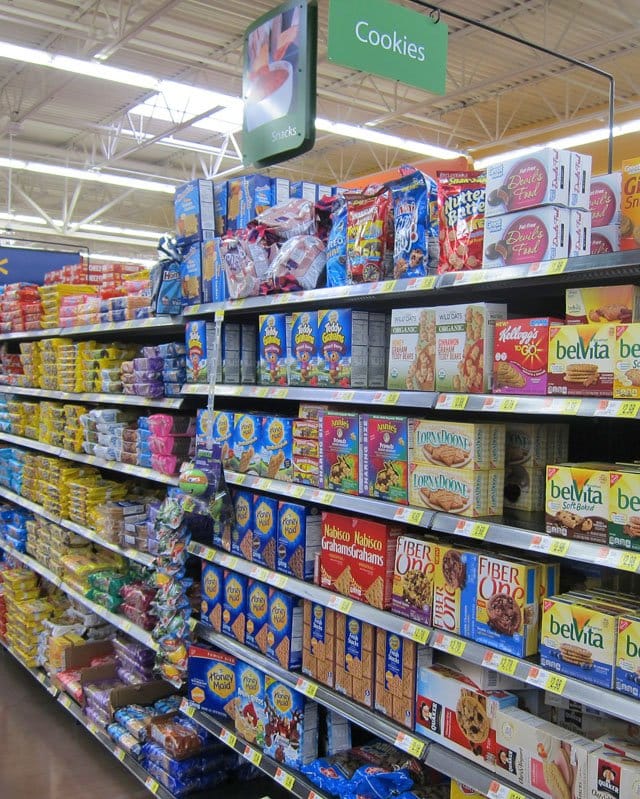
You can find Honey Maid Graham Crackers at Walmart. I found mine in the cookie aisle.
Have you tried the new Honey Maid Vanilla Graham Crackers? They are slightly lighter in color than the honey grahams because they have a sprinkling of sugar on top. I bought a box this week and thought they tasted great. They would look really pretty built into a graham cracker house, too.
If you want instructions for building a traditional graham cracker house, check out this tutorial. I used candy melts to attach the pieces, so you can see how that works, as well.
Have you made a graham cracker house? What fun twist did you give your building?
If you liked this Kid's Recipe, then you need to check out these other fascinating recipes that your little ones will love!


- Banana Split Bars – A Fun and Easy Summer Dessert - March 4, 2026
- Pineapple Fudge (No Candy Thermometer Needed!) - March 4, 2026
- No-Bake Peanut Butter Pie Recipe - March 3, 2026
Paige F says
Hi, if I make this in advance - how long will it last? I plan to use it as a cake topper.
thanks!
Beth says
It should keep for about a week. Any longer and the grahams might get stale. Enjoy!
Samantha K says
Wow! This is a great idea and it looks unbelievable! (client)
Beth says
Thanks, so much. I'm glad you like it.
Karen @ Sugartown Sweets says
What a cute and fun graham cracker barn you've built. Love the tip you gave us for getting the cookies to lay flat and I've not seen the vanilla crackers but would love to try them!
Beth says
Thanks, Karen. When I opened my box of grahams they were all curved and I could get them to fit together properly, but a quick burst of heat from the microwave was just what they needed. They were perfectly flat and so easy to put together. The Vanilla Graham Crackers have a really nice flavor. I really like them, a lot!
the partiologist says
Growing up on a farm, I am in love with your barn! Of course, graham cracker houses can be made for any event, love it!
Beth says
Thanks, Kim. These be so cute on one of your party tables!
Hani says
This is so fun Beth.
Beth says
Thanks, Hani. I always love seeing your cookie house designs and I had so much fun making this barn. 🙂
Michelle Smith says
How cute! I love this twist on gingerbread houses! It turned out really cute and would be perfect for a farm party!
Beth says
Thanks so much, Michelle. Using graham cracker is so much easier than making homemade cookies and the houses look just as cute!
meaghan says
OH MY GOSH I LOVE THIS!! All caps. 🙂
Beth says
THANKS!!! I'm so glad my barn made you smile!