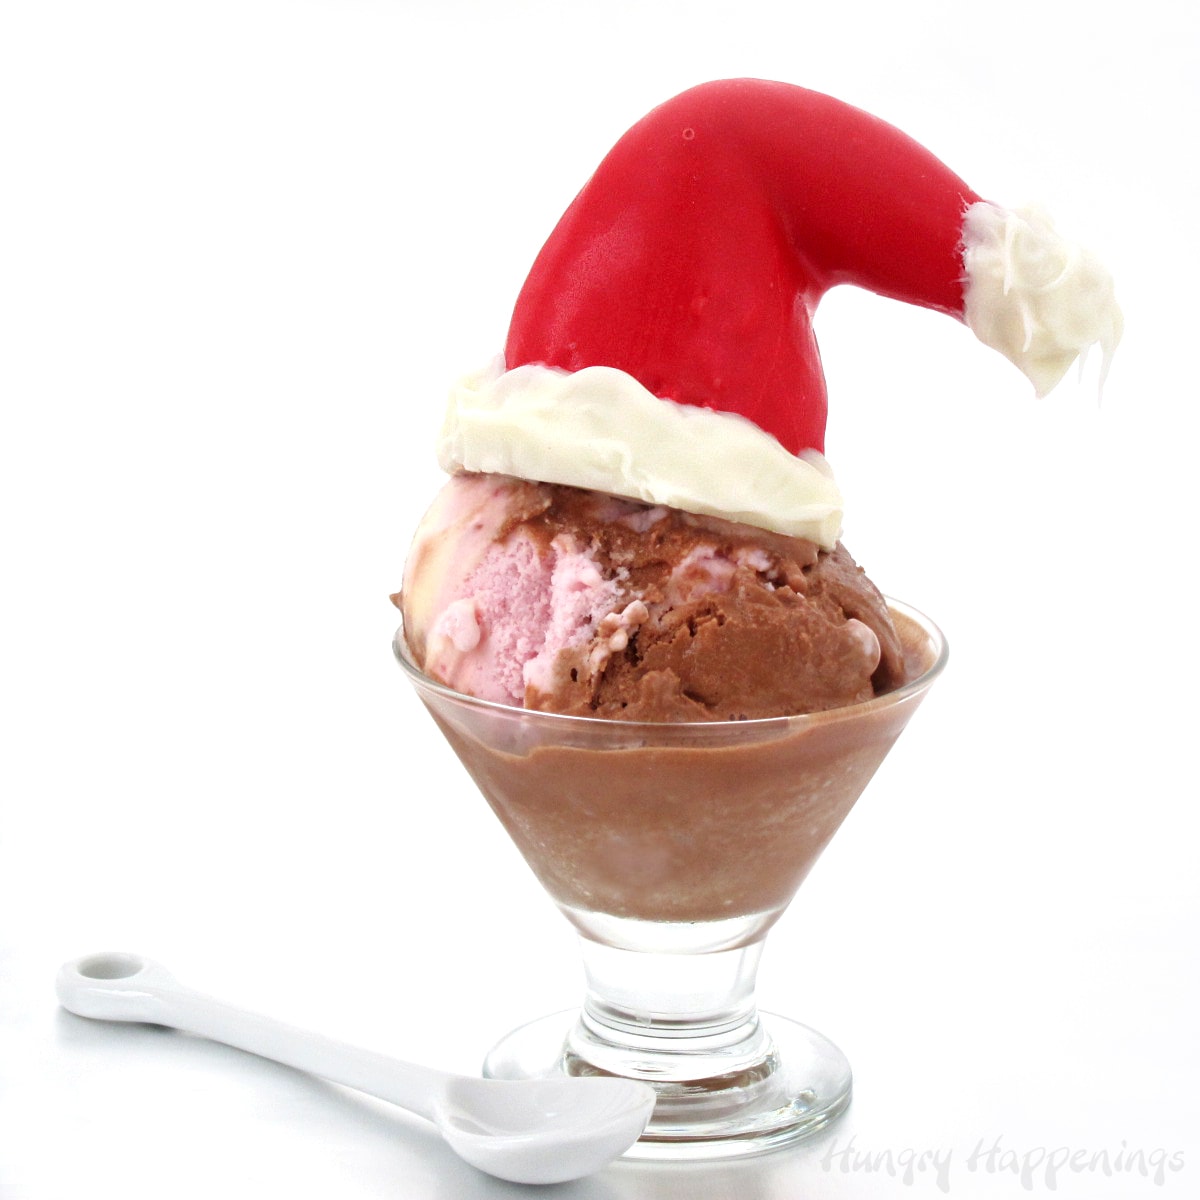
Did you know that you can bend store-bought ice cream cones into adorable Sugar Cone Santa Hats? How fun would it be this Christmas to surprise your guests with these treats straight from the North Pole?
All you need is a microwave. Just heat up a single cone a bit and you can manipulate the cone to look like Santa's hat. Isn't that fun?
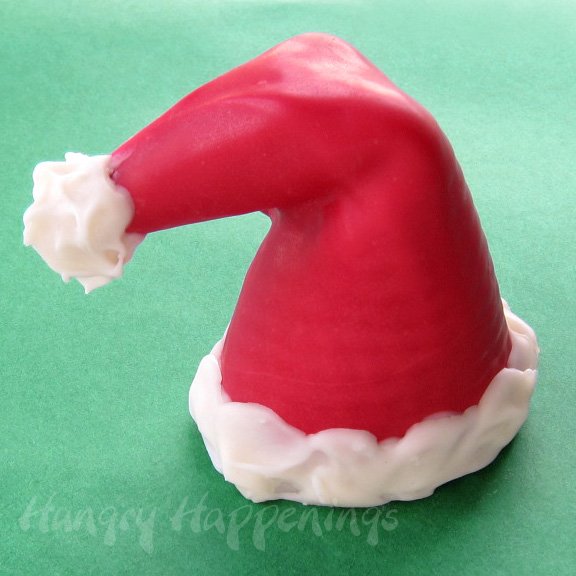
Once you have a bendy ice cream cone, you just dip it in red-colored confectionery coating/candy melts and add some white candy-coating fur.
They look great served atop some store-bought or homemade ice cream - but are also pretty darn cute and tasty all on their own.
You can make these a few weeks before Christmas, store them in an airtight container, and they will be ready to serve for Christmas dessert.
Sweet Sugar Cone Santa Hats
Ingredients
- sugar cones - I tried two different brands of cones and would highly recommend using Joy Sugar Cones as they bent really nicely, Kroger cones were much stiffer and I couldn't get them bent down as far as I'd like. I'm sure there are other brands that will work great too. Let me know which you like best!
- red candy melts
- white candy melts
Before you begin, be sure to check out my Chocolate Making Tips page for instructions on melting candy melts.
Supplies
- microwave - You need to soften your sugar cones in the microwave in order to get them to bend.
- tall glass measuring cup or bowl
- parchment paper-lined baking sheet
Items used to create this project are available on Amazon.com. I earn a small commission when you make a purchase using the Amazon affiliate links on this page at no extra cost to you.
") Joy Cone Sugar Cone, 12-Cou...Shop on Amazon
Joy Cone Sugar Cone, 12-Cou...Shop on Amazon Wilton Red Candy Melts Cand...Shop on Amazon
 Red Red Liquid Candy Colori...Shop on Amazon
 Wilton White Candy Melts, 1...Shop on Amazon
 Ateco 1385 Offset Spatula w...Shop on Amazon
Instructions
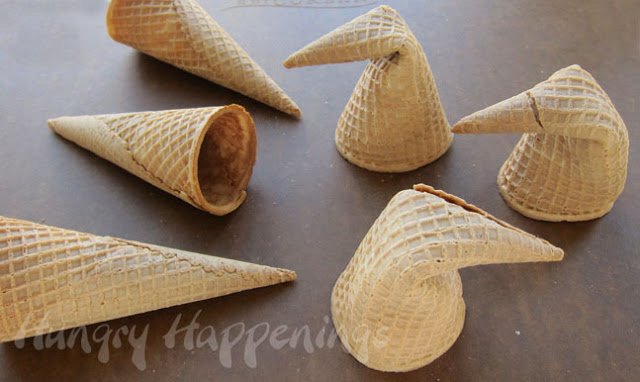
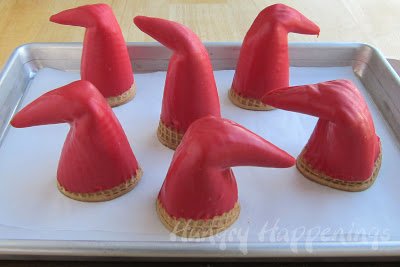
Bend the sugar cones.
- Heat one sugar cone at a time in the microwave for 10-20 seconds. The time will vary as each microwave is different. I suggest starting at 10 seconds then you can always heat the ice cream cones for more time if needed. I heated mine in a 1200-watt microwave for 14 seconds and it worked great.
- Remove the hot sugar cone and VERY CAREFULLY, bend the tip so that the ice cream cone looks like a flopped-over Santa hat. Be sure the seam is to the back side when you bend your sugar cone or it may come apart at the seam.
NOTE: The sugar cones will be hot when they come out of the microwave, so if you have kids helping, you may want to have them wear gloves. I had no trouble bending them without wearing gloves, but my hands are used to working with hot foods.
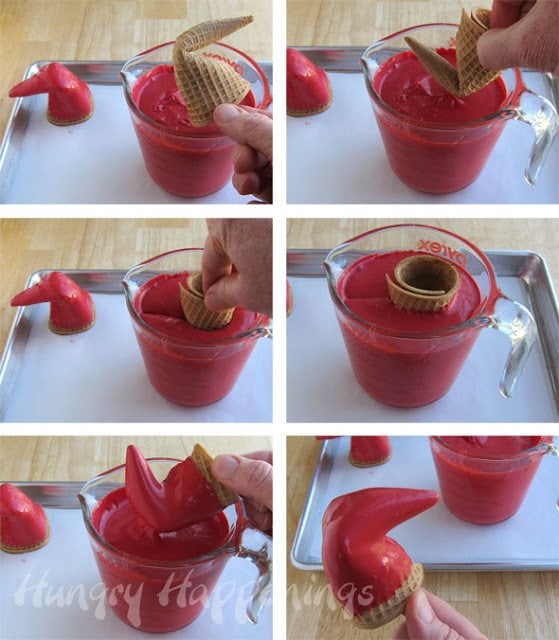
Dip the sugar cones in red candy melts.
- Pour melted red confectionery coating/candy melts into a tall glass or measuring cup, making sure your bent sugar cones can fit in the opening.
- Hold onto the open end of your sugar cone and dip it into the red coating, leaving about ½ inch around the base un-coated.
- Once you dip a few, put them in the freezer for 3-5 minutes, just until they set.
Tips
- If you dip a lot of Sugar Cone Santa Hats and leave them at room temperature, the candy coating on the first ones that you dipped will begin to harden and you will end up with white spots or streaks on those hats. Dip a few then place them in the freezer!
- Your dipped sugar cones will crack if left in the freezer for too long. Remove after 3-5 minutes - set your timer if necessary!
You can see the Joy Sugar Cones are in the front and have a great Santa hat shape, while the Kroger brand sugar cones are in the back. I much prefer the Sugar Cone Santa Hats made using the Joy cones.
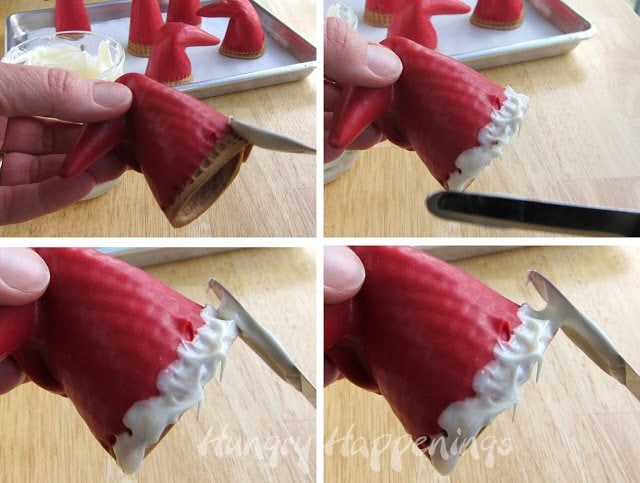
Add the fur.
- Allow your melted white candy coating to cool and thicken slightly before proceeding, or you'll melt too much of the red candy coating as you add the white to the hat.
- Use a small spatula, spoon, or knife, to spread melted white candy coating around the bottom edge of each hat making it look fuzzy by pressing the spatula against the candy coating and pulling the spatula away quickly. Freeze for 1-2 minutes until hardened.
- Once again, don't leave these in the freezer too long or your candy-coated ice cream cones can crack.
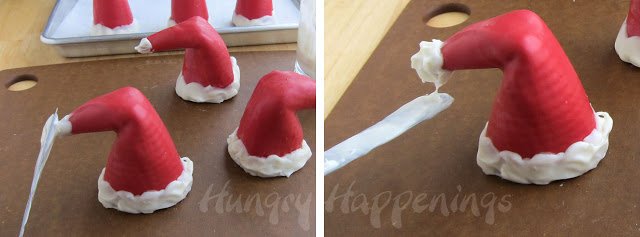
Add the fluffy ball.
- Spread some melted white candy coating all around the tip of each sugar cone Santa hat.
- Allow it to dry for a minute or two, then put on another layer.
- Put on as many layers as you'd like, then make it look furry by pressing the spatula against the candy coating and pulling the spatula away quickly.
- Freeze for 1-2 minutes until hardened.
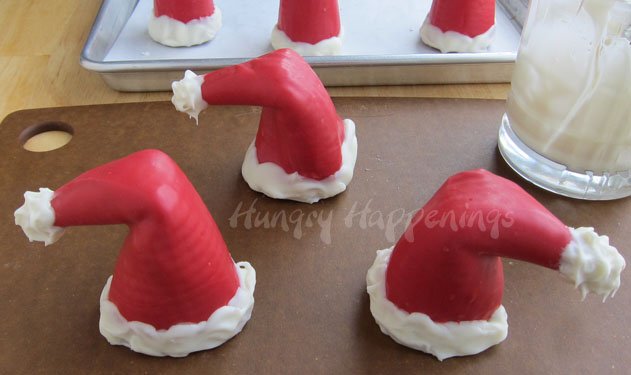
Storage
Store your Sugar Cone Santa Hats in an airtight container for up to a few weeks. Serve as is or on top of a scoop of ice cream.
Related Recipes
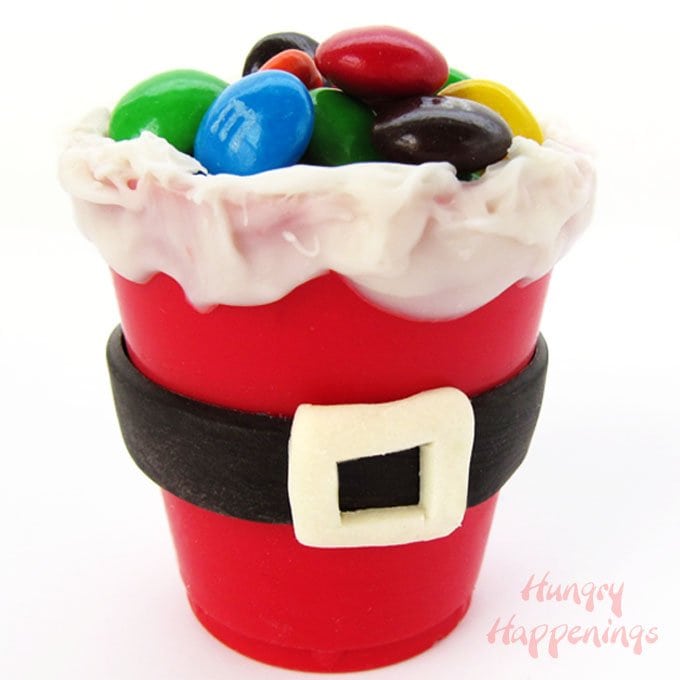
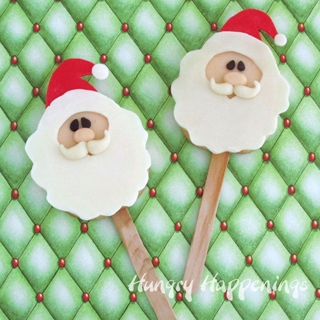
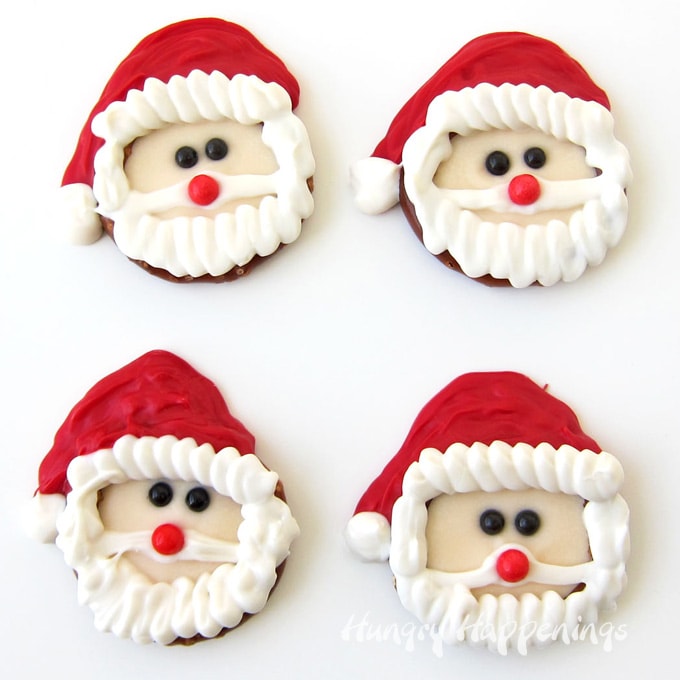
If you enjoy making these Santa hat ice cream cones, you might also like making these other Santa Claus-themed desserts.
Be sure to check out all of my fun Christmas recipes.
Recipe

- 6 sugar cones (pointed ice cream cones - Joy brand works best)
- 10 ounces melted red confectionery coating/candy melts or red candy coloring
- 2 ounces melted white confectionery coating/candy melts
-
Heat one sugar cone at a time in the microwave for 10-20 seconds. Start at 10 seconds then you can always heat them for more time if needed. I used a 1200 watt microwave for 14 seconds and it worked great.
-
Remove the hot sugar cone and VERY CAREFULLY, bend the tip so that the ice cream cone looks like a flopped over Santa hat. Be sure the seam is to the back side when you bend your sugar cone or it may come apart at the seam.
-
Pour melted red confectionery coating/candy melts into a tall glass or measuring cup, making sure your bent sugar cones can fit in the opening.
-
Hold onto the open end of your sugar cone and dip it into the red coating, leaving about ½ inch around the base un-coated.
-
Once you dip a few, put them in the freezer for 3-5 minutes, just until they set.
-
TIP: If you dip a lot of Sugar Cone Santa Hats and leave them at room temperature, the candy coating on the first ones that you dipped will begin to harden and you will end up with white spots or streaks on those hats. Dip a few then place them in the freezer!
-
TIP: Your dipped sugar cones will crack if left in the freezer for too long. Remove after 3-5 minutes - set your timer if necessary!
-
Allow your melted white candy coating to cool and thicken slightly before proceeding, or you'll melt too much of the red candy coating as you add the white to the hat.
-
Use a small spatula, spoon, or knife, to spread melted white candy coating around the bottom edge of each hat making it look fuzzy by pressing the spatula against the candy coating and pulling the spatula away quickly. Freeze for 1-2 minutes until hardened.
-
Spread some melted white candy coating all around the tip of each sugar cone Santa hat.
-
Allow it to dry a minute or two, then put on another layer.
-
Put on as many layers as you'd like, then make it look furry by pressing the spatula against the candy coating and pulling the spatula away quickly.
-
Freeze for 1-2 minutes until hardened.
-
Serve as is, or on top of a scoop of ice cream.
Store your Sugar Cone Santa Hats in an airtight container for up to a few weeks.

- Banana Split Bars – A Fun and Easy Summer Dessert - March 4, 2026
- Pineapple Fudge (No Candy Thermometer Needed!) - March 4, 2026
- No-Bake Peanut Butter Pie Recipe - March 3, 2026

Emily says
They turned out so cute! What a great idea to use sugar cones. Thanks for sharing 🙂
Karen @ Sugartown Sweets says
I just now found these on Pinterest! I can just imagine how excited you were to find that these turned out even better than you envisioned! Love~Love~Love these awesome Santa hats.
beth says
I love when I set out to make something and it looks better than I thought it would, don't you? It's always a treat!
Unknown says
I love this idea.... Im currently trying to make them. It isnt working. The cones arent bendable. I have tried different cooking times. I am using the Kroger ones I didnt remember that you said not to use them. I cant even get a little bend out of them. All thats happening is the cone is being cooked. Any suggestions!!
Beth Jackson Klosterboer says
I'm sorry to hear you are having trouble. I did have the same issue with the Kroger cones. I was only able to bend the very tip and if I remember correctly I had to heat them longer than the Joy cones. One thing I did try was to put them upside down in a glass or coffee mug before setting them in the microwave. That way the inside gets heated a bit better. Give that a try.
Sue says
This is one of the cutest ideas ever! Thanks Beth!
The Bearfoot Baker says
Amazing! This is such a cute idea!I can't wait to try this! Thank you so much for sharing!!!
CuteEverything.com says
That's a great idea, I've seen this used for cornucopias, and the santa hat is so fun!
Susan Zentmyer says
These are wonderful! You have such terrific ideas - thanks for sharing!
Anonymous says
These are brilliant as always. It must be fun living in your head. Thanks for another wonderful Holiday craft to eat. Trish (Motheroverkill)
Beth Jackson Klosterboer says
Thanks, it is fun!!!
Tracie says
So cute! These would be great as witch hats at Halloween too!
Msita says
Great! and very original!
I am wondering if I can cover them with royal icing, i suppose the taste will not be so good but I canno get candy melts here and I'm not so good at working with chocolate.
Beth Jackson Klosterboer says
Hi Msita, I think you could use royal icing, it would just taste different. I'd make the red icing thin enough to either dip the sugar cones into it or pour it over top much like you'd make a petit four. If you make them, I'd love to see how they turn out.
Lisa says
oh i just LOVE these Beth! 🙂 who knew cones were microwavable?! as long as they're not metal cones, there good to go i guess-LOL Awesome treat! 🙂
Beth Jackson Klosterboer says
A few days before I made these, my microwave decided it was time to say good-bye. I put some white candy melts in it to melt, and I saw sparks and heard zaps. It was quite a show. I thought maybe I had accidentally put metal inside, but nope there was nothing there but candy coating and a glass bowl. So the microwave will be on the curb in the morning waiting for the trash truck and a shiny new one has taken it's place 🙂
The Partiologist says
I can't keep up with all your creativity! I love these, I had seen what I thought were cones, but I didn't think you could bend them without breaking! Adorable! 🙂
Beth Jackson Klosterboer says
Thanks, Kim. I didn't have any cones break, but I did have one crack just a little. Once covered in the candy coating, you couldn't even see the crack.
Michelle | Creative Food says
This is a brilliant idea! Love it!!
Beth Jackson Klosterboer says
Thanks, Michelle 🙂
lizy b says
Oh my goodness these are adorable!!! The cone is always my favorite part! pinning!
Beth Jackson Klosterboer says
Thanks, Lizy. Wait until you taste the cone with the white candy coating. It is so good!
walmart_gal2001 says
this is so cool , can cut down to make smaller hats too ........great idea
Beth Jackson Klosterboer says
Great idea. If you do cut them down, let me know how it works out.