Turn store-bought ice cream cones into brightly colored Sugar Cone Party Horns for your New Year's Eve celebrations or birthday parties. They are as fun to make as they are to eat and will bring the kid out in everyone.
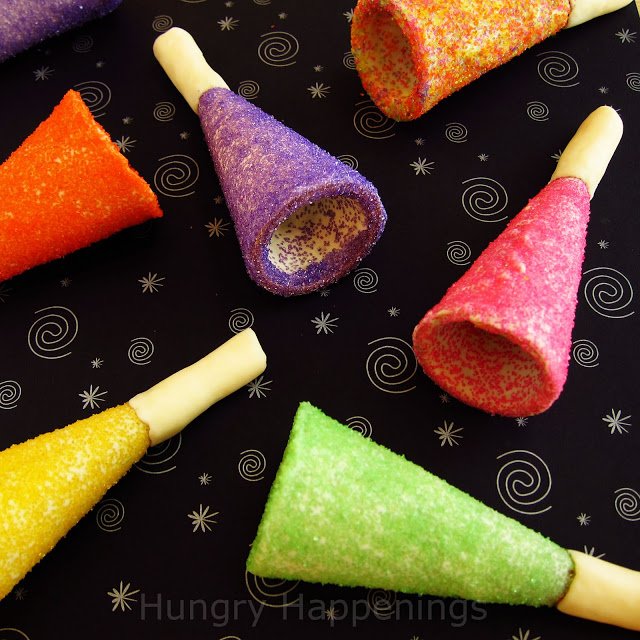
If you are looking for a fun treat to make for a New Year's Eve party or a birthday party that both kids and adults will love, these Sugar Cone Party Horns are it!
They are bright and colorful and will look so fun on your dessert table. Plus, they are fun to play with and to eat.
You can serve them for dessert on New Year's Eve or at a birthday party, or wrap them in cellophane bags and give them as party favors to your guests. For an extra special treat, you could even fill them with some candies or nuts.
Each party horn is made using a sugar cone, the ice cream cones that are pointed on the ends, and taste like waffles.
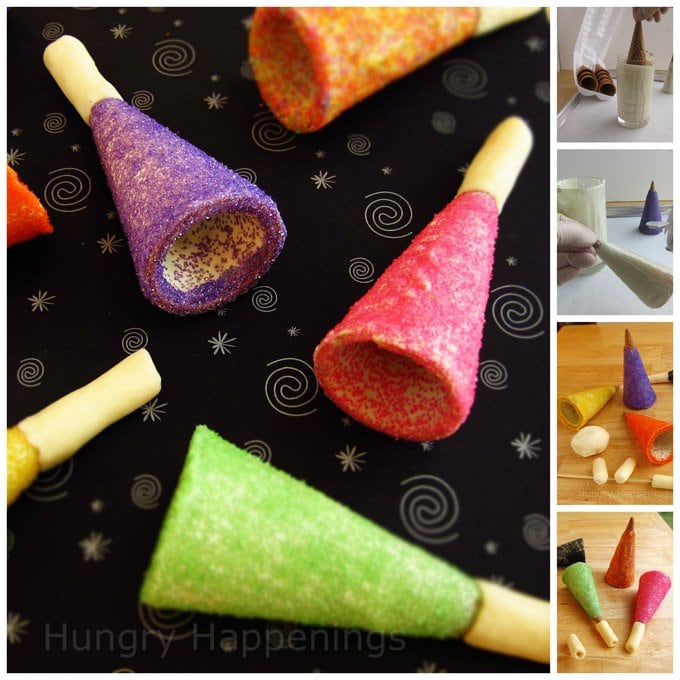
The sugar cones are dipped in white chocolate and coated in colorful sugar. To make the cones look like a party horn, they need a blower. You know the part of the horn you put your lips on to blow?
I used modeling chocolate (candy clay) to make mine because it tastes like chocolate (in this case, it tastes like white chocolate). As an alternative, you use store-bought fondant, but most people won't want to eat a big piece of fondant.
A better alternative, if you don't want to make modeling chocolate, is to use vanilla Tootsie Rolls. You can find them in bags of assorted fruit-flavored Tootsie Rolls.

Let's make Sugar Cone Party Horns for New Year's Eve!
Ingredients
- white candy melts, melted OR pure white chocolate, melted and tempered - See my chocolate-making tips page for details about choosing chocolate, melting and tempering chocolate, and more.
- colored sugar
- white modeling chocolate (candy clay) or white Tootsie Rolls
Supplies
- tall glass (a little wider than a sugar cone)
- parchment paper or wax paper
- rimmed baking sheet (helps to keep the colored sugar contained)
- skewer
Instructions
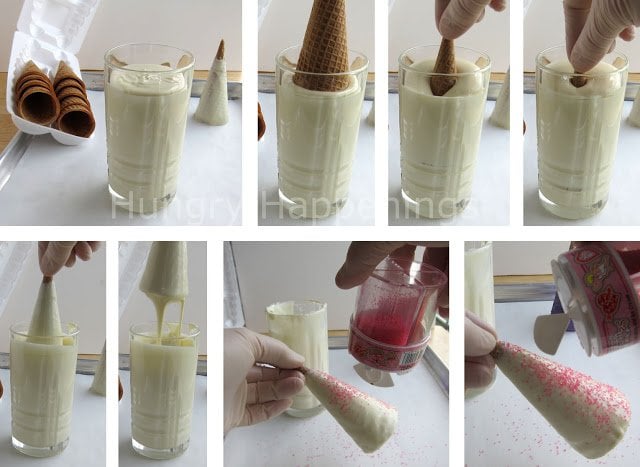
step 1 - Dip sugar cones in white chocolate.
- Pour melted and tempered white chocolate or melted white compound chocolate (also known as confectionery coating, candy melts, melting wafers, or almond bark) into a tall glass.
- If you don't have experience melting (and tempering) chocolate, be sure to read my Chocolate-Making Tips page for detailed instructions.
- Hold onto the tip of a sugar cone and dip it into the glass. Coat all but the very tip of the sugar cone with white chocolate.
- Remove the cone from the glass and allow the excess chocolate to drip off.
- While wet, sprinkle colorful sanding sugar all over the cone (inside too, if you'd like.)
- Set on a parchment paper-lined baking sheet.
- Place the dipped cones in the refrigerator for about 10 minutes until the white chocolate hardens.
- Refill the glass with more chocolate as needed. When you start to run out of white chocolate, you'll need to use a spoon or spatula to get the chocolate up to the tip of the cone.
You will have leftover white chocolate. This could be used to make your modeling chocolate or you can spread it on a parchment-lined baking sheet, harden it, and use it for another project.
step 2 - Create the modeling chocolate blowers.
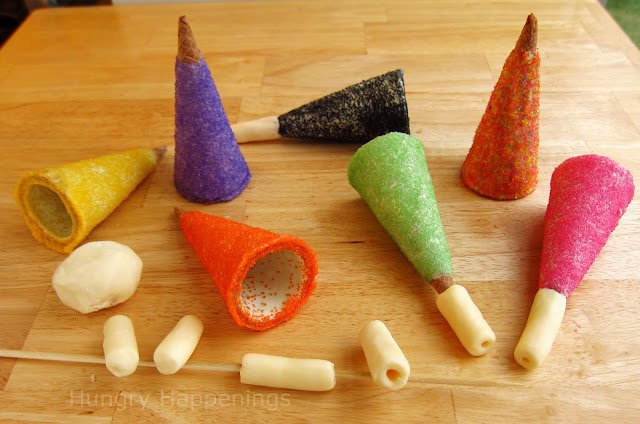
- Pinch off pieces of white modeling chocolate and roll them into 1 ¼"-1 ½" long logs.
- Insert a skewer into the log, creating a hole.
- Move the skewer around, making the hole a bit bigger.
- Remove the skewer.
- Press one log onto each dipped cone.
- It is helpful if you stick the modeling chocolate log on the tip of the cone then twist it upwards until the white modeling chocolate touches the colorful sugar on the cone.
- Reshape the log, if needed.
If you use Tootsie Rolls, they will be much firmer. You will need to create a hole on both ends of the Tootsie Roll, then gently push the candy onto the tip of the sugar cone. If needed, use some white chocolate to attach the candy to the cone. The modeling chocolate stuck without using any white chocolate.

Tips
Work over a rimmed baking sheet so the sanding sugar doesn't go all over your floor. As you work with these horns and touch the sugar, some of it will come off, so be careful where you place your modeling chocolate, as you don't want the sugar to stick to it.
The sanding sugar may color your fingers (temporarily, until you wash your hands). So, as not to turn your white modeling chocolate a color, use one hand to hold the white modeling chocolate and the other to hold the cone. Wash or wipe your hands after handling each cone and keep the work surface clean.
I used a variety of colorful sanding sugars, and when I was finished, I mixed the sugars that had fallen onto my baking sheet together and sprinkled this mixture over one of my horns (upper left.)
Related Recipes
If you are hosting or attending a New Year's Eve party, you might also enjoy making these other festive New Year's Eve party recipes.
Recipe

- 12 sugar cones (ice cream cones)
- 22 ounces melted and tempered pure white chocolate with cocoa butter OR melted white confectionery coating/candy melts
- variety of colored sanding sugars
- 6 ounces white modeling chocolate or 12 vanilla Tootsie Rolls or white taffy
-
Pour melted and tempered white chocolate or melted confectionery coating/candy melts into a tall glass.
-
Hold onto the tip of a sugar cone and dip it into the glass.
-
Coat all but the very tip of the sugar cone with white chocolate.
-
Remove the cone from the glass and allow the excess chocolate to drip off.
-
While wet, sprinkle colorful sanding sugar all over the cone (inside too, if you'd like).
-
Set on a parchment paper lined baking sheet.
-
Place the dipped cones in the refrigerator for about 10 minutes until the white chocolate hardens.
-
Pinch off pieces of white modeling chocolate and roll them into 1 ¼"-1 ½" long logs.
-
Insert a skewer into the log, creating a hole.
-
Move the skewer around making the hole a bit bigger.
-
Remove the skewer.
-
Press one log onto each dipped cone.
-
Reshape the log, if needed.
Recipe Video
Store your sugar cone party horns in an airtight container at room temperature for up to 3 weeks.
You will have quite a bit of white chocolate leftover. Pour it out onto a parchment paper-lined baking sheet, spread it into an even layer, and freeze it for about 10 minutes until hard. Store at room temperature for another use.

- Banana Split Bars – A Fun and Easy Summer Dessert - March 4, 2026
- Pineapple Fudge (No Candy Thermometer Needed!) - March 4, 2026
- No-Bake Peanut Butter Pie Recipe - March 3, 2026

Dorothy @ Crazy for Crust says
This is a great idea! I love it, not just for New Year's but for a cheer party too! Thanks for sharing on Crazy Sweet Tuesday. 🙂
Lisa @ Flour Me With Love says
Oh how cute! I'd love for you to share anything from your site 🙂 at my new party:
http://flourmewithlove.blogspot.com/2012/01/mix-it-up-monday.html
I hope to see you soon 🙂
Beth Jackson Klosterboer says
Thanks everyone!
Crystal, I'm so happy to hear that this recipe was one of the most clicked posts on your site. How exciting. Thanks for featuring it on Facebook too.
Joan says
Do they actually make noise
Beth Jackson Klosterboer says
Only when you bite into them - you hear a nice "crunch!"
Crystal says
I love these horns!
Congrats! You were one of my most clicked blog post on the Mommy Solutions link up last week! http://www.crystalandcomp.com/2012/01/the-mommy-club-share-your-resources-and-solutions-25/
You rock! Thanks for sharing and I look forward to more of your mommy solution link ups! I did feature you on my Facebook page! So love this!
Have a super week, Crystal
Erin says
These are fantastic!!!
Consultoria RH says
Este blog é uma representação exata de competências. Eu gosto da sua recomendação. Um grande conceito que reflete os pensamentos do escritor. Consultoria RH
Trish - Sweetology101 says
You have the best ideas!
Make handmade says
So cute gift for kids! i love it.
Beth Jackson Klosterboer says
Thanks for all the pins and Facebook posts. I really appreciate you sharing this idea. I linked up to several sites too. I wish I had much more time to link up to all the linky parties. I've been in the kitchen today making food for my friend's New Year's party.
Kara @ Mine for the Making says
These are too fun! I found you via pinterest and featured this on my facebook page today!
Kara
www.mineforthemaking.com
Lindsi B says
Oh my word those are AMAZING!!! Would you please share these with our readers for Fun Stuff Fridays? http://www.toysinthedryer.com/2011/12/fun-stuff-fridays-4-3-weeks-long-for.html
Beth (www.livinglifeintentionally.blogspot.com) says
Super cute! I wanted to invite you to link up at TGIF Linky party - http://livinglifeintentionally.blogspot.com/search/label/Linkey%20Parties - I know my readers would love this & any other kid friendly posts!
Happy New Year,
Beth =-)
Jenn "Rook No. 17" says
Your project caught my eye over at "Mom Ideas for Busy Moms". Love these edible horns!! I'm pinning them to my New Year's board.
Happy New Year!
Jenn/Rook No. 17
Kim @ Party Frosting! says
you are so dang creative! I can't wait to share!hugs! Kim @ Party Frosting!
Beth Jackson Klosterboer says
Wow, thanks so much everyone. When I create an edible craft, I never know how people will react, but this idea is proving to be a big hit. I've had almost 700 visitors just from Pinterest postings already today with over 4,000 page views. I am so happy to read here and on Pinterests that so many people are planning to make these for their New Year's parties. I'd sure love to see pictures!!!
Christina says
I love your super creative party horns! My kids would love these and I love that you could use any color sugar to match any New Years theme!
I would love it if you would share these at my "It's a Celebration" link party. I know my readers will love these too.
Christina
http://www.inspirationforcelebration.com/2011/12/its-celebration-link-party-december.html
Krista Baum says
What a great idea! I have tons of extra white choclate left over from my holiday baking so i'm going to make these for new years eve. Thanks for posting!!
bookcasefoodie says
This is ingenious. Everyone has to love these.
Beth Jackson Klosterboer says
Thanks Danielle, I hope your kids enjoy making and/or eating them!
Danielle says
I love this idea - bookmarking it for the kids on New Years!