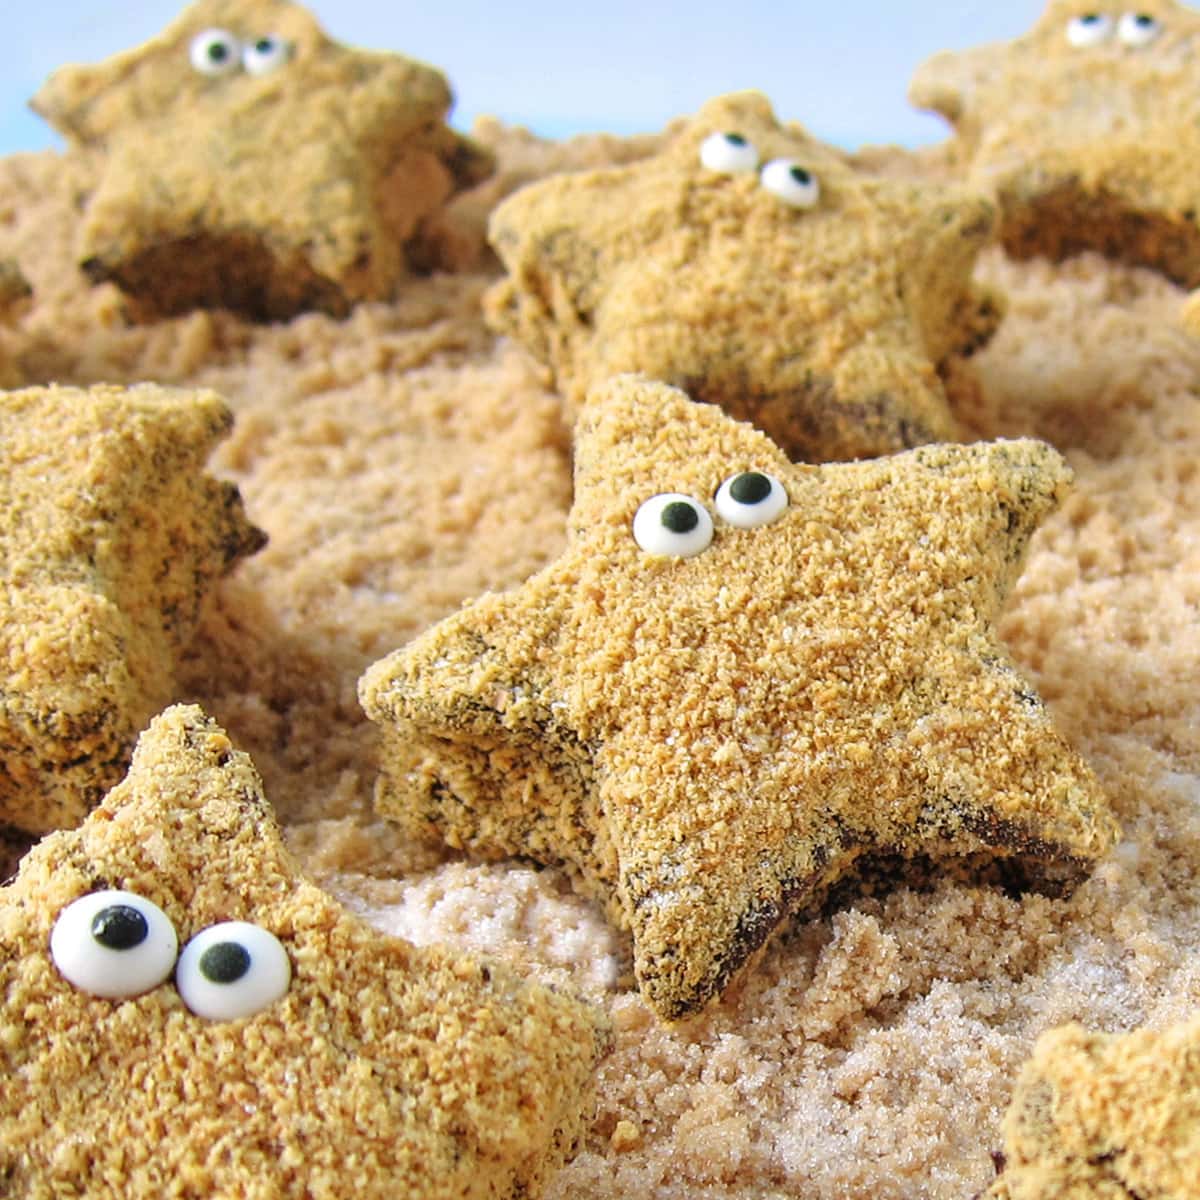
Make homemade marshmallows, then dip them in chocolate and turn them into adorably cute Starfish S'Mores. This fun twist on a summer classic will add a touch of whimsy to any pool party or day at the beach.
I am in love with these starfish-shaped chocolate-dipped marshmallows.
They not only look adorable, but they taste amazing too. They are made using homemade marshmallows. If you have never eaten a homemade marshmallow, now is definitely the time to try them. You will love them!
Each billowy soft marshmallow tastes far superior to any store-bought marshmallow. Dip them in chocolate and add a coating of graham cracker crumbs, and you have the most amazing s'more you've ever tasted.
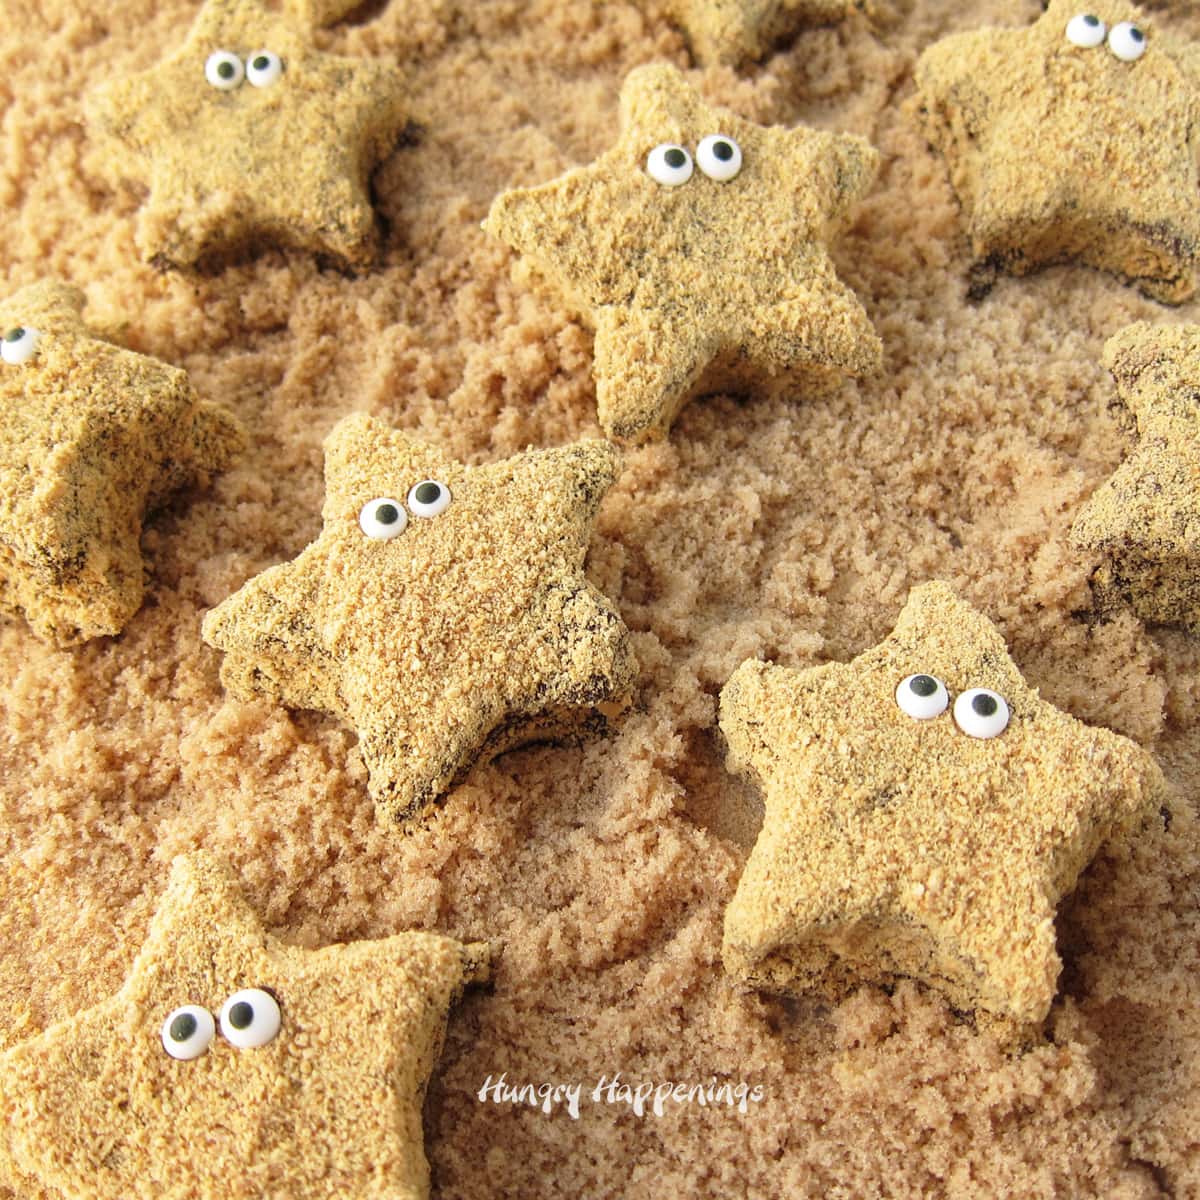
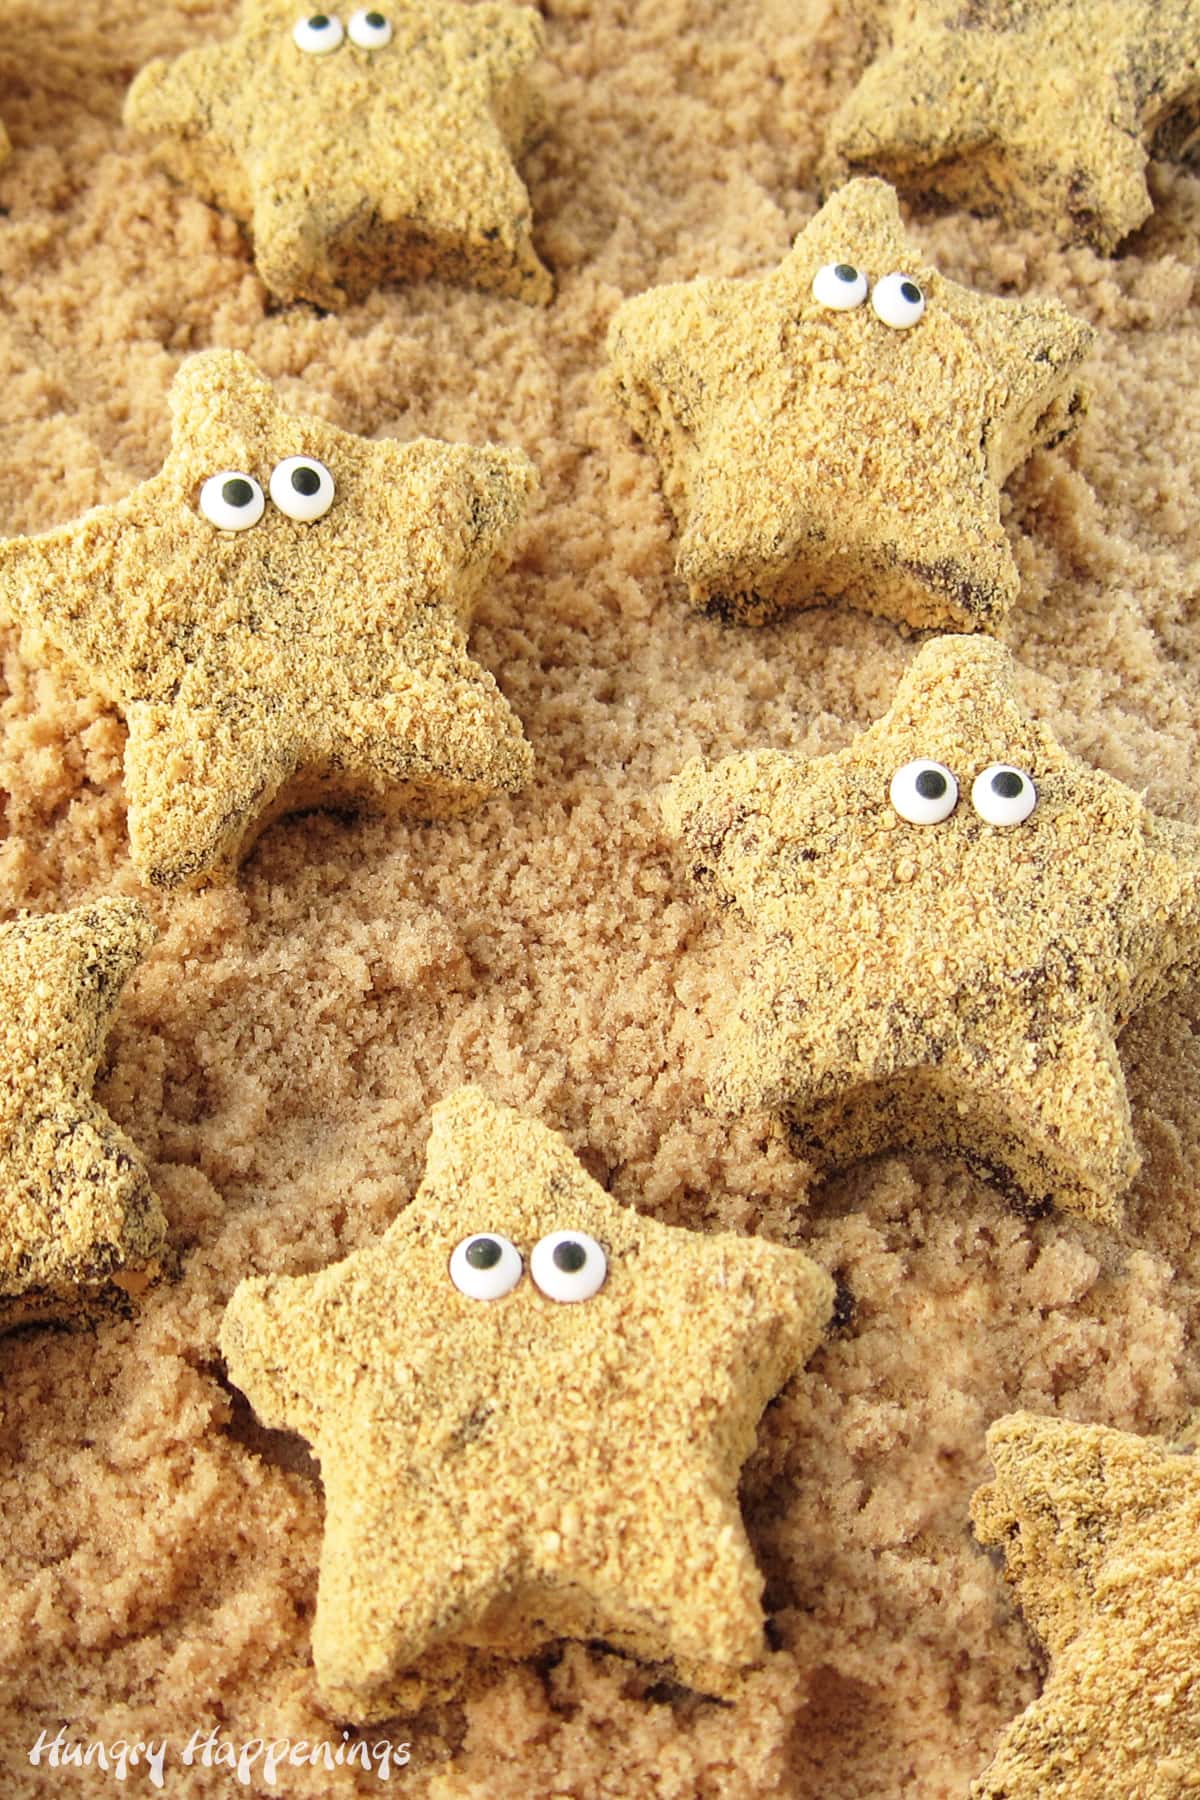
Plus, look how cute they are when decorated with two candy eyes to look like starfish.
Imagine how fun these sweet treats will be to serve at a beach-themed picnic or under-the-sea party. Your guests will fall in love with them, too.
Are you ready to make some?
Pan Prep
- butter or non-stick baking spray - Grease the inside of a 9X13-inch pan well. I prefer the flavor of butter, but the non-stick baking spray works well too.
- a blend of powdered sugar and corn starch - Some recipes tell you to dust your marshmallows with just corn starch. I'm not a fan of the flavor, so I blend my cornstarch with powdered sugar. Powdered sugar already has cornstarch in it, but it's best to add a bit more.
Ingredients
Homemade Marshmallows
- water - You will dissolve the gelatin in water, then use more water to make a sugar syrup.
- gelatin - Use unflavored gelatin. You'll need 2 ½ tablespoons for this homemade marshmallow recipe. It's best to measure the gelatin as packages don't always contain the same amount from brand to brand.
- granulated sugar - Adds sweetness and structure to the marshmallows.
- light corn syrup - This will not only add sweetness but will also keep the sugar from crystallizing. Crystalized sugar will make your marshmallows gritty. By adding corn syrup, your marshmallows will be smooth.
- vanilla - I suggest you use pure vanilla extract or vanilla bean paste for the best flavor. I love using vanilla bean paste as it is loaded with real vanilla bean seeds. When you make your marshmallows with the paste, they will be speckled with vanilla bean seeds.
S'mores Toppings and Decorations
- semi-sweet chocolate - You'll make the marshmallows, then dip them in dark chocolate. Choose your favorite semi-sweet (or bittersweet) chocolate.
- graham crackers - Crush 50 graham cracker squares (or 25 whole crackers) to make the crumbs to coat your chocolate-dipped marshmallow stars. You may also want to crush more crackers to use as sand to display your starfish s'mores.
- candy eyes - Not all candy eyes are created equal. I use ⅜-inch royal icing eyes. They look really cute. Some brands of candy eyes are a bit too bug-eyed-looking for my taste.
Supplies
stand mixer
small saucepan with a lid
candy thermometer
9" x 13" pan
rubber spatula and/or an offset spatula
star cookie cutter (I used the 3" cutter)
dipping fork or kitchen fork
parchment paper or wax paper
baking sheet or cutting board
toothpick
You can find items to make these Starfish S'mores on Amazon. I earn a small commission when you use the affiliate links in this post at NO extra cost to you.
 ⅜" White And Black Icing ...Shop on Amazon
  Unflavored Gelatin - 1 lbShop on Amazon
  Wilton Set of 3 Star Cut Ou...Shop on Amazon
  Wilton Recipe Right Non-Sti...Shop on Amazon
  Taylor Stainless Steel Cand...Shop on Amazon
  All-Clad D3 3-Ply Stainless...Shop on Amazon
 ") KitchenAid RKP26M1XWH 6 Qua...Shop on Amazon
KitchenAid RKP26M1XWH 6 Qua...Shop on Amazon  Parchment Paper Baking Shee...Shop on Amazon
 Nordic Ware Natural Aluminu...Shop on Amazon
 Wilton Candy Melts Candy Di...Shop on Amazon
Instructions
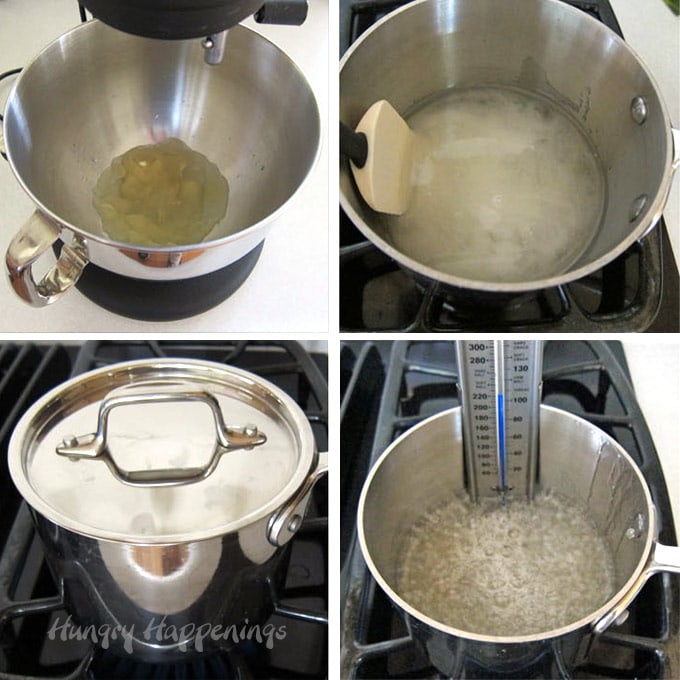
Bloom the gelatin and boil the sugar syrup.
- Pour ½ cup of water into the bowl of a stand mixer.
- Sprinkle 2 ½ tablespoons of gelatin over the top of the water and allow it to soften (bloom) for 5 minutes.
- Meanwhile, pour the remaining ½ cup of water, 1 ½ cups of granulated sugar, 1 cup of corn syrup, and a pinch of salt into a small saucepan.
- Stir just to combine the ingredients. You don't want to get sugar crystals on the side of the pan, so stir slowly.
- Cover the saucepan, place it over medium heat, and bring to a boil. This will take about 4-5 minutes. Condensation will build up in the pan, and when you remove the lid, the water will help to wash down any sugar crystals on the side of the pan.
- If you notice lots of sugar crystals, you can put the lid back on the pan for a few more minutes, or you can dip a pastry brush in water and brush the water around the side of the pan to brush the crystals back into the boiling sugar syrup.
- Remove the pan lid, and clip a candy thermometer onto the side of the pan.
- Continue to cook, without stirring, until the mixture reaches 240 degrees Fahrenheit (about 7-8 minutes).
- Be very careful not to touch or spill any of this hot syrup on your skin - it will burn badly!
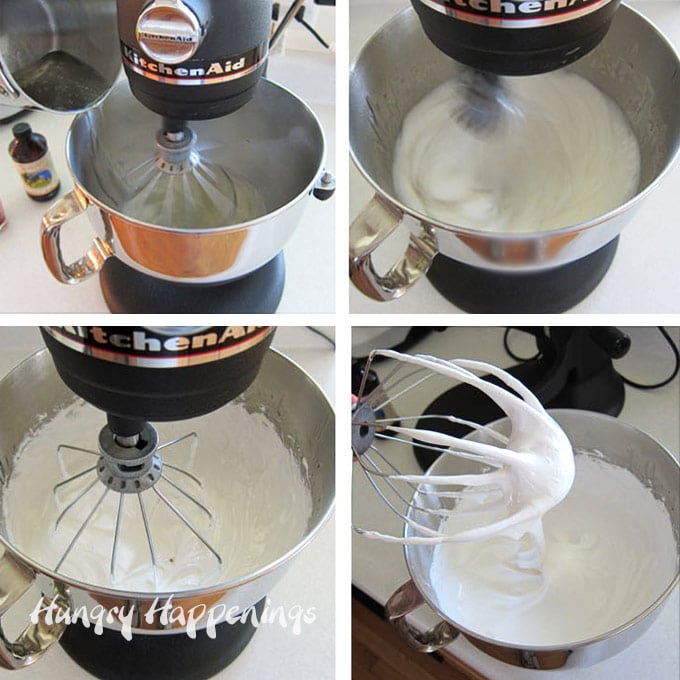
Whip the marshmallows until light and fluffy.
- Place the whisk attachment on your stand mixer.
- You will need to whisk this marshmallow mixture at high speed for about 15 minutes, so it is imperative that you use a strong stand mixer, not a handheld mixer.
- Turn the stand mixer onto low speed.
- Very carefully and slowly pour the hot sugar syrup down the side of the bowl into the softened gelatin.
- This hot liquid can burn your skin badly, so be very careful with this step.
- Once all of the sugar syrup is in the bowl, increase the mixer speed to high (going up a few steps at a time).
- Whip until the marshmallow becomes very thick and cools to a lukewarm temperature, about 12-15 minutes.
- Add the vanilla (use vanilla bean paste for the best flavor) and whip just to combine.
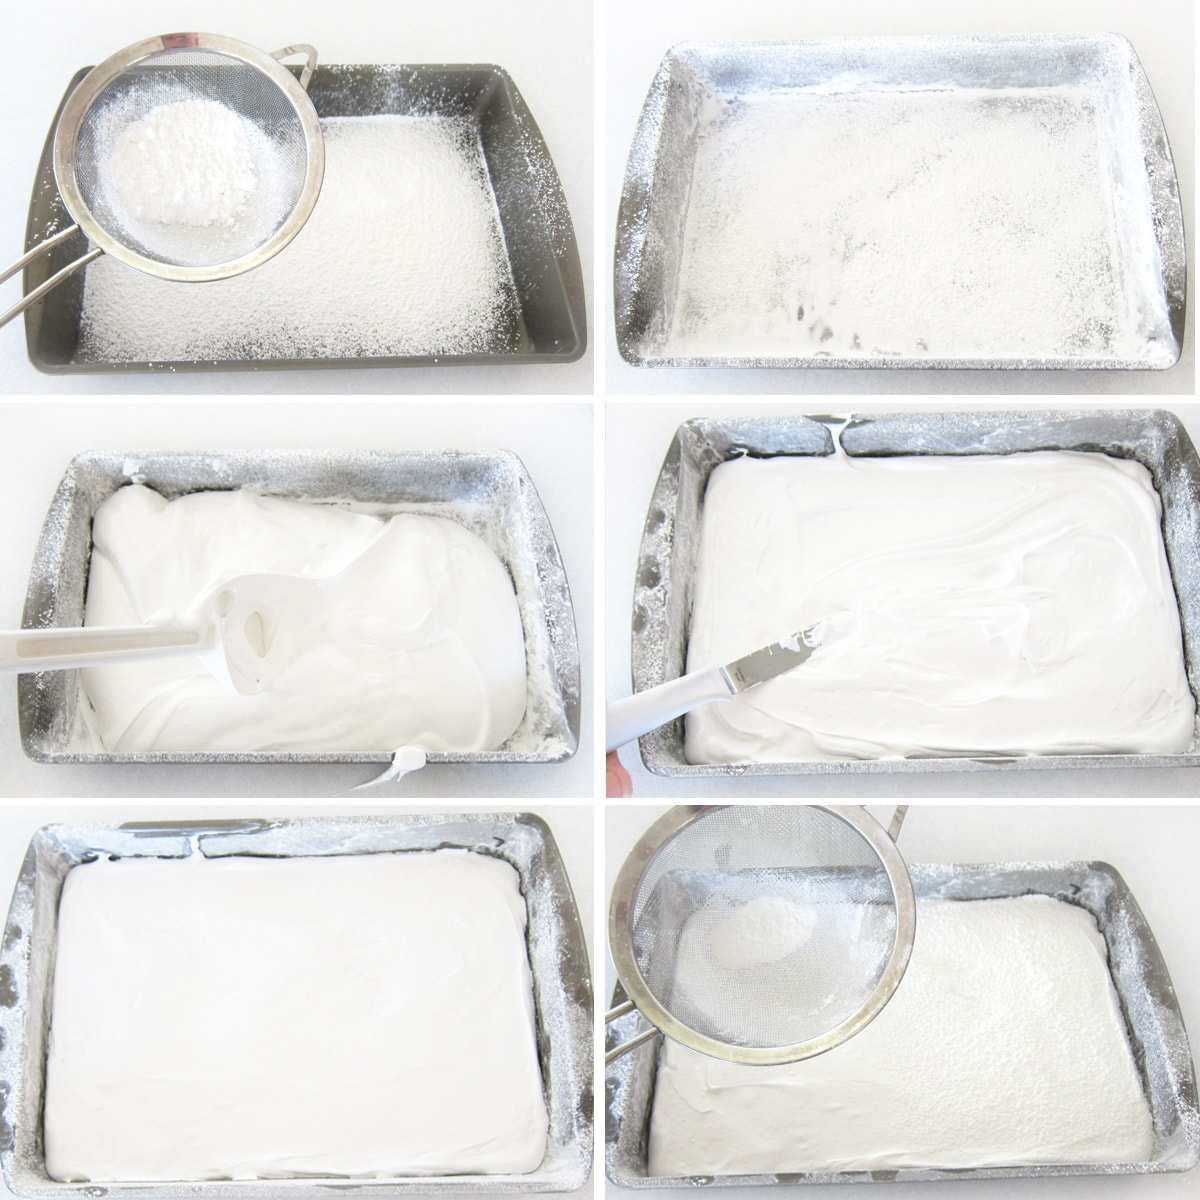
- While the marshmallow is whipping, prepare your pan.
- Butter the bottom and sides of a 9" x 13" pan.
- Combine the powdered sugar and cornstarch in a bowl.
- Pour about half of the powder blend through a fine-mesh sieve evenly over the bottom and sides of the pan.
- Tap the pan to remove excess.
- Save the remaining powder for later.
- Butter or spray a rubber spatula and use it to remove the marshmallow from the bowl.
- Spread the marshmallow evenly in the pan.
- Use a buttered offset spatula to smooth the surface.
Dust marshmallows with powdered sugar and cornstarch.
- Dust the top of the marshmallow with enough of the remaining sugar and cornstarch mixture to lightly cover.
- You can now use your hands to really flatten out the marshmallow.
- Cover any remaining powdered mixture for later use.
- Allow the marshmallows to sit uncovered for at least 4 hours and up to overnight.
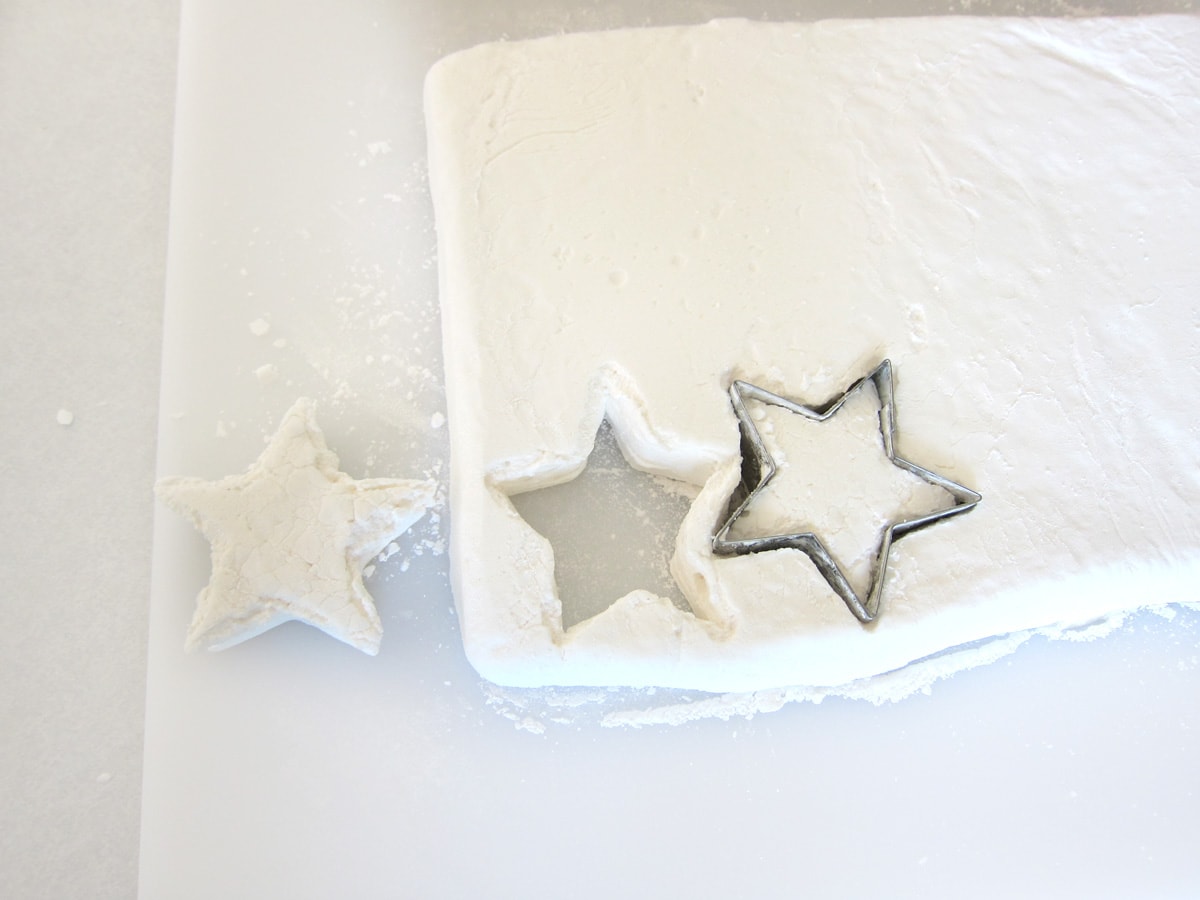
Cut out marshmallow stars.
- Set a large cutting board on top of the pan of marshmallows.
- Turn both the board and pan upside down.
- The marshmallow should fall right out of the pan onto the board. If it doesn't, help it along.
- Dust a star-shaped cookie cutter with some of the powdered sugar/cornstarch mixture.
- Press the cookie cutter into the marshmallow, remove it, and press the marshmallow out.
- Dust the cutter again, and continue to cut stars until you can't cut anymore.
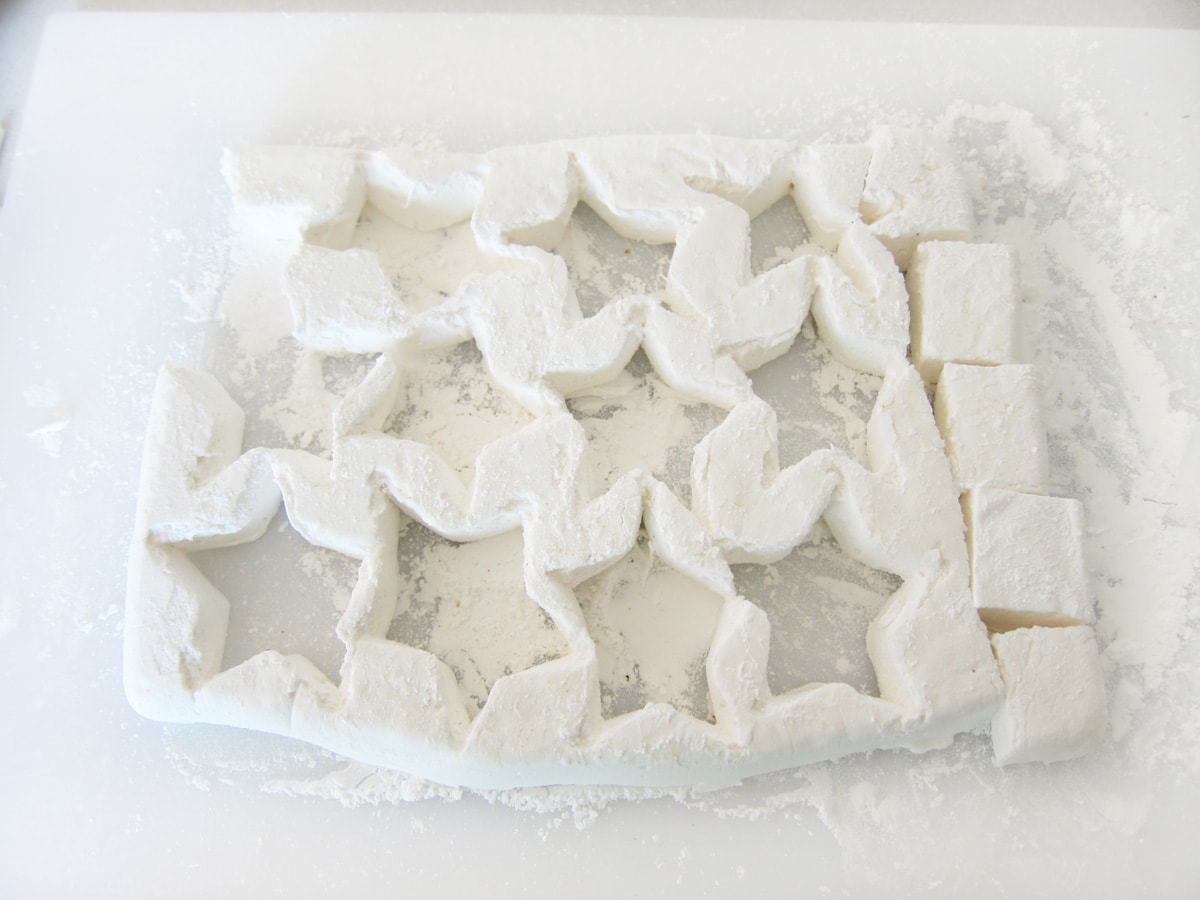
As you can see, you will have a lot of marshmallow scraps. Either dust them with more powdered sugar/cornstarch or dip them in any leftover chocolate.
Melt the chocolate.
- Pour chopped chocolate into a microwave-safe bowl.
- Heat on high power for 30 seconds. Stir.
- Heat on high power for 20 seconds. Stir vigorously.
- Heat on high power for 15 seconds. Stir vigorously.
- If not melted, continue to heat for 10-second increments, stirring after each, until melted. For more detailed melting instructions, read my chocolate-making tutorial.
NOTE: You don't need to temper this chocolate because the graham crackers will completely coat the chocolate. You can use good-quality pure chocolate for this recipe. You can, if you prefer, use confectionery coating/candy melts. You do need to make sure, however, that your melted chocolate is not too hot, somewhere between 90 and 97 degrees Fahrenheit, so you don't melt your marshmallows.
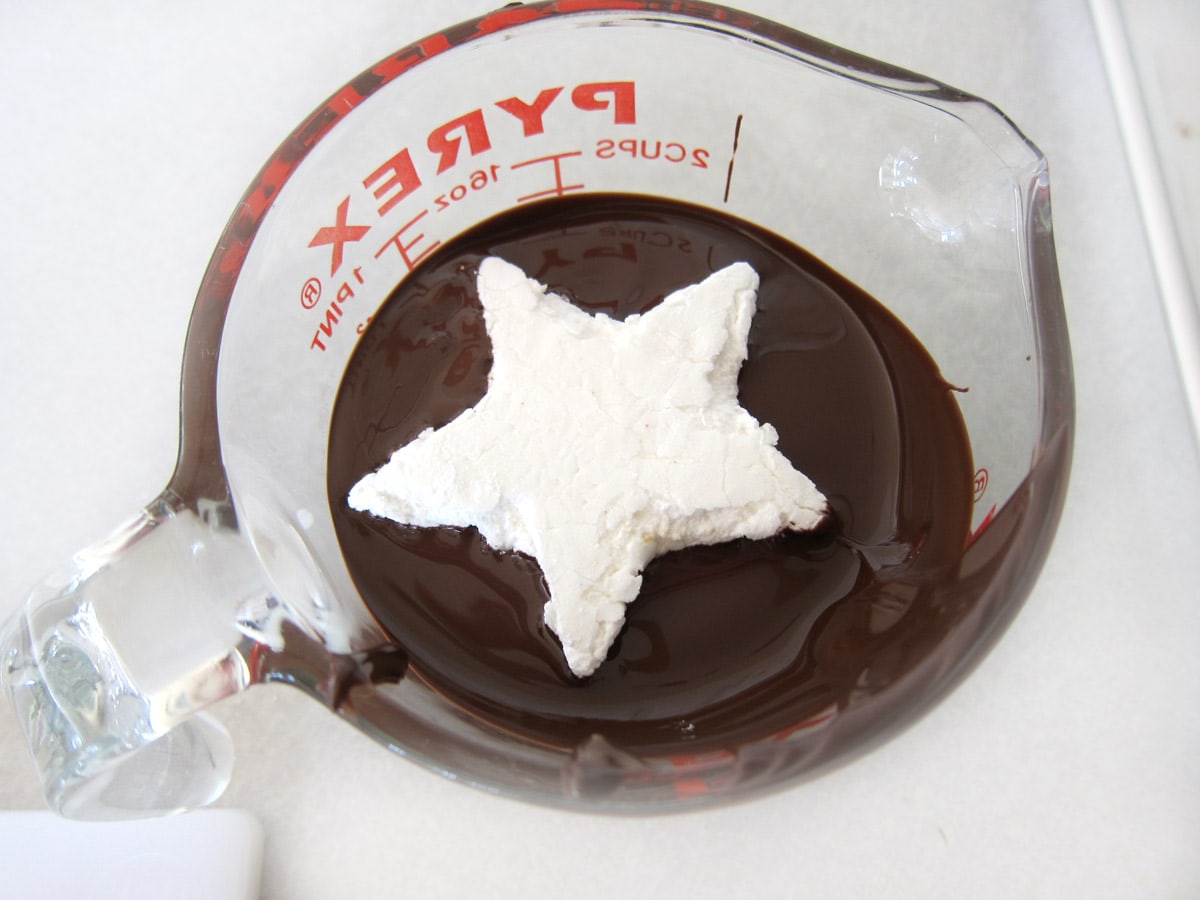
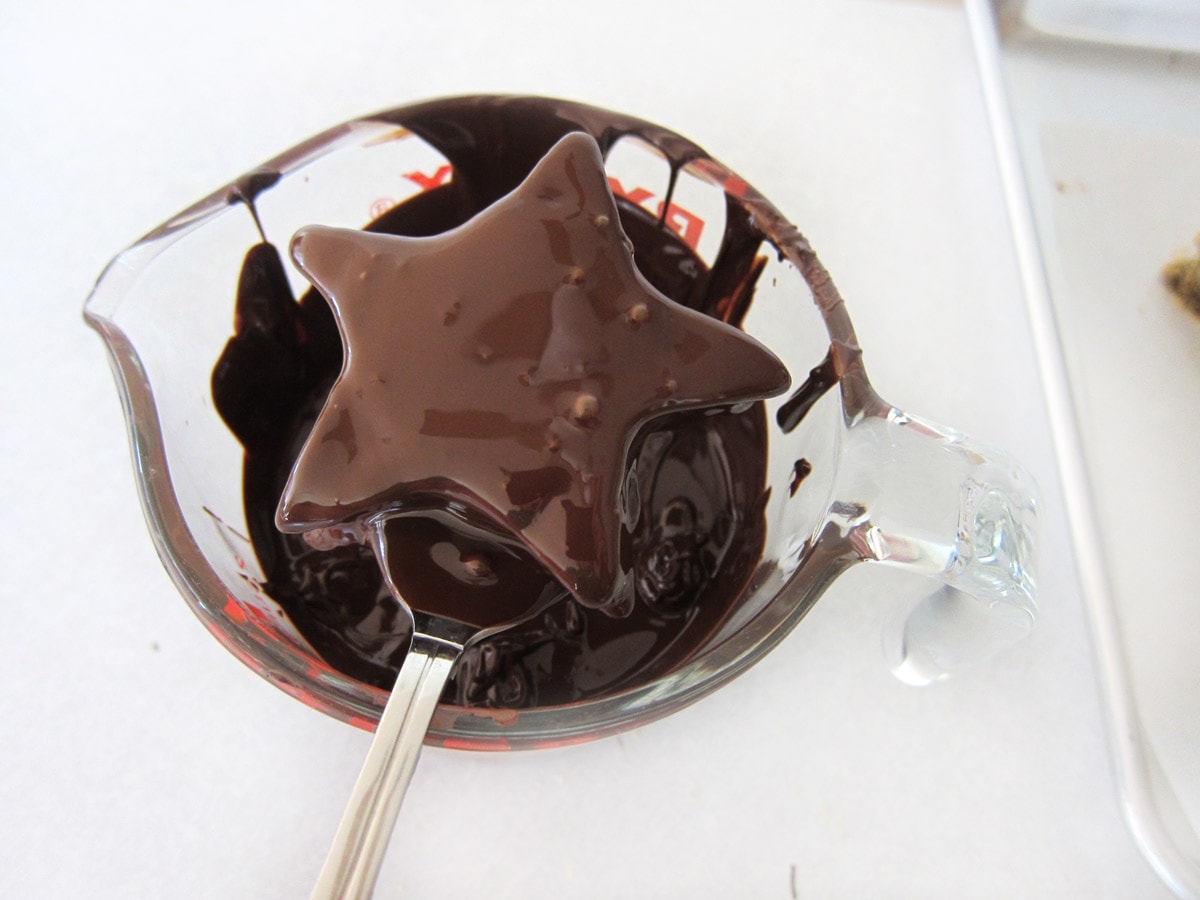
Dip a marshmallow star in chocolate.
- Pour graham cracker crumbs into a shallow dish.
- Place one marshmallow star in the melted chocolate. Use a fork to press the marshmallow into the chocolate, covering the top and all sides of the star.
- Place the fork on the underside of the marshmallow and use it to lift the marshmallow out of the chocolate.
- Shake the marshmallow to allow any excess chocolate to fall off.
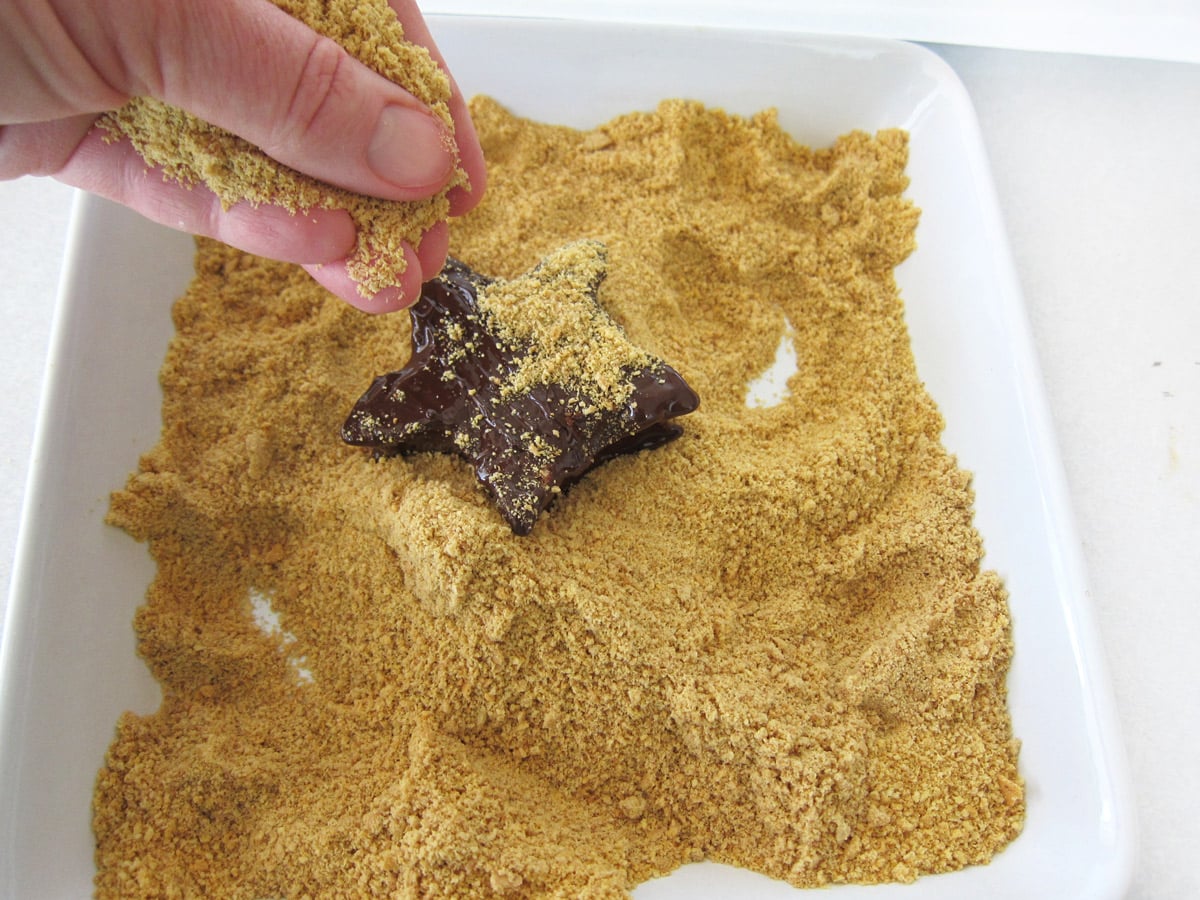
Cover the star in graham cracker crumbs.
- Set the marshmallow in the graham cracker crumbs.
- NOT PICTURED (but shown in the video tutorial) - attach two candy eyes now.
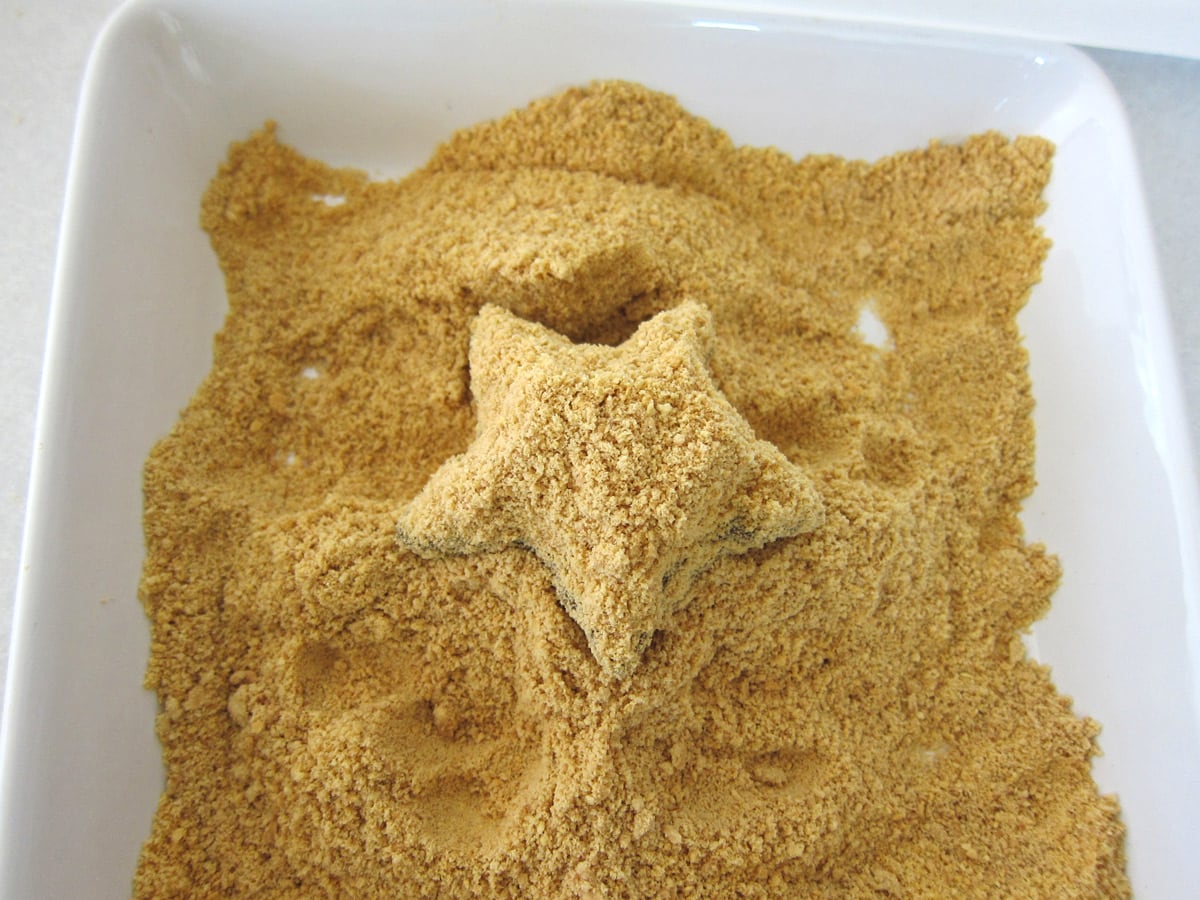
- Sprinkle and push the crumbs over and up against the marshmallow star.
- Completely cover the star with crumbs and allow to dry for 1-2 minutes in the crumbs.
- Remove from crumbs and set on a parchment paper-lined baking sheet or cutting board.
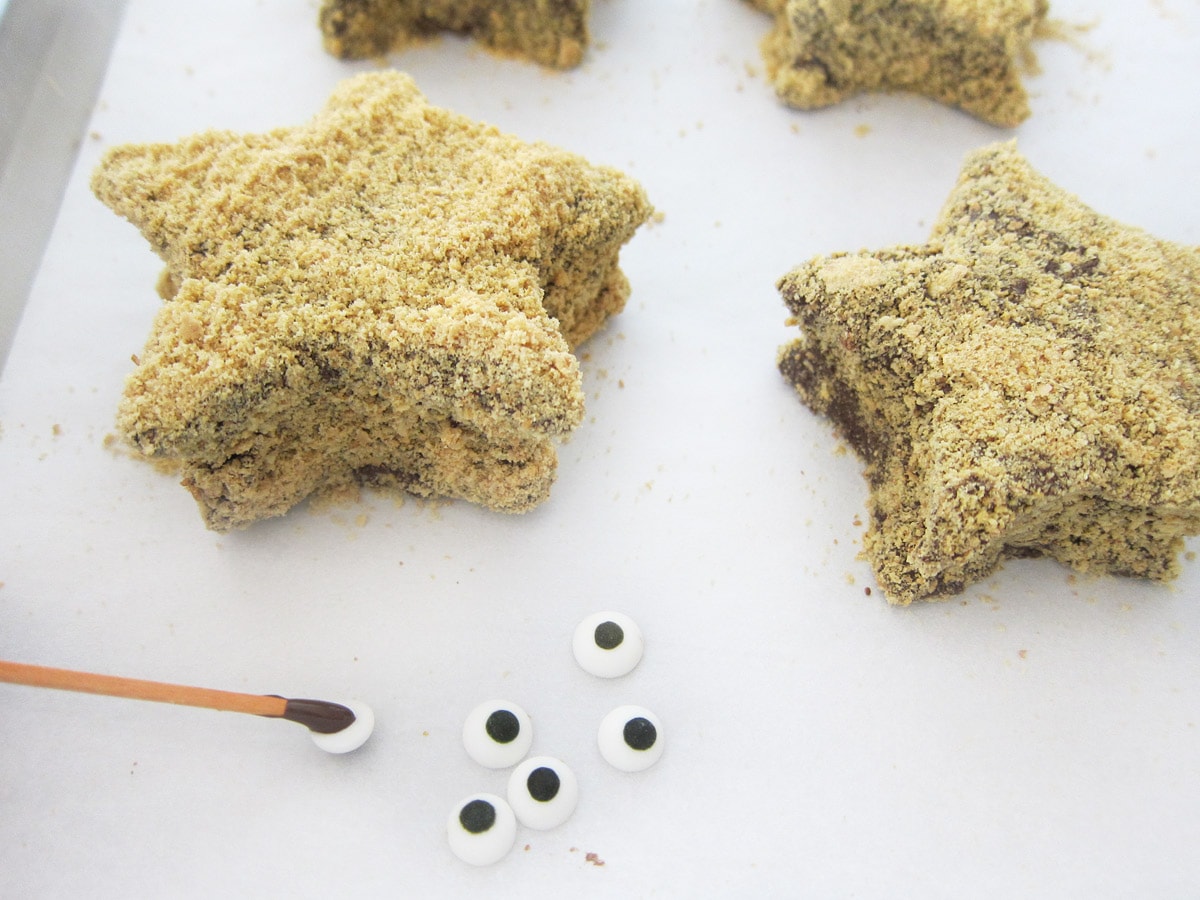
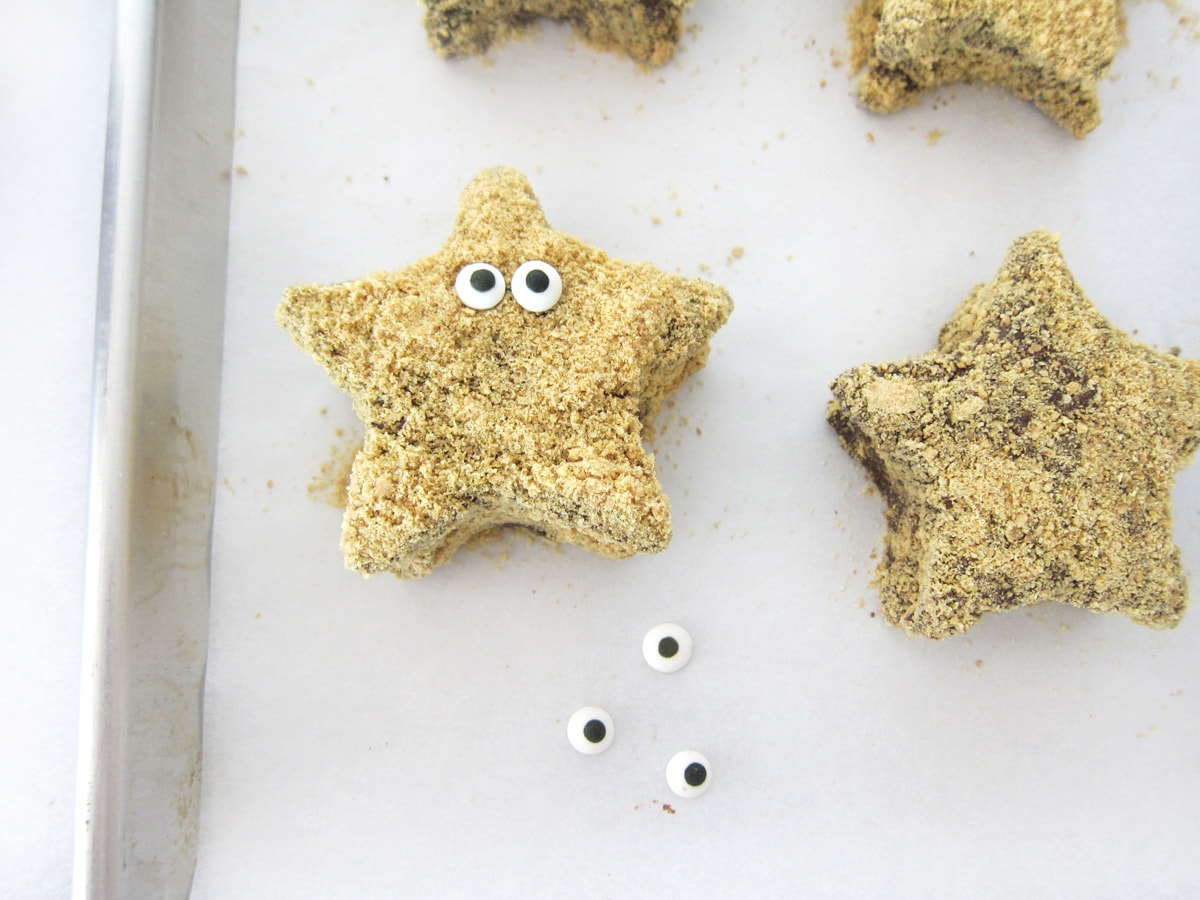
Add candy eyes.
I originally added the candy eyes to the graham cracker-coated marshmallow starfish, but found when creating my video that I could add them to the wet chocolate before sprinkling on the graham crackers.
If you don't attach them to the wet chocolate, you can use a toothpick to dig out small circles of the graham cracker crumbs where the eyes will be on each starfish. Add a dab of chocolate to the holes and place an eye on top.
Storage
- Store your marshmallow starfish in an airtight container for up to 1 week.
- Package individual starfish in cellophane bags to give as party favors or gifts.
Tips
You will have lots of extra scrap pieces of marshmallow once you cut out all of your stars. I saved some to eat and dipped some in chocolate.
If you create a beach scene to display your starfish, you can use some of the chocolate-dipped scraps as big rocks. I didn't mind having scraps, but if you need a lot of starfish and don't want any scraps, you can put your marshmallow in a large pastry bag and pipe out stars on a cornstarch/powdered sugar-lined baking sheet.
Just be sure to pipe a few layers of marshmallow, so each of your starfish is thick.
I created my beach scene using brown sugar sprinkled with a bit of white sugar - a bit messy, but it looked great.
Related Recipes

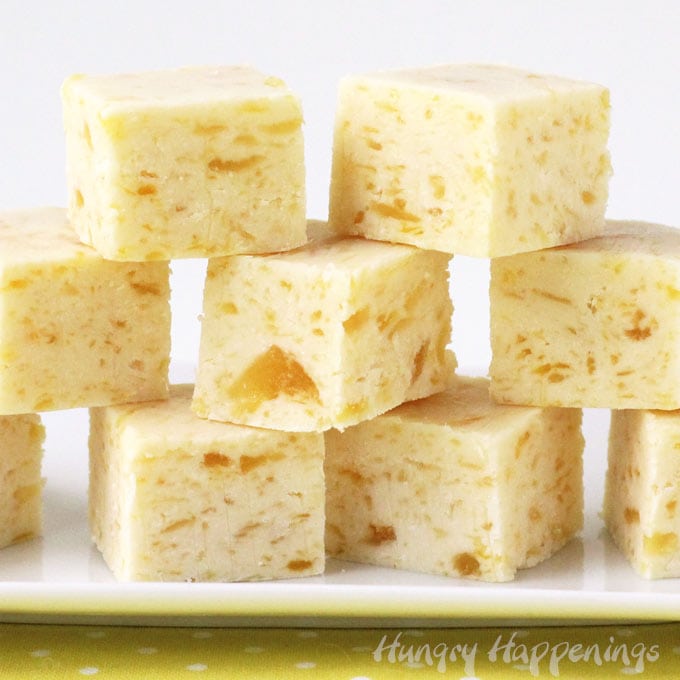
Veggie Pizza Fish, Fruit Pizza Beach Ball, Goldfish Marshmallow, Peanut Butter Fudge Starfish
S'mores Starfish (made using store-bought marshmallows)
Ice Cream Cone Goldfish, Rice Krispie Treat Sand Castle, Beach Ball Pie
Embrace the beautiful weather that we are having and make some of these gorgeous and scrumptious Summer Fun Recipes.
Recipe
This Starfish S'Mores recipe was originally published on July 14, 2011.
- 1-2 teaspoons butter or non-stick cooking spray
- ⅓ cup powdered confectioners sugar
- ¼ cup corn starch
- 1 cup water divided
- 2 ½ tablespoons unflavored gelatin (about 3 packages)
- 1 ½ cups granulated sugar
- 1 cup light corn syrup
- pinch of salt
- 1 teaspoon pure vanilla extract
- 50 squares of graham crackers crushed into fine crumbs
- 16 ounces semi-sweet chocolate melted
- 24 candy eyes
-
Grease the bottom and sides of a 9" x 13" with butter or cooking spray.
-
Combine the powdered sugar and corn starch and dust the inside of the pan.
-
Sprinkle gelatin over ½ cup of water in the bowl of a stand mixer.
-
Let sit 5 minutes.
-
Stir together remaining water, sugar, corn syrup and salt in a small saucepan set over medium heat.
-
Cook, covered for 4 minutes.
-
Remove lid and cook, without stirring until the mixture reaches 240 degrees Fahrenheit (about 7-8 minutes.)
-
Slowly pour hot liquid into the gelatin with the mixer turned on low speed.
-
Increase mixer speed to high and whip until the marshmallow becomes very thick and cools to a lukewarm temperature, about 12-15 minutes.
-
Add the vanilla and whip just to combine.
-
Spread the marshmallow into an even layer in the pan.
-
Dust top with powdered sugar/corn starch.
-
Let cool for 4 hours.
-
Turn out onto a cutting board, cut into star shapes.
-
Dip in melted chocolate, attach two candy eyes, and coat in crushed graham crackers.
-
Set on a parchment paper lined baking sheet and allow the chocolate to harden before serving.
Recipe Video

- Banana Split Bars – A Fun and Easy Summer Dessert - March 4, 2026
- Pineapple Fudge (No Candy Thermometer Needed!) - March 4, 2026
- No-Bake Peanut Butter Pie Recipe - March 3, 2026
Karen says
Yes!! Love that they are made with homemade marshmallows. The video and photos are excellent. Thanks for all your work to make sure we can make these easily!
Diane Miller says
This is the cutest idea ever .I just sent a family memember who makes the best homemade marshmallow this recipe Thank im going to make these
Beth says
Thanks so much, Diane. I'm happy you are going to share the recipe! 🙂
Christy says
About how many does one recipe make?
Beth says
I got one dozen stars cut out of one pan of homemade marshmallows, but you could make more or less depending on the size of the cookie cutter you use.
Jennifer Prior says
These are sooooo cute! Thanks for the idea and tutorial.
By the way, I'd like to invite you to post on my new blog hop (www.myflagstaffhome.com) that is open all weekend, if you're interested.
Jennifer
Kati says
I love homemade marshmallows. But your stars are too cute, I would feel guilty eating them! Maybe I'll have to try them for our 4th of July party!
Kim Denne says
These are RIDICULOUSLY cute!!! Such a clever and fun idea 🙂
Kat@Home. Made. Interest. says
What a cute and delicious idea. I'm pinning this...now I just have to convince someone to have a beach htemed birthday! 😉
April Lord-Brown says
I have failed at this twice. Been trying all week. I tried to make the easy premade marshmallow version, but my microwave is broke. I tried to heat the marshmallow on the stove the way I would for rice crispy treats. Burnt them. On the upside, they tasted like a marshmallow that had been roasted on a fire, so I thought they tasted yummy.. but I will be serving to a bunch of city people who would taste burn and have no context of a real smore. Then I tried melting them over boiling water, uhh they didn't melt much and I was unable to press them into pan. I'm doing one more desperate attempt tonight before I give up... I really really wanted these for my daughter's underwater clifford birthday party. Which is Tomorrow. Sigh. It looks so easy and so beautiful and fun. Sadness.
beth says
Sorry to hear about all your mishaps. I would have probably tried the same things you did. I don't really know another way to melt store bought marshmallows. I do love the homemade marshmallows and do recommend them for this recipe. I hope you are able to get this to work for your party.
Anonymous says
They actually sell star-shaped marshmallows. Already made.
I bought some in red, white, and blue for the 4th of July and
am going to use the leftovers to make these cute starfish.
beth says
Yes, I saw those in the stores here this year and bought some too. I saw large ones that would be perfect for these starfish and some really small ones that I don't think would look much like stars once they were dipped in chocolate. I always love when a product comes on the market that makes creating one of my project easier! Have fun making the starfish.
MamaBenson7 says
What a great idea! I am definitely going to be doing these this weekend with my girls. Thanks so much. How fun!
Amanda says
I tried to make these tonight. My son's first birthday is in a couple of weeks and we are doing an under the ocean themed party for him and I thought these were ADORABLE so I decided to do a trial run.. I'm not too great with baking or being creative but I'm pretty good at following directions. I don't have a mixture so I used store bought marshmallows. The first part seamed easy enough all the way to putting the marshmallows in the pan to cool. I let them cool for an hour but they still seamed way too sticky. I was impatient so I stuck them in the freezer for a few minutes which seemed to help when it came to cutting out the star shapes. Although I quickly realized I think I had the wrong type of cookie cutter? Mine is plastic and small... I thought I had a different one also but I don't know what happened to it 🙁 anyways it was a pain because the cutter I had wouldn't cut all the way through the marshmallows. So I had to cut them all out with a knife. Once I did that, I melted the chocolate as directed on here, but then as the comment above, mine turned into blobs also 🙁 I was so sad because they're so cute I really want them at his party! Do you have any suggestions? Also even after they cooled they were pretty messy and seemed just too gooy and nothing like your photos!! Maybe they were just too small? I'm not sure :/ I want to make them again but I'm scared they wont turn out again!
HELP.
Beth Jackson Klosterboer says
Hi Amanda,
I know how frustrating it can be trying to re-create a recipe without the proper tools and ingredients. I used homemade marshmallows because I think they taste great and are easier to work with, but have had success with store bought marshmallows too. They are stickier and have a more rubbery consistency. You can cut through them, but you do need to have a cookie cutter that has inch high sides and are made of thin material. Plastic cutters, as you found, do not have very high sides and are rather thick. A metal cutter definitely works better.
The only reason I know why the marshmallows turned into blobs is that the chocolate was too hot, as mentioned above. If you don't have a thermometer, the best way to test the chocolate is to put a dab on your lip. You want it to feel cool, yet still be liquid. It's best to cool the chocolate to about 90-91 degrees which is about 8 degrees cooler than body temperature. If you dip your marshmallow stars into cooler chocolate, they will not melt then they will hold their shape nicely once coated in the crumbs.
I do hope you give this another try with the metal cookie cutter. They really are cute and would make a great addition to your ocean themed birthday party. If you have any other questions, don't hesitate to ask.
Reagan Leigh says
I want to know how anyone was able to make these?!?! My stars turned to blobs in the chocolate!!! My kitchen is a mess and I've spent $ and all day trying to make these stupid things!! Cute, but impossible (at least with store bought marshmallows)!
Beth Jackson Klosterboer says
Hi Reagan, I'm so sorry to hear it didn't go well for you. Your chocolate must have been too hot which melted the marshmallows. I apologize for not covering that in my tutorial. No one has mentioned it before, so I hadn't even thought about it. When you melt chocolate, it's best to not let it get above 115 degrees Fahrenheit, but it's best to use even cooler chocolate when you dip something into it. I usually use tempered chocolate which is 90 degrees and had no trouble with my marshmallows melting. I am going to add note to the tutorial above about checking the temperature.
If you are ever working on one of my recipes again and are having trouble with something, please let me know and I'll try to help you through it.
TalisHa Vining says
Hi luv it how far in advance can I make the starfish s'mores and how can I store them to sty fresh
Beth Jackson Klosterboer says
Keep them stored in an airtight container, like Tupperware or a Rubbermaid container. Just leave them at room temperature and they will keep for at least one week.