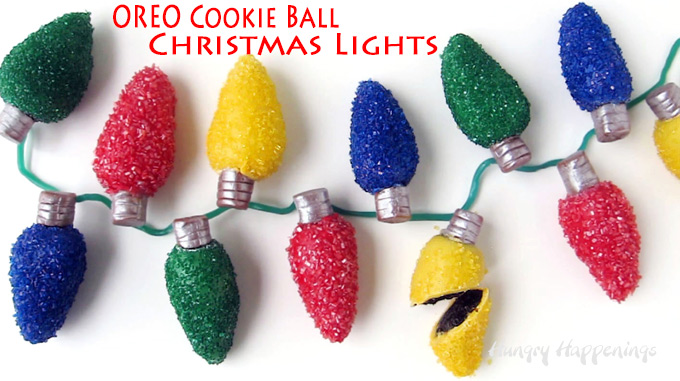
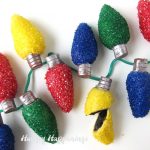
Brighten up your holiday by making these OREO Cookie Ball Christmas Lights to share with your family and friends. Each OREO Cookie ball is shaped like a Christmas light and coated in candy melts and colored sugar so they sparkle.

Have you enjoyed the chocolatey goodness of an Oreo cookie ball before?
Oreo cookies are crushed and blended with cream cheese, rolled into balls, and dipped in chocolate. You can easily make them plain round balls, or you can have some fun and create these bright and colorful OREO Cookie Ball Christmas Lights.
Each of these light bulb-shaped OREO Cookie Balls has been dipped in colored confectionery coating and sprinkled with glistening colored decorator sugar.
To make them really look like Christmas lights, a silver screw base made out of chewy chocolate fudge rolls brushed with silver luster dust is attached.

You can string these lightbulb-shaped Oreo cookie balls across your Christmas dessert table along with stands of green or black licorice laces to add a festive holiday touch to your display.
Or you can package individual lights in clear cellophane bags and attach them to gifts or use them as stocking stuffers.
Ingredients
- Mint Cremé OREO Cookies
- cream cheese
- candy melts in a variety of colors (red, green, blue, and yellow)
- colored sugar in the same colors as above
- chewy chocolate fudge rolls (Tootsie Rolls)
- edible silver luster dust
Supplies
- food processor (optional)
- jars or cups
- toothpicks
- paintbrush (food-use-only brush)
You can find items needed to make these OREO Christmas Lights at Amazon. I earn a small commission when you make a purchase using the links below at NO extra cost to you.
 Wilton Red Candy Melts Cand...Shop on Amazon
  CK Products 4 Ounce Sanding...Shop on Amazon
  Dee Best Rainbow Multicolor...Shop on Amazon
Instructions
Make the OREO Cookie Balls.
- Crush your OREO Cookies.
- I find it easiest to crush my cookies using a food processor, but if you don't have one, it's no problem. You can place your Oreo cookies in a large zip-top bag and smash them using a rolling pin, a meat mallet, or the back of a skillet.
- Be sure to crush the whole cookie, including the filling.
- Mix cream cheese into the cookie crumbs.
- Be sure to set your cream cheese out at least an hour ahead in order for it to soften enough to easily blend with the cookie crumbs.
- You can mix the cookies and cream cheese in the food processor as well. Just add the cream cheese to the food processor with the cookie crumbs and pulse until the mixture comes together in a ball.
- Cover the dough with plastic wrap and refrigerate it for at least 30 minutes until it feels firm.
- Scoop out 36 tablespoons of the cookie dough mixture.
- Roll each scoop into a ball, then shape it into a light bulb shape. See the video below to see how to do this.
- Set the cookie bulbs on a baking sheet lined with parchment paper and pop them into the freezer for about 10 minutes.

Create the lightbulbs.
- Meanwhile, melt your candy melts and pour them into a glass or jar. I used red, blue, yellow, and green, but any color will work. See my chocolate-making tips page for easy melting instructions.
- Once your light bulbs have chilled, take a few of them out of the freezer and insert a toothpick into the rounded edge of each bulb.
- Dip one of the bulbs into one color of the confectionery coating, leaving a small ¼-inch circle around the toothpick uncovered. You will need to work very quickly, as the cookie balls are very cold.
- Once you've dipped the cookie ball, light bulb, remove it from the confectionery coating and allow the excess candy coating to drip off for just a second or two, then hold the light bulb over a parchment paper-lined baking sheet and pour colored sugar over the entire wet surface. More of the candy coating might drip off into the sugar in your pan. If you allow those little dribbles to harden, you will easily be able to remove them from the sugar so you can save the sugar for another use.
- Set the dipped cookie ball Christmas light on a clean sheet of parchment paper and let it air dry for at least 20 minutes.
- Once you have dipped this set of cookie ball lights, get more from the freezer and repeat the process.
Tips
- It's best to keep the Cookie Balls chilled in order to be able to easily dip them. If they are too soft, they will fall off the toothpick, and you will lose them in your candy coating.
- As the candy coating hardens around the cookie ball mixture, it will shrink. Leaving the whole up around the toothpick will allow the dough to pop out on top as the candy coating shrinks. This will keep your candy-coated cookie balls from cracking.
- Once all your cookie balls have sat at room temperature for at least 20 minutes, you can use a toothpick to remove any of the Cookie Ball mixture that has poked through the hole.

Create the screw base for each bulb.
- Cut each chewy chocolate fudge roll in half.
- Then use a knife to create some ridges in each piece that will allow the candies to look like threads on a screw base.
- Use some melted candy melts to attach one of these chewy chocolate fudge roll pieces to each light bulb. You will completely cover the hole at the top.
- Set the light bulbs aside to dry for about 10 minutes. If any of the fudge rolls pop off after that time, just reattach them.
- Brush the fudge rolls with edible silver luster dust. The silver color will make your light bulbs look very realistic, but you can skip this step if you'd like.
To serve your OREO Cookie Ball Christmas Lights, you can string green or black licorice laces across a serving platter or your table and set the bulbs so that they look as if they're attached to the licorice lace.
If you want, you can attach the light bulbs using candy melts, but in order to do so, you need to arrange them on the platter exactly as you'd like and don't plan to move them.
I personally like them unattached so that my party guests can easily pick them up without disturbing the rest of the strand.
You can use these Oreo Cookie Ball Christmas lights to decorate a cake if you have a large cake, or you can make your OREO Cookie Balls a bit smaller to top a smaller cake.
Related Recipes
Here are a few more fun Christmas recipe ideas.

Recipe
Colorful light bulb shaped OREO Cookie Balls are dipped in colored candy coating and sprinkled with shimmering sugar.
- 36 Mint Creme OREO Cookies crushed into crumbs
- 8 ounces (1 block) cream cheese, softened
- 32 ounces melted confectionery coating wafers, red, green, blue, and yellow
- 6 ounces colored sanding sugar, red, green, blue, and yellow
- 18 small chewy chocolate fudge rolls
- edible silver luster dust, optional
- green or black licorice laces, optional
-
Stir together the OREO Cookie crumbs with the cream cheese until well blended.
-
Cover with plastic wrap and refrigerate for about 30 minutes until firm.
-
Scoop out 36 tablespoon size portions of the dough.
-
Roll each into a ball then shape into a Christmas light bulb.
-
Freeze for 10 minutes.
-
Remove a few bulbs at a time and insert a toothpick into the fat end of the bulb.
-
Dip one bulb at a time into a colored confectionery coating leaving a small opening near the toothpick then lift out of the coating and allow the excess to drip off.
-
Immediately and quickly sprinkle the same colored sugar over the candy coating.
-
Set the OREO Cookie Ball Christmas Light onto a parchment paper lined baking sheet and allow to dry at room temperature for at least 20 minutes.
-
Repeat.
-
Once the cookie dough has oozed out from around the toothpick, remove the excess leaving a flat opening.
-
Cut the fudge rolls in half then use the knife to create grooves that look like the screw base of the light bulb.
-
Attach a fudge roll screw base to each light bulb using melted confectionery coating.
-
Let the candy coating harden for about 10 minutes.
-
Brush edible silver luster dust over the fudge roll if desired.
-
Your OREO Cookie Ball Christmas Lights are ready to serve.
Recipe Video
- Wrap the OREO Cookie Ball Christmas Lights well with plastic wrap or wax paper (preferably individually) and place in a cardboard box.
- Store in the refrigerator for up to 3 weeks.
- To thaw, remove from the refrigerator but do not open the box.
- Let the box sit at room temperature for at least an hour before opening and removing the cookie balls.
- The cardboard will wick up any moisture from the refrigerator keeping the candy coating on the cookie balls dry.
- If you freeze these, thaw in the refrigerator for a full day before allowing them to come to room temperature.

- Banana Split Bars – A Fun and Easy Summer Dessert - March 4, 2026
- Pineapple Fudge (No Candy Thermometer Needed!) - March 4, 2026
- No-Bake Peanut Butter Pie Recipe - March 3, 2026

Bridget Lucas says
Love this idea but don't like cream cheese what else can I use thank you
Beth says
You can use frosting instead. I've not done this before but I think you could start by adding 1/2 cup of frosting then add more as needed until it forms a pliable dough.
Bonnie Snow says
It says to use chewy chocolate fudge rolls for the light base. Are these tootsie rolls or rolos or what kind are they?Are they in the candy aisle?
Beth says
Yes, use Tootsie Rolls. The Tootsie Roll midges work great!
T.Beste says
Looking for holiday dips for.cookies
The Partiologist says
These are fantastic, and I love that you used the fudge roll on the light!!
Beth says
Thanks! I wanted something that was just the right size and was soft enough to be able to make it look like the light bulb screw base. Being able to carve grooves into the candy was perfect. I'm glad you like it!