You'll hit a home run with your favorite ball players when you make them a batch of Candy Filled Baseball Cap Pinata Cookies. They're fun to make and even more fun to eat!

I have to laugh when I look at these cookies, not because they are funny in any way, but because it took me three years to finally get these made. Twice over the past few years, I've made the dough for these cookies, and let it sit in the refrigerator until I had to throw it out.
The first baseball season was almost over before I made the first batch of dough, and just simply ran out of time. Our exchange student was here and we just got too busy. The second time I made the dough, I colored it orange and green, because those were my nephew's team colors. The dough looked so ugly, that I just didn't feel up to making and sharing the cookies with you.

This year, I was determined to make these early in the baseball season, so I'd actually get them done and am so happy that I did.
My nephew is playing on the high school varsity team and their colors are blue and white, which definitely made a nicer looking baseball cap cookie than those I set out to make last year using orange and green.

Of course, if you are making these for your child's team, you may just have to make orange and green, or gold and black, or purple and yellow cookies.
That's the beauty of these cookies, they can be made to represent your favorite team using any color.
You can even go so far as to fill them with candies that match the color of the caps.

In order to make these three dimensional cookies, you will need to bake your cookie dough over a curved pan. I used a cake ball pan. I chose one that makes large cake balls, a Bake Pop Pan, but any size will work. You'll just need to adjust the measurements for the bottom and bill of each cap depending on the size pan you use.
When my husband saw the cookies before I decorate them, he thought they would have looked more realistic with a flatter top, so you could use a mini muffin tin, instead of the cake ball pan if you want a flatter topped cap. Your cookies will be a bit larger, so, once again, just adjust the dimensions of the bottom cookie.
I do wish I would have gotten these made a few years ago, but really loved the idea and just wanted to get them made so I could share them with you. Being my nephew is a teenager, and is too cool to pass these out to his teammates, my sister is going to sell them at the concession stand at tonight's game. I'm pretty sure they will sell out quickly and some of the parent's will buy them for their little, or not so little, sluggers.

3-D Candy Filled Baseball Cap Piñata Cookies
Ingredients: (makes 26-32 cookies)
Cookie Dough-
4 cups (17 ounces) all purpose flour
¾ teaspoon salt
¾ teaspoon baking powder
1 cup butter, softened slightly
1 ½ cups sugar
2 large eggs
1 ½ teaspoons vanilla bean paste or pure vanilla extract
¾ teaspoon almond extract
food coloring to match your team's colors
Decorations:
4-6 ounces modeling chocolate* or fondant
corn syrup
2-4 tablespoons royal icing (or store bought cookie icing to match cookie color)
candy (about a tablespoonful per cookie)
*You can find the recipe and tutorial for making homemade white modeling chocolate on my Chocolate Making Tips page.
Supplies:
Bake Pop Pan or mini muffin tin
round cookie cutters (I used 2 ½ and 2 ¼ inch cutter)
square or rectangle cookie cutter (I used a 2 ¼ square)
pizza wheel or knife
Instructions:

Mix the flour, salt, and baking powder together in a bowl. Set aside. Cream butter and sugar until light and fluffy. Stir in eggs, vanilla bean paste, and almond extract.
Note: I love using Rodelle's Vanilla Bean Paste in my cookies. The flavor is so intense and it doesn't bake out as it does when using liquid extracts, so the cookies have an amazing vanilla flavor.If your baseball cap cookies will be just one color (not including the modeling chocolate decorations) then add the food coloring to your batter now. Make the color really intense because the flour will lighten it up a lot.
Add the dry ingredients and stir just until blended.
If using multiple colors, then you'll have to mix the coloring in after you mix the dough. I suggest using food handling gloves and kneading the color into the dough, just be sure you don't over mix the dough or your cookies will get tough.

Lightly dust your work surface or non-stick mat with flour.
Most cake ball pans come in two halves, one that is smooth and one that has a hole drilled in it. Use the smooth half.
Roll the cookie dough out to between a 1/16 inch and ⅛th inch thickness. Cut using round cutters, so that when you drape the dough over your cake ball or mini muffin pan, the dough drapes over but doesn't touch the base of the pan. The cookies will spread slightly while baking so you want to give them a bit of room to spread. You don't want the dough forming a lip at the base of the cookie. I used a 2 ½ inch cutter for this.

Drape circles of dough over each mound on your pan and smooth with your fingers.

For a realistic look, use a gumpaste quilting (stitching) wheel to make the stitch lines on your baseball caps. Roll the wheel across the cap then make an X over that original line, so you'll have 6 stitch lines.

Place the pan in the freezer for 15 minutes and preheat your oven to 350 degrees Fahrenheit.
Bake the cookies for 8-11 minutes.

Allow the cookies to cool for 2 minutes, then release the cookies from the pan, but leave them sit for another 10 minutes. I wedged a thin plastic spatula under the bottom edge of each cookie and just lifted them off the pan slightly, just to make sure they weren't sticking.
Once the cookies have cooled for 10 minutes, then lift them off and set them on a cooling rack and allow them to cool completely.

To make the bills of the cookies, you could draw a template based on the size of your baked caps and hand cut them or you can cut a circle and square or rectangle and attach them together. To do this you'll need to cut a circle to fit under the caps you've just made. If using the Bake Pop Pan, you'll use a 2 ¼ inch cutter.
Next you'll need to cut the bills. You can hand cut these, or use a square or rectangle cutter. I cut 2 ¼ inch squares.
Use the round cutter to cut a half moon shape out of each dough square. Brush some water around the cut edge and set a circle of dough snugly up against the cut edge. If needed, cut and shape the bill so that it looks right. My square of dough was too big, so I had to cut about ⅛th of an inch off each side. I also curved the edges a bit.

Set the cookie bills on a parchment paper lined baking sheet. Refrigerate for 15 minutes, then bake for 10-12 minutes until set.
Allow cookies to cool completely.
NOTE: I made enough caps and brims to assemble 18 cookies (the number of cookies I could make at one time using my Bake Pop Pan,) then afterwards used the remaining dough to make 10 more cookies. I did throw some of the dough out, as I don't like to roll it too many times because the cookies get tough. I could have gotten about 32 cookies out of the dough, if I would have used it all.

If you want to add a different color panel to your baseball caps, roll out that color of modeling chocolate or fondant to 1 1/16th inch thickness.
Cut triangles out that fit your caps and attach them to the front of each cap, cutting off excess modeling chocolate as needed. Pinch off small pieces of the modeling chocolate and roll into balls.

Brush a thin layer of corn syrup on the front of the cookie and attach the modeling chocolate panel folding the edges under the bottom edge of the cookie. Attach the ball of modeling chocolate at the top point of the triangle panel and flatten into a button.

If you want, you can add a letter or a very small shape to the front of each baseball cap cookie.
Roll out some colored modeling chocolate or fondant, cut out your letter or shape, then brush the backside of the letter with water and press it onto the modeling chocolate on the cookie. If you haven't added the modeling chocolate triangle, then you'll need to use icing to attach the letter or shape to the front of each cookie.
You could also use a food coloring marker to personalize each baseball cap. This will work well if you want a more detailed logo.

To assemble the cookies, turn each cap upside down, fill with candy. Pipe a thin line of royal icing (or cookie icing) over the edge of the cookie. Turn the brim upside down and attach it to the cap. Carefully turn the cookie right side up and set it on the counter. Allow it to dry for at least 30 minutes before moving.

Allow the icing to dry completely.
I used Betty Crocker Cookie Icing and it dries pretty quickly, but if you use homemade royal icing you'll need to let them dry for at least a few hours.

I am so excited to have finally gotten these cookies made and hope they sell well at the concession stand.
You can find supplies needed to create this recipe on Amazon. I earn a small commission when you use the sales links in this post to make a purchase at no extra cost to you.
 Telebrands Bake PopShop on Amazon
  Ateco Plain Edge Round Cutt...Shop on Amazon
  Fox Run, 1 x 2.75 x 2.75 in...Shop on Amazon
 Rodelle Vanilla Bean Paste,...Shop on Amazon
 KitchenAid Pro 600 6 quart ...Shop on Amazon
 Bc Cookie Icing Whte Size 7...Shop on Amazon
More Candy Filled Piñata Treats
from Hungry Happenings


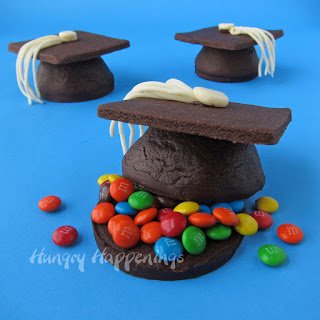
3D Candy Filled Graduation Cap Cookies

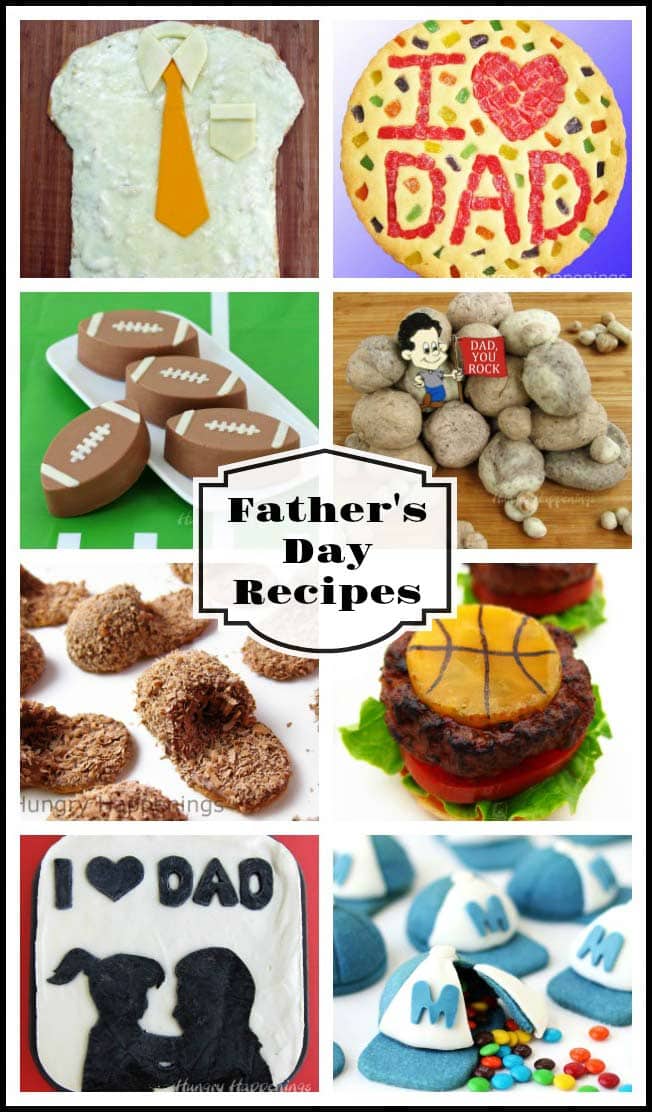
Need some more ideas for Father's Day? Well go check out the attached link and shower your dad in goodies!

- Banana Split Bars – A Fun and Easy Summer Dessert - March 4, 2026
- Pineapple Fudge (No Candy Thermometer Needed!) - March 4, 2026
- No-Bake Peanut Butter Pie Recipe - March 3, 2026

Georganne says
Oh my gosh!! Beth!!! These are hands down the coolest pinata cookies I've ever seen!!! I can't believe I haven't seen them before now!!!
Beth says
Thanks, Georganne. These baseball caps were a huge hit with my nephews baseball team and they were really fun to make?)
Linda Vandermeer says
Oh my goodness these are so awesome I love them.
Jennifer says
These are adorable! How did they sell at the game?
beth says
Thanks, Jennifer. Sadly three games were rained out that week, so my sister just gave them to the players and their parents at practice one night. Everyone loved them, so that made me happy.
Sugartown Sweets says
Your most-est awesome-est pinata cookie yet. I'm reading your post as hubby and I are watching the Braves game! I agree with you on this blue..love it,,so glad you finally made 'em. There is no doubt these sold out quick. I'd say you hit it out of the park!
beth says
I hope the Braves won the game:) I always wished my school colors were blue and white, but instead I got black and gold in high school and brown and orange in college. Gross, on both accounts!
TwoPlusCute says
Oh my, they are brilliant!
beth says
Thank you:)
The Partiologist says
How cute, I'm glad this was the year for you to hit a homerun! 🙂
beth says
That will be the only homerun of my life, that's for sure.
Amanda says
They look lovely! It must have taken you ages to decorate them!
beth says
Thanks, Amanda. Surprisingly these came together quite quickly. I thought they were going to take forever and was happy when they did not.
The Bearfoot Baker says
Oh my goodness! These are the cutest baseball hat cookies I have ever seen. You are so creative!!
beth says
Thanks, I think these cookies are really fun too!
Lisa@hooplapalooza says
oh my goodness these are awesome. hats off to you Beth hats off to you! 🙂
beth says
Thanks, Lisa!
Carlee Scharnhorst says
Those are so cute! You have way more patience than me and it pays off! You always have the best ideas.
beth says
Thanks so much, Carlee. When it comes to decorating food, I do have a lot of patience. My husband would say otherwise in all other areas of my life, though!