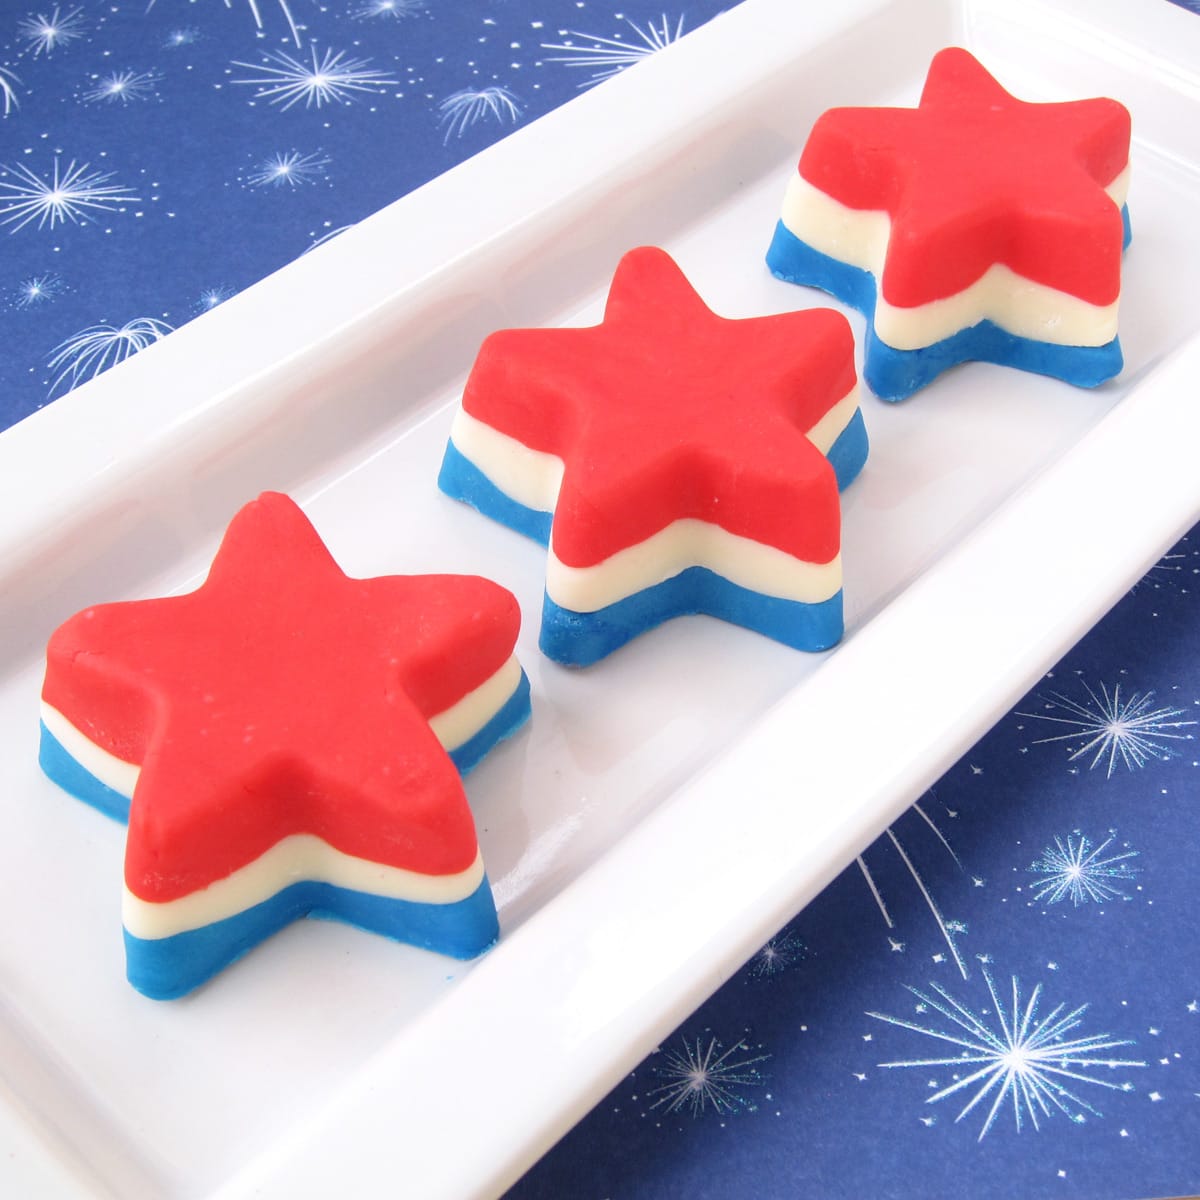
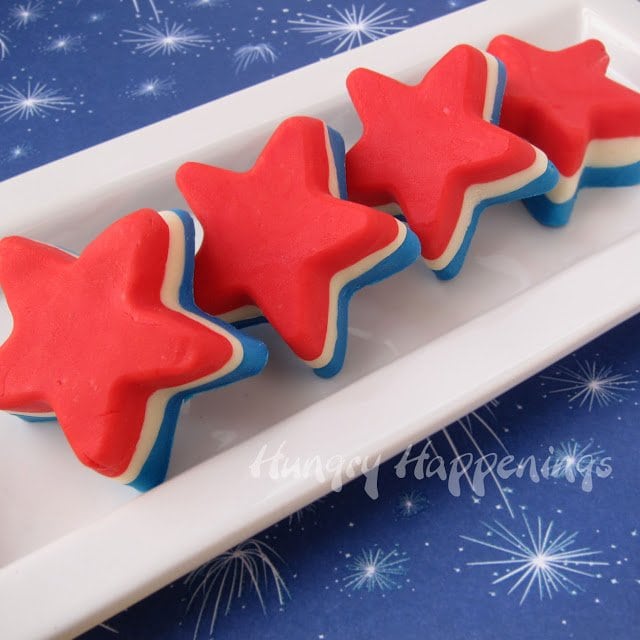
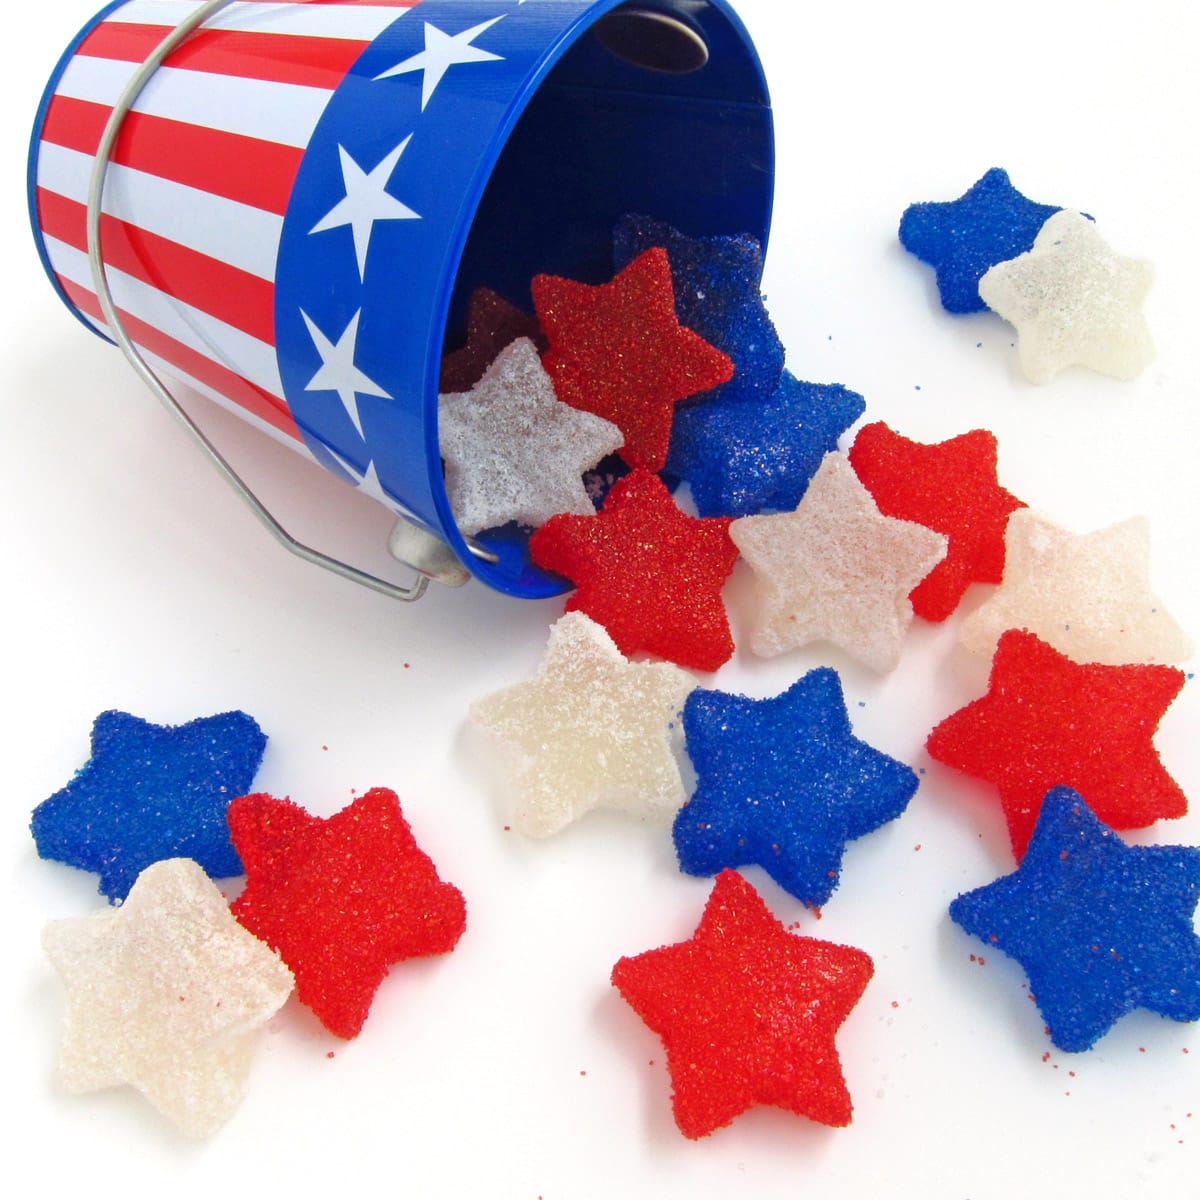
These Red, White, and Blue Fudge Stars are a great way to flair up your next patriotic party! They're simple to make and so yummy to eat!
Silicone molds have become one of my absolute favorite kitchen gadgets.
They are so easy to use and come in so many fun shapes.
When it comes to creating 4th of July desserts, I find myself grabbing my star-shaped silicone molds time and time again.
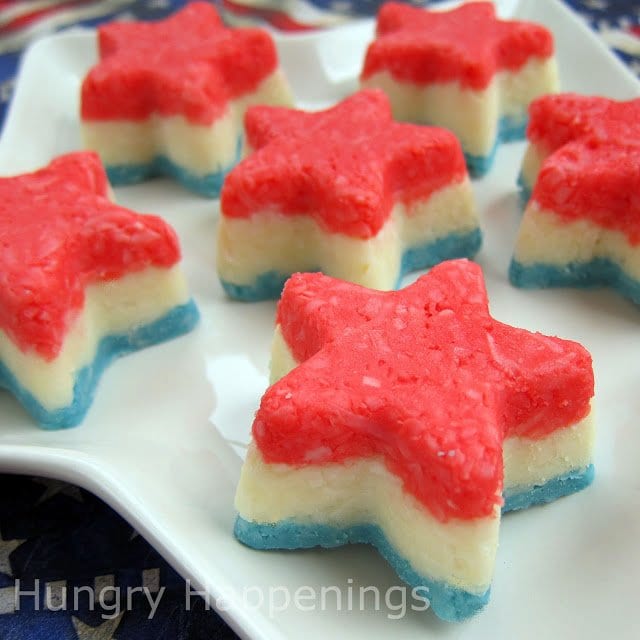
Two years ago I brought these Creamy Coconut Red, White, and Blue Stars, pictured above, to a Fourth of July party. I heard lots of compliments but too many people wouldn't try them because they hate coconut.
I love coconut, as do a handful of my friends, and those lucky few were more than happy to wrap up the extras to take home with them.
I understand that not everything I make will please the masses, but I liked this red, white, and blue star so much, that I felt compelled to use a recipe that would appeal to a larger crowd.
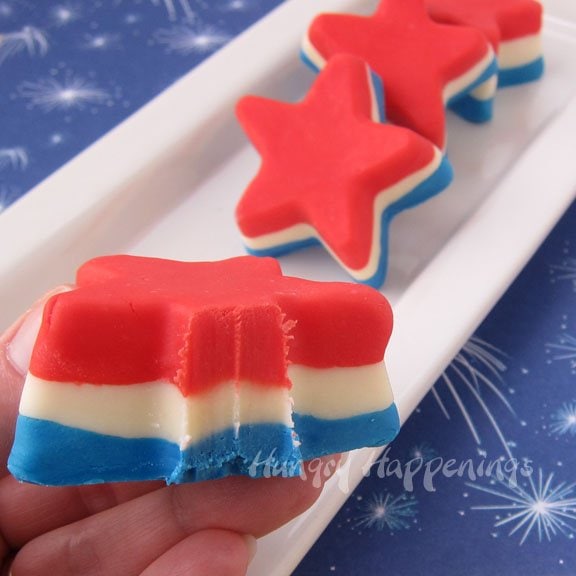
I chose to use white chocolate fudge. It's easy to color and mold as long as you follow my step-by-step instructions. When I made my Conversation Heart Fudge earlier this year, I tried to just pour the warm fudge into the mold, but the finished candies were wrinkled and ugly, so I came up with a simple solution.
My method for making these stars out of fudge is so easy that even kids can help. They'll have fun smashing the fudge into the molds. Their little hands will make easy work of it.
I know many of you attend outdoor picnics on July 4th, and although these are made using white chocolate, you can serve them outside as long as you place them in a shady spot on the table.
RELATED: Find dozens of easy fudge recipes at HowToMakeEasyFudge.com.
Ingredients
white chocolate or white confectionery coating (candy melts)
sweetened condensed milk
red and blue food coloring
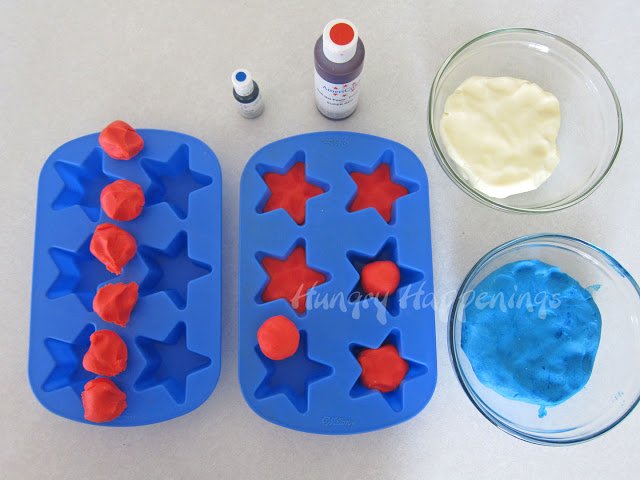
Supplies
medium saucepan
3 small mixing bowls
2 Wilton Silicone 6 cavity star mold
Items used to create this project are available on Amazon.com (commission earned for sales)
 Wilton Star Silicone Mold, ...Shop on Amazon
") Eagle Brand Sweetened Conde...Shop on Amazon
Eagle Brand Sweetened Conde...Shop on Amazon Merckens Super Coatings, Wh...Shop on Amazon
 AmeriColor, Royal Blue, .75...Shop on Amazon
Instructions
Make easy white chocolate fudge.
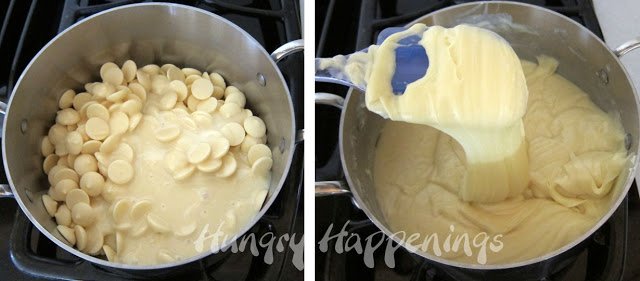
- Heat white chocolate or white confectionery coating and sweetened condensed milk in a medium saucepan over low heat.
- Stir frequently until about half of the chocolate or candy coating is melted.
- Turn off the heat or remove from the stovetop and let sit for three minutes then stir until smooth.
- The heat from the melted chocolate will help to melt the remaining pieces of chocolate.
- If you still have un-melted pieces, set the pan back over low heat for a minute, then repeat.
NOTE: If you overheat this creamy white fudge, it will become greasy as the cocoa butter may seep out of the chocolate. If that happens see how you can fix it, here.
Fill the star mold with red fudge.
- Equally divide the white chocolate fudge into 3 bowls. Color one bowl red, one bowl blue, and leave one bowl white. Allow the fudge to sit at room temperature for 30-60 minutes to cool and thicken.
- Divide the red fudge into 12 equal pieces. Roll into balls and press into the bottom of your silicone star molds.
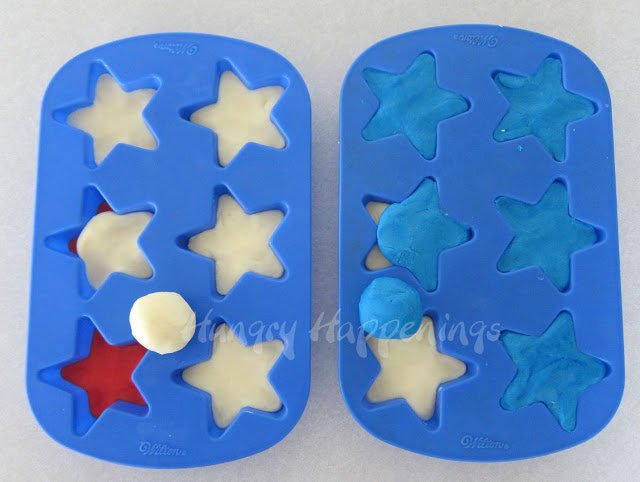
Add layers of white and blue fudge.
- Divide the white fudge into 12 equal pieces and press them on top of the red fudge in the molds.
- Repeat with the blue fudge.
- Allow the fudge to sit at room temperature for 2 hours.
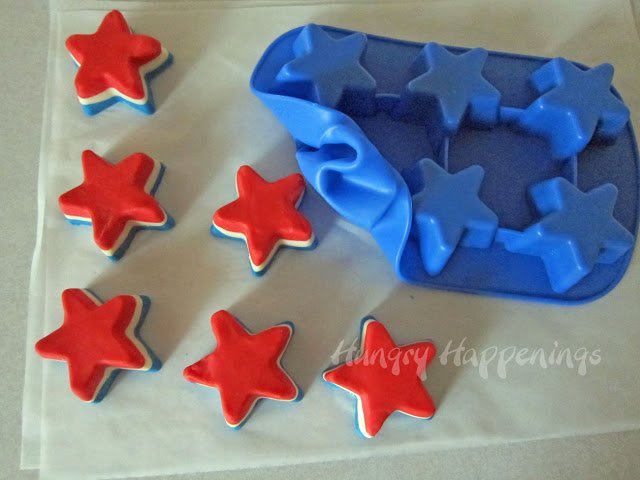
Unmold the fudge stars.
- Pop the fudge stars into the freezer for 15 minutes.
- Then remove and un-mold.
- Press on the backside of each star mold, pushing the fudge out onto your work surface.
- They are ready to serve.

Storage
Store your Red, White, and Blue Fudge Stars in an airtight container at room temperature for up to 2 weeks.
Related Recipes
You might also like these other 4th of July Recipes.
Recipe

Star-shaped white chocolate fudge with layers of red, white, and blue.
- 24 ounces finely chopped white chocolate (or chips)
- or white confectionery coating
- 14 ounces sweetened condensed milk
- red and blue food coloring
-
Heat white chocolate or white confectionery coating and sweetened condensed milk in a medium saucepan over low heat.
-
Stir frequently until about half of the chocolate or candy coating is melted.
-
Turn off the heat or remove from the stovetop and let sit for two minutes then stir until smooth.
-
The heat from the melted chocolate will help to melt the remaining pieces of chocolate.
-
If you still have un-melted pieces, set the pan back over low heat for a minute, then repeat.
-
Equally divide the white chocolate fudge into 3 bowls. Color one bowl red, one bowl blue, and leave one bowl white. Allow the fudge to sit at room temperature for 30-60 minutes to cool and thicken.
-
Divide the red fudge into 12 equal pieces. Roll into balls and press into the bottom of your silicone star molds.
-
Divide the white fudge into 12 equal pieces and press them on top of the red fudge in the molds.
-
Repeat with the blue fudge.
-
Allow the fudge to sit at room temperature for 2 hours.
-
Pop the fudge stars into the freezer for 15 minutes.
-
Then remove and un-mold.
-
Press on the backside of each star mold, pushing the fudge out onto your work surface.
-
They are ready to serve.
Store your Red, White and Blue Fudge Stars in an airtight container at room temperature for up to 2 weeks.

- Banana Split Bars – A Fun and Easy Summer Dessert - March 4, 2026
- Pineapple Fudge (No Candy Thermometer Needed!) - March 4, 2026
- No-Bake Peanut Butter Pie Recipe - March 3, 2026
Carol says
I am going to order some of the products you use from Amazon. It says you earn a commission, is there something I need to do so you get the commission?
Beth says
Thanks for asking, Carol. Just click on the link provided in the post for each product and I will automatically receive the commission with no extra cost to you!
Anonymous says
I am a coconut lover - so how are the coconut stars made? Same recipe except you just add coconut? I've got to try these for sure - I may end up eating them all!!
beth says
The recipe for the coconut stars is here, https://hungryhappenings.com/2011/06/red-white-and-blue-striped-creamy_20.html, but Wilton has Limited Edition Coconut Candy Melts on the market right now, and they could be used in this fudge recipe in place of the white chocolate. That would be great.
J Young says
These are so pretty! Also, I LOVE coconut, so feel free to make me some of those creamy coconut stars. 🙂 I'll be sharing a link to this in a roundup this week on my blog!
www.littledovecreations.blogspot.com
Shamene Medeiros says
I love these 4th of july stars!!!
Crystal says
You are so talented. Every time I am on here I am amazed at the things you create!
See your feature here: http://www.crystalandcomp.com/2013/06/best-mom-advice-62413/
beth says
Thanks for featuring these today on Best Mom Advice!
Julie Corbisiero says
Hi, these look so good and I would love to make them. I saw it on made by you monday.
Julie from julieslifestyle.blogspot.com
Pint Sized Baker says
You always have such great treats! Thanks for sharing on Two Cup Tuesday. Pinned it!
Beth Jackson Klosterboer says
Thank you and I appreciate the pin!
Paula Jones says
Beautiful!!! Pinned, thanks for coming to Sat. Dishes!
Beth Jackson Klosterboer says
Thanks so much for pinning!
Executiva de Panela says
This is one more great tip I find here. Love this blog.
Beth Jackson Klosterboer says
Nice to hear:)
Erin says
How cool are these!!!
Beth Jackson Klosterboer says
Thanks, Erin.
Beth Jackson Klosterboer says
I highly recommend getting some of the silicone molds for candy making and baking. They are really easy to use.
The Bearfoot Baker says
I agree with Kim! You need to have a party for this fudge! Looks yummy!!
Beth Jackson Klosterboer says
They may not have had their own party, but my parent's and their friends did party a bit at the cabin this weekend, and they enjoyed these stars:)
The Partiologist says
These fudge stars deserve a party of their own! LOVE LOVE!
Beth Jackson Klosterboer says
Too bad they have already been gobbled up! My parents took them to a friend's cabin this weekend. They loved 'em.
Maria says
Wow these look so beautiful!!! I actually have those same star molds too!!!! I'll have to try something similar out, thanks so much for the idea!!
Beth Jackson Klosterboer says
I really do love the silicone molds for candy making. I hope you find some great uses for them too!
Hani Bacova says
I need to get some of those molds you use. These are so festive!
Beth Jackson Klosterboer says
I really do love the molds. My only complaint about them is they take up more room than other molds, so I'm needing a big space to store all of them:)