Hungry Happenings

  • RECIPES
    • All Recipes
    • Dessert Recipes
    • Decorated Cookies
    • Decorated Cakes
    • Cheesecake Recipes
    • Everyday Desserts
    • Homemade Candy
    • Everyday Meals
    • Readers’ Gallery
  • HOW TO
    • Chocolate Making Tips
    • Chocolate Making Course (video lessons)
    • Make Modeling Chocolate
      • Modeling Chocolate Recipe and Tutorial
      • How to Color Modeling Chocolate
      • How to Store and Work with Modeling Chocolate
      • How to Fix Greasy Modeling Chocolate
      • How to Fix Dry Modeling Chocolate
      • Use Colored Candy Melts to Make Candy Clay
    • Candy Clay Creations
    • How To Color White Chocolate and Candy Melts and Paint Candy Molds
    • How to Use Food Coloring Markers
  • HOLIDAYS
    • ALL HOLIDAY RECIPES
    • Valentine's Day
    • St. Patrick's Day
    • Easter
    • 4th of July
    • Halloween
      • Hungry Halloween
    • Thanksgiving
    • Christmas
    • New Year's Eve
    • MORE HOLIDAYS
      • Mother's Day
      • Father's Day
      • April Fools
      • Chinese New Year
      • Cinco de Mayo
      • Day of the Dead
      • Earth Day
      • Mardi Gras
  • PARTY FOOD
    • Super Bowl
    • Graduation
    • Birthday Party
    • March Madness
    • Summer Fun
    • Baby Shower
    • Wedding Shower
    • School/Teacher
    • Movie and T.V. Characters
    • Kid's Treats
    • Fun Party Recipes
  • MY COOKBOOKS
  • ABOUT
  • MY BLOGS
    • HowToMakeCerealTreats.com
    • HowToMakeEasyCookies.com
    • HowToMakeEasyFudge.com
    • TheSugarAcademy.com
menu icon
go to homepage
  • recipes
  • chocolate tips
  • about
  • cookbooks
  • subscribe
  • holiday recipes
  • Halloween recipes
  • party food
  • appetizers
  • decorated cheese balls
  • cute food for kids
  • dessert recipes
  • chocolate recipes
  • homemade candy
  • decorated cakes
  • cupcake recpes
  • cheesecake recipes
  • cookie recipes
  • rice krispie treats recipes
  • fudge recipes
  • modeling chocolate treats
  • ice cream recipes
  • popcorn recipes
  • everyday meals
  • recipe roundups
  • readers' gallery
    • Facebook
    • Pinterest
    • YouTube
  • search icon
    Homepage link
    • recipes
    • chocolate tips
    • about
    • cookbooks
    • subscribe
    • holiday recipes
    • Halloween recipes
    • party food
    • appetizers
    • decorated cheese balls
    • cute food for kids
    • dessert recipes
    • chocolate recipes
    • homemade candy
    • decorated cakes
    • cupcake recpes
    • cheesecake recipes
    • cookie recipes
    • rice krispie treats recipes
    • fudge recipes
    • modeling chocolate treats
    • ice cream recipes
    • popcorn recipes
    • everyday meals
    • recipe roundups
    • readers' gallery
    • Facebook
    • Pinterest
    • YouTube
  • ×
    Home » Holiday Treats and Recipes » 4th of July

    Patriotic Biscuits

    Modified: Sep 6, '23 · Published: May 16, '12 · By: Beth Klosterboer · Commission earned on paid or sponsored links.

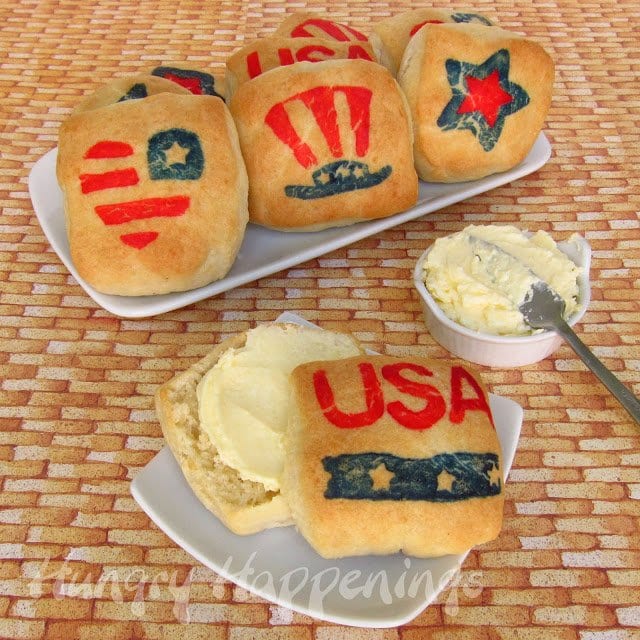
    These Patriotic Biscuits are an amazing addition to your Memorial Day, Veterans Day, or 4th of July party! These yummy biscuits will have your guests craving more than you can make!

    I know I've shared the biscuit decorating technique with my readers before, but this time, I'm making my biscuits from scratch using a simple recipe adapted from Cook's Illustrated that utilizes heavy whipping cream instead of buttermilk and butter.

    It's my go-to biscuit recipe because I always have cream on hand to make chocolate truffles, ganache, etc. They have a wonderful flavor and nice texture. You can use any biscuit recipe you like or use store-bought dough, the resulting decorated biscuits should look similar.

    Transform an ordinary pile of beige biscuits into an eye-catching focal point for your picnic table using foam stamps and food coloring.

    Patriotic Biscuits to celebrate Memorial Day or 4th of July (makes 9)

    Ingredients:

    2 cups all purpose flour, plus more to dust work surface
    ½ teaspoon salt
    1 teaspoon baking powder
    2 teaspoons granulated sugar
    1 ½ cups heavy whipping cream
    red and blue liquid food coloring (the grocery store variety)

    Supplies:

    patriotic foam stamps*

    bench scraper, pizza wheel, or knife

    two paint brushes used for food only

    baking sheet lined with parchment paper

    *I purchased my patriotic foam stamp set this week from Hobby Lobby. I thought I'd be able to find a link for this product on their website for those of you who don't live near a Hobby Lobby store but could not, so here are a few links to other places with fun patriotic foam stamps which will work also. Set of 6 stamps on Etsy or a  Set of 8 on Bonanza.

    Instructions:

    • Preheat your oven to 450 degrees and put one of your oven racks in the upper-middle position.
    • Whisk together the flour, salt, baking powder, and sugar in a mixing bowl.
    • Pour in the heavy cream and stir just until combined.
    • Dust your work surface liberally with flour.
    • Pour the dough out onto the work surface and knead for about 30 seconds until the dough is elastic and forms a ball easily.
    • The kneading, although an unusual technique for biscuits, will help them to rise taller and fluffier, so don't skip it.

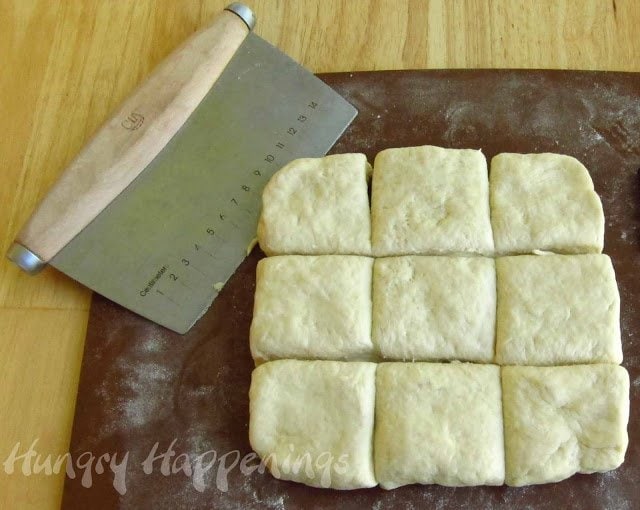
    • Flatten the dough into a square that is about 6" x 6" or so.
    • Cut into 9 squares.
    • If you prefer, you can use a biscuit cutter and cut them into circles, but the stamps worked well on the square biscuits.

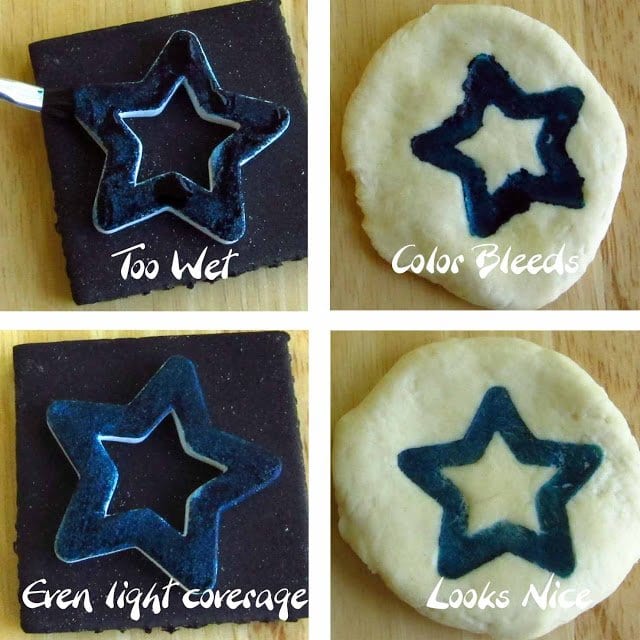
    • Lightly brush food coloring onto your foam stamps.
    • If you have puddles of food coloring on the stamp it will bleed once pressed onto the dough (see top picture.) So, be sure to brush off any excess coloring.
    • Turn the foam stamp upside down and press the painted side onto the dough.
    • Hold for a few seconds then carefully pull it straight up and away from the biscuit leaving a nice clean imprint.

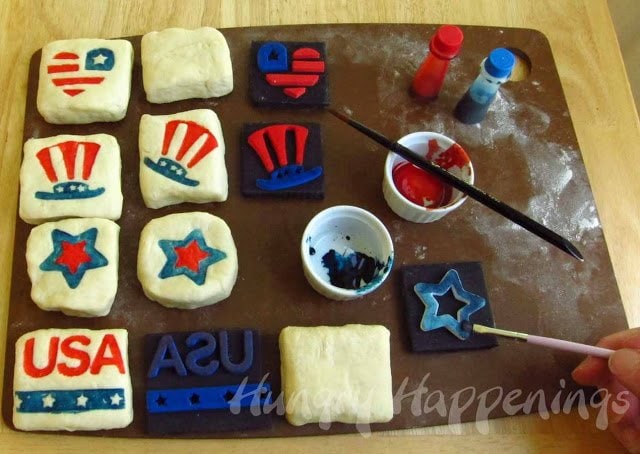
    • The stamp set that I used allowed for two colors to be painted on most of the stamps.
    • I used the larger biscuits to stamp USA and the smaller corner pieces were stamped with the star.

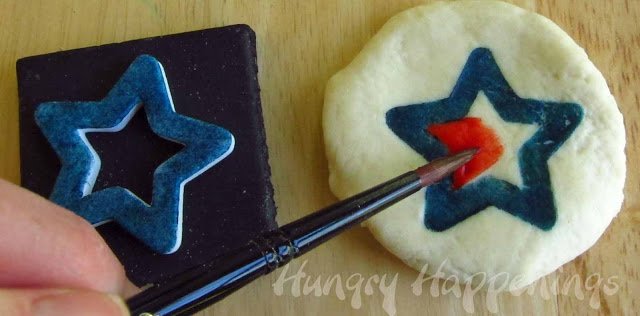
    • The star stamp doesn't allow for two colors, so I just used the red food coloring to paint inside the star directly onto the biscuit dough.
    • If you have artistic talent, you could just use the food coloring to paint your own designs onto the dough.


    • Place the biscuits on a parchment paper lined baking sheet and bake for about 15 minutes until golden brown, rotating the pan halfway through the baking cycle.
    • Serve warm or at room temperature.
    • You can make and decorate your biscuits, cover the baking sheet with plastic wrap, and refrigerate for up to 2 hours before baking if you want to bake just before serving.
    • If taking to a potluck, allow biscuits to cool completely before arranging in a basket and wrapping them in plastic wrap.
    • I've not doubled this recipe, and due to the kneading would suggest making one batch at a time, if you need more than 9 biscuits.

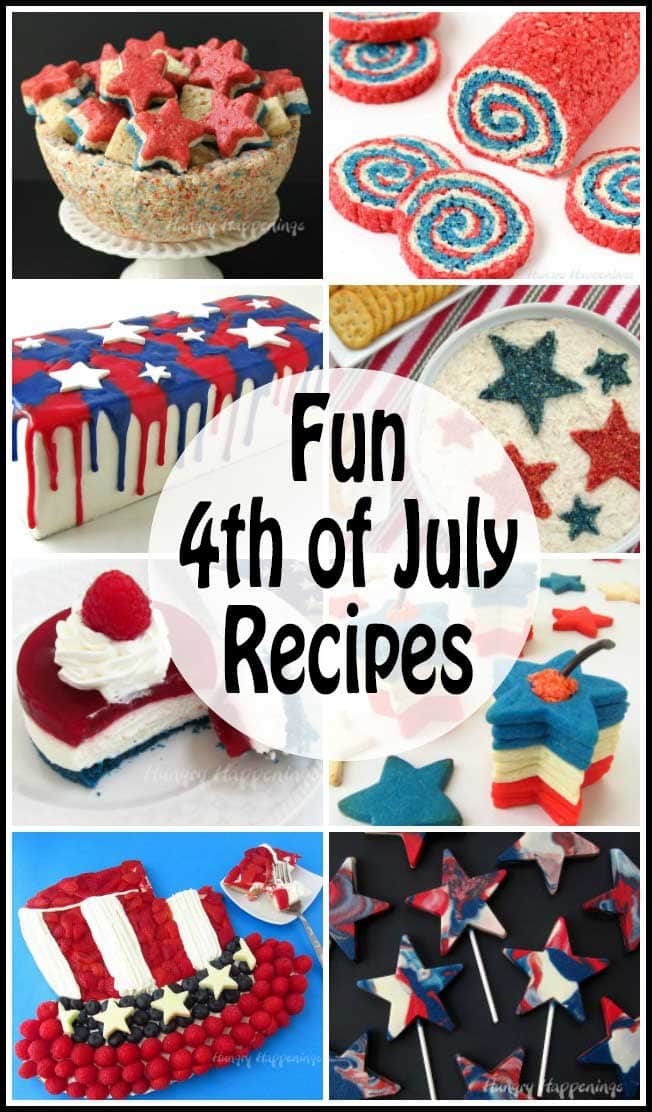
    If you're looking for other 4th of July Recipes, click the link and explore all my other Independence Day inspired food.

    Make fun 4th of July recipes for your party or picnic. These red, white and blue desserts and appetizers will make your guests "ooh and aah."


    SaveSave

    • Author
    • Recent Posts
    Beth Klosterboer
    Beth Klosterboer
    Hi, I'm Beth Klosterboer, a professional chocolatier & baker, cookbook author, and event planner. I love sharing recipes for happy occasions here on Hungry Happenings. I also create easy fudge recipes to share at HowToMakeEasyFudge.com, rice krispie treat recipes at HowToMakeCerealTreats.com, and easy cookie recipes at HowToMakeEasyCookies.com
    Beth Klosterboer
    Latest posts by Beth Klosterboer (see all)
    • Irresistible Sweets with Dixie Crystals® - July 13, 2024
    • How to make peanut butter? - February 15, 2024
    • OREO Penguins - December 20, 2023

    More Fun 4th of July Recipes - Desserts, Appetizers, and More

    • red, white, and blue ice cream star
      Red, White, and Blue Ice Cream Star
    • Red, white, and blue no-bake cheesecake with blue cookie crust and raspberry gelee on top
      No-bake cheesecake with raspberry Gelée
    • cheesecake decorated with a red, white, and blue flag.
      4th of July Dessert - Flag Cheesecake
    • Uncle Sam Hat Surprise Cake

    About Beth Klosterboer

    Comments

      Please leave a comment. Cancel reply

      Your email address will not be published. Required fields are marked *

      Recipe Rating


    1. Recipes We Love says

      May 26, 2012 at 1:15 am

      Cute and festive!!!

      Reply
    2. Trish - Sweetology101 says

      May 25, 2012 at 8:47 pm

      These are beyond fun and creative!! I love it! - you could even dye the butter red/white/blue too! FUN!

      Reply
      • Beth Jackson Klosterboer says

        May 25, 2012 at 9:37 pm

        Great idea Trish.

        Reply
    3. Lisa @ Flour Me With Love says

      May 25, 2012 at 12:53 am

      These are so cute! Thanks so much for sharing at Mix it up Monday 🙂

      Reply
    4. Beth Jackson Klosterboer says

      May 24, 2012 at 2:10 pm

      I just added some links. Thanks for inviting me to share on your blog.

      Reply
    5. CuteEverything says

      May 24, 2012 at 5:31 am

      These are delightful. And I loved reading about your memories! Thanks very much for linking up!

      Reply
    6. Susan Case says

      May 23, 2012 at 7:59 pm

      This is an amazing blog. Love those patriotic biscuits! I'm your newest follower from Polkadot Linky Party. I hope you can visit me sometime: Kindergarten & Preschool for Parents & Children.

      Reply
    7. Beth Jackson Klosterboer says

      May 23, 2012 at 5:06 pm

      I was so happy to find such a nice set of patriotic foam stamps at Hobby Lobby. I also purchased the stencil and hope to come up with a recipe for 4th of July using it!

      Reply
    8. beti says

      May 23, 2012 at 2:30 pm

      they are amazing! so cute and I never thought about that

      Reply
    9. Dorothy @ Crazy for Crust says

      May 23, 2012 at 1:27 pm

      I love those! They're so great. And so easy to make!

      Reply
    10. RecipeGirl says

      May 23, 2012 at 1:11 am

      These are simply adorable! What a fun idea!

      Reply
    11. Michelle Paige says

      May 22, 2012 at 11:17 pm

      Thanks so much for linking up!

      Reply
    12. lej619 says

      May 22, 2012 at 10:20 pm

      love it, only one problem the "heart" stamp is backwards 🙁

      Reply
      • Beth Jackson Klosterboer says

        May 22, 2012 at 10:59 pm

        Yeah, I know. I really liked the heart and it was driving me crazy that it was backwards, but I used it anyway. I'm not sure how the manufacturer didn't realize that. It slipped through the cracks!

        Reply
    13. Sue says

      May 22, 2012 at 9:07 pm

      These look so awesome! What a great idea!

      Reply
    14. Nann from At Nann's Table says

      May 22, 2012 at 2:25 pm

      What a darling idea. Love it. But you always come up with the best ideas. I so enjoy watching all your fabulous ideas come to life. You are so creative.

      Nann

      Reply
    15. Trish - Sweetology101 says

      May 22, 2012 at 2:23 am

      this is a GREAT idea!!!!

      Reply
    16. Stacy @ She's {kinda} Crafty says

      May 22, 2012 at 1:23 am

      these are awesome and creative! the possibilities are endless!

      Reply
    17. Erin @ Dinners, Dishes and Desserts says

      May 21, 2012 at 3:36 pm

      These biscuits look awesome! What a fun idea, NEVER would have thought to do that!

      Reply
    18. Elle says

      May 21, 2012 at 3:31 pm

      Beth, I can't even tell you how much I love this idea! And it's so simple, too! You're right, it turns plain old biscuits into something wonderful--and they look like you slaved over them for hours. Also, I have to say your memories of past picnics sure brought a smile to my face--thanks!

      Reply
      • Beth Jackson Klosterboer says

        May 21, 2012 at 4:18 pm

        Thanks Elle, I'm glad my story of picnic's past made you smile. I'd love to relive that time of my life!

        Reply
    19. Rowena Dumlao-Giardina says

      May 21, 2012 at 2:53 pm

      These are great! They look so beautiful! Lovely working with you Beth!

      Reply
    20. Katrina {In Katrina's Kitchen} says

      May 21, 2012 at 2:26 pm

      I love these!!! Love love love them!!! 🙂

      Reply
    Newer Comments »
    Beth Jackson Klosterboer

    Welcome to Hungry Happenings!

    I'm Beth. I've been a professional chocolatier & baker for over 30 years, have written 5 cookbooks, and love creating fun food for holidays and special occasions.

    Read more about me →

    Popular

    • Mini cheesecakes collage of images with plain cheesecakes, cheesecake cups with toppings, and decorated edible flower cheesecakes.
      Mini Cheesecakes
    • homemade candy bars including dark chocolate bars, milk chocolate cashew bars, white chocolate cookies and cream candy bars, and more
      The Best Step-by-Step Chocolate Bar Recipes
    • Marry a chocolate cake ball with a chocolate dipped maraschino cherry to get these amazing Chocolate Cherry Bombs.
      Chocolate Cherry Bombs - Cherry Filled Cake Balls Dipped in Chocolate
    • Giant Reese's Cup on a cake stand with a slice cut and served on a small dessert plate.
      Giant Peanut Butter Cup
    • Cakesicles with red and green drizzle, rainbow sprinkles, and chocolate drizzle
      How to make Cakesicles (cake pop popsicles)
    • Delicious chocolate truffles coated in chopped cashews, shaved dark chocolate, cocoa powder, cookie crumbs, and a blend of dark and white chocolate shavings.
      Chocolate Truffles Recipe

    Buy my cookbooks

    Footer

    ↑ back to top

    use policies

    • privacy policy
    • photo-use policy
    • terms of service

    join us

    • subscribe (newsletter)
    • our online courses
    • readers' gallery

    contact

    • contact
    • about Beth
    • FAQ

    As an Amazon Associate, I earn from qualifying purchases.

    Copyright © 2025 Hungry Happenings