Dip and decorate Halloween OREO Cookie Pops to look like pumpkins, cauldrons, mummies, spider webs, monsters, and more. These cute chocolate-dipped cookies make fun party favors for Halloween.
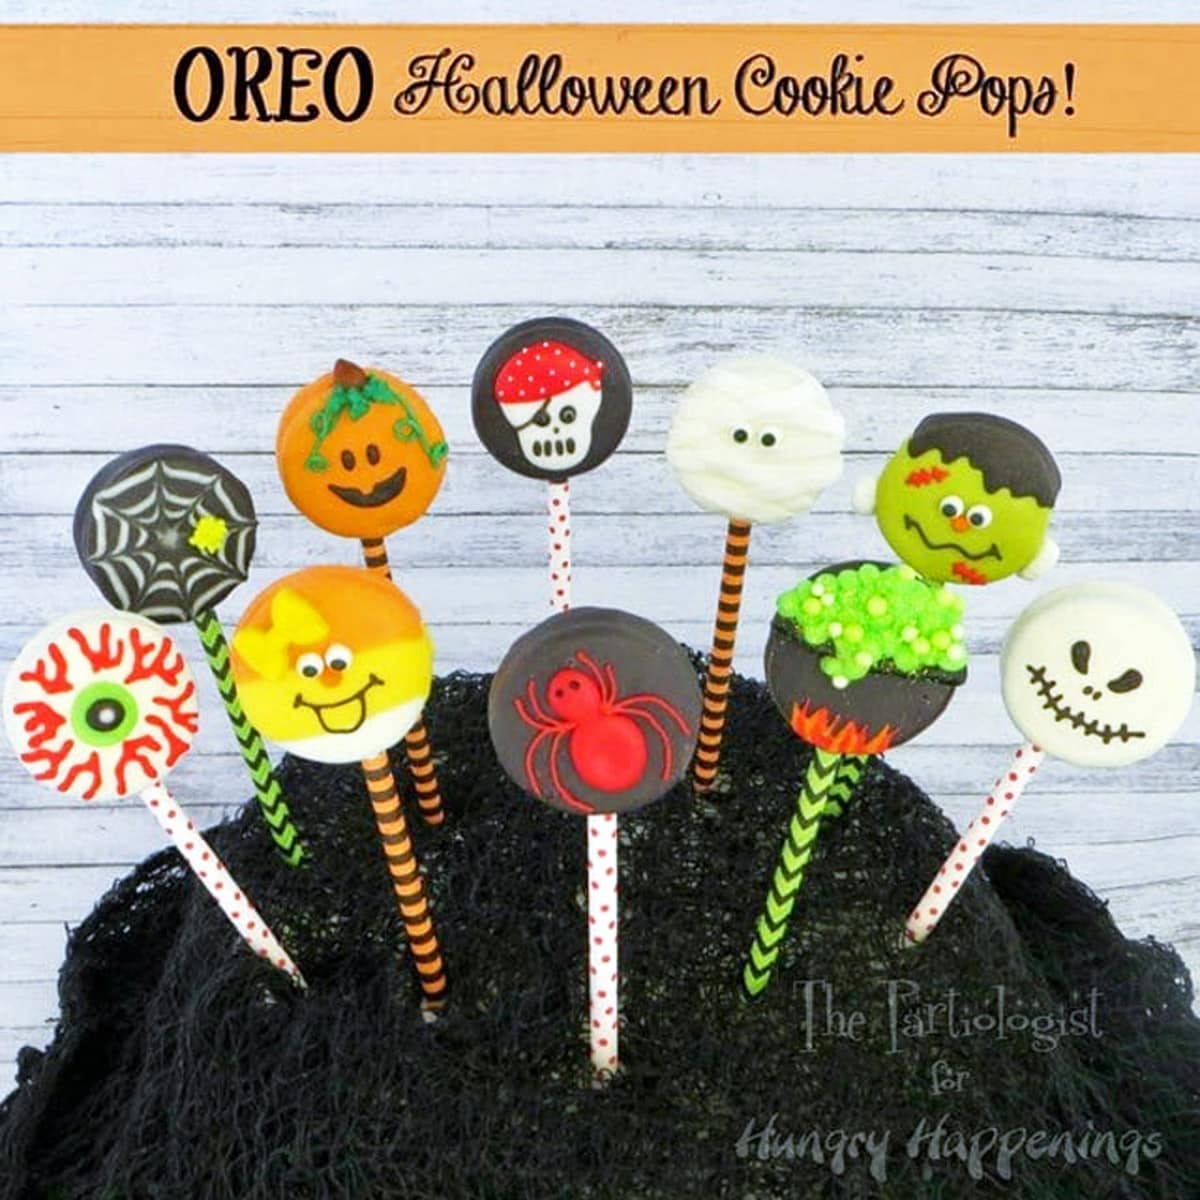
Hi Everyone! I'm Kim, The Partiologist and I'm here with some delicious Halloween Oreo Cookie Pops!
Have some fun with your kids and decorate these cute treats for Halloween. Each cookie pop is made by dipping an OREO cookie in candy melts. Then, they are decorated to look cute or creepy for Halloween.
At a glance, you might think these Halloween Oreo Cookie Pops will be a lot of work, but we'll start out slow.

Ingredients and Supplies
OREO Cookies
Cookie sticks, lollipop sticks, or sturdy paper straws
candy melts in a variety of colors
Instructions
Insert a stick in the center of the Oreo.

Mummy OREOs
The mummy was pretty simple. Start by melting white candy melts in a microwave-safe bowl. I like to use mason jars so when I'm finished I just close the lid until I need it again.
Now that you're cookies are ready to be dipped, dip FOUR cookies in the white candy melts and set aside.
Add royal icing eyes to the first white cookie, by placing a bit of candy melt on a toothpick, then on the back of the eye. Next, using Ateco decorating tip #44 and a bag of frosting, pipe lines across the mummy's face, not covering the eyes. Remove the excess frosting from the sides with an offset spatula.

Candy Corn OREO Cookie Pops
Dip another white cookie three-quarters of the way, into yellow candy melts. Let dry. Dip again, one-quarter of the way, into orange candy melts.
Add royal icing eyes with a bit of frosting. Pipe on a smiley face (candy corn is happy corn) with tip #1 and black royal icing.
Add a dot of orange royal icing (or a mini orange m & m) for the nose.

Spider Web Cookies
Now it's time to dip four additional cookies into the black candy melts and set aside.
Add royal icing to the top of one black cookie. Immediately pipe three white circles, with a dot in the center of the royal icing.
Drag a toothpick from the inside out, making the web shape. Add a little candy spider to the cookie before it dries.

Cauldron Cookies
Now let's make the cauldron...take a black cookie and pipe a curved line across the tip with frosting and a tip #7.
Add bits of fire to the bottom of the cookie by piping yellow and red royal icing with tip #2.
Outline the sides of the cauldron with frosting and Tip #2.
Pipe neon green frosting dots to the top of the cauldron. Add candy pearls and edible glitter to finish it off.

Skeleton Pirate Cookie Pops
With the next black cookie, I used a mini skull cookie cutter to press a mark into the cookie.
Follow the outline and pipe white royal icing to make the skull. Let the white skull dry.
After the skull has dried, add a red bandana to the top with royal icing and a #1 piping tip. Before the red icing dries, add tiny white dragees with tweezers.
Add the eye patch and eye, nose, and teeth with black royal icing and tip #1. Make a dot of royal icing for the eye, add a bit of white to the center, and add a tiny black dragee to the center of the eye.

Frankenstein OREOs
After melting neon green candy melts, dip one cookie and let dry.
Pipe a jagged edge across the top of the cookie and fill with royal icing, using tip #2.
Add the royal icing eyes with a bit of frosting.
Add a mini orange m & m for the nose and pipe the mouth and scars with black and red royal icing.

Pumpkin OREOs
Dip two cookies into orange candy melts. For the pumpkin, add a face with black royal icing and tip #1. Pipe green frosting with tip #1 for the curls and add brown frosting for the stem with tip #4. Add two green leaves with Ateco leaf tip #349.
Pipe a skeleton fish on wax paper with a #2 tip and royal icing, and let dry overnight.
Remove the royal icing from the wax paper and place it on the orange cookie. For some reason, that cookie didn't make it in the photo shoot.

Spider, Jack Skellington, and Eyeball OREOs
The last couple of cookies were pretty simple. Take the last black cookie and pipe a big red dot in the center with royal icing and tip #3. Let dry and then pipe another dot to the top and let dry. Add legs and two black eyes with tip #1
With another white cookie, add a face to make your Jack Skeleton cookie by piping royal icing with tip #1.
Make your last white cookie into a bloodshot eyeball. Pipe a big round dot of green frosting into the center of the cookie. Add black frosting to the center of the green and then white frosting to the center of the black.
Add red squiggle lines to the outside of the eye with a #1 tip and red royal icing.
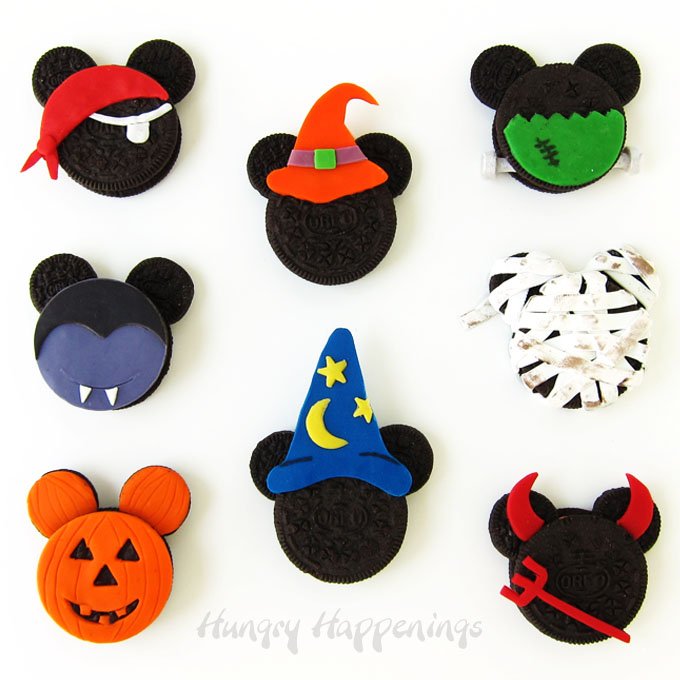
Be sure to check out Beth's Halloween Mickey Mouse OREO cookies. Each cookie is decorated with colored modeling chocolate. She made Mickey wizards, devils, vampires, pumpkins, and more.

Now they're ready to go trick or treating...wait the trick's on them, they're the TREAT!
I had such a great time today and I hope you did too...
I'll Be Back!
![]()

Hi! I'm Kim, the girl behind the pink hair... I love to plan and host parties and show how to recreate them from start to finish. I also love making cute edible sweets, where I turn anything plain into a party. I hope you enjoy my creations for HUNGRY HAPPENINGS and party along with me each week.
Here are a few skeletons from my closet~

Chocolate Covered Halloween Pears

Chocolate covered Halloween Caramel Apples


- Banana Split Bars – A Fun and Easy Summer Dessert - March 4, 2026
- Pineapple Fudge (No Candy Thermometer Needed!) - March 4, 2026
- No-Bake Peanut Butter Pie Recipe - March 3, 2026


Hani/Haniela's says
Beth and Kim, you are both amazing. I love all of you creative ideas!
Kim, these fantastic, and I love the tip about the mason jar. I'll keep that in mind for next time! Thanks.
The Partiologist says
Thank you Hani, Beth is so very creative, I love being here and I know you'll love using the mason jar!!
Lisa@hooplapalooza says
this is pure food artistry at its best 🙂
The Partiologist says
Lisa, you know how to make a girl smile! 🙂
Anonymous says
I'm not sure if I've been living under a rock or what, but I had no idea you could 'dip' oreos like this! I thought you had to use a mold!!! You just simplified my world Kim! Thank you 🙂 Jennifer G.
The Partiologist says
I discovered dipping OREO's this way because I wanted to use them on a stick. Plus, they don't need as much chocolate this way. Glad I could help simplify your world! 🙂
Karen @ Sugartown Sweets says
The Partiologist on Hungry Happenings. Perfect pairing! I love your cute little crafts and will be looking forward to seeing what you share with us! Adorable cookie pops..the candy corn cutie is too sweet. Love them all. :o)
The Partiologist says
Thank you Karen for the sweeeeeeet comment, I'm so excited to be here!
Susan says
Awesome Kim! Great to see you here!
Susan C
The Partiologist says
Thank you Susan - I'm so excited to be here!!