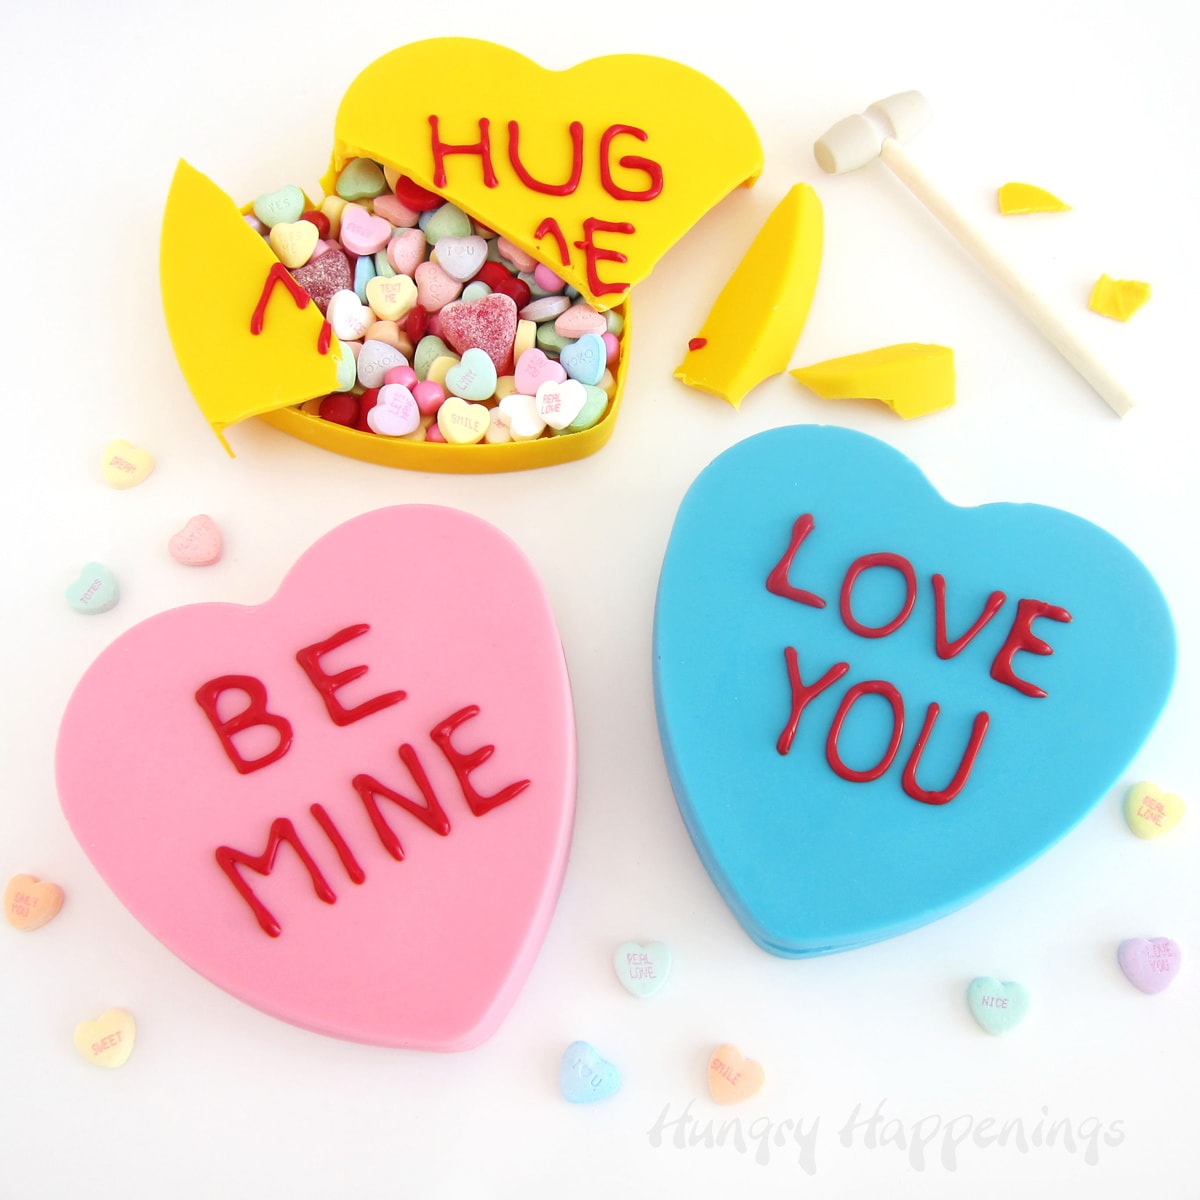
This Valentine's Day tell your sweethearts how you feel by adding personalized messages to brightly colored, rich, and creamy, Conversation Heart Cheesecakes. This fun twist on a holiday classic is sure to win the hearts of your loved ones. See the new Video Tutorial at the end of this post.
I've heard people, including my husband, say, "I've never met a cheesecake I didn't like." Well, I can't say the same.
I've been known to pay upwards of $10 for a slice of cheesecake take one bite and shove it aside.
To me, cheesecake should be lusciously creamy and smooth with a bit of crunch from the graham cracker crust. I love it when it just melts on my tongue. It should taste delicately rich with just a hint of tang from the cream cheese. I won't settle for dense, spongy, crumbly, and or sour cheesecake; it better be good if I'm going to indulge. If it's not perfection, I don't want it.
Do you feel the same?

I have the perfect cheesecake recipe for you.
Many years ago, after many failed attempts at finding a cheesecake with just the right texture and taste, I discovered Tyler Florence's Ultimate Cheesecake. It is the best I've ever tried. I've perfected the recipe and shared tips and tricks for making it creamy and smooth. You can see my Classic Cheesecake Recipe, here.
I've used his cheesecake recipe dozens of times and my family and friends all rave about it.
You can imagine how they reacted when I turned that wonderful dessert into cute Conversation Heart Cheesecakes for Valentine's Day.
Video
Be sure to watch the video in this post to see how to make these cute Valentine's Day desserts.
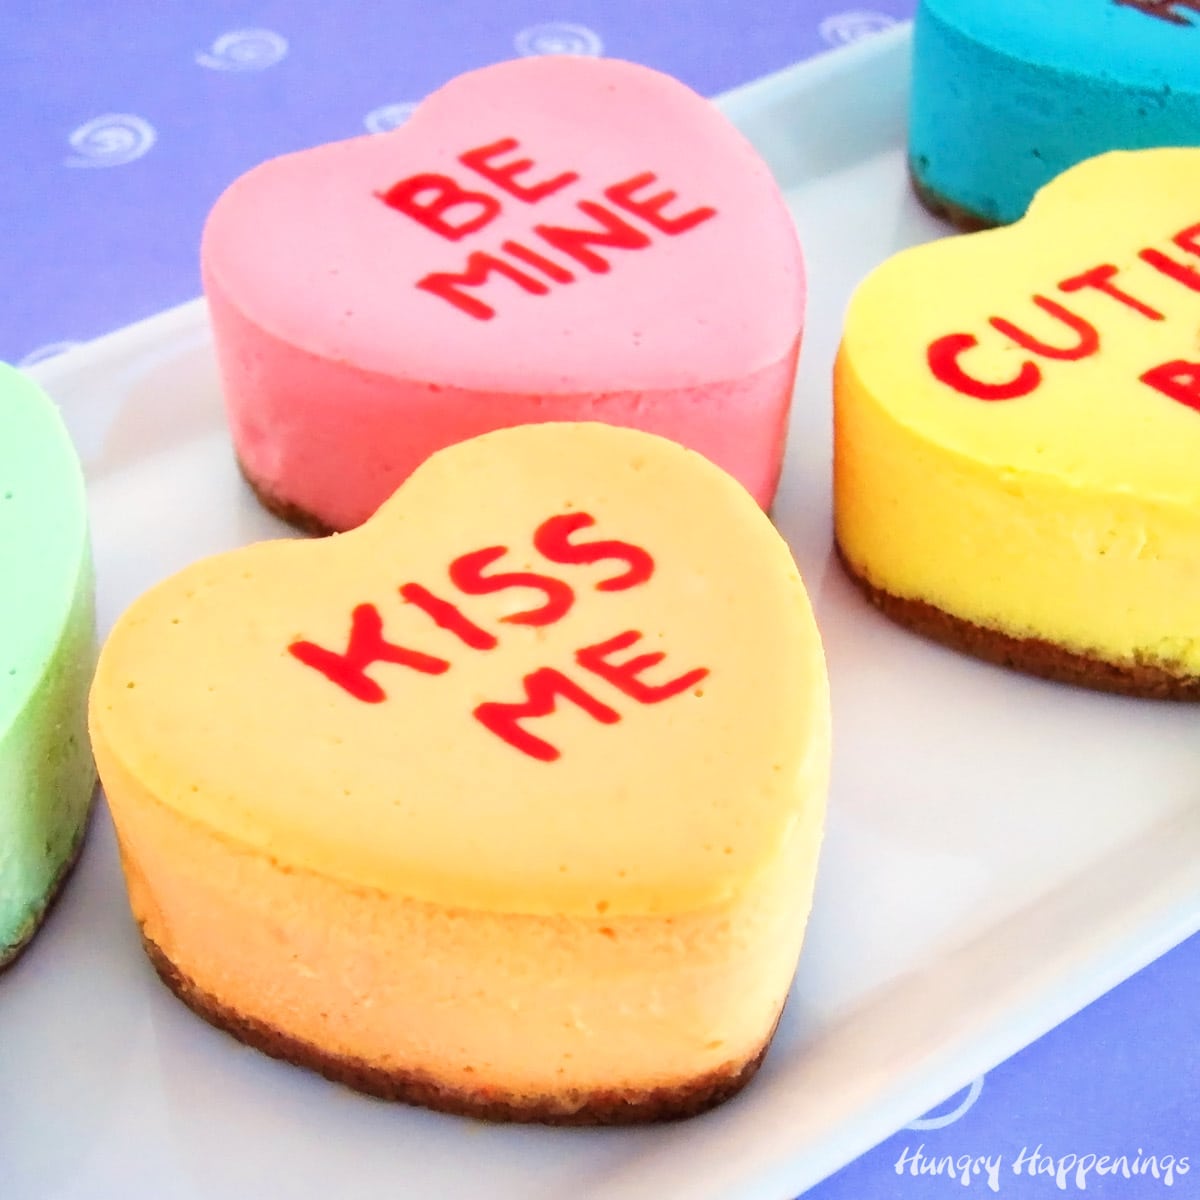
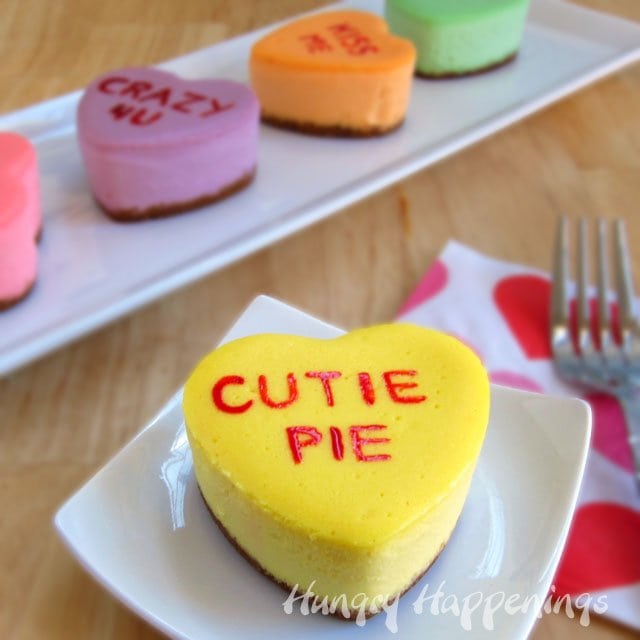
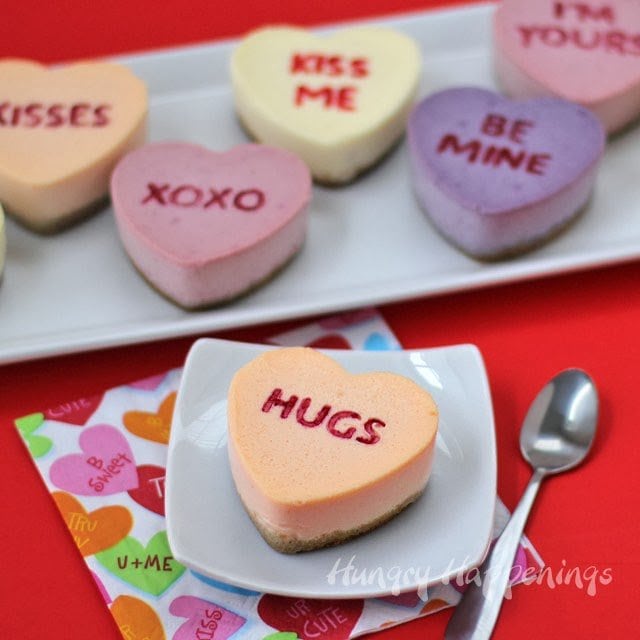
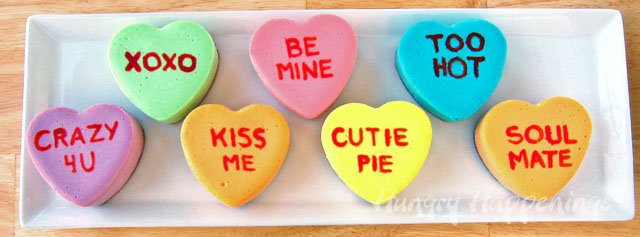
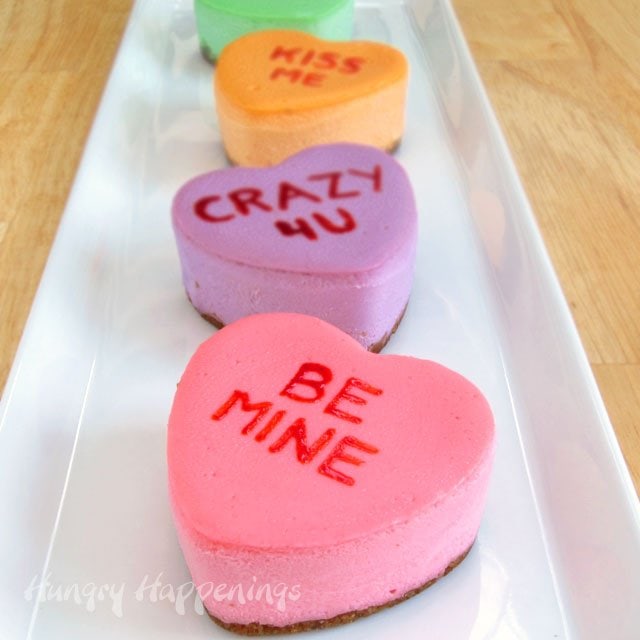
Each sweet little dessert was brightly colored and personalized with a special message printed on the top just like the candy conversation hearts.
The cheesecake hearts made for the perfect ending to a lovely Valentine's Day meal.
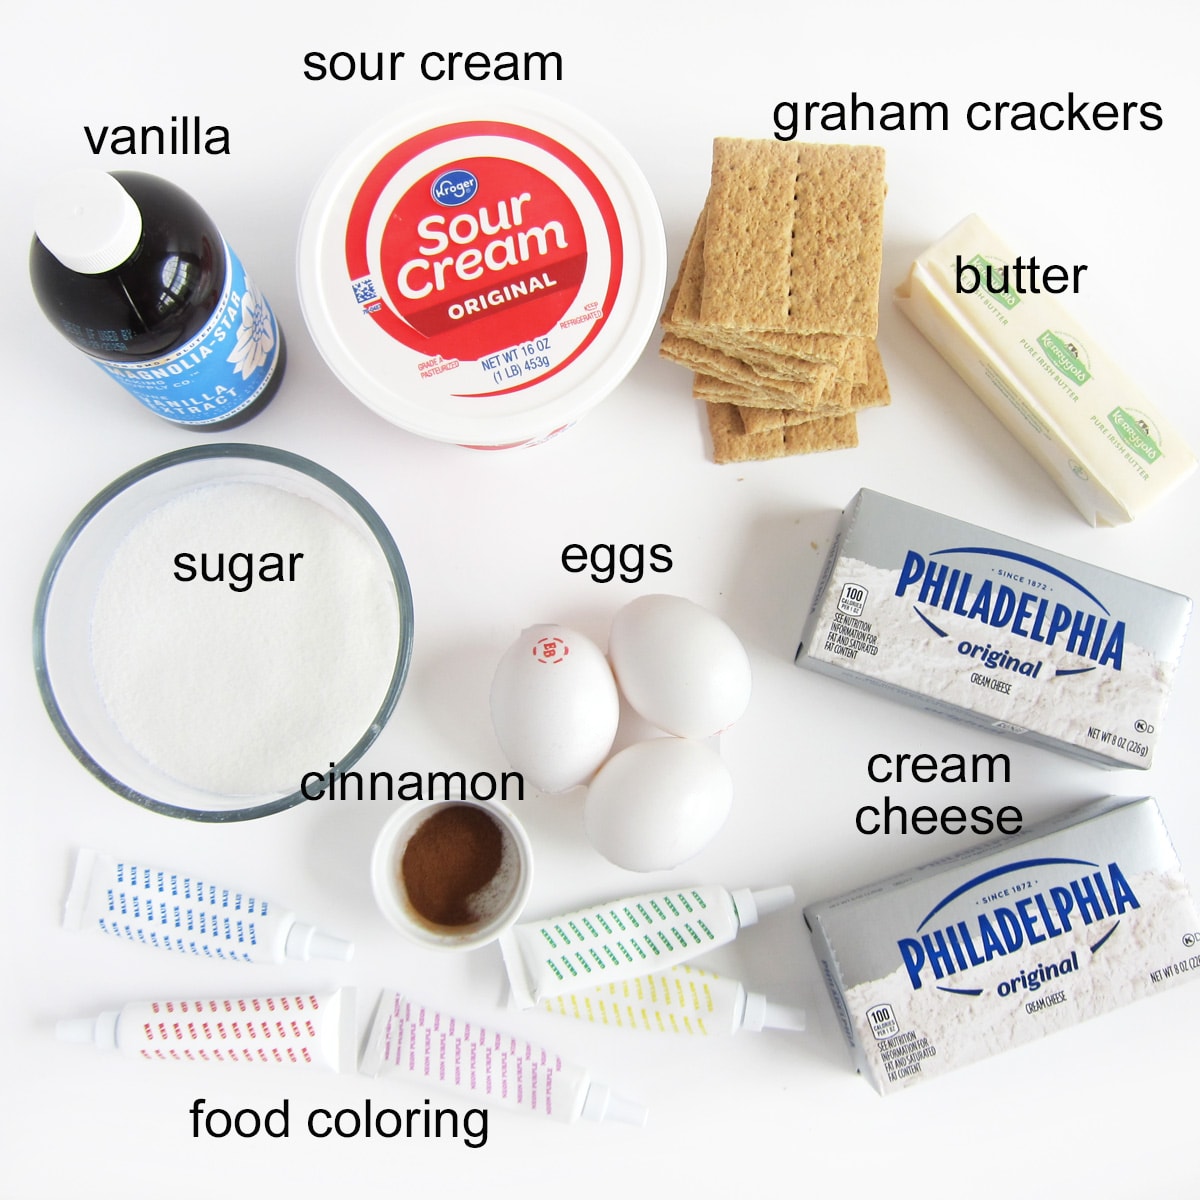
Graham Cracker Crust
graham crackers - You need 1 cup of crumbs. If you crush about 15 graham cracker squares, you'll get about 1 cup of crumbs.
butter - Use salted or unsalted butter to make your cookie crust. Either will work fine.
cinnamon - I like adding a small sprinkling of cinnamon to the crust. It's optional, though.
Cheesecake Filling
cream cheese - Use full-fat cream cheese for the best texture and flavor. I recommend using Philadelphia Cream Cheese. I think it tastes best! Soften your cream cheese at room temperature for at least 3 hours if not more.
sour cream - Adding this to the cheesecake will add a nice tangy flavor and will give your cheesecakes a super smooth and creamy texture. Set the sour cream out an hour before you mix the filling.
eggs - Use room-temperature eggs.
vanilla - Pure vanilla extract adds a nice vanilla flavor but artificial extract will work too.
sugar - Use granulated sugar to add sweetness and structure to the cheesecakes.
Supplies
To make these heart-shaped cheesecakes, you will need three Heart-Shaped Silicone Molds. The molds are the perfect size to make an individual serving of cheesecake.
I only had 2 of the molds at the time I made these hearts and ended up using the extra cheesecake filling to make some mini cheesecake hearts. The bite-sized treats were cute, but I would have preferred having 3 of the larger hearts in each of the six colors.
Items I used to create this project are available on Amazon.com (commission earned for sales).
 Boao 2 Pcs Heart Shaped Sil...Shop on Amazon
  BAKER DEPOT 6 Holes Heart S...Shop on Amazon
  T-fal A85797 Specialty Nons...Shop on Amazon
 Bottles") U.S. Cake Supply 30 Color C...Shop on Amazon
U.S. Cake Supply 30 Color C...Shop on Amazon Chicago Metallic Conversati...Shop on Amazon
stand mixer or a mixing bowl and handheld mixer
rubber spatula
3 Heart-Shaped Silicone Molds
fine tip paintbrush (new or food-only brush)
roasting pan big enough to fit your heart-shaped molds
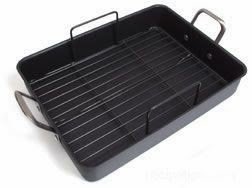
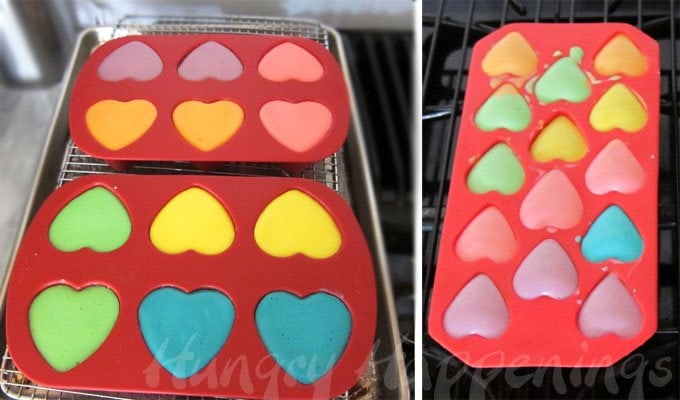
You will need a water bath to bake your cheesecakes, so either set your roasting pan in the oven filled with enough water to go halfway up the sides of your heart molds and allow the water to heat along with the oven or bring some water to a boil in a teapot or the microwave then pour it in the bottom of the pan.
My roasting pan has a flat rack that fits inside. I set two heart molds on the rack, filled them, then used the handles to help me lower the molds into the hot water.
After the cheesecakes bake it's so easy to lift them out and cool them on the rack.
Instructions

Make the mini cheesecake crusts in a heart mold.
- Once you have your molds ready to fill, equally divide a mixture of graham cracker crumbs, butter, and cinnamon in the bottom of the heart-shaped cavities.
- You'll use about a tablespoon of crumb mixture in each heart cavity. Press the crumbs down making an even crust. Refrigerate until ready to fill with the cheesecake mixture.
- You can bake this crust for 8-10 minutes if you want it to be a bit crisper. Either way works fine.
Make the cheesecake filling.
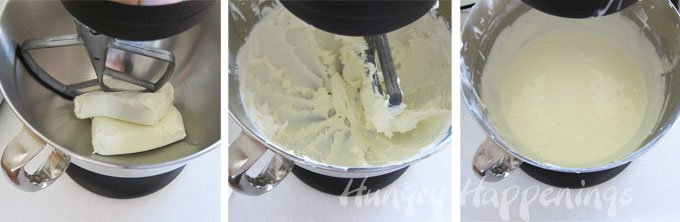
- In the bowl of a stand mixer, or in a mixing bowl using a handheld mixer, beat the cream cheese on medium-high until smooth, scraping down the sides of the bowl as needed.
- Be sure to scrape the cream cheese out of the mixing blade as well. You don't want lumps in your cheesecake.
- Add sugar and beat for one minute.
- Add eggs and beat until creamy, 1 to 2 minutes, scraping the sides of the bowl once.
- Add the sour cream and vanilla and mix just to combine.
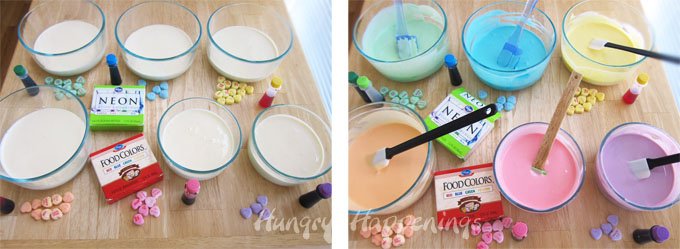
Color the cheesecake filling.
- Equally divide the filling among 6 bowls.
- Add food coloring to create the colors you'd like.
- The colors will intensify a bit once baked, so make them a little less bright than you want them. I was not happy with how intense the blue cheesecakes turned out. I would only a few drops of blue.
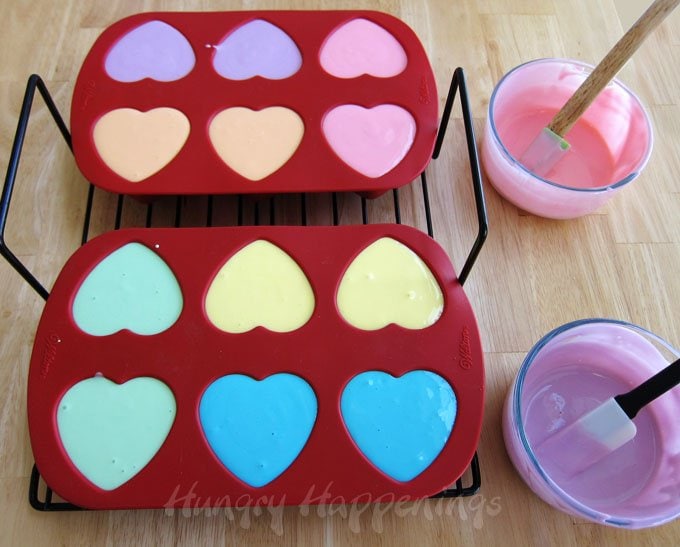
Fill the silicone heart mold with the colored filling.
- Pour the colored cheesecake filling into the heart-shaped cavities in your Wilton silicone molds.
- If you are using 3 heart molds and making 18 cheesecakes, equally divide each color among 3 hearts.
- The cavities will be a little over ¾ full.
- I filled mine completely, as I only made 12 of this size. I then used the remaining batter to make some mini hearts (see the image below.)
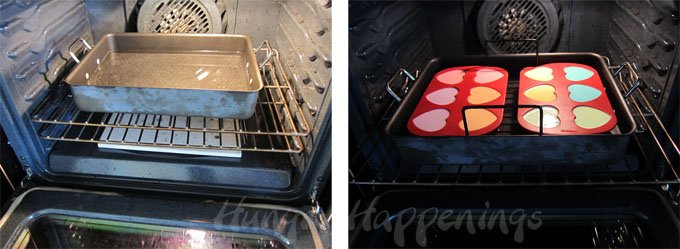
Bake in a water bath.
- Bake the cheesecakes in a water bath for 18-22 minutes.
- When baked thoroughly, the cheesecakes should still jiggle, but not look wet
- Use a roasting pan with a removable rack to make it easier to remove cheesecakes.
- You can set your heart molds in your roasting pan, then carefully pour boiling water around the heart molds.
- If baking tiny cheesecakes, bake for 10-14 minutes.
- If you bake one large heart-shaped cheesecake, it should take between 42-50 minutes.
Cool then freeze the heart-shaped cheesecakes.
- Remove your baked cheesecakes from the oven and water bath and allow them to cool at room temperature for an hour.
- Then cover the mold with a piece of paper towel and wrap it in plastic wrap.
- Freeze for at least 2 hours or up to several weeks.
- It's easiest to remove the cheesecakes if they are frozen solid.
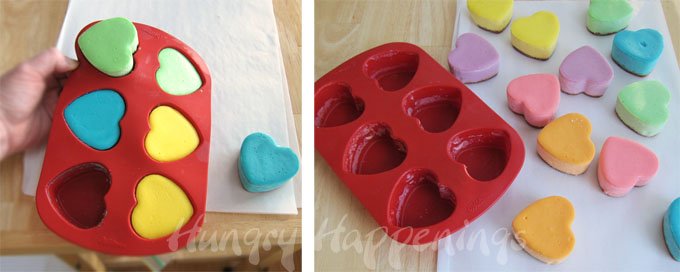
Un-mold the heart-shaped cheesecakes.
- Remove from the freezer, uncover, then push on the underside of each heart mold, releasing the cheesecakes.
- Carefully lift them out of the mold. If they don't pop right out, you need to freeze them longer.
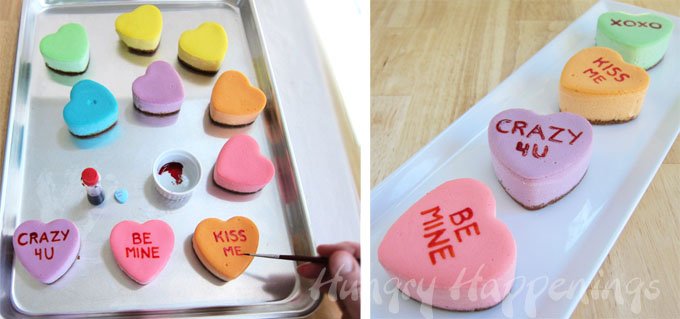
Personalize the conversation heart cheesecakes.
- To add the conversation heart phrases, squeeze a few drops of red food coloring into a small bowl.
- Use a fine-tip paintbrush to paint the words onto each cheesecake heart.
Tips
- Traditional conversation heart sayings are printed in all capital letters.
- Don't worry if your words are off-center, as many conversation hearts are printed that way.
- If you have too much food coloring on your brush, your letters will bleed.
- The food coloring will dry if you refrigerate your cheesecakes for a while.
Variations
If you prefer to use natural coloring, you can either purchase bottles of natural food coloring or use fruit and vegetable purees.
You can make naturally colored conversation heart cheesecakes using fruit purees (pictured above.) The cheesecakes are flavored and colored with blueberries, raspberries, lemon, and orange/carrot.
If you enjoy fruit-flavored cheesecakes, this is a wonderful, natural, alternative. They taste great and, although the colors are a bit more muted than the original cheesecakes, they look equally festive.
You will also notice, the lettering on those conversation heart cheesecakes is a lot nicer. Check out the other tutorial to see how to achieve this really clean look using cookie stamps.
Storage
- Store in the refrigerator for up to several days or freeze for up to a month.
- I suggest storing them in an airtight container. To keep the condensation from developing on the tops of the cheesecakes, set a piece of paper towel, that is larger than the container's lid, across the underside of the lid. Close and seal. The moisture will get wicked up by the paper towel.
Recipe

- 1 cup graham cracker crumbs (about 15 squares)
- pinch of cinnamon
- 4 tablespoons (½ stick) butter, melted
- 16 ounces (2 blocks) cream cheese, softened
- 1 cup sugar
- 3 large eggs
- 1 pint sour cream (1 pint = 16 ounces or 2 cups of sour cream)
- 1 teaspoon vanilla extract
- food coloring - pink purple, blue, green, yellow, and red
-
Fill a roasting pan with enough water to come halfway up the sides of the silicone heart molds.
-
Set the roasting pan in the oven.
-
Heat oven to 325 degrees Fahrenheit.
-
Mix together the graham cracker crumbs, cinnamon, and melted butter.
-
Equally divide the crumbs among 18 heart-shaped silicone mold cavities.
-
Press the crumbs into an even layer and refrigerate until needed.
-
Beat cream cheese until creamy and smooth.
-
Add sugar and beat until incorporated.
-
Beat in eggs then add sour cream and vanilla and mix just to combine.
-
Equally divide the cheesecake batter into 6 bowls.
-
Color one bowl of filling pink, lavender, yellow, orange, green, and blue using food coloring.
-
Equally divide each color of filling among 3 heart cavities.
-
Bake cheesecakes in a water bath for 18-24 minutes until the edges look set but the center is jiggly but not wet.
-
Remove from oven and water bath and allow to cool at room temperature for an hour.
-
Freeze for at least two hours then remove and un-mold.
-
Paint conversation heart phrases onto the tops of the cheesecakes using red food coloring.
Recipe Video
Store your conversation heart cheesecakes in the refrigerator for up to several days or freeze them for up to a month. I highly recommend you wait to decorate the cheesecakes until the day you plan to serve them.
More Valentine's Day Recipe Ideas
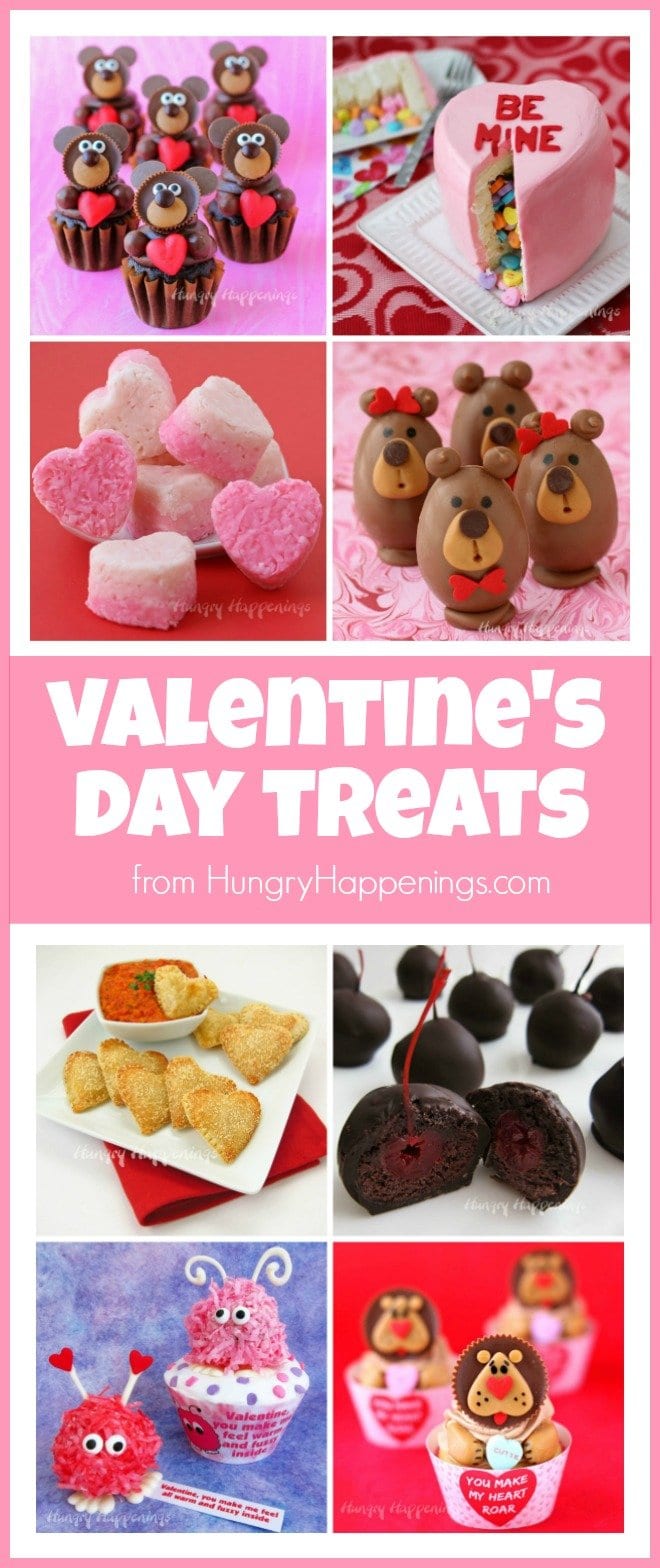
If you are looking for other treats or gifts to make for Valentine's Day, you might like these other recipes too.
Reese's Cup Teddy Bear Cupcakes • Conversation Heart Piñata Cake
Creamy Coconut Candy Hearts • Chocolate Buckeye Bears
Mozzarella Cheese filled Heart Pastries • Sweet Chocolate Cherry Bombs
Warm Fuzzy Cake Balls and Cupcakes • You Make My Heart Roar Lion Cupcakes

- Banana Split Bars – A Fun and Easy Summer Dessert - March 4, 2026
- Pineapple Fudge (No Candy Thermometer Needed!) - March 4, 2026
- No-Bake Peanut Butter Pie Recipe - March 3, 2026

Catherine Holt says
These are so adorable....a little bit of heaven on a plate 🙂 Looks like a great recipe to try and I love how they look so simple yet really effective.
Felicia says
My 2 year old and I made these today, and they turned out amazing!! Thank you for this great idea!
Baking Friends Forever says
I love these, they are pure genius and look delicious!
Shrey Patel says
So many great ideas! Everything looks so appetizing!Can’t wait to try it!
Beautiful!
fabulously photo shoot!
Aharon says
Hi,
you convinced me at:
"To me, cheesecake should be so lusciously creamy and smooth that it just melts in my mouth, and tastes delicately rich with just a hint of tang from the cream cheese"
this looks great!
Thanks for sharing:)
Anna says
Hi, these are gorgeous! I am looking forward to trying your cheesecake recipe. I don't live in America, so how many grams is 1/2 a stick of butter?
beth says
Thanks, Anna. There are 56.5 grams in a 1/2 stick of butter.
Anonymous says
Just made these today for my hubby for Valentine's Day! He LOOOOOVED them and thought they were adorable. For him he said they were the perfect bite size dessert. haha. Thank you soooo much for this recipe. It was super easy and fun to make. I found my molds at Joanns for those that haven't been able to find them.
Beth Jackson Klosterboer says
Happy to hear your husband enjoyed the cheesecakes. I saw the molds at JoAnn's this year too. I love using the silicone molds for desserts and did two more recipes using the heart molds.
Shaniqua Kilburn says
i attempted to make these today and sadly i failed 🙁 they fell apart
Beth Jackson Klosterboer says
Sorry to hear that Shaniqua. When I first attempted to make a cheesecake in a silicone mold, mine fell apart too. That's when I realized they need to be really frozen in order to pop out of the mold easily.
Anonymous says
when you say half a stick of butter, do you mean a quarter of a cup?? just checking...
Beth Jackson Klosterboer says
Yes, a quarter of a cup/4 tablespoons.
Jen gamboa says
So I don't have a silicone mold but I do have a plastic one I bought from Walmart will that work?
Beth Jackson Klosterboer says
Hi Jen, I'm not sure you would be able to get the cheesecake out of the mold if it isn't flexible. The great thing about the silicone molds is that the cheesecakes, once frozen, can be pushed out of the mold, but the mold needs to bend.
Jessica says
These turned out wonderful!!! I only had one silicone heart tray to work with, so I only colored enough of the filling to make just more than six hearts. I will give these to my husband for Valentine's day. I used the rest to simply make a cheesecake, but I swirled the leftovers of each color into it! We'll have it tonight for Mardi Gras! So fun. Thank you again.
Beth Jackson Klosterboer says
I'm glad to hear you had success with your cakes. I think swirling the left over colors into a Mardi Gras cake is a fantastic idea. I hope your family enjoyed and will enjoy the cakes.
Jasmine Ford says
Hello Beth, it's me again! I really want to make these cheesecakes for Valentines Day and but this is the recipe that I have always used. http://www.cookingforengineers.com/recipe/89/Cheesecake-Plain-New-York-Style
I was just wondering if you could convert the cooking times for me, like you did for this one. I don't want to screw it up too bad.
For instance, my recipe says bake at 500 degrees Fahrenheit for ten minutes and then for 140 minutes at 200 degrees. Since the cakes are so much smaller, these times would be way off. Do you think you could help me?
Thanks for your time.
-Jasmine
Mapu04 says
What if i only use 8 oz. of soyur cream (i think it's about 1 cup). That ingredient it's a little two much expensive here in my country. What can i use instead of sour cream.
Beth Jackson Klosterboer says
You could use thick yogurt (we call it Greek style yogurt) in place of some of the sour cream. It might change the flavor a bit, but should be a good substitute. If your yogurt is thin, pour it over a piece of cheese cloth or a linen towel and let it sit for 30-60 minutes allowing the excess moisture to drain off.
Mapu04 says
What if i only use 8 oz. of soyur cream (i think it's about 1 cup). That ingredient it's a little two much expensive here in my country. What can i use instead of sour cream.
Mapu04 says
What if i only use 8 oz of sour cream (i think it's about 1 cup). That ingredient it's a little expensive here in my country... what can i used instead of another cyup of sour cream.
Jasmine Ford says
Hello Beth, its me again. This is the recipe I use (http://www.cookingforengineers.com/recipe/89/Cheesecake-Plain-New-York-Style) and I really want to do this but I can't figure out the timing. If it is not too much trouble, I was wondering if you could take a look at it. For example, it says bake at 500º f for 10 mins and then 200º f for 1hr and 20mins.. I wouldn't do it that long since they are smaller right?
Beth Jackson Klosterboer says
HI Jasmine. The recipe you are looking at makes a New York Style Cheesecake which is a bit different than what I made. Once baked it will have a browned exterior and a creamy interior, so your colored hearts will look brown especially around the edges. I'm sure your recipe will work, I just don't know how you'll like the look of the cheesecake hearts. As far as baking them, I would say bake at 500 for 4 minutes, then reduce the temp and bake 12-15 minutes. Check the internal temperate of one of the cheesecakes to see how much more they need to be baked. Your oven won't cool down that much in that short amount of time and you don't want to over bake the cakes. You want them to reach an internal temperature of 150 degrees Fahrenheit. Your best bet would be to use a probe thermometer and put it in one of the cakes to monitor the temperature. Good luck.
Shaniqua Kilburn says
oh my goodness im going to attempt to make these for this valentines day to surprise my boyfriend...might have a little trouble hiding them from him tho since he's off before me :/
Anonymous says
Do you have to use sour cream???
Beth Jackson Klosterboer says
The sour cream makes these cheesecakes ultra smooth and creamy. If you prefer, you can use the recipe I used to make my Swirled Cheesecake Leaves. It is very good too, just not quite as rich and creamy.
https://hungryhappenings.com/2012/11/festive-fall-cheesecake-leaves-and.html
Anonymous says
Hello,
I really love this idea and I want to try it out for valentines day (: it's so cute and creative! I was just wondering if you think minis would come out as good if they were made with a non-bake cheesecake recipe. I don't have a large roast pan and I'm worried my heart tray will melt, I'd really appreciate your opinion and help ^^
Beth Jackson Klosterboer says
I'm not sure how the no-bake cheesecake will work, but assume if you can get it frozen hard enough so that it comes out of the mold nicely, it will be fine. If you do make then, I'd love to hear how they turn out.
If you use the baked cheesecake recipe, you can set your heart pan in a 9"x13" baking dish and fill it with water. You'll only be able to bake one heart tray at a time, but that is fine. If your heart tray is silicone, it won't melt. You can also just bake your cheesecakes without a water bath. The texture of the cakes will be less creamy, but still very good. Just be sure that you don't over bake then as the tops of the cakes can crack.
Sarah says
These are so adorable! I will be making a bunch of these (probably about 4 dozen) for my law school friends for V-day this week. I'm doing a test run as we speak! 🙂 I was able to pick up some similar silicone heart molds at Walmart for $3.50. They have a ruffle edge but are otherwise identical to the Wilton ones, and more inexpensive 🙂 I plan on putting these in Valetine-themed treat cups, wrapping them up in red saran wrap, and tying a fork to it with some white yarn. I am so excited to work on these! Thank you so much for sharing your wonderful idea!
Beth Jackson Klosterboer says
Thanks Sarah. I too saw the molds at Walmart and at Target also. Your heart will be very pretty with the ruffled edge. Just be sure you freeze them well so they come out of the molds nicely.
I'd love to see pictures of your Valentine's packages. I've had several people ask for creative ways to package them. If you snap any photos, send one to me at beth@hungryhappenings.com so I can share it with everyone in my Reader's Gallery.
Have fun!