This Valentine's Day tell your sweethearts how you feel by adding personalized messages to brightly colored, rich, and creamy, Conversation Heart Cheesecakes. This fun twist on a holiday classic is sure to win the hearts of your loved ones. See the new Video Tutorial at the end of this post.
I've heard people, including my husband, say, "I've never met a cheesecake I didn't like." Well, I can't say the same.
I've been known to pay upwards of $10 for a slice of cheesecake take one bite and shove it aside.
To me, cheesecake should be lusciously creamy and smooth with a bit of crunch from the graham cracker crust. I love it when it just melts on my tongue. It should taste delicately rich with just a hint of tang from the cream cheese. I won't settle for dense, spongy, crumbly, and or sour cheesecake; it better be good if I'm going to indulge. If it's not perfection, I don't want it.
Do you feel the same?

I have the perfect cheesecake recipe for you.
Many years ago, after many failed attempts at finding a cheesecake with just the right texture and taste, I discovered Tyler Florence's Ultimate Cheesecake. It is the best I've ever tried. I've perfected the recipe and shared tips and tricks for making it creamy and smooth. You can see my Classic Cheesecake Recipe, here.
I've used his cheesecake recipe dozens of times and my family and friends all rave about it.
You can imagine how they reacted when I turned that wonderful dessert into cute Conversation Heart Cheesecakes for Valentine's Day.
Video
Be sure to watch the video in this post to see how to make these cute Valentine's Day desserts.
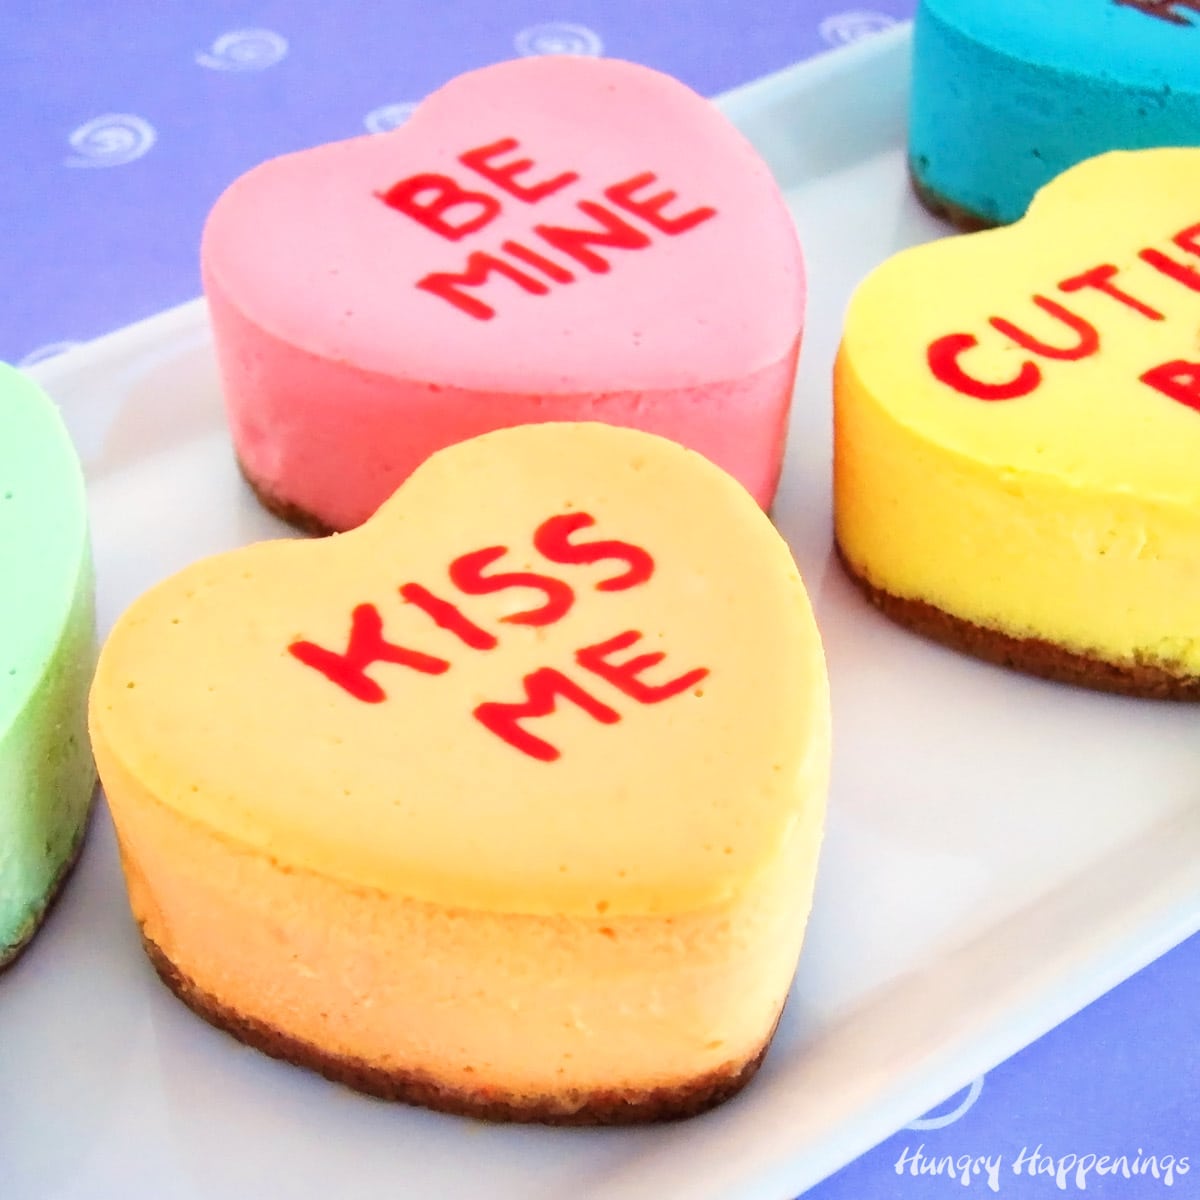
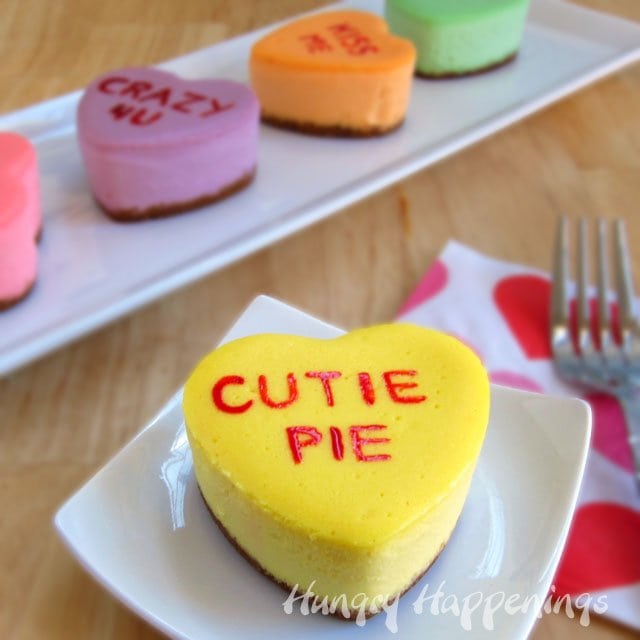
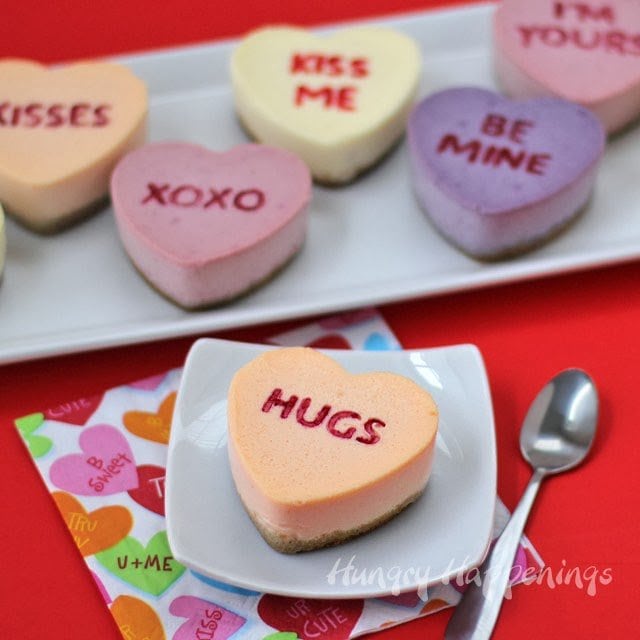
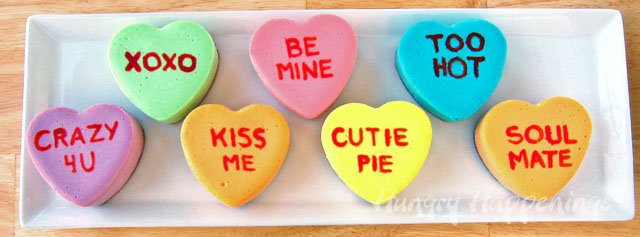
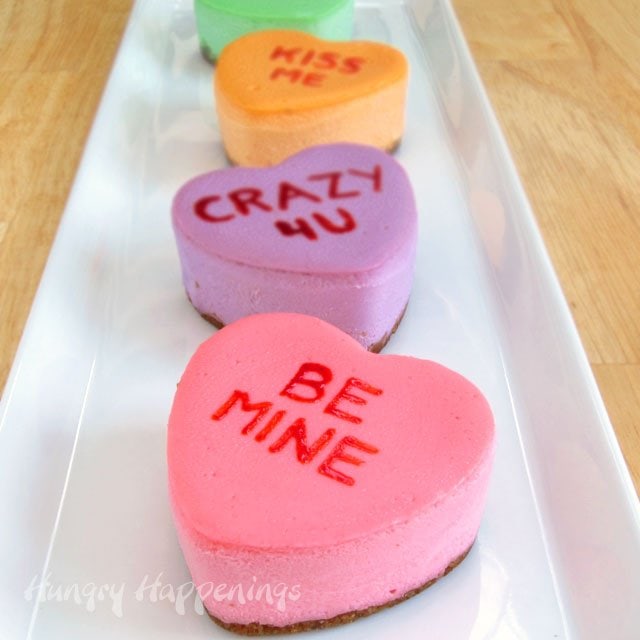
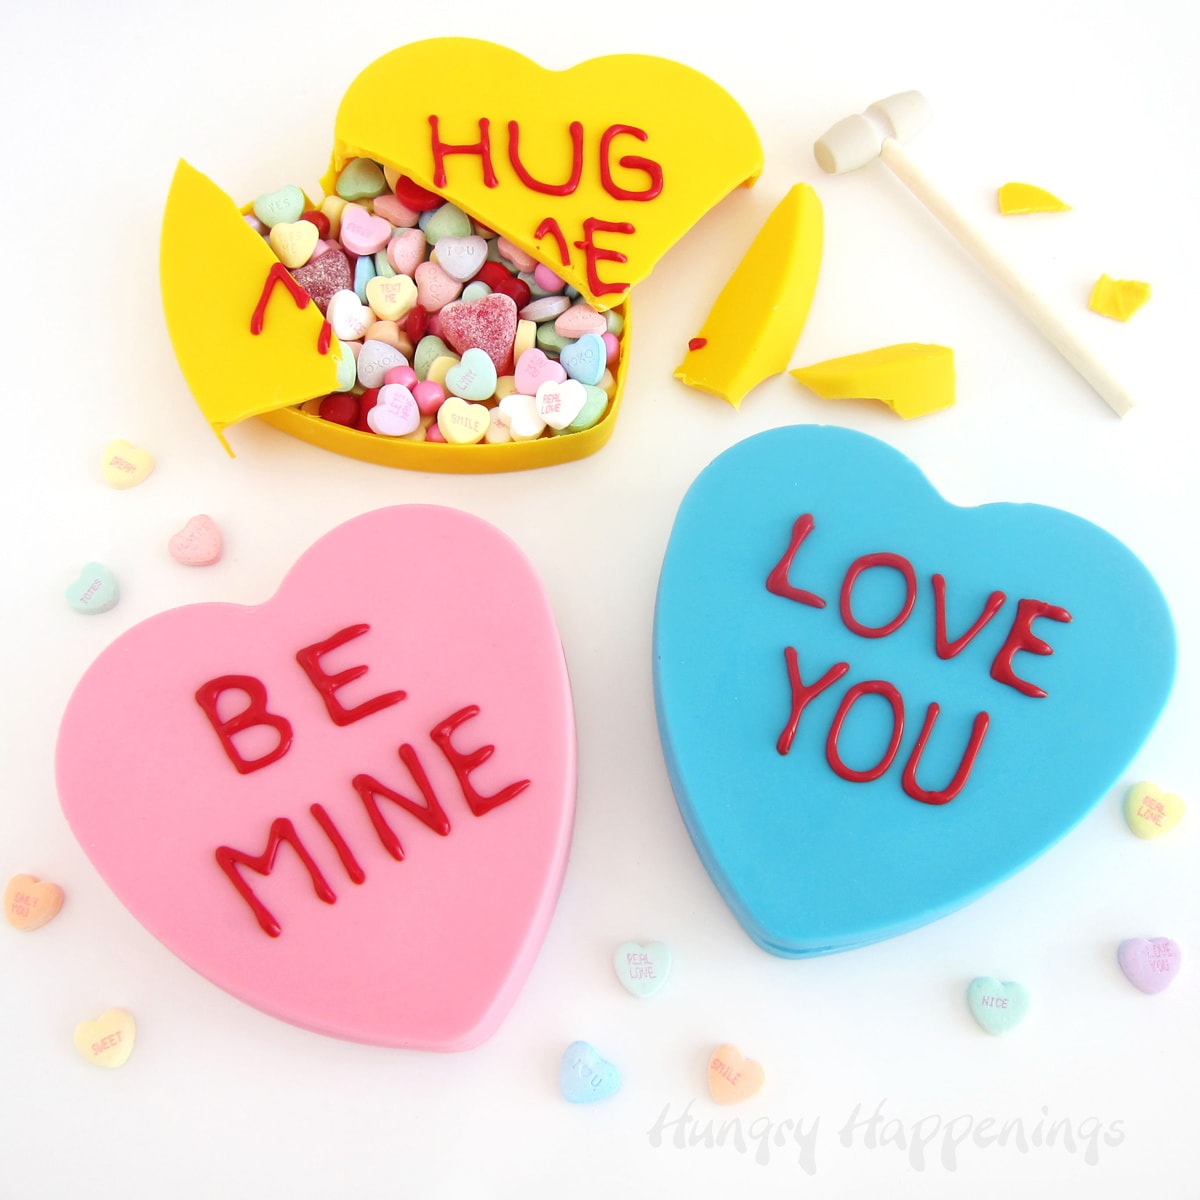
Each sweet little dessert was brightly colored and personalized with a special message printed on the top just like the candy conversation hearts.
The cheesecake hearts made for the perfect ending to a lovely Valentine's Day meal.
Graham Cracker Crust
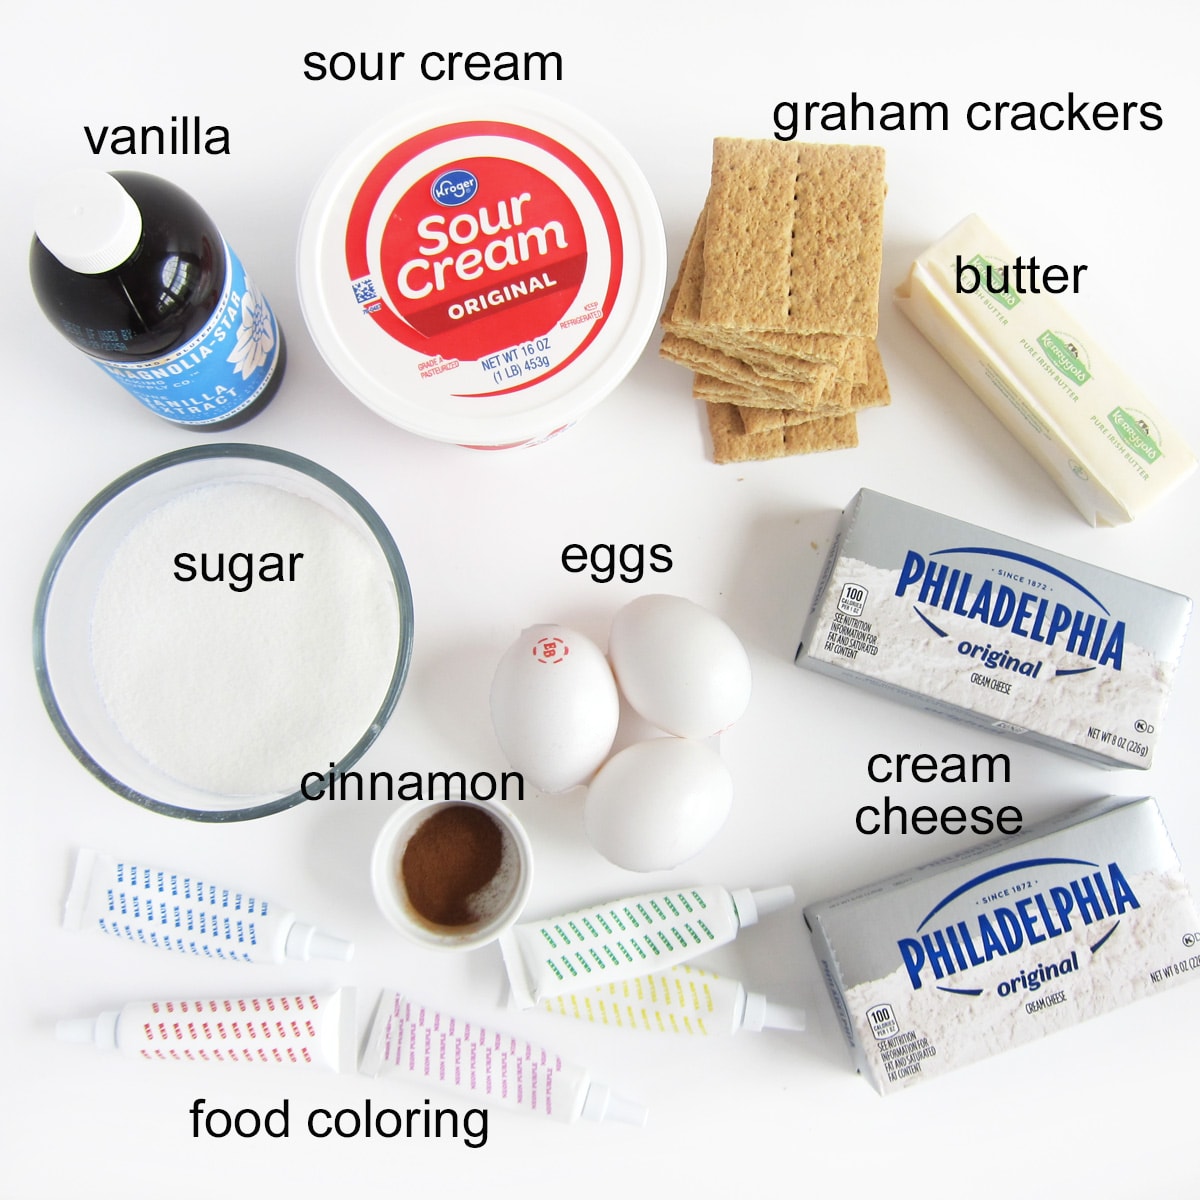
graham crackers - You need 1 cup of crumbs. If you crush about 15 graham cracker squares, you'll get about 1 cup of crumbs.
butter - Use salted or unsalted butter to make your cookie crust. Either will work fine.
cinnamon - I like adding a small sprinkling of cinnamon to the crust. It's optional, though.
Cheesecake Filling
cream cheese - Use full-fat cream cheese for the best texture and flavor. I recommend using Philadelphia Cream Cheese. I think it tastes best! Soften your cream cheese at room temperature for at least 3 hours if not more.
sour cream - Adding this to the cheesecake will add a nice tangy flavor and will give your cheesecakes a super smooth and creamy texture. Set the sour cream out an hour before you mix the filling.
eggs - Use room-temperature eggs.
vanilla - Pure vanilla extract adds a nice vanilla flavor but artificial extract will work too.
sugar - Use granulated sugar to add sweetness and structure to the cheesecakes.
Supplies
To make these heart-shaped cheesecakes, you will need three Heart-Shaped Silicone Molds. The molds are the perfect size to make an individual serving of cheesecake.
I only had 2 of the molds at the time I made these hearts and ended up using the extra cheesecake filling to make some mini cheesecake hearts. The bite-sized treats were cute, but I would have preferred having 3 of the larger hearts in each of the six colors.
Items I used to create this project are available on Amazon.com (commission earned for sales).
 Boao 2 Pcs Heart Shaped Sil...Shop on Amazon
  BAKER DEPOT 6 Holes Heart S...Shop on Amazon
  T-fal A85797 Specialty Nons...Shop on Amazon
 Bottles") U.S. Cake Supply 30 Color C...Shop on Amazon
U.S. Cake Supply 30 Color C...Shop on Amazon Chicago Metallic Conversati...Shop on Amazon
stand mixer or a mixing bowl and handheld mixer
rubber spatula
3 Heart-Shaped Silicone Molds
fine tip paintbrush (new or food-only brush)
roasting pan big enough to fit your heart-shaped molds
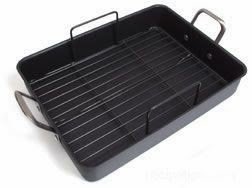
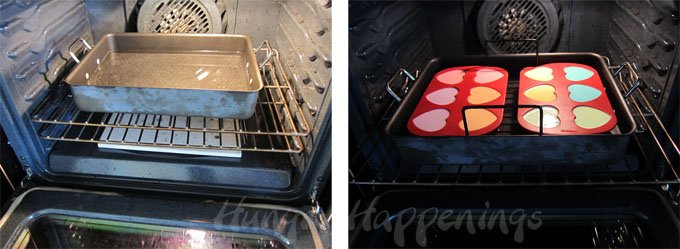
You will need a water bath to bake your cheesecakes, so either set your roasting pan in the oven filled with enough water to go halfway up the sides of your heart molds and allow the water to heat along with the oven or bring some water to a boil in a teapot or the microwave then pour it in the bottom of the pan.
My roasting pan has a flat rack that fits inside. I set two heart molds on the rack, filled them, then used the handles to help me lower the molds into the hot water.
After the cheesecakes bake it's so easy to lift them out and cool them on the rack.
Instructions

Make the mini cheesecake crusts in a heart mold.
- Once you have your molds ready to fill, equally divide a mixture of graham cracker crumbs, butter, and cinnamon in the bottom of the heart-shaped cavities.
- You'll use about a tablespoon of crumb mixture in each heart cavity. Press the crumbs down making an even crust. Refrigerate until ready to fill with the cheesecake mixture.
- You can bake this crust for 8-10 minutes if you want it to be a bit crisper. Either way works fine.
Make the cheesecake filling.
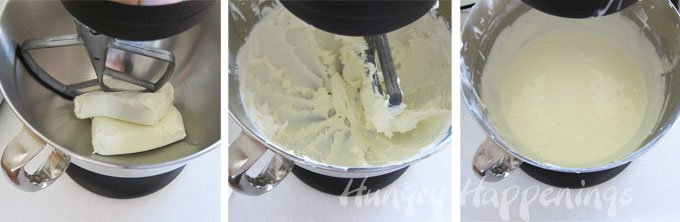
- In the bowl of a stand mixer, or in a mixing bowl using a handheld mixer, beat the cream cheese on medium-high until smooth, scraping down the sides of the bowl as needed.
- Be sure to scrape the cream cheese out of the mixing blade as well. You don't want lumps in your cheesecake.
- Add sugar and beat for one minute.
- Add eggs and beat until creamy, 1 to 2 minutes, scraping the sides of the bowl once.
- Add the sour cream and vanilla and mix just to combine.
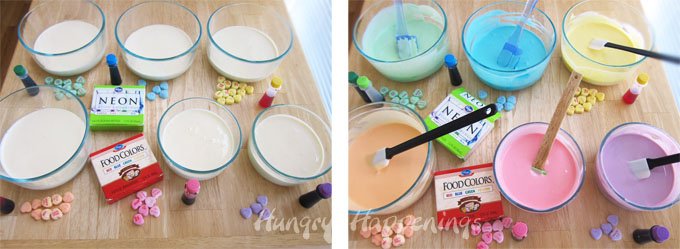
Color the cheesecake filling.
- Equally divide the filling among 6 bowls.
- Add food coloring to create the colors you'd like.
- The colors will intensify a bit once baked, so make them a little less bright than you want them. I was not happy with how intense the blue cheesecakes turned out. I would only a few drops of blue.
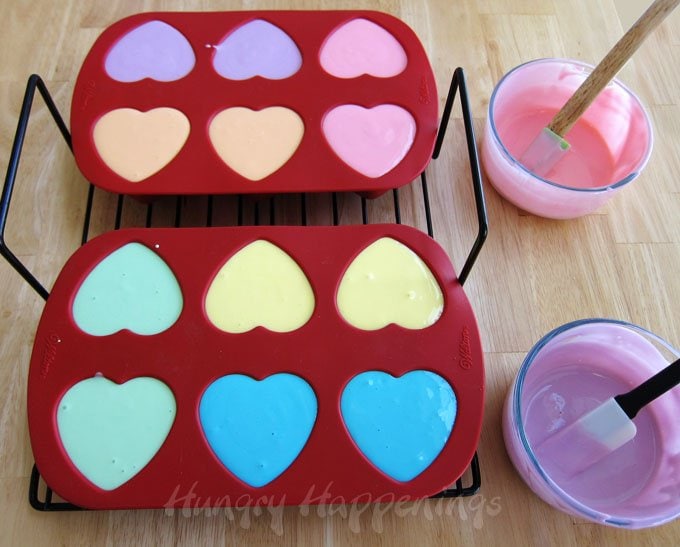
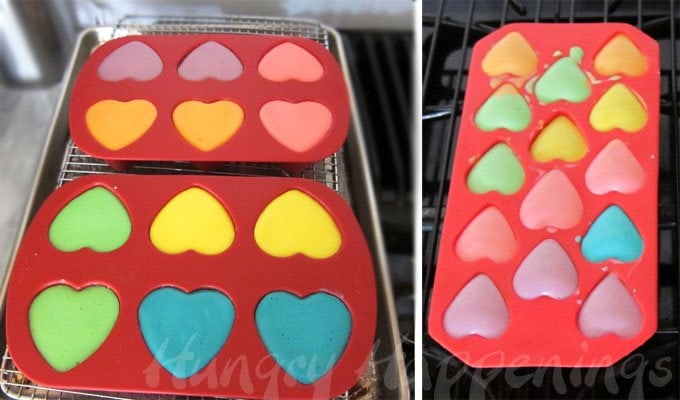
Fill the silicone heart mold with the colored filling.
- Pour the colored cheesecake filling into the heart-shaped cavities in your Wilton silicone molds.
- If you are using 3 heart molds and making 18 cheesecakes, equally divide each color among 3 hearts.
- The cavities will be a little over ¾ full.
- I filled mine completely, as I only made 12 of this size. I then used the remaining batter to make some mini hearts (see the image below.)
Bake in a water bath.
- Bake the cheesecakes in a water bath for 18-22 minutes.
- When baked thoroughly, the cheesecakes should still jiggle, but not look wet
- Use a roasting pan with a removable rack to make it easier to remove cheesecakes.
- You can set your heart molds in your roasting pan, then carefully pour boiling water around the heart molds.
- If baking tiny cheesecakes, bake for 10-14 minutes.
- If you bake one large heart-shaped cheesecake, it should take between 42-50 minutes.
Cool then freeze the heart-shaped cheesecakes.
- Remove your baked cheesecakes from the oven and water bath and allow them to cool at room temperature for an hour.
- Then cover the mold with a piece of paper towel and wrap it in plastic wrap.
- Freeze for at least 2 hours or up to several weeks.
- It's easiest to remove the cheesecakes if they are frozen solid.
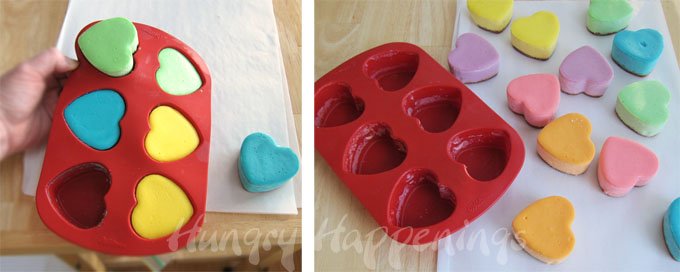
Un-mold the heart-shaped cheesecakes.
- Remove from the freezer, uncover, then push on the underside of each heart mold, releasing the cheesecakes.
- Carefully lift them out of the mold. If they don't pop right out, you need to freeze them longer.
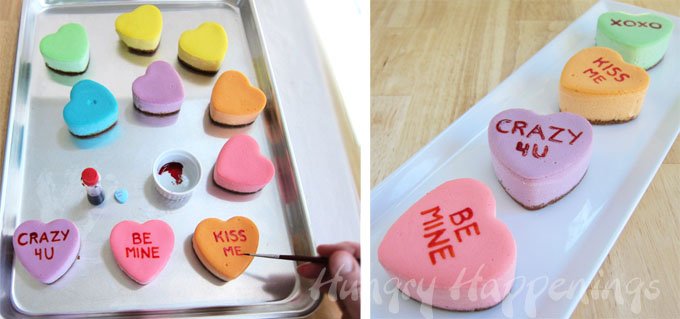
Personalize the conversation heart cheesecakes.
- To add the conversation heart phrases, squeeze a few drops of red food coloring into a small bowl.
- Use a fine-tip paintbrush to paint the words onto each cheesecake heart.
Tips
- Traditional conversation heart sayings are printed in all capital letters.
- Don't worry if your words are off-center, as many conversation hearts are printed that way.
- If you have too much food coloring on your brush, your letters will bleed.
- The food coloring will dry if you refrigerate your cheesecakes for a while.
Variations
If you prefer to use natural coloring, you can either purchase bottles of natural food coloring or use fruit and vegetable purees.
You can make naturally colored conversation heart cheesecakes using fruit purees (pictured above.) The cheesecakes are flavored and colored with blueberries, raspberries, lemon, and orange/carrot.
If you enjoy fruit-flavored cheesecakes, this is a wonderful, natural, alternative. They taste great and, although the colors are a bit more muted than the original cheesecakes, they look equally festive.
You will also notice, the lettering on those conversation heart cheesecakes is a lot nicer. Check out the other tutorial to see how to achieve this really clean look using cookie stamps.
Storage
- Store in the refrigerator for up to several days or freeze for up to a month.
- I suggest storing them in an airtight container. To keep the condensation from developing on the tops of the cheesecakes, set a piece of paper towel, that is larger than the container's lid, across the underside of the lid. Close and seal. The moisture will get wicked up by the paper towel.
Recipe

- 1 cup graham cracker crumbs (about 15 squares)
- pinch of cinnamon
- 4 tablespoons (½ stick) butter, melted
- 16 ounces (2 blocks) cream cheese, softened
- 1 cup sugar
- 3 large eggs
- 1 pint sour cream (1 pint = 16 ounces or 2 cups of sour cream)
- 1 teaspoon vanilla extract
- food coloring - pink purple, blue, green, yellow, and red
-
Fill a roasting pan with enough water to come halfway up the sides of the silicone heart molds.
-
Set the roasting pan in the oven.
-
Heat oven to 325 degrees Fahrenheit.
-
Mix together the graham cracker crumbs, cinnamon, and melted butter.
-
Equally divide the crumbs among 18 heart-shaped silicone mold cavities.
-
Press the crumbs into an even layer and refrigerate until needed.
-
Beat cream cheese until creamy and smooth.
-
Add sugar and beat until incorporated.
-
Beat in eggs then add sour cream and vanilla and mix just to combine.
-
Equally divide the cheesecake batter into 6 bowls.
-
Color one bowl of filling pink, lavender, yellow, orange, green, and blue using food coloring.
-
Equally divide each color of filling among 3 heart cavities.
-
Bake cheesecakes in a water bath for 18-24 minutes until the edges look set but the center is jiggly but not wet.
-
Remove from oven and water bath and allow to cool at room temperature for an hour.
-
Freeze for at least two hours then remove and un-mold.
-
Paint conversation heart phrases onto the tops of the cheesecakes using red food coloring.
Recipe Video
Store your conversation heart cheesecakes in the refrigerator for up to several days or freeze them for up to a month. I highly recommend you wait to decorate the cheesecakes until the day you plan to serve them.
More Valentine's Day Recipe Ideas
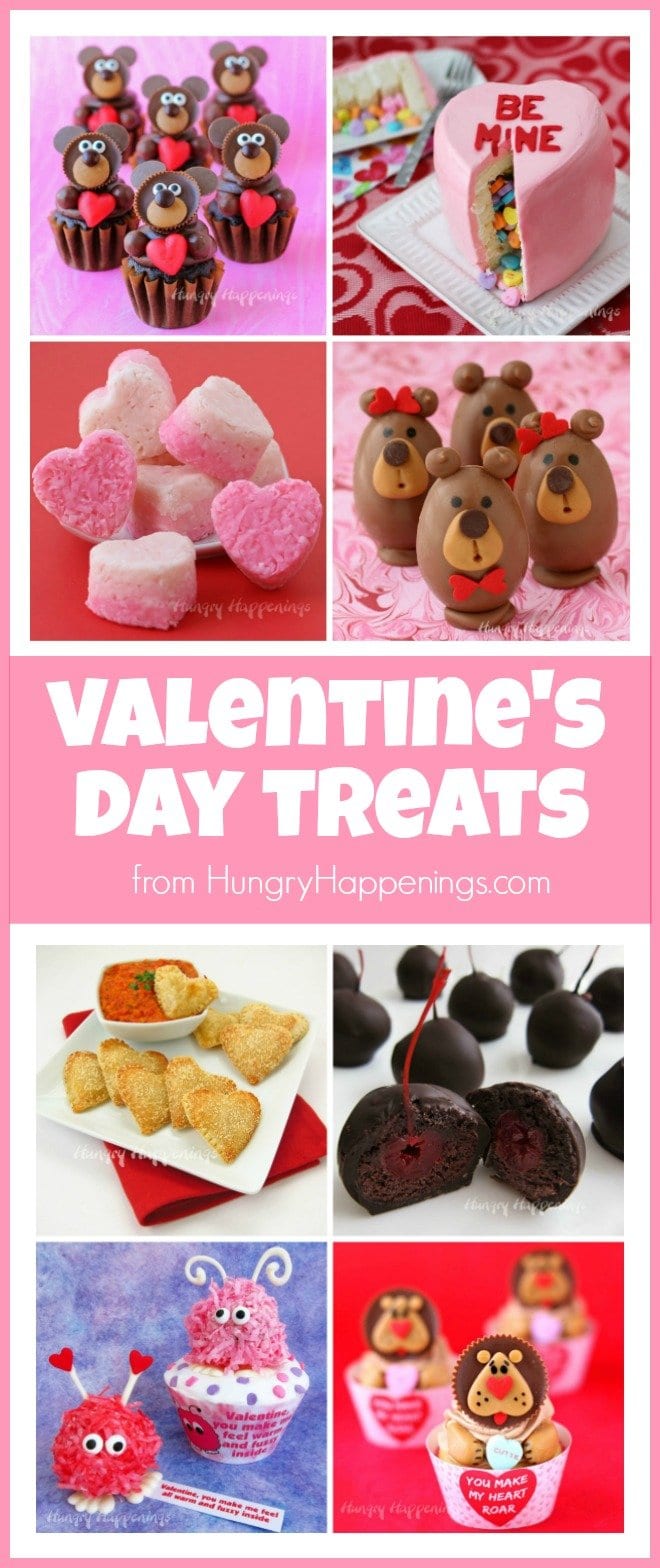
If you are looking for other treats or gifts to make for Valentine's Day, you might like these other recipes too.
Reese's Cup Teddy Bear Cupcakes • Conversation Heart Piñata Cake
Creamy Coconut Candy Hearts • Chocolate Buckeye Bears
Mozzarella Cheese filled Heart Pastries • Sweet Chocolate Cherry Bombs
Warm Fuzzy Cake Balls and Cupcakes • You Make My Heart Roar Lion Cupcakes

- Banana Split Bars – A Fun and Easy Summer Dessert - March 4, 2026
- Pineapple Fudge (No Candy Thermometer Needed!) - March 4, 2026
- No-Bake Peanut Butter Pie Recipe - March 3, 2026

Natural-Nesters says
These are AMAZING!!!! Will you link up over at our party? You may be featured next week!! Thanks
http://natural-nester.blogspot.com/2012/02/naturally-nifty-party-1.html#idc-container
-Your Newest Follower
Beth Jackson Klosterboer says
Thank you and welcome to my blog. I linked up at your party and added your button to my Featured On page.
pixelhazard says
This is fantastic! I am absolutely trying this!Bright Green Laces
Beth Jackson Klosterboer says
So glad to hear it. I'd love to share pictures of your cheesecakes in my Reader's Gallery if you want to send them to beth@hungryhappenings.com.
Brooke says
These are so incredibly cute! I am so glad that I saw these before Valentine's day! I am definitely making them this weekend! Thanks for the awesome idea! =)
Beth Jackson Klosterboer says
Thank you and have fun making your cheesecakes. Be sure to snap some pictures and send them to me at beth@hungryhappenings.com so I can share them in my Reader's Gallery.
Diana - FreeStyleMama says
Those are absolutely adorable!
JavelinWarrior says
Your conversation cheesecakes are incredible! I've never seen this done before and that's a real shame because I LOVE cheesecake... I have featured this post in today's Friday Food Fetish roundup. Let me know if you have any objections and thanks for the inspiration
Beth Jackson Klosterboer says
Of course, I am very please that you featured this recipe on your Friday Food Fetish. Thank you! I'm glad you like them.
Beth (www.livinglifeintentionally.blogspot.com) says
Beth, I LOVED these SO much I featured them at TGIF this week (http://livinglifeintentionally.blogspot.com/2012/02/tgif-linky-party-16.html) - Come stop on by and link up what you've been up to this week. Thanks for sharing your creativity with all of us!! (By the way this has been being repinned like CRAZY on my Pinterest page =-)
Beth =-)
Beth Jackson Klosterboer says
Thank you so much Beth. I really appreciate being featured. This recipe has turned out to be my most popular one to date, by a huge margin. I am shocked and excited to see how many people have stopped by my blog to see the tutorial. I'll be sure to link up on your site.
Yvonne says
These are the cutest cheesecakes I have ever seen! I LOVE cheesecakes and can't wait to try a new recipe! Looking forward to making these for my hubby and 3 kiddos for Valentines Day! Thank you so much for this awesome idea!
Beth Jackson Klosterboer says
Thanks Yvonne. I'd love to share pictures of your cheesecakes in my Reader's Gallery if you snap a few. I hope your family enjoys their sweet Valentine's Day treat.
Trish - Mom On Timeout says
Thanks so much for sharing these amazing recipe at Taking A Timeout Thursday! I've had this repinned so many times....Just wanted to let you know that you are being featured this week! Thank you for the inspiration 🙂
Beth Jackson Klosterboer says
Thanks so much for the feature Trish. I hope your readers enjoy them too.
Vere Perez says
Soo cool! I have similar molds and I have been saving them for a special recipe, well I my search is over.
Beth Jackson Klosterboer says
The silicone molds are perfect for this and I hope you enjoy making them. Thanks Vere.
Brandi says
I love it! Such a creative and unique idea! I love your mini cheesecakes!
OneMommy says
Those are pretty cute! Makes me think I should go find some heart cupcake molds!
Carrie says
Unbelievable!! This are perfectly amazing! I have never attempted a normal cheesecake much less something so fabulous...GREAT JOB!
Maria says
Wow these are absolutely amazing! I've never seen anything like this, and how perfect for Valentine's Day! These look like they came straight from a page from a magazine! AMAZING!!!!
Beth Jackson Klosterboer says
Wow, right back at ya. What an amazingly nice comment. My dream would be to have one of my edible craft recipes in the pages of a magazine. Someday, perhaps.
Julie @White Lights on Wednesday says
This is such a cool idea. I LOVE cheesecake. It's nice to see a different way to do conversation hearts that aren't cookies or cupcakes. A big thumbs up!
Beth Jackson Klosterboer says
Thanks for the thumbs up. I try hard to not do the same thing everyone else is doing and appreciate you noticing.
terriavidreader (IN-USA) says
This is so cute, I'd love to do it, but my boys and hubby would have a hissy fit if I changed my recipe after all these years. they won't allow it. I tried a few times mixing things up a little with different flavors, etc., and they wouldn't eat it. Same with my deviled eggs - only the old way will work.
Beth Jackson Klosterboer says
Hey, I'm with them, when you find a recipe you like, stick with it. Just use your cheesecake recipe for this project and I'm sure they'll love it. I'm picky about deviled eggs too, so I totally understand!
4you-withlove says
This is AWESOME...my guys LOVE cheesecake!!! Were they hard to get out of the molds?
Beth Jackson Klosterboer says
Thank you and no, the cheesecakes were not difficult to get out of the mold because I froze them for a few hours. They really pop right out when you turn the silicone mold inside out. If you don't freeze them, you'll still be able to get them out, they just might not come out as perfectly.
von Hand zu Hand says
oh that's such a lovely idea! i often color dought but i've never baked a colored cheesecake!
i love it!
I linked to your recipe on my blog - thanks for sharing!
doro K.
Beth Jackson Klosterboer says
Danke Doro,
Thank you for featuring my Conversation Heart Cheesecakes on your blog. Some of your readers have stopped by already.
Beth Jackson Klosterboer says
Wow, so many nice comments. Thank you so much for visiting my site and taking time to comment. It's amazing to see so many new people stopping by to check out these cheesecakes.
Russell at Chasing Delicious says
These are the cutest things I've seen for valentines day yet. Love 'em!
Anonymous says
I really want to make these. Is there something else I could use instead of a roasting pan? Or suggestions of where to buy one that is super expensive?
Beth Jackson Klosterboer says
You just need a pan that is big enough to fit at least one of your heart shaped silicone molds. A 9"x13" casserole dish will work fine. If you don't have one of those, you can buy a tin foil roasting pan for a few dollars. You don't absolutely need to bake the cheesecakes in a water bath, but there are two reasons it's better to do so: the texture of your cheesecake will be creamier and the top of the cheesecake wont crack.
Alejandra Godoy says
I just baked this without the water bath and it turned out just fine. I did one big hearth cheesecake for my boyfriend and he absolutely loved it! thank you very much for the recipe!
Alejandra Godoy says
I just baked this without the water bath and it turned out just fine. I baked one big hearth cheesecake for my boyfriend and he absolutely loved it! Thank you for this amazing recipe and idea!