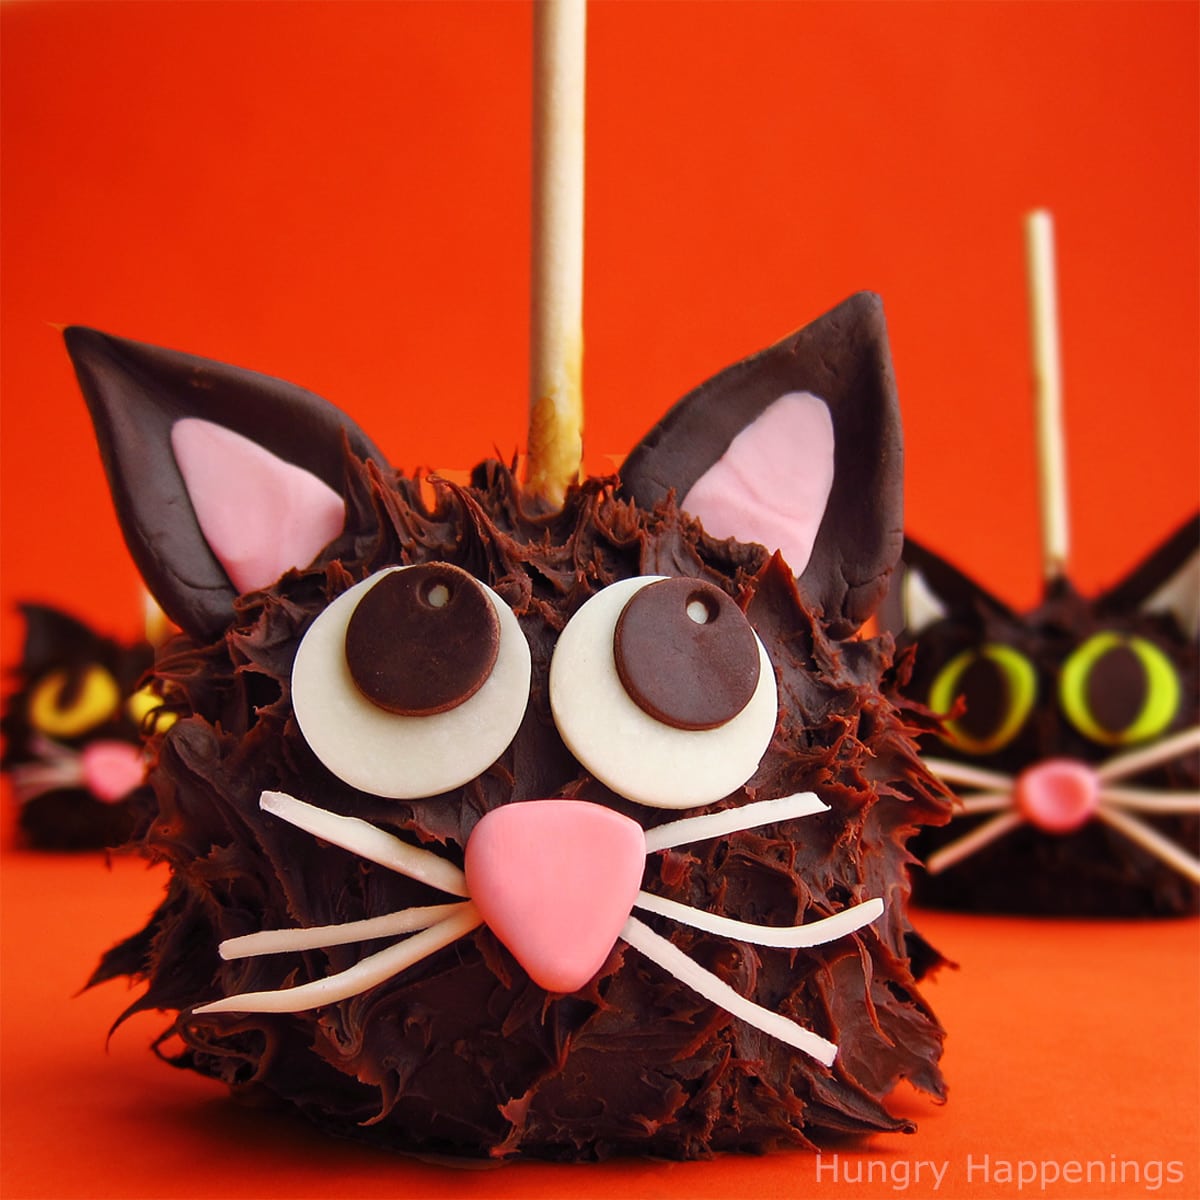
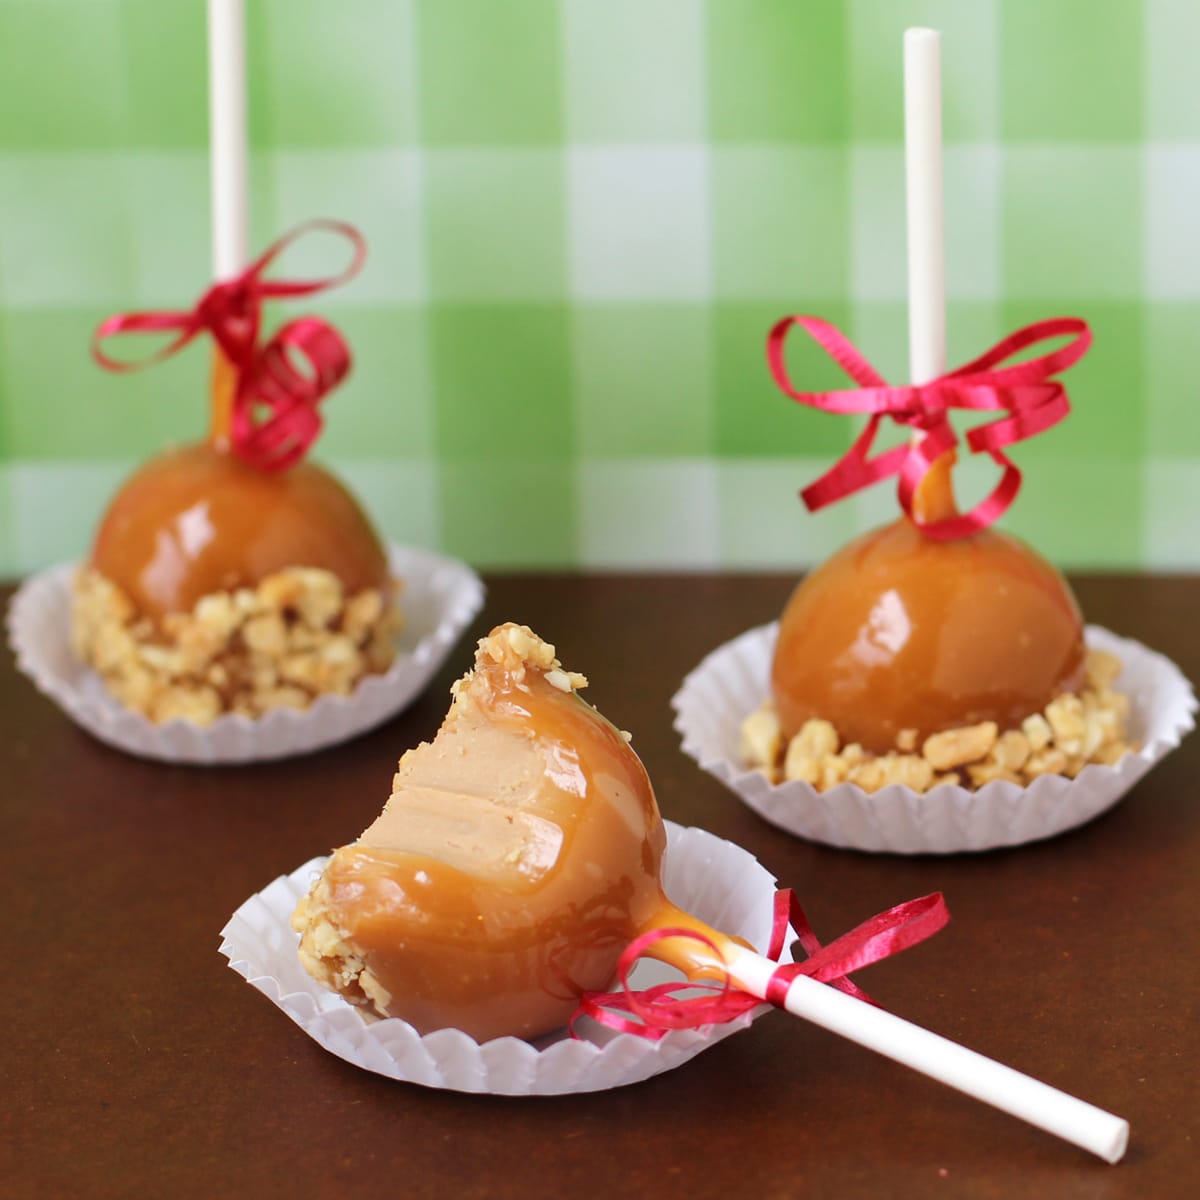
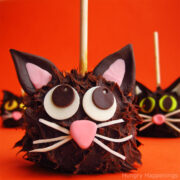
These adorable Chocolate Caramel Apple Cats are the purr-fect dessert for Halloween. Each chocolate-coated caramel apple can be decorated to look like a cute or spooky black cat.
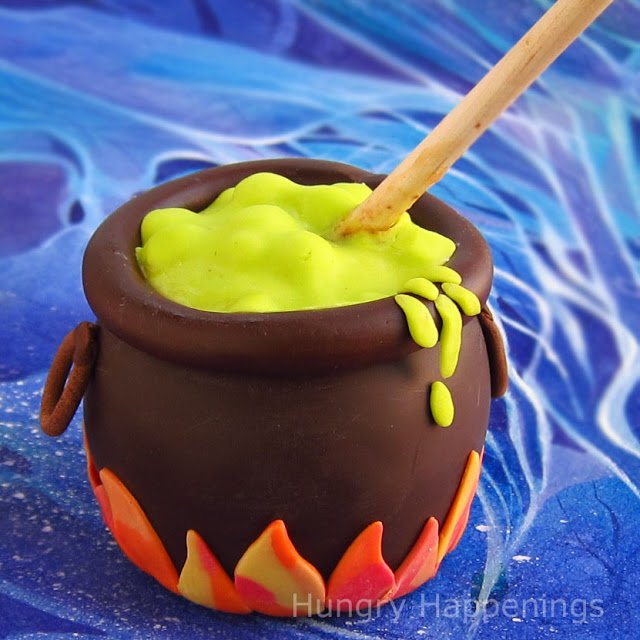
Have you ever decorated a caramel apple? I recently shared a recipe to make Caramel Apple Cauldrons and had so much fun creating them that I couldn't wait to share another decorating idea.
Black cats are synonymous with Halloween so I chose to make a caramel apple cat that's covered in furry-looking chocolate ganache.
The chocolate ganache takes the flavor of the caramel apple to a whole new level. It's a grown-up treat that kids will love too.
The chocolate cats are decorated using modeling chocolate, also known as candy clay. It's easy to make using chocolate and corn syrup. It is easy to sculpt into shapes and it tastes like a chocolate or vanilla Tootsie Roll.
Be sure to check out my Modeling Chocolate Recipe before you begin.
Chocolate Caramel Apple Cats
Ingredients
caramel apples (homemade or store-bought)
dark chocolate, finely chopped
heavy whipping cream
light corn syrup
Decorations
white modeling chocolate
dark modeling chocolate
pink, yellow, and bright green modeling chocolate - See my How To Color Modeling Chocolate tutorial for instructions.
Supplies
food processor or a mixing bowl and a spatula or spoon
Silpat non-stick liner, a non-stick baking sheet, or a piece of parchment paper
small round and oval cookie cutters, optional
rolling pin
pizza cutter or knife
Sculpy clay extuder, optional
Instructions
Make chocolate ganache.
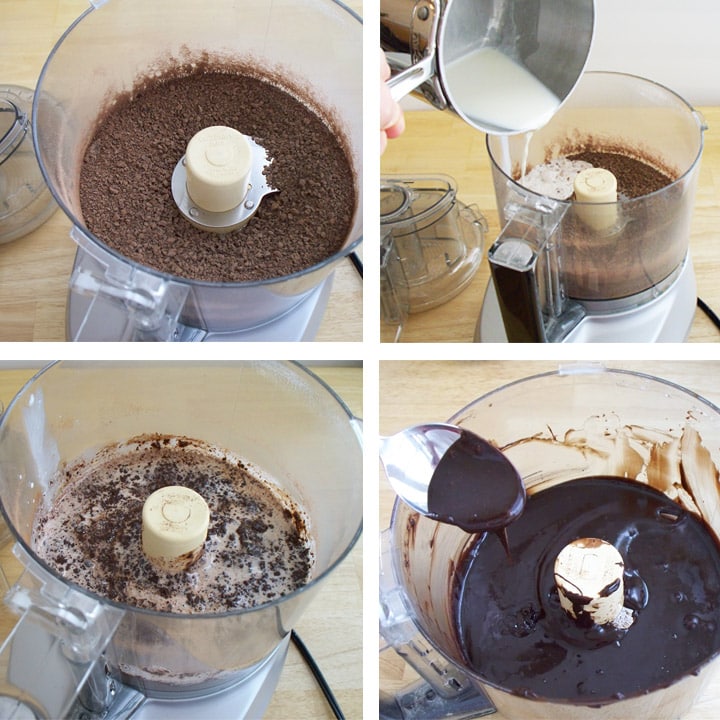
To use a food processor to make your ganache, start by placing chopped chocolate in the bowl. Pulse until the chocolate is fine crumbs.
Heat heavy whipping cream and corn syrup in a small saucepan over medium heat. Stir often until it just comes to a boil.
Pour the hot cream over the chocolate, put the lid on the food processor bowl, and let sit for 2-3 minutes. Pulse for 5 seconds. Remove the lid and scrape down the sides and bottom of the food processor bowl. Return the lid and pulse for 5 more seconds or until the mixture, which is called ganache, is smooth.
Don't over-mix your ganache or it will turn grainy as it sets up.

Or make ganache in a bowl.
Finely chop your chocolate and put it in a microwave-safe mixing bowl.
Heat the cream as above and pour it over the chocolate and let sit for 2-3 minutes.
Use a whisk to create an emulsion. Begin by stirring just in the center of the bowl, then slowly bring the whisk out to the edge of the bowl. Stir just until combined and the ganache is smooth.
If you have chunks of chocolate remaining, place the entire bowl in the microwave and heat on high for 10 seconds. Stir until melted.
Trouble Shooting Ganache: If your ganache gets too hot the cocoa butter from the chocolate will separate and rise to the surface. The cocoa butter will harden as the ganache cools and you will have chunks of cocoa butter throughout. This can happen if you add cream that is too hot or get the ganache too hot in the microwave.
If your ganache does separate or look oily, add a little cold whipping cream (a tablespoon at a time) and mix until smooth.
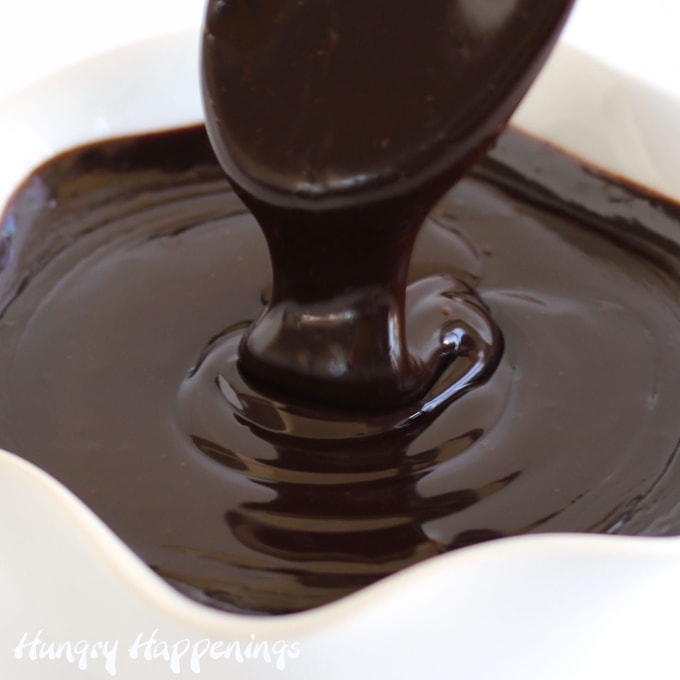
Allow the ganache to thicken.
Allow the ganache to cool until it thickens.
You will be frosting your caramel apples, so you need the ganache to cool enough that it thickens like frosting. The ganache pictured above needs to cool longer. This may take up to an hour.
Meanwhile, you can make your cat's eyes, nose, ears, and whiskers.
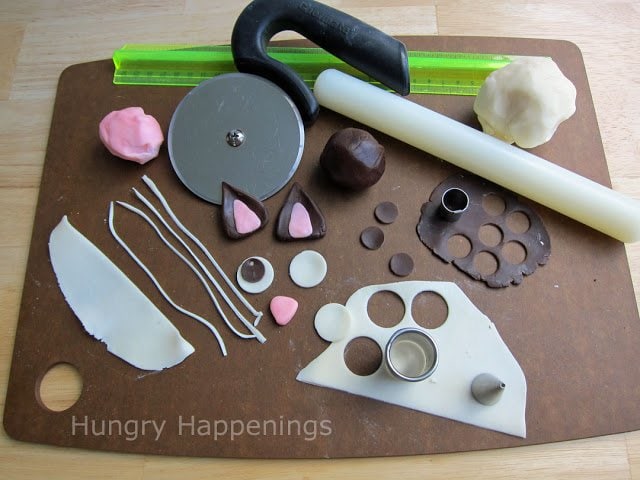
Make the modeling chocolate decorations.
If your modeling chocolate is hard, knead it until it softens. If it is too soft, set it aside until it cools off and firms up.
Cat Nose
Roll some pink modeling chocolate into a ball then flatten it into a triangular-shaped nose.
Cat Ears
Roll out dark modeling chocolate to ⅛-inch thickness and cut into triangle-shaped ears. Or shape it by hand just be sure the ears are thick enough that they will hold their shape when standing upright.
Do the same using pink modeling chocolate making the triangles smaller so they fit inside the dark ear.
Attach the pieces of modeling chocolate to each other by dabbing a very small amount of water on one piece and pressing them together.
Cat Eyes
Roll out white, yellow, or bright green modeling chocolate to about 1/16-inch thickness. Cut out circles using a round cutter. The size will be dependent on the size of your caramel apples. Mine were about an inch.
Then roll out dark modeling chocolate and cut it into circles or ovals to make the pupils.
Attach the pupil to the eye using a small bit of water.
Whiskers
Roll out white modeling chocolate and cut out long, narrow strips. Or use a clay extruder to create the whiskers.
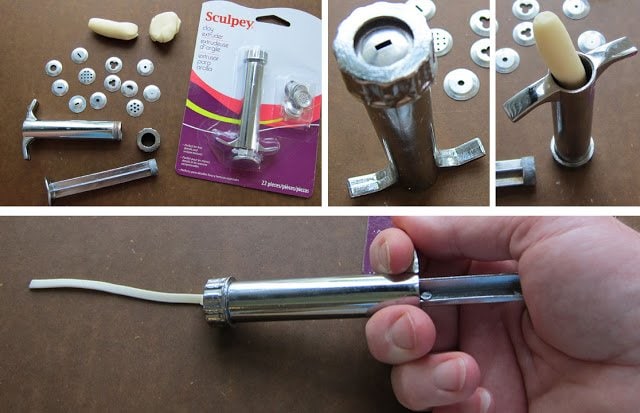
I use a Sculpey Clay Extruder to make a lot of decorative pieces out of modeling chocolate. The clay extruders can be found at your local craft stores in the clay aisle.
To use, attach the metal disc with the appropriate hole (the one I used in this picture makes a flat strip, roll some modeling chocolate into a log, place it in the clay extruder tube, insert the plunger, and press the modeling chocolate out onto your work surface.
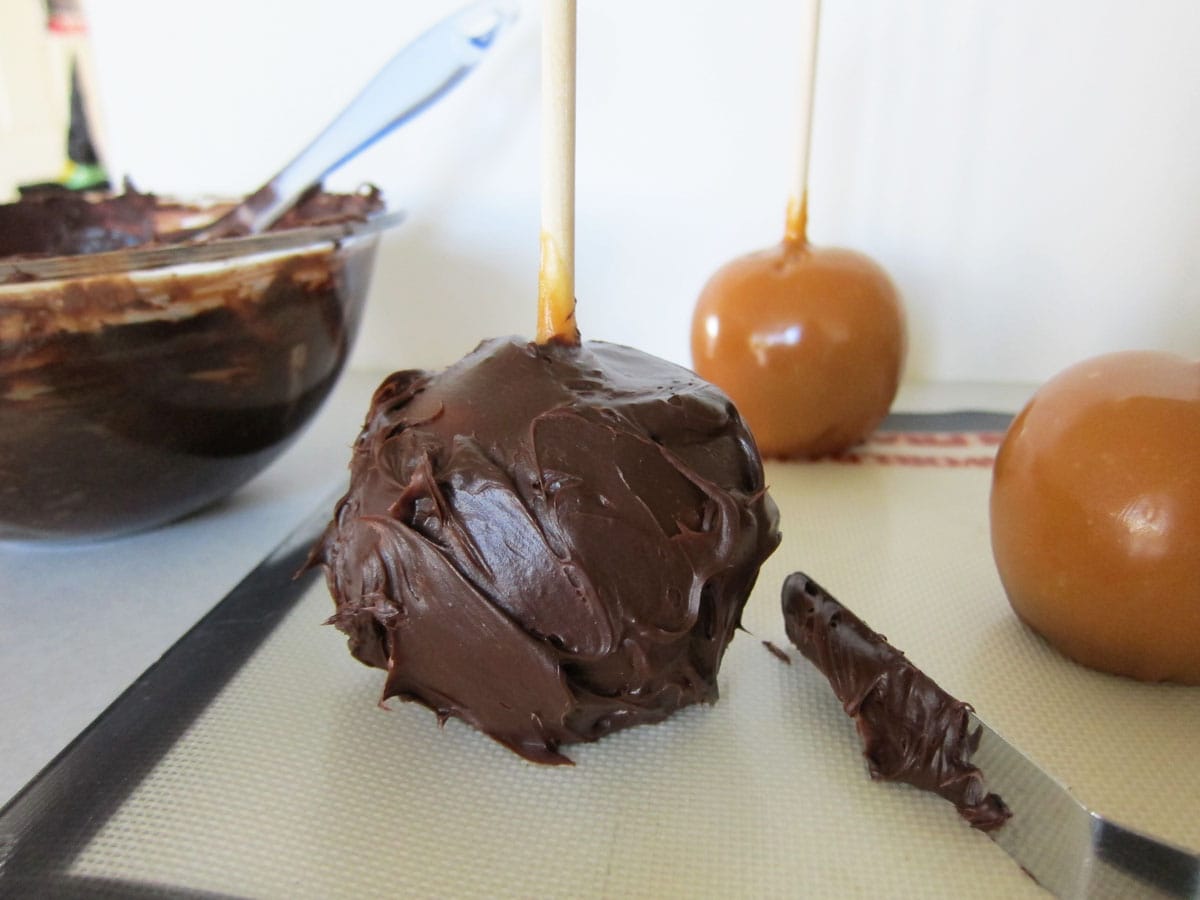
Frost caramel apple with chocolate ganache.
Allow your ganache to thicken just enough so that it is the consistency of frosting.
Set your caramel apple on a Silpat, a non-stick baking sheet, or a piece of parchment paper. If your caramel apples have a footer (a round bottom where the caramel has puddled) use a knife or kitchen shears to cut it off.
Use your hands to round the bottom of the apple. This will ensure a nice round face for your cats.
Now, frost one of your caramel apples with the ganache.
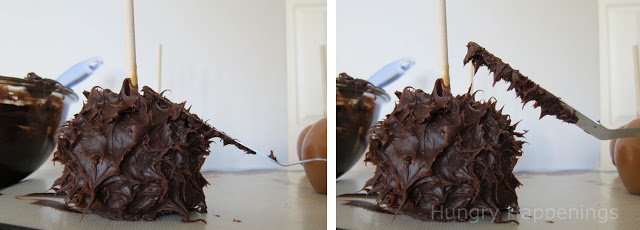
Make the chocolate look furry.
Once each apple is frosted you'll want to create the cat's fur by pressing an offset spatula, knife, or spoon, onto the ganache and quickly pulling it away creating spikes.
If the ganache is not thick enough, the spikes won't form, so let it sit for a few minutes to thicken.
If the ganache is too dry, the spikes will get crusty, so be sure to do one apple at a time.
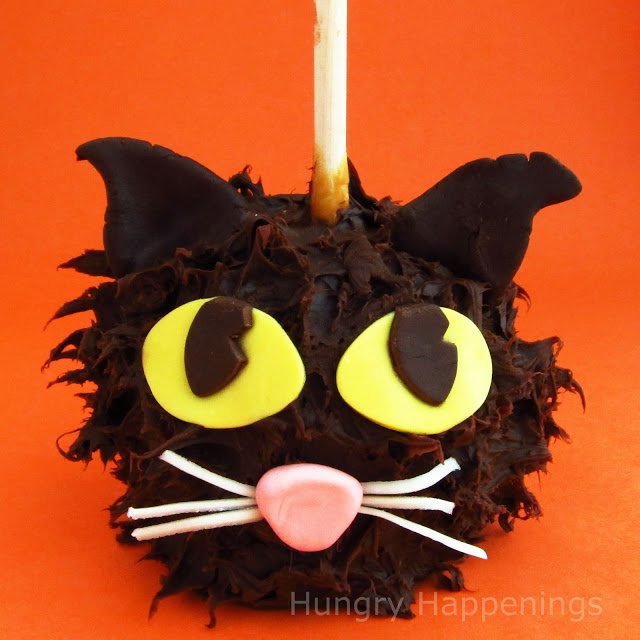
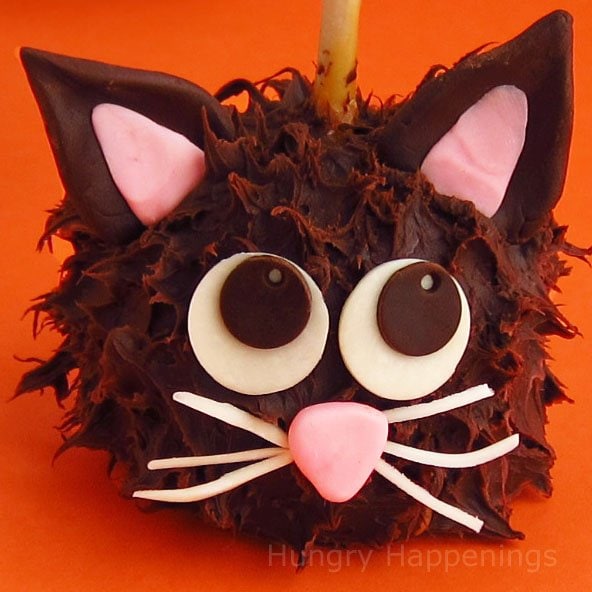
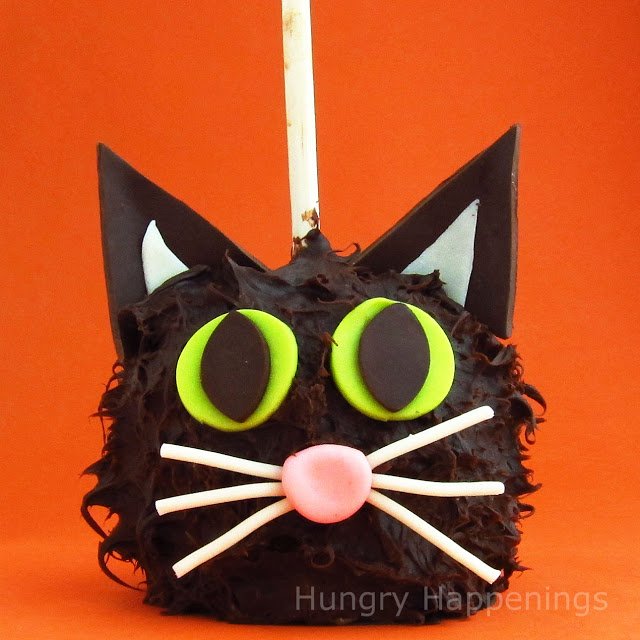
Decorate the black cat caramel apples.
Press two eyes, 6 whiskers, a nose, and two ears into the ganache frosting. Hold them in place until they stay put.
You can make your black cat caramel apples look sweet and cute or a bit spooky. Either way, they will make amazing treats to serve for dessert, to give as Halloween gifts, or to sell at a Halloween craft show or bake sale.
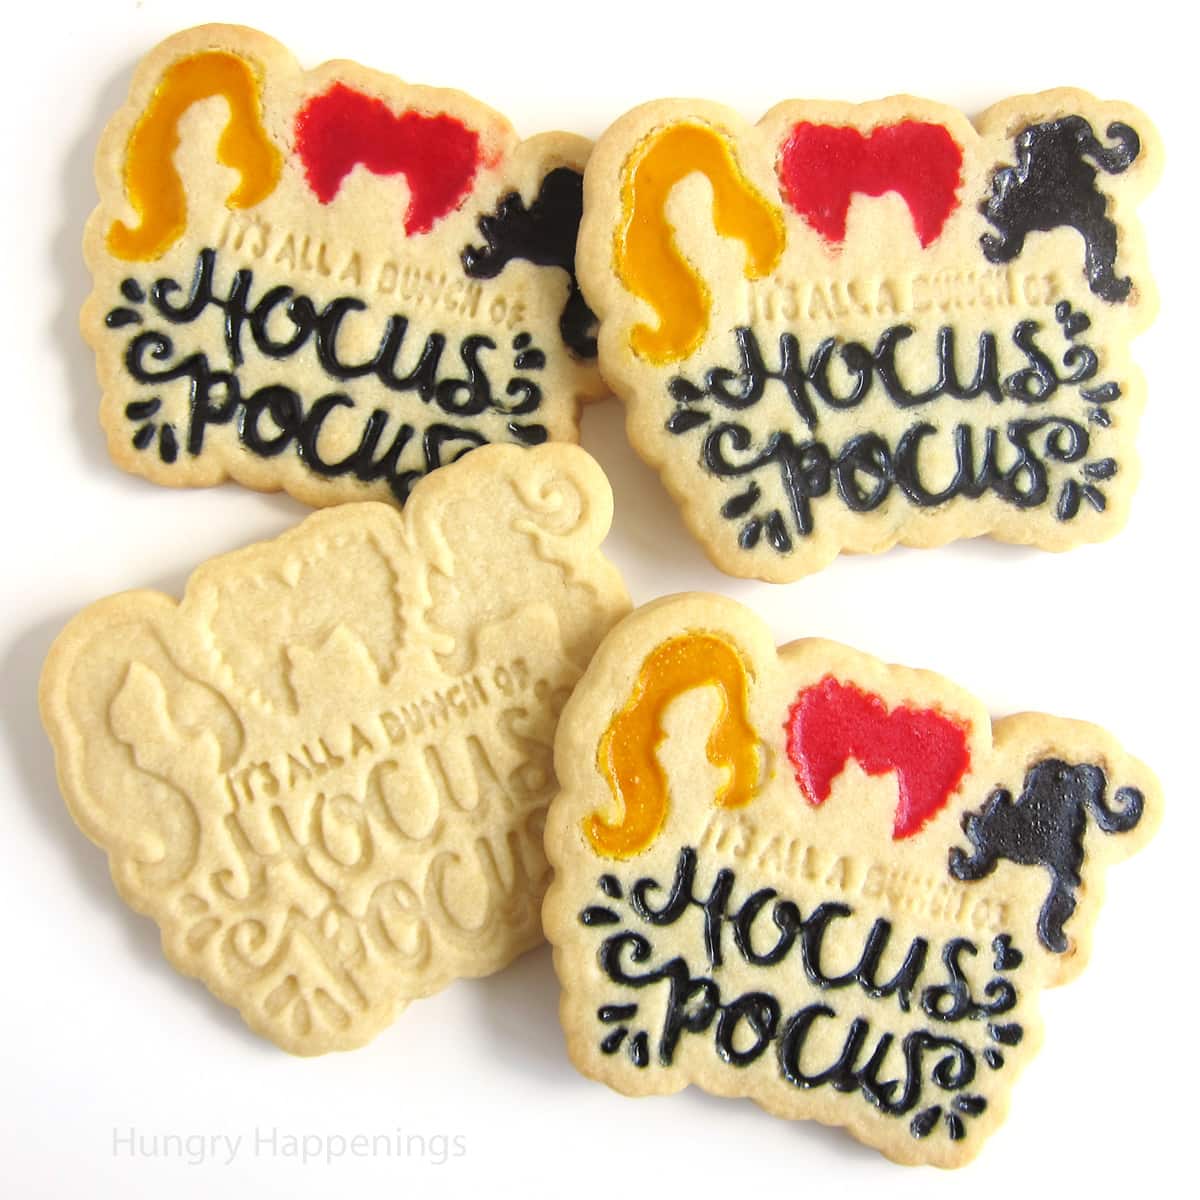
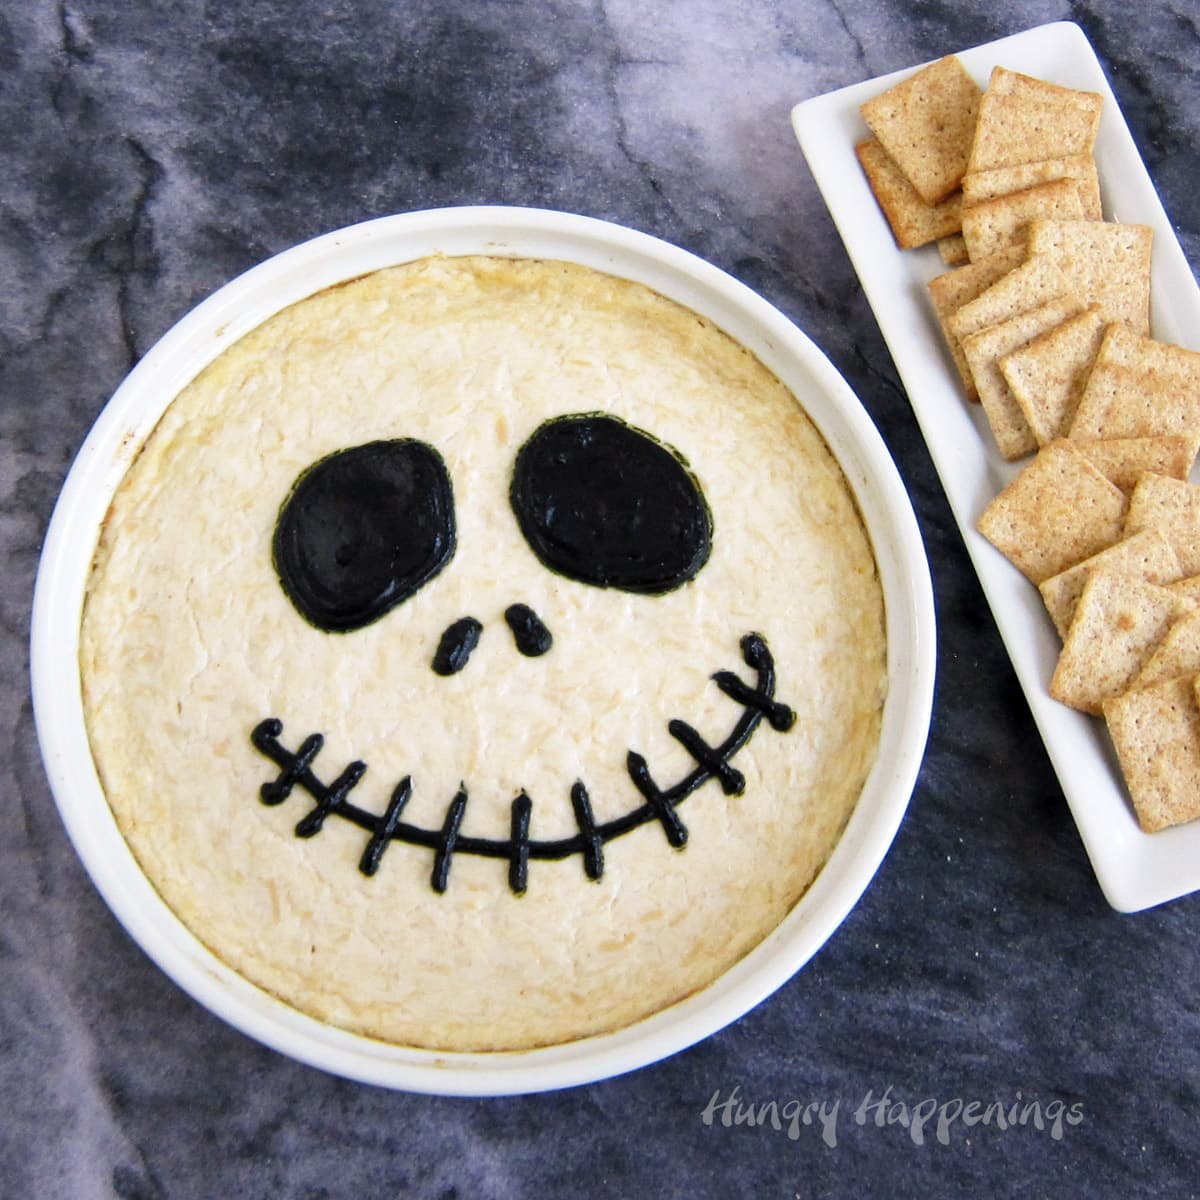
Related Recipes
If you enjoy making these black cat caramel apples, you might also enjoy making these other Halloween Recipes.
Recipe
Frost caramel apples with chocolate ganache then decorate with modeling chocolate to look like black cats for Halloween.
- 6 large caramel apples
- 14 ounces dark chocolate, finely chopped
- 1 cup heavy whipping cream
- 1 tablespoon light corn syrup
- 3 ounces white modeling chocolate
- 3 ounces dark modeling chocolate
- 1 ounce pink yellow, and green modeling chocolate
-
If your caramel apples have a footer (a round bottom where the caramel has puddled) use a knife or kitchen shears to cut it off. Use your hands to round the bottom of the apple. This will ensure a nice round face for your cats.
-
To make the chocolate ganache, either pour your chopped chocolate into the bowl of a food processor or a mixing bowl.
-
Heat the heavy whipping cream and corn syrup in a small saucepan over medium heat until it just begins to bubble.
-
Pour it over the chocolate.
-
Let it rest for 3 minutes.
-
If using a food processor, pulse 5 times, then scrape down the bowl, and pulse a few more times until smooth and creamy.
-
If using a bowl, beging stirring the chocolate in the middle of the bowl, and continue to stir out from the center until smooth and creamy.
-
If you have any chocolate pieces remaining, place the bowl in the microwave and heat on high for 10 seconds. Stir until melted.
-
Allow your chocolate ganache to thicken just enough so that it is the consistency of frosting. This could take up to an hour.
-
Meanwhile make your modeling chocolate decorations.
-
Roll some pink modeling chocolate into a ball then flatten it into a triangular-shaped nose.
-
Roll out dark modeling chocolate to ⅛-inch thickness and cut into triangle-shaped ears. Or shape it by hand just be sure the ears are thick enough that they will hold their shape when standing upright.
-
Do the same using pink modeling chocolate making the triangles smaller so they fit inside the dark ear.
-
Attach the pieces of modeling chocolate to each other by dabbing a very small amount of water on one piece and pressing them together.
-
To make cat eyes, roll out white, yellow, or bright green modeling chocolate to about 1/16-inch thickness. Cut out circles using a round cutter. The size will be dependent on the size of your caramel apples. Mine were about an inch.
-
Then roll out dark modeling chocolate and cut it into circles or ovals to make the pupils.
-
Attach the pupil to the eye using a small bit of water.
-
Make whiskers by rolling out and cutting white modeling chocolate into long, narrow strips.
-
When the frosting is thick enough to hold it's shape, frost one caramel apple with chocolate ganache.
-
Press a spatula against the ganache then pull away quickly creating spikes.
-
Repeat all over the caramel apple making it look furry.
-
Attach two eyes. Then add 6 whiskers underneath the eyes. Place a nose in the center of the whiskers. Press two ears on top of the cat's head.
These are best if eaten within 3 days. Store at room temperature.

- Banana Split Bars – A Fun and Easy Summer Dessert - March 4, 2026
- Pineapple Fudge (No Candy Thermometer Needed!) - March 4, 2026
- No-Bake Peanut Butter Pie Recipe - March 3, 2026


happy wheels says
Such a cutie idea. I wanna do this for my cousins' birthday party >.< Aww, they will like them much, maybe cannot eat cuz this cutie is too lovely
Beth says
We made these at our Halloween party and some people did want to save them but most enjoyed eating them that night. They are really fun to make:) Enjoy.
happy wheels games says
nice! thank you for sharing!
Anonymous says
These are fabulous! I'm a super duper busy working mom however and dont have a lot of time for all the extra work in preparing the icing and chocolate, wondering if there are alternatives for the whiskers, eyes and even the chocolate coating? 🙁
Beth Jackson Klosterboer says
Hi, you can swap out chocolate frosting in a tub for the chocolate ganache and use candies like taffy, Tootsie Rolls, gumdrops and licorice laces for the decorations. Have fun!
Friv3 says
Great and very informative post you have shared with us i like this blog post.
bubble shooter says
I have known this content through my friends and I argued a lot about these issues. Those of you share is accurate answer for what we are concerned.
free games online says
you make the story so compelling and it made me curious and want to care about things related to this story in the future. Thanks for sharing this useful.
friv says
the sharing of your wonderful is that I wish at this time because of the problems you are fit to share what I was looking for.
cube field says
I really like following your blog as the articles are so simple to read and follow. Excellent. Please keep up the good work. Thanks.
cubefield says
Your information is very interesting, I am curious and it makes me have different views about them. Thank you very much.
cubefield says
This is difficult like the way to paradise.
Beth Jackson Klosterboer says
There are a lot of steps to make these, but I had kids doing it at our Halloween party this year. They look so cute and taste great, so Paradise it is!
Y8 games says
looks delicious,thanks for linking up
angry birds rio says
So cute! thanks for sharing.
JDaniel4's Mom says
Please link this to my Halloween Traditions link up! I love it!
Crystal says
Oh my stinkin' heck. These are adorable.
Thanks for linking up. I am sharing them over on Facebook.
Jocelyn says
Those are incredible and so super cute!!!! You are way talented!!!
Winnie says
These are sooooooooooooooooo cute and adorable!
Wonderful creative work!:)
and thanks for the tutorial
Hollie - TheSevenYearCottage says
Love these... so clever!
Vanessa says
That is the most adorable thing I've seen! It's almost too cute to eat.
Jo and Sue says
So cute! Sue and I just did some sweets for a Halloween bake sale - I wish I had seen these first, I am sure they would have sold well! It's almost Halloween time - getting excited to make all the spooooooky treats and things we have been eyeing up all year. Thanks for all the great ideas!! (Here is the link to our blog about our bake sale Halloween treats :)) -- http://joandsue.blogspot.com/2011/10/halloween-sweets.html
Dorothy @ Crazy for Crust says
This is so adorable and such a creative idea! I love it and am going to pin it for next year. 🙂