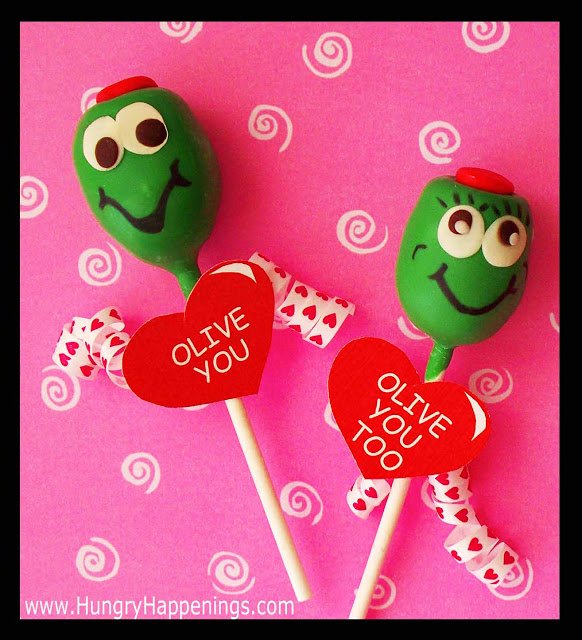
Be as punny as possible for Valentine's Day with these Chocolate Truffle Pops. They read "Olive You" but mean so much more when given to a loved one.
Creating totally unique treats can be a challenge, but one I'm willing to tackle. Sometimes, however, I need a little help with my inspiration, so I turn to fellow foodie friends. I wanted to create a Valentine's Day cupcake that hadn't been done before but just couldn't find that special idea. My friend, Julie B., told me that she has found some great ideas by looking through boxes of kid's Valentine's Day cards. You know the ones we used to pass out in grade school. They always have cute pictures and silly sayings or jokes.
Julie suggested I use one of her favorite cards which features a boy Olive saying "OLIVE YOU" to a girl Olive who responds with "OLIVE YOU TOO." I was very amused with this idea for a cupcake and found it to be quite unique and perfect for kids or adults.
My first step in creating my new Valentine's Day treat was to sculpt the olives out of modeling chocolate. They are such a simple shape that they took very little time to make. I adorned each of them with adorable faces giving the boy a nice smile and the girl eyelashes and twinkling eyes. As I sat admiring my olives, I realized they should be the star of the show. I grabbed two lollipop sticks and inserted them into each of the olives. They were perfect just like that, so I decided to make them as pops instead of using them to decorate cupcakes.
Recently I have made cake pops, brownie pops, cheesecake pops, Oreo truffle pops, modeling chocolate pops, and chocolate truffle pops, with the later being my favorite. I chose to use a dark chocolate truffle center dipped in mint flavored white chocolate for my pops. They taste great. You can certainly use this idea to make any of the other types of pops, but I think you will really enjoy the flavor of the truffle pops.
You will need a basic knowledge of melting chocolate/confectionery coating, as well as, making and coloring modeling chocolate. I have written a very extensive tutorial on the subject. Click here for recipes and information.
"OLIVE YOU" Chocolate Truffle Pops
Ingredients:
8 ounces semi-sweet chocolate, finely chopped
½ cup heavy whipping cream
10 ounces dark green confectionery coating (candy coating/candy melts)*
peppermint oil, to taste (optional)
¼ recipe white modeling chocolate (4 oz. white chocolate, 1-2 tablespoons corn syrup)
red powder food coloring or red (paste or gel) food coloring
⅛ recipe dark modeling chocolate (2 oz. dark chocolate, 1 tablespoon corn syrup)**
Special equipment needed:
food processor, or a microwave-safe bowl and whisk
plastic wrap
parchment paper or wax paper lined baking sheet
a block of Styrofoam (I recommend covering it in tin foil)
Making Chocolate Truffle Centers:

Place chopped chocolate in the bowl of a food processor. Pulse until the chocolate is fine crumbs.
Heat heavy whipping cream in a small saucepan over medium heat. Stir often until it just comes to a boil. Pour the hot cream over the chocolate, put the lid on the bowl, and let sit for 2-3 minutes. Pulse 10 seconds.
Remove the lid and scrape down the sides and bottom of the food processor bowl. Return the lid and pulse for 5 more seconds or until the mixture, which is called ganache, is smooth. Don't over-mix your ganache or it will turn grainy as it sets up.
Note: A food processor makes easy work of creating a chocolate ganache. If you don't have one, finely chop your chocolate and put it in a microwave-safe mixing bowl. Pour hot cream over chocolate and let sit for 2-3 minutes. Whisk just until smooth.
Trouble Shooting: If your ganache has chunks of chocolate in it, heat it in a heatproof bowl (not your food processor bowl) in the microwave on the defrost setting for 5 seconds, then stir. Repeat if necessary. Don't let your ganache get too hot or the cocoa butter from the chocolate will separate and rise to the surface.
The cocoa butter will harden as the ganache cools and you will have chunks of cocoa butter throughout. This can happen if you add cream that is too hot or get the ganache too hot in the microwave.
If your ganache does separate or look oily, add a little cold whipping cream (a tablespoon at a time) and mix until smooth. This will result in a softer ganache that may be more difficult to roll into a ball, but it sure beats having ganache with chunks of fat.
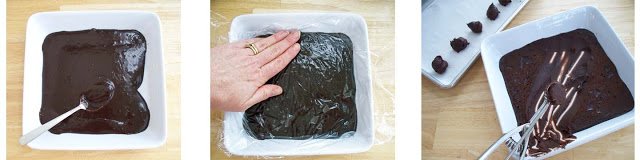
Pour ganache, into a shallow dish. Press a piece of plastic wrap directly on top of the ganache. This will keep your chocolate ganache from forming a crust. Let your ganache sit at room temperature to firm up, for about 3 hours or overnight.
If you're in a hurry, you can refrigerate the ganache for about 1 hour, but the texture may be compromised. (I think the ganache is creamier if left to set at room temperature.) Scoop out 16 tablespoonfuls of ganache and set on a parchment-lined or wax paper-lined baking sheet.
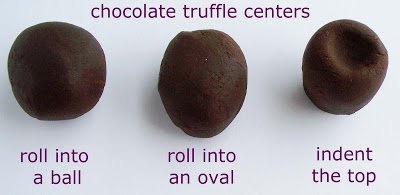
Roll each scoop into a ball. Continue to roll tapering each end creating an oval. Press your finger into one end of the oval, creating an indentation.
Insert one lollipop stick into the bottom (opposite the indentation) of each truffle.
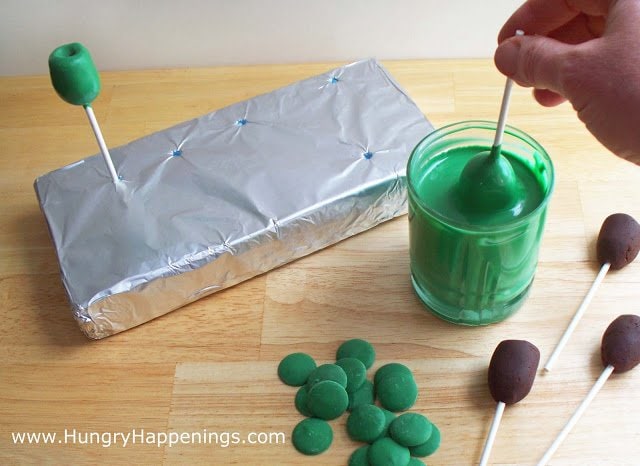
Melt green confectionery coating wafers. Click here for detailed chocolate melting instructions. Place wafers in a microwave-safe bowl. Heat on high power for 20 seconds. Stir. Heat on high for 15 seconds. Stir. Continue to heat for 10-second increments, stirring after each, until melted. Pour green coating into a glass or coffee mug.
Optional: Flavor the coating with peppermint oil, adding a few drops at a time, then tasting, until you reach the desired minty flavor.
Dip truffle pop into the green coating.
Remove the pop from the coating and allow the excess coating to drip off. I suggest you dip just the tip of the truffle pop in and out of the coating quickly a few times. This will help pull the excess coating off of the pop.
Push the pop's stick into the block of Styrofoam. Continue to coat a few more pops. Place in the freezer for 5 minutes. Remove pops from Styrofoam block then continue coating some more pops. I suggest you dip and then freeze a few pops at a time as the green coating may become streaked or spotted if allowed to cool at room temperature for too long.
As you work, your green coating may become too thick to coat the pops. Re-heat it in the microwave for 10-second intervals, stirring after each, until melted and thinned out before continuing to coat your pops.
To Decorate Olive Pops:
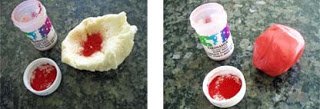
Pinch off about 2 tablespoons of modeling chocolate. Add red powdered, paste, or gel, food coloring and knead until smooth. Continue adding coloring until you achieve the desired shade. To create the pimentos, pinch off a small amount and roll into balls. Flatten slightly.
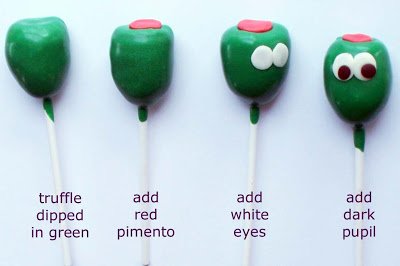
Press one red pimento on top of each olive.
Pinch off very small pieces of white modeling chocolate for the olive's eyes. Roll into balls and flatten slightly. Brush lightly with water and affix to olive.
Pinch off tiny pieces of dark modeling chocolate and roll into balls, flatten slightly, brush lightly with water, and affix to white eyes.
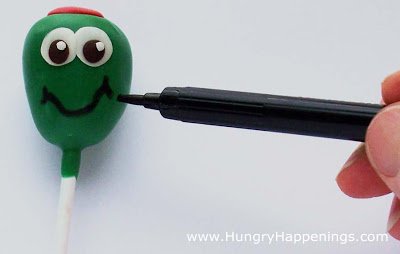
Use black food coloring marker to draw smiles onto each olive. Make some girl pops by drawing on her eyelashes. If you make a mistake, wipe off ink with a damp paper towel.
Add twinkles to the eyes by adding tiny bits of white modeling chocolate to the pupils.
Make each olive unique by changing the eyes and smiles.
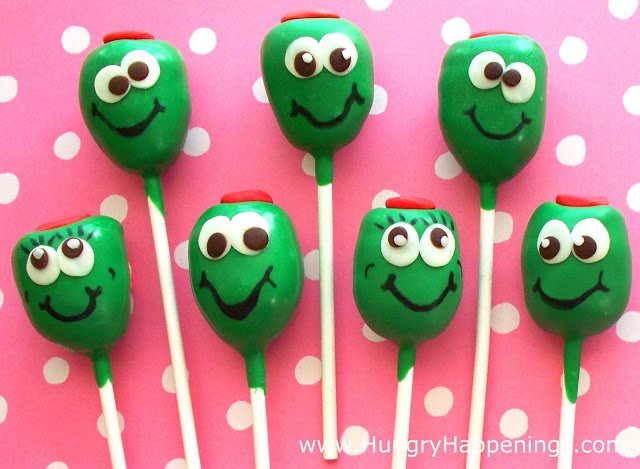
I love how each of these olives has a unique facial expression showing off his/her personality.
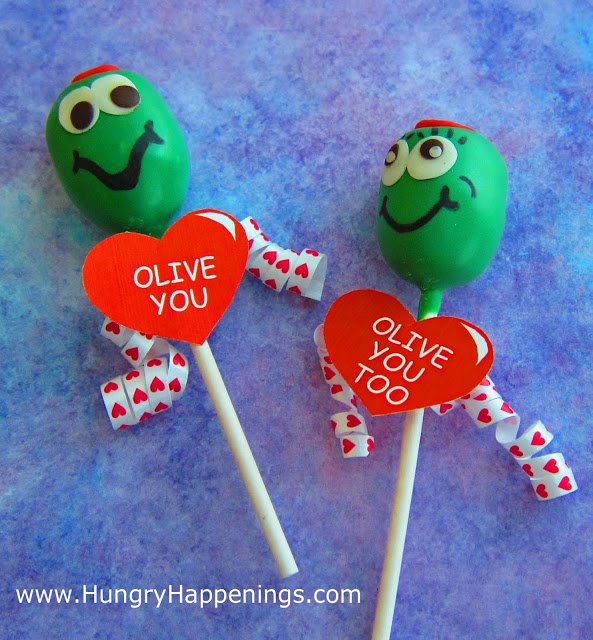
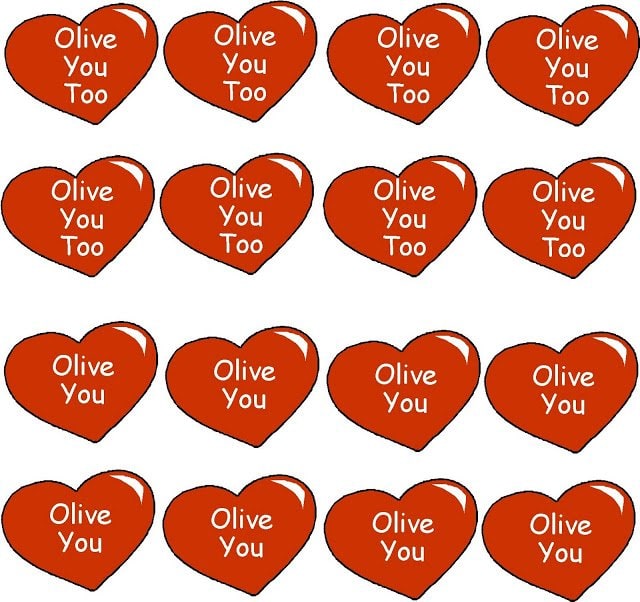
Wrap olives in cellophane bags if desired. Print out "Olive You" and "Olive You Too" heart tags. Cut out and tie onto olives with ribbon.
*You can use white confectionery coating and color it with green powder, paste, or gel food coloring, but the color won't be as vibrant.
**I used dark modeling chocolate to create the pupils in the eyes, but you can just color a small amount of your white modeling chocolate with black powder coloring. Or you can use the black food coloring marker to draw the pupils onto the eyes. You may also substitute fondant for the modeling chocolate if desired.
If you are looking for other treats or gifts to make for Valentine's Day,
you might like these other recipes too.


- Banana Split Bars – A Fun and Easy Summer Dessert - March 4, 2026
- Pineapple Fudge (No Candy Thermometer Needed!) - March 4, 2026
- No-Bake Peanut Butter Pie Recipe - March 3, 2026
SATVIKI says
Its a class preparation..All the best.need some more in future
Erin says
These are super cute too! Love your blog!!!
SatvikiBoutique says
What a class of preparations you have delivered..Mam..Wanna see more posts like these..